1
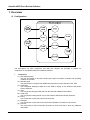
HeartOn AED Event Review Software
User Guide
EU representative
OBELIS S.A
Bd. Général Wahis, 53, 1030 Brussels, Belgium
Manufacturer
Mediana Co., Ltd.
132, Donghwagongdan-ro,
Munmak-eup, Wonju-si, Gangwon-do, Korea
Tel: (82) 2 542 3375 (82) 33 742 5400
Fax: (82) 2 542 7447 (82) 33 742 5483
Part Number: A7313-1
Revised Date: 0314
Copyright © 2014 All rights reserved.
HeartOn AED Event Review Software
Table of Contents
1.
Overview ................................................................................................................................................... 1
A. Configuration...................................................................................................................................... 1
B. The files saved in the AED (AED data file) ...................................................................................... 3
C. The files saved in the HeartOn AED Event Review Software (Reviewer data file) ...................... 3
2.
Installing HeartOn AED Event Review Software .................................................................................. 4
3.
Using the HeartOn AED Event Review Software and structure.............................................................. 5
A. Loading the ‘MIF’ file ......................................................................................................................... 5
B. Loading the ‘.aed’ file ........................................................................................................................ 9
C. Event tree .......................................................................................................................................... 12
D. General .............................................................................................................................................. 14
E. Entire ECG ........................................................................................................................................ 15
F. Enlarged ECG ................................................................................................................................... 16
G. Incident Log & Print ......................................................................................................................... 21
Figures
Figure 1. Starting installation ............................................................................................................................... 4
Figure 2. Selecting the ‘Open’ menu ................................................................................................................... 5
Figure 3. Selecting the type of file ....................................................................................................................... 5
Figure 4. Selecting the MIF file ............................................................................................................................ 6
Figure 5. Selecting the directory to save the ‘.aed’ file ........................................................................................ 7
Figure 6. Notice window for erasing MIF file........................................................................................................ 7
Figure 7. Completion of the MIF file loading ........................................................................................................ 8
Figure 8. Selecting the ‘Open’ menu ................................................................................................................... 9
Figure 9. Selecting the type of file ....................................................................................................................... 9
Figure 10. Selecting ‘.aed’ file ........................................................................................................................... 10
Figure 11. Completion of the ‘.aed’ file loading .................................................................................................. 11
Figure 12. Event tree window ............................................................................................................................ 12
Figure 13. Case menu window .......................................................................................................................... 12
Figure 14. Adding the annotation – Event tree .................................................................................................. 13
Figure 15. Editing or deleting the annotation – Event tree ................................................................................. 13
Figure 16. General window ............................................................................................................................... 14
Figure 17. Entire ECG window .......................................................................................................................... 15
Figure 18. Enlarged ECG window ..................................................................................................................... 16
Figure 19. Display setting of the enlarged ECG ................................................................................................ 17
Figure 20. Setting the enlarged ECG menu ...................................................................................................... 18
Figure 21. Adding the annotation – Enlarged ECG ........................................................................................... 18
Figure 22. Basic enlarged ECG display............................................................................................................. 19
Figure 23. CPR display of enlarged ECG .......................................................................................................... 19
Figure 24. Segment display of the enlarged ECG ............................................................................................. 19
Figure 25. Combination display for CPR & Segment of the enlarged ECG ....................................................... 20
Figure 26. Incident log window .......................................................................................................................... 21
Figure 27. Printing ............................................................................................................................................. 22
i
HeartOn AED Event Review Software
1. Overview
A. Configuration
The descriptions for each component and data flow diagram are provided to explain for
composition of the HeartOn AED Event Review Software.
i.
Component
(1) AED data file(.MIF)
The five files saved in SD-card including vital signs information of patient and operating
condition of the AED.
(2) Data file(.aed)
The filed saved in Computer with additional information from the data file of the AED.
(3) Load(.MIF)
The component loading the data file of the AED to display on the HeartOn AED Event
Review Software.
(4) Save
The component saving the data file from the AED with additional information.
(5) Load(.aed)
The component loading the file only for the HeartOn AED Event Review Software.
(6) Entire
The component to show the entire ECG wave flow.
(7) Enlarged
The component to show the ECG wave and the detailed information for each event.
(8) General
The component to show information according to each case and to input any additional
information.
1
HeartOn AED Event Review Software
(9) Event tree
The component to show events for cases arranged by the date or unit ID.
(10) Print
The component to print the screen shown in the enlarged.
(11) Log file(.html)
The component to show the report on the web browser.
ii.
2
Data flow(by function)
The HeartOn AED Event Review Software consists of four major functions.
(1) Load
The HeartOn AED Event Review Software has two methods to load the data file. The first
method is to load five files saved in the AED according to applicable protocols. These files
include each data (CT data, ECG data, HR data, Trend data and Temp data). Second
method is to load the data from the file (.aed) only for the HeartOn AED Event Review
Software according to the applicable protocol. The file only for the HeartOn AED Event
Review Software includes all the five data saved in the AED and additional data as well.
(2) Store
The HeartOn AED Event Review Software saves the five files saved in the AED and
additional data as its exclusive file format. When the additional data is changed, it is saved
again as the file only for the HeartOn AED Event Review Software.
(3) View
The HeartOn AED Event Review Software provides four types of display. Open the saved
file and send the data to each display, then arrange the data according to display
properties. The first display is the tree view that shows several cases and these cases are
arranged by its date or unit ID. The memo can be added by the annotation function. The
second display is the general view which the basic data and information for user or patient
can be added in. The third display is the entire ECG that shows entire ECG data flow for 2
minutes and 30 seconds. The fourth display is the enlarged ECG that shows ECG data
and the event log at an interval of 2, 6 or 8 seconds. These data can be optionally printed.
(4) Print
The ECG data and the event log selected in the enlarged ECG can be printed. Additionally,
the display based on the web browser is provided to print the event log and data added on
the HeartOn AED Event Review Software only.
HeartOn AED Event Review Software
B.
The files saved in the AED (AED data file)
The data saved in SD card of the AED consists of five files and its file extension is ‘MIF’.
i.
CT
It includes data to calculate the shock energy.
ECG
It includes ECG data of 250 sample/sec.
HR
It includes Heart Rate data measured during the ECG analysis.
TREND
It includes events related to Pad, Shock and Body Impedance.
TEMP
It includes Temperature data around AED.
ii.
iii.
iv.
v.
C. The files saved in the HeartOn AED Event Review Software (Reviewer data
file)
The reviewer data file includes the AED data file and additional data from the HeartOn AED Event
Review Software, and the file extension is ‘.aed’. The additional data appears in the report which
includes the AED data file as well.
i.
AED data
It includes the loading time from SD card for the file and the serial number of the unit.
ii.
Add Information
It includes the information about the user and patient of AED and each case.
3
HeartOn AED Event Review Software
2. Installing HeartOn AED Event Review Software
The HeartOn AED Event Review Software is automatically installed when the installation CD is inserted
into the CD driver of the computer.
NOTE: Before installing HeartOn AED Event Review Software, the enclosed lock key shall be put in the
USB port.
NOTE: When the HeartOn AED Event Review Software is not automatically installed, search for
‘HeartOn AED Event Review Software.exe’ file from the installation CD’s root directory and
double click to start.
Figure 1. Starting installation
.
4
HeartOn AED Event Review Software
3. Using the HeartOn AED Event Review Software and structure
A. Loading the ‘MIF’ file
Select the ‘Open’ menu to open the MIF file.
Figure 2. Selecting the ‘Open’ menu
When the ‘Open’ menu is selected, the below window appears.
Figure 3. Selecting the type of file
i. Set International Date Line
When setting the time zone, the time of data loaded from the AED can be set to match the
current local time.
Set the time zone by selecting International Date Line. The International Data Line contains the
time zone for about 200 world wide cities. The time zone is shown in the following format:
City name(Country name) UTC +/- HH:MM
NOTE: The default International Date Line is the time that Windows uses.
5
HeartOn AED Event Review Software
ii. Load MIF File
Click MIF file path to load MIF file.
Enter the serial number indicated on the bottom of the AED into HeartOn AED Serial number
box to identify the AED.
NOTE: The MIF File Path is to load the MIF file saved in SD card of the AED. Connect the SD card
to the computer and move to the default directory. Then the ‘A15’ or ‘A10’ directory appears
as shown in the below. The folders are created whenever AED is used and the relevant
data are saved in each folder. The folder name mounts from 001. The five MIF files
explained above exist in each folder. One file may be selected.
Select the MIF file, enter the serial number and click the ‘Load MIF File’ button to progress.
Figure 4. Selecting the MIF file
When the ‘Load MIF File’ is selected the window appears as shown in Figure 5. The path and file
name may set in the below window to save the MIF file saved in the AED as ‘.aed’ file only for the
HeartOn AED Event Review Software. The name is auto-defined or user-defined. When the setting
is completed, click ‘Save’ button to progress.
6
HeartOn AED Event Review Software
Figure 5. Selecting the directory to save the ‘.aed’ file
When the saving procedure is completed, the MIF files are automatically deleted from the SD card.
The notice window appears as shown in Figure 6.
Figure 6. Notice window for erasing MIF file
The below window appears to show all data when all procedures are completed.
7
HeartOn AED Event Review Software
Figure 7. Completion of the MIF file loading
8
HeartOn AED Event Review Software
B. Loading the ‘.aed’ file
Select the ‘Open’ menu to open the ‘.aed’ file.
Figure 8. Selecting the ‘Open’ menu
NOTE: The ‘.aed’ file only for HeartOn AED Event Review Software is to be directly converted from
MIF file saved in the AED via HeartOn AED Event Review Software. Therefore, it needs the
file management after saving al of '.aed’ file. Note that it is impossible to restore the data
when the ‘.aed’ file is erased.
The below window appears when the ‘Open’ menu is selected.
Figure 9. Selecting the type of file
9
HeartOn AED Event Review Software
i. Set International Date Line
Set the time zone by selecting International Date Line. The International Data Line contains the
time zone for about 200 world wide cities. The time zone is shown in the following format:
City name(Country name) UTC +/- HH:MM
When setting the time zone, the time of ‘.aed’ data is set to match the current local time.
NOTE: The default International Date Line is the time that Windows uses.
ii. Load AED File
The below window appears to select the ‘.aed' file when the ‘Load AED File’ button is selected.
Figure 10. Selecting ‘.aed’ file
10
HeartOn AED Event Review Software
The below window appears to show all data when all procedures are completed.
Figure 11. Completion of the ‘.aed’ file loading
11
HeartOn AED Event Review Software
C. Event tree
Figure 12. Event tree window
The event tree is to show the event data saved in the AED.
One or more ‘.aed’ file(s) are can be opened on the event tree and the events are opened or hided
with a case unit.
Figure 13. Case menu window
The menu for each case is available by right-clicking.
- Close: It is used to close the case.
- Add Annotation: It is used to add the annotation for the specified time.
- Mark as (Not) viewed: It is used to mark that each case is viewed or not.
12
HeartOn AED Event Review Software
Figure 14. Adding the annotation – Event tree
The added annotation can be edited or deleted by right-clicking it.
Figure 15. Editing or deleting the annotation – Event tree
13
HeartOn AED Event Review Software
D. General
Figure 16. General window
The General window is to save the additional data generated by using the AED.
It consists of three major functions.
Case: It is used to display the selected case information.
Automated external defibrillator: It is used to display the AED information.
Patient: It is used to display the patient information.
If necessary, you can input data into the blank spaces of the General window and save it. These
data is available later.
14
HeartOn AED Event Review Software
E. Entire ECG
Figure 17. Entire ECG window
The Entire ECG window is to view the entire ECG data flow saved in the AED.
The ECG data during 2 minutes and 30 seconds are displayed with the interval 30 seconds and the
event points are marked on the display. The CPR periods can be set and indicated.
The setting menu for CPR periods is available by right-clicking the specified point. The CPR
periods can be set, deleted, displayed or hidden via this menu.
NOTE: The CPR periods can be operated on the HeartOn AED Event Review Software but it
cannot be saved. The initial CPR periods is specified by the AED.
Use the below scroll bar to show data on the desired point.
15
HeartOn AED Event Review Software
F. Enlarged ECG
Figure 18. Enlarged ECG window
The enlarged ECG window is to view the ECG data and event data of the AED enlarged with the
time unit.
It plays or stops all procedures by pressing ‘Play’ or ‘Stop’ buttons located at the top of the window.
The display setting button is located under the ‘Play’ and ‘Stop’ button.
The display setting button is used to set three menus below.
- Display 6sec View: It is used to display the 6 seconds view of enlarged ECG. (The default of
enlarged ECG display is the 8 seconds view.)
- Display Large View: It is used to display the 2 seconds view of enlarged ECG.
- Display Event Text: It is used to display or hide the event text. The default setting is to display
the event text.
16
HeartOn AED Event Review Software
Figure 19. Display setting of the enlarged ECG
17
HeartOn AED Event Review Software
The display setting menu is available by right-clicking the enlarged ECG display.
Figure 20. Setting the enlarged ECG menu
-
Add Annotation: It is used to add the annotation for the specified time.
(The specified time is not selectable unlike event tree.)
Figure 21. Adding the annotation – Enlarged ECG
18
Export Entire ECG: For future use.
Copy Segment: For future use.
Segment: It is a part of entire AED data.
HeartOn AED Event Review Software
It can be set or deleted like the CPR periods but not be saved.
It is used to print the ECG wave form.
Figure 22. Basic enlarged ECG display
Figure 23. CPR display of enlarged ECG
Figure 24. Segment display of the enlarged ECG
19
HeartOn AED Event Review Software
Figure 25. Combination display for CPR & Segment of the enlarged ECG
20
HeartOn AED Event Review Software
G. Incident Log & Print
i.
Incident Log
The incident log is to view the all data of the specified case except for ECG waveform on the
web browser. It supports all functions – save, print, or etc. - provided based on the web
browser.
NOTE: If the incident log data is not saved when displayed on Internet Explorer, it is available
only via the HeartOn AED Event Review Software.
Figure 26. Incident log window
21
HeartOn AED Event Review Software
ii.
Print
The print function provides only for the segment selected from the enlarged ECG. The
segment is printed out with interval of 10 seconds, and it includes the ECG data and event
data.
NOTE: The printing resolution should be set to 600dpi. If the resolution is not proper, it would
cause the abnormal printing.
Figure 27. Printing
22