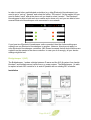
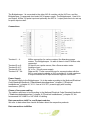
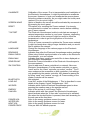
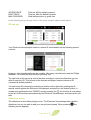
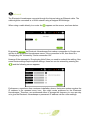
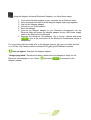
1
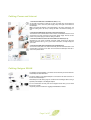
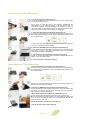
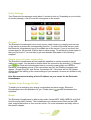
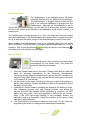
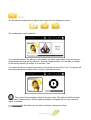
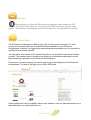
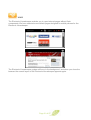
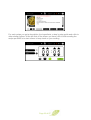
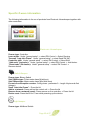
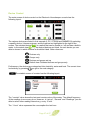
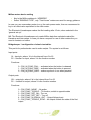
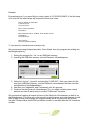
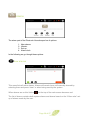
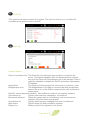
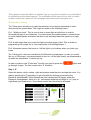
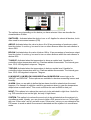
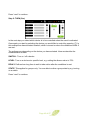
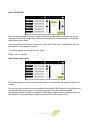
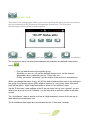
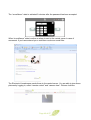
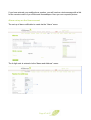
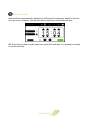
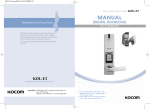
Project Acronym: Class 1
REF EC: 038572
REF (project coordinator org.):
Work package: 1
DOCUMENT: Del. 6
REF.: Ove Morck, Cenergia
Project Coordinator:
Jacob Madsen
Project coordination org.:
Municipality of Egedal
Date: January 24, 2013
Revision: 1
User manual explaining the use of the BEMS
function of the Electronic Housekeeper
CONCERTO INITIATIVE
Class 1
Cost-effective Low-energy Advanced Sustainable
So1utions
Instrument: Integrated Project
Thematic Priority: Energy 2005
Period covered:
1.11.07- 31.10.13
Start date of project:
November 1, 2007
Date of preparation:
January 24, 2013
Duration: 6 years
CONCERTO is co-funded by the European Commission
Preface
1. THE CLASS 1 PROJECT
The idea of the project CLASS 1 is to use the strengthening of the energy requirements to boost and drive
the technological developments and to prove the economic and environmental benefits of ultra-low energy
buildings (50% below the new requirements in the Danish building regulations) integrated with biomassand solar heating based renewable energy supply.
In this context the objectives are to:
1. Optimise the integration of low-energy building technologies with supply (renewable and conventional)
and distribution (heating and electricity) technologies.
2. Advance selected technologies within the 3 areas: low-energy building, renewable energy supply and
distribution
3. Improve the design, checking and verification procedures (this relates directly to the implementation of
the building energy performance directive -EPBD).
4. Integrate the European ecolabel in the building projects (houses and components)
5. Demonstrate large scale implementation at close to market technical and economical conditions.
The Class 1 project is focused on the optimisation of sustainable energy systems in local communities,
through an innovative integration of RE technologies with ultra low-energy buildings.
Deliverable 6
Deliverable 6 is a deliverable produced to provide the single family house owner having installed the
Electronic Housekeeper BEMS systems with a user manual. The distribution is public.
Ove Morck
Technical coordinator
Ove Mørck,
Cenergia Energy Consultants
Herlev Hovedgade 195 st.
DK 2730 Herlev
2
Electronic Housekeeper
User Manual - In Control
October 2012
Page 1 af 67
HOW TO GET STARTED ............................................................................................................................................... 4
BASIC PACKAGE INCLUDES ............................................................................................................................................ 4
ADDITIONAL - DEPENDING ON CHOICE OF PACKAGE ..................................................................................................... 4
CABLING: POWER AND INTERNET .................................................................................................................................. 5
CABLING: NETGEAR WLAN........................................................................................................................................... 5
HOUSEKEEPER: W ALL MOUNTING ................................................................................................................................ 6
HOUSEKEEPER: TABLE MOUNTING ............................................................................................................................... 6
QUICK SETTINGS ........................................................................................................................................................... 7
Overall ....................................................................................................................................................................... 7
Check your internet connection ................................................................................................................................. 7
Update Your Energy Profile ....................................................................................................................................... 7
Music ......................................................................................................................................................................... 7
Switchkeeper ............................................................................................................................................................. 8
Smart Read ................................................................................................................................................................ 8
INTERNET SET-UP ....................................................................................................................................................... 9
SET-UP ........................................................................................................................................................................... 9
REMOTE CONTROL VIA THE INTERNET......................................................................................................................... 10
www.electronichousekeeper.com ........................................................................................................................... 10
Smart Phone app ..................................................................................................................................................... 10
THE ELECTRONIC HOUSEKEEPER CONSOLE ................................................................................................................12
W EATHER..................................................................................................................................................................... 14
Traffic........................................................................................................................................................................... 15
ONLINE TV .................................................................................................................................................................... 16
MUSIC .......................................................................................................................................................................... 18
Media Player ......................................................................................................................................................... 19
FM radio ................................................................................................................................................................. 20
Online Radio ............................................................................................................................................................ 20
CONTROL ..................................................................................................................................................................... 24
SPECIFIC Z-WAVE INFORMATION ............................................................................................................................. 25
ELECTRONIC HOUSEKEPER ........................................................................................................................................... 25
SWITCHKEEPER ......................................................................................................................................................... 25
LIGHTKEEPER ............................................................................................................................................................ 25
DEVICE CONTROL ........................................................................................................................................................ 27
Adding devices ...................................................................................................................................................... 28
Device Set-up ........................................................................................................................................................ 29
Deleting a device .................................................................................................................................................. 31
OTHER CONTROLLERS ................................................................................................................................................. 31
Bridgekeeper 1 (IHC) ........................................................................................................................................... 32
Group set-up ......................................................................................................................................................... 37
Alarms .................................................................................................................................................................... 38
New alarms ............................................................................................................................................................. 38
Historic .................................................................................................................................................................... 39
Set-up ...................................................................................................................................................................... 39
System alarms ...................................................................................................................................................... 39
´,I-then-HOVH´VHW-up .............................................................................................................................................. 40
Alarm Clock ............................................................................................................................................................. 44
SYSTEM STATE............................................................................................................................................................. 45
Alarm set-up on the User account ..................................................................................................................... 47
STATISTICS .................................................................................................................................................................. 48
KEY PERFORMANCE VALUES ............................................................................................................................................. 48
DEVICES ...................................................................................................................................................................... 49
PROFILE ....................................................................................................................................................................... 52
Page 2 af 67
HOW TO SAVE............................................................................................................................................................... 54
E-MAIL .......................................................................................................................................................................... 55
SET-UP ......................................................................................................................................................................... 57
General set-up ......................................................................................................................................................... 57
IR set-up .................................................................................................................................................................. 59
Slideshow set-up .................................................................................................................................................. 59
Network ................................................................................................................................................................... 61
Media ...................................................................................................................................................................... 63
IP Phone................................................................................................................................................................... 66
Date and time.......................................................................................................................................................... 67
Page 3 af 67
+RZWRJHWVWDUWHG
In order to get the Housekeeper started we have made quick start guidance for you.
Basic package includes
Electronic Housekeeper
Mounting plate
POE Cabling
Ethernet Cable
Power Supply
Switchkeepers
USB memory stick
Additional - depending on choice of package
Netgear Ethernet Adapter
Smart Read Power Reader
Bridgekeeper
Page 4 af 67
Cabling: Power and Internet
1. Connect the POE units to the Ethernet cable (1 + 2)
Via the POE connectors it is able only to have one cable going to the Electronic
Housekeeper, and to store the power supply away from sight of the Electronic
Housekeeper.
Note: The maximum distance of the POE cabling is 30 meter. Furthermore, the
Ethernet cabling has to be CAT5, meaning all wires in the Ethernet cabling is in
use.
2. Connect the POE female connector to the power supply (3)
The POE units have a female and a male connector, the female connector is to be
connected to the male connector from the black power supply. Wait to connect
power to the power supply until all the cabling is finished.
3. Connect the Ethernet connector of the POE to the Internet (4 + 5)
Depending on your choice of Internet connection (cable, power line or WIFI) the
Ethernet connector has to go in to your Internet connection; normally directly into
your router.
4. Connect the POE cable to the Electronic Housekeeper (6)
Connect the round power core and the Ethernet jack from the POE cable to the
corresponding connectors at the back of the Electronic Housekeeper. Number 1
and 5 in the picture below:
Cabling: Netgear WLAN
The Netgear Universal adapter is connected to the Ethernet jack of the Electronic
Housekeeper as described above.
The Power supply to the Netgear adapter is connected to the USB connector on
the Electronic Housekeeper.
Alternatively the POE cabling might be combined with the Netgear device using a
separate power adapter to the Netgear adapter.
For more information we kindly refer to the Netgear manual. Also you can follow
this link on YouTube
http://www.youtube.com/watch?v=Cgg8YgnmG7A&feature=related
Page 5 af 67
Housekeeper: Wall Mounting
1. Fit the mounting plate on the wall (1+2)
The mounting plate is to be fitted at the wall using 3 screws. Normal height
from the floor is about 150 cm.
Tip: In order to cover the wires to the Electronic Housekeeper we
recommend one of the following locations; 1) kitchen between over and
under kitchen cabinets, 2) next to the fridge in the kitchen or 3) next to a
cable tube outtake. In all of these 3 cases, you are able to hide the power
supply and Internet connection of the Electronic Housekeeper.
2. Connect the POE cable to the Electronic Housekeeper (3)
Connect the round power core and the Ethernet jack from the POE cable to
the corresponding connectors at the back of the Housekeeper. Number 1 and
5 in the picture below
The other end of the POE cable is to be connected to the power supply and
to Internet connection (look under cabling)
3. Connect the USB MP3 stick to the Electronic Housekeeper (4)
On the USB stick there is some MP3 free trial music. If you would like to add
more music, you need to copy this to the USB stick from your PC before
setting it into the Electronic Housekeeper.
4. Place the Electronic Housekeeper on the mounting plate (5)
In order to give the best viewing angle, the Electronic Housekeeper can be
fitting in a 90 or 45 degree position.
5. Turn on the power to the power supply (6)
Housekeeper: Table Mounting
1. Connect the POE cable to the Electronic Housekeeper (1)
Connect the round power core and the Ethernet jack from the POE cable to
the corresponding connectors at the back of the Housekeeper. Number 1 and
5 in the picture below
The other end of the POE cable is to be connected to the power supply and to
Internet connection (look under cabling)
2. Connect the USB MP3 stick to the Electronic Housekeeper (2)
On the USB stick there is some MP3 free trial music. If you would like to add
more music, you need to copy this to the USB stick from your PC before
setting it into the Electronic Housekeeper.
3. Mount the aluminum foot the Electronic Housekeeper (3 + 4)
The foot is connected in two steps and pressed in until you hear a click.
NB: If you would like to disconnect the foot, you simply place one hand on top
of the Electronic Housekeeper and hit the foot downwards towards the
connectors with the other hand.
4. Place the Electronic Housekeeper on the table (5)
5. Turn on the power to the power supply (6)
Page 6 af 67
Quick Settings
Your Electronic Housekeeper needs about 1 minute to boot up. Depending on your choice
of service package, a list of icons will now appear on the screen:
Overall
The Electronic Housekeeper has a touch screen, which means you simply touch an icon
on the screen to access the corresponding function. To return to the initial screen, touch
the Electronic Housekeeper logo in the middle top of the screen. If you do not touch the
screen stops for 30 seconds, it will be dark to save energy. To activate the screen again in
that you just touch it. You are able to get more detailed information in the following
chapters.
Check your internet connection
The Electronic Housekeeper will automatically establish an online connection via the
cabling you made. You are able to double check the connection by selecting ³1HWZRUN´
and
the Electronic Housekeeper tries to connect to www.google.com and the
Electronic Housekeeper server. If the connections are OK, the following messages will
DSSHDU³*RRJOH3LQJ2.´DQG³6HUYHU&RQQHFWLRQ2.´,IWKHWHVWVDUHQRW2.SOHDVH
double check the cabling or the router settings of your network, as some are limited to only
one device.
Hint: We recommend making a fixed IP address on your router for the Electronic
Housekeeper.
Update Your Energy Profile
To assist you in analyzing your energy consumption and save energy, Electronic
Housekeeper has a few questions for you. Please select
, profile and answers the
questions.
Music
The Electronic Housekeeper is able to play music formats MP3, WMA, MPEG-4 and DivX.
He will not play MAC formats. The housekeeper can retrieve music files from the USB
stick, external hard drive or from a music server. For more information we kindly refer to
the specific chapter.
Page 7 af 67
Switchkeeper
The Switchkeeper is an intelligent power-off switch
controlled wirelessly by the Electronic Housekeeper.
The Switchkeeper is plugged into an outlet and the
plug of an electrical appliance is plugged into the
Switchkeeper. Although the Switchkeeper is set to
control the connected devices, you can also do so at any time yourself ± either
via the touch screen of the Electronic Housekeeper, an IR remote control or a
smart phone.
The Switchkeeper controls devices up to 16A. You might also connect several
electrical appliances to the Switchkeeper via a power strip or replace the cable
to e.g. a lamp with the cable going into the Switchkeeper to make it look nicer.
Once installed, the Switchkeeper needs to be informed about how you would
like it to perform - like turning the connected electrical appliances on / off by a
schedule. This is done by selecting
, selecting the device, and selecting
We kindly refer to the device set-up chapter.
.
Smart Read
The Smart Read is used to measure the total power
consumption of your power meter. You install the
meter by following these steps:
1. Place the Smart Read next to the meter. Please notice that all metal will
block the wireless transmission to the Electronic Housekeeper.
Therefore, please place the Smart Read to get the best RF conditions, by
using the long cable. Either simply use the double sided tape on the back
or 2 screws to fit it on the wall.
2. Fit the sensor to the meter, following by using the marks on the sensor to
get the best readings. Please remember to remove the protection film at
the back of the sensor.
3. Calibrate the Smart Read by pressing the button at the bottom 5 times.
The calibration process may take several minutes, and during the
process the LED light flashes. When calibration is complete, the LED
blinks only once each, if the unit registered a pulse from the counter.
Note: If the LED light stops flashing or not constantly flickers, the
calibration was not successful. Adjust the position of the sensor head
and start a new calibration.
4. The Smart Read is precoded to measure once every 15 min. However,
by pressing the button a reading will be transmitted immediately.
Page 8 af 67
,QWHUQHW6HW-XS
The Housekeeper is configured based on the products and services you ordered. The
configuration is made via the Internet, and you are always able to change the set-up of
your Housekeeper at www.electronichousekeeper.com E\VHOHFWLQJ´8VHU/RJLQ´.
The UserID default is your e-mail and the password is the 5 digits ID number at the back
side of your Housekeeper. In case you need help to find this information, please send an
e-mail to [email protected].
Once logged on, you are able to select either to change the set-up or to make remote
control of your Housekeeper.
Set-up
The set-up via the Internet is described under the corresponding chapters.
Page 9 af 67
Remote control via the Internet
The remote control allows you remotely to control and to change the set-up of the devices
connected to your Housekeeper.
You are able to make remote control either via our Electronic Housekeeper home page or
via a Smart Phone app
www.electronichousekeeper.com
The following picture shows the remote control with the Electronic Housekeeper home
page. The icons are equal to the one you see at the Housekeeper.
Smart Phone app
You are able to download an app to your smart phone at www.electronichousekeeper.com
Page 10 af 67
In order to get started, you need to key in the following information:
x
x
x
App product code, send to your by e-mail
ID number of the Electronic Housekeeper
User ID and password to login to www.electronichousekeeper.com
Once the product is activated, you do only have to key in the 4 digit code entered at
www.electronichousekeeper.com .
You are able to control all devices, groups, music and system state via the app.
Page 11 af 67
7KH(OHFWURQLF+RXVHNHHSHU&RQVROH
The basic main screen has the following design:
The features on the main screen depend on the service package you have selected to
your Electronic Housekeeper. You navigate by pressing on the screen.
In the top of the screen you will find the following information:
x
x
x
x
x
x
x
x
Left side: date and time
Circle between the time and the Electronic Housekeeper logo: Indicates if the
Electronic Housekeeper is busy. White: not busy (no messages), green normal (1-5
messages) activity and red indicates the Electronic Housekeeper is very busy (more
than 5 messages).
Middle: Electronic Housekeeper logo. By pressing this logo from another sub page
you always get back to the main screen.
Right of the Electronic Housekeeper logo: 2 temperatures. The first temperature is
the average measured indoor temperature. The second is the estimated outdoor
temperature of the selected weather area.
Next to the temperatures you find an icon for the alarms. In case an alarm occurs
this icon becomes red. You can go to the alarm screen by pressing this icon.
Next to the alarm icon you find a node. This links to the player, and it is red when
the player is muted.
The next icon is for the alarm clock. It becomes red if the alarm clock is activated.
To the right you will find a question mark. By pressing this icon you get help for the
various pages.
Page 12 af 67
The icons have the following features:
Weather
Traffic
Online TV
Music
WWW
Mail
Recipes
Alarm
Device control
System state
Statistic
Set-up
In the following we go through the various menus.
Page 13 af 67
:HDWKHU
The icon at the main page of the Electronic Housekeeper shows the actual weather
forecast in your area. Furthermore, n the top right corner two temperatures are shows. The
left temperature in the square box is the average indoor temperature measured by the
Electronic Housekeeper and the selected temperature sensors. The right temperature
shows the estimated outdoor temperature, and is updated twice daily.
The weather menu gives a 3 day forecast for 3 areas. Select the city for which you would
like at weather forecast, once selected you can change the city by pressing the button
more than 5 seconds. By pressing the weather map a more weather forecast information is
displayed.
The default city where the Electronic Housekeeper is located is to be keyed in under
general set-up. The Electronic Housekeeper uses this to collect the daily degree-day
information and evaluate your heat consumption.
Page 14 af 67
7UDIILF
The traffic menu enables you to view your 3 favourite traffic web cams at the same time.
The web cams are updated every 30 second.
By pressing the buttons you are able to select other web cams.
Page 15 af 67
2QOLQHWY
The Electronic Housekeeper is able to show online TV streaming.
For each country a list of free TV stations that are available on your Electronic
Housekeeper. However, by logging into www.electronichousekeeper.com you are able to
edit this list of channels yourself.
You are able to add other TV streams to your Electronic Housekeeper. The streams have
to have the following specifications:
Maximum bitrate: 600 kbit/sec
Maximum resolution: 480 x 234 pixels
Formats: DivX, XviD, MPEG4-SP (plus B-frame support), MPEG1, MPEG
and wmv (Windows Mobile)
Page 16 af 67
You can either select some of the default channels or you are able to add some streams
yourself. The streams have to be able to be played on a windows media player, and no
flash streaming is possible on the Electronic Housekeeper.
Furthermore, for each channel you need to add a logo to be displayed on the Electronic
Housekeeper. The size of the logo is to be 200 x 200 pixels.
The streaming looks like:
The streaming normally takes about 10 to 20 sec to start. If it takes more than 45 sec the
Electronic Housekeeper goes back to the main screen. 5 sec after the streaming has
started the Electronic Housekeeper plays is full screen mode. You get back to normal by
pressing the screen.
We recommend a minimum of 1 Mbit internet connection in order to get the best quality.
Page 17 af 67
0XVLF
The Electronic Housekeeper is able to play music from the following sources:
MP3
FM Radio
Internet
The media player index looks like:
You navigate between the albums or streams by the slider (main index) or by moving your
finger across the area with the albums / streams (detailed index). You are able to change
to list view by pressing the slider in more than 3 sec.
You select the album or track by pressing on the picture in more than 3 sec. The player will
now start playing the selected music, and go to the player screen.
The center of the navigation wheel is for play / stop. The right and left circle parts
are for next / previous track, and the upper and lower circle parts are for next / previous
album or streams.
By this slider you are able to increase / decrease volume
Page 18 af 67
By pressing on the cover you get a full screen view.
You are also able to remote control your player via Z-wave buttons, IR or app for mobile
phones. The Z-ZDYHEXWWRQVDUHGHILQHGYLDWKH³LI-then-HOVH´VHWXS
, and the IR is
GHILQHGLQ³VHW-XS´DQG³JHQHUDO´
.
You are able to use the build in speakers or connect external speakers to the line out
connector at the back of the Electronic Housekeeper. When using external speakers, they
KDYHWRKDYHDEXLOGLQDPSOLILHUDQGXQGHU³VHW-XS´³JHQHUDO´\RXQHHGWRFKDQJH³OLQH
RXW´WR³RQ´
.
You are able to access the music from all pages by pressing the
the screens.
in the top menu of
Media Player
The Electronic Housekeeper player is able to play the following formats: MP3, WMA, AVI,
MPEG-4, DivX, Xvid and MPEG4-SP. Videos have to be with a maximum bit rate of 600
kbit/sec and a maximum resolution of 480 x 234 pixels.
The music and videos are stored on a USB memory card connected to the Electronic
Housekeeper or from a hard disc on your network. When using a hard disc on your
network, please do notice that no user ID and password can be used; the Electronic
Housekeeper has to have direct access to your libraries.
Storing music on a USB memory stick:
x
x
x
Copy the desired music libraries from your computer to the USB stick
Plug in the USB stick to your Electronic Housekeeper
The Electronic Housekeeper will now ask if you would like to make a scan
of your music. Answer Yes.
The Electronic Housekeeper now makes an index of the music, this may take several
minutes. 4 GB takes about 6-8 minutes, and you can follow the progress by the XX% on
the top of the main screen.
Getting the music from a network hard disc;
We kindly refer to Set-up and Media.
Page 19 af 67
FM radio
By pressing up or down the Electronic Housekeeper make a search of FM
stations. The name of the stations is received via the RDS information from the radio
station. The Electronic Housekeeper gets the FM-radio from the attached FM antenna.
Online Radio
The Electronic Housekeeper is able to play a list of online music channels. For each
country we have selected a list of channels that are available on your Electronic
Housekeeper. However, by logging into www.electronichousekeeper.com you are able to
edit this list of channels yourself.
You can either select some of the default channels or you are able to add some streams
yourself. The streams have to be able to be played on a windows media player, and no
flash streaming is possible on the Electronic Housekeeper.
Furthermore, for each channel you need to add a logo to be displayed on the Electronic
Housekeeper. The size of the logo is to be 200 x 200 pixels.
Several sites offer a list of available online music streams, such as: www.shoutcast.com or
www.listenlive.eu or www.livelive24.com
Page 20 af 67
WWW
The Electronic Housekeeper enables you to open internet pages without flash
components. We have selected some default pages designed for mobile phones for the
Electronic Housekeeper.
The Electronic Housekeeper system still runs in the background, and when you close the
browser the normal layout of the Electronic Housekeeper appears again.
Page 21 af 67
Recipes
The Electronic Housekeeper has several hundreds of recipes in various categories. You
are able to text the list of ingredients to your cell phone.
The index shows the various recipes within the selected category. You change category by
pressing
You can view all recipes or your favorites only by pressing
By pressing
to the right of the recipe you add the recipe to your favorites.
By pressing
you are able to send the recipe shopping list to your mobile phone.
Simply select the number of the mobile phone and press send.
By pressing the picture of the recipe or the heading of the recipe you go to the specific
dish.
Page 22 af 67
For each recipe you get a description, the ingredients, a step by step guide and a link to
other similar recipes. At the left side of the screen you have a link to both sending the
recipe per SMS or to start a timer to keep track on your cocking.
Page 23 af 67
Control
The devices are intelligent and speak wirelessly with your Electronic Housekeeper. Once
installed, the units automatically remember when to turn on / off or increase / decrease.
However, you are always able to control the units yourself via the touch screen of the
Electronic Housekeeper console, other devices, mobile app, IR remote controls and the
Internet.
Several wireless standards are at the market, of which some of the leading are:
Electronic Housekeeper mainly uses the open protocol Z-wave ® and makes bridges to
other wireless and wired solutions such as ZigBee ® and IHC ® and KNX ®.
The Z-wave standard has an outdoor range of
80 meter and an indoor range of 20 meters
between the various devices (nodes). The
communication is a mess network, allowing the
communication to be resend from one device to
another. In total the signal can go through 4
devices, which equals 4 x 20 = 80 meter. All
basic functions in Z-wave certified products for
the European market will work directly with the
Electronic Housekeeper, special features of
some devices are implemented continuously to
the Electronic Housekeeper.
Currently more than 700 products are Z-wave certified, more information is available at
http://www.z-wave.com/modules/Products/
NB: All metal will reduce the RF signals. If the Electronic Housekeeper is not able to see a
device it will be marked with an exclamation mark on the screen.
Page 24 af 67
Specific Z-wave information
The following information is for use of products from Electronic Housekeeper together with
other controllers.
Electronic Housekeper
Z-wave type: Controller.
Learn-mode: 8QGHU³JHQHUDOVHWXS´-> select ZW-Control -> Select Receive
7UDQVPLW´note-info-)UDPH´ 8QGHU³JHQHUDOVHWXS´-> select Send ZW-INF.
Controller shift: 8QGHU³JHQHUDOVHWXS´-> select ZW-Control -> Select Shift
´$GGQRGH´,QFOXVLRQ 8QGHU³JHQHUDOVHWXS´-> select ZW-Control -> Add device.
´5HVHWQRGH´([FOXVLRQ UndHU³JHQHUDOVHWXS´-> select ZW-Control ->
Remove.device.
SwitchKeeper
Z-wave type: Binary-Switch
Sub Z-Wave-type: Pulse-meter-class (Watt-hour)
Sub Z-Wave-type: Meter-meter-class (Kilo-Watt-hour)
Pre-set of consumption counter: Config-class - parameter 0 ± length 4 bytes msb first
(Integer)
6HQG´QRWH-info-)UDPH´ Press the lid.
Add to a network: Press add on the control unit -> Press the lid
Remove from a network (reset): Press remove on the controller -> Press the lid
Device reset: Press the lid for 10 sec while powering up the device.
Lightkeeper
Z-wave type: Multilevel Switch
Page 25 af 67
6HQG´QRWH-info-)UDPH´ Press the button.
Add to a network: Press add on the controller -> Press the button
Remove from a network (reset): Press remove on the controller -> Press the button
Page 26 af 67
Device Control
The main screen of device control on the Electronic Housekeeper console has the
following layout:
The various devices are listed, in this example 3; PC, STROM and DIMMER. By selecting
a specific device, it becomes green, and the options are highlighted to the right of the
screen. The selected device
is a switch that can be turned on / off and has a build in
meter. In the actual view
only the desired devices are listed, for each device you are
able to choose in which screens is should be listed. Other views are:
Devices only
Groups only
Devices and groups set-up
Default view: Selected devices and groups only
Furthermore, the devices are categorized into electricity, water and heat. The current view
is electricity, by pressing
you go to the next category.
The statistic screen of a meter has the following layout:
7KH´FRXQWHU´YDOXHVKRZVWKHODVWUHDGFRXQWHUYDOXHRIWKHPHWHU7KHGHIDXOWIUHTXHQF\
RIWKHUHDGLQJVLVRQFHHYHU\KRXU+RZHYHULQ³VHW-XS´³*HQHUDO´DQG³5HDGLQJV´\RXDUH
able to select other reading intervals e.g. every 15 min.
7KH³KRXU´YDOXHH[SUHVVHVWKHFRQVXPSWLRQWKHODVWKRXU
Page 27 af 67
7KH³ORDG´LVWKHDFWXDOORDGRIWKHPHWHU
Set-up of a specific device or group of devices.
Adding devices
In the following we describe how to add a device to the Electronic Housekeper.
Use the following steps when adding a device:
x
x
x
x
Select
on the list of devices
6HOHFW³DGGPRGXOH´DQGFKRRVHWKH³W\SHRIdevice´\RXZRXOGOLNHWRDGG. You are
able to choose between; 1) Device, 2) Group, 3) Bridge, 4) Virtual and 5) Statistic.
Devices are all basic Z-wave device (like Switchkeeper or Lightkeeper), Group is a
group of devices, Bridge is a device that bridges to a list of other standards (like
Bridgekeeper 1 and 3), Virtual is virtual Z-wave devices on the Bridge (like power,
water and heat meters) and Statistic is devices used statistic purposes only.
In order to add a device is has to be within a few meters from the Electronic
Housekeeper. Also existing connected devices should be turned on before adding a
new device, this in order to establish the mess network set-up in each device.
Press the button on the device to include / exclude the device. Please read the
installation manual for the specific device for how to add which varies from one
product to another ± like sometimes you have to press a specific add button and
sometimes you need to press an on/off button 3 times (e.g. Merten devices).
When the configuration screen appears, then the Electronic Housekeeper has found the
device.
Fill in the special conditions for the device and press OK. The device now appears in the
list of devices, and you are free to relocate the device to where it is to be used. Once a
device is connected to the Electronic Housekeeper, then no other Z-wave network or
master units are able to use the device. So your system will not interfere with similar
systems at your neighbors.
Page 28 af 67
Device Set-up
In the following we go through the various set-up options for devices. Some are generic
whereas others depend on the specific device.
Name: Here you add a familiar name for you device
Type: Here the Z-wave description of your device is displayed.
Location: Location of your device
Schedule: This set-up option allows your device to be controlled by a schedule 15
minutes around the clock. You are also able to differ between workdays / weekends and
surveillance / no surveillance mode. So e.g. the light might be turned on when you are not
at home, to simulate you are at home.
Connected: Here you inform what your device is controlling, e.g. a TV set.
STB value: This feature is to measure the standby value of the attached device. You set
the standby mode by:
x
x
Connecting the appliance to the device and put it on standby mode.
Pressing the button and the device is now measuring the actual consumption.
The feature is only possible for devices with build in meters, like the Switchkeeper. The
YDOXHLVXVHGWRJHWKHUZLWKWKH³VWDQGE\PRGH´EHORZ
STB mode: Here you decide how your Swicthkeeper is to react, when the attached
devices reaches the stand-by level. You have 3 options:
x
x
x
Off ± means that the standby feature is disabled.
Normal ± means that no matter when the device measure a consumption that is
less than the standby value, it turns of.
Timer only ± means that the standby function is controlled by the on- and off
periods in the schedule. The standby function is disabled in the on periods and
activated in the off periods.
STB timer: This option is used to determine how much time must elapse from the unit is in
standby to be turned off. The values are from 20 sec to 5 min.
Timer: This option overrules all other setting when activated. You specify how long a
device is allowed to be turned on. This is an extra security in case you forget to turn off
your TV set and therefore it newer goes in standby mode and is turned off. Or if you would
like a maximum on how long you are allowed to watch TV. When the value is 0 it is
deactivated.
Page 29 af 67
Rem Ctrl: You have two options for remote control.
x Activated ± allows you to make remote control of the device.
x Deactivated ± stops you from making remote control of your device. The device can
only be controlled via the buttons on the device itself. However, the schedule and
standby settings are still active.
Sched enable: Here you easily can activate or deactivate your schedule without
destroying your settings.
MTR offset: This offset is for devices measuring meters ± like; power meters and water
meters. The offset is added to the measured value from the meter.
MTR factor: This setting is for devices measuring meters ± like; power meters and water
meters. This factor is used to convert number of measured pulses to e.g. kWh or M3. For
example the value will be 0.01 to convert a meter giving 100 pulses per kWh.
MTR mode: This option is for sensors able to measure both by measuring LED blinks or
by both sending LED light and measuring the LED coming back.
Reading Type: This option is to categorize the meter to be either a total meter for
electricity, water or heat, or to be a sub meter. This is for statistic purposes.
LED mode: Here you are able to decide how the LED of the Switchkeeper reacts; normal,
delay and blink.
Wake up: This option is the wake up interval for battery powered devices. The interval
goes between 5 min to 4 hours
Events: Link to the alarm set-up screen for setting up; ´LIWKHQHOVH´ rules.
Association: This option makes direct links between the actual device and one or more
other devices. This link works locally between the devices and ensures imidiate response.
It might be used when you would like a movement sensor to turn on the light via another
device.
Picture: For all meters there are standard pictures for each category. However, you are
DEOHWRVHOHFWDSLFWXUHIRU\RXUVSHFLILFPHWHUDVZHOO7KLVSLFWXUHVLVXVHGLQWKH³GHYLFH´
³VWDW´RSWLRQ
Pulse alarm: For specific water sensors with build in water stop functions. You select how
many M3 may run through before the water is stopped.
Time alarm: For specific water sensors with build in water stop functions. You select how
long time the water is allowed to run.
Local off: For specific water sensors with build in water stop functions. Activate or
deactivate the water stop function
Page 30 af 67
Visible: This option allows you to choose where you would like to display the device. All =
all pages with devices and statistics, List = the default selected group and device list
,
Statitics = statistics only, None = not to be displayed. However all devices will be visible
when choosing
Source: This option specify if a power meter is analogue or digital.
Nilan: The Nilan option goes into a specific Nilan menu with detailed information about the
Nilan units and Nilan settings.
Deleting a device
In the following we describe how to delete a device from the Electronic Housekeper.
Use the following steps when deleting a basic device:
x 6HOHFWWKHGHYLFH\RXZRXOGOLNHWRGHOHWHVHOHFW³VHW-XS´DQGSUHVVGHOHWH1RZWKH
following screen will appear
x
x
x
6HOHFWWKH³GHOHWHGHYLFH´DQGSUHVVWKHEXWWRQRQWKHGHYLFHWRLQFOXGHH[FOXGH
the device.
When the device is removed from the Electronic Housekeeper, a new screen
DSSHDUVZLWKWKHWH[W³'(9,&(68&&(66)8//<5(029('´SUHVV³'21(´
The device has now been removed from the list of devices on the Electronic
Housekeeper.
PS: In case a device is to be moved from one Z-wave master like the Electronic
Housekeeper to another, then you first have to delete the device before you can add the
device to the new master unit.
Other controllers
Page 31 af 67
In order to add other sophisticated controllers (e.g. other Electronic Housekeepes) you
QHHGWRJRWR³VHW-XS´³JHQHUDO´DQGVHOHFWWKHRSWLRQ³=:FRQWURO´$WWKHPDVWHUXQLW\RX
QHHGWRVHOHFW³VHQG´DQGDWWKHVODYHXQLW\RXQHHGWRVHOHFW³UHFHLYH´7KH(OHFWURQLF
Housekeeper is able to both work as a master and a slave unit, and you are able to have
several Electronic Housekeeper units connected in one network.
If you have two Electronic Housekeeper units connected, then the device settings are
copied from one Electronic Housekeeper to another. However, this does not apply for
none Electronic Housekeeper controllers. NB: Please be aware that all device devices are
copied from the master to the slave controller. In case you do it wrongly, all your device
settings might be lost.
Bridgekeeper 1 (IHC)
The Bridgekeeper 1 makes a bridge between Z-wave and the IHC ® system from Laurits
Knudsen, and multiple sensor inputs from e.g. power meters. The Bridgekeeper 1 is able
to replace a basic IHC controller or to work in parallel with an existing IHC controller.
Installation
Page 32 af 67
The Bridgekeeper 1 is connected to the other IHC ® modules via the IHC bus, and the
Bridgekeeper 1 is powered via a basic IHC ® power supply. The Bridgekeeper 1 has 64 in
and output, M-Bus, S0 pulse input and optionally the IHC in- / output ports are to be set-up
for pulse input as well.
Connections
Terminal 1 - 4:
Terminal 5 og 6:
Terminal 5 og 7:
Terminal 8 og 9:
Terminal 10 ± 24:
M-Bus connection for various meters, like Kamstrup power
meters. The Bridgekeeper 1 is able to have in total 5 M-Bus units
connected.
S0 input from a pulse sensor, like a Sensus water meter.
Analogue input
24 V d.c. / 24 mA power supply.
Data and 0V. These connectors are for communication with the
IHC in- and output modules or IHC controller ®. In total maximum
8 output modules and 4 input modules might be connected
Power Supply
The power supply to the Bridgekeeper 1 is to be made according to the National Electrical
&RGH6WDQGUDG+DQGERRN´6W UNVWU¡PEHNHQGWJ¡UHOVHQ´FKDSWHU´(OHFWULFDO
,QVWDOODWLRQHV´FKDSWHUIURPD9'&SRZHUVXSSO\ZLWKDVDIHW\
transformer, (SELV).
Chose of low power cabling
The cables used have to be according to the National Electrical Code Standrad Handbook
´6W UNVWU¡PEHNHQGWJ¡UHOVHQ´FKDSWHU´(OHFWULFDO,QVWDOODWLRQHV´FKDSWHU:H
recommend IHC LINK-6 or IHC LINK-10 cabling.
Data connections toIHC In- and Output modules
We refer to data sheet from Lauritz Knudsen about the respective products.
Data connections to M-Bus
Page 33 af 67
To avoid ring connections in the data coupling the 0 V cable is not to be looped.
Cable length: maximum 25 meters.
Data connections to S0 pulses
Cable length: maximum 25 meters.
How to connect a Bridgekeeper 1
The Bridgekeeper 1 is added as other Z-wave controllers.
x
x
x
x
Select
on the list of devices
6HOHFW³DGGPRGXOH´DQGFKRRVH³DGGBridge´
Use a small metal piece to press the button hidden in the front plate of the
Bridgekeeper 1.
)LOOLQ³%ULGJHNHHSHU´DVWKHQDPHRIWKHGHYLFH6HOHFW³QRQH´LQ³YLVLEOH´DVWKH
%ULGJHNHHSHULVQRWWREHLQ\RXQRUPDOOLVWRIGHYLFHVXVHGGDLO\7KHQSUHVV³2.´
Configuration of connectors
The connectors on the Bridgekeeper are now to be configured. This can be done locally in
the Bridgekeeper 1 or as virtual Z-wave devices on the Electronic Housekeeper.
When the configuration is done locally in the Bridgekeeper 1, the Bridgekeeper is able to
work independently of the Electronic Housekeeper.
Normally, you configure the basic connector settings directly in the Bridgekeeper 1, like
which input ports should turn on / off specific output ports. Only those output ports that you
would like to control from the Electronic Housekeeper is recommended to make as virtual
devices. The virtual devices on the Electronic Housekeeper will perform as any other Zwave device, which allows you to e.g. make schedules or if-then-HOVH´UXOHV
All sensors for various meters are to be made as virtual devices on the Electronic
Housekeeper. For each sensor you define weather it is a pulse (like Sensus water meter)
or an M-bus sensor (Like Kamstrup power meter). In general settings you need to select
³5HDGLQJV´LQRUGHUWRVHOHFWKRZRIWHQWKH(OHFWURQLF+RXVHNHHSHULVJRLQJWRVWRUHWKH
readings.
Pulse meters device setting
x
x
x
.H\LQWKHSXOVHFRXQWHULQ³0752))6(7´
.H\LQWKHFRQVXPSWLRQIDFWRULQ³075)$&725´
6HOHFW³5($',1*7<3(´RQO\³7RWDOKRXVH´PHWHUVDUHXVHGIRUHQHUJ\JXLGDQFH
For a power meter giving e.g. 150 pulses per kWh, you need to key in 1/150 = 0,00667 as
³075)$&725´
The Electronic Housekeeper makes the first reading after 15 min, when selected in the
³JHQHUDOVHW-XS´
Page 34 af 67
M-Bus meters device setting
x
x
Key in the M-%XVDGGUHVVLQ³$''5(66´
6HOHFW³5($',1*7<3(´RQO\³7RWDOKRXVH´PHWHUVDUHXVHGIRUHQHUJ\JXLGDQFH
In case you use a secondary meter to e.g. the main power meter, then we recommend to
key in an offset value equivalent to the main meter.
The Electronic Housekeeper makes the first reading after 15 min, when selected in the
³JHQHUDOVHW-XS´
NB: The Electronic Housekeeper only reads M-Bus data from selected meters like
Kamstrup and Ista meters. In case you have a request for use of other meters the you
need to contact our hotline.
Bridgekeeper 1 configuration via basic text editor
This part is for professionals used to make scripts. The syntax is as follows:
Input ports:
IX ± input pin, where X is in the interval from 0 to 63
FX ± function for input, where X is the function number
Functions:
0 ± PIN_IN_FUNC_FALL ± activated when the button is released
1 ± PIN_IN_FUNC_RISE ± activated when the button is pressed
2 ± PIN_IN_FUNC_1SEC ± makes a pulse in 1 sec when pressed
3 ± PIN_IN_FUNC_2SEC ± makes a pulse in 2 sec when pressed
Output ports:
OX ± output pin, where X is in the interval from 0 to 63
FX - function for output, where X is the function number
Functions:
0 ± PIN_FUNC_NONE - No action
1 ± PIN_FUNC_TOGGLE ± Tilt function, switch to opposite state
2 ± PIN_FUNC_SET_ON ± Turn on
3 ± PIN_FUNC_SET_OFF ± Turn off
4 ± PIN_FUNC_IN_EQUAL_OUT ± Output follows input
5 ± PIN_FUNC_TOGGLE_SYNC ± All outputs follows the state of the first
output
Page 35 af 67
Example:
By pressing input 1 you would like to control output 4: I1F0O1O2O3O4F5, if the first lamp
is on, then all the other lamps will be turned off and vice versa.
// EH 0: Sensor by front door
I1,F0,O1,O2,F2
I1,F1,O1,O2,F3
//EH 1: Tilt by front door
I2,F0,O3,F1
//EH 2: Sensor bath 2 ; L/HK19, Turn off after 10 min
I3,F0,O4,F2
I3,F1,O4,O5,F3
//EH 3: All off
I4,F1,O1,O2,O3,O4,O5,F5
³´DUHXVHGIRUFRPPHQWVDQGRYHUYLHZRQO\
We recommend using Notepad as editor. Once finised, then you program the setting into
the Bridgekeeper by:
1. Saving the program file ´W[W´on an USB-flash memory
2. Inserting the USB flash memory into the Electronic Housekeeperen
3. *RLQJLQWR´set-XS´´JHQHUDO´DQGVHOHFWLQJ´/2$',+&´+HUH\RXVHOHFWWKHILOH
from your USB flash memory, and the Electronic Housekeeper will then send the
configuration to the Bridgekeeper 1.
4. Now test your installation, and if necessary redo the process.
5. Continue via the Electronic Housekeeper. E.g. you might combine some virtual
devices via other Z-ZDYHGHYLFHRUPDNH´LI-then-HOVH´IXQFWLRQV
We recommend creating all output devices on the Electronic Housekeeper as well as on
the Bridgekeeper. This gives you most security on performance and most features as well.
Also in order to test your settings, we suggest making an all off group with all devices
included. Please notice that the EH connector number is one less than the IHC connector
number.
Page 36 af 67
Hint: If you would like to combine the Bridgekeeper 1 with an IHC wireless controller, you
are able to do so by connecting the output from the IHC wireless controller with input on
the Bridgekeeper 1 and visa versa. Hereby, you are able to integrate all basic functions
from the IHC Wireless controller into the Electronic Housekeeper.
Group set-up
Groups are added the same way as devices. For each group you are able to add
members.
Devices might be linked to several groups. Groups might be linked to other groups.
For each group you are able to add several members or other groups. A device might be
connected to several groups.
The schedule for groups is controlled by the Electronic Housekeeper. For battery powered
devices the changes will only be applied to the device when it wakes up.
There are 4 special standard groups, these are used to control the overall status of the
KRPH7KHUHLVDVSHFLDOIHDWXUHIRUWKHVWDQGDUGJURXS³5(0(0%(5´:KHQ\RXSUHVV
this button the Electronic Housekeeper remembers the state of the group members. This
VWDWHLVDFWLYDWHGXQGHU³6\VWHP6WDWH´
.
Page 37 af 67
$ODUPV
The alarm part of the Electronic Housekeeper has 4 options:
1.
2.
3.
4.
New alarms
Historic
Set-up
Alarm clock
In the following we go though these options.
New alarms
This menu lists all active alarms. Alarms will remain here until manually cleared by
selecting them and press ³FOHDU´RUZKHQEHLQJUHVHWE\WKHV\VWHP
When alarms are on this list the
on the top of the main screen becomes red.
The list of DODUPVFRQWDLQVERWKV\VWHPDODUPVDQGDODUPVEDVHGRQWKH³LI-then-HOVH´VHWup of alarms made by the user.
Page 38 af 67
Historic
This menu list all alarm events in the system. The menu is used to e.g. see when the
surveillance has been turned on and off.
Set-up
System alarms
Server connection error The Electronic Housekeeper was not able to connect to the
server. If this alarm happens often it indicates that the network
set-up of the Electronic Housekeeper has to be changed. Often it
might be advisable to disable the DHCP and select a permanent
IP address.
Node failed
The Electronic Housekeeper lost connection to a device / node
Bridgekeeper error
The Bridgekeeper is not able to communicate with an attached
sensor, like error on the M-Bus communication with a Kamstrup
power meter.
New EH version has been installed New software version is successfully installed.
Surveillance on
6\VWHPVWDWHKDVEHHQFKDQJHGWR³VXUYHLOODQFH´
Movement detected
:KHQWKHV\VWHPVWDWHLV³VXUYHLOODQFH´DQGDPRYHPHQWLV
detected, then this alarm is generated.
Surveillance off
6\VWHPVWDWHKDVEHHQFKDQJHGEDFNIURP³VXUYHLOODQFH´
Nilan alarm
Specific alarm for Nilan ventilation systems
Battery low
Battery needs to be replaced in the device
Page 39 af 67
These alarms cannot be edited nor deleted. You are only able to decide if you would like to
be notified when this alarm happens. The notification will be send to the e-mail or mobile
number entered the system on out homepage www.electronichousekeeper.com
´If-then-else´ set-up
7KH³LI-then-HOVH´DOORZV\RXWRPDNHWKHEHKDYLRU of one device depending on other
devices and the system state. This might be usable in the following cases:
Ex 1: ´1LJKWSHHURXWH´. This is used to turn on some light at night time, in order to
illuminate the way to your bathroom. You select some movement sensors, connect those
to some Switchkeepers and select that this is only activated when the system is in night
mode.
Ex 2: A wall switch that is to control the light at another power outlet. This is similar to
programming IHC scripts for in- and output ports on the Bridgekeeper 1.
Ex 3: Movement sensor, that turns on / off the light in your hallway when you enter your
home.
7KH³LI-then-HOVH´UXOHVDUHFRQWUROOHGE\WKH(OHFWURQLF+RXVHNHHSHU,QFDVH\RXZRXOG
like e.g. a PIR sensor / movement sensor to turn on / off the light locally, we recommend to
GRPDNHDQ³DVVRFLDWLRQ´LQGHYLFHVHW-up.
,QRUGHUWRPDNHDQHZ´LI-then-HOVH´IXQFWLRQ\RXQHHGWRSUHVVWKH
go through 4 steps. The firsWVFUHHQLVWKH³LI´FRQGLWLRQ
button and
Step 1: IF
Select the device, device values, night and system mode that is to activate the event. You
start by pressing the
whereby you get a list with the devices connected to the
Electronic Housekeeper. If this example we have chosen the PIR sensor within the
(OHFWURQLF+RXVHNHHSHU:KHQLWLV³RQ´PRYHPHQWGHWHFWHGDQG1LJKWLV³RQ´RQO\DW
night times) and System is in ³6XUYHLOODQFHPRGH´WKHQWKLVHYHQWLVDFWLYDWHG
Page 40 af 67
The options vary depending on the device you have selected. Here we describe the
characteristics of them:
SWITCHED: Activated when the device is on or off. Applies for almost all devices, but is
often used for movement sensors (PIR)
ABOVE: Activated when the value is above 0 to 90 as percentage of maximum output
from the device. It could e.g. be used to turn on other dimmers when the main dimmer is
above 50%.
BELOW: Activated when the value is below 100 to 10 as percentage of maximum output
from the device. It could e.g. be used to turn on other dimmers when the main dimmer is
abelow 20%.
T-ABOVE: Activated when the temperature is above a certain level. Useable for
controlling indoor temperature with e.g. Danfoss radiator thermostats. The interval goes
from -20 to 100 degrees in steps on 1 degree.
T-BELOW: Activated when the temperature is below a certain level. Useable for
controlling indoor temperature with e.g. Danfoss radiator thermostats. The interval goes
from -20 to 100 degrees in steps on 1 degree.
LUM ABOVE, LUM BELOW, HUM ABOVE and HUM BELOW: same logic as for
³$%29(´DQG³%(/2:´7KHVHRSWLRQVDUHDYDLODEOHIRUGHYLFHVPHDVXULQJOXPHQVDQG
humidity.
ALARM: Here you are able to define that an alarm should be raised when the event
happens. For example it might be usefull to generate an alarm in case the temperature
drops below a certain value. This event could then be sent as SMS to alert you.
NIGHT: This options is to reduce the event only to be activated in night time. Usefull for
e.g. PIR sensors to turn on the light, but only in night times.
SYSTEM: This option is to reduce the event only to be activated when the system is in
surveillance mode. Hereby, you can chose to have a PIR sensor to turn on / off the light
ZLWKRQH³LI-then-HOVH´VHW-XSDQGZLWKDQHZ³LI-then-HOVH´VHW-up you can determine the
PIR sensor to send an alarm if movement is detected and the system is in surveillance
mode.
Page 41 af 67
3UHVV³QH[W´WRFRQWLQXH
Step 2: THEN (Yes)
In the next step you select which device is to be controlled when the event is activated.
Once again you start by selecting the device you would like to control by pressing
. In
this example we have selected a switch, which is turned on when the conditions under if
are met.
The actions vary depending on the device you have selected. Here we describe the
characteristics of them:
SWITCH: Turn on / off a device.
LEVEL: Turn on a device at s specific level, e.g. setting the dimmer value to 75%
DELAY: Defines how long time to wait to take action after the conditions is met.
STATE: This applies for groups only. You are able to active a group state by e.g. turning
on a switch.
3UHVV³QH[W´WRFRQWLQXH
Page 42 af 67
Step 3: ELSE (No)
Here you decide what is going to happen when the conditions are no longer true, in our
case when there is no longer any movement detected. We have selected to turn off the
switch without any delay.
You do not have to have both an event if in both ³WKHQ´DQG³HOVH´LWDOOGHSHQGVRQKRZ
the behavior of the specific devices.
7KHDFWLRQRSWLRQVDUHWKHVDPHDVIRU³WKHQ´
3UHVV³QH[W´WRFRQWLQXH
Step 4 Name and notify
On the last page you nave the event and decide if you would like the system to notify you
as well.
In case you have several movement sensors connected to the Electronic Housekeeper we
recommend that you join them in a group, and make a rule for the group overall,
generating an alarm in case of movement. Each sensor might control a switch locally, but
this relation you are also able to make as a direct link in the device set-up.
Page 43 af 67
Alarm Clock
The alarm clock allows you to use the Electronic Housekeeper to wake you up with online
streaming of music. Simply select time and station, and the alarm clock function start
working.
Page 44 af 67
6\VWHPVWDWH
This menu is for changing the state of your home, and thereby which function the various
devices connected to the Electronic Housekeeper should have. The Electronic
Housekeeper has the following status options:
All off
I am home
Night
Surveillance
The functions to carry out when these statuses are activated, are defined under device
set-up
:
x
x
x
First you add devices to the specific group
Secondly you turn on / off, set the desired dimmer level, set the desired
WHPSHUDWXUHOHYHOPDNHWKHUXOHVIRU´LI-then-HOVH´HWF
)LQDOO\\RXVHOHFW´UHPHPEHU´DQGWKHVWDWXVRIWKHGHYLFHVLVUHPHPEHUHG
:KHQ\RXFKDQJHWKHVWDWXVWRHJ³DOORII´WKHGHVLUHGVWDWXVZLOOEHVHQWWRWKHGHYLFHVLQ
the group. A movement sensor (PIR) might be inactive in ³,DPKRPH´VWDWHZKHUHDVLW
turns off the lighWLQ³1LJKW´VWDWHDQGVHQGVDQDODUPLQ³6XUYHLOODQFH´VWDWH
9LDWKH´LI-then-HOVH´UXOHVVHWWLQJVRUWKH,5VHW-XSXQGHU³VHW-XS´DQG³JHQHUDO´\RXDUH
able to turn a group on or off. However, you are only able to activate a state in the state
screen.
7KH³VXUYHLOODQFH´VWDWHLVVSHFLDODVLWKDVDGLJLWSDVVZRUGFKRVHQLQWKHVHW-up on
www.electronichousekeeper.com
7KH6XUYHLOODQFHVWDWHPLJKWDOVREHDFWLYDWHGYLDWKH³LI-then-HOVH´VHWWLQJV
Page 45 af 67
7KH³VXUYHLOODQFH´VWDWHLVDFWLYDWHGPLQXWHVafter the password has been accepted.
:KHQ³VXUYHLOODQFH´VWDWHis active an alarm is sent to the central server in case of
movement. If you have entered you e-mail then receive an e-mail like:
The Electronic Housekeeper sends those to the central server. You are able to view these
SLFWXUHVE\ORJJLQJLQVHOHFW³UHPRWHFRQWURO´DQG³FDPHUDYLHZ´3LFWXUHVORRNOLNH
Page 46 af 67
If you have entered your mobile phone number, your will receive a text message with a link
for the remote control of your Electronic Housekeeper. Here you can request a picture.
Alarm set-up on the User account
The set-XSRIDODUPQRWLILFDWLRQLVPDGHYLDWKH³$ODUP´PHQX
7KHGLJLWFRGHLVHQWHUHGYLDWKH³1DPHDQG$GGUHVV´PHQX
Page 47 af 67
6WDWLVWLFV
The statistic main screen is to give you an overview of your consumption of electricity,
water and heat.
Main screen
Here you see how your consumption has changes over the last month. In case the
consumption increases more than 15% an alarm is generated as well.
Furthermore by pressing one of the consumption icons
key performance values.
you get some
%\ SUHVVLQJ ³ '$<6 5()´ \RX WRJJOH EHWZHHQ GD\V DQG \RXUHQHUJ\ SURILOH DVD
reference.
%\SUHVVLQJ³'HYLFHV´\RXJRWRGHWDLOHGFRQVXPSWLRQLQIRUPDWLRQIRUVSHFLILFGHYLFHV
%\SUHVVLQJ³3URILOH´\RXDUHDEOHWRPRdify your energy profile.
Key performance values
The key performance values have been selected based on input from Elsparefonden and
the Class 1 project.
The reference building is either based on the energy profile you have or a group of
buildings you have selected.
The consumption per M2, person and night allows the user to get an easy overview, and
compare it with the expected usage. Especially the consumption at nighttimes tells you
KRZPXFKEDVLVFRQVXPSWLRQLVXVHGDWDOOWLPHV%\HJSOXJJLQJLQD³SOXJLQPHWHU´LQ
front of various appliances you are able to find out which units are responsible for
unnecessary consumption.
Page 48 af 67
From this screen you DUH DEOH WR JR WR ³KRZ WR VDYH´ ³GHYLFHV´ DQG WR FKDQJH \RXU
³SURILOH´
Devices
The device screen view gives detailed consumption information for various devices, like
your total electricity consumption or the consumption of your TV set.
For each selected device you can view:
Historic view
Comparation view
Table view
These will be described in the following.
Page 49 af 67
Historic view ± Normal
In the historic view you are able to see the consumption monthly, daily and hourly.
Furthermore, you are able to toggle between; 1) normal view, 2) weather adjusted 3)
reference group and 4) budget. The weather adjusted only applies for degree day
depending usage. The reference group view shows your consumption compared with your
energy reference. The budget you are able to key in on the homepage.
Historic view ± Reference
The purpose of this is comparing your consumption with similar buildings. In the specific
case you see that overall this household uses more than the other buildings, only in
October and November the consumption of this household is less than the others.
Page 50 af 67
Comparation view - Reference
In the comparation view you are able to compare two periods with one another. You are
able to toggle between; 1) normal view, 2) weather adjusted 3) reference group and 4)
budget. The weather adjusted only applies for degree day depending usage. The
reference group view shows your consumption compared with your energy reference. The
budget you are able to key in on the homepage.
Table view ± Weather adjusted
The table gives detailed consumption information daily, weekly, monthly or yearly. You are
able to toggle between; 1) normal view, 2) weather adjusted 3) reference group and 4)
budget. The weather adjusted only applies for degree day depending usage. The
reference group view shows your consumption compared with your energy reference. The
budget you are able to key in on the homepage.
The degree day information is automatically calculated based on the temperature
information for a specific region. Degree days are calculated as 17 subtracted the average
outdoor temperature, so if e.g. the temperature is 10, the number of degreed days is 7. For
GHJUHHGD\GHSHQGLQJXVDJHWKH³GLI´ZLOOEHFRPSHQVDWHGIRUWKHZHDWKHUFKDQJHIURP
one period to another. So e.g. if the usage has been increased by 10% and the weather
has been 7% colder, then the compensated consumption will be 3%.
Page 51 af 67
Table view ± Budget
7KHYDOXHVVKRZQDUHLQORFDOFXUUHQF\HJ¼DQGWKHEXGJHWHGPRQWKO\DPRXQWLV¼
The monthly budget is keyed in on the homepage. The price per kWh or M3 is entered
under general set-up as power price, water price and heat price, e.g. for power we use
¼DVGHIDXOW
Profile
Based on simple questions the Electronic Housekeeper is able to estimate an annual
consumption, or the user is able to key in a known consumption of electricity, water and
heat.
Screen 1:
The first screen refers to the residents of the households.
Page 52 af 67
Screen 2:
The second screen refers to the size and insulation of the building.
Screen 3:
The last page gives an estimated yearly consumption based on simple algorithms.
However, in case you know the actual consumption of your household, you are able to key
in this information, and it will overrule the estimated consumption in the energy guidance.
For the Class 1 project we added an energy reference group option on the last page. It can
be e.g. the other houses in the area or other similar houses throughout Europe. The
reference groups are generated centrally by the system administrator.
Page 53 af 67
How to save
The Electronic Housekeeper provides some basic guidance of how to make simple energy
savings on a day to day basis.
The advices are an ongoing process; more advices are added and tailored to the energy
profiles and regions of the buildings.
Page 54 af 67
(-PDLO
The Electronic Housekeeper is able to either synchonise with Outlook and an e-mail
account or simply to link directly to an online e-mail account like gmail.
<RXVHOHFWWKHPDLOVHWWLQJLQ³VHW-XS´³JHQHUDO´DQG³PDLORSWLRQ´Outlook 2) web mail.
When choosing Outlook you also need to answer:
x
x
E-mail check: How often to check for mails
E-mail max: The maximum number of e-mails to be listed
Furthermore, you need to go to www.electronichousekeeper.com and key in the basic email information:
Also in order to sunchronize with Outlook, you need to download the program awailable on
www.electronichousekeeper.com
Page 55 af 67
When using web mail you only need to key in the link to your mail provider homepage in
WKHILHOG³0DLOSURYLGHU´LQ*HQHUDOVHW-up.
Page 56 af 67
6HW-XS
Set-up allows you to change the basic parameters of the Electronic Housekeeper.
General set-up
In general set-up you are able to set overall parameters for the Electronic Housekeeper.
At the right side of the screen the Electronic Housekeeper ID, EH version and OS version
is displayed.
SCREEN OFF
SCREEN DIM
SCREEN SAVER
SLIDE SHOW
LINE OUT
IR
Indicates how long time must elapse before the Electronic
Housekeeper turns off the screen. It varies from newer to 30 min.
Indicates how long time must elapse before the Electronic
Housekeeper dims the screen. It varies from newer to 30 min.
Indicates how long time must elapse before the Electronic
Housekeeper turns off screen saver screen. It varies from newer
to 30 min.
Pictures for slideshow when playing music. This is described in
more details below.
Activates / deactivates the build in line out
Set-up of IR remote control functions of the Electronic
Housekeeper. This is described in more details below.
Page 57 af 67
CALIBRATE
SCREEN WAKE
RESET
T OFFSET
OPTIMIZE
LANGUAGE
READINGS
EMAIL CHECK
EMAIL MAX
SEND ZW INF
ZW CONTROL
BLUETOOTH
LOAD IHC
WATHER
ENERGY
CAM URL
POWER URL
WATER URL
HEAT URL
POWER PRICE
Calibration of the screen. Due to transportation and installation of
the Electronic Housekeeper, it might be advisable to recalibrate
the screen. However, in case you recalibrate the screen please
follow the guidance carefully, as you might make the touch panel
useless if you do not do it right.
Option of weather the screen should be activated by movement or
by pressing the touch panel.
This option is for resetting the Z-wave network. It is strongly
recommended to contact our customer service before resetting
your Z-wave network.
The Electronic Housekeeper is able to calculate an average of
various temperature sensors in your home. However, depending
on the location of the sensors it might be useful to offset the
temperature in order to get the right picture of the indoor
temperature.
This is a Z-wave command to optimize the Z-wave mess network.
It might be handy when doing a larger installation and you would
like to optimize the network.
Change the language of the various pages on the Electronic
Housekeeper.
Indicates how often the Electronic Housekeeper makes readings.
When using Outlook synchronization of e-mails on the Electronic
Housekeeper, you can indicate
Indicates how many e-mails you would like to have displayed on
your Electronic Housekeeper.
Sends the Z-wave information of the Electronic Housekeeper to
the mess network.
Used to add more Z-wave controllers in a network, like more
Electronic Housekeepers. For the master controller you press
³VHQG´DQGIRUWKH³VODYH´FRQWUROOHU\RXVHOHFW³UHFHLYH´7KH=wave nodes are the accessible on both controllers, but settings
only possible by the master controller. NB: please be aware the
E\GRLQJ³VHQG´DQG³UHFHLYH´ZURQJO\DOO=-wave setting of the
master controller will be erased.
Not activated
Local IHC scripts of the Bridgekeeper 1. This is described in more
details in the chapter Control, Bridgekeeper 1 IHC.
Indicates which link the Electronic Housekeeper goes to when
pressing the weather map on the weather screen.
Links to the set-up of your Energy Profile
Indicates which web cam stream the Electronic Housekeeper
VKRXOGDFWLYDWHZKHQWKH³LI-then-HOVH´HYHQWVHW-up is activated.
Like when the doorbell button is pressed, then start streaming for
the web cam at the front door.
Links to the energy guidance screen for power.
Links to the energy guidance screen for water.
Links to the energy guidance screen for heat.
Price per kWh for statistic purpose
Page 58 af 67
WATER PRICE
HEAT PRICE
MAIL PROVIDER
Price per M3 for statistic purpose
Price per kWh for statistic purpose
Web mail provider e.g. gmail.com
In the following we go through some of the more complex options listed above.
IR set-up
Your Electronic Housekeeper is able to receive IR commands from the following remote
controls:
However, other brands might also be useable. Like many manufactures uses the Phillips
standard. <RXVHOHFWWKH,5SURWRFROE\SUHVVLQJ³VHW´
The right side of the screen is a list of devices and player control functions that you are
able to control by IR. The left side is the devices and player functions where an IR
command is already linked to.
You add a new IR command by selecting a function at the right side, pointing the IR
remote control against the Electronic Housekeeper and press on the desired button. A
QXPEHUQRZUHSODFHVWKHWH[W³35(66´DQGE\SUHVVLQJWKH
this function is now added
to the list of IR functions remembered by the Electronic Housekeeper, and listed at the left
side.
Slideshow set-up
The slideshow is used when playing music. The Electronic Housekeeper has a default
slideshow, but you are able to add your own pictures instead. When pressing
following screen appears:
Page 59 af 67
the
Select Music by pressing
The screen shows the set-up of the current slideshow. By pressing
you are able to
add a new slideshow. Key in the full link like \\mycomputer\documents\pictures\vacation or
just add another USB memory stick to the Electronic Housekeeper.
The pictures shown at the Electronic Housekeeper have to be fitted to the wide screen
format of the Electronic Housekeeper. At our homepage you are able download a program
that guides you how to modify the pictures.
Page 60 af 67
Network
The Electronic Housekeeper connects through the Internet using an Ethernet cable. The
cable might be connected to a VLAN network using a Netgear WLAN bridge.
When using a cable directly to a router the
appears on the screen, as shown below:
By pressing
the Electronic Housekeeper first makes a connection to Google.com
and the to the Electronic Housekeeper server. If the connection is OK, then there is a
³*RRJOHSLQJ2.´IROORZHGE\³6HUYHUFRQQHFWLRQ2.´
+RZHYHULIWKHPHVVDJHLV³*RRJOHSLQJIDLOHG´WKen you need to recheck the cabling. Also
some Router settings require special settings, these are can be entered by pressing the
, and the following screen appears:
Furthermore, experience from customer installation shows, that some routers requires the
IP address to be renewed every hour, this might cause problems for the Electronic
Housekeeper. Therefore, we recommend either to change the frequency to once per day
or to give the Electronic Housekeeper a permanent IP address via the router settings.
Page 61 af 67
Using the Netgear Universial Wireless N Adapter, you follow these steps:
1.
2.
3.
4.
5.
6.
Connect the Netgear adapter to your computer via an Ethernet cable.
Open a browser and wait until the Netgear adapter login page appears
Log into the Netgear adapter
Connect to you VLAN network
Save the settings
Connect the Netgear adapter to your Electronic Housekeeper via the
Ethernet cable and power the Netgear adapter via the USB power supply
cable to the Electronic Housekeeper
7. Repower the Electronic Housekeeper. Go to set-up, network and press
to see if the connection to the Electronic Housekeeper server is
established.
For more information we kindly refer to the Netgear manual. Also you can follow this link
on YouTube http://www.youtube.com/watch?v=Cgg8YgnmG7A&feature=related
does not appear: Repower the Netgear adapter.
³*RRJOHSLQJIDLOHG´ Sometimes it takes a while before the Netgear is ready for the
Electronic Housekeeper to use. Select
Netgear adapter.
and select
Page 62 af 67
to reconnect to the
Media
Getting the music from a network hard disc;
x
x
Enable the music free to use for the Electronic Housekeeper.
Add the library on your Electronic Housekeeper.
The Electronic Housekeeper needs free access to your music, and no user ID and
password can be used.
How to make your music free to use for the Electronic Housekeeper:
x
Find the music library on your PC or your network.
x
Right click on the library and select sharing and security. Depending on your
Windows system the next pages may look like:
or
Page 63 af 67
x
x
6HOHFW´VKDUHWKLVOLEUDU\RQWKHQHWZRUN´RU´VKDUHWKLVOLEUDU\´
Right click and select properties and security
Select all. Hereby, you open your music library for everybody on your network to play
music from your library, but not editing your music.
How to add the music library to the Electronic Housekeeper:
x Right down the name of your FRPSXWHUE\SUHVVLQJVWDUWDQGULJKWFOLFNRQ³WKLV
FRPSXWHU´+HUHDIWHUWKHIROORZLQJVFUHHQZLOODSSHDULQWKLVFDVH,%0
x
On the Electronic Housekeeper you need to key in where the music is stored on
\RXUQHWZRUN6HOHFW³VHW-XS´³PHGLD´.
Now the following screen will appear:
Page 64 af 67
x
3UHVVDQG³DGG´DQGWKHIROORZLQJVFUHHQZLOODSSHDU
x
7KHDGGUHVVKDVWREHOLNH´\\Computername\'LUHFWRU\´RSWLRQDOO\ZLWKDQDPHRID
subdirectory. Example: \\ibm03\musik\rock
Once added, then please check thHOLEUDU\E\SUHVVLQJ´&KHFNSDWK´3OHDVHQRWLFH
that this function only checks the path, not if the music is free to use or not.
x
Necessary music structure of you library
The Electronic Housekeeper is able to play music from your library with the following file
structure:
In order for the Electronic Housekeeper to display the cover of a CD, you need to store the
cover pictures in JPEG or PNG with a maximum size of 200 x 200 pixels. Most of the
media players today automatically find this information when copying a CD while being on
the internet at the same time. You are also able to add these pictures later on.
Page 65 af 67
IP Phone
The IP Phone set-up only applies for those Electronic Housekeeper packages including IP
communication.
The basic settings are:
The information is provided by your IP phone supplier.
Page 66 af 67
Date and time
Date and time is automatically updated in the Electronic Housekeeper based on the time
zone you are in. However, you are also able to manually to select date and time.
NB: If the time and date is years away from actual time and date, it is necessary manually
to set time and date.
Page 67 af 67