1
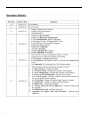
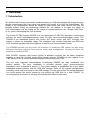
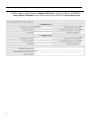
IP PBX
PX0050
User Manual
1
2
3
4
5
1. Overview
1.1 Introduction
We believe that the next generation networks based on VoIP technologies will change the way
people communicate with each other and people will benefit a lot from the technologies. The
usage of the technologies should be simple to most users; the users should only find the
benefits without facing the technology barriers. So, our mission is to make the usage of
VoIP technologies just as simple as the usage of normal telephone set. “Simple is the best”
is our goal in developing the VoIP products.
The Future IP PBX system PX0050 is a next generation IP PBX that provides a cost-saving
solution for small business/enterprise users on their telecommunication/data needs. The
PX0050 is an embedded system with built-in SIP proxy server and NAT functions that
makes it perfect for enterprise usage. The enterprise can combine both data and PBX and
VoIP functions together with this single box to treat it as a Communication Center.
The PX0050 provides not only basic call functions on traditional PBX system but also many
advanced functions including voice mail to email, web management, roaming etc that’s not
possible on traditional PBX.
With PX0050, company with branch offices in different countries can be easily combined
together to work like a virtual single office through internet. PX0050 can also register to an
ITSP vendor to let all offices share the benefits of the services from ITSP.
The two most important considerations of designing PX0050 are easy installation and
system stability. The easy installation is provided through some auto-provisioning
procedures and is detailed in section 2. The system stability is established by a very stable
embedded system platform and the USB disk storage. Since all the system configurations
(including voice mail) are stored in the USB storage, if in any chance that the system damaged,
you could restore the whole system by just putting the USB disk to a new PX0050, no
re-configuration is needed. In this way, the maintenance effort is minimized.
6
7
- Least Cost Call Routing (20)
- Call Detailed Record (CDR)
- User Management via Web Browser
- Call/Pickup Group
- Codec: G.723.1(6.3k/5.3k)*, G.729A/B, G.711(A-law/U-law)
- Display 200 Registered User’s Status: Unregistered / Registered / On-Call
- Outgoing Call Block List (10)
- Register to Other PX0050
- Remote Office Support
- Interoperable with Other SIP Devices
Call Features
- Call Forward Immediate
- Call Forward on Busy
- Call Forward on No Answer
- Do Not Disturb (Forward to VM)
- Direct Inward Dialing (DID)
- Call Pickup
- Call Park
- Call Retrieval
- Caller ID
- Roaming Extensions
- Music on Hold / Music on Transfer
- Call Queuing
- Call Recording*
- SMS Messaging*
Additional Features when used with VanAccess IP-Phones
- Call Transfer (Attended and Blind)
- Call Hold
- Call Waiting
- Dial By Name
- Three-way Calling
- Intercom*
- Paging*
- Distinctive Ring*
- IP-Phone Downloading the Configuration Automatically (TFTP)
- IP-Phone Downloading the Company Phone Book Automatically
8
(Notice: the items with ‘*’ is available for future release)
9
1.3 Hardware Specification
Table 1. Hardware Specification of PX0050
10
2. Basic Installation
PX0050 is designed to be installed easily. Before installation, connecting a computer or a
Notebook PC to the LAN port of PX0050, setting the network environment of the computer to
be static IP with IP address 192.168.1.xxx (could be for example 192.168.1.100). Then log into
PX0050 with the web browser on the connected Notebook/PC. The default value of the LAN
IP of PX0050 is 192.168.1.1.
There are only three things that must be followed to let the PX0050 work:
1.
Configure the LAN IP of PX0050 – if there is already another DHCP server (another
NAT/Router device) existed in the LAN network, you must make sure that they are
not using the same sub networks; otherwise you need to change the LAN IP of
PX0050 to a different sub network.
2. Configure the WAN IP of PX0050 – depends on the internet connection of the office,
you can configure the WAN IP as PPPoE, DHCP or static IP.
3. Configure the users of the PX0050 – the user management page of the configuration
will allow you to determine the number/password and other things that you needed to
let the IP Phone register to this PX0050. For more detailed configurations, please go to
section 2.2.
After the three basic configurations, you can install the IP Phone on the LAN network, the
IP Phone will automatically find this PX0050 and get its user configuration and function
immediately. Of course, there are something needed to be noticed to let this auto-installation
work correctly, please go to section 2.2 for detailed description.
Figure 1 The installation environment of PX0050 (PX0050 used as a IP PBX only)
11
As shown in Figure 1, it’s very possible that the office already has a NAT/Router for internet
connection, so we had better to have another internet connection for PX0050. In this way, the
data traffics from PC are handled by the NAT/Router and voice packet traffics from IP Phones
are handled by PX0050, and these two kinds of packets will not interfere with each other, the
voice quality will be guaranteed.
(Please notice that the PX0050 not only has the IP PBX and SIP Proxy server functions, it
also has the NAT/Router function inside. You can let PX0050 to work as a NAT/Router for the
computers on your office, or you can just let PX0050 work as a pure IP PBX and let other
NAT/Router device to do the NAT function for the computers on the office. Our
recommendation is to just let PX0050 work as a pure IP PBX to guarantee the voice quality.)
The basic installation steps could be more detailed in the following two sections 2.1 and 2.2:
12
2.1 Network Setup
Once your PC has configured a static IP address 192.168.1.xxx (for example 192.168.1.7),
you can log into the PX0050 (default IP address 192.168.1.1) web server with the username
root and password 1234. (Please notice that the default mode of PX0050 can only provide
DHCP service to IP Phones, not to Notebook/PC. Notebook/PC can not get IP address from
PX0050 by DHCP). The Status page will be displayed.
Click the Network Setup item on the main menu; you will see the following web page.
13
1.
LAN: You can change the LAN IP Address and Subnet Mask of the PX0050 here.
If there is already another DHCP server or another NAT/Router device existed in
the LAN network, you must make sure that they are not using the same sub
network.
2.
WAN: You can configure the WAN IP as PPPoE, DHCP or static IP depending on
the internet connection method provided for the PX0050 in the office.
3.
NTP: To get the real time from internet, you need to choose the correct Time Zone
of your area. If the default NTP servers cannot work in your area, you have to find
the workable NTP servers and set the values in these fields. (In almost all cases, just
use the default NTP server and everything should be fine).
14
2.2 User Management
To let the IP-Phone register to PX0050, you need to set the user accounts of all the IP
Phones to be installed in the User Mgmt. page.
By clicking the IP PBX link, the submenu will expand. Then click User Mgmt., you can see
four default users shown in the web page.
Some items/checks must be explained below:
1.
DHCP Only for IP Phones
If this check box is checked, the DHCP server in this PX0050 will only provide IP
address to IP Phones in this user management page, the PC in the same network will
not be able to get any IP address from PX0050. In this way, as depicted in Figure 1,
the voice packets from IP Phones will go through PX0050 and data packets from
Notebook/PC will go through other NAT/Router. The default value for this field is
checked.
If you want to use the PX0050 as both IP PBX and NAT/Router for the office, you
need to uncheck DHCP Only for IP Phones checkbox. The PX0050 will assign IP
address to IP Phones and Notebook/PC in the office network. Fig 2 depicts this usage.
But this kind of usage is not recommended.
15
Figure 2 PX0050 used as both IP PBX and NAT/Router
2.
3.
4.
Index: the sequence number in this list of the users (IP Phones) accounts.
: check this box for the items that wanted to be deleted together.
Call Status: this field displays the call status of the IP Phone, red light means
unregistered, green light means registered successfully, and yellow light means
registered and on-call.
5.
Disp. Name: the display name of the IP Phone account. Max allowed length is 32.
6.
Number: the user number of the IP Phone account. Max allowed length is 64.
7.
Password: the password of the IP Phone account. The allowed characters for the
password are all digits. Max allowed length is 64. This is also the password for
accessing the voicemail records for this account.
8.
Call Group: the call groups this IP Phone belongs to. An IP Phone can belong to
multiple call groups. The purpose of assigning IP Phones to some call groups is for
the pickup usage as explained in the next item below.
9.
Pickup Group: an IP Phone can have multiple pickup groups. Any extension IP
Phone can only pickup the call of another ringing extension when the ringing extension
is in one of the pickup groups of this IP Phone.
10. Hunt Group: an IP Phone can belong to a maximum of 5 hunt groups. This
feature allows multiple users to be contacted by dialing into one configured hunt
group number.
16
Figure 3 the relationship of call group and pickup group
As shown in Figure3, IP Phone #103 belongs to call group #1 and #2, suppose that its
pickup group is #1, and then it can only pickup the calls of #101, #102 and #104. And
suppose that IP Phone #101 has pickup groups #1 and #2, and then it can pickup calls
of every IP Phones in this figure.
11. Call Type: PX0050 will automatically detect whether the IP Phone is registered from
this office (displayed “local”) or from another office (displayed “remote”).
12. IP Port: this field will show the IP address and port number of the registered IP Phone.
13. APS: the field when set to “YES” will enable the auto-provisioning (auto-installation)
of this specific IP Phone, the PX0050 will give the user accounts to the specific IP
Phone
(identified by the MAC address), and thus the IP Phones could be installed
without any configuration.
14. VMWI (new/old): the number of new and old voice mails of this extension IP Phone.
The following sections will detail the possible installation methods (manually or
automatically) of PX0050 and IP Phones step by step:
17
2.2.1 Install IP-Phone Automatically
If you purchased a batch of IP-Phones with the PX0050 at the same time, you can install all
these IP Phones automatically without doing any configuration on each IP Phone, you just
need to do some configurations on PX0050 only.
The following steps will lead you to do this automatic installation step by step:
1. Click on Batch Add button, and the following page will appear.
18
2.
Fill in the First Number, Number of Users and Password fields. The system will
automatically generate some user accounts with alphabetically increased user name
and same password. If you want all the IP-Phones to have different password, just
check the Auto-increase check box.
3.
The Call Group and Pickup Group check boxes could be multiply selected. You can
set the IP Phones to belong to some Call Groups, and let the IP Phones to pick up the
call of some Pickup Groups. These two settings are independent. Please refer to
Figure3 for more detailed illustration.
4.
Do Not Disturb: When the PX0050 receives SIP response 486 from the IP Phone,
it can forward the call to the voicemail or will reply the 486 to the user that will cause
the IP-Phone busy.
5.
Enable/Disable the Call Forward Immediate/Call Forward on Busy/Call Forward
on No Answer settings.
6.
Fill in the start MAC address of all the IP Phones in the MAC Address field. This
field will only be used when the DHCP Only for IP Phones is enabled or APS field
is enabled.
When DHCP Only for IP Phones is enabled, the DHCP service of PX0050 will only give
DHCP address to the device with this MAC address.
When APS field is enabled, PX0050 will generate the auto configuration file to the IP
Phone with this MAC address.
7.
Choose the APS to Yes; the IP-Phone will then be able to get the individual
configuration from the PX0050 and work automatically. If the user is the local user, it
will get the TFTP server IP address and auto configuration file via DHCP header. If the
user is the remote user, you have to enter the WAN IP address of PX0050 to the IP
phone web page manually.
8.
Fill in the e-mail server of the office; this is for voice mail to email service usage.
9. Click Apply to generate all the user accounts of all the IP Phones back to the main
menu.
10.
11.
12.
Make sure that DHCP Only for IP Phones is checked. This will ensure the PX0050
only offer the IP address to the following users. This is the recommended setting
when there is another DHCP server existed in the same network.
Click Apply to save the settings.
You can now install all the IP Phones in the network of the office, and the IP
Phones will automatically find out the PX0050 and be ready for call.
19
19
2.2.2 Install IP-Phone Manually
Other than the automatic installation of IP Phones, you could also install IP Phone manually.
The manual installation steps for IP Phone and PX0050 are detailed in the followings:
IP-Phone settings:
On the IP Phone, you need to at least set the user account and proxy server address
to let the IP Phone register to the PX0050 manually. Suppose that your IP-Phone is
with number/password as 101/101, and then just fill in this account into the IP Phone.
The default IP address of PX0050 is 192.168.1.1, so, just key in this IP address as the
proxy server address field in the IP Phone. The IP-Phone network type is better set to
be DHCP type.
PX0050 settings:
On the PX0050, you need to add this user account to allow the IP Phone to register
into it. By clicking the Edit button on the 001 row, the following page will pop-up. The
MAC address field is needed if the IP Phone wants to get IP address from PX0050 by
DHCP.
20
2.2.3 IP Phone Registration and Call Status
After some IP Phones installed, whether automatically or manually, the registration status
of all the IP Phones are displayed in the User Mgmt. page as shown in the figure below. If the
IP Phone is registered to the PX0050 successfully, the Call Status field of that IP Phone will
be green light. Red light means unregistered and yellow light means registered on on-call.
21
2.2.4 Two-Level Management
PX0050 supports two levels management – administrator and user. The administrator can
configure everything in the IP-PBX, while the user can only configure his setting or view his
status. For each legal user, he can login the PX0050 with the registered number and
password. The following page shows the menu structure when user 101 has login into the
PX0050 successfully.
22
3. DHCP Server Configuration
By clicking the DHCP Server page, you can configure the DHCP server of the PX0050.
You can specify the DHCP Server IP Pool Start IP and DHCP Server IP Pool End IP. Also
you can specify the WINS Server (for Windows).
PX0050 could possibly get the DNS server from ISP (using PPPoE or DHCP), if you want
this DNS server information passed to DHCP client, you can check on Provide Real DNS
Server option.
Notice: this DHCP server configuration will work for both Notebook/PC and IP
Phones if the “DHCP only for IP Phones” box in User Management is disabled.
If the “DHCP only for IP Phones” box in User Management is enabled, this DHCP
server will work only for IP Phones.
In the Dynamic DHCP Client List, you can see the active DHCP client lists.
23
4. IP-PBX Settings
In the following sections, all the IP PBX related functions will be introduced.
4.1 System
The System settings are for the IP PBX related basic parameters, including the following
parts.
General
Voice Mail
Call Forward
Call Park
24
4.1.1 General
WAN IP: displayed current WAN IP address of PX0050.
LAN IP: displayed current LAN IP address of PX0050.
Port: The PX0050 works as a SIP proxy server for the other SIP devices, any SIP devices
can register to PX0050 to the WAN IP or LAN IP addresses, you can change the port of
this proxy server by modifying the Port field in the IP PBX Configuration page. The default
value is
5060. The allowed value for this field is between 1 and 65535.
RTP Port Range: This is the range of ports used by the PX0050 for RTP transmission
and reception. All the calls routed through PX0050, including call to auto-attendant, will
have the RTP port in this range.
Remote/PBX Codec: PX0050 will determine the remote call codec by this selection. Also
the IP Phone will use this codec to access the voicemail and IVR.
DTMF: This is the DTMF relay detection method used by PX0050 when a call is connected
between registered devices. PX0050 cannot support Inband DTMF when the
Remote/PBX Codec is G.723 or G.729.
Authentication: This field can determine if the other SIP devices needed to be
authenticated if they try to register to PX0050. If this field is enabled, only those devices
with the correct accounts listed in the User Management page are allowed to register into
PX0050
Concurrent Calls per User: This is the max allowed calls for a single IP Phone in the
same time. If want the call waiting function to work, set this filed to a value bigger than two.
Maximum System Parallel Call: This is the max allowed calls for the whole PX0050
system in the same time, that includes inter-extension calls and incoming and outgoing
calls. The allowed value for this field is between 1 and 60.
Inter-PBX Call In Prefix: This is the prefix number for incoming call from other PX0050,
with this prefix, the calls between PX0050 could be like an inter-extension calls. The way it
works like this - the dialed number outside of the other PX0050 will be prefixed with this
prefix number , and before incoming into this PX0050, this prefix number will be removed,
and call into the specific extension number.
25
4.1.2 Voice Mail
Send Voicemail to E-mail: You can send the voicemail to your e-mail account by
enabling this option.
Go to Voicemail after Ringing: You can set the ringing time before go to the
voicemail.
Maximum Time of a Voicemail: You can set the maximum recording time length of a
specific voicemail. The allowed value for this field is between 10 and 254 seconds.
Maximum Time of Voicemail per User: You can set the total time length of all the
voicemails for a single user. The allowed value for this field is between 10 and 254
seconds.
Maximum Time of Voicemail for System: PX0050 can store up to 1200 seconds of
total voicemails in the system DRAM.
Maximum Time of Voicemail for USB: If the external 512 MB USB disk is plugged
into the system, PX0050 can store up to 12000 seconds of total voicemails in this USB
disk.
Local Voice Mail Access Number: By dialing 9999 from your IP Phone, you can
access this IP Phone’s voicemail records. The IVR system will ask for a password, just
press the password of the SIP account to access your voicemail records. This local
access number could be changed.
Global Voice Mail Access Number: By dialing 9998 from any other IP Phone, you can
still access your own voicemail records. The IVR system will first ask for your mailbox
number, just press the extension number of your IP Phone. The IVR system will then ask
for a password, just press the password of the SIP account to access your voicemail
records. This global access number could be changed.
26
4.1.3 Call Forward
PX0050 can enable/disable some call forwarding functions for the extension IP Phones
by dialing some digits on the extension IP Phone. First off-hook the IP Phone, after
hearing the dial tone, presses the specific digits, and then presses a ‘#’ digit. Notice that
the IP Phone could also have some call forwarding settings on its own menu
configurations, both of IP Phone’s and PX0050’s call forwarding could work
independently.
Call Forward Immediate Enable:
Enable the call forward immediate function of each IP Phone by pressing the specific
digits on the IP Phone followed by the extension number to be forwarded, and then press
a ‘#’ digit. (This procedure must be done when the IP Phone is off-hooked and heard the
dial tone). You can also enable this function through the menu configuration of the IP
Phone device. The default value for this function is *1.
Call Forward Immediate Disable:
Disable the call forward immediate function of each IP Phone by pressing these specific
digits on the IP Phone, and then press a ‘#’ digit. (This procedure must be done when
the IP Phone is off-hooked and heard the dial tone). You can also disable this function
through the menu configuration of the IP Phone device. The default value for this
function is *2.
Call Forward on Busy Enable:
Enable the call forwarding on busy function of each IP Phone by pressing the specific
digits on the IP Phone followed by the extension number to be forwarded, and then press
a ‘#’ digit. (This procedure must be done when the IP Phone is off-hooked and heard the
dial tone). You can also enable this function through the menu configuration of the IP
Phone device. The default value for this function is *3.
Call Forward on Busy Disable:
Disable the call forward on busy function of each IP Phone by pressing these specific
digits on the IP Phone, then press a ‘#’ digit. (This procedure must be done when the IP
Phone is off-hooked and heard the dial tone). You can also disable this function through
the menu configuration of the IP Phone device. The default value for this function is *4.
Call Forward on No Answer Enable:
Enable the call forward on no answer function of each IP Phone by pressing the specific
digits on the IP Phone followed by the extension number to be forwarded, and then
press a ‘#’ digit. (This procedure must be done when the IP Phone is off-hooked and
heard the dial tone). You can also enable this function through the menu configuration of
the IP Phone device. The default value for this function is *5.
27
Call Forward on No Answer Disable:
Disable the call forward on no answer function of each IP Phone by pressing these specific
digits on the IP Phone, then press a ‘#’ digit. (This procedure must be done when the IP
Phone is off-hooked and heard the dial tone). You can also disable this function through
the menu configuration of the IP Phone device. The default value for this function is *6.
Call Pickup Number:
This is the digits for any IP Phone to press (after off-hooked) to pickup a call of the other
ringing extension on the same pickup group. Remember to press a ‘#’ digit after the
specific digits. The default value for this function is *7.
28
4.1.4 Call Park
Call Park Number:
This is the digit(s) for any extension IP Phone to press during a call conversation to park
this call, a following ‘#’ digit must be pressed, then, a retrieve number (9900~9910) will be
heard on the phone, . After you walk to another IP Phone, you can dial the retrieve number
you just heard in the parked IP Phone to retrieve back the previous call conversation. The
default value for this Call Park Number is 9.
Call Retrieve Number:
This is the retrieve number range the user will heard from the phone when parking a call.
Parking Time:
This is the maximum allowed parking time for the parked call. The default value for this
function is 30 seconds.
29
4.2 Proxy Server
The Proxy Server page includes the following parts:
IP-PBX Behind NAT
Register Expire
Proxy Server
If PX0050 has the private WAN IP address (behind the NAT), you may need to set
IP-PBX behind NAT to Yes, and enable the SIP Keep Alive settings. If you ITSP cannot
support the private IP address registration, you need to enable the Stun Server Settings. You
should turn on Stun Server or Outbound Proxy Settings according to the ITSP instructions.
The settings in IP-PBX behind NAT and Register Expire are effective for all the items in the
Proxy server settings.
If the WAN IP address of the PX0050 is a public IP address, just set IP-PBX behind
NAT to No.
30
4.2.1 IP-PBX behind NAT
IP-PBX behind NAT: If your IP-PBX is behind NAT, please select this value to Yes.
Stun Enable: You can enable or disable these Stun settings by clicking on the checkbox.
Stun Server: You can fill in the stun server FQDN or IP address in this field.
Stun Port: You can fill in the stun server port in this field. The default value is 3478.
Stun Status: If PX0050 can connect to the stun server, this will show the green light. SIP Keep
Alive Enable: You can enable or disable this option by clicking on the checkbox. You will need
to enable this only when the PX0050 is put behind another NAT device.
SIP Keep Alive Period: If you enable the keep alive, you can fill in the period in this field. The
PX0050 will periodically send out a small SIP message to keep the signal path between PX0050
and the Proxy Server to prevent another NAT device from disconnecting this path.
When you complete the configurations, you can press Apply to save all the settings. The system will
restart to take the new settings effect.
4.2.2 Register Expire
Register Expire Period: You can fill in the register expire period in this field. The PX0050
will periodically re-register to the Proxy Server.
31
4.2.3 Proxy Server
The PX0050 works as a SIP proxy server for the other SIP devices, any SIP devices can register
to PX0050 to the WAN IP or LAN IP addresses. The PX0050 can also register to other PX0050 or other
SIP Proxy server on this setting. The system can allow up to 8 registrations to other proxies.
The fields of each registration item are explained below:
Reg: this field displays the registration status of the Proxy Server, green light means registered
successfully.
Name: this is the name of this registration. And this name will be used in the Call Route settings.
User Name: the user name of this registration item.
Password: the password of this registration item.
Auth. ID: the authentication ID of this registration item.
Proxy IP: the IP address of the registered SIP proxy server.
Proxy Port: the port number of the registered SIP proxy server.
Outbound Proxy: if ComCenter is behind the NAT, you should enable this option. This will show
the IP address and port of the registered SIP outbound proxy.
DID (Direct Inward Dialing): Any calls originating from the registered ITSP to PX0050
will go into the auto-attendant or direct to the selected user or hunting group.
Action: You can modify the existing entry by clicking Edit button.
After Delete/Add/Edit of any items, you need to press the Apply button to save the configurations
to the system. And all the settings will work immediately after pressing the Apply button. Do not need to
restart the system to let this settings work.
For some ITSP, you cannot send the User Number to make the off net call. You can see the Caller
ID Delivery when you Add/Edit proxy server entry. In this case, you need to select Anonymous as the
Caller ID Delivery.
If you delete the Proxy Server item, the Call Route items associating with the Proxy Server will
be deleted at the same time. PX0050 will prompt a message box to allow you to confirm the
deleting.
32
4.3 Gateway
PX0050 can make the off-net call either via the ITSP Proxy or the FXO gateway. Before you
can make the successful call, you have to add the Gateway entry or the Proxy Server entry and set the
proper Call Route. In this section, we’ll describe how to add a FXO gateway entry.
By clicking Add button, you’ll see the Add Gateway page. Fill in the
Name, Gateway IP, Gateway Port, Number of Analog Ports (Physical FXO Ports) and press
Apply. This Name will be used in the Call Route, and it must be a unique for each Gateway.
If the PX0050 is behind NAT, we recommend you to connect the FXO gateway to the WAN
side of the IP-PBX. If the PX0050 has the public IP address, we recommend you to connect the
FXO gateway to the LAN side of the IP-PBX.
33
Back to the Gateway page, you can see the new entry, and press Apply to save the settings to the
flash. If you delete the Gateway item, the Call Route items associating with the Gateway will be deleted
at the same time. PX0050 will prompt a message box to allow you to confirm the deleting.
34
4.4 Call Route
The extension of a PX0050 can call out to other extensions of other PX0050 or to other SIP proxy
server or to other gateway device by setting the call route rules in this configuration page. For a called
number, when the first few digits match the pattern of a call route, this call will be routed to a destination
in this call route rule.
The Call Route settings make many PX0050 to be able to group together to become a much larger
system and make PX0050 to bundle to other SIP service system and to call to PSTN through the
gateway devices.
The default route entry always exists in the PX0050 and the user cannot delete it. If the
outgoing call cannot match any other call routes, it will match the default route.
The fields of all items are explained below:
Name: this is the name of this route entry.
Pattern: this is the number that when the first few digits a call number matched will be routed
specifically. For the call pattern, the ‘x’ is used to represent the wildcard for one digit, and ‘.’ is used
to represent the unlimited length of wildcards.
Destination: the destination of this call route item, this could be the Proxy Server or Gateway
name.
Drop Digits: the first few digits of the dialed number will be removed after going out of the
PX0050 when the dialed number matches this pattern. This field is the length of the
removed first few digits.
35
Prefix: this prefix number will be added to the dialed number after going out of the PX0050
when the dialed number matches this pattern.
You can press Add button to add the new Call Route entry. By pressing Add, you can see the
following page. The following steps will guide you how to setup a Call Route entry.
1.
2.
Fill the 9. in the Pattern field, any call begin with digit 9 will route to this entry.
Then choose the existing Proxy Server Name from the dropdown combo box, or select
the existing FXO Gateway from the combo box.
3.
Fill in 1 in Drop Digits field.
4.
We don’t want to add any prefix to the outgoing number, so leave Prefix field empty.
5. Press Apply to go back the main page.
After Delete/Add/Edit of any items, you need to press the Apply button to save the configurations
to the system. And all the settings will work immediately after pressing the Apply button.
36
4.5 Block List
By dialing 9991, you can record your customized Block List announcement. You can change this
number by typing the new number and press Apply.
If you want to block some certain outgoing calls, you can add the block number here. For example,
if you want to block any number that starts with 0204, you can add the block pattern 0204.. This setting
will block the number 0204x/0204xx/0204xxx etc, but it cannot block 0204. The Name must be unique
for each Block List entry.
37
4.6 Call Status
The Call Status page will show all the users’ call status in this page. When the operator wants to
transfer the call, he can know each user’s call status in this page. Red light means the user is unregistered.
Green light means the user has registered. Yellow light means the user has registered and on the call.
38
4.7 Hunt Group
This feature allows multiple users to be ringed by dialing into one configured hunt group number.
Any call to the hunt group number will be forwarded to all the users configured in that number based on
the mode of the hunt group. Hunt Group can have three modes, Round Robin, Parallel and Random.
All hunt group members will be ringed one by one in Round Robin mode. For example, if Sale’s Group
contains members 101, 102 and 103, the first incoming call will ring 101, then 102, then 103. The second
call will ring 102, then 103, then 101. All the users will be ringed in the same time in Parallel mode.
PX0050 will ring the members randomly in Random mode.
By pressing Add button, you can see the Add Hunt Group page.
1. Fill the hunt group name in the Name field. The name should be unique for each hunting
group.
2. Give a hunt group number that is not used by any other users, and fill this number in
Number field.
3. Select the Hunt Mode from the combo box.
4. Fill in the Hunting Time. For the Round Robin mode, the system will ring each member for 7
seconds and pause for 2 seconds. The minimal hunting time cannot be less than #members*9
seconds. In the Random mode, it’s similar with the Round Robin mode. If you set the hunting
time to 30 seconds, it will ring 30/ (7+2) members in each incoming call. In the Parallel mode,
the system will ring the group members 10 seconds and pause for 5 seconds periodically. i.e. If
you set the hunting time to 30 seconds, it will ring the hunting group 30/ (10+5) times.
5.
Select the group members from the left box to the right box.
6.
If no one will answer the call after the hunting time, the system will go to one of the
member’s voicemail. You need to choose one member from Go to VM after Hunting Time
combo box.
39
7.
40
Press Apply to go back the main page.
4.8 CDR
The CDR (Call Detailed Record) of PX0050 can save & display some information of all the
calls, successful or failed etc.
The fields of each CDR items are explained below:
Caller: this is the calling party number.
Callee: this is the called party number.
Start Time: the time when the caller starts the call.
Answer Time: the time when the callee answered the call, if the call is not answered, this
field will be empty.
End Time: the time when any party hangs up the call.
Total Duration: the total duration of the call from Start time to end time.
Bill: the total duration of the call from Answer time to end time
Call Action: shows the result of the call - answered or busy.
41
4.9 Auto Attendant
PX0050 provides the flexible Auto Attendant architectures. The system will play the different
message according to the Service Time configurations. If someone dials into PX0050 in the
business hours, it will play the welcome message that will say that please press 0 for native
language or press 9 for the operator. If the call is coming during the off-duty period, it will
play the off-duty message that will say that it’s the after business hour and please dial the
extension number directly. The digit 0 or 9 is called Service Digit, the user can record the
customized message that prompt the different digit ranging from 0~9 for different services.
This page is divided into three parts. The first part provides two numbers for auto attendant and
auto attendant recording.
The second part is the Auto Attendant Message List that allows the user to record 4
customized messages. The system provides default English and Chinese welcome and
off-duty messages. User can upload their own messages to replace the default messages.
The third part is the Auto Attendant Service Time List. User can add the service time range,
and select the associating message. System allows the user to add 6 service time entries.
42
4.9.1 Auto Attendant Recording
Auto Attendant Number:
By dialing 9997 from any extension IP Phone, you can listen to your customized auto
attendant announcement. This number 9997 could be changed.
Auto Attendant Recording Number:
By dialing 9990 from any extension IP Phone, user can record the customized auto
attendant announcement. The IVR system will direct you to record every sentences
needed for the
auto-attendant announcements, that include welcome message, off-duty message in
both English and native languages. This number 9990 could be changed.
43
4.9.2 Auto Attendant Message List
PX0050 provides 6 messages that can be played at different service times. There are
two default messages called Welcome and Off-Duty messages and 4 Custom messages. By
clicking the Edit button in the Welcome Message, the following page will be shown. Before
you can use the upload function, you must make sure the USB is mounted. The maximum
size of the voice file size is 200 Kbytes. The 200 Kbytes will allow you to upload 204.8
seconds G.729 voice file and 172 seconds GSM
file.
For each message, the system has reserved service digit 0 for the native language
service and the user can add 5 digits for different services. For Welcome message, it always
plays at the working hour. The system has reserved digit 9 for operator service and the default
operator’s extension is 100. You can upload the customized English and Native Welcome
message by browsing the .gsm or .g729 file in the local storage and upload to the system.
Once you have done all the changes, press Apply button to take effect.
44
4.9.3 Auto Attendant Service Time List
You can set six Service Time List entries. By clicking Add button, you can see the following
page. The following settings show the working hour is from 9:00~18:30 Monday to Friday. Any
call coming in this period will play the Welcome Message. Press Apply to back to the previous
screen and press Apply again.
45
45
For example, your company will be closed during Dec 25 ~ Dec 31 every year and you
want to play the Custome-1 message. After you have added this entry and press Apply
button, you can see the following page.
Unfortunately you can never the Custome-1 message during Dec 25 ~ Dec 31. The
system will always match the first entry of the service time and play the Welcome Message,
since the first entry has the highest priority when matching the rule. So you have to select the
second entry and press Up button to move this entry to the first priority.
Then you can see the following page. Press Apply to save the settings to the flash.
46
4.10 Upload Voice File
You can upload English/Native Invalid Message, English /Native Block List Message, Call
Queuing Message, and Music on Hold File via this page. Before you can use the upload
function, you must make sure the USB is mounted. The maximum size of the voice file size
is 200 Kbytes. The 200 Kbytes will allow you to upload 204.8 seconds G.729 voice file and 172
seconds GSM file.
If the PX0050 Remote/PBX Codec is G.711ulaw or G.711alaw, you have to upload the gsm
file to the system. If the codec is G.729, you have to upload the file with .g729 format. We’ll
show the details in Appendix VII.
47
5. NAT Advanced Configuration
PX0050 has the built-in Hardware NAT functions, so most of the NAT functions are
accelerated by the hardware. PX0050 provides the following NAT functions.
Access Control List
Virtual Server
URL Filter
Static Route
Special Application
DMZ Host
DoS
Dynamic DNS
Passthrough
UPnP
Ping Toolkit
Notice 1 : Section 5.1 to 5.11 are all related to NAT advanced functions of PX0050, these functions will work
when PX0050 is not only working as an IP PBX, but also working as a NAT/Router for the office.
But we recommend just use PX0050 as a pure IP PBX to guarantee the voice quality. So, if you
just use PX0050 as a pure IP PBX, then don’t need to do any configurations for section 5.1 to
5.11.
Notice 2: When PX0050 is used as a pure IP PBX, the WAN port IP address also needed to be configured so
that the PX0050 can be accessed by remote users or register to another proxy server.
48
5.1 Access Control List
With Access Control List, you can forbid/block a certain Notebook/PC from accessing
certain internet service. There are 8 different access control lists for user’s configuration. If you
want to generate the ACL log, you have to check the Generate ACL Log box on.
The following setting give the example of blocking a certain Notebook/PC with IP address
192.168.1.250 from doing the FTP access (port 21) to the internet.
49
5.2 Virtual Server
Virtual Server can be used to set up public server services on your network. When users from
the Internet make certain service requests on your network, the PX0050 can forward those
requests to computers that really have the service. For example, if you set the port
number 80 (HTTP) to be forwarded to IP Address 192.168.1.2, then all HTTP
requests from internet will be forwarded to 192.168.1.2.
You may use this function to establish a Web server or FTP server service through PX0050. Be
sure that you enter a valid IP Address. (You may need to establish a static IP address with your
ISP in order to properly run an Internet server). The packets will simply be forwarded through
the PX0050.
Enter the range of port numbers and the protocol type (UPD or TCP) that will be used by the
server service. Then enter the IP Address and port range of the real local server that will
handle the service requests.
There are eight virtual server entries for user configuration.
Click the Apply button to save the settings.
50
5.3 URL Filter
You can deny some Notebook/PC from accessing to some websites by listing them in
this “URL Filter” list. For example, if you want to deny all the Notebook/PC with IP addresses
from 192.168.1.2 to 192.168.1.254 to access the www.playboy.com website, you can do the
following settings.
51
5.4 Static Route
You will need to configure “Static Route” function if there are multiple routers installed
on your network.
The “Static Route” function let the PX0050 be able to direct some packets to go to
correct interface (LAN or WAN) when the packets were with destination IP address listed in
the “Static Route” list.
For example, if you have the following network hierarchy, you can configure the following
settings in the routing table.
52
5.5 Special Application
PX0050 has a natural firewall that rejects any unsolicited data from traveling into a computer
on the LAN network. Basically, if you didn't ask for the data, it isn't going to pass through the
firewall. A Special Application is one that breaks this rule. For some applications, you can
configure the PX0050 to allow them to pass inside PX0050 to a specific Notebook/PC by
setting this “Special Application” list, or a certain special application to pass through PX0050,
first, a trigger packet that has a destination port falling in the range between Trigger Start
Port and Trigger End Port must be sent from a Notebook/PC in the LAN side out to the WAN
side. Second, the packets of the special application from the internet must have the destination
port falling in the Incoming Port Range. These packets then will be forwarded to the
Notebook/PC that has sent the trigger packet.
53
5.6 DMZ Host
The DMZ Host setting can allow one local user to be exposed to the Internet with no
firewall protection. When a local user wishes to use some special-purpose service, such as
an Internet game or Video-conferencing, set the dedicated DMZ Port and click the Apply
button.
54
5.7 DoS
DoS (Denial of Service) Protection
When you enable this function, it will block most of the Internet attacks. This option is
enabled as default value.
55
5.8 Dynamic DNS
PX0050 supports dynamic DNS service. If the WAN IP address of PX0050 is dynamic and
public (PPPoE), you can use this service to let other Internet host to access PX0050 by its
dynamic domain name.
56
5.9 Passthrough
PX0050 provides the following pass through functions; you can let some specific types of
packets to pass through PX0050 without any modification of the packets. The types of
packets that could be enabled to pass through are PPPoE, IPv6, IPX, NETBIOS and IP
multicast. You can choose to enable some of these types to pass through by checking the Pass
through page.
57
5.10 UPnP
Universal Plug and Play (UPnP) is designed to support zero-configuration, "invisible"
networking, and automatic discovery for some devices installed inside the LAN network of
PX0050. The specific devices must have some UPnP application running to let this function
work. Window XP can support UPnP function. MSN version above 6.0 can use UPnP to learn
the NAT router’s WAN IP and thus traverse the NAT seamlessly. To enable the UPnP function,
just check on the box and press Apply to take effect.
58
5.11 Ping Toolkit
You can use the Ping Toolkit to allow PX0050 to ping another device in the LAN network or in
the Internet to check if the network link between PX0050 and the specific device are
connected. The results of the pinging will be displayed in this page. The following web page
shows the example of pinging “www.google.com”.
59
6. Log
In this setting, you can decide which kind of events to be logged and to view these
individually logged events.
There are five kinds of events that could be logged; they are system, ACL (section 5.1),
URL filter (section 5.3), New NAPT (newly opened port mapping) and PBX logs.
For example, if you want to log the system events, you need to check on this System Log
check box and pressing Apply button. Latter on, you could then press the View System Log
to see the logged events.
60
7. Management
7.1 Remote Management
Remote Management Port:
PX0050 allows you to do the remote management via the web browser. You can change
the remote management port by modifying this field. The default port number is 8080. If
you want to disable remote management through web, you need to enter 0 in this field.
Ping from WAN Side:
This feature is designed to prevent attacks through the Internet. When it is disabled, the
PX0050 will drop ICMP packets from the WAN side. The hacker cannot find the PX0050
by pinging the WAN IP address. The default value of this field is enabled.
61
7.2 Password
This setting allows you to change the web login password of the administrator account.
If you want to change the password, just click on Password page and type the new
password. Press the Apply button when you have done the input.
62
7.3 Upgrade
By clicking on the Upgrade page, you can do the following functions.
Firmware Upgrade:
The firmware of PX0050 could be upgraded if you have a newer firmware on your
Notebook/PC. Just press the Browse button on this page, a small window will pop up
that allows you to select the new firmware file in your PC. After the firmware file is
selected, press the Upgrade button to do the firmware upgrade. A progress bar will pop
up to display the upgrading status. The upgrade progress will take about 4~5 minutes.
Please don’t reboot the device during upgrade.
Backup Configuration:
By pressing Backup button, you can save PX0050’s current configuration settings into a file
in your PC. The saved filename is “config.dat”.
Restore Configuration:
The configuration of PX0050 could be restored from the backup configuration file you
stored previously with the file name of “config.dat”. You can press the Browse button to
select the backup configuration file name. Then, by pressing Restore button, the
configuration will be restored to PX0050. If the external USB disk is inserted and works
with PX0050, the new settings will be restored to the flash and external USB disk at the
same time.
Factory Default:
Press the Factory Default will restore the flash & external USB settings to the factory
default values.
System Restart:
Press the System Restart will reboot the system.
63
Appendix I - DHCP Server Function Notice
There are two web pages related to the DHCP Server options. One is DHCP Server
Status in the DHCP Server page (see section 4.0) and the other is the DHCP Only for IP
Phones in the User Management page (see section 2.2).
This appendix will illustrate the different combinations and results.
DHCP Server Status: Enabled / DHCP Only for IP Phones : Checked
-
The DHCP server in this PX0050 will only provide IP address to IP Phones with
MAC addresses listed in the user management page, the Notebook/PC in the same
network will not be able to get any IP address from PX0050. In this way, as depicted in
Figure 1, the voice packets from IP Phones will go through PX0050 and data packets
from Notebook/PC will go through NAT/Router. This is the default setting.
-
Under this situation, if the APS selection is checked, the IP Phone will also get the
auto-configuration information (file name) from DHCP packets, and the IP Phone
could be installed automatically.
DHCP Server Status: Disabled
-
The DHCP Server will not offer IP addresses to any devices that were connected to the LAN
network of the PX0050.
DHCP Server Status: Enabled / DHCP Only for IP Phones: Unchecked
-
64
The DHCP Server will offer IP addresses to any devices that were connected to the LAN
network of the PX0050. The devices could be IP Phones and/or Notebook/PC.
Appendix II – USB Disk Usage Notice
We recommend you to plug the 512 Mbytes external USB Disk to PX0050. There are two
very important benefits of using the USB disk:
1. The storage size of voicemail and CDR records is 10 times larger.
2. When under some terrible situation that the PX0050 damaged, you can get a
new PX0050 in a fastest speed and insert the old USB disk into it, the whole
configurations of the old PX0050 will be back, no need to worry about any
re-configuration and storage lost.
This appendix will describe the USB Disk behavior in more details.
Fresh USB Disk
-
When you plug a fresh USB Disk into PX0050, PX0050 will backup all current configurations to the USB
Disk in the booting time.
Load Setting Sequence
-
During system boot up, if the USB Disk is inserted and is not fresh, the system will load the settings
from the USB Disk; these settings will then be saved into system flash memory after boot up. If there is no
valid configuration in the USB Disk or the USB Disk is not plugged into the system, the system will load the
configurations from the system flash memory instead.
Configuration Synchronization
-
During the web page configuration, when the Apply button in each page is pressed, the new settings will
be saved into the system flash memory and USB Disk simultaneously.
Factory Default
-
When the Factory Default button in the management/upgrade page is pressed, the configurations in
system flash memory and USB Disk will be cleared to factory default values.
Don’t try to unplug the USB Disk at runtime
-
PX0050 does not support hot plug-and-unplug, so make sure that the USB Disk is plugged into the
system before power on. Don’t unplug the USB Disk during system runtime.
Persistent Storage
-
The CDR records and Voicemail when stored into the USB Disk, the storage could be
permanent.
The CDR records and Voicemail when stored into the USB Disk, the storage size could be much larger.
LED
-
65
When the system boots up and mount the USB Disk successfully, the USB LED will be on. Since the
system doesn’t support hot plug-unplug, the LED won’t be turned off.
Appendix III – How to make off-Net Calls (PSTN calls)
There are two ways to make the off-net calls (call to PSTN numbers). One is via other
proxy server and the other is via the local FXO gateway.
For method one, the PX0050 needs to register to a sip proxy server provided by a
service provider, this could be configured in the Proxy Server page (see section 4.2). The
following web page is an example of setting PX0050 to register to a proxy server
“sip.gossiptel.com”, and this service is named “gossiptel”.
Since a PX0050 could register to up to eight different proxy servers, so, there must be a
way to direct a call to go to the correct proxy server you desired to use. This is done through
the Call Route settings (see section 4.3). For example, as depicted in the following web page
of a call route setting, if you want to make the off-net call via “gossiptel” proxy server, you
have to dial 9 followed by the PSTN phone number. The PX0050 will direct this call to the
“gossiptel” proxy server and drop digit 9 before sending the telephone number to the proxy
server. The “gossiptel” proxy server will then call to the correct PSTN phone number.
In the reverse direction, if any user of the public proxy server dials into PX0050 by calling
the PX0050’s registered number, this call will enter into the Auto Attendant announcement
of PX0050 or the selected user.
66
67
The second method is to put a FXO gateway in the LAN network and there could be two
methods for configuring PX0050 to do the PSTN call:
a.
b.
68
Configure the FXO gateway to register to PX0050. If the FXO gateway registered to
PX0050 with the registered number as 0, then, any extension IP Phone can dial 0#
to first connect to the gateway, and then dial the desired PSTN number. This is a
two-stage dialing.
If you want to configure a one-stage dialing, a call route with destination IP address
pointed to the FXO gateway must be added in the “Call Route” list. The following
figure shows the sample configuration. In this way, the FXO gateway does not
need to register to PX0050.
Appendix IV –Auto Attendant Announcement
PX0050 provides the Auto Attendant function. When a registered IP Phone calls the
Auto Attendant Number (9997) or other user dials into the number that is registered to other
proxy server, the Auto Attendant announcement will be heard.
There are six default auto attendant messages as following:
1.
2.
3.
4.
5.
6.
Welcome message: Welcome to VanAccess Technology, please dial the extension number or press 9 for
operator, for native language service please press 0.
Busy message: Sorry, the extension number cannot be recognized, please check again or wait for
operator.
Off-duty message: We are sorry we cannot take your call now, please dial the extension number, or
press 0 for native language service.
Chinese welcome message.
Chinese invalid message.
Chinese after business hour message.
If you want to record your customized auto attendant messages, you can press 9990 to
record your messages.
69
Appendix V – Make a Call via HTTP CGI
PX0050 allows the user to make a call via the HTTP CGI. You can type in the following
cgi string in the web browser.
http://ipaddress/goform/call.asp?from=<exten>&to=<callerid>&timeout=<seconds>
http://ipaddress/goform/hangup.asp?from=<exten>
For example, you want to make a call from extension 102 to 5781019. You can type the
following cgi string. The system will ring the 102 firstly. After the extension 102 has pickup
the call, the system will ring 5781019. If the callee has not pickup the call in 30 seconds, the
system will terminate the call.
http://192.168.1.1/goform/call.asp?from=102&to=5781019&timeout=30
To hang up the call, you have to type the following cgi string.
http://192.168.1.1/goform/hangup.asp?from=102
70
Appendix VI – Call Park Procedures
We’ll demonstrate how to do the Call Park with SJ Phone in this appendix. SJ Phone is
the soft phone developed by SJ Labs. You can find the document from
http://www.sjlabs.com/sjp.html. Of course you can use other soft phones to do the call park
function without any problem.
Before you go into the following steps, we assume that you have installed the SJ
phone and registered to the PX0050 successfully. SJ Phone only supports G.711 codec, so
you have to set the PX0050 Remote/PBX Codec to G.711-uLaw or G.711-aLaw. For this
demonstration, we’ll set the SJ-Phone and PX0050 codec to G.711-uLaw.
Suppose we have the following architecture as Figure 4. The user 101 call 103, 103 park
the call and 102 retrieve the call. We would show how 103 park the call in the following steps.
102
101
WAN
LAN
103
Figure 4 the architecture for demonstrating Call Park procedures
71
Step1: 103 have received the incoming call from user 101, Press Accept button to accept the
call.
Step2: After you have accepted the incoming call, you will see the following display.
72
Step3: Press Hold button to hold the call.
Step4: Type 9 and press the Dial button to park the call.
73
Step5: Now you can see 2 phone calls shown on the screen and heard a number between
9900~9910 to retrieve the call. In this case, the retrieve number is 9900.
Step6: Now you have two calls, move the mouse to select the On-Hold 101 call.
74
Step7: Press the Transfer button and click the 9. Now the call has been parked successfully.
Step8: You can now walk to IP Phone 102, pick up the handset and dial 9900# to retrieve the
call.
75
Appendix VII – Upload Voice File Procedures
PX0050 allows the user to upload customized IVR or Music on Hold files via web page. If the
Remote/PBX Codec is G.711, you can upload the .gsm file to replace the default IVR. If the
Remote/PBX Codec is G.729, you can upload .g729 file. The upload files will be placed at the
USB disk, and the file size cannot exceed 200 Kbytes.
Many shareware or software can record the voice in .gsm format. We’ll use WavePad to
demonstrate the recording procedures. You can find the information of WavePad in
http://www.nch.com.au/wavepad/masters.html.
The following steps demonstrate how to record a file using the WavePad and how to
use the VanAccess G.729 encoder utility to convert the uncompress wave file to .g729 file.
Step1: Press the
76
button
Step2: Press OK button
Step3: Start to record the IVR till you press
77
button to stop recording.
Step4: Move the mouse
the recording window.
Step5: Click on
78
to
the
upper-right
to play the voice.
corner
of
the
window,
and
close
Step6: Move the mouse to File and select Save File As… menu to save the voice.
Step7: Type in the filename, select the extension to .GSM, and press Save button to save the
file.
79
Step8: Type in the filename, select the extension to .Wave, and press Save button to save the
file.
tep9: Choose the 8 kHz, 16 bits, Mono, 15 kb/second, PCM, and press OK button to save the
file. This will be the uncompress wave file format.
80
Step10: Then you can use G.729 encoder to convert the uncompress wave file to .g729 file.
81
Appendix VIII – How to Setup a FXO Gateway
You can connect the FXO gateway to the LAN or WAN side of PX0050. We recommend
you to connect to the PX0050 LAN side. There are many brands of FXO gateways that
can connect to the PX0050. We don’t want to demonstrate how to configure all the gateways to
work with PX0050. We just use Occtel Gateway as an example to show the configurations. If
you have problem in configuring your FXO gateway, please ask the customer service of your
Gateway vendors.
The FXO physical ports don’t need to register to PX0050 as the users. You just need
to follow the following three steps.
1.
[PX0050] Add the one FXO gateway entry in 4.3
2.
[FXO] Set the Hot Line No. of each port to 9997 that is the auto attendant number of
PX0050.
82
3. [FXO] Check on the checkbox of Enable SIP Proxy 1. Fill in the LAN IP of PX0050 to
Proxy Server IP/Domain and fill in the server port of PX0050 to Proxy Server Port
83