1
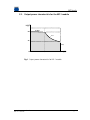
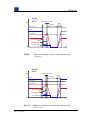
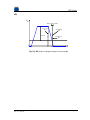
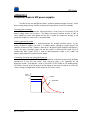
MPMP-1 DC Generator USER MANUAL Notice! This operating manual is required for the safe operation of the MP-1 Generators. Therefore, you should keep the operating manual close to the unit. MP Family Operating instructions for MPMP - 1 Generator Genera tor DC Generator HUETTINGER Electronic Sp. z o.o. Marecka 47 PL - 05-220 Zielonka tel: +48 22 761 38 00 fax: +48 22 761 38 01 [email protected] www.huettinger.com Operating Instructions for MP-1 Generator Rev. 3.1.1.4.P.07 Page 1 MP Family Headquarters HÜTTINGER Elektronik GmbH + Co. KG HUETTINGER Electronic Sp. z o.o. Bötzinger Straße 80 79111 Freiburg Germany Tel. +49 761 89 71-0 Fax +49 761 89 71-1150 [email protected] Marecka 47 PL-05-220 Zielonka Poland Tel. +48 22 761 38 00 Fax. +48 22 761 38 01 [email protected] HUETTINGER Electronic Inc. 111 Hyde Road Farmington, CT 06032 USA Tel. +1 860 255 65 55 Fax +1 860 255 64 23 [email protected] HÜTTINGER Electronic K.K. Shinyokohama Tobu AK bldg. 7F 3-23-3 Shinyokohama, Kohoku-ku, Yokohama city, Kanagawa 222-0033 Japan Tel. +81 45 470 3761 Fax +81 45 470 3510 [email protected] HÜTTINGER Electronics Ltd. 11H, Century Ba-Shi Building 398 Huai Hai Zhong Road Shanghai 200020-P.R. China Phone +86-21-63 85-12 38 ext 301 Telefax +86-21-63 85-16 60 [email protected] Operating Instructions for MP-1 Generator Rev. 3.1.1.4.P.07 Page 2 MP Family © 2007, HUETTINGER Electronic. All rights reserved. This manual is purposed to enable the reader to install and operate safely the equipment described below. Making copies of any part of this manual for any purpose other than these is a violation of Poland copyright law. In the interest of providing even better equipment, HUETTINGER Electronic reserves the right to make product modifications without notification or obligation. To the best of our knowledge, the information contained in this manual is the most accurate available as of the date on the front page. © 2007, HUETTINGER Electronic. To ensure years of dependable service, HUETTINGER Electronic ® products are thoroughly tested be among the most reliable and highest quality systems available. All parts and labour carry our standard 3-year warranty. For Customer Service or Support, call: HUETTINGER Electronic Sp. z o.o. tel: +48 22 761 38 00 fax: +48 22 761 38 01 [email protected] Returning Units for Repair Before returning any product for repair or adjustment, call HUETTINGER Electronic Service and discuss the problem with a representative service engineer. Be prepared to give the serial number of the unit and the reason for the purposed return. This consultation call will allow Customer Service to determine if the unit needs to be returned. Such technical consultation is always available at no charge. Operating Instructions for MP-1 Generator Rev. 3.1.1.4.P.07 Page 3 MP Family Table of contents page 1. Safety information 1.1. 1.2. 1.3. 1.4. Important information Personnel Safety standards profile Transport and storage 2. Explanation of symbols and notes 3. General information 3.1. 3.2. Electrical and mechanical specification 5. Installation 6. 8 11 13 Installation site Fusing Connecting the power supply 6.1. 6.2. 6.3. 6.4. 7 MP-1 block diagram Output power characteristic for the MP-1 module 4. 5.1. 5.2. 5 14 Connection terminals RS-232 terminal description Profibus terminal description External Interlock 7. Working with the Front Panel Console 17 8. Description of displayed data and settings 20 8.1. 8.2. 8.3. 9. Basic controls and readouts ON/OFF control User setup menu Interfaces 9.1. 9.2. 22 RS-232 communication protocol Profibus communication protocol APPENDIX A - Arc detection criteria. APPENDIX B - Presputter mode in MP power supplies. Operating Instructions for MP-1 Generator Rev. 3.1.1.4.P.07 Page 4 MP Family 1. Safety information 1.1. Important information Safe operating procedures and proper use of the equipement are the responsibility of the user of this system. The MP-1 Power Supply is designed to power industrial vacuum process chambers in PVD surface treatment technologies. Any other use, or any use beyond the foregoing, is deemed to be improper. The HUETTINGER Electronic company shall not be liable for any loss and damages resulting in such usage. Correct usage also includes: • compliance with all instructions from the operating manual, • adherence to inspection and maintenance intervals. 1.2. Personnel Only qualified personnel may work with the MP-1. "Qualified" means that the staff will be familiar with safe installation, maintenance and operation. All of the personnel working with this equipment must take precautions to protect themselves against possible electrical shocks or fatal injuries. They must be acquainted with the entire MP-1 operating instruction manual and understand all of its contents. Do not be careless around the equipment! 1.3. Safety standards profile The MP-1 Power Supply was designed and constructed in compliance with requirements included in the following standards and EC directives: • EN 60950: • EN 50178: • EN 61000-6-4: • EN 61000-6-2: 1992 "Safety of information technology equipment, including electrical business equipment" 1998 "Electronic equipment for use in power installations" 2001 "Generic standards -Emission standards for industrial environments" 2001 "Generic standards – Immunity for industrial environments” Operating Instructions for MP-1 Generator Rev. 3.1.1.4.P.07 Page 5 MP Family EC directives: • 73/23/EEC • 89/336 EMC Low Voltage Directive – Law for electrical equipment within certain voltage limits Directive as amended by 93/68/EEC – Laws relating to electromagnetic compatibility Check the external fuse value and grounding circuit before switching the mains on. Never unscrew the front terminal cover before switching the mains off. The positive output of the power supply must be connected to the chamber frame potential (must be grounded). 1.4. Transport and storage Transport MP-1 system must be firmly situated in a horizontal position. Storage Storage environments should be dry, free of aggressive vapors and not exposed to temperatures from beyond the 3k3 class range – EN 50178 (i.e.: -25, +55ºC). See table ‘Environment’. Operating Instructions for MP-1 Generator Rev. 3.1.1.4.P.07 Page 6 MP Family 2. Explanation of symbols and notes Failure to comply with these precautions means that slight physical injury or damage to property is possible. Failure to comply with these warnings means that death, serious physical injury or damage to property are possible. Failure to comply with these information can cause faults or failure of the MP-1 system performance. Useful notice and tips about correct handling, operation and maintenance. Operating Instructions for MP-1 Generator Rev. 3.1.1.4.P.07 Page 7 MP Family 3. General information The MP-1 Power Supply is designed to provide power for the magnetron ion source in an industrial vacuum process chamber for PVD surface treatment technologies. The power-electronic design is based on switched mode technology which ensures low output current ripples, high efficiency, small dimensions and weight, low audio noise generation. Modular construction of the power converter circuits simplify transportation, installation and servicing duties. All units are microprocessor controlled. All control-signal connections are digital and opto-isolated giving high resistance to electric disturbances. A multi-control system gives the user a possibility of selecting from three optional control sources: • • • Local: DISPLAY console located on the front panel of the MP-1. Remote: from a PC computer through an RS232 or RS485 link, Remote: Profibus The power supply is assembled in one industrial steel enclosure in the 19” standard. 3.1. MP-1 block diagram The power circuit consists of the following functional blocks: • • • • • • • • • input EMI filter to reduce the EMI delivered to the mains, power relays which provide soft mains switch-on rectifier and filter high frequency switched-mode power converter high frequency transformer high frequency rectifier output filter arc switch-off circuit control electronics and auxiliary power supplies. Operating Instructions for MP-1 Generator Rev. 3.1.1.4.P.07 Page 8 MP Family Profibus RS232 A block diagram of the MP-1 is shown below: Operating Instructions for MP-1 Generator Rev. 3.1.1.4.P.07 Page 9 MP Family 3.2. Output power characteristic for the MP-1 module U [V] 800 U n =800V Pn=1 Pn =20kW 400 InI=2,5 =50A n 0 25 1,25 50 2,5 I [A] Fig.1. Output power characteristic for MP-1 module. Operating Instructions for MP-1 Generator Rev. 3.1.1.4.P.07 Page 10 MP Family 4. Electrical and mechanical specification 4.1. Electrical and mechanical specification in tables Electrical specification - input characteristics Overall V 3 x 400V ±10% 50 - 60Hz Hz 3 x 2A A Mains voltage Mains frequency Maximum mains input current Electrical specification – output characteristics Output voltage and current: Control modes: Output parameters control Power supply section: 0 … 800V 0 … 1.25 A V 0 … 400V 0 … 2.5 A (see power characteristic Fig.1) Local − display panel Remote − RS232 Remote − Profibus U voltage regulation I current regulation P power regulation: Arc detection criteria: Imax an arc is detected when output A adj. Imax threshold 100 … 2600 mA, V A adj. U threshold 0 … 200 V, adj. I threshold 50 … 2500 mA current exceeds the Im U x I (cross detection) an arc is detected (if UxI detection mode is enabled) when output current exceeds the Ix threshold value while the output voltage drops below the Ux value dU (dynamic voltage change) preset ∆U = 75% actual output voltage value an arc is detected (in case dU detection mode is enabled) when the output voltage drops rapidly by 75% of its value Maximum arcing frequency Fusing Arc/s A Efficiency Operating Instructions for MP-1 Generator Rev. 3.1.1.4.P.07 % max 20 10A, C-class installed inside of the enclosure ca. 95% Page 11 MP Family Mechanical Specification Mechanical Specification: mm Size (Width x Height x Length) kg Weight (19”) 482 x 133 x 545 11 Environmental specification Ambient operating temperature Storage temperature Relative humidity Air pressure °C °F °C °F % g/m3 kPa mbar Pollution degree Operating Instructions for MP-1 Generator Rev. 3.1.1.4.P.07 0 … +35 +32…+95 -25 … +55 -13 … +131 5...85 (Non-condensing) 1…25 80-106 800-1060 (approximately 2000 above sea level) <2 (see chapter 5.1 – installation site – contamination) Page 12 MP Family 5. Installation 5.1. Installation site Enclosure The MP-1 power supply is built in a standard 19” enclosure and is designed to fit into a standard 19”, 600mm deep rack cabinet. The weight of this device is ca. 11kg, and the mechanical construction of the cabinet should be strong enough to hold it. Forced ventilation inside cabinet is recommended. Inlet air temperature should not exceed 35°C. Contamination Cooling air should be free from corrosive vapors and particles that could become conductive particularly after exposure to moisture. A proper environment conditions ensure long lasting reliable performance- significantly increasing the MTBF. Unpacking Inspect the devices packaging for damage and compare its contents with delivery documents. 5.2. Fusing The MP-1 power supply has a set of 10A, class C mains fuses installed on the rear side of the enclosure. Also small fuses are installed inside the unit to protect the control circuits supply transformer. In case these fuses break, an examination of the power supply’s interior is necessary, so the user should not exchange these fuses by himself. Operating Instructions for MP-1 Generator Rev. 3.1.1.4.P.07 Page 13 MP Family 6. Connecting the power supply All connection terminals are located at the rear side, and should be covered by a protection grid after cabling. Mains supply and PE 4x at least 1.5mm2 cable Output 2x at least 1.5mm2 cable Fuse RS-232 PRofibus Interlock 6.1. Connection terminals Terminal MAINS OUTPUT Description 3 x 400VAC 800V / 2.5A Cable min. 3 x 1.5mm2 min. 2 x 1.5mm2 twisted pair cable. Cable endings 3x ferrule 2x ferrule PE Protective earth min. 1.5mm2 ∅ 6 mm Terminal RS232 Description RS232 Com. with PC Profibus Communication with PC Cable Cable endings Standard RS232 cable. SUBD 9pin female Pins 6 and 7 must be shorted. See RS-232 cable description. One twisted pair shielded for SUBD 9pin male Profibus; with terminators Interlock see below Operating Instructions for MP-1 Generator Rev. 3.1.1.4.P.07 SUBD 9pin male Page 14 MP Family 6.2. RS-232 terminal description Pin no Name Type Description 1 - n/c n/c 2 TxD Digital output RS232 transmit data 3 RxD Digital input RS232 receive data 4 - 5 GND 6 n/c n/c GND Can be used for cable shield - n/c n/c 7 - n/c n/c 8 - n/c n/c 9 - n/c n/c RS 232 standard cable COM PC TxD RxD GND 1 6 2 7 3 8 4 9 5 1 6 2 7 3 8 4 9 5 male female X232 1 6 2 7 3 8 4 9 5 Shield Operating Instructions for MP-1 Generator Rev. 3.1.1.4.P.07 female 1 6 2 7 3 8 4 9 5 MP-5 MP-1 TxD RxD GND male Page 15 MP Family 6.3. Profibus terminal description Pin no Name Type Description 1 2 n/c n/c n/c n/c n/c n/c 3 RxD/TxD-P Digital I/O Differential I/O signal 4 n/c 5 DGND n/c n/c GND Isolated Profibus ground 6 VP +5V DC Isolated Profibus supply voltage 7 n/c n/c n/c 8 RxD/TxD-N Digital I/O Differential I/O signal 9 n/c n/c n/c PMP3 MP-1 PROFIBUS 1 6 2 7 3 8 4 9 5 1 6 2 7 3 8 4 9 5 +5V RxD/TxD-P RxD/TxD-N X Isolated Cable Male Operating Instructions for MP-1 Generator Rev. 3.1.1.4.P.07 Female GND Page 16 MP Family 6.4. External Interlock The Interlock feature is a circuit used for emergency interlock system. After disconnecting interlock loop (pins 12 and 19) power supply is immediately switched off power relays are open. SUBD25pin MALE (at device side) Pin nr Name Type Description 12 Interlock Digital input 19 +24V Must be connected to 24V (pin 19) to enable power supply switch-ON. This is a relay-based hardware connection. Supply output 24V supply for all digital inputs. Interlock External Interlock 1 14 2 15 3 16 4 17 5 18 6 19 7 20 8 21 9 22 10 23 11 24 12 25 13 Fe m ale Operating Instructions for MP-1 Generator Rev. 3.1.1.4.P.07 1 14 2 15 3 16 4 17 5 18 6 19 7 20 8 21 9 22 10 23 11 24 12 25 13 MP-1 BP-18 +24V Interlock signal M ale Page 17 MP Family 7. Working with the Front Panel Console All indications and settings can be accessed through the front panel of the device. The next several pages contain description of the MP-1 Front Panel Console functions (illustrated in the menu map on page 20) and step-by-step instructions on how to access them. LCD Display LED columns represent voltage and current levels Menu/Cancel Key LED indicators Enter/Accept Key Cursor Keys The most important states are displayed on LED indicators for quick identification. These are: Name Color standby green The power supply is powered, but not switched-on yet. ON green The power supply is running. instab green Not used. analog, digital green green Show the actual control mode. Analog LED lights if controlled through the analog connector. Digital LED lights if controlled through the RS232 or RS485 connector. Both LEDs are dark when controlled by the display console. Digital LED blinks to show proper RS transmission during PC monitoring. Alarm red Blinks when critical conditions occur. Also an audible signal is sounded then. Interlock yellow Interlock or door-closed detection circuits open, Arc occ. yellow Blinks each time an arc is detected Reg U Reg I Reg P green green green Indicate which regulator is currently active 1) Meaning This LED blinks in standby mode when parameters are being changed (display panel in Modify Mode) to indicate the mode that the parameters refer to. Operating Instructions for MP-1 Generator Rev. 3.1.1.4.P.07 Page 18 MP Family The data displayed on the LCD display is organized into several item lists. The 2 basic ones are: • Basic controls and readouts, • Basic ON/OFF and mode control. Use arrow keys and to scroll display window along the list Use MENU/CANCEL key to switch between the item lists Basic controls and readouts Initial menu >Pout= 1000/ 700 W< >Uout= 680/679 V< >Iout= 2500/ 2500mA< ALARM: NONE dU ARC CNT= 0 UxI ARC CNT= 0 Imax ARC CNT= 0 > RESET COUNTERS < > ACCESS CODE STRD < Init ON/OFF settings > POWER ON / OFF LstAlm: NONE < On/Off An item, which can be modified, is indicated by a line-cursor: > modifiable item <. In this case it is sensitive to the ENTER/ACCEPT key. If the correct ACCESS CODE has been previously selected, pressing ENTER/ACCEPT will bring us into MODIFY mode and allow modification of the selected item values. The MODIFY mode is indicated by two arrows: Value = 0000 . The value can be now modified by using the and keys. Press ENTER/ACCEPT soft key to activate the new setting. Press MENU/CANCEL soft key to leave MODIFY mode without changing the settings. The ACCESS CODE feature keeps critical data from being accidentally changed. It also provides access to additional item lists, which are used during testing and service operations. The initial access level is STANDARD (STRD). This allows the user to change the voltage, current and power settings for the power supply’s regulators, reset the arc counters, switch the power supply on and off, change the operating modes and – of course – change the access level by entering the appropriate ACCESS CODE. Selecting SETUP (SETP) access level will reveal a fourth item list – the USER SETUP, and allow the user to change the rest of the settings. The access code for this level is initially 1. Operating Instructions for MP-1 Generator Rev. 3.1.1.4.P.07 Page 19 MP Family The available item lists after entering the SETUP access code will be: Init see above On/Off see above User Setup Menu Producer and product information USER SETUP MENU: >CONTROL: DISPLAY < >ArcDet Imax =2500mA< >ArcDet Ix =2500mA< >ArcDet Ux = 100V < Enable / Disable >Imax: ENABLE < >UxI : ENABLE < >dU : ENABLE < >BreakTime = 20ms < >RampRate = 30units< >Ix setting= NORM >Profibus ID 120< >RS SPEED 9600 bps < HUETTINGER Electronic tel:+48 22 7620000 tel:+48 606 298900 info@ pl.huettinger.com DEVICE: MP-01 PVD-Power Supply MAINS: 3x400V+/-10% 50/60Hz, 3x 2A OUTPUT: Pmax= 1kW U=0-800V I=0–2.5A PROGRAM VERSIONS: P15con4 :MP01-9 P15AD2 : AD-4 P15user2: U-7 There is one more level. It is the SERVICE (SERV) access level. It enables modification of input and output calibration values, voltage thresholds etc. Since improper modification of any of these settings may cause a malfunction of the device, the access code to this level is known by the service staff only. Operating Instructions for MP-1 Generator Rev. 3.1.1.4.P.07 Page 20 MP Family 8. Description of displayed data and settings 8.1. Basic controls and readouts Display Modif. Description >Pout = 1000/ 700 W< Yes Power regulator setting (first number) and actual power supply’s output power readout (second number). >Uout = Yes Voltage regulator setting (first number) and actual power supply’s output voltage readout (second number). Yes Current regulator setting (first number) and actual power supply’s output current readout(second number). No When the ALARM LED blinks, this cyclically displays the states which caused the alarm. 45 No Number of arcs detected by the dU criteria, which occurred from the last counter reset (max 10000) 1300 No Number of arcs detected by U x I criteria, which occurred from the last counter reset (max 10000) 300 No Number of arcs detected by the Imax, which occurred from the last counter reset (max 10000) 680/ 545 V< >Iout = 1.0/ 0.5 A< ALARM: dU NONE ARC CNT = UxI ARC CNT= ImaxARC CNT= > RESET COUNTERS < - >ACCESS CODE STRD< Yes Press ENTER to reset the arc counters. Entering the appropriate access code gives access to the USER SETUP MENU list and SERVICE SETUP list. 8.2. ON/OFF control Display > POWER LstAlm: OFF NONE Modif. Description < Yes Setting this item to ON or OFF will switch the power supply ON or OFF if the DISPLAY control mode is selected (user setup menu). No If the power supply has been switched off due to an alarm state, this alarm statement will be displayed here. Operating Instructions for MP-1 Generator Rev. 3.1.1.4.P.07 Page 21 MP Family 8.3. User setup menu User setup menu: (accessible from USER access level). Display Modif. Description >CONTROL: ANALOG< Yes The control mode (control source) can be switched between DISPLAY-console control or ANALOG connector control. The RS232 connection mode is automatically activated when RS232 transmission is detected and the RS232 control feature in PVD Power is selected at the PC, and deactivated when this feature is deselected or no transmission is present for more then 5sec. >ArcDet Imax = 2500mA< Yes I threshold 0.1 … 2.6A >ArcDet Ix = 2500mA< Yes I threshold 0.05 … 2.5A =200V< Yes U threshold 0 … 200V >ArcDet Ux Enable/Disable: ENABLE Enable / Disable for Imax function >UxI : DISABLE Enable / Disable for U x I function >dU DISABLE Enable / Disable for dU function >Imax: : Yes After an arc is detected the power supply’s output shuts off for the amount of time 2 … 60ms. >RampRate= 30units< Yes The voltage recovery ramp slope setting. The higher the setting, the faster (steeper) the recovery ramp. >Ix setting Yes AUTO: The actual Ix threshold is set either to the Ix setting or the Iout setting depending on which one of them is LOWER. NORM: AUTO feature disabled >BreakTime= NORM < >Profibus ID >RS SPEED 20ms< 120< 9600bps< Operating Instructions for MP-1 Generator Rev. 3.1.1.4.P.07 Profibus ID setting Baud Rate for serial port (2400 - 38400) Page 22 MP Family 9. Interfaces 9.1. RS-232 communication protocol The MP acts as a slave device in the communication process. It never initiates a transmission. The master computer (PC) sends a command which is executed by the MP and a reply is generated (with respect to note 1). The recognized commands are presented below. Additional commands can be implemented if necessary. The baud rate can be set from 2400 to 38400 from the MP’s front panel console to correspond to the rate set at the PC. 8913 Normal run PC to MP 0 $16 1 $E9 2 $89 3 $13 4 Adr 5-8 Uset 9-12 Iset 13-16 17,18 Pset ignor ed 19 Bits 20 SH2) 21 SL2) Where: Adr Address for RS485 0 ... 255 1) Uset (float) Voltage setpoint [V] 0 ... 800V Iset (float) Current setpoint [A] 0 ... 2500mA Pset (float) Power setpoint[kW] 0 … 1kW Bits: Control bits: 0: PC controls the MP (1), Monitoring only (0) 1: 2: Mains relays ON (1), OFF (0) 3: Power ON (1), OFF (0) 4: 5: Reset arc counters (for 1 transmission is enough) 6: RegSel1 7: RegSel2 Regulator P Regulator I Regulator U Presputter RegSel1 0 1 0 1 RegSel2 0 0 1 1 Operating Instructions for MP-1 Generator Rev. 3.1.1.4.P.07 Page 23 MP Family MP reply to PC 0 $16 18 dU cnt 1 $E9 19 - Where: Uact (float) Iact (float) Im cnt (integer) UxI cnt (integer) Ud cnt (integer) 2 $40 20 SH2) 3 00 21 SL2) 4-7 Uact 8-11 Iact 12-13 14-15 16 Im cnt UxI cnt Bits1 Output average voltage [V] Output average current [A] Arc counter (Imax criteria) Arc counter (UxI criteria) Arc counter (dU criteria) 17 Bits2 0...800V 0...2500mA 0...10000 0...10000 0...10000 Bits0: Acknowledge bits: 0: PC control acknowledge (1), analog or display console (0) 1: =1 2: Relays ON ack. (1), or OFF (0) 3: Power ON (1), INHIBIT (0) 4: =1 5: UxI enabled 6: dU enabled 7: =1 after RESET until the 1-st transmission to PC Bits1: more acknowledge bits. 0: Interlock (1), no interlock (0) 1: OverTemp Bit: 1=Overtemp 2: PowerFail (1), power OK (0) 3: Display Fail (1), display OK (0) 4: Communication with pulse unit Fail (1) OK (0) 5: EEprom data sum error (1), OK (0) 6: EEprom write Error (1), OK (0) 7: AlarmActive (1), inactive (0). Other parameters can be accessed for reading or adjustment through their channel numbers. Byte, integer and float values have separate channel number lists. The command strings for reading and setting these values together with the channel lists are presented below. However, the user must be aware, that changing the values by using these Set… commands will interrupt the operation of the power supply for ca. 100ms each time the command is executed. This time is needed to store the new data into an EEPROM memory, verify the contents and calculate new checksums. Therefore, it is wise not to use these commands under power-on conditions. Also changing some parameters (dynamic settings) may spoil the performance of the power supply. Operating Instructions for MP-1 Generator Rev. 3.1.1.4.P.07 Page 24 MP Family 8003 Set a floating point value PC to MP 0 $0D 7 Val0 1 $F2 8 Val1 2 $80 9 Val2 Where: Adr Chan (int) Val (float) 3 $03 10 Val3 4 Adr 11 SH2) 5 6 Chan1 Chan2 12 SL2) 0..255 1) Adres for RS485 Channel number Value to be set MP reply 0 $06 8004 1 $F9 2 AckH3) 3 AckL3) 4 SH2) 5 SL2) Read a floating point value PC to MP 0 $09 7 SH2) 1 $F6 8 SL2) 2 $80 Where: Adr Chan (int) 3 $04 4 Adr 5 6 Chan1 Chan2 Adres for RS485 Channel number 0..255 1) MP reply (OK.) 0 $0A 7 Val3 1 $F5 8 SH2) 2 $40 9 SL2) 3 $00 4 Val0 5 Val1 2 AckH3) 3 AckL3) 4 SH2) 5 SL2) 6 Val2 MP reply (Fail) 0 $06 1 $F9 Operating Instructions for MP-1 Generator Rev. 3.1.1.4.P.07 Page 25 MP Family 8006 Set a byte value PC to MP 0 $0A 7 Val 1 $F5 8 SH2) 2 $80 9 SL2) Where: Adr Chan (int) Val (byte) 3 $06 4 Adr 5 6 Chan1 Chan2 Adres for RS485 Channel number Value to be set 0..255 1) MP reply 0 $06 8007 1 $F9 2 AckH3) 3 AckL3) 4 SH2) 5 SL2) Read a byte value PC to MP 0 $09 7 SH2) 1 $F6 8 SL2) 2 $80 Where: Adr Chan (int) 3 $07 4 Adr 5 6 Chan1 Chan2 Adres for RS485 Channel number 0..255 1) MP reply (OK.) 0 $07 1 $F8 2 $40 Where: Val (byte) 3 $00 4 Val 5 SH2) 6 SL2) Asked byte value MP reply (Fail) 0 $06 1 $F9 2 AckH3) 3 AckL3) 4 SH2) Operating Instructions for MP-1 Generator Rev. 3.1.1.4.P.07 5 SL2) Page 26 MP Family 8008 Set an integer value PC to MP 0 $0B 7 ValH 1 $F4 8 ValL 2 $80 9 SH2) Where: Adr Chan (int) ValH, ValL (word) 3 $08 4 Adr 5 6 Chan1 Chan2 SL2) Adres for RS485 Channel number Value to be set 0..255 1) MP reply 0 $06 8009 1 $F9 2 AckH3) 3 AckL3) 4 SH2) 5 SL2) Read an integer value PC to MP 0 $09 7 SH2) 1 $F6 8 SL2) 2 $80 Where: Adr Chan (int) 3 $09 4 Adr 5 6 Chan1 Chan2 Adres for RS485 Channel number 0..255 1) MP reply (OK.) 0 $08 1 $F7 2 $40 Where: Val (byte) 3 $00 4 ValH 5 ValL 6 SH2) 6 SL2) Asked byte value MP reply (Fail) 0 $06 1 $F9 2 AckH3) 3 AckL3) 4 SH2) Operating Instructions for MP-1 Generator Rev. 3.1.1.4.P.07 5 SL2) Page 27 MP Family Channel numbers: Byte: Chan Text 0. Address for RS485 communication 1. Break time [ms] 2. Ramp rate [V/ms] PID settings for regulators 3. KpU_HV 4. TiU_HV 5. TdU_HV 6. KpI_HV 7. TiI_HV 8. TdI_HV 9. RplMax 10. ImPsp $8003 Imax arc detection criteria enabled Range 0 … 255 2 … 60 5 … 40 Adjustable? YES YES YES 0 … 200 0 … 200 0 … 200 0 … 200 0 … 200 0 … 200 0 … 100 20 … 255 0…1 YES YES YES YES YES YES YES YES YES $8004 UxI arc detection criteria enabled 0…1 YES $8005 dU arc detection criteria enabled 0…1 YES Integer Chan Text 28 Power supply software version 29 Pulse controller software version 30 Analog interface (if installed) software version Float Chan 0 1 2 3 4 5 6 7 8 Text Arc detection threshold settings Current threshold for Imax arc det. criteria: Current threshold for Ix arc det. criteria: Voltage threshold for Ix arc det. criteria: Internal temperature values and voltages At control PCB GB Rect At transformer Rectified mains voltage (nomin: 650V) Controller supply voltage (nomin: 24V) Range 0…255 0…255 0…255 Adjustable? NO NO NO Range Adjustable? 100...2600mA 50...2500mA 0…200V YES YES YES 0…100°C 0…100°C 0…100°C 0…100°C 0…700V 0...35V NO NO NO NO NO NO NOTES: 1) If Adr=255 the MP will always react to the received command, regardless its own address, but it will send a reply (confirmation) only if its own address matches the Adr. Operating Instructions for MP-1 Generator Page 28 Rev. 3.1.1.4.P.07 MP Family 2) SH, SL are the high and low bytes of the check-sum. The check-sum is an arithmetic sum of bytes 2 … (n-2), where n is the number of the last byte of transmission. 3) AckH and AckL are acknowledge codes which are listed below. Acknowledge and failure codes (HEX format) 4000 OK Transmission OK. and command executed. 4001 Transmission length error Byte1 is not a negation of byte0. 4002 Check sum error The two byte checksum is not equal to the sum of bytes nr 2 … (n-2) 4003 Command not executable Command is understood, but can not be executed due to technical conditions. 4004 Command not understood Command is not implemented. Operating Instructions for MP-1 Generator Rev. 3.1.1.4.P.07 Page 29 MP Family 9.1. Profibus communication protocol PROFIBUS is an interface that allows you communicate with the MP01 from a PROFIBUS master . The BP unit acts as a slave device in the communication process. It never initiates a transmission. The PROFIBUS master sends a command coded in modules, which is executed by the MP, after that generated is reply. The recognized modules are presented below. Additional modules or functions can be implemented if it is necessary. Baud Rate for communication between PROFIBUS master and PROFIBUS slave The PROFIBUS slave in the MP has the auto –baude feature, which allows to adjust automatically to the rate of the PROFIBUS master system during start-up. Baud rate are accessible in discrete steps from 9.6 kbits to 12 Mbits. Settings of PROFIBUS ID The ID number is setting by using the front panel console of MP. The software read the ID number from MP at the beginning the program. If the ID number was changed, the unit must be restarted. PROFIBUS module construction MP01 use two modules, which have a different length of byte. It is very important to put modules in properly order, otherwise the “Parameter data error” can be appearing. All integer (2 byte) values are given with the MSB first. There is no possibility to set the float value, but it can be implemented if it is necessary. All types of modules are presented below. Module 1 - Outputs- (identification 0x82,0x0D,0x00,0x01) 0 Ctrl 12 Val 1 Uset0 13 Chan3 2 Uset1 3 Iset0 4 Iset1 5 Pset0 6 Pset1 7 Chan0 8 ValH 9 ValL 10 Chan1 11 Chan2 This module is represented by 16 bytes, where: Ctrl – control byte represented by 8 control bits: Uset 0: PROFIBUS master controls the MP (1) 1: 2: Mains relays ON (1), OFF (0) 3: 4: 5: Reset arc counters (for 1 transmission is enough) 6: Presputter 7: - Voltage setpoint, represented by a 16bit (two bytes Uset0 and Uset1) integer number. Scaling: 0..10000 represents 0..800V Operating Instructions for MP-1 Generator Rev. 3.1.1.4.P.07 Page 30 MP Family Iset - Current setpoint, represented by a 16bit (two bytes Iset0 and Iset1) integer number. Scaling: 0..10000 represents 0.. 2500 mA Pset - Power setpoint, represented by a 16bit (two bytes Pset0 and Pset1) integer number. Scaling: 0..10000 represents 0..1000 W Chan0, ValH, ValL – write integer value These three bytes enables to write new threshold values. The first byte - Chan0 represent channel number, second and third bytes - ValH, ValL - represent the new value in integer. If new value was wrote properly, the MP confirm this, sending in “ValHi” and “ValLi” new, just written value. The list of available channels presented is on the next page. Scaling is: 0..10000 represents 0..1000 value. Chan1 - read integer value This output byte enables to read threshold values or temperatures and represent channel number of the value, which will be read. The list of available channels presented is on the next page. Chan2, Val – write byte value These three bytes enables to write new byte values (new PI regulators settings, etc.). The first byte - Chan0 -represent the channel number and the second byte - Val represent the new value in byte. If new value was wrote properly, the MP confirm this, sending in “ValB” new, just written value. The list of available channels presented is on the next page. Chan3 - read byte value This output byte enables to read byte value from selected channel and represents channel number of the value, which will be read. The list of available channels; presented is on the next page. Module 1 - Inputs- (identification 0x42,0x12,0x00,0x02) 0 Uact0 12 Bits0 1 Uact1 13 Bits1 2 Iact0 14 Chan4 3 Iact1 15 ValHi 4 Pact0 16 ValLi 5 Pact1 17 Chan5 6 Imcn0 18 ValB 7 Imcn1 8 UxIc0 9 UxIc1 10 dUcn0 11 dUcn1 This module is represented by 19 bytes, where: Uact - Average voltage readout, represented by a 16bit (two bytes Uact0 and Uact1) integer number. Scaling: 0..10000 represents 0..800V Iact - Average current readout, represented by a 16 bit (two bytes Iact0 and Iact1) integer number. Scaling: 0..10000 represents 0..2500 mA Pact - Average power readout, represented by a 16bit (two bytes Pact0 and Pact1) integer number. Scaling: 0..10000 represents 0..1000 W Imcn - Arc counter for Imax criteria, represented by a 16bit (two bytes Imcn0 and Imcn 1) integer number. Show actual value of Imax counter. The range of Imcn counter is: 0 - 10000. Operating Instructions for MP-1 Generator Rev. 3.1.1.4.P.07 Page 31 MP Family UxIc - Arc counter for UxI criteria, represented by a 16bit (two bytes UxIc0 and UxIc1) integer number. Show actual value of UxI counter. The range of Imcn counter is: 0 - 10000. dUcn - Arc counter for dU criteria, represented by a 16bit (two bytes dUcn0 and dUcn1) integer number. Show actual value of dU counter. The range of Imcn counter is: 0 - 10000. Bits - Represented by a 16bit (two bytes Bits0 and Bits1), show basis information about MP. The description and complete information about acknowledge Bits0: Acknowledge bits: 0: PC control acknowledge (1), analog or display console (0) 1: 2: Relays ON ack. (1), or OFF (0) 3: Power ON (1), INHIBIT (0) 4: 5: UxI enabled 6: dU enabled 7: =1 after RESET until the 1-st transmission to PC Bits1: more acknowledge bits. 0: Interlock (1), no interlock (0) 1: OverTemp Bit: 1=Overtemp 2: PowerFail (1), power OK (0) 3: Display Fail (1), display OK (0) 4: Communication with pulse unit Fail (1) OK (0) 5: EEprom data sum error (1), OK (0) 6: EEprom write Error (1), OK (0) 7: AlarmActive (1), inactive (0). Chan4, ValHi ValLi - read integer value These three bytes are reply for a command – read integer value (setting channel Chan1) or write integer (setting channel Chan0) in output module. Chan4 byte represents channel number of written or read value. After writing value (setting channel Chan1) MP unit confirm its - if new value was written properly, send in “Chan4” channel number and in “ValHi” and “ValLi” new, just written value. If not, the MP unit will send in all theses bytes the 0xFF value. The scaling is: For channel number 1 to channel 3 is: 0..10000 represents 0..10000 value For channel number 4 to channel 9 is: 0..10000 represents 0..1000 value Chan5,ValB - read byte value These two bytes are reply for a command – read byte value (setting by channel Chan3) or write byte (setting by channel Chan2) in output module. Chan5 byte represents channel number of written or read value. After writing value (setting channel Chan3) MP unit confirm its – if new value was written properly, send in “Chan5” channel number and in “ValB” new, just written value. If not, the MP unit will send in all theses bytes the 0xFF value. Operating Instructions for MP-1 Generator Rev. 3.1.1.4.P.07 Page 32 MP Family Channel address: Byte: Chan 11. ID number 12. Break time [ms] 13. Ramp rate [V/ms] Text Range 1 … 127 2 … 60 5 … 40 Adjustable? NO YES YES PID settings for regulators 14. 15. 16. 17. 18. 19. 20. 21. 23. 24. 25. 26. KpU TiU TdU KpI TiI TdI Phase Detection Treshold Imax Presputter Profibus version Power supply software version Pulse controller software version Analog interface (if installed) software version Integer Chan 1. 2. 3. 4. 5. 6. 7. 8. 9. Text Arc detection threshold settings Current threshold for Imax arc det. criteria: Current threshold for Ix arc det. criteria: Voltage threshold for Ix arc det. criteria: Internal temperature values and voltages At control PCB At HF rectifier At pulse switch semicond. At transformer Rectified mains voltage (nomin: 650V) Controller supply voltage (nomin: 24V) Operating Instructions for MP-1 Generator Rev. 3.1.1.4.P.07 0 … 200 0 … 200 0 … 200 0 … 200 0 … 200 0 … 200 0 … 200 20 … 255 0…255 0…255 0…255 0…255 YES, but do not change the setting without consulting AC NO NO NO NO Range Adjustable? 100... 2600A 50... 2500A 2…200V YES YES YES 0…100°C 0…100°C 0…100°C 0…100°C 0…700V 0...35V NO NO NO NO NO NO Page 33 MP Family Profibus safety In any case when the PROFIBUS slave lost connection with PROFIBUS master or when master stops communicating, the MP01 turn off output power and restart PROFIBUS slave. After then the PROFIBUS slave will be try to connect with PROFIBUS master. Physical layer and configuration of MP01 To connect the MP with the PROFIBUS, an isolated RS-485 interface (according with EN 50170) is required. Please ensure that termination resistors are available at both ends of the cable. If special PROFIBUS connectors are being used, these resistors are often found inside the connector and must be switched on. The cable shield should be firmly connected to ground at every device. Make sure that there is no potential difference between the grounds at the devices. GSD files GSD (Electronic data sheet of a device) files contain and describe the functions and character of PROFIBUS device. Therefore, to use this unit in a PROFIBUS system, it needs to have a specific GSD file that is compatible with the unit. Please, use only this GSD file, which is delivered with MP. Specification for PROFIBUS slave MP: Configuration data: in accordance with GSD file (MP_v2.gsd) Technology: ASIC Physical separation fieldbus side: Standard Baud rate for RS485: Automatic detection up to 12 Mbaud Sync: Supported Freeze: Supported Primitive fieldbus ID: 126 Dipswitch: Supported Operating Instructions for MP-1 Generator Rev. 3.1.1.4.P.07 Page 34 MP Family APPENDIX A Arc detection criteria This circuit is responsible for: • • • measuring the voltage and current at the output terminals of the power supply, arc occurrence detection and a switch-off initiation, a time control of a switch-off procedure. The output voltage is measured through a high-voltage isolation amplifier. The output current is measured a LEM transducer. The arc detector circuit bears quite complex ideas which may require some theoretical explanation. Electric arcs, which will occur inside the vacuum chamber during any stage of the surface treatment process may negatively affect the treated surface and for that reason should be extinguished as soon as possible. From the electrical point of view an arc occurrence is a rapid change of impedance at the chambers electric terminals. The MP arc detection system is equipped with three types of parameter “traps” to ensure fast response to arc occurrence. Imax - a programmable, maximum current trap level, U x I - voltage-current trap pair (UxI) with both constant, programmable voltage (Ux) and current (Ix) levels, dU - a dynamic voltage trap level Imax and dU traps are a single parameter type (an arc is detected when the working point crosses one current or voltage level). UxI requires crossing both - current and voltage levels to detect the arc. Once arcs are detected, their number is displayed on the LCD display with respect to 2 types of traps – Imax and UxI + dU - which has detected the arc. Once an arc has been detected the shut-down signal is activated and the output power of the power supply is switched off. At this same moment a time control procedure is called and a shut-down time interval is provided. When the shut-down time interval has elapsed, the shut-down signal is released and the power units return to it’s previous voltage setting with a voltage ramp which is also programmable. By setting the ramp rate parameter, the time after which the voltage reaches its stable value may be controlled. Operating Instructions for MP-1 Generator Rev. 3.1.1.4.P.07 Page 35 MP Family Imax I Switch-off time <300ns Ramp time Break time Imax threshold Iout arc occurs (A) arc detected (B) arc switch-off (C) 0 t1 Fig. 5.1. t2 t3 t4 t5 t Imax criteria arc detection example. UxI U,I Ux<Uout Ix<Iout Switch-off time <300ns Ramp time Break time Uout Iout Ix threshold Ux threshold arc occurs (A) arc detected (B) arc switch off (C) 0 Fig. 5.2. t1 t 2 t3 t4 t5 t UxI (cross detection) criteria arc detection example. Ux<Uo, Ix<Io. Operating Instructions for MP-1 Generator Rev. 3.1.1.4.P.07 Page 36 MP Family Ux>Uout Ix>Iout U,I Switch-off time <300ns Ramp time Break time Ux threshold Uout Ix threshold Iout arc occurs (A) arc detected (B) arc switch off (C) 0 t1 Fig.5.3. t2 t3 t4 t5 t UxI (cross detection) criteria arc detection example. Ux>Uo, Ix>Io. Ux<Uout Ix>Iout U,I Switch-off time <300ns Break time Uout Ramp time Ux threshold Ix threshold Iout arc occurs (A) arc detected (B) 0 Fig. 5.4. arc switch off (C) t1 t2 t3 t4 t5 t UxI (cross detection) criteria arc detection example. Ux<Uout, Ix>Iout. Operating Instructions for MP-1 Generator Rev. 3.1.1.4.P.07 Page 37 MP Family dU Uout Switch-off time <300ns arc occurs (A) arc detected (B) ∆U=75% 0 arc switch off (C) t1 t2 t3 t Fig. 5.5. dU (dynamic voltage change) criteria example Operating Instructions for MP-1 Generator Rev. 3.1.1.4.P.07 Page 38 MP Family APPENDIX B Presputter mode in MP power supplies The idea of the new presputter mode is to deliver greater energies into arcs, which occur during presputtering in order to decrease the presputter time of the cathode. Increasing the arc energy. The normal arc suppression feature performs a short circuit at the output of the power supply when the arc occurs. This keeps the internal inductor current as well as some capacitive current from going into the arc. In order to increase arc energy, in the presputter mode this short circuit is not performed. Selecting presputter mode. The presputter mode is selected through the analog interface signals. As you know, the power supplies can work in 3 modes: power, voltage or current control. The selection of one of these 3 modes is done by a 2-bit digital signal (RegSel0 and RegSel1). Since 2 bits give 4 possible states, and we only need 3 to select control mode, the 4-th combination (both signals HIGH) is used to select presputter mode. In this mode, the power supply operates in power control mode. Controlling the presputter mode performance. In presputter mode the UxI and dU arc detection criteria are automatically disabled, leaving Imax as the only one active. Also, the Imax value is set separately for the presputter mode (“Imax-presptr” value in the USERS SETUP MENU on the display panel). This allows the user to set the amount of the charge in the internal inductor at switch-off. The arc energy is proportional to the square of this current value. Imax adjustable Iarc - normal Ix Iarc - presputter Operating Instructions for MP-1 Generator Rev. 3.1.1.4.P.07 Page 39 MP Family The MP-1 power supply is delivered in a ready to use condition. If all connections have been made properly and the operating instructions will carefully be followed there should be no problems with the activation of the power supply. The default settings should give proper behavior of the device in the most commonly used system configuration. It would be useful, however to learn as much about the maintenance and operation principals as possible before proceeding with the startup. Understanding the systems operating principals will help the user obtain more useful information from the controllers display and understand the behavior of the entire power supply. Introducing any changes into the devices settings will obviously require full knowledge of the system (and also the password). Operating Instructions for MP-1 Generator Rev. 3.1.1.4.P.07 Page 40