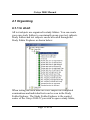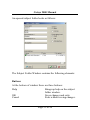
1
CATSYS 2000 USER’S MANUAL Danish Product Development Ltd. Stolbjergvej 19 DK 3070 Snekkersten DENMARK www.catsys.dk Table of Contents 1 Introduction.............................................................................1 2 Background............................................................................ 1 3 Installing Catsys 2000............................................................. 4 3.1 Know your hardware....................................................... 4 3.1.1 Datalogger............................................................... 4 3.1.2 Cables...................................................................... 5 3.1.3 Reaction Handle.......................................................6 3.1.4 Recording Drum...................................................... 6 3.1.5 Tremor Pen (optional)............................................. 6 3.1.6 Force Plate ..............................................................7 3.1.7 Calibration disk........................................................ 7 3.2 Connecting the datalogger and installing software.......... 8 3.2.1 Connecting the instruments to the datalogger ........ 8 3.2.2 Installing hardware...................................................9 4 Using Catsys 2000.................................................................12 4.1 Organizing..................................................................... 13 4.1.1 In short...................................................................13 4.1.2 Study Folders.........................................................14 4.1.2.1 Study Folder Window.................................... 14 4.1.2.2 Creating New Study Folders..........................17 4.1.2.3 Deleting Study Folders...................................19 4.1.2.4 Study Folder Statistics................................... 19 4.1.3 Subject Folders...................................................... 20 4.1.3.1 Subject Folder Window................................. 20 4.1.3.2 Adding a New Subject Folder........................ 23 4.1.3.3 Deleting a Subject Folder...............................24 4.1.3.4 Moving a Subject Folder................................25 4.1.4 Examinations..........................................................26 4.1.4.1 Examination Window.....................................26 4.1.4.2 Deleting Examinations................................... 29 4.1.4.3 ndex Summary............................................... 29 4.2 Tests and testing............................................................ 30 4.2.1 Test Window......................................................... 30 4.2.1.1 Tremor Pen Test............................................ 30 4.2.1.2 Force Plate Test............................................. 33 4.2.1.3 Reaction Time Test........................................ 36 4.2.1.4 Maximum Frequency Test..............................37 4.2.1.5 Rhythmic Test................................................ 38 4.2.1.6 Maximum Frequency Free Test..................... 40 4.2.2 Testing................................................................... 41 4.3 Exporting, Importing and Printing.................................48 4.3.1 Exporting Data ..................................................... 48 4.3.1.1 One File Library ............................................ 48 4.3.1.2 Subject Report............................................... 50 4.3.1.3 Export to ASCII............................................ 52 4.3.2 Importing Data.......................................................55 4.3.2.1 Importing Data from the Catsys 7.0...............55 4.3.2.2 Importing Data from One File Library........... 55 4.3.3 Printing Data..........................................................57 4.4 Customized testbatteries................................................60 4.4.1 Adding a Customized Battery...............................63 4.4.2 Editing the Name and Description of a Customized Battery............................................................................ 66 4.4.3 Editing a Single Test in a Customized Battery...... 66 4.4.4 Adding a Single Test to a Customized Battery......66 4.4.5 Adding a Tremor Pen Test.....................................67 4.4.6 Adding a Force Plate Test..................................... 68 4.4.7 Adding a Reaction Time Test................................ 69 4.4.8 Adding a Rhythmic Test........................................ 71 4.4.9 Adding a Maximum Frequency Test.....................72 4.4.10 Adding a Maximum Frequency Free Test............74 4.5 Preferences.................................................................... 76 4.5.1 Datalogger............................................................. 76 4.5.2 Instruments............................................................ 78 4.5.3 Gains...................................................................... 79 5 Background information........................................................80 5.1 Performance Index.........................................................80 5.2 Catsys Index.................................................................. 83 5.3 The Catsys Standard Test Battery Index....................... 84 5.3.1 Tremor 7 Normal Material...................................84 5.3.2 Sway 7 Normal Material........................................84 5.3.3 Catsys 7 Normal Material...................................... 86 5.4 The Beuter/Catsys Test Battery Index.......................... 86 5.5 The ASCII Export format............................................. 90 Catsys 2000 Manual 1 Introduction The CATSYS system is a Windows based test system for quantification of CNS-related human behavior such as coordination ability, reaction time, tremor and postural stability (balance). The CATSYS system relates a subject's or a group of subjects' performance to human normality or monitors the development of a subject's performance over a period of time. The CATSYS system is a portable test system based on a small datalogger, which communicates with your PC via a usb cable. The datalogger records data from up to four sensors: a Tremor Pen™, a touch recording plate, a reaction time handle and a force plate (for balance-recording). The Windows software includes user-friendly test routines and is very easy and efficient to operate. At the same time, the software contains a number of helpful facilities, such as customization of test data, bundling and export to most statistical systems. 2 Background Catsys 2000 is the MS-WINDOWS based version - and further development - of Catsys 7 a MS-DOS based test system. Catsys 7.0 was created through an international collaborative effort with input from several countries. The project was initiated by The Clinic of Occupational Health, Copenhagen University Hospital together with Danish Product Development Page 1 of 96 Catsys 2000 Manual Ltd: a spin-off company from Technical University of Denmark and a specialist in innovative high-tec development. Development work was launched in 1986. The original idea was to develop a new method for quick assessment of brain damage caused by exposure to organic solvents. The first five prototypes went into operation in 1987 and proved that the system did in fact live up to expectations within occupational medicine. But they also revealed interesting features within other medical disciplines related to the Central Nervous System. During the 90s, a number of methodology studies and epidemiological examinations with Catsys were launched, basically by leading researchers within neurotoxicology. By the end of the millennium, Catsys 7 was established as a standard test method within neurotoxicology and occupational medicine with more than 30 instruments at work in all parts of the world. The number of articles published and papers presented at international conferences is still increasing. With the publication of a methodical and comprehensive Canadian normal material, presented by Professor Ann Beuter and her team at the international neurotoxic conference in Stockholm, 2000, a complete reference to normality, independent from nationality and education is now available. Since 2000 Catsys 2000 a windows based system has replaced the Catsys 7.0 MS-DOS based system, taking Catsys into the world of MS WINDOWS and making it even easier to use and interoperate with other software systems. Catsys 2000 is backed up by a web-site, where the latest software versions, normal material, publications, various product documentation and a comprehensive reference to Page 2 of 96 Catsys 2000 Manual Catsys users and projects are available to our users and visitors. Our users receive an electronic newsletter, when new software or new articles are released. Our latest achievement, the USB enabling of the datalogger, means that Catsys will work wherever your PC or lap-top will run. Page 3 of 96 Catsys 2000 Manual 3 Installing Catsys 2000 Installing Catsys 2000 is easy. Follow the instructions in this chapter and you will have the system up and running in about 15 minutes. The installation is divided into the following parts: Get to know your hardware Install the USB drivers, connect the datalogger to the computer and install the software Connect the sensors to the datalogger Install the hardware 3.1 Know your hardware The first step is to learn the function and name of the different parts of the hardware: 3.1.1 Datalogger The datalogger is the main unit of the Catsys 2000 testing system. In the back of the datalogger, the connections for the computer (USB port) and the reset button are located. The serial port also found here, can be enabled in case no computer with a USB port is available. In this case, power supply can be provided by a cheap active USB Page 4 of 96 Catsys 2000 Manual hub, connected to the USB port of the datalogger. In the front, you find all the connections for the sensors. The connections are clearly labeled indicating the appropriate connection for each specific sensor. However, the plugs are all individual,and you cannot connect sensors and datalogger wrong.. There is also a volume button. To turn up the volume turn the volume to the right, and to lower the volume turn it to the left. There are two green light diodes in the front panel of the datalogger. The left diode indicates that the datalogger is turned on. The right diode lights up while the datalogger is logging data from one of the sensors. 3.1.2 Cables Catsys 2000 comes with two cables. One standard USB cable for connecting the datalogger to the computer and one standard serial 9/9 cable for connecting the force plate to the datalogger. Page 5 of 96 Catsys 2000 Manual 3.1.3 Reaction Handle The reaction handle is used for reaction time testing. Use the thumb to press the black area in response to the stimulus, emitted by the datalogger loudspeaker. A mechanical click provides feed back to the subject. 3.1.4 Recording Drum The recording drum is used for maximum frequency, rhythmic and maximum frequency free testing. Hit the drum with your hand during hand-pronationsupination or with your finger during finger tapping. A microphone records the action and the datalogger records the time. The drum should be placed on an acoustically damping material like a mouse-pad unless the table itself dampens the sound and vibrations from the subject's hits on the drum . 3.1.5 Tremor Pen (optional) The tremor pen is used to record the subtle tremor at the fingertips. A unique two-axis micro-accelerometer, sensitive in a plane perpendiclar to the tube axis, is embedded in the tip of the pen. Standard position during recordings: hold Page 6 of 96 Catsys 2000 Manual the Tremor Pen like a ball point pen, position it some five centimetres or two inches from your naval and relax. The system produces a full Fourier analysis of the tremor between 2 Hz and 15 Hz, as well as a tremor intensity. 3.1.6 Force Plate N.B When doing force plate testing, be sure that the force plate is placed on a hard surface. Soft surfaces like carpets etc. can lead to incorrect test results. The force plate is used to determine postural stability. Vertical forces are recorded in three points to determine the position of the force center on the plate. The movement of the force centre in the XY-plane defined by the force plate surface is recorded in time and analyzed to provide all key-information, known from similar platforms such as RMS sway, sway velocity, sway area and Fourier analysis of the sway pattern. 3.1.7 Calibration disk 3½" disks marked calibration disks are supplied with your system. These calibration disks contain the calibration files necessary for the Catsys 2000 program to correctly use the instruments. The datalogger serial number on the calibration disk should match the serial number on the datalogger. Page 7 of 96 Catsys 2000 Manual 3.2 Connecting the datalogger and installing software The second step is to connect your datalogger to your computer and install the Catsys software. Before connecting the datalogger to the computer you need to install the usb drivers for the datalogger. These drivers with instructions can be found on the cd-rom shipped with the system. To install the drivers double-click on the index file on the cd-rom and follow the instructions there. If the driver installation is completed succesfully, your datalogger should now be connected to your computer and the green light in front of the datalogger should be lit. The Catsys 2000 software should also be installed now, if you followed the instructions in the index file on the cd rom. 3.2.1 Connecting the instruments to the datalogger The third step is to connect the instruments to your datalogger. To connect your force plate to your datalogger, first connect the serial cable to the front of the datalogger and then connect the other end of the serial cable to the force plate. To connect the other instruments to the datalogger simply connect the cable of the instrument to the datalogger in the specific labeled port in front of the datalogger. Page 8 of 96 Catsys 2000 Manual 3.2.2 Installing hardware The fourth and final step is to install the hardware. Before installing the hardware you have to make sure that the previous steps are completed and that you have the calibration disk(s) or calibration files at hand. The Catsys 2000 has a hardware installation page that will help you install the hardware. There are two ways to start the installation. Either you start from the window that appears the first time you start the Catsys 2000. There is a button called Install hardware. You can also start the installation from the Preferences window found in the Tools menu at the Preferences menu item. To start press the Install hardware button situated on the datalogger page. The hardware installation process is an automated process. When you enter the installing hardware process, you will be shown a reminder of what you should have ready before continuing, see above. When your datalogger is connected, turned on and you have your installation disk in the disk drive or your calibration files on your harddisk/network drive, you can press the Continue button. This will start installing the hardware. If you want to cancel the hardware installation, please press the Cancel button. If you want help, please press the Help button. Page 9 of 96 Catsys 2000 Manual The Installation page looks as follows: The system starts by searching your computer to detect which comport the datalogger is connected to. Then you will be prompted for the location of the calibration files, if you have the files on a floppy disk specify the drive. If the files are on the harddisk specify the folder they are in. Remember to doubleclick on the folder or drive. Press Done when you have doubleclicked on the location of the calibration files Depending on the outcome of the search, you will get the following messages: "Installation finished. Press Save and Exit to save and exit or press Cancel to cancel" This notice indicates that everything went OK. Your datalogger Page 10 of 96 Catsys 2000 Manual was found and identified and all instruments were installed. If you want to keep this installation, please press Save and Exit. If you do not want to keep it, press Cancel. "Installation finished. If you have additional calibration files press Retry or Press Save and Exit to save and exit or press Cancel to cancel" This notice indicates that almost everything is OK. Your datalogger was found and identified, but not all instruments were installed. If you want to install more instruments than listed on the instruments list, please press Retry and specify the folder where the additional calibration files are in. If you want to keep this installation, please press Save and Exit. If you do not want to keep it, press Cancel. "No datalogger was found. Please check that your connections are correct. Press Retry to retry or press Cancel to cancel." No datalogger was found. For help see above on how to connect your datalogger. When you have checked your connections, please press Retry. If you want to abort the installation, please press Cancel. "No datalogger serial number found. If you have additional files press Retry to retry or press Cancel to cancel." The datalogger serial number could not be found. If you have additional calibration files, press Retry and specify their location. If this does not solve the problem, please contact [email protected] Page 11 of 96 Catsys 2000 Manual 4 Using Catsys 2000 This chapter explains how to use Catsys 2000. How to organize your test subjects, how to perform testing, how to print your test results etc. This chapter is divided into 5 sub-chapters: Organizing Explains how to organize your test subjects in study folders and how to use the Study Folder Explorer to get access to the functions of Catsys 2000. Testing Explains how to perform testing. How to enter testmode. Export, Importing and Printing Explains how to export your data to other programs, like Excel, SPS etc. Explains how to import your data from Catsys 7 and other users of Catsys 2000. Printing is also explained. Customized testbatteries How to make your own customized testbatteries. Preferences Contains information on preferences. Page 12 of 96 Catsys 2000 Manual 4.1 Organizing 4.1.1 In short All test subjects are organized in study folders. You can create your own study folders to conviniently group your test subjects. Study folders and test subjects can be accessed through the Study Folder Explorer as shown below: When testing has been done on a test subject the completed examinations and individual tests can be seen in the Study Folder Explorer. The Study Folder Explorer is the control center of the Catsys 2000. If you wish to open a study folder, Page 13 of 96 • Catsys 2000 Manual subject folder, examination or tests simply double-click on the corresponding item in the Study Folder Explorer. You can also right click on the mouse and a pop-up menu will appear with different functions, e.g. Exporting, printing etc. 4.1.2 Study Folders As explained above the study folders are used to group test subjects as you wish. This can be used if you are running several projects, using controls groups etc. The only limitiation is that test subjects in a specific study folder must all be tested with the same test battery. The testbattery is defined when creating the study folder. A test battery is a definition contaning information on which tests should be performed and with which parameters. Catsys 2000 comes with three built in testbatteries: The Catsys Standard Catsys pd Beuter/Catsys You can also create your own testbatteries, this is explained in detail in 4.4 Customized Battery 4.1.2.1 Study Folder Window The study folder window appears when a study folder is opened. To open a study folder: 1. Double-click the study folder you wish to open in the Study Folder Explorer, or Page 14 of 96 Catsys 2000 Manual 2. Select the study folder you wish to open in the Study Folder Explorer, right click the mouse and select open from the pop-up menu that appears. An opened study folder looks as follows: The Study Folder “indow contains the following elements: Buttons At the bottom of window there are 4 buttons: Page 15 of 96 Catsys 2000 Manual View Study Folder Statistics Help OK Cancel Creates statistical material of the study folder. Brings up help on the study folder window. Saves changes and exits. Exits without saving changes. Name This is the name of the study folder. Can be edited. Description This is the description of the folder. Can be edited. Subject Folder Caption The caption of the subject folders in the Study Folder Explorer depends on this setting. If this setting is Name then the name of the subject folders belonging to this study folder appears as the caption. You can select another caption from the drop-down list. Default Battery Default battery is the battery used when testing. This is selected when creating the study folder. It cannot be changed. Subject Folder List This is a list of the subject folders belonging to this folder. The ID column is the subject folder ID and the name column is the subject folder name. The examination column indicates how many examinations have been performed on the subject folder. Page 16 of 96 Catsys 2000 Manual You can add new subject folders to the study folder by right clicking on the subject folder list and select Add subject folder from the pop-up menu that appears. See Subject Folders. If you want to delete a subject folder, select the subject folder from the list, right click the mouse and select delete from the pop-up menu that appears. See deleting Subject Folders. If you want to open a subject folder on the list, you have two options: 1. you can double-click the subject folder on the list, or 2. you can select the subject folder and right click the mouse and select open from the pop-up menu that appears. Opening a subject folder will bring up the Subject Folder Window 4.1.2.2 Creating New Study Folders If you want to add a study folder select the Catsys Study Folders item at the top of the Study Folder Explorer, right click on the mouse and select Add study folder from the menu that appears. This will start a step by step guide on adding a study folder. Start The Start step is an introduction to the step by step guide. On the right side of the guide, you can see the progress. The current step is in bold, and completed steps are checkmarked. Page 17 of 96 Catsys 2000 Manual At any time, you can press the Help button for help on the current step. The Back and Next buttons are used for navigating between the different steps. When you have completed a step, press the Next button to continue to the next step. The Cancel button will exit the guide without creating any study folder. Name and description Name is the name used to identify the study folder in the Study Folder Explorer, when printing etc. Description is a description of the study folder. The description will appear on printouts etc. Default battery At this step, you select which battery is going to be used for testing the subject folders in this study folder. If you wish to use another battery than the Catsys Standard Battery supplied with the Catsys 2000, select customized battery and select the battery you wish to use from the drop-down list. New study folder – Tree caption At this step, you decide how subject folders belonging to this folder are going to be represented in the Study Folder Explorer. The caption of the subject folders in the Study Folder Explorer depends on this setting. If this setting is Name then the name of the subject folders belonging to this study folder appears as the caption. You can select another caption from the drop-down list. Page 18 of 96 Catsys 2000 Manual New study folder – Finished The Finished step is the last step. The study folder has now been created. By pressing Next you will exit the guide. 4.1.2.3 Deleting Study Folders To delete a study folder select the study folder in the Study Folder Explorer, right click the mouse and select delete study folder from the menu that appears. You will now be asked if you want to delete the study folder or not. Press OK if you want to delete the study folder or press Cancel if you do not want to delete the study folder. Attention: Deleting a study folder will also delete all the data in the study folder. Including subject folders, examinations and tests. 4.1.2.4 Study Folder Statistics The Study Folder Statistics contains average and standard deviations for the test results of all completed tests in the folder. To view the Study Folder Statistics select a folder in the Study Folder Explorer and select Study Folder Statistics in the FilePrint menu, or right-click on the selected folder in the Study Folder Explorer and select Study Folder Statistics. The Study Folder Statistics can also be viewed by pressing the View Study Folder Statistics in an open study folder window. The Study Folder Statistics can be printed by pressing the Print symbol in the Study Folder Statistics window Page 19 of 96 Catsys 2000 Manual Note:Computing of the Study Folder Statistics can take minutes depending on the number of tests and computer speed. 4.1.3 Subject Folders 4.1.3.1 Subject Folder Window The Subject Folder Window appears when the subject folder is opened. To open the subject folder: 1. Double-click the subject folder you wish to open in the Study Folder Explorer, or 2. Select the subject folder you wish to open in the Study Folder Explorer, right click the mouse and select open from the pop-up menu that appears, or 3. Open the subject folder through the Study Folder Window. Page 20 of 96 Catsys 2000 Manual An opened subject folder looks as follows: The Subject Folder Window contains the following elements: Buttons At the bottom of window there are three buttons: Help OK Cancel Brings up help on the subject folder window. Saves changes and exits. Exits without saving changes. Page 21 of 96 Catsys 2000 Manual Personal ID This is the personal ID of a subject. This can be an employee number, social security number etc. Can be edited. Name This is the name of the subject. Can be edited. Misc. 1 and Misc. 2 This space can be used to enter extra information on the subject. Can be edited. Description This is the description of the subject. Can be edited. Gender Subject gender. Can be edited. Dominating hand Subject dominating hand. Can be edited. Performed battery list This is a list of the examinations belonging to the subject folder. The Name is the name of the examination. Number of tests in the examination, and the number in brackets are the numbers of completed tests. Accepted indicates the data and the time the examination was accepted. If you want to delete an examination, select the examination from the list, right click the mouse and select delete from the pop-up menu that appears. See deleting examinations. Page 22 of 96 Catsys 2000 Manual If you want to open an examination from the list, you have two options: 1. you can double-click the examination on the list, or 2. you can select the examination, right click the mouse and select open from the pop-up menu that appears. Opening an examination will bring up the Examination Window. 4.1.3.2 Adding a New Subject Folder If you want to add a new subject folder, select the study folder you want to add the the subject folder to in the Study Folder Explorer, right click the mouse and select Add subject folder from the menu that appears. This will start a step by step guide on adding a subject folder. You can also add new subject folders through the Study Folder Window. Start The Start step is an introduction to the step by step guide. On the right side of the guide, you can see the progress. The current step is in bold and completed steps are checkmarked. At any time, you can press the Help button for help on the current step. The Back and Next buttons are used for navigating between the different steps. When you have completed a step, press the Next button to continue to the next step. The Cancel button will exit the guide without creating any subject folder. Page 23 of 96 Catsys 2000 Manual ID and name The ID is the personal ID of the subject. It can be an employee number, social security number etc. Name is the name of the subject. ID and name are used to identify the subject folder in the Study Folder Explorer, when printing etc. Misc. information This space can be used to enter extra information on the subject. The description field can be used to enter a description of the subject. Gender Gender is the gender of the subject. Dominating hand Dominating hand is the subjects dominating hand. Finished The Finished step is the last step. The subject folder has now been created. By pressing Next you will exit the guide. 4.1.3.3 Deleting a Subject Folder To delete a subject folder select the subject folder in the Study Folder Explorer, right click the mouse and select Delete subject folder from the menu that appears. You will now be asked if you want to delete the subject folder or not. Press OK if you Page 24 of 96 Catsys 2000 Manual want to delete the subject folder or press Cancel if you do not want to delete the subject folder. You can also delete a subject folder from the Study Folder Window Attention: Deleting a subject folder will also delete all the data that is in the folder, including examinations and tests. 4.1.3.4 Moving a Subject Folder To move a subject folder to a different study folder, select the subject folder in the Study Folder Explorer, right click the mouse and select the move subject folder menu item from the menu that appears. This will bring up a list of study folders that the subject folder can be moved to. Select the study folder you want the subject folder to be moved into by double clicking the study folder. If you want to copy the subject folder, check the Copy option below the study folder list. If you do not want to move to the subject folder, press the Cancel button. Note: A subject folder can only be moved to a study folder using the same default battery as the one the subject folder already is in. Page 25 of 96 Catsys 2000 Manual 4.1.4 Examinations The examination is a set of completed tests defined by the testbattery used when testing. 4.1.4.1 Examination Window The Examination Window appears when an examination is opened. To open an examination: 1. Double-click the examination you wish to open in the Study Folder Explorer, or 2. Select the examination you wish to open in the Study Folder Explorer, right click the mouse and select Open from the popupmenu that appears, or 3. Open the examination through the Subject Folder Window 4. Page 26 of 96 Catsys 2000 Manual An opened examination looks as follows: The examination window contains the following elements: Buttons The window has three buttons: Index Summary Help Cancel Brings up the index summary window. Brings up help on the examination window. Exits the window. Page 27 of 96 Catsys 2000 Manual Name This is the name of the battery used for testing this examination. Description This is the description of the battery used for testing this examination. Accepted Indicates when the examination was accepted. Catsys 7.0 Index (Only shows up if tested with Catsys Standard Battery) Shows the Catsys 7.0 index. This index is primarly for backwards compability with the Catsys 7 system. Test list This is a list of tests in this examination. The Name is the name of the test. The Type is the test type. Accepted indicates the data and the time the test was accepted. If you want to open a test from the list, you have two options: 1. you double-click the test on the list, or 2. you select the test, right click the mouse and select open from the pop-up menu that appears. Opening a test will bring up the test window Page 28 of 96 Catsys 2000 Manual 4.1.4.2 Deleting Examinations To delete an examination select the examination in the Study Folder Explorer, right click the mouse and select Delete examination from the menu that appears. You will now be asked if you want to delete the examination or not. Press OK if you want to delete the examination or press Cancel if you do not want to delete the examination. You can also delete an examination from the Subject Folder Window Attention: Deleting a examination folder will also delete all the tests in the examination. 4.1.4.3 ndex Summary The Index Summary is a graphical summary of the indices for a completed examination. The Index Summary also contains an examination index. The summary can be viewed by right-clicking an examination in the Study Folder Explorer and selecting Index Summary. The summary can also be viewed by pressing the Index Summary button in the examination window. For more information on the individual tests, press the corresponding graphical bar and a window containing additional information will pop-up. If the examination has been tested with a customized test battery without a index definition, the graphical bars are grey. The Index Summary can be printed by pressing the Print button on the button of the Index Summary Window Page 29 of 96 Catsys 2000 Manual 4.2 Tests and testing 4.2.1 Test Window The test window appears when the test is opened. To open the test: 1. Double-click the test you wish to open in the Study Folder Explorer, or 2. Select the test you wish to open in the Study Folder Explorer, right click the mouse and select open from the pop-up menu that appears, or 3. Open the test through the examination window. There are five different layouts for the test window depending on the test type. All tests have the following two buttons at the bottom in common: Help Brings up help on the test window. Closes the test window. Close 4.2.1.1 Tremor Pen Test A Tremor Pen Test result window consists of a window with three pages, a key figures pane and a parameter pane located at the bottom of the window. Page 30 of 96 Catsys 2000 Manual Key figures The key figures are located at the center of the test window and consists of the following key figures: Tremor Intensity Tremor intensity is defined as the root mean square of accelerations, recorded in the 0.9 Hz to 15.0 Hz band during the test period. Unit is measured in m/s². Center frequency Center frequency is the mean frequency of the accelerations in the 0.9 Hz to 15.0 Hz band during the test period: 50 % of the power that drives the tremor is produced at frequencies above the center frequency, and 50 % is produced below. Unit is measured in Hz. Standard Deviation of Center Frequency The standard deviation of the center frequency indicates the degree of discoordination of the tremor. 66 % of the power is dissipated within the Center Frequency ± the standard deviation. A very rhythmic tremor has a little standard deviation, indicating that most of the energy is produced within a narrow frequency band. Harmonic Index This index compares the tremor frequency pattern with the pattern of a single harmonic oscillation, which has a HI = 1,00. Page 31 of 96 Catsys 2000 Manual A tremor composed of few dominating frequencies will have a high HI. Up to 0.95 is not unusual, whereas the normal discoordinated tremor will have a HI around 0.88. Tremor Index An index based on normal material defined in the test battery definition. The 3 pages Time Domain Shows the recorded timeseries of each axis. The blue lines indicate the run-in and run-out periods of the timeseries. The timeseries can be zoomed by holding down the left mouse button while dragging the wanted zoom area down-right. To un-zoom left click mouse and drag left-up. Frequency Domain The blue line shows a normalized power spectrum of the two timeseries. A power spectrum for each channel x and y is calculated and frequency square value is added together and the square root is calculated. The thick green line is a running average of the normalized power spectrum. The vertical red line marks the center frequency. The two black vertical lines mark the standard deviation. The red bar on the right shows the tremor intensity. Page 32 of 96 Catsys 2000 Manual Energy distribution Shows the relative energy distribution in different frequency bands. 4.2.1.2 Force Plate Test A Force Plate Test result window consist of a window with three pages, a key figures pane on the right and a parameter pane located at the bottom of the window. Key figures Weight The weight of the person tested. Unit is measured in kg. Mean Sway The mean sway is defined as the simple mean of the distance from the geometrical mean force center position to all recorded force center positions during the test. Unit is measured in mm. Transversal and Sagittal Sway The Transversal sway and the Sagittal sway is defined as the simple mean of the recorded x- and y values of the force center in a coordinate system with the mean force center position as the origo. Unit is measured in mm. Page 33 of 96 Catsys 2000 Manual Sway Area The Sway area or SA is defined as the area of the smallest polygon, which includes the total trajectory of the force center in the horizontal force plate plane. The Sway area is calculated by looking at the force center trajectory through a grid. If a force center position is found within an element in the grid, the element is marked. After this, the outer perimeter of marked elements is established to allow the final calculation of the Sway area as the area of the polygon, defined by this perimeter. The number of cells in the grid are independent of the size of the sway trajectory. For large trajectory patterns, we use large elements and for small patterns we use small elements. Thus, the relative precision of the SA is independent of the size of the sway trajectory. Small patterns are analyzed with same relative precision as larger ones. Unit is measured in mm² Sway Velocity The average travel speed of the force centre in the horizontal force plate plane is calculated by dividing the total length of the force centre trajectory (in mm) with the recording period length (in sec.). This is done as follows: let a, b, c, d, e be force center positions separated in time according to a sample frequency = 31.25 Hz as indicated here: --a--b--c--d--e-- . The Sway velocity is calculated as the sum of the distances: ---, a-c, c-e, --- through the complete data set, divided with the test length in sec. This principle effectively filters out impact from random noise from app. 15 Hz and up. (Noise will increase path-length and thus increase velocity). Unit is measured in mm/s. Page 34 of 96 Catsys 2000 Manual Sway Intensity Sway intensity is defined as the root mean square of accelerations, recorded in the 0.1 Hz to 10.1 Hz band during the test period. Sway Index An index based on normal material defined in the test battery definition. The 3 pages X-Y Force Center Shows the x-y force center position. Can be zoomed by holding down the left mouse button while dragging the wanted zoom area down-right. To un-zoom left click mouse and drag left-up. Time Domain Shows the sway in x and y directions. The blue lines indicate the run-in and run-out periods of the timeseries. Can be zoomed by holding down the left mouse button while dragging the wanted zoom area down-right. To un-zoom left click mouse and drag left-up. Frequency Domain The blue line shows a normalized power spectrum of the sway. A power spectrum for sway in and x and y directions is caluculated and frequency square value is added together and Page 35 of 96 Catsys 2000 Manual the square root is calculated. The red bar on the right shows the Sway intensity. Relative energy distrbution is shown at the bottom. 4.2.1.3 Reaction Time Test This test is a traditional stimulus-response test. Signals are given at random within fixed periods. Both sound and light signals are emitted. Responses, which are simple clicks with the thumb on the grey zone on the reaction test handle switch, are evaluated by the program system. Reaction times less than 0.10 sec are considered cheat. Reaction times larger than the user specified "Maximum reaction time" are also excluded. The maximum permitted reaction time is a predefined waiting period too. After each stimulus the system waits this period for the subject to act. If no response occurs, the next period at which a stimulus is randomly emitted, is commenced. The first signal is not included in the calculations. A Reaction Time Test result window consists of a graph with test result, a key figures pane and a parameter pane located at the bottom of the window. Key figures and graph Average Reaction Time The average reaction time. Unit is measured in seconds. Page 36 of 96 Catsys 2000 Manual Standard Deviation The standard deviation of the reaction times. Unit is easured in seconds. Reaction Time Index An index based on normal material defined in the test battery definition. Graph The graph shows the reaction time plotted. The x-axis is the time of the signal and the y-axis is the reaction time. 4.2.1.4 Maximum Frequency Test The Maximum Frequency Tests include hand pronation/ supination and finger tapping, just like the rhythmic tests, but now the beat increases linearly from slow to extremely fast. The first five metronome beats are used to drag the subject into action. From beat six, action is recorded. The maximum frequency, which is the beat at which the subject looses control over the hand movements, is determined by decreasing the touch-sensitive period around each metronome beat while the beat increases. Thus, the precision required to produce recorded hits increases together with the beat. To compensate for random errors, the subject is allowed to miss one hit if the next two are recorded. The last legal hit determines the maximum frequency. This principle distinguishes well between controlled and chaotic movements. Page 37 of 96 Catsys 2000 Manual A Maximum Frequency Test result window consists of a graph with test result, a key figures pane and a parameter pane located at the bottom of the window. Key figures and graph Maximum Frequency The maximum frequency. Unit is measured in hz. Maximum Frequency Index An index based on normal material defined in the test battery definition. Graph The x-axis is the time of the signal and the y-axis is the deviation in time from the signal. Red points are missed points. The vertical blue line shows the "run-in" period. The hits/misses before this line are not included in the calculation of keyfigures. The vertical red-line shows the last legal hit. 4.2.1.5 Rhythmic Test To perform a Rhythmic Test, the subject must either tap on the drum or slap it in an alternating hand pronation-supination movement as close to a constant metronome beat as possible. When tapping, the palm of the hand should rest on the table with the thumb on one side and the middle finger on the other Page 38 of 96 Catsys 2000 Manual side of the drum. Tapping is done with the index finger. Performance is calculated from the ability to regulate the rhythm during a long slow test as well as a short and quicker one. During the first five metronome beats, the subject is allowed to adjust his or her beat. Calculation starts at beat no. six. The typical beat regulation will vary within ±0.05 sec. from the mean time offset between metronome beat and the subject's response. The offset is called the precision, but the main concern is the beat regulation, which is quantified as the dispersion of precisions of each response from beat 6 until the test expires. A Rhythmic Test result window consists of a graph with test result, a key figures pane and a parameter pane located at the bottom of the window. Key figures and graph Average offset The average offset. Unit is measured in seconds. Standard Deviation The standard deviation of offsets . Unit is measured in seconds. Rhythmic Test Index An index based on normal material defined in the test battery definition. Page 39 of 96 Catsys 2000 Manual Graph The x-axis is the time of the signal and the y-axis is the deviation in time from the signal. Red points are missed points. The vertical blue line shows the "run-in" period. The hits/misses before this line are not included in the calculation of keyfigures. 4.2.1.6 Maximum Frequency Free Test To perform a Maximum Frequency Free Test, the subject must either tap on the drum or slap it in an alternating hand pronation-supination movement as fast as possible. When tapping, the palm of the hand should rest on the table with the thumb on one side and the middle finger on the other side of the drum. Tapping is done with the index finger. Hits before the run-in time and the run-in time are not included in key figures calculation. A Maximum Frequency Free test result window consists of a graph with test result, a key figures pane and a parameter pane located at the bottom of the window. Key figures and graph Average Frequency Calculated as total number of hits devided by the recording time. Unit is measured in Hz. Page 40 of 96 Catsys 2000 Manual Deviation The deviation of hits from the average frequency calculated metronome hits. A person who is able to maintain the same hit speed will have a small deviation from the average frequency as opposed to a person with a variation in the hit speed. Maximum Freqency Free Test Index An index based on normal material defined in the test battery definition. Graph Hits are marked as a vertical black line. The calculated frequency metronome hits are shown as small red vertical lines. 4.2.2 Testing There are three ways to enter the testing mode in the Catsys 2000: 1. In the menu bar there is a menu called Testing. Click the menu and select the testing item in the menu. You will now be given a list of study folders to perform testing upon, please select the appropriate folder. 2. Select the subject folder you want to perform testing upon in the Study Folder Explorer, right click the mouse and select the Start testing item from the menu that appears. 3. Select the study folder you want to perform testing upon in the Study Folder Explorer, right click the mouse and select the Start testing folder from the menu that appears. Page 41 of 96 Catsys 2000 Manual Before entering testing mode the system will verify that everything is ready for testing. That is, the system will check to see, if all the necessary instruments are installed and that the datalogger is ready. If something is not ready you will be informed and you will have to correct the error before entering testing. As previously mentioned you can enter testing mode in several ways. Either on a folder (1 or 2 above) or on a subject folder (3 above). If you choose to start testing on a study folder, you will be asked to choose a subject folder to test on when entering testing mode. You can then select an existing subject folder or add a new subject folder. When the testing is done on a subject folder, you will be prompted for another subject folder. This continues until you press the Close button. If you entered testing mode in a subject folder, the testing will be exited when the testing is completed on that subject folder. Page 42 of 96 Catsys 2000 Manual The testing window looks as follows: The window is divided into 4 sections: 1 Subject folder. This section contains information on the current subject. 2 State section. This section changes according to the state of testing. 3 List of tests. This section contains a list of the tests to be performed. 4 Information section. This section contains information on current standings and which options the user has at this moment. Page 43 of 96 Catsys 2000 Manual Buttons In the bottom left-hand corner of the screen, there are several buttons depending on the state the testing is in. e.g. if the Catsys 2000 is ready to do a test the buttons will be Start and Skip. In the bottom right-hand corner of the screen, there is a Help button and a Close button. The Close button exits the testing and unsaved tests will be lost. The Help button brings up help on testing. States: The testing mode has the following states: Select subject folder The select subject folder state is present when entering testing mode on a folder. The state window shows space to enter data on a new subject folder and a list of existing subject folders. If you want to enter a new subject folder, enter the data on that subject folder and press the Add subject folder button or you can select an existing subject folder from the list by doubleclicking. When pressing the Add subject folder button or double-clicking the list the system will enter the next state – the ready for testing state. Page 44 of 96 Catsys 2000 Manual Ready for testing When a subject folder has been selected to perform tests upon, the system enters this state. The state section will now show the actual test. The subject folder information section will show information on the subject folder and the test lists will show the list of tests in this examination. The actual test is highlighted in the test list. You now have the following options: Start testing by pressing Space or the Start button. This will take the system to the testing state. Skip the test by pressing s or the Skip button. This will take you to the next test on the list and enter the ready for testing state again for that test. If the test was the last one, you will be taken to the Accept examination state. Testing Your system is now testing, you will see the progression on the progress bar in the state section and depending on the test you will see real-time data from the test. At any time, you can stop the actual test by pressing ESC or the Stop button. This will take you to the ready for testing on the same test again. If an error occurs during testing you will be taken to the Error state. When testing is completed you will be taken to the Accept test state. Page 45 of 96 Catsys 2000 Manual Accept test Your test has been sucessfully completed. You will see keyfigures on the test in the state section. You now have the following options: Accept the test by pressing Space or the Accept button. This will take you to the next test on the list, and enter the ready for testing state again for that test. If the test was the last one, you will be taken to the Accept examination state. Skip the test by pressing s or the Skip button. Skipping the test will discard the testing just completed and take you to the next test on the list, and enter the ready for testing state again for that test. If the test was the last one, you will be taken to the Accept examination state. Retry the test by pressing r or the Retry button. Retrying the test will discard the test and take you to ready for testing state on the same test. Accept examination All tests in this examination have been completed or have been skipped. In the state section, there is a button that brings up a summary on the examination. You now have the following options: You can accept the examination by pressing Space or the Accept button. This will save the tests. If you entered testing mode on a subject folder, the testing mode will be exited now. If you entered testing on a study folder you will be taken to the select subject folder state. Page 46 of 96 Catsys 2000 Manual You can reject the examination by pressing r or the Reject button. If you reject the examination all tests will be discarded. If you entered testing mode on a subject folder the testing mode will be exited now. If you entered testing on a study folder, you will be taken to the select subject folder state. Error state If any errors occurred during testing, the system goes into Error state and you will have to check your datalogger and connections to see what is wrong. Press r or the Restart button to enter the ready for testing state again. Note specific for force plate testing: The force plate needs to be zero-point calibrated before testing. The calibration has a validation of one day. The system will ask if it is necessary to perform the calibration. When you are asked to do so be sure that nothing is on the plate and then press the Start button. The system will then zero calibrate the force plate. This will take about 5 seconds. Page 47 of 96 Catsys 2000 Manual 4.3 Exporting, Importing and Printing The Catsys 2000 contains export, import and print features enabling you to share your data with other users, make backup of your data and create statistical material on data for us in other programs. 4.3.1 Exporting Data There are three ways to export data from the Catsys 2000: The One File Library Export exports selected study folders and/or customized batteries into one single file. This export format is ideal for backup and for e-mailing data to other users. The subject report exports data one subject examination pr. row. This format is very simple, and enables you to quickly export and use your data in other programs. The export to ascii function exports data to the ASCII format. This export format is ideal, if you want other programs to read your Catsys 2000 data, e.g. statistical packages. This export format is complicated but very flexible. 4.3.1.1 One File Library The One File Library Export function can be found in the Files menu under Export and submenu to One File Library. Selecting this menu item starts the guide called One File Library Export, the guide is explained below. Page 48 of 96 Catsys 2000 Manual Start The Start step is an introduction to the step by step guide. On the right side of the guide, you can see the progress. The current step is in bold and completed steps are checkmarked. At any time, you can press the Help button for help on the current step. The Back and Next buttons are used for navigating between the different steps. When you have completed a step, press the Next button to continue to the next step. The Cancel button will exit the guide without exporting any data. Select data At this step, you select the data to export. The available data is seen in the white box. Both study folders and customized batteries are shown in the box. The Catsys Standard Battery and the Catsys 7.0 Import Battery are not shown. Select the study folders and/or batteries to export by clicking the box on the left-hand side of the study folder/battery. If you check off a study folder that is using a customized battery, this battery is automatically exported. Select destination At this step, you select where to export your data. You select the appropriate directory using the directory list. If you want to change drive then use the drop-down menu at the bottom of the window. If you want to create a new directory to export the data into: first select the directory you want the new directory to be created in, press the New directory button and enter the directory name in the input box that appears and press OK or Page 49 of 96 Catsys 2000 Manual enter. When you press the Next button the export starts. Export status This step shows the status of the export. The export is completed when the status shows completed and the Next button is enabled. Press Next to exit. 4.3.1.2 Subject Report The subject report function can be found in the Files menu under Export and in the submenu to Subject Report. Selecting this menu item starts the guide called subject report, see below. Start The Start step is an introduction to the step by step guide. On the right side of the guide, you can see the progress. The current step is in bold and completed steps are checkmarked. At any time, you can press the Help button for help on the current step. The Back and Next buttons are used for navigating between the different steps. When you have completed a step, press the Next button to continue to the next step. The Cancel button will exit the guide without exporting any data. Select folder At this step you select which folder to export. You select the folder from the drop-down menu. Press Next when done. Page 50 of 96 Catsys 2000 Manual Select examinations At this step you select which examinations to export. You have the following options: ·First examination. Only exports the first examination of each subject. ·Last examination. Only exports the last examination of each subject. ·All examinations. Exports all examinations of each subject. ·Examination number. Exports a specific examination. For example if you want to export the third examination of every subject, you check of this option and select 3 from the dropdown menu. Press Next when done. Select test results At this step you select which subject, examination information and test results to export. As default everything is exported. If you want to exclude results you click the row you want to exclude and the value in the included column changes from yes to no. If you change your mind you simply press once more and it changes back to yes. Press Next to when done. Select destination At this step, you select where to export your data. You select the appropriate directory using the directory list. If you want to change drive use the drop-down menu at the bottom of the Page 51 of 96 Catsys 2000 Manual window. If you want to create a new directory to export the data into: select the directory you want the new directory to be created in. Then press the New directory button and enter the directory name in the input box that appears and then press OK or enter. When you press the Next button the export starts. Finished The Subject Report has now been created. Please press Next to exit. Export format The subject export format is very simple. It outputs a semicolon seperated text file, that can be imported into Excel, Access and other programs suited for analyzing data. Every single row in the file is an examination, excluding the first row that contains the header. The header contains information on the values in the corresponding column. 4.3.1.3 Export to ASCII The Export to ASCII function can be found in the Files menu under export and in the submenu Export to ASCII. Selecting this menu item starts the guide called Export to ASCII, see below. For more information on how the data is exported and formatted, please see the Export to ASCII format in the chapter called Background Information Page 52 of 96 Catsys 2000 Manual Start The Start step is an introduction to the step by step guide. On the right side of the guide, you can see the progress. The current step is in bold and completed steps are checkmarked. At any time, you can press the Help button for help on the current step. The Back and Next buttons are used for navigating between the different steps. When you have completed a step, press the Next button to continue to the next step. The Cancel button will exit the guide without exporting any data. Select data At this step, you select the data you want to export. First you select which study folder to export by using the first drop-down menu. The second drop-down menu indicates all subject folders or no subject folders, if the study folder does not contain any subject folders. If all subject folders are selected, all subject folders, all examinations are going to be exported. If you want to export one single subject folder, please select the subject folder from the second drop-down menu. If you do so another drop-down menu appears. Now you have the option of selecting to export all examinations or a single one. If you select a single test, the fourth drop-down menu appears, where you have the possibility of selecting a specific single test to export. Note: the upper part of the data is always exported. That is if you choose to export a specific subject folder, the study folder is also exported. Page 53 of 96 Catsys 2000 Manual Select tests At this step, you select which tests to export. As default all tests are selected with checkmarks on the left side. To select and deselect tests, please press the checkbox on the left side of the tests. Export options At this step, you select the export options. Time series are the samples done when testing. Including time series increases the size of the exported files a lot. (For every second of tremor pen testing there are 31samples). Exporting each subject folder into one individual file reduces the file size, but increases the number of files. Instead of getting one single large file, you will get several smaller files. Select destination At this step you select where to export your data. You select the appropriate directory using the directory list below. If you want to change drive use the drop-down menu at the bottom of the window. If you want to create a new directory to export the data into: first select the directory you want the new directory to be created in. Then press the New directory button, enter the directory name in the input box that appears and press OK or enter. Press Next to start export. Export status This step shows the status of the export. The export is complete when the status says Done and the Next button is enabled. Press Page 54 of 96 Catsys 2000 Manual Next to exit. 4.3.2 Importing Data There are two ways to import data into Catsys 2000: The Catsys 7.0 Import imports files created with the Catsys 7.0. makes it possible to import your old data created in Catsys 7.0. The One File Library imports data exported with the One File Library Export function in the Catsys 2000. 4.3.2.1 Importing Data from the Catsys 7.0 This import function imports files created with the Catsys 7.0. This function can be found in the file menu under import "Catsys 7.0 tests" Importing the Catsys 7.0 data is done by selecting the files you want to import. If you want to select multiple files, please hold down shift or ctrl while selecting files. When done selecting, press the Open button. The files will now be imported into the Catsys 2000. The importing may take a while. 4.3.2.2 Importing Data from One File Library The One File Library Import imports files exported with the One File Library Export function. The One File Library Import function can be found in the Files menu under import and in the submenu to One File Library. Selecting this menu item starts the guide called One File Library Page 55 of 96 Catsys 2000 Manual Import, see below. Start The Start step is an introduction to the step by step guide. On the right side of the guide, you can see the progress. The current step is in bold and completed steps are checkmarked. At any time, you can press the Help button for help on the current step. The Back and Next buttons are used for navigating between the different steps. When you have completed a step, press the Next button to continue to the next step. The Cancel button will exit the guide without exporting any data. Select file At this step, you select the file you want to import. Pressing the Select file button brings up a file dialog. Please find the file and press OK. If the file is an OFL, file the filename and path will be shown in the white box below the button. Pressing the Next button will start the import. Import status This step shows the status of the import. The import is completed when the status says Done and the Next button is enabled. Press Next to exit. Page 56 of 96 Catsys 2000 Manual 4.3.3 Printing Data The Catsys 2000 contains a print function that helps you print your data. There are several ways to print your data. You can print by selecting the data you want to print in the Study Folder Explorer. Proceed to right click the mouse and select print from the menu that appears. You will be asked if you want to print parent data too. This means that when printing a test you are asked to choose whether you want to print the corresponding subject folder and study folder or not. If you do not want to do so press No. After deciding you will be taken to the print guide. For more help on the print guide, see below. You can also start printing by pressing the print item in the file menu. This will start the print guide. For more help on the print guide see below. Start The Start step is an introduction to the step by step guide. On the right side of the guide, you can see the progress. The current step is in bold and completed steps are checkmarked. At any time, you can press the Help button for help on the current step. The Back and Next buttons are used for navigating between the different steps. When you have completed a step, press the Next button to continue to the next step. The Cancel button will exit the guide without any printing. Page 57 of 96 Catsys 2000 Manual Select data At this step, you select what to print. At the first level, you select which study folder to print using the drop-down menu. You can also choose to print the subject folders associated with that study folder by checking the print subject folder box. If you do so, a drop-down menu containing the subject folders will appear. Here you can select all subject folders or a specific subject folder. You can also select if you want to print examinations etc. Note: If you have started printing using the Study Folder Explorer and have selected Yes when asked whether you wanted to print parent data or not you will start at this step. Select options At this step, you set the print options. The first option is the printer settings. Pressing the Printer setting button will bring up the printer settings box with other Windows programs. You change the print quality, paper size etc. depending on your printer. In preview you select whether you want to preview the output instead of printing it. If you select this option you will preview every output and you can decide whether to print it or not using the printer icon at the top of the preview window. You can also save your output to WMF format, which is a graphics format that can be used in other programs or you can save your output in rtf format, which is a text format that can be used in other programs. Note: If you have started printing using the Study Folder Explorer and have selected No when asked whether you wanted Page 58 of 96 Catsys 2000 Manual to print parent data or not you will start at this step. Status When entering this step, the Catsys 2000 starts printing based on what you have chosen in the previous steps. You will be able to see the status of the printing. When the Catsys 2000 is done sending the print jobs to the printer, it will close down the guide. Page 59 of 96 Catsys 2000 Manual 4.4 Customized testbatteries The user can design customized batteries using the battery manager. This can be found in the Tools menu. A battery is a template used for testing. All customized batteries are uniquely identified by a serial number. This means that no users of the Catsys 2000 can create a customized battery with the same serial number. But you can import and export customized batteries from/to other users. Index definitions can also be entered for customized batteries. If a customized testbattery is in use, it is locked and can not be edited in any way or deleted. The Catsys 2000 is supplied with three testbatteries: Catsys Standard Battery with serial number 000-0000-00, Catsys PD Battery with serial number 000-0000-01 and Beuter-Catsys Battery with serial number 804-7452-02. These three batteries are always locked. Page 60 of 96 Catsys 2000 Manual Battery Manager: The battery manager consists of two windows. The first window shows the batteries, and the second window shows the tests in the selected battery. The first window has two columns. The first column shows the name of the battery, and the second column shows the serial number of the battery. The lock icon on the left side of the test battery name shows whether the battery is locked or not. The second window that shows the tests has two columns. One showing the test name and another showing the test type. The tests are arranged in testing order. Page 61 of 96 Catsys 2000 Manual The battery manager has the following buttons: Add battery Edit battery Delete battery Print battery Add test Edit test Delete test Move up Move down Edit Index Help Close Adds a new customized battery. Edits name and description of the selected battery. Deletes the selected battery. Prints out the battery definition. Adds a test to the selected battery. Edits the selected test. Deletes the selected test. Moves the selected test one step up. Moves the selected test one step down. Opens the index definition window, where you can view index definitions and enter index definitions for customized batteries. Opens help. Closes the battery manager. Page 62 of 96 Catsys 2000 Manual 4.4.1 Adding a Customized Battery To create your own customized batteries, you need to enter the Battery Manager. Press the Add battery button. This will start a step by step guide on adding a customized battery. Start The Start step is an introduction to the step by step guide. On the right side of the guide, you can see the progress. The current step is in bold and completed steps are checkmarked. At any time, you can press the Help button for help on the current step. The Back and Next buttons are used for navigating between the different steps. When you have completed a step, press the Next button to continue to the next step. The Cancel button will exit the guide without creating a battery. Existing or new At this step you decide whether to start from scratch or create a customized battery based on another battery. If you want to create a completely new battery, press New. If you want to use an existing battery as a template, press Existing battery. A dropdown menu will appear. In the drop-down menu you can choose the battery you want to use as a template. Note: Creating a battery based on another can save a lot of time. For example if you want to create a battery like the Catsys Standard Battery, but without the sway and tremor tests, you simply use the Catsys Standard Battery as a template, and in the test step you can remove the sway and tremor tests. Page 63 of 96 Catsys 2000 Manual Name and description Name is the name used to identify the battery in the Battery Manager etc. Description is a description of the battery. The description will appear on printouts etc. Tests The layout of this step depends on whether you have chosen to build your battery from scratch or to use an existing battery as a template. If you have chosen to use an existing battery as a template the white box in the middle will contain the name of the tests that your battery already consists of. If you have chosen to start from scratch the box will be empty. In this step you are able to decide which tests you want your battery to consist of. If you want to add a new test right click the mouse in the white box. A pop-up menu consisting of the following menu items will appear: Add new, Edit and Remove. The Add new menu item has a submenu with the different testtypes. Please select the appropriate test you want to add. When you have selected a test to add, a corresponding guide will start helping you to add the test. For more information on adding the different tests see the following chapters. If you want to remove a test from the battery, select the test, right click the mouse and select the Remove menu item from the menu that appears. If you want to edit a test, select the test, right click the mouse and select the Edit menu item from the menu that appears. You can also double-click the test. Press OK when you are done editing to save and exit. Pressing Cancel will exit without saving. For more information on editing tests, Page 64 of 96 Catsys 2000 Manual see Editing a single test in a battery. Test order In this step you will be able to arrange the tests in the order of the testing. Please select the test you want to move and press the button with the arrow up if you want to move the test up or the button with arrow down, if you want to move the test down. Press Next when done. Finished The customized battery is now ready to be created. Press Next to create the customized battery and exit the guide. If you want to exit the guide without creating the battery, press Cancel. Page 65 of 96 Catsys 2000 Manual 4.4.2 Editing the Name and Description of a Customized Battery If you want to edit the name and description of a customized battery, please select the battery and select Edit battery button. You can also double-click on the battery. Press OK when you are done editing to save and exit. Pressing Cancel will exit without saving. Note: You can not edit locked batteries. 4.4.3 Editing a Single Test in a Customized Battery If you want to edit a test, select the test and press the Edit test button. A test edit window will now appear. You can also double-click the test. Press OK when you are done editing to save and exit. Pressing Cancel will exit without saving. Note: You can not edit tests in locked batteries. 4.4.4 Adding a Single Test to a Customized Battery If you want to add a single test to a battery select the battery and press the button Add test. A step by step guide helping you create the test will now appear. For more information on this guide, see the following chapters. Page 66 of 96 Catsys 2000 Manual Note: You can not add a test to a locked battery. 4.4.5 Adding a Tremor Pen Test You add a Tremor Pen Test to a test battery by pressing the Add test button in the battery manager, and selecting the Tremor Pen Test from the list of tests that appear. This will start a step by step guide on adding a Tremor Pen Test to the test battery. Start The Start step is an introduction to the step by step guide. On the right side of the guide, you can see the progress. The current step is in bold and completed steps are checkmarked. At any time, you can press the Help button for help on the current step. The Back and Next buttons are used for navigating between the different steps. When you have completed a step, press the Next button to continue to the next step. The Cancel button will exit the guide without adding any test to the battery. Name and Description Name is the name used to identify the test in the Study Folder Explorer, when testing etc. Description is a description of the test. The description will appear on printouts, in the test window etc. Hand The Hand is the hand on the subject for which the test is meant. Page 67 of 96 Catsys 2000 Manual Recording period The unit of the recording period is seconds. The minimum recording period is 1 second and the maximum is 80 seconds Finished The Finished step is the last step. The test has now been added to the test battery. By pressing Next you will exit the guide. 4.4.6 Adding a Force Plate Test You add a Force Plate Test to a test battery by pressing the Add test button in the battery manager, and selecting the Force Plate Test from the list of tests that appear. This will start a step by step guide on adding a Force Plate Test to the test battery. Start The Start step is an introduction to the step by step guide. On the right side of the guide, you can see the progress. The current step is in bold and completed steps are checkmarked. At any time, you can press the Help button for help on the current step. The Back and Next buttons are used for navigating between the different steps. When you have completed a step, press the Next button to continue to the next step. The Cancel button will exit the guide without adding any test to the battery. Name and description Name is the name used to identify the test in the Study Folder Explorer, when testing etc. Description is a description of the Page 68 of 96 Catsys 2000 Manual test. The description will appear on printouts, in the test window etc. Recording period The unit of the recording period is seconds. The minimum recording period is 1 second and the maximum is 80 seconds. Finished The Finished step is the last step. The test has now been added to the test battery. By pressing Next you will exit the guide. 4.4.7 Adding a Reaction Time Test You add a Reaction Time Test to a test battery by pressing the Add test button in the battery manager, and selecting the Reaction Time Test from the list of tests that appear. This will start a step by step guide on adding a Reaction Time Test to the battery. Start The Start step is an introduction to the step by step guide. On the right side of the guide, you can see the progress. The current step is in bold and completed steps are checkmarked. At any time, you can press the Help button for help on the current step. The Back and Next buttons are used for navigating between the different steps. When you have completed a step, press the Next button to continue to the next step. The Cancel button will exit the guide without adding any test to the battery. Page 69 of 96 Catsys 2000 Manual Name and description Name is the name used to identify the test in the Study Folder Explorer, when testing etc. Description is a description of the test. The description will appear on printouts, in the test window etc. Hand The Hand is the hand on the subject for which the test is meant. Recording period The unit of the recording period is seconds. The minimum recording period is 1 second and the maximum is 80 seconds. Average period The Average period is the average period between every metronome beat. The Average period unit is seconds. The Average period has to be smaller than the recording period and larger than 0,1 second. Maximum reaction time The Maximum reaction period is the time the subject has to make a hit. The Maximum reaction period unit is seconds. The maximum reaction period has to be smaller than the Average period and larger than 0,1 second. Page 70 of 96 Catsys 2000 Manual Finished The Finished step is the last step. The test has now been added to the test battery. By pressing Next you will exit the guide. 4.4.8 Adding a Rhythmic Test You add a Rhythmic Test to a battery by pressing the Add test button in the battery nanager, and selecting the Rhythmic Test from the list of tests that appear. This will start a step by step guide on adding a Rhythmic Test to the battery. Start The Start step is an introduction to the step by step guide. On the right side of the guide, you can see the progress. The current step is in bold and completed steps are checkmarked. At any time, you can press the Help button for help on the current step. The Back and Next buttons are used for navigating between the different steps. When you have completed a step, press the Next button to continue to the next step. The Cancel button will exit the guide without adding any test to the battery. Name and description Name is the name used to identify the test in the Study Folder Explorer, when testing etc. Description is a description of the test. The description will appear on printouts, in the test window etc. Page 71 of 96 Catsys 2000 Manual Hand The Hand is the hand on the subject for which the test is meant. Frequency The Frequency is the beat frequency when testing. The minimum frequency is 0,8Hz and maximum is 12Hz Recording period The unit of the Recording period is seconds. The minimum and maximum recording period depends on the frequency. The minimum number of samples is 5 and the maximum number is 75. Higher frequency means shorter allowed minimum and maximum recording period. Lower frequency means longer allowed minimum and maximum recording period. Finished The Finished step is the last step. The test has now been added to the test battery. By pressing next you will exit the guide. 4.4.9 Adding a Maximum Frequency Test You add a Maximum frequency test to a battery by pressing the Add test button in the battery manager, and selecting the Maximum frequency test from the list of tests that appear. This will start a step by step guide on adding a Maximum frequency test to the battery. Page 72 of 96 Catsys 2000 Manual Start The Start step is an introduction to the step by step guide. On the right side of the guide, you can see the progress. The current step is in bold and completed steps are checkmarked. At any time, you can press the Help button for help on the current step. The Back and Next buttons are used for navigating between the different steps. When you have completed a step, press the Next button to continue to the next step. The Cancel button will exit the guide without adding any test to the battery. Name and description Name is the name used to identify the test in the Study Folder Explorer, when testing etc. Description is a description of the test. The description will appear on printouts, in the test window etc. Hand The Hand is the hand on the subject for which the test is meant. Start Frequency The Start frequency is the frequency at which the metronome beats start. The frequency unit is Hz. Minimum frequency is 0,8Hz and maximum is 3Hz. Page 73 of 96 Catsys 2000 Manual Stop Frequency The Stop frequency is the frequency at which the metronome beats stop. The frequency unit is Hz. Minimum frequency is the start frequency and maximum is 12Hz. Recording period The unit of the Recording period is seconds. The minimum and maximum recording period depends on the frequency. The minimum number of samples is 5 and the maximum number is 75. Higher average frequency means shorter allowed minimum and maximum recording period. Lower average frequency means longer allowed minimum and maximum recording period. Finished The Finished step is the last step. The test has now been added to the test battery. By pressing next you will exit the guide. 4.4.10 Adding a Maximum Frequency Free Test You add a Maximum Frequency Free Test to a battery by pressing the Add test button in the battery manager, and selecting the Maximum Frequency Free Test from the list of tests that appear. This will start a step by step guide on adding a Maximum Frequency Free Test to the battery. Page 74 of 96 Catsys 2000 Manual Start The Start step is an introduction to the step by step guide. On the right side of the guide, you can see the progress. The current step is in bold and completed steps are checkmarked. At any time, you can press the Help button for help on the current step. The Back and Next buttons are used for navigating between the different steps. When you have completed a step, press the Next button to continue to the next step. The Cancel button will exit the guide without adding any test to the battery. Name and description Name is the name used to identify the test in the Study Folder Explorer, when testing etc. Description is a description of the test. The description will appear on printouts, in the test window etc. Hand The Hand is the hand on the subject for which the test is meant. Recording period The unit of the recording period is seconds. The minimum recording period is 1 second and the maximum is 40 seconds. Finished The Finished step is the last step. The test has now been added to the test battery. By pressing Next you will exit the guide. Page 75 of 96 Catsys 2000 Manual 4.5 Preferences The Preferences menu enables you to view and edit preferences. To access the Preferences window, please select the menu item Preferences in the Tools menu. Note: If you want to install new hardware use the Install new hardware button on the datalogger page. Press the button and a guide will guide you through installing new hardware. For more information on this guide, see Installing hardware In order to shift between the pages, press the tabs at the top of the Preferences window. To leave the Preferences window and saving your changes press OK, to leave without saving press Cancel. Note: Not all changes can be canceled, because changes are saved automatically when turning pages. The Preferences window contains the following three pages: 4.5.1 Datalogger The Datalogger page contains the following information about the installed datalogger: Serial number Serial number is the dataloggers serial number. The serial number can be found at the bottom of the datalogger. The serial number has the format DLGX-XXX, e.g. DLG7-003. The serial number is used to identify which calibration files can be used with the datalogger. The serial number is automatically detected Page 76 of 96 Catsys 2000 Manual when installing hardware. Comport Comport is the communications port that the datalogger is connected to on your computer. For more information on connecting your datalogger to the computer, please go to Connecting and Installing the Hardware. Eprom The datalogger is controlled by software inside the datalogger. This software is permanently stored on an eprom. It is possible for Catsys 2000 to upload new software into this eprom. This enables Catsys 2000 to use new features of the datalogger , like new tests etc. A drawback is that the upgrade is lost when the datalogger is reset or powered off. An upload takes about 25 sec. New eprom versions can be found at www.catsys.dk The eprom window on the datalogger page contains information on the current status of the datalogger eprom. The window also contains controls for controlling the eprom software. A more detailed description follows: The current eprom shows which software version the datalogger currently is using. The built in eprom tells which software version is built in. This is also the version that the datalogger will revert to when powered off or reset. The newest version shows the newest available software version on the system. New versions can be found at www.catsys.dk. Download the epromfile from the site and save it, then press the Import eprom software button. This brings up a file selector, Page 77 of 96 Catsys 2000 Manual select the file you just downloaded and press Open. The new eprom software is now ready to use. The leftmost button in the eprom window, enables you to either to upload the newest eprom version to your datalogger or revert to the built in. The ‘always use newest eprom version‘ checkflag controls whether the system will automatically update your datalogger when testing. If you want to always use the newest version when testing, be sure to check of this setting. If you want to refresh the characteristics, be sure your datalogger is connected, turned on and press the Refresh button. The Catsys 2000 now requests the characteristics from the datalogger. If the characteristics are OK, the datalogger sounds a beep and the characteristics are shown in the white boxes. If the white boxes show ‘n/a’ the Catsys 2000 could not correctly retrieve your datalogger characteristics. Please check that your datalogger is properly connected, see Connecting and Installing the Hardware. Installing hardware If you want to install new hardware the easiest way is to use install hardware. To start, press the Install Hardware button. 4.5.2 Instruments The Instruments page shows which sway and tremor instruments are installed. The text box shows the serial number of the tremor and sway Page 78 of 96 Catsys 2000 Manual instruments installed. If no instruments are installed, please press the Install button. The drop-down menus contain the instruments available for the connected datalogger. If no instruments can be found for the selected datalogger the drop down-menus will inform you. Buttons: View instrument characteristics. By pressing the button on the left side of the text box, the instrument characteristics are shown. Install new instruments. If you want to install new instruments, press the Install button. This brings forth the installing instruments window. Please follow the instructions on the screen to install instruments. 4.5.3 Gains The Gains page contains the actual gain setting for testing. The Gains settings can not be changed and are specific for each datalogger and instrument. Page 79 of 96 Catsys 2000 Manual 5 Background information 5.1 Performance Index The performance index is a value between 0 and 2, relating the performance of the subject to the average performance of a large population of sound subjects. PI P Pm s(Pm) Performance index of subject Performance as measured and calculated by Catsys Mean performance of a large sound population. Defined in the testbattery. Standard deviation of normal human performance. Defined in the test. Indices for performances better than normal human performance are higher than 1.00, indices below normal human performance are less then 1.00. Formula relating performance index to performance below average: 1 PI = P−P m e s P m Page 80 of 96 Catsys 2000 Manual Formula relating performance index to performance better than average: 1 PI =2− e P−Pm s P m The formulas above are exponential equations of the same type as the Gauss distribution function. This gives following performance indices: Performance index (PI) of a normal performance Pm PI of a performance equal to Pm - s(Pm) PI of a performance equal to Pm + s(Pm) Page 81 of 96 PI 1.00 0.37 1.63 Catsys 2000 Manual The figure below indicates the function, relating index to performance. Example. The subject reaction time performance, P is 0.195sec. Normal reaction time Pm is 0.212 sec and s(Pm)=0.036sec (Catsys Standard Testbattery Normal Material). The subjects performance is plotted at “A”. The corresponding performance index, PI is 1.35 Page 82 of 96 Catsys 2000 Manual Definition of “below average” performance: Tremor Sway Reaction time Max. frequency Rhythmic tests Max. frequency free TI1 SN2 RT MF s(Pr) FR P>Pm P>Pm P>Pm P<Pm P>Pm P<Pm 5.2 Catsys Index The Catsys Index is a index calculated by taking the average of all performance indicies in the examination. The standard deviation of the Catsys Index is defined by the expression: 1− sCI =100 1 e n where n is the number of tests in the examination. The standard deviation increases with decreasing number of tests in the examination. 1 The Tremor Index is calculated as 1 TI = ∗ P I P F50 P sF50 / 2 P HI 3 2 Sway Number SN was defined by Dr. Jansen as the Pythagorean sum of the transveral sway and the saggital sway. Page 83 of 96 Catsys 2000 Manual 5.3 The Catsys Standard Test Battery Index Prior to Catsys 2000, the Catsys system was divided into three different systems: Catsys 7, Tremor 7 and Sway 7. With the Catsys 2000, these three batteries were merged into the Catsys Standard Test Battery. This also means that the index definitions used in the Standard Test Battery is based on three different normal materials, coming from each of the original systems. These normal materials are described below: 5.3.1 Tremor 7 Normal Material The data was collected by Dr. Sigurd Mikkelsen, the Clinic of Occupational Health, Copenhagen County Hospital, Denmark Tremor Intensity Center Frequency Standard Deviation Harmonic Index Number of data sets Left hand Pm s(Pm) 0.11 0.03 7.5 1.2 3.8 0.7 0.87 0.04 61 Right hand Pm s(Pm) 0.11 0.03 7.2 1.1 3.5 0.8 0.89 0.04 61 5.3.2 Sway 7 Normal Material The data was collected by Dr. Jansen, Copenhagen University Hospital, Denmark, 1986-88. Dr. Jansen used a highly sophisticated instrument set-up, designed and manufactured at the Technical University of Denmark. His basic standards for sway performance testing are implemented in the Catsys test system. Page 84 of 96 Catsys 2000 Manual Women s(S) Trans. s(T) Sag. s(S) mm 1.49 1.17 3.13 1.87 2.02 mm mm 1.07 5.4 1.14 5.4 1.80 5.5 1.46 5.4 1.62 6 mm 1.11 1.49 1.55 2.00 1.76 20-70 100 5,64 1,76 6,51 2,42 4,85 1,43 5,53 1,56 Age years 20-29 30-39 40-49 50-59 60-70 Men n Trans s(T) Sag. . mm mm mm 10 5.2 1.10 5.8 10 4.2 1.33 4.6 10 5.6 1.44 7.5 10 6.2 1.84 6.1 10 7.1 1.76 8.6 AVERAGE, all: mm 4.5 4.4 4.8 5.3 5.2 Transversal Pm=5.25 s(Pm) = 1.64 mm sway: mm Sagittal sway: Pm=6.02 s(Pm) = 2.09 mm mm SWAY Pm=8.02 s(Pm) = 2.53 mm NUMBER: mm The SWAY NUMBER is the Pythagorean sum of transversal and sagittal sway. Mean and dispersion is calculated on the basis of SWAY NUMBERS from all 100 individuals in the reference group. Page 85 of 96 Catsys 2000 Manual 5.3.3 Catsys 7 Normal Material The data was produced by the Clinic of Occupational Health, Copenhagen University Hospital, Copenhagen, and the Clinic of Occupational Health, Copenhagen County Hospital. Test Left hand Right hand Mean StdDev Mean StdDe Rhythmic Hand 1.0Hz 20s 2.5Hz 10s Finger 1.0Hz 20s 2.5Hz 10s Maximum Freq. Reaction Time Hand 1.6-7.5Hz 12s Finger 1.6-7.5Hz 12s Pr msec Pm s(Pm) Pm s(Pm) -109 88 -96 88 s(Pr)msec 57 46 63 35 Pr msec -21 28 -25 32 s(Pr)msec 38 34 33 22 Pr msec -41 59 -44 47 s(Pr)msec 47 22 53 40 Pr msec -24 23 -30 23 s(Pr)msec MF Hz 27 4.64 26 0.95 22 4.88 15 1.03 MF Hz 5.11 0.85 5.30 0.89 212 36 212 36 RT msec 5.4 The Beuter/Catsys Test Battery Index In 1999, a substantial CATSYS normative material was Page 86 of 96 Catsys 2000 Manual published by researchers at Universty of Quebec at Montréal. The material is available from the CATSYS website with permission from the autors. The article headings are quoted below: Standardization of a neuromotor test battery: The CATSYS System Christine Després, Daniel Lamoureux, and Anne Beuter Centre de Neuroscience de la Cognition Université du Québec à Montréal CP 8888, succ. Centre-Ville Montréal, Québec, Canada, H3C 3P8 Tel: 514- 987-3000 ext. 3724 Fax: 514- 987-8952 We are deebly indepted to Professor Anne Beuter and her collegues for making this research result available to other CATSYS users. It is a major contribution to develop an international standard on normative behavior, which gives researchers all over the world a valuable reference to their own epidemiological and individual examinations. If you select the Beuter-Catsys test battery definition, which is a default template, included in the library of test battery definitions, embedded in CATSYS 2000, a Beuter Catsys Index will be calculated and presented in graphical and numerical Page 87 of 96 Catsys 2000 Manual outputs. It allows you quickly compare your subject's performance to the Beuter Normative material. Definition of performance indices and index is treated in section 5.1. You may also analyse your subjects in depth with gender and age as variables. This requires more sophisticated manipulations, where the CATSYS export facility comes in handy. See section 4.3.1 for a detailed definition of output layout, allowing you to migrate your data into a database for further sorting and analysis. The definition of the Beuter/Catsys Index is shown below: Test Tremor Test Right Hand Mean 2 Tremor Int. m/s 0.13 0.03 Center Freq. Hz 6.98 0.81 Standard Dev. Hz 2.50 0.64 2.08 0.50 Harmonic Index Tremor Test Left Hand StdDev Tremor Int. m/s 0.11 0.04 Center Freq. Hz 7.06 1.05 Standard Dev. Hz 3.03 0.58 1.77 0.43 2 Harmonic Index Sway 1 Sway Number mm 5.39 1.92 Sway 2 Sway Number mm 5.76 1.99 Sway 3 Sway Number mm 6.61 2.39 Sway 4 Sway Number mm 7.17 2.40 Rhythmic Test Slow For Right Hand P/S s(P) s 0.05 0.03 Page 88 of 96 Catsys 2000 Manual Test Mean StdDev Rhythmic Test Slow For Left Hand P/S s(P) s 0.05 0.04 Rhythmic Test Fast For Right Hand P/S s(P) s 0.04 0.02 Rhythmic Test Fast For Left Hand P/S s(P) s 0.04 0.03 Rhythmic Test Slow For Right Hand F-tap s(P) s 0.06 0.04 Rhythmic Test Slow For Left Hand F-tap s(P) s 0.06 0.04 Rhythmic Test Fast For Right Hand F-tap s(P) s 0.03 0.02 Rhythmic Test Fast For Left Hand F-tap s(P) s 0.04 0.03 Max. Frequency Test Right Hand P/S Max. Freq. Hz 4.48 1.19 Max. Frequency Test Left Hand P/S Max. Freq. Hz 4.30 1.08 Max. Frequency Test Right Hand F-tap Max. Freq. Hz 5.66 1.19 Max. Frequency Test Left Hand F-tap Max. Freq. Hz 5.38 1.08 Reaction Time Test For Right Hand Reaction Time s 0.21 0.03 Reaction Time Test For Left Hand Reaction Time s 0.21 0.03 Page 89 of 96 Catsys 2000 Manual 5.5 The ASCII Export format The "export-to-ASCII" function enables a Catsys user to export data generated by the Catsys to other programs. Such programs can be statistical programs. The export format is ASCII, which is a basic format that can be read, imported and edited by all text programs such as MS Word. Furthermore, all databases, spreadsheets and statistical programs can read and import ASCII formatted data. The structure of the exported file is shown in this table: Each row contains one set of data. Column 1, 2, 3 and 4 describe the origine of the data. Column 1: If larger than ‘00000000’ the data belongs to a subject folder. And the number in column 1 contains the unique ID number from the subject folder. '00000000' indicates that the data does not belong to a subject folder, but belongs to the study folder. A row showing data from a study folder (called "Test study folder A") could look as follows: 000000 000000 000000 000000 000001 Test study folder A Column 2: Identifies the number of examinations performed with the subject. Each examination belonging to a subject folder gets a unique ID number starting with 0. The value 0 indicates that the data is subject folder specific. Column 3: Identifies the individual test within an examination. The value 0 indicates that the data is examination specific. Column 4: Contains information whether or not test data is sample data. If test data is not sample data, this column will Page 90 of 96 Catsys 2000 Manual contain the value 0. If the data is sample data the first sample is marked 1, the next 2 etc. Column 5: Identifies data type (please refer to the end of this document for a list of codes used). For example, if column 5 contains the value "33" it indicates that the measured value came from a sway test and is equal to the subjects weight. Examples 000001 000000 000000 000000 000004 Martin Johannesen The row tells that the subject folder with ID number 1 is called Martin Johannesen 000001 000001 000000 000000 000010 Catsys standard battery The row tells that the first examination performed on subject folder 1 is called Catsys standard battery. 000001 000001 000001 000000 000013 Tremor test for left hand The row tells that the first test performed on subject folder 1 and examination 1 is called Tremor test for left hand. 000001 000001 000001 000000 000019 8,2 The row tells that test 1 in examination 1 performed by subject folder 1 has a recorded time on 8,2 seconds. 000001 000001 000001 000000 000021 0,11 The row tells that test 1 in examination 1 performed by subject folder 1 has a tremor intensity on 0,11. 000001 000001 000001 000010 000026 10 000001 000001 000001 000010 000027 0,307 000001 000001 000001 000010 000028 65004 Page 91 of 96 Catsys 2000 Manual 000001 000001 000001 000010 000029 54000 These rows tell that test 1 in examination 1 performed by subject folder 1 contains the following information. Data sample 10 is sampled 0,307 seconds after start with value from channel 'x' (65004) and channel 'y' (54000) Data ID ID 1 2 3 4 5 6 7 8 9 10 11 12 13 14 15 16 17 18 19 20 Description Study folder name Study folder description Subject folder ID Subject name Subject misc1 Subject misc2 Subject description Subject gender Subject dominating hand Examination name Examination description Examination accepted time and date Testname Test description Test accepted time and date Test type Test hand Test run in time Test recording time Test run out time Page 92 of 96 Comments s s s Catsys 2000 Manual ID 21 22 23 24 25 26 27 28 29 30 31 32 33 34 35 36 37 38 39 40 41 42 43 44 45 46 47 Description Tremor intensity Tremor centre frequency Tremor std. deviation Tremor harmonic index Number of samples Sample number Sample time Tremor x-channel raw Tremor y-channel raw Tremor Fourier frequency number Tremor Fourier frequency Tremor Fourier amplitude normalized Sway weight Sway mean sway Sway transversal x Sway sagital y Sway area Sway velocity Tremor sensor serial Sway sensor serial Sway force ch1 Sway force ch2 Sway force ch3 Sway x Sway y Sway ch1 raw Sway ch2 raw Page 93 of 96 Comments Hz Hz Hz kg mm mm mm mm*mm mm/s N N N mm mm Catsys 2000 Manual ID 48 49 50 51 52 53 54 55 56 57 58 59 60 61 62 63 64 65 66 67 68 69 70 71 72 Description Sway ch3 raw Reaction average period Reaction max. reaction time Reaction average reaction time Reaction std. deviation Reaction hit time Metronome time Max freq. start frequency Max freq. stop frequency Max freq. maximum frequency Max freq. hit time Rhythmic frequency Rhythmic average time Rhythmic std. deviation Rhythmic hit time Testbattery serial Sway Fourier frequency number Sway Fourier frequency Sway Fourier Transversal amplitude normalized Sway intensity Tremor Fourier running average Free average frequency Free deviation Free hit Free metronome Page 94 of 96 Comments s s s s s s Hz Hz Hz s Hz s s s Hz Hz ms ms Catsys 2000 Manual ID Description 73 Sway Fourier Saggital amplitude normalized Page 95 of 96 Comments Catsys 2000 Manual Alphabetical Index Datalogger 1pp., 42, 47, 76pp. Sway 4, 7, 33pp., 63, 78, 83pp., 88, 91, 93pp. Tremor 1pp., 6p., 30pp., 54, 63, 67, 78, 83p., 88, 91, 93p. Page 96 of 96