1
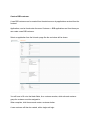
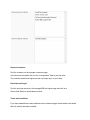
Magento B2B user manual Installation Login to your magento admin area and disable all cache types. Upload the content from the zip you received thru an ftp client. Return to the magento area and reload any page, then reactivate your cache. Log out and in again, so you can access the settings in the system > configuration area. The installation of the module is now completed. Setup the B2B module. There are only a few settings in this module to consider: Under the system > configuration section under B2B you can access these settings. Under the registration section, you can enable or disable a simple captcha function, if enabled a simple math question is added to the registration page, to avoid B2B applications from bot systems. Under the login section you will have 3 settings: The login fields set which information to request from customer on the login page. Redirect to CMS page, if set to yes, will redirect the customers to a cms page instead of the default my account page after they have logged in. A new option will become visible, here you select the CMS page you want them redirected to. Create a B2B customer. A new B2B customer can be created from the admin area or by applications received from the frontend. Applications, can be found under the menu Customer > B2B applications and from these you can create a new B2B customer. Select an application from the list and a page like the one below will be shown. You will have to fill out a few blank fields, for a customer number, which site and customer group the customer must be assigned to. When complete, click the save and create a customer button. A new customer will then be created, with a single sub login. If you wish to create a new B2B customer by yourself, start with creating a regular customer from the manage customer page. It is important to fill out the Company name and customer number fields and the customer type must be set to B2B. When the customer has been created go to the Customer / B2B sublogins page and click add new in the top. Fill out the fields and select the customer you just created in the customer dropdown. Your new B2B customer can now log in. Setup allowed shipping / payment methods for customers If you need to limit the access to shipping and payment methods for your single customers this is done directly in the manage customer page. Find the customer in the manage customer page. In the tab Account information, you can select which of the active payment or shipping methods this customer can use. If none selected the customer can use all active methods. Suspend customer Find the customer on the manage customers page. In the Account information tab, set the “is suspended” field to yes and save. The customer and all sublogins can then no longer log in to your shop. Deactivate sublogin Find the sublogin account in the manage B2B sublogins page and click on it Set the field Status to deactivated and save. Terms and conditions If you have enabled terms and conditions on the checkout page, these needs to be edited after the module has been installed. A new field, customer groups, has been added, and must be filled out. Here you select which customer groups the conditions apply to.