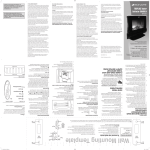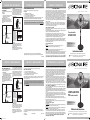
1
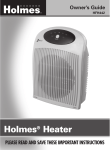
CLEANING AND MAINTENANCE
TRANSFORMING FAN INTO 4 USE
CONFIGURATIONS
Your fan is designed to function well in all below possible
configurations:
1. Stand Fan
Press the Extension Pole Release Button to adjust the
height of the extension pole in Stand Fan
configuration (see Figure 8).
NOTE: Oscillation cannot work in the other
configurations (Table Fan, Air Circulator and Storage).
Before folding up the fan, please make sure the fan
head is back to the vertical position facing front as shown
in Figure 8.
2. Table Fan
Press and hold the Middle Joint Pivot Button below the
control panel (press from both sides of the button), and
use another hand to push the fan head backward and
fold towards the pole (see Figure 8) until resting to the
Table Fan position as shown in Figure 9. Press the
Extension Pole Release Button to adjust the height in
Table Fan configuration.
Figure 9
Extension Pole
Release Button
CLEANING AND MAINTENANCE
CLEANING/MAINTENANCE INSTRUCTIONS
WA R R A N T Y I N F O R M AT I O N
5 YEAR LIMITED WARRANTY
Follow these instructions to correctly and safely care for your fan. Please remember:
Fan Cleaning
• Always unplug the fan before cleaning.
• Do not allow water to drip on or enter into fan housing.
• Be sure to use a soft cloth moistened with a mild soap solution.
• Do not use gasoline, thinner or benzene as a cleaner.
Clean the fan grill, housing and base with a soft, damp cloth. Do not attempt to remove the fan blade. Please use caution
around the motor housing area. Do not allow the motor or other electrical components to be exposed to water.
If you have any questions regarding your product or would like to learn more about other Bionaire® products,
please contact our Consumer Service Department at 1-800-253-2764 or visit our website at www.bionaire.com.
Figure 8
Sunbeam Products, Inc. doing business as Jarden Consumer Solutions or if in Canada, Sunbeam Corporation (Canada)
Limited doing business as Jarden Consumer Solutions (collectively “JCS”) warrants that for a period of five years from
the date of purchase, this product will be free from defects in material and workmanship. JCS, at its option, will repair
or replace this product or any component of the product found to be defective during the warranty period.
Replacement will be made with a new or remanufactured product or component. If the product is no longer available,
replacement may be made with a similar product of equal or greater value. This is your exclusive warranty. Do NOT
attempt to repair or adjust any electrical or mechanical functions on this product. Doing so will void this warranty.
This warranty is valid for the original retail purchaser from the date of initial retail purchase and is not transferable.
Keep the original sales receipt. Proof of purchase is required to obtain warranty performance. JCS dealers, service
centers, or retail stores selling JCS products do not have the right to alter, modify or any way change the terms and
conditions of this warranty.
This warranty does not cover normal wear of parts or damage resulting from any of the following: negligent use or
misuse of the product, use on improper voltage or current, use contrary to the operating instructions, disassembly,
repair or alteration by anyone other than JCS or an authorized JCS service center. Further, the warranty does not
cover: Acts of God, such as fire, flood, hurricanes and tornadoes.
pure indoor living
What are the limits on JCS’s Liability?
JCS shall not be liable for any incidental or consequential damages caused by the breach of any express, implied or
statutory warranty or condition.
Except to the extent prohibited by applicable law, any implied warranty or condition of merchantability or fitness for a
particular purpose is limited in duration to the duration of the above warranty.
JCS disclaims all other warranties, conditions or representations, express, implied, statutory or otherwise.
JCS shall not be liable for any damages of any kind resulting from the purchase, use or misuse of, or inability to use
the product including incidental, special, consequential or similar damages or loss of profits, or for any breach of
contract, fundamental or otherwise, or for any claim brought against purchaser by any other party.
Some provinces, states or jurisdictions do not allow the exclusion or limitation of incidental or consequential damages
or limitations on how long an implied warranty lasts, so the above limitations or exclusion may not apply to you.
This warranty gives you specific legal rights, and you may also have other rights that vary from province to province,
state to state or jurisdiction to jurisdiction.
Base Joint Pivot Button
Middle Joint Pivot Button
Extension Pole
Extension Pole
Release Button
3. Air Circular
Figure 10
Press and hold the Base
Joint Pivot Button on
Base, and use another
hand to push the fan head
with the pole (see Figure
9) until resting onto the
base horizontally in the Base Joint Pivot Button
configuration of air
circulator as shown in Figure 10.
4. Storage
Turn off the fan and unplug the adaptor as in the air
circulator configuration (see Figure 10). This folded
position allows you to place the fan into the original
shipping carton for storage.
NOTE: When storing your fan in the off season, it is
important to keep it in a safe dry location. It is important
to protect the fan head from dust.
How to Obtain Warranty Service
© 2011 Sunbeam Products, Inc. doing business as Jarden Consumer Solutions. All Rights Reserved.
Distributed by Sunbeam Products, Inc. doing business as Jarden Consumer Solutions, Boca Raton, Florida 33431.
Printed In China
LIMPIEZA Y MANTENIMIENTO
CÓMO TRANSFORMAR EL VENTILADOR
EN 4 CONFIGURACIONES DE USO
2. Ventilador de Mesa
Presione y sostenga el Botón de Pivote de la Junta Media
que se encuentra debajo del panel de control (presione
Su ventilador está diseñado para funcionar bien en todas ambos lados del botón) y use la otra mano para empujar
las siguientes configuraciones posibles:
la cabeza del ventilador hacia atrás y plegarla hacia el
tubo (ver la Figura 8) hasta que quede en posición de
1. Ventilador de Pie
Presione el Botón de Desbloqueo del Tubo de Extensión Ventilador de Mesa como se muestra en la Figura 9.
Presione el Botón de Desbloqueo del Tubo de Extensión
para ajustar la altura del tubo de extensión en
para ajustar la altura en la configuración Ventilador de
configuración de Ventilador de Pie (ver Figura 8).
Mesa.
NOTA: La oscilación no puede funcionar en las otras
configuraciones (Ventilador de Mesa, Circulador de Aire y
Figura 9
Almacenamiento). Antes de plegar el ventilador,
asegúrese de que la cabeza del ventilador este en
posición vertical mirando hacia adelante como se muestra
en la Figura 8.
Botón de Desbloqueo
del Tubo de Extensión
Figura 8
LIMPIEZA Y MANTENIMIENTO
INSTRUCCIONES DE LIMPIEZA/MANTENIMIENTO
Tubo de Extensión
Botón de Desbloqueo del
Tubo de Extensión
BSF1411AR_11ESM2.indd 1
3. Circulador de Aire Figura 10
Presione y sostenga el
Botón de Pivote de la
Junta de Base y use la
otra mano para empujar
la cabeza del ventilador
con el tubo (ver Figura 9)
Botón de Pivote de la
hasta que quede
horizontalmente sobre la Junta de Base
base en la configuración de Circulador de Aire como se
muestra en la Figura 10.
4. Almacenamiento
Apague el ventilador y desconecte el adaptador como en
la configuración de Circulador de Aire (ver Figura 10).
Esta posición de plegado le permite colocar el ventilador
en la caja de envío original para su guardado.
NOTA: Cuando guarde el ventilador fuera de la
temporada de verano, es importante que lo haga en un
lugar seco. Es fundamental que proteja la cabeza del
ventilador del polvo.
STAND FAN
MODEL: BSF1411AR
Instruction Leaflet
Read instructions before operating. Retain for future reference.
Questions? Comments? Call 1-800-253-2764 in North America
or visit our website at www.bionaire.com.
INFORMACION DE LA GARANTIA
GARANTÍA LIMITADA DE 5 AÑOS
Siga estas instrucciones para el cuidado correcto y seguro de su ventilador. Por favor recuerde:
Limpieza del Aspa del Ventilador
• Siempre desconecte el ventilador antes de limpiarlo.
• No permita que gotee o entre agua en la cubierta del ventilador.
• Asegúrese de usar un paño húmedo y suave con una solución de jabón suave.
• No use gasolina, diluyente o benceno como limpiador.
Limpie la rejilla, la carcasa y la base del ventilador con un paño húmedo y suave. No intente remover las aspas del
ventilador. Limpie con cuidado el área de la carcasa del motor. No permita que el motor u otros componentes
eléctricos estén expuestos al agua.
Si tiene preguntas relacionadas con este producto o si está interesado en conocer otros productos Bionaire®,
póngase en contacto con nuestro Departamento de Servicio al Cliente: llame al 1-800-253-2764 o visite nuestro
sitio web www.bionaire.com.
Sunbeam Products, Inc. operando bajo el nombre de Jarden Consumer Solutions, o en Canadá, Sunbeam Corporation
(Canada) Limited operando bajo el nombre de Jarden Consumer Solutions, (en forma conjunta, “JCS”), garantiza que
por un período de cinco años a partir de la fecha de compra, este producto estará libre de defectos de materiales y
mano de obra. JCS, a su elección, reparará o reemplazará este producto o cualquier componente del mismo que
presente defectos durante el período de garantía. El reemplazo se realizará por un producto o componente nuevo o
reparado. Si el producto ya no estuviera disponible, se lo reemplazará por un producto similar de valor igual o
superior. Ésta es su garantía exclusiva. No intente reparar o ajustar ninguna función eléctrica o mecánica de este
producto. Al hacerlo elimínará ésta garantía.
La garantía es válida para el comprador minorista original a partir de la fecha de compra inicial y la misma no es
transferible. Conserve el recibo de compra original. Para solicitar servicio en garantía se requiere presentar un recibo
de compra. Los agentes y centros de servicio de JCS o las tiendas minoristas que venden productos de JCS no tienen
derecho a alterar, modificar ni cambiar de ningún otro modo los términos y las condiciones de esta garantía.
Esta garantía no cubre el desgaste normal de las piezas ni los daños que se produzcan como resultado de uso
negligente o mal uso del producto, uso de voltaje incorrecto o corriente inapropiada, uso contrario a las instrucciones
operativas, y desarme, reparación o alteración por parte de un tercero ajeno a JCS o a un Centro de Servicio autorizado
por JCS. Asimismo, la garantía no cubre actos fortuitos tales como incendios, inundaciones, huracanes y tornados.
vida en interiores puros
¿Cuál es el límite de responsabilidad de JCS?
JCS no será responsable de daños incidentales o emergentes causados por el incumplimiento de alguna garantía o
condición expresa, implícita o legal.
Excepto en la medida en que lo prohíba la ley aplicable, cualquier garantía o condición implícita de comerciabilidad o
aptitud para un fin determinado se limita, en cuanto a su duración, al plazo de la garantía antes mencionada.
JCS queda exenta de toda otra garantías, condiciones o manifestaciones, expresa, implícita, legal o de cualquier otra
naturaleza.
JCS no será responsable de ningún tipo de daño que resulte de la compra, uso o mal uso del producto, o por la
imposibilidad de usar el producto, incluidos los daños incidentales, especiales, emergentes o similares, o la pérdida de
ganancias, ni de ningún incumplimiento contractual, sea de una obligación esencial o de otra naturaleza, ni de ningún
reclamo iniciado contra el comprador por un tercero.
Algunas provincias, estados o jurisdicciones no permiten la exclusión o limitación de los daños incidentales o
emergentes ni las limitaciones a la duración de las garantías implícitas, de modo que es posible que la exclusión o las
limitaciones antes mencionadas no se apliquen en su caso.
Esta garantía le otorga derechos legales específicos y es posible que usted tenga otros derechos que varían de un
estado, provincia o jurisdicción a otro.
Botón de Pivote de la Junta de Base
Botón de Pivote de la Junta
Media
In the U.S.A.
If you have any question regarding this warranty or would like to obtain warranty service, please call
1-800-253-2764 and a convenient service center address will be provided to you.
In Canada
If you have any question regarding this warranty or would like to obtain warranty service, please call
1-800-253-2764 and a convenient service center address will be provided to you.
In the U.S.A., this warranty is offered by Sunbeam Products, Inc. doing business Jarden Consumer Solutions located in
Boca Raton, Florida 33431. In Canada, this warranty is offered by Sunbeam Corporation (Canada) Limited doing
business as Jarden Consumer Solutions, located at 20 B Hereford Street, Brampton, Ontario L6Y 0M1. If you have
any other problem or claim in connection with this product, please write our Consumer Service Department. PLEASE
DO NOT RETURN THIS PRODUCT TO ANY OF THESE ADDRESSES OR TO THE PLACE OF PURCHASE.
Transformable
Cómo solicitar el servicio en garantía
© 2011 Sunbeam Products, Inc. operando bajo el nombre de Jarden Consumer Solutions. Todos los derechos
reservados. Distribuido por Sunbeam Products, Inc. operando bajo el nombre de Jarden Consumer Solutions, Boca
Raton, Florida 33431.
154912 Rev. A
GCDS-BIO24920-JC
BSF1411AR_11ESM2
Impreso en China
En los Estados Unidos
Si tiene alguna pregunta sobre esta garantía o desea recibir servicio de garantía, llame al 1.800.253.2764 y podrá
obtener la dirección del centro de servicio que le resulte más conveniente.
En Canadá
Si tiene alguna pregunta sobre esta garantía o desea recibir servicio de garantía, llame al 1.800.253.2764 y podrá
obtener la dirección del centro de servicio que le resulte más conveniente.
En los Estados Unidos, esta garantía es ofrecida por Sunbeam Products, Inc. operando bajo el nombre de Jarden
Consumer Solutions, Boca Ratón, Florida 33431. En Canadá, esta garantía es ofrecida por Sunbeam Corporation
(Canada) Limited operando bajo el nombre de Jarden Consumer Solutions, 20 B Hereford Street, Brampton, Ontario
L6Y 0M1. Si usted tiene otro problema o reclamo en conexión con este producto, por favor escriba al Departamento
de Servicio al Consumidor. POR FAVOR NO DEVUELVA ESTE PRODUCTO A NINGUNA DE ESTAS
DIRECCIONES NI AL LUGAR DE COMPRA.
VENTILADOR DE
PIE transformable
MODELO: BSF1411AR
Folleto de Instrucciones
Lea las instrucciones antes de usarlo. Consérvelas para futuras consultas.
¿Preguntas? ¿Comentarios? Llame al 1-800-253-2764 en Norteamérica
o visite nuestro sitio web www.bionaire.com.
3/6/12 9:32 AM
P L E A S E R E A D A N D S AV E T H E S E
I M P O RTA N T S A F E T Y I N S T R U C T I O N S
When using electrical appliances, basic safety precautions
should always be taken including the following:
1. Read all instructions before using this appliance.
2. Use fan only for purposes described in the instruction
manual.
3. To protect against electrical shock do not immerse
unit, adapter or cord in water or spray with liquids
and plug the adapter directly into a 120V AC
electrical outlet.
4. Close supervision is necessary when any appliance is
used by or near children.
5. Unplug from outlet when not in use, when moving
fan from one location to another, before putting on
or taking off parts and before cleaning.
6. Avoid contact with moving parts.
7. Do not operate in the presence of explosive and/or
flammable fumes.
8. To avoid fire hazard, NEVER place the cord under
rugs or any parts near an open flame, cooking or
other heating appliance.
9. Do not operate any appliance with a damaged cord
or adapter after the appliance malfunctions, or has
been dropped/damaged in any manner. Discard fan
or return to an authorized service facility for
examination and/or repair.
10.Do not run cord under carpeting. Do not cover cord
with throw rugs, runner, or similar coverings. Do not
route cord under furniture or appliances. Arrange
cord away from traffic area and where it will not be
tripped over.
11.The use of attachments not recommended or sold by
the appliance manufacturer may cause hazards.
12.Do not let the cord hang over the edge of a table,
counter or come in contact with hot surfaces or leave
exposed to high traffic areas.
13.Do not use outdoors.
14.To disconnect, grip adapter and pull from wall outlet.
Never yank on cord.
15.Always use on a dry, level surface.
16.Do not operate fan until fully assembled with all
parts properly in place.
17.This product is intended for household use ONLY and
not for commercial or industrial applications.
18.WARNING: To reduce the risk of electrical shock
and injury to persons, do not use in window.
19.WARNING: To reduce the risk of fire or electric
shock, do not use this fan with any solid-state speed
control device.
PLEASE READ AND SAVE
THESE IMPORTANT
SAFETY INSTRUCTIONS
F E AT U R E S - O P E R AT I O N S
2. Press and hold the Middle Joint Pivot Button below
5. To turn the oscillation on and off, press the oscillation
the control panel (press from both sides of the
button (
) located on the control panel or remote
button), and use another hand to pull up the fan
control.
head to vertical position, and then release the button 6.To set your fan to automatically shut off, press the
to fix the position (see Figure 3).
timer button ( ) located on the control panel or the
3. NOTE: Cut and remove the zip tie from the pole
remote control. When set, the fan will run and
(see Figure 3). To extend the height of the stand fan,
automatically shut off after the set duration of time
simply pull up the fan head to draw out the
(1, 2, 4, or 8 hours) has expired.
extension pole to your desired height.
4. Take out the remote control from the logo plate to
Figure 4
prepare for operations.
A
Figure 3
Remote Control
snapped on the
logo plate
PRE-OPERATING INSTRUCTIONS
Your fan comes fully assembled, simply unfold and
transform the fan to stand fan position, no tool is required.
Follow the below steps to transform the fan to stand fan
position and adjust to desirable height:
1. Press and hold the
Figure 1
Base Joint Pivot
Button on Base, and
use another hand to
pull up the fan head
with the extension
Base Joint Pivot Button
pole until reaching the
maximum angle, and
Figure 2
then release the
button to fix the
position (see Figure 1
and 2).
NOTE: The pole will
NOT stand perfectly
vertical when pulling
to the final location.
Base Joint Pivot Button
BSF1411AR_11ESM2.indd 2
16.No opere el ventilador hasta que esté totalmente
ensamblado y con todas sus piezas instaladas
adecuadamente en su lugar.
17.Este artefacto sólo es para uso doméstico y no para
uso comercial ni industrial.
18.ADVERTENCIA: Para reducir el riesgo de descarga
eléctrica o de lesiones, no lo utilice en las ventanas.
19.ADVERTENCIA: Para reducir el riesgo de incendio o
choque eléctrico, no use este ventilador con ningún otro
dispositivo con control de velocidad de estado sólido.
LEA Y CONSERVE ESTAS
INSTRUCCIONES
IMPORTANTES DE
SEGURIDAD
Remote Control
C
Extension Pole
D
Base Joint
Pivot Button
E
J
F
OPERATING INSTRUCTIONS
H
I
G. Extension Pole
Release Button
H. Base Joint Pivot
Button
I. Base
J. Power Jack
K. Power Adaptor
CARACTERISTICAS Y FUNCIONAMIENTO
NOTA: El tubo NO se parará en posición perfectamente 4. Seleccione su configuración de velocidad deseada,
presione el botón de velocidad ( ) en el panel de
vertical cuando lo tire hasta la ubicación final.
control o presione los botones con flechas ( / )
2. Presione y sostenga el Botón de Pivote de la Junta
en el control remoto para pasar por las tres
Media que se encuentra debajo del panel de control
configuraciones de velocidad (1-2-3). La luz
(presione ambos lados del botón) y use la otra mano
indicadora correspondiente se iluminará para indicar
para levantar la cabeza en posición vertical y luego
la configuración seleccionada.
suelte el botón para fijar la posición (ver Figura 3).
3. NOTA: Corte y retire la atadura de cables del tubo
Figura 4
(ver Figura 3). Para extender la altura del ventilador de
pie, simplemente tire hacia arriba la cabeza del
A
ventilador para extender el tubo de extensión a la altura
deseada.
B
4. Retire el control remoto de la placa del logotipo para
Control Remoto
preparar el ventilador para su funcionamiento.
C
Figura 3
Control Remoto
encastrado en la placa
del logotipo
Tubo de
Extensión
F
F
G
I
A. Aro Externo
B. Cabeza del
Ventilador
C. Placa del Logotipo
D. Panel de control
E. Botón de Pivote de
la Junta Media
F. Tubo de Extensión
ADJUSTMENT INSTRUCTIONS
NOTE: PLEASE REMOVE THE PROTECTIVE FILM FROM THE
REMOTE CONTROL BATTERY BEFORE OPERATION.
This unit includes one lithium battery, CR2032/3V.
Remove battery before discarding the remote.
Battery Replacement
a) Locate the battery compartment on the back of the
remote control handset. Slide the tab with your
thumb and take out the battery cover.
b) Remove old battery.
c) Place new battery into battery compartment.
d) Slide battery compartment into the remote control
handset.
NOTES:
• THIS PRODUCT CONTAINS A BUTTON BATTERY. IF
SWALLOWED, IT COULD CAUSE SEVERE INJURY IN
JUST 2 HOURS. SEEK MEDICAL ATTENTION
IMMEDIATELY.
• Remove the battery from the equipment when it is
not being used for an extended period of time.
• Remove the used battery promptly.
• Do not discard used batteries into household trash
containers. Contact your local government for
disposal or recycling practices in your area.
Potential for Radio/Television interference
This device complies with Part 15 of the FCC Rules.
Operation is subject to the following two conditions:
(1) This device may not cause harmful interference, and
(2) this device must accept any interference received,
including interference that may cause undesired operation.
This product has been tested and found to comply with
the limits for a Class B digital device, pursuant to part 15
of the FCC rules.
These limits are designed to provide reasonable
protection against harmful interference in a residential
installation. The product generates, uses, and can radiate
radio frequency energy and, if not installed and used in
accordance with the instructions, may cause harmful
interference to radio communications. However, there is
no guarantee that the interference will not occur in a
particular installation. If the product does cause harmful
interference to radio or television reception, which can be
determined by turning the product on or off, the user is
encouraged to try to correct the interference by one or
more of the following measures:
• Reorient or relocate the receiving antenna.
• Increase the separation between the product and the
receiver.
• Connect the product into an outlet on a circuit
different from that to which the receiver is
connected.
• Consult the dealer or an experienced radio/TV
technician for help.
• Changes or modifications not expressly approved by
the party responsible for compliance could void the
user’s authority to operate the equipment.
Tilt-Adjustment
K
H
Remote Control
E
A. Speed Indicator Lights
(1-2-3)
B. Speed Control Button
( )
C. Breeze/Sleep Mode
Indicator Lights
D. Breeze/Sleep Button
(
)
E. Power Button ( )
F. Timer Button ( )
G. Timer Indicator Lights
(1hr/2hr/4hr/8hr)
H. Oscillation Button
(
)
I. Oscillation Indicator
Light
B
B
D
5. P ara encender y apagar la oscilación, presione el
botón de oscilación (
) ubicado en el panel de
control o el control remoto.
6.Para configurar su ventilador en apagado automático,
presione el botón de temporizador ( ) ubicado en el
panel de control o el control remoto. Una vez
configurado, el ventilador funcionará y se apagará
automáticamente cuando el tiempo de duración
configurado (1, 2, 4 u 8 horas) haya terminado.
7. Para activar el modo brisa/suspensión, presione el
botón brisa/suspensión (
) ubicado en el panel
de control o el control remoto. En el modo Brisa, el
ventilador circulará aleatoriamente a través de
configuraciones de velocidad que recreen una brisa
exterior natural. En el modo Suspensión, el
ventilador circulará a través de las configuraciones
de velocidad en orden.
8.Para apagar el ventilador en cualquier configuración,
presione y sostenga el botón de encendido ( )
Panel de Control
B
I
H
C
G
D
F
E
A. PowerButton
B. Arrow Buttons
( / )
A. Luces Indicadoras de
Velocidad (1-2-3)
B. Botón de Control de
Velocidad ( )
C. Luces Indicadoras de
Modo Brisa/Suspensión
D. Botón de Brisa/
Suspensión (
)
E. Botón de Encendido
( )
F. Botón de
Temporizador ( )
G. Luces Indicadoras del
Temporizador
(1h/2hs./4hs./8hs.)
H. Botón de Oscilación
(
)
I. Luz Indicadora de
Oscilación
Figure 7
Height Adjustment
To adjust the height of the stand fan. Press and hold the
Extension Pole Release Button and lower down the
extension pole into the lower pole.
C. Timer Button
D. Breeze/Sleep Button
E. Oscillation Button
ubicado en el panel de control o el control remoto.
NOTA: Su ventilador posee luces indicadoras LED. Cuando
una función específica está activada en su ventilador, se
iluminará la luz indicadora LED correspondiente para
indicar qué funciones han sido activadas.
MANDO DE CONTROL REMOTO
NOTA: RETIRE EL AUTOADHESIVO PROTECTOR DE LA
BATERÍA DEL CONTROL REMOTO ANTES DE LA OPERACIÓN.
Esta unidad incluye una batería de litio, CR2032/3V.
Retire la batería antes de descartar el control remoto.
Reemplazo de la Batería
a) Localice el compartimiento de la batería en la parte
trasera del mando de control remoto. Deslice la
pestaña con su pulgar y quite la tapa de la batería.
b) Retire la batería vieja.
c) Coloque una batería nueva en el compartimiento de
baterías.
d) Deslice el compartimiento de la batería en el mando
del control remoto.
NOTAS:
• ESTE PRODUCTO CONTIENE UNA BATERÍA TIPO
BOTÓN. EN CASO DE SER TRAGADA PUEDE CAUSAR
UNA LESIÓN GRAVE EN SOLO 2 HORAS. SOLICITE
ATENCIÓN MÉDICA INMEDIATAMENTE.
• Retire la batería del equipo cuando no esté en uso
para que dure más tiempo.
• Retire la batería usada inmediatamente.
Figura 6
If you would like to adjust the stand fan for upward/
downward angle of air movement, pull the fan head with
both hands for slight tilt angle adjustment (see Figure 7).
You will hear clicks while adjusting the tilt angle.
C
Control Remoto
E
G. Botón de Desbloqueo
del Tubo de
Extensión
H. Botón de Pivote de
la Junta de Base
I. Base
J. Enchufe hembra
K. Adaptador de
corriente
A
CARACTERISTICAS Y FUNCIONAMIENTO
A
J
J
1. Coloque el ventilador sobre una superficie seca y
nivelada.
2. Conecte el adaptador de corriente al enchufe hembra
ubicado por encima y al costado de la Junta de Base
(ver Figura 4). Enchufe el adaptador de corriente en
cualquier enchufe de CA de 120 voltios estándar.
3. Para encender el ventilador, presione el botón de
encendido ( ) ubicado en el panel de control o
control remoto.
D
E
Botón de Pivote
de la Junta de
Base
INSTRUCCIONES DE USO
G
Figura 5
D
Botón de Pivote
de la Junta Media
C
FCC STATEMENT
E
J
A. Outer Ring
B. Fan Head
C. Logo Plate
D. Control Panel
E. Middle Joint Pivot
Button
F. Extension Pole
B
I
H
F E AT U R E S - O P E R AT I O N S
REMOTE CONTROL HANDSET
Figure 6
K
G
1. Set fan on a dry, level surface.
2. Connect the power adapter to the power jack located
above and to the side of the Base Joint (see Figure
4). Plug the power adapter into any standard 120
volt AC outlet.
3. To turn the fan on, press the power button ( )
located on the control panel or remote control.
4. To select your desired speed setting, press the speed
button ( ) on the control panel or press the arrow
buttons ( / ) on the remote control to cycle
through three speed settings (1-2-3). The
corresponding indicator light will illuminate to
indicate which setting is selected.
Control Panel
A
Middle Joint Pivot
Button
INSTRUCCIONES PREVIAS AL
FUNCIONAMIENTO
Su ventilador viene completamente ensamblado,
simplemente despliéguelo y transforme el ventilador en la
posición de Ventilador de Pie. No es necesaria ninguna
herramienta.
Figura 1
Siga los pasos a continuación
para transformar el
ventilador en la posición de
Ventilador de Pie y ajústelo
Botón de Pivote de la Junta
a la altura deseada:
1. Presione y sostenga el de Base
Botón de Pivote de la Figura 2
Junta de Base y use la
otra mano para tirar
la cabeza del
ventilador con el tubo
de extensión hasta
que alcance el ángulo
máximo y luego
presione el botón para
fijar la posición (ver
Figura 1 y 2).
Botón de Pivote de la Junta
de Base
B
7. T o activate the breeze/sleep mode, press the
breeze/sleep button (
) located on the control
panel or remote control. In Breeze mode, the fan will
randomly cycle through the speed settings recreating
a natural outdoor breeze. In Sleep mode, the fan will
cycle through the speed settings in order.
8.To turn the fan off at any setting, press and hold the
power button ( ) located on the control panel or
remote control.
NOTE: Your fan features LED indicator lights. When a
specific feature is activated on your fan, a corresponding
LED indicator light will illuminate showing which features
have been activated.
Figure 5
LEA Y CONSERVE ESTAS IMPORTANTES
INSTRUCCIONES DE SEGURIDAD
Cuando se usen artefactos eléctricos, siempre se deben
tomar precauciones básicas de seguridad, incluyendo las
siguientes:
1. Lea todas las instrucciones antes de usar este artefacto.
2. Sólo utilice el ventilador para el propósito descrito en
este manual.
3. Para evitar los riesgos de choque eléctrico, no
sumerja la unidad, el adaptador ni el cordón en agua
ni les rocíe líquidos. Enchufe el adaptador
directamente a un tomacorriente de 120 V de CA.
4. Se necesita supervisión estrecha cuando los niños
usen cualquier artefacto o se usen cerca de ellos.
5. Siempre desenchufe el ventilador cuando no esté en uso,
antes de moverlo a otro lugar, instalarle o quitarle piezas
o limpiarlo.
6. Evite el contacto con las piezas movibles.
7. NO opere esta unidad en presencia de gases o
vapores explosivos y/o inflamables.
8. Para evitar el riesgo de incendio NUNCA coloque el
cordón debajo de alfombras ni parte alguna cerca de
llamas abiertas, hornillas ni otros artefactos que generen
calor.
9. No opere artefacto alguno con el cordón o el
adaptador dañados, después de haber funcionado mal,
de haberse caído o dañado de cualquier forma.
Deshágase del ventilador o llévelo a un servicio técnico
autorizado para su revisión o reparación.
10.No extienda el cable debajo de la alfombra. No
cubra el cable con tapetes, alfombras de camino o
cubiertas similares. Coloque el cable lejos del área de
tráfico y donde nadie se vaya a tropezar.
11.El uso de accesorios o dispositivos no recomendados
o vendidos por el fabricante puede generar riesgos.
12.No permita que el cordón cuelgue de la mesa o
mostrador, que haga contacto con superficies
calientes, ni lo deje expuesto en áreas de mucho
tránsito.
13.No lo utilice en exteriores.
14.Para desenchufar el ventilador, jale del adaptador,
nunca del cordón.
15.Siempre colocarlo sobre una superficie seca y nivelada.
F E AT U R E S - O P E R AT I O N S
A
B
B
D
A. Botón de Encendido
B. Botones de Flechas
( / )
C. Botón de Temporizador
C
D. Botón de Brisa/
Suspensión
E. Botón de Oscilación
CARACTERISTICAS Y FUNCIONAMIENTO
•No descarte las baterías usadas en contenedores de basura
del hogar. Comuníquese con su gobierno local para
informarse sobre las prácticas de eliminación o reciclado en
su área.
DECLARACIÓN DE LA COMISIÓN
FEDERAL DE COMUNICACIONES (FCC
POR SUS SIGLAS EN INGLÉS)
Posibilidad de interferencias con Radio/Televisión
Este equipo cumple con la Parte 15 de las Normas de la
FCC. Su funcionamiento está sujeto a las siguientes dos
condiciones: (1) Este equipo no puede causar
interferencia perjudicial y (2) este equipo debe aceptar
toda interferencia recibida, inclusive interferencia que
pueda causar un funcionamiento no deseado.
Este producto ha sido probado y se determinó que
cumple con los límites para un dispositivo digital Clase B,
según la parte 15 del reglamento de la FCC.
Estos límites están diseñados para brindar protección
razonable contra interferencias nocivas en una
instalación residencial. El producto genera, usa y puede
irradiar energía de radiofrecuencia, y si no se lo instala y
se lo usa según las instrucciones, puede causar
interferencias adversas en las comunicaciones radiales.
Sin embargo, no hay garantía de que la interferencia no
ocurra en una instalación en particular. Si el producto
causa interferencias nocivas en la recepción de radio o
televisión, lo cual se puede determinar apagando y
encendiendo el producto, se recomienda al usuario que
intente corregir la interferencia por medio de una de los
siguientes métodos:
• Reorientar o reubicar la antena receptora.
• Aumentar la separación entre el producto y el
receptor.
• Conectar el producto a una salida en un circuito
diferente de aquella a la cual está conectado el
receptor.
• Pedir ayuda al distribuidor o a un técnico de radio/
TV idóneo.
• Todo cambio o modificación que no haya sido
expresamente autorizado por la parte responsable
de exigir el cumplimiento podría anular la autoridad
del usuario para usar el equipo.
INSTRUCCIONES DE AJUSTE
Ajuste de Inclinación
Si desea ajustar el ventilador de pie para un ángulo de
movimiento de aire hacia arriba/hacia abajo, tire la
cabeza del ventilador con ambas manos para lograr un
leve ajuste del ángulo de inclinación (ver Figura 7).
Escuchará unos clics mientras ajusta el ángulo de
inclinación.
Figura 7
Ajuste de Altura
Para ajustar la altura del ventilador de pie, presione y
sostenga el Botón de Desbloqueo del Tubo de Extensión y
baje el tubo de extensión hasta el tubo inferior.
3/6/12 9:32 AM