1
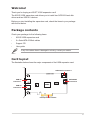
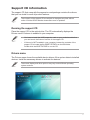
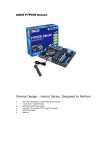
U3S6
expansion card
User Guide
E5159
First Edition
October 2009
Copyright © 2009 ASUSTeK COMPUTER INC. All Rights Reserved.
No part of this manual, including the products and software described in it, may be reproduced,
transmitted, transcribed, stored in a retrieval system, or translated into any language in any form or by any
means, except documentation kept by the purchaser for backup purposes, without the express written
permission of ASUSTeK COMPUTER INC. (“ASUS”).
Product warranty or service will not be extended if: (1) the product is repaired, modified or altered, unless
such repair, modification of alteration is authorized in writing by ASUS; or (2) the serial number of the
product is defaced or missing.
ASUS PROVIDES THIS MANUAL “AS IS” WITHOUT WARRANTY OF ANY KIND, EITHER EXPRESS
OR IMPLIED, INCLUDING BUT NOT LIMITED TO THE IMPLIED WARRANTIES OR CONDITIONS OF
MERCHANTABILITY OR FITNESS FOR A PARTICULAR PURPOSE. IN NO EVENT SHALL ASUS, ITS
DIRECTORS, OFFICERS, EMPLOYEES OR AGENTS BE LIABLE FOR ANY INDIRECT, SPECIAL,
INCIDENTAL, OR CONSEQUENTIAL DAMAGES (INCLUDING DAMAGES FOR LOSS OF PROFITS,
LOSS OF BUSINESS, LOSS OF USE OR DATA, INTERRUPTION OF BUSINESS AND THE LIKE),
EVEN IF ASUS HAS BEEN ADVISED OF THE POSSIBILITY OF SUCH DAMAGES ARISING FROM ANY
DEFECT OR ERROR IN THIS MANUAL OR PRODUCT.
SPECIFICATIONS AND INFORMATION CONTAINED IN THIS MANUAL ARE FURNISHED FOR
INFORMATIONAL USE ONLY, AND ARE SUBJECT TO CHANGE AT ANY TIME WITHOUT NOTICE,
AND SHOULD NOT BE CONSTRUED AS A COMMITMENT BY ASUS. ASUS ASSUMES NO
RESPONSIBILITY OR LIABILITY FOR ANY ERRORS OR INACCURACIES THAT MAY APPEAR IN THIS
MANUAL, INCLUDING THE PRODUCTS AND SOFTWARE DESCRIBED IN IT.
Products and corporate names appearing in this manual may or may not be registered trademarks or
copyrights of their respective companies, and are used only for identification or explanation and to the
owners’ benefit, without intent to infringe.
About this guide
Conventions used in this guide
To make sure that you perform certain tasks properly, take note of the following
symbols used throughout this manual.
DANGER/WARNING: Information to prevent injury to yourself
when trying to complete a task.
CAUTION: Information to prevent damage to the components
when trying to complete a task.
IMPORTANT: Instructions that you MUST follow to complete a
task.
NOTE: Tips and additional information to help you complete a
task.
Typography
Bold text
Indicates a menu or an item to select.
Italics
Used to emphasize a word or a phrase.
<Key> Keys enclosed in the less-than and greater-than sign means
that you must press the enclosed key.
Example: <Enter> means that you must press the Enter or
Return key.
<Key1+Key2+Key3>
If you must press two or more keys simultaneously, the key
names are linked with a plus sign (+).
Example: <Ctrl+C>
Command
Means that you must type the command exactly as shown,
then supply the required item or value enclosed in
brackets.
Example: At the DOS prompt, type the command line:
format a:
U3S6 specifications summary
Internal Connectors
-2 x SATA 6Gb/s ports support of up to 2 SATA hard
disk drives
- Backward compatible with SATA 3Gb/s and SATA
1.5Gb/s hard disk drives
External Connectors
-2 x USB 3.0 ports
- Backward compatible with USB 2.0/1.1 interface
Interface
- PCI Express x4 interface
- Compatible with PCI Express x4, x8 and x16 slots
Configuration
Supported
AHCI Mode
Operating Systems
Supported
Windows 7/Vista/XP 32/64bit
Compatible Models
-
-
-
-
-
-
-
-
-
Features
True SATA 6Gb/s & USB 3.0: Native support PCIe Gen2 bandwidth
Support Hot Plug function
Support Native Command Queuing (NCQ)
Acessories
2 x Serial ATA 6Gb/s cables
1 x Support CD
1 x User manual
Form factor
4.8 in x 3 in (12.2 cm x 7.6 cm)
Maximus III Formula
Maximus III GENE
SABERTOOTH 55i
P7P55D Premium
P7P55D Deluxe
P7P55D EVO
P7P55D PRO
P7P55D
P7P55D LE
Specifications are subject to change without notice.
Welcome!
Thank you for buying an ASUS® U3S6 expansion card!
The ASUS U3S6 expansion card allows you to install two SATA 6G hard disk
drives and two USB 3.0 devices.
Before you start installing the expansion card, check the items in your package
with the list below.
Package contents
Check your package for the following items.
•
ASUS U3S6 expansion card
•2 x Serial ATA 6.0Gb/s cables
•
Support CD
•
User guide
If any of the above items is damaged or missing, contact your retailer.
Card layout
The illustration below shows the major components of the U3S6 expansion card.
SATA 6Gb/s connector 1
USB 3.0
connector 1
SATA 6Gb/s
connector 2
USB 3.0
connector 2
PCI Express x4 interface
Card installation
Follow the instructions below to install the U3S6 expansion card to your motherboard.
The following pictures are for reference only. The motherboard layout may vary
with models, but the installation steps remain the same.
1.
Locate to an empty PCI Express x4,
x8, or x16 slot on the motherboard. If your motherboard has two or
more PCI Express x16 slots and
has no PCI Express x4 or x8 slots,
it is recommended to install the card
to the last PCI Express x16 slot.
The last PCIe x16 slot
2.
Insert the expansion card into the
PCI Express slot. Ensure that it is
completely seated on slot.
It is recommended to install the U3S6 expansion card to a PCI Express x4 slot
prior to other PCI Express slots. The card supports the maximum bandwidth of
x4 link only and will run at x4 link even installed on a PCI Express x8 or x16 slot.
Support CD information
The support CD that came with the expansion card package contains the drivers
that you can install to avail all product features.
The contents of the support CD are subject to change at any time without
notice. Visit the ASUS website at www.asus.com for updates.
Running the support CD
Place the support CD to the optical drive. The CD automatically displays the
Drivers menu if Autorun is enabled in your computer.
•
You have to install the U3S6 expansion card on your motherboard before
you can launch the Autorun function of the support CD.
•
If Autorun is NOT enabled in your computer, browse the contents of the
support CD to locate the file ASSETUP.EXE from the BIN folder.
Double-click the ASSETUP.EXE to run the CD.
Drivers menu
The Drivers menu shows the available device drivers if the system detects installed
devices. Install the necessary drivers to activate the devices.
The screen display and driver options may vary under different operating
system versions.
Make disk menu
The Make disk menu allows you to create a Marvell AHCI Driver disk.
ASUS Contact information
Click the Contact tab to display the ASUS contact information. You can also find
this information on the inside front cover of this user guide.