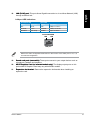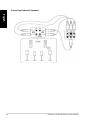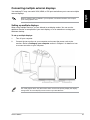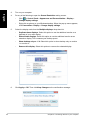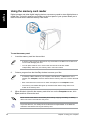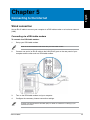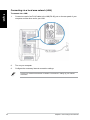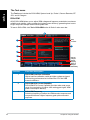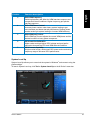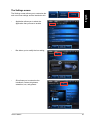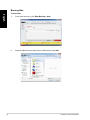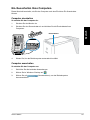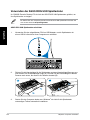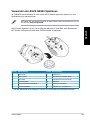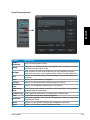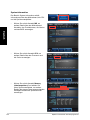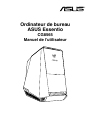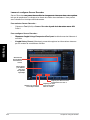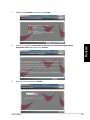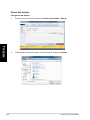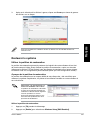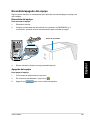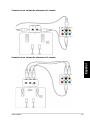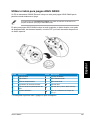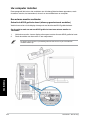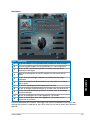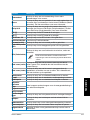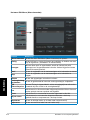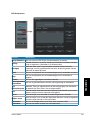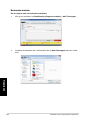
1
ASUS Essentio Desktop PC CG8565 User Manual E6763 English First Edition August 2011 Copyright © 2011 ASUSTeK Computer Inc. All Rights Reserved. No part of this manual, including the products and software described in it, may be reproduced, transmitted, transcribed, stored in a retrieval system, or translated into any language in any form or by any means, except documentation kept by the purchaser for backup purposes, without the express written permission of ASUSTeK Computer Inc. (“ASUS”). Product warranty or service will not be extended if: (1) the product is repaired, modified or altered, unless such repair, modification of alteration is authorized in writing by ASUS; or (2) the serial number of the product is defaced or missing. ASUS PROVIDES THIS MANUAL “AS IS” WITHOUT WARRANTY OF ANY KIND, EITHER EXPRESS OR IMPLIED, INCLUDING BUT NOT LIMITED TO THE IMPLIED WARRANTIES OR CONDITIONS OF MERCHANTABILITY OR FITNESS FOR A PARTICULAR PURPOSE. IN NO EVENT SHALL ASUS, ITS DIRECTORS, OFFICERS, EMPLOYEES OR AGENTS BE LIABLE FOR ANY INDIRECT, SPECIAL, INCIDENTAL, OR CONSEQUENTIAL DAMAGES (INCLUDING DAMAGES FOR LOSS OF PROFITS, LOSS OF BUSINESS, LOSS OF USE OR DATA, INTERRUPTION OF BUSINESS AND THE LIKE), EVEN IF ASUS HAS BEEN ADVISED OF THE POSSIBILITY OF SUCH DAMAGES ARISING FROM ANY DEFECT OR ERROR IN THIS MANUAL OR PRODUCT. SPECIFICATIONS AND INFORMATION CONTAINED IN THIS MANUAL ARE FURNISHED FOR INFORMATIONAL USE ONLY, AND ARE SUBJECT TO CHANGE AT ANY TIME WITHOUT NOTICE, AND SHOULD NOT BE CONSTRUED AS A COMMITMENT BY ASUS. ASUS ASSUMES NO RESPONSIBILITY OR LIABILITY FOR ANY ERRORS OR INACCURACIES THAT MAY APPEAR IN THIS MANUAL, INCLUDING THE PRODUCTS AND SOFTWARE DESCRIBED IN IT. Products and corporate names appearing in this manual may or may not be registered trademarks or copyrights of their respective companies, and are used only for identification or explanation and to the owners’ benefit, without intent to infringe. Contents English Notices........................................................................................................... 5 Safety information........................................................................................... 7 Conventions used in this guide....................................................................... 8 Where to find more information...................................................................... 8 Package contents........................................................................................... 9 Chapter 1: Getting started Welcome!.......................................................................................................11 Getting to know your computer......................................................................11 Setting up your computer.............................................................................. 16 Turning your computer ON/OFF................................................................... 19 Chapter 2:: Using Windows® 7 Starting for the first time................................................................................ 21 Using Windows® 7 desktop........................................................................... 22 Managing your files and folders.................................................................... 24 Restoring your system settings..................................................................... 26 Protecting your computer.............................................................................. 27 Getting Windows® Help and Support............................................................ 28 Chapter 3: Connecting devices to your computer Connecting a USB storage device................................................................ 29 Connecting microphone and speakers......................................................... 30 Connecting multiple external displays.......................................................... 33 Connecting an HDTV.................................................................................... 35 Chapter 4: Using your computer Proper posture when using your Desktop PC.............................................. 37 Using the memory card reader..................................................................... 38 Using the optical drive.................................................................................. 39 Using the ASUS ROG U9N Gaming Keyboard............................................. 40 Using the ASUS GX900 Gaming Mouse...................................................... 41 Chapter 5: Connecting to the Internet Wired connection.......................................................................................... 49 Contents English Chapter 6: Using the utilities ASUS AI Suite II............................................................................................ 51 ASUS AI Manager......................................................................................... 64 Nero 9 ......................................................................................................... 69 Recovering your system............................................................................... 73 Chapter 7: Troubleshooting Troubleshooting............................................................................................ 75 ASUS contact information............................................................................. 82 Notices English REACH Complying with the REACH (Registration, Evaluation, Authorisation, and Restriction of Chemicals) regulatory framework, we published the chemical substances in our products at ASUS REACH website at http://csr.asus.com/english/REACH.htm. Federal Communications Commission Statement This device complies with Part 15 of the FCC Rules. Operation is subject to the following two conditions: • This device may not cause harmful interference; and • This device must accept any interference received including interference that may cause undesired operation. This equipment has been tested and found to comply with the limits for a Class B digital device, pursuant to Part 15 of the FCC Rules. These limits are designed to provide reasonable protection against harmful interference in a residential installation. This equipment generates, uses and can radiate radio frequency energy and, if not installed and used in accordance with manufacturer’s instructions, may cause harmful interference to radio communications. However, there is no guarantee that interference will not occur in a particular installation. If this equipment does cause harmful interference to radio or television reception, which can be determined by turning the equipment off and on, the user is encouraged to try to correct the interference by one or more of the following measures: • Reorient or relocate the receiving antenna. • Increase the separation between the equipment and receiver. • Consult the dealer or an experienced radio/TV technician for help. • Connect the equipment to an outlet on a circuit different from that to which the receiver is connected. The use of shielded cables for connection of the monitor to the graphics card is required to assure compliance with FCC regulations. Changes or modifications to this unit not expressly approved by the party responsible for compliance could void the user’s authority to operate this equipment. RF exposure warning English This equipment must be installed and operated in accordance with provided instructions and the antenna(s) used for this transmitter must be installed to provide a separation distance of at least 20 cm from all persons and must not be co-located or operating in conjunction with any other antenna or transmitter. End-users and installers must be provide with antenna installation instructions and transmitter operating conditions for satisfying RF exposure compliance. Canadian Department of Communications Statement This digital apparatus does not exceed the Class B limits for radio noise emissions from digital apparatus set out in the Radio Interference Regulations of the Canadian Department of Communications. This class B digital apparatus complies with Canadian ICES-003. Macrovision Corporation Product Notice This product incorporates copyright protection technology that is protected by method claims of certain U.S. patents and other intellectual property rights owned by Macrovision Corporation and other rights owners. Use of this copyright protection technology must be authorized by Macrovision Corporation, and is intended for home and other limited viewing uses only unless otherwise authorized by Macrovision Corporation. Reverse engineering or disassembly is prohibited. Lithium-Ion Battery Warning CAUTION: Danger of explosion if battery is incorrectly replaced. Replace only with the same or equivalent type recommended by the manufacturer. Dispose of used batteries according to the manufacturer’s instructions. ASUS Recycling/Takeback Services ASUS recycling and takeback programs come from our commitment to the highest standards for protecting our environment. We believe in providing solutions for you to be able to responsibly recycle our products, batteries, other components as well as the packaging materials. Please go to http://csr.asus.com/english/Takeback.htm for the detailed recycling information in different regions. English Safety information Disconnect the AC power and peripherals before cleaning. Wipe the Desktop PC using a clean cellulose sponge or chamois cloth dampened with solution of nonabrasive detergent and a few drops of warm water then remove any extra moisture with a dry cloth. • • • • • • • • • • • • • DO NOT place on uneven or unstable work surfaces. Seek servicing if the casing has been damaged. DO NOT expose to dirty or dusty environments. DO NOT operate during a gas leak. DO NOT place or drop objects on top and do not shove any foreign objects into the Desktop PC. DO NOT expose to strong magnetic or electrical fields. DO NOT expose to or use near liquids, rain, or moisture. DO NOT use the modem during electrical storms. Battery safety warning: DO NOT throw the battery in fire. DO NOT short circuit the contacts. DO NOT disassemble the battery. Use this product in environments with ambient temperatures between 0˚C (32̊F)and 35˚C (95̊F). DO NOT cover the vents on the Desktop PC to prevent the system from getting overheated. DO NOT use damaged power cords, accessories, or other peripherals. To prevent electrical shock hazard, disconnect the power cable from the electrical outlet before relocating the system. Seek professional assistance before using an adapter or extension cord. These devices could interrupt the grounding circuit. Ensure that your power supply is set to the correct voltage in your area. If you are not sure about the voltage of the electrical outlet you are using, contact your local power company. If the power supply is broken, do not try to fix it by yourself. Contact a qualified service technician or your retailer. Conventions used in this guide English To ensure that you perform certain tasks properly, take note of the following symbols used throughout this manual. DANGER/WARNING: Information ������������������������������������������ to prevent injury to yourself when trying to complete a task. CAUTION: Information ������������������������������������������������ to prevent damage to the components when trying to complete a task. IMPORTANT: Instructions that you MUST follow to complete a task. NOTE: ������������������������������������������������������� Tips and additional information to help you complete a task. Where to find more information Refer to the following sources for additional information and for product and software updates. ASUS websites The ASUS website provides updated information on ASUS hardware and software products. Refer to the ASUS website www.asus.com. ASUS Local Technical Support Visit ASUS website at http://support.asus.com/contact for the contact information of local Technical Support Engineer. English Package contents ASUS Essentio Desktop PC ASUS ROG U9N Gaming Keyboard package x1 ASUS GX900 Gaming Mouse package x1 Installation Guide Power cord x1 Nero 9 burning software DVD x1 (optional) Installation Guide x1 Warranty card x1 Support DVD x1 (optional) Recovery DVD x1 (optional) • If any of the above items is damaged or missing, contact your retailer. • The illustrated items above are for reference only. Actual product specifications may vary with different models. • For details on using the bundled gaming keyboard and mouse, refer to sections Using the ASUS ROG Gaming Keyboard and Using the ASUS GX900 Gaming Mouse. English 10 English Chapter 1 Getting started Welcome! Thank you for purchasing the ASUS Essentio CG8565 Desktop PC! The ASUS Essentio CG8565 Desktop PC provides cutting-edge performance, uncompromised reliability, and user-centric utilities. All these values are encapsulated in a stunningly futuristic and stylish system casing. Read the ASUS Warranty Card before setting up your ASUS Desktop PC. Getting to know your computer Illustrations are for reference only. The ports and their locations, and the chassis color vary with different models. Front panel 9 10 11 12 8 7 1 6 2 3 4 5 ASUS CG8565 11 English 1. Power button. Press this button to turn on your computer. 2. Secure Digital™ / MultiMediaCard slot. Insert a Secure Digital™ card or MultiMediaCard into this slot. 3. Optical disk drive bay. There is an optical disk drive in this bay. 4. Hot Swap Bay (empty). Allows you to install an additional HDD in this bay. 5. Power LED. This LED lights up when you turn on your computer. 6. Memory Stick™ / Memory Stick Pro™ card slot. Insert a Memory Stick™ / Memory Stick Pro™ card into this slot. 7. CompactFlash® / Microdrive™ card slot. Insert a CompactFlash® / Microdrive™ card into this slot. 8. OC Button. This button adjusts the System Level Up profile of your computer. 9. USB 3.0 ports. These Universal Serial Bus 3.0 (USB 3.0) ports connect to USB 3.0 devices such as a mouse, printer, scanner, camera, PDA, and others. • DO NOT connect a keyboard / mouse to any USB 3.0 port when installing Windows® operating system. • Due to USB 3.0 controller limitation, USB 3.0 devices can only be used under Windows® OS environment and after the USB 3.0 driver installation. • USB 3.0 devices can only be used as data storage only. • We strongly recommend that you connect USB 3.0 devices to USB 3.0 ports for faster and better performance for your USB 3.0 devices. 10. USB 2.0 ports. These Universal Serial Bus 2.0 (USB 2.0) ports connect to USB 2.0 devices such as a mouse, printer, scanner, camera, PDA, and others. 11. Microphone port. This port connects to a microphone. 12. Headphone port. This port connects to a headphone or speaker. 12 Chapter 1: Getting started English Rear panel 16 E-SATA 1 2 13 3 17 4 18 5 19 6 7 8 9 20 21 10 11 12 13 14 15 1.��������������� USB 2.0 ports. These Universal Serial Bus 2.0 (USB 2.0) ports connect to USB 2.0 devices such as a mouse, printer, scanner, camera, PDA, and others. 2.�������������� E-SATA port. This port connects to an external HDD/ODD drive. 3.������������������������� Optical S/PDIF_OUT port. This port connects to an external audio output device via an optical S/PDIF cable. 4. 5. 6. HDMI port. This port is for a High-Definition Multimedia Interface (HDMI) connector, and is HDCP compliant allowing playback of HD DVD, Blu-ray, and other protected content. DVI-D port. This port is for any DVI-D compatible device and is HDCP compliant allowing playback of HD DVD, Blu-ray, and other protected content. USB 3.0 ports. These Universal Serial Bus 3.0 (USB 3.0) ports connect to USB 3.0 devices such as a mouse, printer, scanner, camera, PDA, and others. • DO NOT connect a keyboard / mouse to any USB 3.0 port when installing Windows® operating system. • Due to USB 3.0 controller limitation, USB 3.0 devices can only be used under Windows® OS environment and after the USB 3.0 driver installation. • USB 3.0 devices can only be used as data storage only. • We strongly recommend that you connect USB 3.0 devices to USB 3.0 ports for faster and better performance for your USB 3.0 devices. ASUS CG8565 13 7. English Side Speaker Out port (gray). This port connects to the side speakers in an 8-channel audio configuration. 8.������������������������������� Rear Speaker Out port (black). This port connects to the rear speakers in a 4, 6, and 8-channel audio configuration. 9. Center/Subwoofer port (orange). This port connects to the center/subwoofer speakers. 10.������������������������ Microphone port (pink). This port connects to a microphone. 11.���������������������� Line Out port (lime). This port connects to a headphone or speaker. In a 4, 6, or 8-channel configuration, the function of this port becomes Front Speaker Out. 12.��������������������������� Line In port (light blue). This port connects to a tape, CD, DVD player, or other audio sources. Audio 2, 4, 6, or 8-channel configuration Port Headset 2-channel 4-channel 6-channel 8-channel Light Blue Line In Line In Line In Line In Lime Line Out Front Speaker Out Front Speaker Out Front Speaker Out Pink Mic In Mic In Mic In Mic In Orange – – Center/Subwoofer Center/Subwoofer Black – Rear Speaker Out Rear Speaker Out Rear Speaker Out Gray – – – Side Speaker Out 13. Air vents. These vents allow air ventilation. DO NOT block the air vents on the chassis. Always provide proper ventilation for your computer. 14. Power connector. Plug the power cord to this connector. 15. Power switch. Switch to turn ON/OFF the power supply to your computer. 16. Bluetooth module. Plug any bluetooth enabled device, such as cellular phones, for wireless data transfer. 17.����������� VGA port. This port is for VGA-compatible devices such as a VGA monitor. 14 Chapter 1: Getting started English 18.������������������ LAN (RJ-45) port. This port allows Gigabit connection to a Local Area Network (LAN) through a network hub. LAN port LED indications Activity/Link LED Status Description ORANGE Linked OFF BLINKING No link Data activity Speed LED Status Description ORANGE 100Mbps connection OFF GREEN 10Mbps connection 1Gbps connection ACT/LINK SPEED LED LED LAN port Refer to the audio configuration table below for the function of the audio ports in a 2, 4, 6, or 8-channel configuration. 19.�������������������������������� Sound card ports (removable). These ports connect to your output devices such as microphone, headset and speakers. 20.���������������������������������������������� ASUS Graphics Card (on selected models only). The display output ports on this optional ASUS Graphics Card may vary with different models. 21.������������������������ Expansion slot bracket. Remove the expansion slot bracket when installing an expansion card. ASUS CG8565 15 Setting up your computer English This section guides you through connecting the main hardware devices, such as the external monitor, keyboard, mouse, and power cord, to your computer. Connecting an external monitor Using the ASUS Graphics Card (on selected models only) Connect your monitor to the display output port on the discrete ASUS Graphics Card. To connect an external monitor using the ASUS Graphics Card: 1. Connect a monitor to a display output port on the ASUS Graphics Card. 2. Plug the monitor to a power source. The display output ports on the ASUS Graphics Card may vary with different models. 16 Chapter 1: Getting started Using the onboard display output ports English Connect your monitor to the onboard display output port. To connect an external monitor using the onboard display output ports: 1. Connect a VGA monitor to the VGA port, or a DVI-D monitor to the DVI-D port, or an HDMI monitor to the HDMI port on the rear panel of your computer. 2. Plug the monitor to a power source. • If your computer comes with an ASUS Graphics Card, the graphics card is set as the primary display device in the BIOS. Hence, connect your monitor to a display output port on the graphics card. • To connect multiple external monitors to your computer, refer to Connecting multiple external monitors in Chapter 3 of this user manual for details. ASUS CG8565 17 Connecting a USB keyboard and a USB mouse English Connect a USB keyboard and a USB mouse to the USB ports on the rear panel of your computer. Connecting the power cord Connect one end of the power cord to the power connector on the rear panel of your computer and the other end to a power source. 18 Chapter 1: Getting started Turning your computer ON/OFF English This section describes how to turn on/off your computer after setting up your computer. Turning your computer ON To turn your computer ON: 1. Turn your monitor ON. 2. Turn the power switch ON, then press the power button on your computer. Power button E-SATA 4. Wait until the operating system loads automatically. Turning your computer OFF To turn your computer OFF: 1. Close all running applications. 2. Click 3. Click ASUS CG8565 on the Windows® desktop. to shut down the operating system. 19 English 20 Chapter 1: Getting started English Chapter 2 Using Windows® 7 Starting for the first time When you start your computer for the first time, a series of screens appear to guide you in configuring the basic settings of your Windows® 7 operating system. To start for the first time: 1. Turn your computer on. Wait for a few minutes until the Set Up Windows screen appears. 2. From dropdown list, select your language, then click Next. 3. From the dropdown lists, select your Country or region, Time and currency, and Keyboard layout, then click Next. 4. Key in uniques names for the user name and computer name, then click Next. 5. Key in the necessary information to set up your password, then click Next. You may also click Next to skip this step without entering any information. If you want to set up a password for your account later, refer to the section Setting up a user account and password in this chapter. 6. Carefully read the license terms. Tick I accept the license terms and click Next. 7. Select Use recommended settings or Install important updates only to set up the security settings for your computer. To skip this step, select Ask me later. 8. Review your date and time settings. Click Next. The system loads the new settings and restarts. You may now start using your computer. ASUS CG8565 21 Using Windows® 7 desktop English Click the Start icon > Help and Support to obtain more information about Windows® 7. Using the Start menu The Start menu gives you access to programs, utilities, and other useful items on your computer. It also provides you with more information about Windows 7 through its Help and Support feature. Launching items from the Start menu To launch items from the Start menu: 1. From the Windows® taskbar, click the Start icon . 2. From the Start menu, select the item that you want to launch. You may pin programs that you want constantly displayed on the Start menu. For more details, refer to the section Pinning programs on the Start menu or taskbar on this chapter. Using the Getting Started item The Getting Started item on the Start menu contains information about some basic tasks such as personalizing Windows®, adding new users, and transferring files to help you to familiarize yourself with using Windows® 7. To use the Getting Started item: 1. From the Windows® taskbar, click the Start icon 2. Select Getting Started. The list of available tasks appears. to launch the Start menu. 3. Select the task that you want to do. Using the taskbar The taskbar allows you to launch and manage programs or items installed on your computer. Launching a program from the taskbar To launch a program from the taskbar: • From the Windows® taskbar, click an icon to launch it. Click the icon again to hide the program. You may pin programs that you want constantly displayed on the taskbar. For more details, refer to the section Pinning programs on the Start menu or taskbar on this chapter. 22 Chapter 2: Using Windows® 7 Pinning items on the jumplists English When you right-click an icon on the taskbar, a jumplist launches to provide you with quickaccess to the program’s or item’s related links.You may pin items on the jumplist such as favorite websites, often-visited folders or drives, or recently played media files. To pin items to the jumplist: 1. From the taskbar, right-click an icon. 2. From the jumplist, right-click the item that you want to pin, then select Pin to this list. Unpinning items from the jumplist To unpin items from the jumplist: 1. From the taskbar, right-click an icon. 2. From the jumplist, right-click the item that you want to remove from the jumplist, then select Unpin from this list. Pinning programs on the Start menu or taskbar To pin programs on the Start menu or taskbar: 1. From the Windows® taskbar, click the Start icon 2. Right-click the item that you want to pin on the Start menu or taskbar. to launch the Start menu. 3. Select Pin to Taskbar or Pin to Start menu. You may also right-click on the icon of a running program on the taskbar, then select Pin this program to taskbar. Unpinning programs from the Start menu To unpin programs from the Start menu: 1. From the Windows® taskbar, click the Start icon to launch the Start menu. 2. From the Start menu, right-click the program that you want to unpin, then select Remove from this list. Unpinning programs from the taskbar To unpin programs from the taskbar: 1. From the taskbar, right-click the program that you want to remove from the taskbar, then select Unpin this program from taskbar. ASUS CG8565 23 Using the notification area English By default, the notification area shows these three icons: Action Center notification Click this icon to display all the alert messages/notifications and launch the Windows® Action Center. Network connection This icon displays the connection status and signal strength of the wired or wireless network connection. Volume Click this icon to adjust the volume. Displaying an alert notification To display an alert notification: • Click the Notification icon , then click the message to open it. For more details, refer to the section Using Windows® Action Center in this chapter. Customizing icons and notifications You may choose to display or hide the icons and notifications on the taskbar or on the notification area. To customize icons and notifications: 1. From the notification area, click on the arrow icon 2. Click Customize. . 3. From the dropdown list, select the behaviors for the icons or items that you want to customize. Managing your files and folders Using Windows® Explorer Windows® Explorer allows you to view, manage, and organize your files and folders. Launching Windows® Explorer To launch Windows Explorer: 24 1. From the Windows® taskbar, click the Start icon 2. Click Computer to launch Windows Explorer. to launch the Start menu. Chapter 2: Using Windows® 7 Exploring files and folders 1. Launch Windows® Explorer. 2. From the navigation or view pane, browse for the location of your data. 3. From the breadcrumb bar, click the arrow to display the contents of the drive or folder. English To explore files and folders: Customizing the file/folder view To customize the file/folder view: 1. Launch Windows Explorer. 2. From the navigation pane, select the location of your data. 3. From the toolbar, click the View icon 4. From the View menu, move the slider to select how you want to view the file/folder. . You may also right-click anywhere on the View pane, click View, and select the view type that you want. Arranging your files To arrange your files: 1. Launch Windows Explorer. 2. From the Arrange by field, click to display the dropdown list. 3. Select your preferred arrangement type. Sorting your files To sort your files: 1. Launch Windows Explorer. 2. Right-click anywhere on the View pane. 3. From the menu that appears, select Sort by, then select your preferred sorting type. Grouping your files To group your files: 1. Launch Windows Explorer. 2. Right-click anywhere on the View pane. 3. From the menu that appears, select Group by, then select your preferred grouping type. ASUS CG8565 25 Adding a new folder English To add a new folder: 1. Launch Windows Explorer. 2. From the toolbar, click New folder. 3. Key in a name for the new folder. You may also right-click anywhere on the View pane, click New > Folder. Backing up your files Setting up a backup To set up a backup: > All Programs > Maintenance > Backup and Restore. 1. Click 2. Click Set up backup. Click Next. 3. Select your backup destination. Click Next. 4. Select Let Windows choose (recommended) or Let me choose as your backup mode. If you select Let Windows choose, Windows will not back up your programs, FATformatted files, Recycle Bin files, or temporary files that are 1GB or more. 5. Follow the onscreen instructions to finish the process. Restoring your system settings The Windows® System Restore feature creates a restore point where the computer’s system settings are stored at certain time and date. It allows you to restore or undo changes to your computer’s system settings without affecting your personal data. To restore your system: 26 1. Close all running applications. 2. Click 3. Follow the onscreen instructions to complete the process. > All Programs > Accessories > System Tools > System Restore. Chapter 2: Using Windows® 7 English Protecting your computer Using Windows® 7 Action Center Windows® 7 Action Center provides you with alert notifications, security information, system maintenance information, and the option to automatically troubleshoot and fix some common computer problems. You may customize the notifications. For more details, refer to the previous section Customizing icons and notifications in this chapter. Launching Windows® 7 Action Center To launch Windows® 7 Action Center: 1. To launch Windows 7 Action Center, click the Notification icon Action Center. 2. From Windows 7 Action Center, click the task that you want to do. , then click Open Using Windows® Update Windows Update allows you to check and install the latest updates to enhance the security and performance of your computer. Launching Windows® Update To launch Windows® Update: 1. From the Windows® taskbar, click the Start icon 2. Select All Programs > Windows Update. to launch the Start menu. 3. From the Windows Update screen, click the task that you want to do. Setting up a user account and password You may create user accounts and passwords for people who will use your computer. Setting up a user account To set up a user account: > Getting Started > Add new users. 1. From the Windows® taskbar, click 2. Select Manage another account. 3. Select Create a new account. 4. Key in the name of the new user. 5. Select either Standard user or Administrator as the user type. 6. When done, click Create Account. ASUS CG8565 27 Setting up a user’s password English To set up a user’s password: 1. Select the user that you would like to set a password. 2. Select Create a password. 3. Key in a password and confirm it. Key in your password’s hint. 4. When done, click Create password. Activating the anti-virus software Trend Micro Internet Security is pre-installed on your computer. It is a third-party anti-virus software protecting your computer from virus. It is purchased separately. You have a 30-day trial period after activating it. To activate Trend Micro Internet Security: 1. Run the Trend Micro Internet Security application. 2. Carefully read the license terms. Click Agree & Activate. 3. Input your e-mail address and select your location. Click Next. 4. Click Finish to complete the activation. Getting Windows® Help and Support Windows® Help and Support provides you with guides and answers in using the applications in Windows® 7 platform. To launch Windows® Help and Support, click > Help and Support. Ensure that you are connected to the Internet to obtain the latest Windows® online help. 28 Chapter 2: Using Windows® 7 English Chapter 3 Connecting devices to your computer Connecting a USB storage device This desktop PC provides USB 2.0/1.1 and USB 3.0 ports on both the front and rear panels. These USB ports allow you to connect USB devices such as storage devices. To connect a USB storage device: • Insert the USB storage device to your computer. Front panel Rear panel To remove a USB storage device: 1. Click from the Windows notification area on your computer, then click Eject USB2.0 FlashDisk or Eject USB3.0 FlashDisk if you are using the USB3.0 flash drive or USB3.0-compatible devices. 2. When the Safe to Remove Hardware message pops up, remove the USB storage device from your computer. DO NOT remove a USB storage device when data transfer is in progress. Doing so may cause data loss or damage the USB storage device. ASUS CG8565 29 Connecting microphone and speakers English This desktop PC comes with microphone ports and speaker ports on both the front and rear panels. The audio I/O ports located on the rear panel allow you to connect 2-channel, 4-channel, 6-channel, and 8-channel stereo speakers. Connecting Headphone and Mic Connecting 2-channel Speakers 30 Chapter 3: Connecting devices to your computer English Connecting 4-channel Speakers Connecting 6-channel Speakers ASUS CG8565 31 Connecting 8-channel Speakers English 32 Chapter 3: Connecting devices to your computer Connecting multiple external displays English Your desktop PC may come with VGA, HDMI, or DVI ports and allows you to connect multiple external displays. When a graphics card is installed in your computer, connect the monitors on the output ports of the graphics card. Setting up multiple displays When using multiple monitors, you are allowed to set display modes. You can use the additional monitor as a duplicate of your main display, or as an extension to enlarge your Windows desktop. To set up multiple displays: 1. Turn off your computer. 2. Connect the two monitors to your computer and connect the power cords to the monitors. Refer to Setting up your computer section in Chapter 1 for details on how to connect a monitor to your computer. For some graphic cards, only the monitor that is set to be the primary display has display during POST. The dual display function works only under Windows. ASUS CG8565 33 English 34 3. Turn on your computer. 4. Do any of the following to open the Screen Resolution setting screen: •Click > Control Panel > Appearance and Personalization > Display > Change display settings. •Right click anywhere on your Windows desktop. When the pop-up menu appears, click Personalize > Display > Change display settings. 5. Select the display mode from the Multiple displays: drop-down list. •Duplicate these displays: Select this option to use the additional monitor as a duplicate of your main display. •Extend these displays: Select this option to use the additional monitor as an extension display. This increases your desktop space. •Show desktop only on 1 / 2: Select this option to show desktop only on monitor 1 or monitor 2. • 6. Click Apply or OK. Then click Keep Changes on the confirmation message. Remove this display: Select this options to remove the selected display. Chapter 3: Connecting devices to your computer Connecting an HDTV English Connect a High Definition TV (HDTV) to the HDMI port of your computer. • You need an HDMI cable to connect the HDTV and the computer. The HDMI cable is purchased separately. • To get the best display performance, ensure that your HDMI cable is less than 15 meters. ASUS CG8565 35 English 36 Chapter 3: Connecting devices to your computer English Chapter 4 Using your computer Proper posture when using your Desktop PC When using your Desktop PC, maintaining the proper posture is necessary to prevent strain to your wrists, hands, and other joints or muscles. This section provides you with tips on avoiding physical discomfort and possible injury while using and fully enjoying your Desktop PC. Eye level to the top of the monitor screen Foot rest 90˚ angles To maintain the proper posture: • Position your computer chair to make sure that your elbows are at or slightly above the keyboard to get a comfortable typing position. • Adjust the height of your chair to make sure that your knees are slightly higher than your hips to relax the backs of your thighs. If necessary, use a footrest to raise the level of your knees. • Adjust the back of your chair so that the base of your spine is firmly supported and angled slightly backward. • Sit upright with your knees, elbows and hips at an approximately 90º angle when you are at the PC. • Place the monitor directly in front of you, and turn the top of the monitor screen even with your eye level so that your eyes look slightly downward. • Keep the mouse close to the keyboard, and if necessary, use a wrist rest for support to reduce the pressure on your wrists while typing. • Use your Desktop PC in a comfortably-lit area, and keep it away from sources of glare such as windows and straight sunlight. • Take regular mini-breaks from using your Desktop PC. ASUS CG8565 37 Using the memory card reader English Digital cameras and other digital imaging devices use memory cards to store digital picture or media files. The built-in memory card reader on the front panel of your system allows you to read from and write to different memory card drives. To use the memory card: 1. Insert the memory card into the card slot. • A memory card is keyed so that it fits in only one direction. DO NOT force a card into a slot to avoid damaging the card. • You can place media in one or more of the card slots and use each media independently. Place only one memory card in a slot at one time. 2. Select a program from the AutoPlay window to access your files. • If AutoPlay is NOT enabled in your computer, click Windows® 7 Start button on the taskbar, click Computer, and then double-click the memory card icon to access the data on it. • Each card slot has its own drive icon which is displayed on the Computer screen. • The memory card reader LED lights up and blinks when data is being read from or written to the memory card. 3. When finished, right-click the memory card drive icon on the Computer screen, click Eject, and then remove the card. Never remove cards while or immediately after reading, copying, formatting, or deleting data on the card or else data loss may occur. To prevent data loss, use “Safely Remove Hardware and Eject Media” in the Windows notification area before removing the memory card. 38 Chapter 4: Using your computer English Using the optical drive Inserting an optical disc To insert an optical disc: 1. While your system is on, press the PUSH button. 2. Press the eject button below the drive bay cover to open the tray. 3. Place the disc to the optical drive with the label side facing up. 4. Push the tray to close it. 5. Select a program from the AutoPlay window to access your files. If AutoPlay is NOT enabled in your computer, click Windows® 7 Start button on the taskbar, click Computer, and then double-click the CD/DVD drive icon to access the data on it. Removing an optical disc To remove an optical disc: 1. 2. While the system is on, do either of the following to eject the tray: • Press the eject button below the drive bay cover. • Right-click the CD/DVD drive icon on the Computer screen, and then click Eject. Remove the disc from the disc tray. ASUS CG8565 39 Using the ASUS ROG U9N Gaming Keyboard English Your CG8565 Essentio Desktop PC comes with the bundled ASUS ROG U9N Gaming Keyboard for an optimal gaming experience. Check the section Package contents for the package contents of the ASUS ROG U9N Gaming Keyboard. Installing the ASUS ROG U9N Gaming Keyboard 1. Use the bundled PS/2 to USB adaptor to connect your gaming keyboard to your computer’s USB 2.0 port. . Align and insert the wrist pad into the gaming keyboard’s wrist pad slots (A). Using both thumbs, push down the wrist pad until it snaps in place (B). A 3. 40 B Restart your computer. Windows® automatically installs all necessary drivers for your keyboard. Chapter 4: Using your computer Using the ASUS GX900 Gaming Mouse English Your CG8565 Essentio Desktop PC comes with the bundled ASUS GX900 Gaming Mouse for your full-blast game control. Check the section Package contents for the package contents of the ASUS GX900 Gaming Mouse. The ASUS GX900 Gaming Mouse comes with a left button, a right button, a scroll wheel, two side buttons, a DPI button, and a specially designed Profile Switch button. Keys Description Keys Description 2 Right button 8 IE Forward button 1 3 4 5 6 Left button Scroll wheel DPI switch Profile switch button/Profile indicator* LED DPI indicator** 7 9 10 11 12 GX900 logo IE Backward button Mouse feet Mouse feet and Twin-Eye Laser sensor Weight base (5 x 4.5g blocks)*** *** To adjust the mouse weight, add or remove the weight blocks. ASUS CG8565 41 English *Profile switch LED indications LED colors Indications Green Red Orange Profile 1 None Normal Profile Profile 2 Profile 3 **DPI switch LED indications LED colors Indications 4 DPI Level 2 2 DPI Level 1 Launching the program The bundled support CD includes a specially designed program that allows you to set up your ASUS GX900 Gaming Mouse to avail all its features. Place the support CD into the optical drive and follow the onscreen instructions to launch the program. If Autorun is NOT enabled in your computer, browse the contents of the support CD to locate the GX900.exe file. Double-click the GX900.exe file to launch the program. Setting your ASUS GX900 Gaming Mouse Ensure that your gaming mouse is connected to your computer’s USB port. The program automatically detects the mouse and displays the main menu. 42 Chapter 4: Using your computer Items 1 2 3 4 5 6 7 8 9 10 11 English Main Menu Description Click each tab to display the selected profile menu. Displays the profile icon to configure profile 1-3 menus. Click to reset the DPI configuration to the previously saved settings. Drag the slider to adjust the DPI value for each level. Click to reset the button settings to the previous settings Click to display the different profile color indicators and their status. Click to load the saved profile to your mouse. Click to save the current profile settings to your hard disk drive. Click to reset all the mouse settings to the factory default settings. Click to save the settings you have made. Click to save the settings you have made and exit the program. * Each profile provides two DPI levels. Two DPI switch LEDs light up indicating that you are using Level 1, and four LEDs light up indicating that you are using Level 2. ASUS CG8565 43 Profile 1 menu English Items 1 2 3 4 Description Click to open the Edit menu and change the profile name and profile icon. Enter the desired profile name. Click to locate the image file you want to use as the profile icon. Select the function for each button/action from the drop down list *Refer to the table below for more details. Functions Description R-Button Right mouse button function L-Button M-Button IE Backward IE Forward 44 Left mouse button function Middle mouse button function IE Backward button function. If selected, press the button to go back to the previous page. IE Forward button function. If selected, press the button to go to the next page. Chapter 4: Using your computer Keyboard Description English Functions Press the button to perform a keystroke or keystroke sequence. Press the button to run a command or series of commands that Macro you can edit via the Edit Macro menu. See Macro menu for details. Press the button to run a script that you can edit via the Edit Script #1-6 Script menu. See Edit Script menu for details. DPI [+] Press the button to increase the DPI value. DPI [-] Press the button to decrease the DPI value. DPI Level 1/2 Press the button to use the DPI Level 1/2. Profile Switch Profile Switch button function. Normal Profile Press the button to use the normal profille. User Profile 1/2/3 Press the button to use the customized profile 1/2/3. Press the button to scroll leftward/rightward as a tilt wheel does. Wheel (left/right) Rapid Fire (mouse) Rapid Fire (key) Web Browser E-mail Media Player Play/Pause Stop Next Track Prev Track Volume Up/Down Mute Calculator My Computer Disabled ASUS CG8565 This function only works for Microsoft® Office applications under the Windows® 7/Vista operating systems. Press the button to do a rapid fire in a click-to-attack game, which is the same as triple clicking the left mouse button. Press the button to do a rapid fire in a game using the spacebar to attack, which is the same as pressing the keyboard’s spacebar thrice. Press the button to launch your default web browser. Press the button to launch your default e-mail application. Press the button to launch your default media player. These buttons become playback control buttons in an active media player. Press the button to increase/decrease the system volume. Press the button to turn the volume’s mute mode on/off. Press the button to launch the Calculator application. Press the button to open My Computer window. Select this item to deactivate the mouse’s selected button. 45 Edit Macro menu English Items Edit Macro Description Click to open the Edit Macro menu. Check this item to record the time between pressing down and Timing releasing a button. (Default: 12 milliseconds) When checked, the new instruction will be inserted before the selected Insert instruction. Otherwise, any new instruction will be given the first priority. Start* Click to start recording the keystrokes and/or mouse actions. Stop Click to stop recording the keystrokes and/or mouse actions. Clear Click to clear all saved instructions. Move up/down Click to move up/down the selected instruction. Instruction When Timing is unchecked, all the actions’ delay time will be the value cycle time you chose from the drop down list. Loop Sets the macro to run at a click and stop when clicked again. Fire Sets the macro to run once in one click. Sets the macro to run when you hold down the button and stop when Keeping fire you release the button. Export Click to save the current macro to your hard disk drive. Import Click to load a macro from your hard disk drive. 46 Chapter 4: Using your computer English Edit Script menu Items Edit Script Description Click to open the Edit Script menu. Check this item to record the time between pressing down and Timing releasing a button. (Default: 12 milliseconds) When checked, the new instruction will be inserted before the selected Insert instruction. Otherwise, any new instruction will be given the first priority. Start Click to start recording the keystrokes and/or mouse actions. Stop Click to stop recording the keystrokes and/or mouse actions. Clear Click to clear all saved instructions. Move up/down Click to move up/down the selected instruction. Instruction When Timing is unchecked, all the actions’ delay time will be the value cycle time you chose from the drop down list. Loop Sets the script to run at a click and stop when clicked again. Fire Sets the script to run once in one click. Sets the script to run when you hold down the button and stop when Keeping fire you release the button. Export Click to save the current script to your hard disk drive. Import Click to load a script from your hard disk drive. ASUS CG8565 47 English 48 Chapter 4: Using your computer English Chapter 5 Connecting to the Internet Wired connection Use an RJ-45 cable to connect your computer to a DSL/cable modem or a local area network (LAN). Connecting via a DSL/cable modem To connect via a DSL/cable modem: 1. Set up your DSL/cable modem. Refer to the documentation that came with your DSL/cable modem. 2. Connect one end of an RJ-45 cable to the LAN (RJ-45) port on the rear panel of your computer and the other end to a DSL/cable modem. 3. Turn on the DSL/cable modem and your computer. 4. Configure the necessary Internet connection settings. Contact your Internet Service Provider (ISP) for details or assistance in setting up your Internet connection. ASUS CG8565 49 Connecting via a local area network (LAN) English To connect via a LAN: 1. Connect one end of an RJ-45 cable to the LAN (RJ-45) port on the rear panel of your computer and the other end to your LAN. 2. Turn on your computer. 3. Configure the necessary Internet connection settings. Contact your network administrator for details or assistance in setting up your Internet connection. 50 Chapter 5: Connecting to the Internet English Chapter 6 Using the utilities The Support DVD and Recovery DVD may not be included in the package. You may use the Recovery Partition feature to create the Support DVD and Recovery DVD. For details, refer to Recovering your system in this chapter. ASUS AI Suite II ASUS AI Suite II is an all-in-one interface that integrates several ASUS utilities and allows users to launch and operate these utilities simultaneously. Installing AI Suite II To install AI Suite II: 1. Place the support DVD in the optical drive. The Drivers installation tab appears if Autorun is enabled. 2. Click the Utilities tab, then click ASUS AI Suite II. 3. Follow the onscreen instructions to complete the installation. Using AI Suite II AI Suite II automatically starts when you enter the Windows® operating system. The AI Suite II icon appears in the Windows® notification area. Click the icon to open the AI Suite II main menu bar. Click each button to select and launch a utility, to monitor the system, to update the motherboard BIOS, to display the system information, and to customize the settings of AI Suite II. Click to select a utility ASUS CG8565 Click to monitor sensors or CPU frequency Click to update the motherboard BIOS Click to show the system information Click to customize the interface settings 51 The Tool menu English The Tool menu includes the DIGI+VRM, System Level Up, Probe II, Sensor Recorder, BT GO!, and Ai Charger+. DIGI+VRM ASUS DIGI+VRM allows you to adjust VRM voltage and frequency modulation to enhance reliability and stability. It also provides the highest power efficiency, generating less heat to longer component lifespan and minimize power loss. To launch DIGI+VRM, click Tool > DIGI+VRM on the AI Suite II main menu bar. 6 1 Help contents 2 7 3 4 Undo all changes without applying 5 Apply all changes immediately Function 52 Function description 1 DIGI+VRM Load-line Calibration Higher-load line calibration could get higher voltage and good overclocking performance but increase the CPU and VRM thermal conditions.. 2 DIGI+VRM CPU Current Capability DIGI+VRM CPU Current Capability provides wider total power range for overclocking. A higher value setting gets higher VRM power consumption delivery. 3 DIGI+VRM Frequency Switching frequency will affect the VRM transient response and component thermal. Higher frequency gets quicker transient response. Chapter 6: Using the utilities Function description 3 DIGI+VRM Frequency Switching frequency will affect the VRM transient response and component thermal conditions. Higher frequency gets quicker transient response. 4 DIGI+VRM Phase Control Increase phase number under heavy system loading to get more transient and better thermal performance. Reduce phase number under light system loading to increase VRM efficiency. 5 DIGI+VRM Duty Control DIGI+VRM Duty Control adjusts the current VRM phase and the thermal condition of every phase component. 6 iGPU Load-line Calibration Higher value could get higher iGPU voltage and good performance but increase the CPU and VRM thermal conditions. 7 iGPU Current Capability A higher value brings a wider total iGPU power and overclocking frequency range to enhance iGPU performance. English Function System Level Up System Level Up allows you to overclock the system in Windows® environment using the profile settings. To launch System Level up, click Tool > System Level Up on the AI Suite II menu bar. ASUS CG8565 53 English In setting the function, assign the hot keys for the system level up profile exchange. You can adjust the hot key settings manually. See figure below for details. Adjust the System Level Up via two methods: BIOS In the BIOS Setup program, click AI Tweaker > System Level Up, and select your desired option. OC Button Press the OC button on the upper left side corner of the front panel. 54 Chapter 6: Using the utilities Launching and configuring Probe II English Probe II is a utility that monitors the computer’s vital components, and detects and alerts you of any problem with these components. Probe II senses fan rotations, CPU temperature, and system voltages, among others. With this utility, you are assured that your computer is always at a healthy operating condition. To launch Probe II: • Click� Tool > Probe II on the AI Suite II main menu bar. To configure Probe II: • Click the Voltage/Temperature/Fan Speed tabs to activate the sensors or to adjust the sensor threshold values. • The Preference tab allows you to customize the time interval of sensor alerts, or change the temperature unit. Saves your configuration ASUS CG8565 Loads your saved configuration Loads the default threshold values for each sensor Applies your changes 55 English Launching and configuring Sensor Recorder Sensor Recorder allows you to monitor the changes in the system voltage, temperature, and fan speed, as well as recording the changes. To launch Sensor Recorder: • Click Tool > Sensor Recorder on the AI Suite II main menu bar. To configure Sensor Recorder: • Click the Voltage/Temperature/Fan Speed tabs and select the sensors that you want to monitor. • The History Record tab allows you to record the changes in the sensors that you enable. Select the sensors that you want to monitor Drag to view the status during a certain period of time Click to return to the default mode 56 Click to zoom in/out the X axis Click to zoom in/out the Y axis Chapter 6: Using the utilities BT GO! English BT GO! connects a bluetooth device with the motherboard through Bluetooth connection for file transferring, file synchronization, music playback, personal manager, and multiple remote functions. Launching BT GO! To launch BT GO!, click Tool > BT GO! on the AI Suite II main menu bar. Using BT GO! Device list Function list Lights when the function is enabled Click to show the corresponding pane on the right side • • • Click and to scroll through the device list and the function list. Click any of the device icons to select the Bluetooth device and BT GO! automatically searches for the supported functions for the selected device. Click any of the device/function icons to connect to the selected device and enable/disable the selected function. Function Shot and send Description Allows you to capture a screen and send it to the connected Bluetooth device. BT Transfer Allows you to share the files stored in the host Bluetooth device to other connected Bluetooth devices. Folder Sync Allows you to synchronize or back up the selected folder between your selected Bluetooth device and your computer. Personal Manager Allows you to synchronize the personal contacts and calendar information between the Bluetooth device and your computer. BT to Net Allows your computer to access the internet via the network shared by the Bluetooth device. Music Player ASUS CG8565 Allows you to play the selected music files in your computer by using the Bluetooth device. 57 Launching and configuring Ai Charger+ English Ai Charger+, a unique and fast-charging software, allows you to charge your BC 1.1* mobile devices on your computer’s USB port three times faster than the standard USB devices**. • * Check your USB device manufacturer if it fully supports the BC 1.1 function. • ** The actual charging speed may vary with your USB device’s conditions. • Ensure to remove and reconnect your USB device after enabling or disabling Ai Charger+ to ensure normal charging function. To launch Ai Charger+, click Tool > Ai Charger+ on the AI Suite II main menu bar. 58 Chapter 6: Using the utilities The Monitor menu English The Monitor menu includes the Sensor and CPU Frequency panels. Launching Sensor The Sensor panel ������������������������������������������������������������������������ displays the current value of a system sensor such as fan rotation, CPU temperature, and voltages. To launch Sensor: • Click Monitor > Sensor on the AI Suite II main menu bar. Launching CPU Frequency The CPU Frequency panel ������������������������������������������������� displays the current CPU frequency and CPU usage. To launch CPU frequency: • Click Monitor > CPU Frequency on the AI Suite II main menu bar. Resident in the right pane (system information area) ASUS CG8565 Sensor panel CPU Frequency panel 59 The Update menu English The Update menu allows you to update the motherboard BIOS and the BIOS boot logo with the ASUS designed update utilities . ASUS Update The ASUS Update is a utility that allows you to manage, save, and update the motherboard BIOS in Windows® OS. The ASUS Update utility allows you to u������������������������ pdate the BIOS directly from the Internet��������������������������������������������������������������������������� , download the latest BIOS file from the Internet, update the BIOS from an updated BIOS file, save the current BIOS file or view the BIOS version information. Updating the BIOS through the Internet To update the BIOS through the Internet: 60 1. From the ASUS Update screen, select Update BIOS from file, then click Next. 2. Select the ASUS FTP site nearest you to avoid network traffic. Tick the two items if you want to enable the BIOS downgradable and Auto-BIOS backup functions. 3. Select the BIOS version that you want to download, then click Next. When no updated version is detected, a message is displayed informing you that there is no new BIOS file from the BIOS server. Chapter 6: Using the utilities Click Yes if you want to change the boot logo, which is the image appearing on screen during the Power‑On SelfTests (POST).������������������ Otherwise, click No. 5. Follow the onscreen instructions to complete the update process. English 4. Updating the BIOS through a BIOS file To update the BIOS through a BIOS file: 1. From the ASUS Update screen, select Update BIOS from file, then click Next. 2. Locate the BIOS file from the Open window, click Open, and click Next. 3. Click Yes if you want to change the boot logo, which is the image appearing on screen during the Power‑On Self-Tests (POST).� Otherwise, click No. 4. Follow the onscreen instructions to complete the update process. ASUS CG8565 61 The System Information screen English The System Information screen displays the information about the motherboard, CPU, and memory slots. 62 • Click the MB tab to see the details on the motherboard manufacturer, product name, version, and BIOS. • Click the CPU tab to see the details on the processor and the Cache. • Click the Memory tab and then select the memory slot to see the details on the memory module installed on the corresponding slot. MB CPU Memory Chapter 6: Using the utilities The Settings screen • Application allows you to select the application that you want to enable. • Bar allows you to modify the bar setting, • Skin allows you to customize the interface’s contrast, brightness, saturation, hue, and gamma. ASUS CG8565 English The Settings screen allows you to customize the main menu bar settings and the interface’s skin. 63 ASUS AI Manager English ASUS AI Manager is a utility which gives you quick and easy access to frequently-used applications. Installing AI Manager To install AI Manager: 1. Place the support DVD in the optical drive. If Autorun is enabled, the Drivers installation wizard appears. If Autorun is disabled, double-click the setup.exe file from the ASUS AI Manager folder in the support DVD. 2. Click the Utilities tab, then click ASUS AI Manager. 3. Follow the onscreen instructions to complete the installation. Launching AI Manager To launch the AI Manager from the Windows® desktop, click Start > All Programs > ASUS > AI Manager > AI Manager 1.xx.xx. The AI Manager quick bar appears on the desktop. After launching the application, the AI Manager icon appears in the Windows® taskbar. Right-click this icon to switch between the quick bar and the main window, and to launch the AI Manager either from the quick bar or taskbar. 64 Chapter 6: Using the utilities AI Manager quick bar English The AI Manager quick bar saves the desktop space and allows you to launch the ASUS utilities or display system information easily. Click any of the Main, My Favorites, Support or Information tab to display the menu’s contents. Exit button Switch to main Window Add to ToolBar Main My Favorites Support Information Click the Maximize/restore button to switch between full window and quick bar. Click the Minimize button to keep the AI Manager on the taskbar. Click the Close button to quit the AI Manager. Main The Main menu contains three utilities: AI Disk, AI Security, and AI Booting. Click the arrow on the Main menu icon to browse through the utilities in the main menu. Click to extend or restore AI Disk AI Disk allows you to easily clear temporary IE files, IE cookies, IE URLs, IE history, or the Recycle Bin. Click the AI Disk icon on the quick bar to display the full AI Disk window and select the items you want to clear. Click Apply when done. ASUS CG8565 65 AI Security English AI Security enables you to set a password to secure your devices, such as USB flash disks and CD/DVD disks, from unauthorized access. To lock a device: 2. Confirm the password. 3. Key in the password hint (recommended). 4. When done, click Ok. 5. Select the device you want to lock, then click Apply. 6. Key in the password you have set previously, then click Ok. 1.When using AI Security for the first time, you are asked to set a password. Key in a password with at most 20 alphanumeric characters. To unlock the device: 1. Deselect the locked device, then click Apply. 2.Key in the password you have set previously, then click Ok. To change the password: 66 •Click Change Password, then follow the onscreen instructions to change password. Chapter 6: Using the utilities AI Booting To specify the boot sequence: 1. 2. English AI Booting allows you to specify the boot device priority sequence. Select a device, then click the left/right button to specify the boot sequence. When done, press Apply. My Favorites My Favorites allows you to add applications that you frequently use, saving you from searching for the applications throughout your computer. To add an application: 1. Click Add, then locate the application you want to add to My Favorites. 2. Click Open on the file location window. The application is added to My Favorites list. Right click on the application icon to launch, delete, or rename the selected application. You can also double click to launch the selected application. ASUS CG8565 67 Support English Click any links on the Support window to go to the ASUS website, technical support website, download support website, or contact information. Information Click the tab on the Information window to see the detailed information about your system, motherboard, CPU, BIOS, installed device(s), and memory. 68 Chapter 6: Using the utilities Nero 9 English Nero 9 allows you to create, copy, burn, edit, share, and update different kinds of data. Installing Nero 9 To install Nero 9: 1. Insert the Nero 9 DVD into your optical drive. 2. If Autorun is enabled, the main menu appears automatically. If Autorun is disabled, double-click the SeupX.exe file from the main directory of your Nero 9 DVD. 3. From the main menu, click Nero 9 Essentials. ASUS CG8565 69 Select the language you want to use for Installation Wizard. Click Next. 5. Click Next to continue. 6. Tick I accept the License Conditions. When done, click Next. English 4. 70 Chapter 6: Using the utilities Select Typical then click Next. 8. Tick Yes, I want to help by sending anonymous application data to Nero then click Next. 9. When done, click Exit. English 7. ASUS CG8565 71 Burning files English To burn files: 72 1. From the main menu, click Data Burning > Add. 2. Select the files that you want to burn. When done, click Add. Chapter 6: Using the utilities After selecting files that you want to burn, click Burn to burn the files to a disc. English 3. For more details about using Nero 9, refer to the Nero website at www.nero.com Recovering your system Using the Recovery Partition The Recovery Partition quickly restores your Desktop PC’s software to its original working state. Before using the Recovery Partition, copy your data files (such as Outlook PST files) to USB storage devices or to a network drive and make note of any customized configuration settings (such as network settings). About the Recovery Partition The Recovery Partition is a reserved space on your hard disk drive used to restore the operating system, drivers, and utilities installed on your Desktop PC at the factory. DO NOT delete the partition named RECOVERY. The Recovery Partition is created at the factory and cannot be restored if deleted. Take your Desktop PC to an authorized ASUS service center if you have problems with the recovery process. Using the Recovery Partition: 1. Press <F9> during bootup. 2. Press <Enter> to select Windows Setup [EMS Enabled]. ASUS CG8565 73 3. Select one of the following recovery options. System Recovery: System Image Backup: English This feature allows you to restore the system to the factory default settings. This feature allows you to burn the system image backup in DVD discs, which you can use later to restore the system to its default settings. System DVD Backup: 4. Follow the onscreen instructions to complete the recovery process. This feature allows you to make a backup copy of the support DVD. Visit the ASUS website at www.asus.com for updated drivers and utilities. Using the Recovery DVD (on selected models) Prepare 1~3 blank writable DVDs as instructed to create the Recovery DVD. Remove the external hard disk drive before performing system recovery on your Desktop PC. According to Microsoft, you may lose important data because of setting up Windows on the wrong disk drive or formatting the incorrect drive partition. To use the Recovery DVD: 1. Insert the Recovery DVD into the optical drive. Your Desktop PC needs to be powered ON. 2. Restart the Desktop PC and press <F8> on bootup and select the optical drive (may be labeled as “CD/DVD”) and press <Enter> to boot from the Recovery DVD. 3. Select OK to start to restore the image. 4. Select OK to confirm the system recovery. Restoring will overwrite your hard drive. Ensure to back up all your important data before the system recovery. 5. Follow the onscreen instructions to complete the recovery process. DO NOT remove the Recovery disc, unless instructed to do so, during the recovery process or else your partitions will be unusable. Visit the ASUS website at www.asus.com for updated drivers and utilities. 74 Chapter 6: Using the utilities English Chapter 7 Troubleshooting Troubleshooting This chapter presents some problems you might encounter and the possible solutions. ? ? ? ? My computer cannot be powered on and the power LED on the front panel does not light up • Check if your computer is properly connected. • Check if the wall outlet is functioning. • Check if the Power Supply Unit is switched on. Refer to the section Turning your computer ON/OFF in Chapter 1. My computer hangs. • Do the following to close the programs that are not responding: 1.Simultaneously press <Alt> + <Ctrl> + <Delete> keys on the keyboard, then click Start Task Manager. 2. Click Applications tab. 3. Select the program that is not responding, then click End Task. • If the keyboard is not responding. Press and hold the Power button on the top of your chassis until the computer shuts down. Then press the Power button to turn it on. I cannot connect to a wireless nestwork using the ASUS WLAN Card (on selected models only)? • Ensure that you enter the correct network security key for the wireless network you want to connect to. • Connect the external antennas (optional) to the antenna connectors on the ASUS WLAN Card and place the antennas on the top of your computer chassis for the best wireless performance. The arrow keys on the number key pad are not working. ASUS CG8565 Check if the Number Lock LED is off. When the Number Lock LED is on, the keys on the number key pad are used to input numbers only. Press the Number Lock key to turn the LED off if you want to use the arrow keys on the number key pad. 75 ? English ? ? ? No display on the monitor. • Check if the monitor is powered on. • Ensure that your monitor is properly connected to the video output port on your computer. • If your computer comes with a discrete graphics card, ensure that you connect your monitor to a video output port on the discrete graphics card. • Check if any of the pins on the monitor video connector is bent. If you discover bent pins, replace the monitor video connector cable. • Check if your monitor is plugged to a power source properly. • Refer to the documentation that came with your monitor for more troubleshooting information. When using multiple monitors, only one monitor has display. • Ensure that the both monitors are powered on. • During POST, only the monitor connected to the VGA port has display. The dual display function works only under Windows. • When a graphics card is installed on your computer, ensure that you connect the monitors to the output port on the graphics card. • Check if the multiple displays settings are correct. Refer to section Connecting multiple external displays in Chapter 3 for details. My computer cannot detect my USB storage device. • The first time you connect your USB storage device to your computer, Windows automatically installs a driver for it. Wait for a while and go to My Computer to check if the USB storage device is detected. • Connect your USB storage device to another computer to test if the USB storage device is broken or malfunctions. I want to restore or undo changes to my computer’s system settings without affecting my personal files or data. 76 The Windows® System Restore feature allows you to restore or undo changes to your computer’s system settings without affecting your personal data such as documents or photos. For more details, refer to the section Restoring your system in Chapter 2. Chapter 7: Troubleshooting The picture on the HDTV is distorted. • It is caused by the different resolutions of your monitor and your HDTV. Adjust the screen resolution to fit your HDTV. To change the screen resolution: 1. Do any of the following to open the Screen Resolution setting screen: • Click > Control Panel > Appearance and Personalization > Display > Change display settings. • R ight click anywhere on your Windows desktop. When the pop-up menu appears, click Personalize > Display > Change display settings. English ? 2.Adjust the resolution. Refer to the documentation came with your HDTV for the resolution. ? 3.Click Apply or OK. Then click Keep Changes on the confirmation message. My speakers produce no sound. • Ensure that you connect your speakers to the Line out port (lime) on the front panel or the rear panel. • Check if your speak is connected to a electrical source and turned on. • Adjust your speakers’ volume. • Ensure that your computer’s system sounds are not Muted. • If it is muted, the volume icon is displayed as . To enable the system sounds, click from the Windows notification area, then click . • • ? ? If it is not muted, click and drag the slider to adjust the volume. Connect your speakers to another computer to test if the speakers arer working properly. The DVD drive cannot read a disc. • Check if the disc is placed with the label side facing up. • Check if the disc is centered in the tray, especially for the discs with non-standard size or shape. • Check if the disc is scratched or damaged. The DVD drive eject button is not respond. > Computer. 1. Click 2. Right-click ASUS CG8565 , then click Eject from the menu. 77 Power English Problem No power (The power indicator is off) Possible Cause Action Incorrect power voltage • S et your computer’s power voltage switch to your area’s power requirements. • Adjust the voltage settings. Ensure that the power cord is unplugged from the power outlet. Your computer is not turned on. Press the power key on the front panel to ensure that your computer is turned on. Your computer’s power cord is not properly connected. • E nsure that the power cord is properly connected. • Use other compatible power cord. PSU (Power supply unit) problems Try installing another PSU on your computer. Possible Cause Action The signal cable is not connected to the correct VGA port on your computer. • C onnect the signal cable to the correct display port (onboard VGA or discrete VGA port). • If you are using a discrete VGA card, connect the signal cable to the discrete VGA port. Signal cable problems Try connecting to another monitor. Display Problem No display output after turning the computer on (Black screen) 78 Chapter 7: Troubleshooting Problem Cannot access the Internet Possible Cause Action LAN cable problems Ensure the LAN LED is on. If not, try another LAN cable. If it still does not work, contact the ASUS service center. The LAN cable is not connected. Your computer is not properly connected to a router or hub. English LAN Connect the LAN cable to your computer. Ensure that your computer is properly connected to a router or hub. Network settings Contact your Internet Service Provider (ISP) for the correct LAN settings. Problems caused by the anti-virus software Close the anti-virus software. Driver problems Reinstall the LAN driver Audio Problem No Audio ASUS CG8565 Possible Cause Action Speaker or headphone is connected to the wrong port. • R efer to your computer’s user manual for the correct port. • Disconnect and reconnect the speaker to your computer. Speaker or headphone does not work. Try using another speaker or headphone. The front and back audio ports do not work. Try both the front and back audio ports. If one port failed, check if the port is set to multi-channel. Driver problems Reinstall the audio driver 79 System English Problem System speed is too slow The system often hangs or freezes. 80 Possible Cause Too many programs are running. Action Close some of the programs. Computer virus attack • U se an anti-virus software to scan for viruses and repair your computer. • Reinstall the operating system. Hard disk drive failure • Send the damaged hard disk drive to ASUS Service Center for servicing. • Replace with a new hard disk drive. Memory module problems • R eplace with compatible memory modules. • Remove the extra memory modules that you have installed, then try again. There is not enough air ventilation for your computer. Move your computer to an area with better air flow. Incompatible softwares are installed. Reinstall the OS and reinstall compatible softwares. Chapter 7: Troubleshooting Problem Too noisy right after turning on the computer. Computer is too noisy when in use. Possible Cause Action Your computer is booting up. It is normal. The fan runs on its full speed when the computer is powering on. The fan slows down after entering the OS. The BIOS settings have been changed. Restore the BIOS to its default settings. Old BIOS version Update the BIOS to the latest version. Visit the ASUS Support site at http://support.asus.com to download the latest BIOS versions. The CPU fan has been replaced. Ensure that you are using a compatible or ASUS-recommended CPU fan. There is not enough air ventilation for the computer. The system temperature is too high. English CPU Ensure that your computer is working in an area with good air flow. • U pdate the BIOS. • If you know how to reinstall the motherboard, try to clean the inner space of the chassis. If the problem still persists, refer to your Desktop PC’s warranty card and contact the ASUS Service Center. Visit the ASUS Support site at http://support.asus.com for the service center information. ASUS CG8565 81 ASUS contact information ASUSTeK COMPUTER INC. Address Telephone Fax E-mail Web site Technical Support Telephone Online support 15 Li-Te Road, Peitou, Taipei, Taiwan 11259 +886-2-2894-3447 +886-2-2890-7798 [email protected] www.asus.com.tw +86-21-38429911 support.asus.com ASUS COMPUTER INTERNATIONAL (America) Address Telephone Fax Web site Technical Support Telephone Support fax Online support 800 Corporate Way, Fremont, CA 94539, USA +1-510-739-3777 +1-510-608-4555 usa.asus.com +1-812-282-2787 +1-812-284-0883 support.asus.com ASUS COMPUTER GmbH (Germany and Austria) Address Fax Web site Online contact Technical Support Telephone (Component) Telephone (System/Notebook/Eee/LCD) Support Fax Online support Harkort Str. 21-23, D-40880 Ratingen, Germany +49-2102-959911 www.asus.de www.asus.de/sales +49-1805-010923* +49-1805-010920* +49-2102-9599-11 support.asus.com * EUR 0.14/minute from a German fixed landline; EUR 0.42/minute from a mobile phone. Manufacturer: ASUSTeK Computer Inc. Address: No.150, LI-TE RD., PEITOU, TAIPEI 112, TAIWAN Authorised representative in Europe: ASUS Computer GmbH Address: HARKORT STR. 21-23, 40880 RATINGEN, GERMANY ASUS Essentio Desktop PC CG8565 Benutzerhandbuch G6763 Erste Ausgabe August 2011 Deutsch Copyright © 2011 ASUSTeK Computer Inc. Alle Rechte vorbehalten. Kein Teil dieses Handbuchs, einschließlich der darin beschriebenen Produkte und Software, darf ohne ausdrückliche, schriftliche Genehmigung von ASUSTeK COMPUTER INC. (“ASUS”) in irgendeiner Form, ganz gleich auf welche Weise, vervielfältigt, übertragen, abgeschrieben, in einem Wiedergewinnungssystem gespeichert oder in eine andere Sprache übersetzt werden. Produktgarantien oder Service werden nicht geleistet, wenn: (1) das Produkt repariert, modifiziert oder abgewandelt wurde, außer schriftlich von ASUS genehmigte Reparaturen, Modifizierung oder Abwandlungen; oder (2) die Seriennummer des Produkts unkenntlich gemacht wurde oder fehlt. ASUS STELLT DIESES HANDBUCH “SO, WIE ES IST”, OHNE DIREKTE ODER INDIREKTE GARANTIEN, EINSCHLIESSLICH, JEDOCH NICHT BESCHRÄNKT AUF GARANTIEN ODER KLAUSELN DER VERKÄUFLICHKEIT ODER TAUGLICHKEIT FÜR EINEN BESTIMMTEN ZWECK, ZUR VERFÜGUNG. UNTER KEINEN UMSTÄNDEN HAFTET ASUS, SEINE DIREKTOREN, VORSTANDSMITGLIEDER, MITARBEITER ODER AGENTEN FÜR INDIREKTE, BESONDERE, ZUFÄLLIGE ODER SICH ERGEBENDE SCHÄDEN (EINSCHLIESSLICH SCHÄDEN AUF GRUND VON PROFITVERLUST, GESCHÄFTSVERLUST, BEDIENUNGSAUSFALL ODER DATENVERLUST, GESCHÄFTSUNTERBRECHUNG UND ÄHNLICHEM), AUCH WENN ASUS VON DER WAHRSCHEINLICHKEIT DERARTIGER SCHÄDEN AUF GRUND VON FEHLERN IN DIESEM HANDBUCH ODER AM PRODUKT UNTERRICHTET WURDE. SPEZIFIKATIONEN UND INFORMATIONEN IN DIESEM HANDBUCH DIENEN AUSSCHLIESSLICH DER INFORMATION, KÖNNEN JEDERZEIT OHNE ANKÜNDIGUNG GEÄNDERT WERDEN UND DÜRFEN NICHT ALS VERPFLICHTUNG SEITENS ASUS AUSGELEGT WERDEN. ASUS ÜBERNIMMT FÜR EVENTUELLE FEHLER ODER UNGENAUIGKEITEN IN DIESEM HANDBUCH KEINE VERANTWORTUNG ODER HAFTUNG, EINSCHLIESSLICH DER DARIN BESCHRIEBENEN PRODUKTE UND SOFTWARE. In diesem Handbuch angegebene Produkt- und Firmennamen können u.U. eingetragene Warenzeichen oder Urheberrechte der entsprechenden Firmen sein und dienen nur der Identifizierung oder Erklärung zu Gunsten des Eigentümers, ohne Rechte verletzen zu wollen. 84 Inhalt Erklärungen.................................................................................................. 87 Sicherheitsinformationen.............................................................................. 89 Darstellungssystematik................................................................................. 90 Weitere Informationsquellen......................................................................... 90 Verpackungsinhalt........................................................................................ 91 Kapitel 1 Erste Schritte Deutsch Willkommen!................................................................................................. 93 Kennenlernen des Computers...................................................................... 93 Einrichten Ihres Computers.......................................................................... 98 Ein-/Ausschalten Ihres Computers............................................................. 101 Kapitel 2 Verwenden von Windows® 7 Das erste Starten........................................................................................ 103 Windows® 7 Desktop verwenden................................................................ 104 Ihre Dateien und Ordner verwalten............................................................. 106 System wiederherstellen............................................................................. 108 Computer schützen..................................................................................... 109 Windows® Hilfe und Support........................................................................110 Kapitel 3 Anschließen von Geräten an Ihren Computer Anschließen eines USB-Datenträgers......................................................... 111 Anschließen von Mikrofon und Lautsprechern............................................112 Anschließen von mehreren externen Anzeigegeräten.................................115 Anschließen eines HDTV.............................................................................117 Kapitel 4 Computer verwenden Richtige Sitzhaltung beim verwenden des Desktop PCs.............................119 Speicherkartenleser verwenden................................................................. 120 Optisches Laufwerk verwenden.................................................................. 121 Verwenden der ASUS ROG U9N Spieltastatur.......................................... 122 Verwenden der ASUS GX900 Spielmaus................................................... 123 Kapitel 5 Einrichten der Internetverbindung Kabelverbindung......................................................................................... 131 85 Inhalt Kapitel 6 Verwenden der Hilfsprogramme ASUS AI Suite II.......................................................................................... 133 ASUS AI Manager....................................................................................... 146 Nero 9 ....................................................................................................... 151 Systemwiederherstellung............................................................................ 155 Kapitel 7 Problembehandlung Deutsch Problembehandlung.................................................................................... 157 ASUS Kontaktinformationen....................................................................... 164 86 Erklärungen REACH Die rechtliche Rahmenbedingungen für REACH (Registration, Evaluation, Authorisation, and Restriction of Chemicals) erfüllend, veröffentlichen wir die chemischen Substanzen in unseren Produkten auf unserer ASUS REACH-Webseite unter http://csr.asus.com/english/index.aspx. Erklärung der Federal Communications Commission • Deutsch Dieses Gerät stimmt mit den FCC-Vorschriften Teil 15 überein. Sein Betrieb unterliegt folgenden zwei Bedingungen: • Dieses Gerät darf keine schädigenden Interferenzen erzeugen, und Dieses Gerät muss alle empfangenen Interferenzen aufnehmen, einschließlich derjenigen, die einen unerwünschten Betrieb erzeugen. Dieses Gerät ist auf Grund von Tests für Übereinstimmung mit den Einschränkungen eines Digitalgeräts der Klasse B, gemäß Teil 15 der FCC-Vorschriften, zugelassen. Diese Einschränkungen sollen bei Installation des Geräts in einer Wohnumgebung auf angemessene Weise gegen schädigende Interferenzen schützen. Dieses Gerät erzeugt und verwendet Hochfrequenzenergie und kann, wenn es nicht gemäß den Anweisungen des Herstellers installiert und bedient wird, den Radio- und Fernsehempfang empfindlich stören. Es wird jedoch nicht garantiert, dass bei einer bestimmten Installation keine Interferenzen auftreten. Wenn das Gerät den Radio- oder Fernsehempfang empfindlich stört, was sich durch Aus- und Einschalten des Geräts feststellen lässt, ist der Benutzer ersucht, die Interferenzen mittels einer oder mehrerer der folgenden Maßnahmen zu beheben: • Empfangsantenne neu ausrichten oder an einem anderen Ort aufstellen. • Den Abstand zwischen dem Gerät und dem Empfänger vergrößern. • Den Händler oder einen erfahrenen Radio-/Fernsehtechniker um Hilfe bitten. • Das Gerät an die Steckdose eines Stromkreises anschließen, an die nicht auch der Empfänger angeschlossen ist. Um Übereinstimmung mit den FCC-Vorschriften zu gewährleisten, müssen abgeschirmte Kabel für den Anschluss des Monitors an die Grafikkarte verwendet werden. Änderungen oder Modifizierungen dieses Geräts, die nicht ausdrücklich von der für Übereinstimmung verantwortlichen Partei genehmigt sind, können das Recht des Benutzers, dieses Gerät zu betreiben, annullieren. 87 RF-Aussetzungswarnung Dieses Gerät und die integrierte Antenne dürfen nicht näher als 20 cm an Ihrem Körper oder in der Nähe befindenden Personen installiert und betrieben werden. Dieses Gerät und seine Antenne(n) dürfen nicht zusammen oder in der Nähe mit anderen Antennen oder Sendern betrieben werden. Endnutzer müssen die spezifischen Betriebsanleitungen für eine RFAussetzung innerhalb der anerkannten Bereiche befolgen. Erklärung des kanadischen Ministeriums für Telekommunikation Deutsch Dieses Digitalgerät überschreitet keine Grenzwerte für Funkrauschemissionen der Klasse B, die vom kanadischen Ministeriums für Telekommunikation in den Funkstörvorschriften festgelegt sind. Dieses Digitalgerät der Klasse B stimmt mit dem kanadischen ICES-003 überein. Macrovision Corporation-Produktanmerkung Dieses Produkt verfügt über Kopierschutztechnologie, die durch methodische Anforderungen bestimmter U.S.A.-Patente und anderer geistiger Eigentumsrechte der Macrovision Corporation und anderer Parteien geschützt sind. Die Verwendung dieser Kopierschutztechnologie muss von Macrovision Corporation genehmigt werden und ist, wenn nicht anderweitig von der Macrovision Corporation genehmigt, nur für private oder eingeschränkte Vorführungszwecke vorgesehen. Reverse-Engineering oder Demontage ist verboten. Warnung: Lithium-Ionen-Akkus CAUTION: Danger of explosion if battery is incorrectly replaced. Replace only with the same or equivalent type recommended by the manufacturer. Dispose of used batteries according to the manufacturer’s instructions. VORSICHT! Explosionsgefahr bei unsachgemäßen Austausch der Batterie. Ersatz nur durch denselben oder einem vom Hersteller empfohlenem ähnlichen Typ. Entsorgung gebrauchter Batterien nach Angaben des Herstellers. ASUS Recycling/Rücknahmeservices Das ASUS-Wiederverwertungs- und Rücknahmeprogramm basiert auf den Bestrebungen, die höchsten Standards zum Schutz der Umwelt anzuwenden. Wir glauben, das die Bereitstellung einer Lösung für unsere Kunden die Möglichkeit schafft, unsere Produkte, Batterien, andere Komponenten und ebenfalls das Verpackungsmaterial verantwortungsbewußt der Wiederverwertung zuzuführen. Besuchen Sie bitte die Webseite unter http://csr.asus.com/english/Takeback.htm für Details zur Wiederverwertung in verschiedenen Regionen. 88 Sicherheitsinformationen Bevor Sie das Gerät reinigen, trennen Sie es von der Stromversorgung. Wischen Sie den Desktop PC mit einem weichen Tuch oder einem Fensterleder ab, das Sie mit einer Lösung aus einem nicht scheuernden Reinigungsmittel und einigen Tropfen warmem Wasser angefeuchtet haben. Wischen Sie verbleibende Feuchtigkeit mit einem trockenen Tuch ab. • • • • • • • • • • • • Nicht auf ungerade oder instabile Oberflächen aufstellen. Bei Beschädigung des Gehäuses den Kundendienst aufsuchen. Keiner schmutzigen oder staubigen Umgebung aussetzen. Kein Betrieb während eines Gaslecks. Deutsch • Keine Gegenstände auf die Oberfläche fallenlassen und keine Fremdgegenstände in den Desktop PC einführen. Keinen magnetischen oder elektrischen Feldern aussetzen. Kein Aussetzen oder Betreiben in der nähe von Flüssigkeiten, Regen oder Feuchtigkeit. Kein Modembetrieb während eines elektrischen Sturms. Akku-Sicherheitswarnung: Batterie nicht in offenes Feuer werfen. Kontakte nicht kurzschließen. Den Akku nicht auseinandernehmen. Dieses Produkt in Umgebungstemperaturen zwischen 0˚C (32̊F) und 35˚C (95̊F) verwenden. Die Lufteinlässe des Desktop PCs nicht abdecken, um eine Überhitzung des Systems zu vermeiden. Keine beschädigten Stromkabel, Zubehörteile oder andere Peripheriegeräte verwenden. Den Kabel zur Vermeidung eine Stromschlags aus der Steckdose herausziehen, bevor das System bewegt wird. Suchen Sie Fachpersonal auf, bevor ein Adapter oder Verlängerungskabel verwendet wird. Solche Geräte können den Schutzkreislauf für die Erdung unterbrechen. Die Netzteilspannung sollte der örtlichen Stromversorgung entsprechen. Falls Sie sich über die Spannung der Stromversorgung unsicher sind, wenden Sie sich an Ihren Stromversorger. Falls das Netzteil ausfällt, reparieren Sie es nicht selbst. Wenden Sie sich an qualifiziertes Fachpersonal oder Ihren Händler. 89 Darstellungssystematik Um sicherzustellen, dass Sie bestimmte Aufgaben richtig ausführen, beachten Sie bitte die folgenden Symbole und Schriftformate, die in diesem Handbuch verwendet werden. Deutsch GEFAHR/WARNUNG: Informationen zum Vermeiden von Verletzungen beim Ausführen einer Aufgabe. VORSICHT: Informationen zum Vermeiden von Schäden an den Komponenten beim Ausführen einer Aufgabe. WICHTIG: Anweisungen, die Sie beim Ausführen einer Aufgabe befolgen müssen. HINWEIS: Tipps und zusätzliche Informationen zur Erleichterung bei der Ausführung einer Aufgabe. Weitere Informationsquellen An den folgenden Quellen finden Sie weitere Informationen und Produkt- sowie SoftwareUpdates. 90 ASUS-Webseiten ASUS-Webseiten enthalten weltweit aktualisierte Informationen über ASUS-Hardware und Softwareprodukte. Beziehen Sie sich auf die ASUS-Webseite unter www.asus.com. Vor-Ort Technische Unterstützung Besuchen Sie die ASUS-Webseite unter http://support.asus.com/contact für Kontaktinformationen der Technischen Unterstützung vor Ort. ASUS Essentio Desktop PC ASUS ROG U9N Gaming Tastaturpaket x1 Deutsch Verpackungsinhalt ASUS GX900 Gaming Mauspaket x1 Installation Guide Netzkabel x1 Nero 9 Burning Software DVD x1 (optional) Installationshilfe x1 Garantiekarte x1 Support-DVD x1 (optional) Wiederherstellungs-DVD x1 (optional) • Sollten o.g. Artikel beschädigt oder nicht vorhanden sein, wenden Sie sich bitte an Ihren Händler. • Die oberhalb illustrierten Artikel sind nur als eine Referenz gedacht. Die tatsächlichen Produktspezifikationen können sich je nach Modell unterscheiden. • Für Details zur Verwendung der mitgelieferten Tastatur und Maus, beziehen Sie sich auf die Abschnitte Verwenden der ASUS ROG Spieltastatur und Verwenden der ASUS GX900 Spielmaus. 91 Deutsch 92 Kapitel 1 Erste Schritte Willkommen! Deutsch Vielen Dank für den Kauf eines ASUS Essentio CG8565 Desktop PCs! Der ASUS Essentio CG8565 Desktop PC liefert topaktuelle Leistung, unvergleichliche Zuverlässigkeit und benutzerorientierte Anwendungen. All diese Eigenschaften wurden in diesem verblüffend futuristischen und eleganten Systemgehäuse vereint. Lesen Sie die ASUS Garantiekarte sorgfältig durch, bevor Sie Ihren ASUS Desktop PC in Betrieb nehmen. Kennenlernen des Computers Abbildungen werden nur zu Ihrer Referenz bereitgestellt. Anschlüsse und deren Platzierung sowie Gehäusefarben variieren mit verschiedenen Modellen. Vorderseite 9 10 11 12 8 7 1 6 2 3 4 5 ASUS CG8565 93 Deutsch 1. Einschalttaste. Drücken Sie diese Taste, um Ihren Computer einzuschalten. 2. Secure Digital™- / MultiMediaCard-Kartensteckplatz. Führen Sie eine Secure Digital™-Karte / MultiMediaCard-Karte in diesen Steckplatz ein. 3. Fach für Optisches Laufwerk. In diesem Laufwerksfach befindet sich ein optisches Laufwerk. 4. Hot Swap-Schacht (leer). Hier können Sie ein zusätzliches Festplattenlaufwerk einbauen. 5. Strom-LED. Diese LED leuchtet, wenn Sie den Computer einschalten. 6. Memory Stick™- / Memory Stick Pro™-Kartensteckplatz. Führen Sie eine Memory Stick™-Karte / Memory Stick Pro™-Karte in diesen Steckplatz ein. 7. CompactFlash®- / Microdrive™-Kartensteckplatz. Führen Sie eine CompactFlash®Karte / Microdrive™-Karte in diesen Steckplatz ein. 8. OC-Taste. Diese Taste passt das System Level Up (Übertaktungs)-Profil Ihres Computers an. 9. USB 3.0-Anschlüsse. Diese Universal Serial Bus 3.0 (USB 3.0)-Anschlüsse nehmen USB 3.0-Geräte wie Maus, Drucker, Kamera, PDA und andere Geräte auf. • Bei der Installation eines Windows® -Betriebssystems verbinden Sie KEINE Tastatur / Maus mit den USB 3.0-Anschlüssen. • Der Beschränkungen des USB 3.0-Controllers wegen, können USB 3.0-Geräte nur unter Windows® und nur nach der Installation eines USB 3.0-Treibers verwendet werden. • USB 3.0-Geräte können nur als Datenspeicher verwendet werden. • Wir empfehlen Ihnen, für eine schnellere Datenübertragung und bessere Leistung alle USB 3.0-Geräte mit den USB 3.0-Anschlüssen zu verbinden. 10. USB 2.0-Anschlüsse. Diese Universal Serial Bus 2.0 (USB 2.0)-Anschlüsse nehmen USB 2.0-Geräte wie Maus, Drucker, Kamera, PDA und andere Geräte auf. 11. Mikrofonanschluss. Dieser Anschluss verbindet mit einem Mikrofon. 12. Kopfhöreranschluss. Dieser Anschluss verbindet mit Kopfhörern oder Lautsprechern. 94 Kapitel 1: Erste Schritte Rückseite 16 E-SATA 1 2 13 3 17 4 18 19 6 7 8 Deutsch 5 9 20 21 10 11 12 13 14 15 1.��������������������� USB 2.0-Anschlüsse. Diese Universal Serial Bus 2.0 (USB 2.0)-Anschlüsse nehmen USB 2.0-Geräte wie Maus, Drucker, Kamera, PDA und andere Geräte auf. 2. eSATA-Anschluss. Dieser Anschluss verbindet mit externen Festplatten- oder optischen Laufwerken. 3. Optischer S/PDIF-Ausgang. Dieser Anschluss verbindet über ein optisches S/PDIFKabel mit externen Audiogeräten. 4. HDMI-Anschluss. Dies ist High-Definition Multimedia Interface (HDMI)-Anschluss und ist kompatibel mit HDCP, um die Wiedergabe von HD DVD, Blu-Ray und anderen geschützten Inhalten zu ermöglichen. 5. DVI-D-Anschluss. Dieser Anschluss nimmt DVI-D-kompatible Geräte auf und ist HDCP-konform. Dies ermöglicht die Wiedergabe von HD DVDs, Blu-Ray Disks und anderen geschützten Inhalten. 6. USB 3.0-Anschlüsse. Diese Universal Serial Bus 3.0 (USB 3.0)-Anschlüsse nehmen USB 3.0-Geräte wie Maus, Drucker, Kamera, PDA und andere Geräte auf. • Bei der Installation eines Windows® -Betriebssystems verbinden Sie KEINE Tastatur / Maus mit den USB 3.0-Anschlüssen. • Der Beschränkungen des USB 3.0-Controllers wegen, können USB 3.0-Geräte nur unter Windows® und nur nach der Installation eines USB 3.0-Treibers verwendet werden. • USB 3.0-Geräte können nur als Datenspeicher verwendet werden. • Wir empfehlen Ihnen, für eine schnellere Datenübertragung und bessere Leistung alle USB 3.0-Geräte mit den USB 3.0-Anschlüssen zu verbinden. ASUS CG8565 95 7. Seitenlautsprecherausgang (grau). Dieser Anschluss verbindet in einer 8-KanalAudiokonfiguration mit den Seitenlautsprechern. 8. Hinterer Lautsprecherausgang (schwarz). Dieser Anschluss verbindet in einer 4Kanal-, 6-Kanal- oder 8-Kanal-Audiokonfiguration mit den hinteren Lautsprechern. 9. Mitte/Subwoofer-Anschluss (orange). Dieser Anschluss verbindet mit den Mitte-/ Subwoofer-Lautsprechern. 10. Mikrofonanschluss (rosa). Dieser Anschluss verbindet mit einem Mikrofon. 11. Deutsch Line Out-Anschluss (hellgrün). Dieser Anschluss verbindet mit Kopfhörern oder Lautsprechern. In 4-Kanal-, 6-Kanal- und 8-Kanalkonfigurationen wird dieser Anschluss zum Frontlautsprecherausgang. 12. Line In-Anschluss (hellblau). Dieser Anschluss verbindet mit Tonband-, CD- oder DVD-Playern und anderen Audiogeräten. Die Funktionen der Audioausgänge in 2, 4, 6 oder 8-Kanalkonfigurationen entnehmen Sie bitte der folgenden Audio-Konfigurationstabelle. Audio 2, 4, 6, oder 8-Kanalkonfigurationen Anschlüsse Kopfhörer 2-Kanal 4-Kanal 6-Kanal 8-Kanal Hellblau Line In Line In Line In Line In Hellgrün Line Out Frontlautsprecher Frontlautsprecher Frontlautsprecher Rosa Mic In Mic In Mic In Mic In Orange – – Mitte/Subwoofer Mitte/Subwoofer Schwarz – Hinterer Lautsprecher Hinterer Lautsprecher Hinterer Lautsprecher Grau – – – Seitenlautsprecher 13. Lüftungsöffnungen. Diese Öffnungen dienen der Luftzirkulation. Blockieren Sie nicht die Lüftungsöffnungen im Gehäuse. Stellen Sie immer adäquate Ventilation für Ihren Computer bereit. 14. Stromanschluss. Verbinden Sie das Netzkabel mit diesem Anschluss. 15. Stromschalter. Schaltet die Stromversorgung für Ihren Computer An/Aus. 16. Bluetooth-Modul. Sie können ein Bluetooth-fähiges Gerät (z.B. Handy) mit diesem Modul koppeln, um Daten drahtlos zu übertragen. 17. VGA-Anschluss. Dieser Anschluss ist für einen VGA-Monitor oder andere VGAkompatible Geräte vorgesehen. 96 Kapitel 1: Erste Schritte 18. LAN (RJ-45)-Anschluss. Dieser Anschluss ermöglicht Gigabit-Verbindungen zu einem Local Area Network (LAN) mittels eines Netzwerk-Hub. ACT/LINK SPEED LED LED LED-Anzeigen am LAN-Anschluss Aktivitäts-/Verbindungs- LED Status Beschreibung ORANGE Verbunden AUS BLINKEND Nicht verbunden Datenaktivität Geschwindigkeits-LED Status Beschreibung ORANGE 100Mbps-Verbindung AUS GRÜN 10Mbps-Verbindung 1Gbps-Verbindung LANAnschluss Deutsch 19. Soundkartenanschlüsse. Diese Anschlüsse verbinden mit Soundgeräten wie Mikrofon, Headset oder Lautsprechern. 20. ASUS-Grafikkarte (nur bei bestimmten Modellen). Die Anzeigeausgänge dieser optionalen ASUS-Grafikkarte variieren je nach Modell. 21. Blenden für Erweiterungssteckplätze. Entfernen Sie die Blenden bei der Installation weiterer Erweiterungskarten. ASUS CG8565 97 Einrichten Ihres Computers Dieser Abschnitt führt Sie durch das Anschließen üblicher Hardware-Geräte wie einen externen Monitor, Tastatur, Maus und Stromkabel an Ihren Computer. Anschließen eines externen Monitors ASUS Grafikkarte verwenden (nur bei bestimmten Modellen) Verbinden Sie den Monitor mit dem Anzeigeausgang der aufgesetzten ASUS Grafikkarte. So verbinden Sie einen externen Monitor mit der ASUS Grafikkarte: Deutsch 1. Verbinden Sie einen Monitor mit dem Anzeigeausgang der ASUS-Grafikkarte. 2. Schließen Sie den Monitor an die Stromversorgung an. Die Anzeigeausgänge der ASUS Grafikkarten können sich je nach Modell unterscheiden. 98 Kapitel 1: Erste Schritte Verwenden der integrierten Anzeigeanschlüsse Schließen Sie den Monitor an den integrierten Anzeigeanschluss an. So verbinden Sie einen externen Monitor mithilfe der integrierten Anzeigeanschlüsse: Verbinden Sie ein VGA-Monitor mit dem VGA-Anschluss oder ein DVI-D-Monitor mit dem DVI-D-Anschluss oder ein HDMI-Monitor mit dem HDMI-Anschluss auf der Rückseite Ihres Computers. 2. Schließen Sie den Monitor an die Stromversorgung an. Deutsch 1. • Falls Ihr Computer mit einer ASUS-Grafikkarte ausgestattet wurde, ist die Grafikkarte in BIOS als primäres Anzeigegerät eingestellt. Verbinden Sie den Monitor deshalb mit dem Anzeigeausgang der ASUS-Grafikkarte. • Um mehrere externe Monitore mit dem Computer zu verbinden, beziehen Sie sich auf den Abschnitt Anschließen von mehreren externen Anzeigegeräten in Kapitel 3 dieses Benutzerhandbuchs. ASUS CG8565 99 Anschließen einer USB-Tastatur und USB-Maus Verbinden Sie eine USB-Tastatur und USB-Maus mit den USB-Anschlüssen auf der Rücktafel (Rückseite) Ihres Computers. Deutsch Anschließen des Netzkabels Verbinden Sie ein Ende des Netzkabels mit dem Stromanschluss auf der Rücktafel (Rückseite) Ihres Computers und das andere Ende mit der Steckdose. 100 Kapitel 1: Erste Schritte Ein-/Ausschalten Ihres Computers. Dieser Abschnitt beschreibt, wie Sie den Computer nach dem Einrichten Ein-/Ausschalten können. Computer einschalten 1. Schalten Sie den Monitor ein. 2. Schalten Sie den Stromschalter ein und drücken Sie die Einschalttaste Ihres Computers. Deutsch So schalten Sie den Computer ein: Einschalttaste E-SATA 4. Warten Sie, bis das Betriebssystem automatisch hochlädt. Computer ausschalten So schalten Sie den Computer aus: 1. Schließen Sie alle laufenden Anwendungen. 2. Klicken Sie im Windows®-Desktop auf 3. Klicken Sie auf herunterzufahren. ASUS CG8565 . (Herunterfahren), um das Betriebssystem 101 Deutsch 102 Kapitel 1: Erste Schritte Kapitel 2 Verwenden von Windows® 7 Das erste Starten Deutsch Beim ersten Start Ihres Computers erscheint eine Abfolge von Fenstern, um Sie durch die Konfiguration der Grundeinstellungen Ihres Windows Windows® 7 Betriebssystems zu führen. So führen Sie den Erststart aus: 1. Schalten Sie den Computer ein. Warten Sie einige Minuten, bis das Fenster Windows einrichten (Set Up Windows) erscheint. 2. Wählen Sie in der Dropdownliste Ihre Sprache. Klicken Sie auf Weiter (Next). 3. Wählen Sie aus der Dropdownliste Ihr Land (Country) oder Region, Zeit (Time) und Währung (Currency) sowie Tastatur-Layout (Keyboard Layout). Klicken Sie auf Next (Weiter). 4. Geben Sie einmalige Namen für Benutzername (user name) und Computername (Computer name) ein. Klicken Sie auf Weiter (Next). 5. Geben sie die benötigten Informationen ein, um Ihr Kennwort einzurichten, und klicken Sie auf Weiter (Next). Sie können auch auf Weiter (Next) klicken und diesen Schritt ohne ein Kennwort einzugeben zu überspringen. Falls Sie später einen Benutzernamen oder Kennwort einrichten möchten, beziehen Sie sich auf den Abschnitt Benutzerkonto und Kennwort einrichten in diesem Kapitel. 6. Lesen Sie sorgfältig die Lizenzbedingungen (License terms). Wählen Sie Ich akzeptiere die Lizenzbedingungen (I accept the license terms) und klicken Sie auf Weiter (Next). 7. Wählen Sie zwischen Empfohlene Einstellungen verwenden (Use recommended settings) oder Nur wichtige Updates installieren (Install important updates only), um Sicherheitseinstellungen Ihres Computers einzustellen. Um diesen Schritt zu überspringen, wählen Sie Später nachfragen (Ask me later). 8. Überprüfen Sie die Zeit- und Datumseinstellungen. Klicken Sie auf Weiter (Next). Das System ladet die neuen Einstellungen und startet erneut. Sie können jetzt mit der Verwendung Ihres Computers beginnen. ASUS CG8565 103 Windows® 7 Desktop verwenden Klicken Sie auf das Startsymbol > Hilfe und Support (Help and Support), um weitere Informationen über Windows® 7 zu erhalten. Das Startmenü verwenden Das Startmenü ermöglicht Ihnen den Zugang zu Programmen, Anwendungen und anderen nützlichen Elementen auf Ihrem Computer. Ebenso bietet es Ihnen weitere Informationen über Windows 7 durch die Funktionen von Hilfe und Support (Help and Support). Deutsch Elemente im Startmenü ausführen So führen Sie Elemente im Startmenü aus: 1. Klicken Sie in der Windows®-Taskleiste auf das Startsymbol 2. Wählen Sie im Startmenü das Element, welches Sie ausführen möchten. . Sie können Programme, die Sie dauerhaft im Startmenü anzeigen möchten, an das Startmenü anheften. Für weitere Details beziehen Sie sich auf den Abschnitt Programme an Startmenü oder Taskleiste anheften in diesem Kapitel. Das Element Getting Started verwenden Das im Startmenü aufgelistete Element Erste Schritte (Getting Started) enthält Informationen über allgemeine Aufgaben wie das Personalisieren von Windows®, Hinzufügen neuer Benutzer und Dateitransfer, um Sie mit der Benutzeroberfläche von Windows® 7 vertraut zu machen. So verwenden Sie das Element Erste Schritte: 1. 2. 3. Klicken Sie in der Windows®-Taskleiste auf das Startsymbol öffnen. , um das Startmenü zu Wählen Sie Erste Schritte (Getting Started). Eine Liste möglicher Aufgaben erscheint. Wählen Sie die gewünschte Aufgabe. Taskleiste verwenden Die Taskleiste ermöglicht das Starten und die Verwaltung der auf Ihrem Computer installierten Programme oder Elemente. Ein Programm aus der Taskleiste starten So starten Sie ein Programm aus der Taskleiste: • Klicken Sie auf ein Symbol in der Windows®-Taskleiste, um es zu auszuführen. Klicken Sie erneut auf das Symbol, um das Programm auszublenden. Sie können Programme, die Sie dauerhaft anzeigen möchten, an die Taskleiste anheften. Für weitere Details beziehen Sie sich auf den Abschnitt Programme an Startmenü oder Taskleiste anheften in diesem Kapitel. 104 Kapitel 2: Verwenden von Windows® 7 Elemente an die Sprunglisten anheften Ein Rechtsklick auf ein Symbol in der Taskleiste ladet die Sprungliste (Jumplist), um Ihnen einen Schnellzugang zu Bezugslinks eines Programms oder Elements zu erleichtern. Sie können Elemente wie Webseiten-Favoriten, oft verwendete Ordner oder Laufwerke sowie kürzlich abgespielte Mediendateien an die Sprungliste (Jumplist) anheften. 1. Klicken Sie mit der rechten Maustaste ein Symbol in der Taskleiste an. 2. Klicken Sie mit der rechten Maustaste auf das gewünschte Element in der Sprungliste und wählen Sie An diese Liste anheften (Pin to this list). Deutsch So heften Sie Elemente an die Sprungliste an: Elemente von der Sprungliste lösen So lösen Sie Elemente von der Sprungliste: 1. Klicken Sie mit der rechten Maustaste ein Symbol in der Taskleiste an. 2. Klicken Sie mit der rechten Maustaste auf das gewünschte Element in der Sprungliste und wählen Sie Von dieser Liste lösen (Unpin from this list). Programme an Startmenü oder Taskleiste anheften So heften Sie Programme ans Startmenü oder Taskleiste an: 1. 2. 3. Klicken Sie in der Windows®-Taskleiste auf das Startsymbol laden. , um das Startmenü zu Klicken Sie mit der rechten Maustatste auf das Gewünschte Element. Wählen Sie An Taskleiste anheften (Pin to Taskbar) oder An Startmenü anheften (Pin to Start menu). Sie können auch das Symbol eines aktuell ausgeführten Programms mit der rechten Maustaste anklicken und Dieses Programm an Taskleiste anheften (Pin this program to taskbar) auswählen. Programme vom Startmenü lösen So lösen Sie Programme vom Startmenü: 1. 2. Klicken Sie in der Windows®-Taskleiste auf das Startsymbol laden. , um das Startmenü zu Klicken Sie mit der rechten Maustaste auf das gewünschte Programm in der Startmenü und wählen Sie Von dieser Liste lösen (Unpin from this list). Programme von der Taskleiste lösen So lösen Sie Programme von der Taskleiste: 1. Klicken Sie in der Taskleiste das gewünschte Programm mit der rechten Maustaste an und wählen Sie Dieses Programm von der Taskleiste lösen (Unpin this program from taskbar). ASUS CG8565 105 Infobereich verwenden In der Standardeinstellung sind folgende Symbole im Infobereich aufgelistet: Benachrichtigung für Wartungscenter Hier können Sie durch das Anklicken dieses Symbols Warnnachrichten/Benachrichtigungen anzeigen und das Windows®-Wartungscenter laden. Netzwerkverbindung Dieses Symbol zeigt den Verbindungsstatus und Signalstärke der Kabel- oder DrahtlosNetzwerkverbindung. Deutsch Lautstärke Zur Einstellung der Lautstärke klicken Sie auf dieses Symbol. Warnnachricht anzeigen So zeigen Sie eine Warnnachricht an: • Klicken Sie auf das Benachrichtigungssymbol diese anzuzeigen. und dann auf die Nachricht, um Für weitere Details beziehen Sie sich auf den Abschnitt Windows®-Wartungscenter verwenden in diesem Kapitel. Symbole und Benachrichtigungen anpassen Sie können die Symbole und Benachrichtungen in der Taskleiste oder im Infobereich wahlweise ein- oder ausblenden. So passen Sie Symbole und Benachrichtungen an: 1. Klicken Sie im Infobreich auf das Pfeilsymbol 2. Klicken Sie auf Anpassen (Customize). . 3. Wählen Sie in der Dropdownliste die gewünschte Verhaltensweise von Symbolen oder Elementen, die Sie anpassen möchten. Ihre Dateien und Ordner verwalten Windows® Explorer verwenden Mit Windows® Explorer können Sie Ihre Dateien und Ordner ansehen, verwalten und organisieren. Windows® Explorer öffnen So öffnen Sie den Windows Explorer: 1. 2. 106 Klicken Sie in der Windows®-Taskleiste auf das Startsymbol laden. , um das Startmenü zu Klicken Sie auf Arbeitsplatz (Computer), um den Windows Explorer zu öffnen. Kapitel 2: Verwenden von Windows® 7 Dateien und Ordner durchsuchen So durchsuchen Sie Dateien und Ordner: 1. Öffnen sie Windows Explorer. 2. Suchen Sie im Navigations- oder Ansichtsbereich nach dem Ort Ihrer Daten. 3. Klicken Sie in der Breadcrumb-Leiste auf den Pfeil, um den Inhalt eines Laufwerks oder Ordners anzuzeigen. Deutsch Datei-/Ordneransicht anpassen So passen Sie die Datei-/Ordneransicht an: 1. Öffnen Sie Windows Explorer. 2. Wählen Sie im Navigationsbereich den Ort Ihrer Daten. 3. Klicken Sie in der Symbolleiste auf das Symbol Ansicht 4. Bewegen Sie den Auswahlregler im Ansichtsmenü, um die Ansicht der Datei oder des Ordners anzupassen. . Sie können auch mit der rechten Maustaste den Ansichtsbereich irgendwo anklicken, Ansicht (View) wählen und die gewünschte Ansichtsart bestimmen. Dateien ordnen So ordnen Sie Dateien: 1. Öffnen Sie Windows Explorer. 2. Klicken Sie im Feld Anordnen (Arrange by), um die Dropdownliste anzuzeigen. 3. Wählen Sie die gewünschte Anordnungsart. Dateien sortieren So sortieren Sie Dateien: 1. Öffnen Sie Windows Explorer. 2. Rechtsklicken Sie irgendwo im Ansichtsbereich. 3. Wählen Sie im erschienenen Kontextmenü Sortieren (Sort by) und dann die von Ihnen gewünschte Sortierungsmethode. Dateien gruppieren So gruppieren Sie Dateien: 1. Öffnen Sie Windows Explorer. 2. Rechtsklicken Sie irgendwo im Ansichtsbereich. 3. Wählen Sie im erschienenen Kontextmenü Gruppieren (Group by) und dann die von Ihnen gewünschte Gruppierungsmethode. ASUS CG8565 107 Neuen Ordner hinzufügen So fügen Sie einen neuen Ordner hinzu: 1. Öffnen Sie Windows Explorer. 2. Klicken in der Taskleiste auf Neuer Ordner (New folder). 3. Wählen Sie einen Namen für den neuen Ordner. Deutsch Sie können auch den Ansichtsbereich mit der rechten Maustaste anklicken und Neu (New) > Ordner (Folder) wählen. Dateien sichern Ein Backup erstellen So erstellen Sie ein Backup: 1. Klicken Sie auf > Alle Programme (All Programs) > Wartung (Maintenance) > Sichern und wiederherstellen (Backup and Restore). 2. Klicken Sie auf Sicherung einrichten (Set up backup). Klicken Sie auf Weiter (Next). 3. Wählen Sie einen Zielort für Ihren Backup. Klicken Sie auf Weiter (Next). 4. Wählen Sie entweder Auswahl durch Windows (empfohlen) (Let Windows choose (recommended)) oder Auswahl durch Benutzer (Let me choose) für Ihren Backup. Falls Sie Auswahl durch Windows auswählen, wird Windows keine Programme, FATformatierte Dateien, Papierkorbdateien oder Temporäre Dateien von 1GB oder mehr sichern. 5. Folgen Sie den Bildschirmanweisungen, um den Vorgang abzuschließen. System wiederherstellen Die Funktion Windows®-Systemwiederherstellung legt einen Wiederherstellungspunkt an, in dem die Systemeinstellungen des Computers an einem Zeitpunkt/Datum gespeichert werden. Dies erlaubt Ihnen die Wiederherstellung oder das Rückgängigmachen von Änderungen Ihres Computersystems, ohne dass Ihre persönlichen Daten betroffen werden. So stellen Sie das System wieder her: 108 1. Schließen Sie alle laufenden Anwendungen. 2. Klicken Sie auf > Alle Programme (All Programs) > Zubehör (Accessories) > Systemprogramme (System Tools) > Systemwiederherstellung (System Restore). 3. Folgen Sie den Bildschirmanweisungen, um den Vorgang abzuschließen. Kapitel 2: Verwenden von Windows® 7 Computer schützen Windows® 7-Wartungscenter verwenden Windows® 7-Wartungscenter hilft Ihnen bei Warnnachrichten und bietet Sicherheitsinformationen, Informationen zur Systemwartung sowie die Möglichkeit einer automatischen Problembehandlung und Behebung häufig auftretender Computerprobleme. Deutsch Sie könne die Benachrichtungen selbst anpassen. Für weitere Details beziehen Sie sich auf den vorherigen Abschnitt Symbole und Benachrichtigungen anpassen in diesem Kapitel. Windows® 7-Wartungscenter ausführen So führen Sie Windows® 7-Wartungscenter aus: 1. Klicken Sie zum Ausführen des Windows 7-Wartungscenter auf das Symbol Infobereich und dann auf Wartungscenter öffnen (Open Action Center). 2. Klicken Sie im Windows 7-Wartungscenter auf die Aufgabe, die Sie ausführen möchten. im Windows® Update verwenden Windows Update erlaubt Ihnen den Abruf und Installation der neuesten Updates, um die Sicherheit und Leistung Ihres Computers zu verbessern. Windows® Update ausführen So führen Sie Windows® Update aus: 1. 2. 3. Klicken Sie in der Windows®-Taskleiste auf das Startsymbol laden. , um das Startmenü zu Wählen Sie Alle Programme (All Programs) > Windows Update. Klicken Sie im Windows Update-Fenster auf die Aufgabe, die Sie ausführen möchten. Benutzerkonto und Kennwort erstellen Sie können für andere Personen, mit Zugriff auf Ihren Computer, weitere Benutzerkonten sowie Kennwörter erstellen. Ein Benutzerkonto erstellen So können sie ein Benutzerkonto erstellen: 1. Klicken Sie in der Windows®-Taskleiste auf > Erste Schritte (Getting Started) > Neue Benutzer hinzufügen (Add new users). 2. Wählen Sie Anderes Konto verwalten (Manage another account). 3. Wählen Sie Neues Konto erstellen (Create a new account). 4. Geben Sie den neuen Benutzernamen ein. 5. Wählen Sie den Benutzertyp, entweder Standardbenutzer (Standard user) oder Administrator. 6. Zum Fertigstellen klicken Sie auf Konto erstellen (Create Account). ASUS CG8565 109 Benutzerkennwort erstellen So erstellen Sie ein Benutzerkennwort: 1. Wählen Sie den Benutzer, für den Sie ein Kennwort erstellen möchten. 2. Wählen Sie Kennwort erstellen (Create a password). 3. Geben Sie ein Kennwort ein und bestätigen Sie es. Geben Sie ein Kennworthinweis ein. 4. Zum Fertigstellen klicken Sie auf Kennwort erstellen (Create password). Deutsch Antivirus-Software aktivieren Trend Micro Internet Security ist eine auf Ihren Computer vorinstallierte Antivirus-Software. Nach der Aktivierung können Sie es 60 Tage lang Probenutzen und eine lizenzierte Version erwerben, nachdem die Probezeit abgelaufen ist. So aktivieren Sie Trend Micro Internet Security: 1. Führen Sie die Anwendung Trend Micro Internet Security aus. 2. Lesen Sie sorgfältig die Lizenzbedingungen (License terms). Klicken Sie auf Zustimmen & Aktivieren (Agree & Activate). 3. Geben Sie Ihre E-Mail-Adresse und Ihren Standort ein. Klicken Sie auf Weiter (Next). 4. Klicken Sie auf Fertigstellen (Finish), um die Aktivierung abzuschließen. Windows® Hilfe und Support Windows® Hilfe und Support bietet Ihnen Anleitungen und Antworten für die Verwendung der Anwendungen auf der Windows® 7-Plattform. Um Windows® Hilfe und Support zu laden, klicken Sie auf and Support). > Hilfe und Support (Help Stellen Sie sicher, dass Sie mit dem Internet verbunden sind, um die aktuellste Windows®Onlinehilfe abrufen zu können. 110 Kapitel 2: Verwenden von Windows® 7 Kapitel 3 Anschließen von Geräten an Ihren Computer Anschließen eines USB-Datenträgers Deutsch Dieser Desktop PC enthält USB 2.0/1.1- und USB 3.0-Anschlüsse auf der Vorder- sowie Rückseite. Die USB-Anschlüsse ermöglichen Ihnen das Anschließen von USB-Geräten wie z.B. USB-Datenträger. So schließen Sie einen USB-Datenträger an: • Stecken Sie den USB-Datenträger in Ihren Computer ein. Vorderseite Rückseite So entfernen Sie einen USB-Datenträger: 1. Klicken Sie im Windows-Infobereich Ihres Computers auf und dann auf USB2.0-Flahslaufwerk auswerfen (Eject USB2.0 FlashDisk) oder USB3.0-Flahslaufwerk auswerfen (Eject USB3.0 FlashDisk), falls Sie einen USB3.0-Datenträger verwenden. Der Name variiert je nach USB-Datenträgermodell. 2. Wenn die Nachricht Hardware kann jetzt entfernt werden (Safe to Remove Hardware) eingeblendet wird, entfernen Sie den USBDatenträger von Ihrem Computer. Entfernen Sie einen USB-Datenträger nicht während eines laufenden Datentransfers. Dies kann zu Datenverlust führen und den USB-Datenträger beschädigen. ASUS CG8565 111 Anschließen von Mikrofon und Lautsprechern Dieser Desktop PC enthält Mikrofon- und Lautsprecheranschlüsse auf der Vorder- sowie Rückseite. Die auf der Rückseite gelegenen Audio E/A-Anschlüsse ermöglichen Ihnen den Anschluss von 2-Kanal, 4-Kanal, 6-Kanal, and 8-Kanal Stereolautsprechern. Anschluss von Kopfhörern und Mikrofon Deutsch Anschluss von 2-Kanal Lautsprechern 112 Kapitel 3: Anschließen von Geräten an Ihren Computer Deutsch Anschluss von 4-Kanal Lautsprechern Anschluss von 6-Kanal Lautsprechern ASUS CG8565 113 Anschluss von 8-Kanal Lautsprechern Deutsch 114 Kapitel 3: Anschließen von Geräten an Ihren Computer Anschließen von mehreren externen Anzeigegeräten Ihr Desktop PC enthält evtl. VGA-, HDMI- und DVI-Anschlüsse/Ausgänge und ermöglicht Ihnen das Verbinden von mehreren externen Anzeigegeräten. Wenn eine Grafikkarte auf Ihren Computer installiert wurde, verbinden Sie die Anzeigegeräte mit den Anzeigeausgängen der Grafikkarte. Einrichten mehrerer Anzeigegeräte Deutsch Wenn Sie mehrere Monitore verwenden, können Sie die Anzeigemodi selbst bestimmen. Sie können einen zusätlichen Monitor als ein Duplikat Ihres Hauptmonitors oder als eine Erweiterung Ihres Windows Desktops verwenden. So richten Sie mehrere Anzeigegeräte ein: 1. Schalten Sie den Computer aus. 2. Verbinden Sie die zwei Monitore mit Ihrem Computer sowie die Netzteile mit den Monitoren. Beziehen Sie sich auf den Abschnitt Einrichten Ihres Computer in Kapitel 1 für Details zum Verbinden eines Monitors mit Ihrem Computer. Bei einigen Grafikkarten kann nur der zur Primäranzeige gesetzte Monitor eine Anzeige während des POST lieferen. Die Dual-Anzeige-Funktion funktioniert nur unter Windows. ASUS CG8565 115 Deutsch 116 3. Schalten Sie den Computer ein. 4. Folgen Sei einer nachstehenden Vorgehensweisen, um das Einstellungsfenster Bildschirmauflösung (Screen Resolution) zu öffnen: •Klicken Sie auf > Systemsteuerung (Control Panel) > Darstellung und Anpassung (Appearance and Personalization) > Anzeige (Display) > Anzeigeeinstellungen ändern (Change display settings). •Klicken Sie mit der rechten Maustaste irgendwo im Desktop. Wählen Sie im Kontextmenü Anpassen (Personalize) > Anzeige (Display) > Anzeigeeinstellungen ändern (Change display settings). 5. Wählen Sie in der Dropdownliste Mehrere Anzeigen: (Multiple displays:) den gewünschten Anzeigemodus. •Diese Anzeigen duplizieren (Duplicate these displays): Treffen Sie diese Auswahl, um den zusätzlichen Monitor als einen Duplikat Ihres Hauptmonitors zu verwenden. •Diese Anzeigen erweitern (Extend these displays): Treffen Sie diese Auswahl, um den zusätzlichen Monitor als eine Erweiterung Ihres Hauptmonitors zu verwenden. Dies vergrößert Ihren Desktop. •Desktop nur auf 1 / 2 anzeigen (Show desktop only on 1 / 2): Treffen Sie diese Auswahl, um den Desktop auf Monitor 1 oder Monitor 2 anzuzeigen. •Diesen Bildschirm entfernen (Remove this display): Treffen Sie diese Auswahl, um den ausgewählten Monitor zu entfernen. 6. Klicken Sie auf Übernehmen (Apply) oder auf OK und in der Bestätigungsnachricht dann auf Änderungen beibehalten (Keep Changes). Kapitel 3: Anschließen von Geräten an Ihren Computer Anschließen eines HDTV Verbinden Sie ein High-Definition TV (HDTV) mit dem HDMI-Anschluss Ihres Computers. • Sie benötigen ein HDMI-Kabel, um ein HDTV mit dem Computer zu verbinden. Das HDMI-Kabel muss separat erworben werden. Deutsch • Um die beste Anzeigeleistung zu erhalten, sollte das HDMI-Kabel kürzer als 15 Meter sein. ASUS CG8565 117 Deutsch 118 Kapitel 3: Anschließen von Geräten an Ihren Computer Kapitel 4 Computer verwenden Richtige Sitzhaltung beim verwenden des Desktop PCs Deutsch Beim Verwenden des Desktop PCs ist die Einhaltung der richtigen Sitzhaltung erforderlich, um Verspannungen Ihrer Handgelenke, Hände und anderer Gelenke oder Muskeln zu vermeiden. Dieser Abschnitt bietet Ihnen Tipps zum Vermeiden von physischen Beschwerden und möglichen Verletzungen beim Verwenden und Erfreuen Ihres Desktop PCs. Augen auf Augenhöhe mit dem Ende des Monitors Fussablage 90o-Winkel So können Sie die richtige Sitzhaltung sicherstellen: • Stellen Sie den Computerstuhl so ein, dass Ihre Ellbogen an oder etwas über der Tastatur ruhen, um eine bequeme Tastaturschreibposition zu gewährleisten. • Stellen Sie die Höhe Ihres Stuhls ein, so dass die Knie etwas unter Ihren Hüften liegen, um die Rückseiten Ihrer Schenkel zu entspannen. Verwenden Sie, falls erforderlich, eine Fussablage, um Ihre Knie anzuheben. • Stellen Sie die Rücklehne Ihres Stuhls ein, so dass die Unterseite Ihres Rückgrats fest abgestützt und etwas nach hinten gewinkelt wird. • Sitzen Sie aufrecht, so dass Ihre Knie, Ellbogen und Hüften beim Sitzen vor dem PC in etwa einen 90º-Winkel bilden. • Stellen Sie den Monitor direkt vor Ihnen auf und passen die Position der Oberseite Ihres Bildschirms so auf Ihre Augenhöhe ein, dass Ihre Augen etwas nach unten blicken. • Platzieren Sie Ihre Maus nahe der Tastatur und verwenden Sie, falls nötig, eine Handgelenkablage, um den Druck auf Ihre Handgelenke während des Tippens zu senken. • Verwenden Sie den Desktop PC in einer gutbeleuchteten Umgebung und halten Sie ihn von starken Lichtquellen wie Fenstern und direkten Sonnenlicht fern. • Legen Sie beim Arbeiten mit dem Desktop PC reguläre Minipausen ein. ASUS CG8565 119 Speicherkartenleser verwenden Digitale Kameras und andere digitale Aufnahmegeräte verwenden Speicherkarten, um digitale Bilder oder Medien zu speichern. Der auf der Vorderseite Ihres Systems integrierte Speicherkartenleser ermöglicht das Lesen und Schreiben von und zu unterschiedlichen Speicherkarten. Deutsch So verwenden Sie eine Speicherkarte: 1. Stecken Sie eine Speicherkarte in den Kartensteckplatz. • Eine Speicherkarte ist gekerbt und lässt sich nur in eine Richtung einpassen. Stecken Sie die Karte nicht gewaltsam in einen Steckplatz, um Schäden an der Karte zu vermeiden. • Sie können Speicherkarten in einen oder in mehrere Steckplätze einstecken und jede voneinander unabhängig verwenden. Verwenden Sie jedoch nur eine Speicherkarte pro Steckplatz. 2. Wählen Sie im AutoPlay-Fenster ein Programm, um auf die Dateien zuzugreifen. • Falls AutoPlay auf Ihren Computer NICHT aktiviert ist, klicken Sie in der Taskleiste von Windows® 7 auf die Start-Taste, klicken Sie auf Arbeitsplatz (Computer) und doppelklicken Sie das Speicherkartensymbol, um auf die darauf enthaltenen Daten zuzugreifen. • Jeder Speicherkartenleser hat ein eigenes Laufwerkssymbol, welches im Fenster Arbeitsplatz (Computer) aufgelistet wird. • Die LED eines Speicherkartenlesers leuchtet auf und blinkt, wenn Daten auf die Speicherkarte geschrieben oder von der Speicherkarte gelesen werden. 3. Wenn abgeschlossen, klicken Sie mit der rechten Maustaste auf das Laufwerkssymbol im Fenster Arbeitsplatz (Computer), klicken Sie auf Auswerfen (Eject), und entfernen Sie dann die Speicherkarte. Entfernen Sie eine Karte niemals während oder sofort nach dem Lesen, Kopieren, Formatieren oder Löschen von Daten auf der Karte, da die Daten eventuell verloren gehen. Um Datenverluste zu vermeiden, verwenden Sie die Funktion Hardware sicher entfernen und Medium auswerfen in Windows Infobereich, bevor Sie die Speicherkarte entfernen. 120 Kapitel 4: Computer verwenden Deutsch Optisches Laufwerk verwenden Optischen Datenträger einlegen So legen Sie einen optischen Datenträger ein: 1. Drücken Sie bei eingeschaltetem System die Taste PUSH. 2. Drücken Sie unten am Laufwerk auf die Auswurftaste, um das Laufwerk zu öffnen. 3. Legen Sie den Datenträger in das Laufwerk, wobei die bedruckte Seite nach oben zeigt. 4. Drücken Sie auf das Laufwerksfach, um es zu schließen. 5. Wählen Sie im Fenster AutoPlay ein Programm, um auf die Dateien zuzugreifen. Falls AutoPlay auf Ihren Computer NICHT aktiviert ist, klicken Sie in der Taskleiste von Windows® 7 auf die Start-Taste, klicken Sie auf Arbeitsplatz (Computer) und doppelklicken Sie das CD/DVD-Laufwerkssymbol, um auf die darauf enthaltenen Daten zuzugreifen. Optischen Datenträger entfernen So entfernen Sie einen optischen Datenträger: 1. 2. Folgen Sie einer der folgenden Vorgehensweisen, um das Laufwerksfach auszuwerfen: • Drücken Sie unten am Laufwerk auf die Auswurfstaste. • Klicken Sie im Fenster Arbeitsplatz (Computer) mit rechten Maustaste auf das Laufwerkssymbol und wählen Sie Auswerfen (Eject). Entfernen Sie den Datenträger aus dem Laufwerksfach. ASUS CG8565 121 Verwenden der ASUS ROG U9N Spieltastatur Ihr CG8565 Essentio Desktop PC wird mit der ASUS ROG U9N Spieltastatur geliefert, um Ihre Spielfreuden zu steigern. Für Details über den Verpackungsinhalt der ASUS ROG U9N Spieltastatur beziehen Sie sich auf den Abschnitt Verpackungsinhalt. ASUS ROG U9N Spieltastatur einrichten Deutsch 1. Verwenden Sie den mitgelieferten PS/2 zu USB Adapter, um die Spieltastatur mit einem USB 2.0-Anschluss Ihres Computers zu verbinden. 2. Richten Sie die Handauflage für die Spieltastatur an deren Handauflageöffnungen aus und stecken Sie die Handauflage hinein (A). Drücken Sie die Handauflage mit beiden Daumen nach unten, bis diese in die Tastatur einrastet (B). A 3. 122 B Starten Sie den Computer wieder neu. Windows® wird alle für die Spieltastatur notwendigen Treiber automatisch installieren. Kapitel 4: Computer verwenden Verwenden der ASUS GX900 Spielmaus Ihr CG8565 Essentio Desktop PC wird mit der ASUS GX900 Spielmaus geliefert, um Ihre Spielsteuerung zu perfektionieren. Für Details über den Verpackungsinhalt der ASUS GX900 Spielmaus beziehen Sie sich auf den Abschnitt Verpackungsinhalt. Tasten Beschreibung Tasten Beschreibung 2 Rechte Taste 8 1 3 4 5 6 Linke Taste Scroll-Rad DPI-Umschalter Profilumschalter/Profilanzeige* DPI LED-Anzeige** 7 GX900-Logo 9 10 11 12 Internet Explorer Zurück-Taste Deutsch ASUS GX900 Spielmaus ist mit Linken-/Rechten Maustaste, Scroll-Rad, zwei Seitentasten, DPI-Schalter und speziell entwickelten Profilumschalter ausgestattet. Internet Explorer Weiter-Taste Mausfüße Twin-Eye Lasersensor Gewichte (5 x 4.5g Blöcke)*** *** Um das Mausgewicht anzupassen, können Sie Gewichtblöcke hinzufügen/entfernen. ASUS CG8565 123 * Profilumschalter LED-Anzeige LED-Farben Bedeutung Grün Profil 1 Kein Rot Standardprofil Profil 2 Orange Profil 3 Deutsch **DPI-Schalter LED-Anzeige LED-Farben Bedeutung 2 DPI-Stufe 1 4 DPI-Stufe 2 Programm einrichten Die mitgelieferte Support-CD enthält ein speziell entwickeltes Programm, womit Sie Ihre ASUS GX900 Spielmaus einrichten und deren Funktionen voll ausnutzen können. Legen Sie die Support-CD in das optische Laufwerk und folgen Sie den Bildschirmanweisungen, um das Programm einzurichten. Falls Autorun deaktiviert ist, suchen Sie auf der Support-CD nach der Datei GX900.exe. Doppelklicken Sie auf GX900.exe, um das Installationsprogramm zu starten. ASUS GX900 Spielmaus einrichten Die Spielmaus sollte mit einem USB-Anschluss Ihres Computers verbunden sein. Das Programm wird die Maus automatisch erkennen und das Hauptmenü laden. 124 Kapitel 4: Computer verwenden Deutsch Hauptmenü Nr. 1 2 3 4 5 6 7 8 9 10 11 Beschreibung Jede Tab-Auswahl zeigt das entsprechende Profilmenü an. Zeigt das Profilsymbol für die Konfiguration der Profilmenüs 1-3. DPI-Konfiguration auf die gespeicherten Einstellungen zurücksetzen. Anpassungsregler für die DPU-Werte der entsprechenden DPI-Stufe. Tastenkonfiguration auf die gespeicherten Einstellungen zurücksetzen. Profilfarbanzeigen und deren Status. Gespeichertes Profil importieren. Ein Profil auf einen Datenträger exportieren. Alle Einstellungen zurücksetzen. Einstellungen speichern. Vorgenommenen Einstellungen speichern und Programm beenden. * Jedes Profil hat zwei DPI-Stufen. Falls Sie DPI-Stufe 1 verwenden, leuchten zwei DPISchalter LEDs auf. Falls Sie DPI-Stufe 2 verwenden, leuchten vier PDI-Schalter LEDs auf. ASUS CG8565 125 Profilmenü Deutsch Nr. Beschreibung 2 Profilname. 1 3 4 Bild als ein Profilsymbol auswählen. Funktionsauswahl für jede Taste/Aktion aus der Dropdown-Liste. * Für weitere Details beziehen Sie sich auf die nachfolgende Tabelle. Funktionen Beschreibung R-Taste Als rechte Maustaste. L-Taste M-Taste IE Zurück IE Weiter 126 Einstellungsmenü öffnen, um Profilname oder -symbol festzulegen. Als linke Maustaste. Als mittlere Maustaste. Internet Explorer Zurück-Taste. Sie können diese Taste drücken, um zurück zur vorherigen Seite zu gelangen. Internet Explorer Weiter-Taste. Sie können diese Taste drücken, um vor zur nächsten Seite zu gelangen. Kapitel 4: Computer verwenden Funktionen Tastatur Beschreibung Rad (links/rechts) Dauerfeuer (Maus) Dauerfeuer (Taste) Webbrowser E-Mail Media Player Wiedergabe/ Pause Stopp Nächste Spur Vorherige Spur Lautstärke +/Ton aus Rechner Mein Computer Deaktiviert ASUS CG8565 Deutsch Tastatureingabe oder Tastatureingabesequenz ausführen. Befehl oder Befehlsabfolge ausführen, die im Makro Einstellungsmenü Makro eingestellt werden können. Siehe Makro Einstellungsmenü für Details. Skript ausführen, das im Skript Einstellungsmenü eingestellt werden Skript #1-6 kann. Siehe Skript Einstellungsmenü für Details. DPI [+] DPI-Wert erhöhen. DPI [-] DPI-Wert verringern. DPI Level 1/2 DPI-Stufen 1/2 verwenden. Profilumschalter Als ein Profilumschalter. Normalprofil Standardprofil verwenden. Benutzerprofil Benutzereingestellte Profile 1/2/3 verwenden. 1/2/3 Nach Links/Rechts scrollen. Diese Funktion funktioniert nur bei Microsoft® Office-Anwendungen unter Windows® 7/Vista. Dauerfeuer in einem Spiel ausführen, wie ein dreifacher Klick auf die linke Maustaste. Dauerfeuer in einem Spiel ausführen, wie ein dreifacher Klick auf die Tastaturleertaste. Standard Webbrowser öffnen. Standard E-Mail-Client öffnen. Standard Media Player öffnen. Diese Taste dienen der Wiedergabesteuerung in einem geöffneten Media Player. Systemlautstärke erhöhen/verringern. Stummschalten Windows® Rechner öffnen. Windows® Arbeitsplatz öffnen. Diese Taste deaktivieren. 127 Makro Einstellungsmenü Deutsch Elemente Makro bearbeiten Timing Einfügen Start* Stopp Löschen Nach oben/ unten Anweisungsdauer Wiederholung Feuer Dauerfeuer Export Import 128 Beschreibung Makro Einstellungsmenü öffnen. Markieren, um die Zeit zwischen dem Drücken und Loslassen einer Taste aufzuzeichnen (Standard: 12ms) Wenn markiert wird die neue Anweisung vor der gewählten eingefügt, andernfalls wird jeder neuen Anweisung die höchste Priorität zugewiesen. Klicken, um die Aufnahme der Tastenanschläge und/oder Mausaktionen zu starten. Klicken, um die Aufnahme zu stoppen. Klicken, um alle gespeicherten Anweisungen zu löschen. Klicken, um die gewählte Anweisung zu verschieben. Wenn Timing nicht markiert ist wird die in der Drop-Down.-Liste gewählte Verzögerungszeit angewendet. Makro startet bei einem Klick und stoppt beim nächsten Klick. Makro wird bei einem Klick einmal ausgeführt. Makro wird ausgeführt, wenn Sie die Taste gedrückt halten und stoppt beim Loslassen der Taste. Klicken, um das aktuelle Makro auf der Festplatte zu speichern. Klicken, um ein Makro von der Festplatte zu laden. Kapitel 4: Computer verwenden Deutsch Script Einstellungsmenü Elemente Skript bearbeiten Timing Einfügen Start Stopp Löschen Nach oben/ unten Anweisungsdauer Wiederholung Feuer Dauerfeuer Export Import ASUS CG8565 Beschreibung Skript Einstellungsmenü öffnen. Markieren, um die Zeit zwischen dem Drücken und Loslassen einer Taste aufzuzeichnen (Standard: 12ms) Wenn markiert wird die neue Anweisung vor der gewählten eingefügt, andernfalls wird jeder neuen Anweisung die höchste Priorität zugewiesen. Klicken, um die Aufnahme der Tastenanschläge und/oder Mausaktionen zu starten. Klicken, um die Aufnahme zu stoppen. Klicken, um alle gespeicherten Anweisungen zu löschen. Klicken, um die gewählte Anweisung zu verschieben. Wenn Timing nicht markiert ist wird die in der Drop-Down.-Liste gewählte Verzögerungszeit angewendet. Skript startet bei einem Klick und stoppt beim nächsten Klick. Skript wird bei einem Klick einmal ausgeführt. Skript wird ausgeführt, wenn Sie die Taste gedrückt halten und stoppt beim Loslassen der Taste. Klicken, um das aktuelle Skript auf der Festplatte zu speichern. Klicken, um ein Skript von der Festplatte zu laden. 129 Deutsch 130 Kapitel 4: Computer verwenden Kapitel 5 Einrichten der Internetverbindung Kabelverbindung Deutsch Für eine Verbindung zwischen Ihrem Computer und DSL-/Kabelmodem oder Lokales Netzwerk (Local Area Network / LAN) verwenden Sie ein RJ-45-Kabel. Über DSL-/Kabelmodem verbinden So verbinden Sie via ein DSL-/Kabelmodem: 1. Richten Sie das DSL-/Kabelmodem ein. Beziehen Sie sich auf die Dokumentation, die mit Ihrem DSL-/Kabelmodem geliefert wurde. 2. Verbinden Sie ein Ende des RJ-45-Kabels mit dem LAN (RJ-45)-Anschluss auf der Rückseite Ihres Computers und das andere Ende mit dem DSL-/Kabelmodem. RJ-45-Kabel 3. Schalten sie den DSL-/Kabelmodem und Ihren Computer ein. 4. Konfigurieren Sie die nötigen Einstellungen für die Internetverbindung. Für Details und Hilfestellung zur Einrichtung einer Internetverbindung wenden Sie sich an Ihren Internetdienstanbieter (ISP). ASUS CG8565 131 Über ein lokales Netzwerk (LAN) verbinden So verbinden Sie sich via LAN: 1. Verbinden Sie ein Ende des RJ-45-Kabels mit dem LAN (RJ-45)-Anschluss auf der Rückseite Ihres Computers und das andere Ende mit dem (Internet) LAN. Deutsch RJ-45-Kabel 2. Schalten sie den Computer ein. 3. Konfigurieren Sie die nötigen Einstellungen für die Internetverbindung. Für Details und Hilfestellung zur Einrichtung einer Internetverbindung wenden Sie sich an Ihren Internetdienstanbieter (ISP) / Netzwerkadministrator. 132 Kapitel 5: Einrichten der Internetverbindung Kapitel 6 Verwenden der Hilfsprogramme Die Support-DVD und die Wiederherstellungs-DVD sind möglicherweise nicht im Lieferumfang enthalten. Sie können diese selbst erstellen/brennen. Weitere Details finden Sie in System wiederherstellen. Deutsch ASUS AI Suite II ASUS AI Suite II ist eine komplett integrierte Oberfläche, die mehrere ASUS-Anwendungen vereint und dem Benutzer erlaubt, diese Anwendungen gleichzeitig zu starten und laufen zu lassen. AI Suite II installieren So installieren Sie AI Suite II: 1. Legen Sie die Support-DVD in das optische Laufwerk. Das Treiberinstallations-Menü erscheint, falls Autorun auf Ihrem Computer aktiviert ist. 2. Klicken Sie auf die Auswahl Utilities, und dann auf AI Suite II. 3. Folgen Sie den Bildschirmanweisungen, um die Installation fertigzustellen. AI Suite II verwenden AI Suite II wird automatisch beim Start von Windows®-Betriebssystem ausgeführt. Das AI Suite II-Symbol erscheint daraufhin auf der Windows®-Taskleiste. Klicken Sie auf das Symbol, um die Hauptmenüleiste von AI Suit II einzublenden. Klicken Sie auf die Anwendungssymbole, um das jew. Programm zu starten, das System zu überwachen oder das BIOS zu aktualisieren, Systeminformationen anzuzeigen und die Einstellungen von AI Suite II anzupassen. Anwendung auswählen ASUS CG8565 Überwachung der Sensoren und der CPU-Frequenz Motherboard-BIOS aktualisieren Systeminfos anzeigen Programmeinstellungen anpassen 133 Tool (Extras) Dieses Menü enthält Panele für DIGI+ VRM, System Level Up, Probe II, Sensorschreiber, BT GO! und Ai Charger+. DIGI+VRM ASUS DIGI+ VRM ermöglicht die Anpassung der VRM-Spannung und Frequenzmodulation, um die Zuverlässigkeit sowie Stabilität des Systems zu gewährleisten. Es bietet auch höchste Energieeffizienz und erzeugt weniger Wärmer für längere Lebensdauer der Komponenten und minimale Energieverluste. So starten Sie DIGI+ VRM: Deutsch • Klicken Sie in der AI Suite II Hauptmenüleiste auf Tool (Extras) > DIGI+ VRM. 6 Hilfe 1 2 7 3 4 Alle Änderungen verwerfen 5 Alle Änderungen übernehmen Funktion 134 Funktionsbeschreibung 1 DIGI+VRM Load-line Calibration (Load-Line Kalibrierung) Höhere Kalibrierung von Load-Line könnte die Spannung erhöhen und gute Übertaktungsleistungen liefern, gleichzeitig aber auch die Wärmeerzeugung der CPU und VRM beschleunigen. 2 DIGI+VRM CPU Current Capability (CPU-Leistungsbereich) DIGI+ VRM CPU Current Capability (CPU-Leistungsbereich) ermöglicht einen breiteren Gesamtleistungsbereich für die Übertaktung. Ein höherer Leistungswert führt zur einer höheren VRM Leistungsaufnahme. 3 DIGI+VRM Frequency (Frequenz) Frequenzwechsel werden das VRM-Einschwingverhalten und die thermale Komponenten beeinflussen. Höhere Frequenz führt zum schnelleren Einschwingverhalten. Kapitel 6: Verwenden der Hilfsprogramme Funktionsbeschreibung 4 DIGI+VRM Phase Control (Phasensteuerung) Erhöhen Sie die Phasenanzahl bei hoher Systembelastung, um schnellere sowie bessere thermale Leistung zu erzielen. Verringern Sie die Phasenanzahl bei niedriger Systembelastung, um die VRM-Effizienz zu steigern. 5 DIGI+VRM Duty Control (Aufgabensteuerung) DIGI+ VRM Duty Control (Aufgabensteuerung) passt die Stromzufuhr jeder VRM-Phase sowie die Thermale Leistung jeder Phasenkomponente an. 6 iGPU Load-line Calibration (iGPU Load-Line Kalibrierung) Höherer Wert könnte die iGPU-Spannung erhöhen und gute Leistungen liefern, gleichzeitig aber auch die Wärmeerzeugung der CPU und VRM beschleunigen. 7 iGPU Current Capability (iGPU-Leistungsbereich) Höherer Wert bewirkt eine erweiterte iGPU-Gesamtleistung und Übertaktungsfrequenz, um die iGPU-Leistung zu verbessern. Deutsch Funktion System Level Up Mit System Level Up können Sie das System in Windows®-Umgebung mit voreingestellten Profilen übertakten. So starten Sie System Level Up: • Klicken Sie in der AI Suite II Hauptmenüleiste auf Tool (Extras) > System Level Up. ASUS CG8565 135 In den Einstellungen können Sie manuell Hot-Keys (Schnellzugriffstasten) festlegen, damit Sie zwischen den Übertaktungsprofilen schalten können. Beziehen Sie sich auf die nachfolgende Abbildung. Deutsch Sie können System Level Up über folgende zwei Vorgehensweisen anpassen: BIOS Klicken sie in BIOS-Setupprogramm auf AI Tweaker > System Level Up und passen sie die gewünschten Einstellungen an. OC-Taste Drücken Sie oben links auf Ihrem Computer die OC-Taste. 136 Kapitel 6: Verwenden der Hilfsprogramme Probe II starten und konfigurieren Das Programm PC Probe II überwacht die wichtigsten Komponenten des Computers und informiert Sie, falls Probleme entdeckt werden. PC Probe II erkennt unter anderem die Lüfterdrehzahlen, die CPU-Temperatur und Systemspannungen. Mit Hilfe dieses Programms werden optimale Betriebsbedingungen für Ihren Computer garantiert. So starten Sie Probe II: Klicken Sie in der AI Suite II Hauptmenüleiste auf Tool (Extras) > Probe II. Deutsch • Probe II konfigurieren: Klicken Sie auf Voltage (Spannung)/Temperature (Temperatur)/Fan Speed (Lüftergeschwindigkeit), um die Sensoren zu aktivieren oder deren Grenzwerte anzupassen. Preference (Bevorzugte Einstellungen) ermöglicht die Anpassung des Zeitintervalls für Sensorwarnungen oder die Änderung der Temperatureinheiten. Konfiguration speichern Konfiguration laden ASUS CG8565 Standardgrenzwerte für jeden Sensor laden Einstellungen übernehmen 137 Sensor Recorder (Sensorschreiber) starten und konfigurieren Sensor Recorder (Sensorschreiber) ermöglicht die Überwachung und Aufzeichnung der Änderungen bei Systemspannungen, Temperaturen und Lüftergeschwindigkeiten. So starten Sie Sensor Recorder: • Klicken Sie in der AI Suite II Hauptmenüleiste auf Tool (Extras) > Sensor Recorder. Sensor Recorder konfigurieren: Deutsch Klicken Sie auf Voltage (Spannung)/Temperature (Temperatur)/Fan Speed (Lüftergeschwindigkeit) und wählen Sie die Sensoren, die überwacht werden sollen. History Record (Verlauf) ermöglicht die Verlaufsaufzeichnung der aktivierten Sensoren. Sensorauswahl (für die Überwachung) Ziehen, um einen bestimmten Zeitpunkt einzusehen Zurück zum Standardmodus 138 Auf der Y-Achse vergrößern/verkleinern Auf der X-Achse vergrößern/verkleinern Kapitel 6: Verwenden der Hilfsprogramme BT GO! BT GO! verbindet, mit Hilfe einer Bluetooth-Verbindung, ein Bluetooth (BT)-Gerät mit einem Motherboard, um Datentransfer, Dateisynchronisierung, Musikwiedergabe, Persönlichen Manager und weitere Remote-Funktionen zu ermöglichen. So starten Sie BT GO! • Klicken Sie in der AI Suite II Hauptmenüleiste auf Tool (Extras) > BT GO! Deutsch BT GO! verwenden Geräteliste Funktionsliste Leuchtet, wenn eine Funktion aktiviert ist Ruft den entsprechenden Arbeitsbereich auf der rechten Seite auf • • • Klicken Sie auf und , um durch die Geräte- und Funktionsliste zu navigieren. Klicken Sie auf ein beliebiges Gerätsymbol, um es als das aktuell ausgewählte Gerät festzulegen. BT GO! wird automatisch nach unterstützten Funktionen für dieses Gerät suchen. Klicken Sie auf das Gerätsymbol, um sich mit einem Gerät zu verbinden und die gewählten Funktionen zu aktivieren/deaktivieren. Funktion Beschreibung Shot and send Ermöglicht die Aufnahme von Screenshots und den Transfer dieser Aufnahmen an das verbundene BT-Gerät. BT Transfer Ermöglicht die Freigabe von Dateien, in einem BT-Gerät gespeichert, an andere mit dem PC verbundene BT-Geräte. Folder Sync (Ordnersynchr.) Ermöglicht die Synchronisierung oder Sicherung eines ausgewählten Ordners zwischen den ausgewählten BT-Geräten und dem Computer. Personal Manager (Persönlicher Manager) Ermöglicht die Synchronisierung der persönlichen Kontakte sowie der Kalenderinfos zwischen einem BT-Gerät und dem System. BT to Net (BT zu Netz) Ermöglicht dem System den Internetzugang durch ein, von einem BTGerät freigegebenes, Netzwerk. Music Player (Musikwiederg.) Ermöglicht die Wiedergabe von den, auf dem BT-Gerät gespeicherten, Musikdateien durch die Lautsprecher des Computers. ASUS CG8565 139 Ai Charger+ starten und konfigurieren Battery Charging Version 1.1 (BC 1.1), eine USB Implementers Forum (USB-IF) zertifizierte USB-Aufladefunktion wurde für das, im Gegensatz zu standard USB-Geräten schnellere USB-Aufladen entwickelt. Falls Ihr Gerät die BC 1.1-Funktion unterstützt*, wird Ihr USB-Gerät beim Anschluss an das System automatisch erkannt und die schnelle USB-Aufladefunktion initialisiert. Die Aufladegeschwindigkeit kann die der standard USB-Geräte um bis zu drei Mal übertreffen**. • * Prüfen Sie, ob Ihr USB-Geräthersteller die BC 1.1-Funktion voll unterstützt. Deutsch • ** Die aktuelle Aufladegeschwindigkeit kann sich je nach USB-Gerätkonfiguration unterscheiden. • Nach dem aktivieren oder deaktivieren des Ai Charger+ sollten Sie Ihre USB-Geräte vom System entfernen und wieder anschließen, damit die USB-Aufladefunktion einwandfrei funktioniert. So starten Sie Ai Charger+: • 140 Klicken Sie in der AI Suite II Hauptmenüleiste auf Tool (Extras) > Ai Charger+. Kapitel 6: Verwenden der Hilfsprogramme Monitor (Überwachung) Die Auswahl Monitor (Überwachung) enthält die Bereiche Sensor und CPU Frequency (CPU-Frequenz). Sensor Deutsch Der Bereich Sensor zeigt die aktuellen Werte eines Systemsensors an, einschließlich Lüfterdrehzahlen, CPU-Temperatur und Spannungen. So starten Sie Sensor: • Klicken Sie in der AI Suite II Hauptmenüleiste auf Monitor > Sensor. CPU Frequency (CPU-Frequenz) CPU Frequency (CPU-Frequenz) zeigt die aktuelle CPU-Frequenz und CPU-Auslastung an. So starten Sie CPU Frequency: • Klicken Sie in der AI Suite II Hauptmenüleiste auf Monitor > CPU Frequency. Im rechten Arbeitsbereich (Systeminfobereich) ASUS CG8565 Sensorbereich CPU-Frequenzbereich 141 Update (Aktualisierung) Die Auswahl Update (Aktualisierung) ermöglicht Ihnen, mit Hilfe der hauseigenen ASUS-Anwendungen, die Aktualisierung des Motherboard-BIOS und des BIOS-Bootlogos vorzunehmen. ASUS Update Deutsch Das Programm ASUS Update gestattet Ihnen, das MotherboardBIOS in der Windows®-Umgebung zu verwalten, speichern und aktualisieren. Mit dem ASUS Update-Programm können Sie das BIOS direkt vom Internet aus aktualisieren, die aktuellste BIOS-Datei vom Internet herunterladen, das BIOS mit einer aktuellen BIOS-Datei aktualisieren, die vorliegende BIOS-Datei speichern oder die Informationen über die BIOS-Version betrachten. BIOS über das Internet aktualisieren So können Sie das BIOS über das Internet aktualisieren: 142 1. Wählen Sie in der Liste der Optionen Update BIOS from Internet (BIOS über das Internet aktualisieren) und drücken Sie auf Next (Weiter). 2. Wählen Sie den Ihnen am nächsten gelegenen ASUS FTP-Ort aus, um starken Netzwerkverkehr zu vermeiden. Falls Sie die Funktionen BIOS downgradable (BIOS-Downgrade) und auto BIOS backup (Autom. BIOSSicherung) aktivieren möchten, wählen Sie das entsprechende Kästchen (vor der Funktion) an. 3. Wählen Sie die BIOS-Version, die heruntergeladen werden soll und klicken Sie dann auf Next (Weiter). Falls keine aktualisierte Version gefunden wurde, wird eine entsprechende Nachricht eingeblendet. Kapitel 6: Verwenden der Hilfsprogramme Falls Sie das Boot-Logo, bzw. das während des Power-On-Self-Tests (POST) erscheinende Bild, ändern möchten, klicken Sie auf Yes (Ja). Ansonsten klicken Sie auf No (Nein), um fortzufahren. 5. Folgen Sie dann den Bildschirmanweisungen, um den Aktualisierungsprozess abzuschließen. Deutsch 4. BIOS über eine BIOS-Datei aktualisieren So können Sie das BIOS über eine BIOSDatei aktualisieren: 1. Wählen Sie in der Liste der Optionen Update BIOS from file (BIOS über eine BIOS-Datei aktualisieren) und drücken Sie auf Next (Weiter). 2. Suchen Sie die BIOS-Datei im Fenster Open (Öffnen), klicken Sie auf Open (Öffnen) und anschließend auf Next (Weiter). 3. Falls Sie das Boot-Logo, bzw. das während des Power-On-Self-Tests (POST) erscheinende Bild, ändern möchten, klicken Sie auf Yes (Ja). Ansonsten klicken Sie auf No (Nein), um fortzufahren. 4. Folgen Sie dann den Bildschirmanweisungen, um den Aktualisierungsprozess abzuschließen. ASUS CG8565 143 System Information Der Bereich System Information enthält Informationen über das Motherboard, die CPU und die Speichersteckplätze. Klicken Sie auf die Auswahl MB, um weitere Details über den MotherboardHersteller, den Produktnamen, die Version und das BIOS anzuzeigen. • Klicken Sie auf die Auswahl CPU, um weitere Details über den Prozessor und die Cache anzuzeigen. • Klicken Sie auf die Auswahl Memory (Arbeitsspeicher)√ und wählen Sie einen Speichersteckplatz, um weitere Details über den auf dem entsprechenden Steckplatz installierten Speichermodul anzuzeigen. Deutsch • 144 MB CPU Memory Kapitel 6: Verwenden der Hilfsprogramme Settings (Einstellungen) Der Bereich Settings (Einstellungen) erlaubt Ihnen die Anpassung der Hauptmenüleiste sowie das Erscheinungsbild der Benutzeroberfläche. Ermöglicht die Auswahl der Anwendungen, die aktiviert werden sollen. • Ermöglicht die Einstellung der Leiste (Hauptmenüleiste). • Ermöglicht die Anpassung von Kontrast, Helligkeit, Sättigung, Farbton und Gamma in der Benutzeroberfläche. Deutsch • ASUS CG8565 145 ASUS AI Manager ASUS AI Manager ist ein Hilfsprogramm, welches Ihnen schnellen Zugriff auf oft verwendete Anwendungen ermöglicht. AI Manager installieren So installieren Sie AI Manager: 1. Legen Sie die Support-DVD in das optische Laufwerk. Die DVD zeigt automatisch das Treiberinstallations-Menü an, wenn Autorun auf Ihrem Computer aktiviert ist. Deutsch Falls Autorun deaktiviert ist, doppelklicken Sie die Datei setup.exe im Ordner ASUS AI Manager auf der Support-DVD. 2. Klicken Sie auf den Tab Hilfsprogramme (Utilities) und dann auf ASUS AI-Manager. 3. Folgen Sie den Bildschirmanweisungen, um die Installation fertigzustellen. AI Manager starten Um AI-Manager vom Windows®-Desktop zu starten, klicken Sie auf Start > Alle Programme (All Programs) > ASUS > AI Manager > AI Manager 1.xx.xx. Die AI-Manager Schnellstartleiste erscheint auf dem Desktop. Nach dem Start der Anwendung erscheint das AI-Manager-Symbol in der Windows®Taskleiste. Klicken Sie mit der rechten Maustaste auf das Symbol, um zwischen der Leiste und dem Hauptfenster umzuschalten und den AI Manager entweder aus der Schnellstart- oder der Taskleiste aus zu starten. 146 Kapitel 6: Verwenden der Hilfsprogramme AI Manager Schnellstartleiste Die AI Manager Schnellstartleiste hält Ihren Desktopplatz frei und ermöglicht das einfache Starten von Hilfsprogrammen oder das Anzeigen von Systeminfos. Klicken Sie auf die Auswahl Hauptfenster (Main), Meine Favoriten (My Favorites), Support oder Information, um die Inhalte der entsprechenden Menüs anzuzeigen. Deutsch Schließen Vollbild Minimieren Support Hauptfenster Meine Favoriten Information Klicken Sie auf (Maximieren), um zwischen Vollbild und der Schnellstartleiste umzuschalten. Klicken Sie auf (Minimieren), um AI Manager in der Taskleiste zu behalten. Klicken Sie auf (Schließen), um AI Manager zu schließen. Hauptmenü Das Hauptmenü enthält fünf Anwendungen: AI Disk, AI Security und AI Booting. Klicken Sie das kleine Dreieck neben dem Symbol Hauptmenü, um die Anwendungen im Hauptmenü einzublenden. Erweitern oder wiederherstellen AI Disk AI Disk ermöglicht Ihnen das einfache Löschen der temporären Internetdateien, IEURLs, IE-Cookies, IE-Verlaufliste oder Papierkorb. Klicken Sie in der Schnellstartleiste auf das Symbol AI Disk, um das Hauptfenster des AI Disk anzuzeigen und die Elemente, die Sie löschen möchten, auszuwählen. Klicken Sie, wenn soweit, auf Übernehmen (Apply). ASUS CG8565 147 AI Security AI Security ermöglicht Ihnen Kennwörter für Geräte, wie z.B. USB-Laufwerk und CD/ DVD-Laufwerk, einzurichten, und sie vor fremdem Zugriff zu sichern. So sperren Sie ein Gerät: 2. Bestätigen Sie Ihr Kennwort. 3. Geben Sie einen Kennworthinweis ein (empfohlen). 4. Klicken Sie, wenn soweit, auf OK. 5. Wählen Sie das zu sperrende Gerät und klicken Sie dann auf Übernehmen (Apply). 6. Geben Sie das zuvor eingerichtete Kennwort ein und klicken Sie auf OK. 1.Wenn Sie AI Security zum ersten Mal benutzen, geben Sie ein Kennwort ein, welches nicht mehr als 20 Buchstaben, Zahlen oder Zeichen enthält. Deutsch So entsperren Sie ein Gerät: 1. Wählen Sie die Auswahl für das gesperrte Gerät auf und klicken Sie auf Übernehmen (Apply). 2.Geben Sie das zuvor eingerichtete Kennwort ein und klicken Sie auf OK. So ändern Sie das Kennwort: 148 •Klicken Sie auf Kennwort ändern (Change Password) und folgen Sie den Bildschirmanweisungen. Kapitel 6: Verwenden der Hilfsprogramme AI Booting Deutsch Mit AI Booting können Sie die Boot-Gerätepriorität festlegen. So legen Sie die Boot-Sequenz fest: 1. 2. Wählen Sie ein Gerät und klicken Sie dann auf die Tasten links/rechts, um die Boot-Reihenfolge festzulegen. Klicken Sie, wenn soweit, auf Übernehmen (Apply). Meine Favoriten My Favorites (Meine Favoriten) ermöglicht Ihnen, Anwendungen die Sie öfter benutzen hinzuzufügen, um diese schneller zu finden. So fügen Sie eine Anwendung hinzu: 1. Klicken Sie auf Hinzufügen (Add) und wählen Sie dann die Anwendung, die Sie zu Meine Favoriten (My Favorites) hinzufügen wollen. 2. Klicken Sie im Auswahlfenster auf Öffnen (Open). Die Anwendung wird zu Meine Favoriten (My Favorites) hinzugefügt. Klicken Sie mit der rechten Maustaste auf das Anwendungssymbol, um die entsprechende Anwendung zu öffnen, löschen oder umzubenennen. Doppelklicken Sie auf ein Symbol, um die entsprechende Anwendung zu öffnen. ASUS CG8565 149 Support Klicken Sie im Fenster Support auf die Links, um zur ASUS-Webseite, Webseite für technische Unterstützung, Download-Webseite zu gelangen oder die Kontaktinformationen abzurufen. Deutsch Information Klicken Sie im Fenster Information auf eine Auswahl, um weitere Informationen Ihres Systems, Motherboards, CPU, BIOS, Arbeitsspeichers und der installierten Geräte anzuzeigen. 150 Kapitel 6: Verwenden der Hilfsprogramme Nero 9 Deutsch Nero 9 ermöglicht Ihnen das Erstellen, Kopieren, Brennen, Bearbeiten, Freigeben und Aktualisieren von Daten verschiedenen Typs. Nero 9 installieren So installieren Sie Nero 9: 1. Legen Sie die Nero 9 DVD in das optisches Laufwerk ein. 2. Falls Autorun aktiviert ist, erscheint automatisch das Hauptmenü. Falls Autorun deaktiviert ist, doppelklicken Sie die Datei SeupX.exe im Hauptverzeichnis Ihrer Nero 9 DVD. 3. Klicken Sie im Hauptmenü auf Nero 9 Essentials. ASUS CG8565 151 Wählen Sie die gewünschte Sprache für den Installationsassistenten. Klicken Sie auf Weiter (Next). 5. Klicken Sie auf Weiter (Next), um fortzufahren. 6. Wählen Sie Ich akzeptiere die Lizenzbedingungen (I accept the License Conditions). Wenn soweit, klicken Sie auf Weiter (Next). Deutsch 4. 152 Kapitel 6: Verwenden der Hilfsprogramme Wählen Sie Typisch (Typical) und klicken Sie dann auf Weiter (Next). 8. Wählen Sie Ja, ich möchte Anwendungsdaten anonym an Nero senden (Yes, I want to help by sending anonymous application data to Nero) und klicken Sie Weiter (Next). 9. Wenn abgeschlossen, klicken Sie auf Beenden (Exit). Deutsch 7. ASUS CG8565 153 Dateien brennen So brennen Sie Dateien: Klicken Sie im Hauptmenü auf Daten brennen (Data Burning) > Hinzufügen (Add). 2. Wählen Sie die Dateien, die Sie brennen möchten. Wenn soweit, klicken Sie auf Hinzufügen (Add). Deutsch 1. 154 Kapitel 6: Verwenden der Hilfsprogramme Nachdem Sie die Dateien zum Brennen ausgewählet haben, klicken Sie auf Brennen (Burn), um die Dateien auf einen Datenträger zu brennen. Deutsch 3. Für weitere Details zur Verwendung von Nero 9, beziehen Sie sich auf die Nero Webseite unter www.nero.com. Systemwiederherstellung Verwenden der Wiederherstellungspartition Die Wiederherstellungspartition versetzt die Software Ihres Desktop PCs schnell in ihren originalen Betriebszustand zurück. Bevor Sie die Wiederherstellungspartition benutzen, kopieren Sie Ihre persönlichen Dateien (z.B. Outlook PST-Dateien) auf einen USBDatenträger oder Netzwerklaufwerk und notieren Sie sich Benutzereinstellungen (z.B. Netzwerkeinstellungen). Über die Wiederherstellungspartition Die Wiederherstellungspartition ist reservierter Speicherplatz auf der Festplatte. Diese Partition wird benutzt, um das Betriebssystem, die Treiber und die vom Hersteller installierten Programme Ihres Desktop PC wiederherzustellen. Löschen Sie NICHT die Partition mit dem Namen RECOVERY. Die Wiederherstellungspartition wurde werkseitig erstellt und kann, wenn vom Benutzer gelöscht, NICHT wieder hergestellt werden. Bringen Sie Ihr Desktop PC zum ASUS Kundendienst, wenn Sie mit der Wiederherstellung Probleme haben. Verwenden der Wiederherstellungspartition: 1. Drücken Sie während des Starvorgangs <F9>. 2. Drücken Sie die <Eingabetaste>, um Windows Setup [EMS Enabled] zu wählen. ASUS CG8565 155 3. Wählen Sie eine der folgenden Wiederherstellungsoptionen. Systemwiederherstellung (System Recovery): Systemabbildsicherung (System Image Backup): Diese Funktion stellt die Werkseinstellungen wieder her. Diese Funktion ermöglicht das Brennen von Systemabbildern auf DVDs, um das System später auf seine Standardeinstellungen wiederherzustellen. System DVD-Sicherung (System DVD Backup): 4. Folgen Sie den Bildschirmanweisungen, um den Wiederherstellungsprozess abzuschließen. Diese Funktion erstellt eine Sicherungskopie der Support-DVD. Deutsch Für aktuelle Treiber und Anwendungen besuchen Sie die ASUS-Webseite unter www.asus.com. Wiederherstellungs-DVD verwenden (nur bei bestimmten Modellen) Bereiten Sie 1~3 leere und beschreibbare DVDs für de Erstellung der WiederherstellungsDVD vor. Entfernen Sie die externe Festplatte bevor Sie die Systemwiederherstellung durchführen. Laut Microsoft können Sie wichtige Daten verlieren, wenn Sie Windows Vista auf der falschen Festplatte installieren oder die falsche Partition formatieren. Verwenden der Wiederherstellungs-DVD: 1. Legen Sie die Wiederherstellungs-DVD in das optische Laufwerk. Ihr Desktop PC muss eingeschaltet sein. 2. Starten Sie den Desktop PC neu und drücken Sie beim Boot-Vorgang auf die Taste <F8> und wählen Sie das optische Laufwerk (eventuell als “CD/DVD” bezeichnet). Drücken Sie die <Eingabetaste>, um von der Wiederherstellungs-DVD zu booten. 3. Wählen Sie OK, um die Wiederherstellung des Abbild (Image) zu starten: 4. Wählen Sie OK, um die Systemwiederherstellung zu bestätigen. Die Wiederherstellung überschreibt alle Daten in Ihrer Festplatte. Vergewissern Sie sich, dass Sie wichtige Daten gesichert haben, bevor Sie den Vorgang ausführen. 5. Folgen Sie die Bildschirmanweisungen, um den Wiederherstellungsvorgang abzuschließen. Entfernen Sie während des Wiederherstellungs-vorgangs nicht die WiederherstellungsDVD bevor Sie dazu aufgefordert werden, sonst werden die Partitionen unbrauchbar. Für aktuelle Treiber und Anwendungen besuchen Sie die ASUS-Webseite unter www.asus.com. 156 Kapitel 6: Verwenden der Hilfsprogramme Kapitel 7 Problembehandlung Problembehandlung ? ? Mein Computer kann nicht eingeschaltet werden und die BetriebsLED auf der Vorderseite leuchtet nicht. • Prüfen Sie, ob Ihr Computer richtig angeschlossen ist. • Prüfen Sie, ob die (Strom)Steckdose betriebsbereit ist. • Prüfen Sie, ob das Netzteil eingeschaltet ist. Beziehen Sie sich auf den Abschnitt Ein-/Ausschalten Ihres Computers in Kapitel 1. Mein Computer hängt. • Versuchen Sie folgendes, um Programme, die nicht reagieren, zu schließen: 1.Drücken Sie gleichzeitig auf die Tastaturtasten <Alt> + <Strg> + <Entf> und dann auf Task-Manager starten (Start Task Manger). 2. ? ? Deutsch Diese Kapitel stellt einige Probleme vor, mit denen Sie konfrontiert werden könnten und bietet einige Lösungsansätze. Klicken Sie auf die Auswahl Anwendungen (Applications). 3.Wählen Sie das nicht reagierende Programm und klicken Sie auf Task beenden (End Task). • Falls die Tastatur nicht reagiert, drücken und halten Sie die Einschalttaste, bis der Computer sich ausschaltet. Drücken Sie erneut auf die Einschalttaste, um ihn wieder zu starten. Ich kann mich mit der ASUS WLAN-Karte nicht mit dem DrahtlosNetzwerk verbinden (nur bei bestimmten Modellen)? • Stellen Sie sicher, dass Sie für das gewünschte Netzwerk den richtigen Netzwerkschlüssel eingegeben haben. • Verbinden Sie externe Antennen (wahlweise) mit den Antennenanschlüssen der ASUS WLAN-Karte und stellen Sie die Antennen auf die Oberseite Ihres Computer-Gehäuses, um die beste drahtlose Netzwerkleistung zu erzielen. Die Pfeiltasten auf der Zahlentastatur funktionieren nicht. ASUS CG8565 Prüfen Sie, ob die Zahlensperre- (NUM)-LED ausgeschaltet ist. Falls die NUM-LED an ist, werden die Tasten auf der Zahlentastatur nur für die Zahleneingabe genutzt. Falls Sie die Tasten auf der Zahlentastatur verwenden möchten, drücken Sie die Taste NUM, um die NUM-LED auszuschalten. 157 ? Deutsch ? ? ? Keine Anzeige auf dem Monotor. • Prüfen Sie, ob der Monitor eingeschaltet ist. • Prüfen Sie, ob der Monitor richtig mit dem Videoausgang Ihres Computers verbunden ist. • Falls Ihr Computer eine aufgesetzte Grafikkarte aufweist, sollten Sie den Monitor mit dem Videoausgang der aufgesetzten Karte verbinden. • Prüfen Sie, dass keine Pole am Videostecker verbogen sind. Falls Sie verbogene Pole entdecken, ersetzen Sie das Videoverbindungskabel für den Monitor. • Prüfen Sie, dass Ihr Monitor richtig mit der Stromversorgung verbunden ist. • Für weitere Informationen und erweiterte Problembehandlung, beziehen Sie sich auf die mit dem Monitor mitgelieferte Dokumentation. Beim Verwenden von mehreren Monitoren liefert nur einer eine Anzeige. • Stellen Sie sicher, dass die beiden Monitore eingeschaltet sind. • Während des POST hat nur der mit dem VGA-Anschluss verbundene Monitor eine Anzeige. Die Dual-Anzeige funktioniert nur in der Windows-Umgebung. • Falls eine Grafikkarte auf Ihrem Computer installiert ist, sollten die Monitore mit den Ausgängen der Grafikkarte verbunden sein. • Prüfen Sie, ob die Einstellungen für mehrere Anzeigegeräte korrekt sind. Für Details beziehen Sie sich auf den Abschnitt Anschließen von mehreren externen Anzeigegeräten in Kapital 3. Mein Computer kann meinen USB-Datenträger nicht erkennen. • Beim ersten Verbinden eines USB-Datenträgers mit Ihrem Computer installiert Windows automatisch einen entsprechenden Treiber für das Gerät. Warten Sie einen Moment und prüfen Sie am Arbeitsplatz (My Computer), ob ein USB-Datenträger erkannt wurde. • Verbinden Sie den USB-Datenträger mit einem anderen Computer um zu prüfen, ob der USB-Datenträger defekt ist oder eine Fehlfunktion aufweist. Ich möchte die Systemeinstellungen meines Computers wiederherstellen oder rückgängig machen, ohne meine persönlichen Dateien oder Daten zu beeinflussen. 158 Die Funktion Windows® Systemwiederherstellung ermöglicht Ihnen die Wiederherstellung oder das Rückgängigmachen der Systemeinstellungen Ihres Computers, ohne Einfluss auf Ihre persönlichen Daten wie Dokumente oder Fotos. Für weitere Details beziehen Sie sich auf den Abschnitt System wiederherstellen in Kapitel 2. Kapitel 7: Problembehandlung ? Das HDTV-Bild ist verzerrt. • Dies wird durch unterschiedliche Auflösungen Ihres Monitors und HDTVs verursacht. Passen Sie die Bildschirmauflösung Ihres HDTVs an. So ändern Sie die Bildschirmauflösung: 1. Folgen Sie einer Vorgehensweise, um das Einstellungsfenster Bildschirmauflösung (Screen Resolution) aufzurufen: • K licken Sie auf > Systemsteuerung (Control Panel) > Darstellung und Anpassung (Appearance and Personalization) > Anzeige (Display) > Anzeigeeinstellungen Ändern (Change display settings). • Klicken ������������������������������������������������������������������ Sie mit der rechten Maustaste irgendwo im Desktop. Wählen Sie im Kontextmenü Anpassen (Personalize) > Anzeige (Display) > Anzeigeeinstellungen ändern (Change display settings). 2.Passen Sie die Auflösung an. Für die richtige Auflösung beziehen Sie auf die Dokumentation Ihres HDTVs. 3. • Stellen Sie sicher, dass die Lautsprecher mit dem Line-Out-Anschluss (Hellgrün) auf der Vorderseite oder Rückseite verbunden sind. • Prüfen Sie, ob die Lautsprecher an die Stromversorgung angeschlossen und eingeschalten sind. • Passen Sie die Lautstärke Ihrer Lautsprecher an. • Stellen Sie sicher, dass die Lautstärke des Systems nicht stummgeschaltet ist. • Falls stummgeschaltet, erscheint das Lautstärkesymbol als . Um Lautstärke zu aktivieren, klicken Sie im Infobereich des Windows auf und dann auf . • ? Klicken Sie auf Übernehmen (Apply) oder auf OK und in der Bestätigungsnachricht dann auf Änderungen beibehalten (Keep Changes). Meine Lautsprecher geben keinen Sound ab. • ? Deutsch ? Falls nicht stummgeschaltet, klicken Sie auf Regler, um die Lautstärke anzupassen. und schieben Sie den Um zu prüfen, ob die Lautsprecher sachgemäß funktionieren, verbinden Sie die Lautsprecher mit einem anderen Computer. Das DVD-Laufwerk kann den Datenträger nicht lesen. • Prüfen Sie, ob der Datenträger mit der bedruckten Seite nach oben eingelegt ist. • Prüfen Sie, ob der Datenträger in der Mitte des Laufwerkfachs ausgerichtet ist, insbesondere bei Datenträgern anderer Größen oder Formen. • Prüfen Sie, ob der Datenträger zerkratzt oder beschädigt ist. Der Auswurfsknopf des DVD-Laufwerks reagiert nicht. > Arbeitsplatz (Computer). 1. Klicken Sie auf 2. Klicken Sie mit der rechten Maustaste auf auf Auswerfen (Eject) im Kontextmenü. ASUS CG8565 , dann 159 Stromversorgung Problem Deutsch Kein Strom (Die Betriebsanzeige ist aus) Mögliche Ursachen Maßnahmen Falsche Betriebsspannung. • P assen Sie den Betriebsspannungsschalter Ihres Computers je nach den Anforderungen Ihrer Region an. • Passen Sie die Spannungseinstellungen an. Vergessen Sie nicht, den Stromkabel aus der Steckdose zu ziehen. Ihr Computer ist nicht eingeschaltet. Drücken Sie den Einschaltknopf auf der Vorderseite Ihres Computers, um ihn einzuschalten. Das Stromkabel Ihres Computers ist nicht richtig angeschlossen. • S tellen sie sicher, dass das Stromkabel sachgemäß angeschlossen ist. • Verwenden Sie ein anderes passendes Stromkabel. Probleme mit dem Netzteil (PSU; Power supply unit). Versuchen Sie ein anderes Netzteil anzuschließen. Mögliche Ursachen Maßnahmen Das Signalkabel ist nicht mit dem richtigen VGA-Anschluss Ihres Computers verbunden. • V erbinden Sie das Signalkabel mit dem richtigen Anschluss für die Anzeige (Anschluss der integrierten VGA oder aufgesetzten VGA). • Wenn Sie eine aufgesetzte VGA verwenden, verbinden Sie das Signalkabel mit dem Anschluss der aufgesetzten VGA. Probleme mit dem Signalkabel. Versuchen Sie einen anderen Bildschirm anzuschließen. Anzeige Problem Keine Anzeige, nachdem der Computer eingeschaltet wurde (Schwarzes Bildschirm). 160 Kapitel 7: Problembehandlung Problem Kein Internet Mögliche Ursachen Maßnahmen Das LAN-Kabel ist nicht angeschlossen. Verbinden Sie das LAN-Kabel mit Ihrem Computer. Probleme mit dem LANKabel. Die LAN LED sollte an sein, Andernfalls probieren Sie ein anderes LAN-Kabel. Falls das Problem weiter besteht, kontaktieren Sie den ASUS Kundendienst. Ihr Computer ist nicht sachgemäß mit den Router oder Hub verbunden. Stellen Sie sicher, dass Ihr Computer sachgemäß mit den Router oder Hub verbunden ist. Netzwerkeinstellungen Für korrekte LAN-Einstellungen setzen Sie sich mit Ihrem Internet Dienstanbieter (ISP) in Verbindung. Durch Antivirus Software verursachte Probleme. Schließen Sie die Antivirus Software. Probleme mit Treibern. Reinstallieren Sie die LAN-Treiber. Deutsch LAN Audio Problem Kein Audio ASUS CG8565 Mögliche Ursachen Maßnahmen Lautsprecher oder Kopfhörer sind nicht richtig angeschlossen. • B eziehen Sie sich für die richtigen Anschlusspositionen auf das Benutzerhandbuch. • Trennen und Verbinden Sie den Lautsprecher mit Ihrem Computer. Lautsprecher oder Kopfhörer funktionieren nicht sachgemäß. Versuchen Sie einen anderen Lautsprecher oder Kopfhörer zu verwenden. Die Anschlüsse (Buchsen) auf der Vorder-/Rückseite funktionieren nicht sachgemäß. Prüfen Sie alle Audio-Anschlüsse (Buchsen) auf der Vorder-/Rückseite. Falls ein Anschluss nicht funktioniert, prüfen Sie, ob dieser zu Multi-Kanal gesetzt ist. Probleme mit Treibern. Reinstallieren Sie die Audio-Treiber. 161 System Problem Systemgeschwindigkeit zu gering. Deutsch Das System bleibt öfters hängen oder reagiert nicht. 162 Mögliche Ursachen Maßnahmen Es werden zu viele Programme ausgeführt. Schließen Sie einige Programme. Computervirusattacke • V erwenden Sie ein Antivirusprogramm, um Ihren Computer nach Viren zu prüfen und zu reparieren. • Reinstallieren Sie das Betriebssystem Betriebsausfall des Festplattenlaufwerks. • Senden Sie das beschädigte Festplattenlaufwerk zur reparatur an den ASUS Kundendienst. • Ersetzen Sie es durch ein neues Festplattenlaufwerk. Probleme mit Speichermodulen. • E rsetzen Sie diese mit passenden (kompatiblen) Speichermodulen. • Entfernen Sie die nachträglich eingebauten Speichermodule und versuchen Sie es erneut. Der Luftstrom zur Kühlung Ihres Computers ist unzureichend. Stellen Sie den Computer an einem Platz mit besserer Luftzirkulation auf. Inkompatible Software wurde installiert. Reinstallieren Sie das Betriebssystem und reinstallieren Sie kompatible Software. Kapitel 7: Problembehandlung Problem Hoher Geräuschpegel nach Computerstart. Hoher Geräuschpegel beim Computerbetrieb. Mögliche Ursachen Maßnahmen Ihr Computer wird hochgefahren. Dies ist Normal. Beim Computerstart läuft der Lüfter mit voller Geschwindigkeit. Der Lüfter verlangsamt sich, nachdem das Betriebssystem geladen wurde. Die BIOS-Einstellungen haben sich geändert. Stellen Sie die BIOS-Standardeinstellungen wieder her. Alte BIOS-Version. Aktualisieren Sie das BIOS zur neuesten Version. Besuchen Sie die ASUS Support-Seite unter http://support.asus.com, um die neueste BIOS-Version herunterzuladen. Der CPU-Lüfter wurde ersetzt. Stellen Sie sicher, dass Sie einen kompatiblen oder von ASUS empfohlenen CPU-Lüfter verwenden. Der Luftstrom zur Kühlung Ihres Computers ist unzureichend. Stellen Sie den Computer an einem Platz mit besserer Luftzirkulation auf. Systemtemperatur ist zu hoch. • A ktualisieren Sie das BIOS. • Falls Sie mit dem Aufbau des Motherboards vertraut sind, können Sie den Innenraum des Gehäuses reinigen. Deutsch CPU Falls das Problem weiterhin besteht, beziehen Sie sich auf die Garantiekarte Ihres Desktop PCs und setzen Sie sich mit dem ASUS Kundendienst in verbindung. Für Infos zum ASUS Kundendienst besuchen Sie die ASUS Supportseite unter http://support.asus.com ASUS CG8565 163 ASUS Kontaktinformationen ASUSTeK COMPUTER INC. Adresse Telefon Fax E-Mail Webseite Technische Unterstützung Deutsch Telefon Online-Support 15 Li-Te Road, Peitou, Taipei, Taiwan 11259 +886-2-2894-3447 +886-2-2890-7798 [email protected] www.asus.com.tw +86-21-38429911 support.asus.com ASUS COMPUTER INTERNATIONAL (Amerika) Adresse Telefon Fax Webseite Technische Unterstützung Telefon Support-Fax Online-Support 800 Corporate Way, Fremont, CA 94539, USA +1-510-739-3777 +1-510-608-4555 usa.asus.com +1-812-282-2787 +1-812-284-0883 support.asus.com ASUS COMPUTER GmbH (Deutschland und Österrreich) Adresse Fax Webseite Online-Kontakt Technische Unterstützung Telefon (Komponenten) Telefon (System/Notebook/Eee/LCD) Support-Fax Online-Support Harkort Str. 21-23, D-40880 Ratingen, Germany +49-2102-959911 www.asus.de www.asus.de/sales +49-1805-010923* +49-1805-010920* +49-2102-9599-11 support.asus.com * 0,14 Euro/Minute aus dem dt. Festnetz, Mobilfunk max. 0.42 Euro/Minute. 164 Hersteller: ASUSTeK Computer Inc. Adresse: No.150, LI-TE RD., PEITOU, TAIPEI 112, TAIWAN Autorisierte Vertretung in Europa: ASUS Computer GmbH Adresse: HARKORT STR. 21-23, 40880 RATINGEN, GERMANY Kapitel 7: Problembehandlung Ordinateur de bureau ASUS Essentio CG8565 Manuel de l’utilisateur F6763 Première édition Août 2011 Français Copyright © 2011 ASUSTeK COMPUTER INC. Tous droits réservés. Aucun extrait de ce manuel, incluant les produits et logiciels qui y sont décrits, ne peut être reproduit, transmis, transcrit, stocké dans un système de restitution, ou traduit dans quelque langue que ce soit sous quelque forme ou quelque moyen que ce soit, à l’exception de la documentation conservée par l’acheteur dans un but de sauvegarde, sans la permission écrite expresse de ASUSTeK COMPUTER, INC. (“ASUS”). La garantie sur le produit ou le service ne sera pas prolongée si (1) le produit est réparé, modifié ou altéré, à moins que cette réparation, modification ou altération ne soit autorisée par écrit par ASUS; ou (2) si le numéro de série du produit est dégradé ou manquant. ASUS FOURNIT CE MANUEL “TEL QUE” SANS GARANTIE D’AUCUNE SORTE, QU’ELLE SOIT EXPRESSE OU IMPLICITE, COMPRENANT MAIS SANS Y ETRE LIMITE LES GARANTIES OU CONDITIONS DE COMMERCIALISATION OU D’APTITUDE POUR UN USAGE PARTICULIER. EN AUCUN CAS ASUS, SES DIRECTEURS, CADRES, EMPLOYES OU AGENTS NE POURRONT ÊTRE TENUS POUR RESPONSABLES POUR TOUT DOMMAGE INDIRECT, SPECIAL, SECONDAIRE OU CONSECUTIF (INCLUANT LES DOMMAGES POUR PERTE DE PROFIT, PERTE DE COMMERCE, PERTE D‘UTILISATION DE DONNEES, INTERRUPTION DE COMMERCE ET EVENEMENTS SEMBLABLES), MEME SI ASUS A ETE INFORME DE LA POSSIBILITE DE TELS DOMMAGES PROVENANT DE TOUT DEFAUT OU ERREUR DANS CE MANUEL OU DU PRODUIT. LES SPECIFICATIONS ET INFORMATIONS CONTENUES DANS CE MANUEL SONT FOURNIES A TITRE INFORMATIF SEULEMENT, ET SONT SUJETTES A CHANGEMENT A TOUT MOMENT SANS AVERTISSEMENT ET NE DOIVENT PAS ETRE INTERPRETEES COMME UN ENGAGEMENT DE LA PART D’ASUS. ASUS N‘ASSUME AUCUNE RESPONSABILITE POUR TOUTE ERREUR OU INEXACTITUDE QUI POURRAIT APPARAITRE DANS CE MANUEL, INCLUANT LES PRODUITS ET LOGICIELS QUI Y SONT DECRITS. Les produits et noms de sociétés qui apparaissent dans ce manuel ne sont utilisés que dans un but d’identification ou d’explication dans l’intérêt du propriétaire, sans intention de contrefaçon. Toutes les marques mentionnées dans ce manuel sont la propriété de leur propriétaires respectifs. 166 Table des matières Notes ....................................................................................................... 169 Consignes de sécurité................................................................................ 171 Conventions utilisées dans ce manuel....................................................... 172 Où trouver plus d’informations.................................................................... 172 Contenu de la boîte.................................................................................... 173 Chapitre 1 Démarrer Bienvenue !................................................................................................. 175 Faire connaissance avec votre ordinateur.................................................. 175 Configurer votre ordinateur......................................................................... 180 Allumer ou éteindre l’ordinateur.................................................................. 183 Utiliser Windows® 7 Démarrer pour la première fois................................................................... 185 Utiliser le Bureau de Windows® 7............................................................... 186 Gérer vos fichiers et vos dossiers............................................................... 188 Restaurer le système.................................................................................. 190 Protéger votre ordinateur............................................................................ 191 Français Chapitre 2 Centre d’Aide et support Windows®........................................................... 192 Chapitre 3 Connecter des périphériques Connecter un périphérique de stockage USB............................................ 193 Connecter un microphone ou un système de haut-parleurs....................... 194 Connecter plusieurs périphériques d’affichage.......................................... 197 Connecter un téléviseur HD........................................................................ 199 Chapitre 4 Utiliser votre ordinateur Posture recommandée lors de l’utilisation de l’ordinateur.......................... 201 Utiliser le lecteur de cartes mémoire.......................................................... 202 Utiliser le lecteur optique............................................................................ 203 Utiliser le clavier de jeu ASUS ROG U9N................................................... 204 Utiliser la souris de jeu ASUS GX900......................................................... 205 Chapitre 5 Se connecter à Internet Connexion filaire......................................................................................... 213 167 Table des matières Chapitre 6 Utiliser les utilitaires ASUS AI Suite II.......................................................................................... 215 ASUS AI Manager....................................................................................... 228 Nero 9 ....................................................................................................... 233 Restaurer le système.................................................................................. 237 Chapitre 7 Dépannage Dépannage................................................................................................. 239 Informations de contact ASUS.................................................................... 246 Français 168 Notes REACH Conforme avec le Règlement REACH (Enregistrement, Évaluation, Autorisation et Restriction des produits chimiques), nous avons publié la liste des substances chimiques utilisées dans nos produits sur le site Web ASUS REACH à l’adresse http://green.asus.com/english/ REACH.htm. Rapport de la Commission Fédérale des Communications Ce dispositif est conforme à l’alinéa 15 des règles établies par la FCC. L'opération est sujette aux 2 conditions suivantes: • Ce dispositif ne peut causer d'interférence nuisible, et Ce dispositif se doit d'accepter toute interférence reçue, incluant toute interférence pouvant causer des résultats indésirables. Cet équipement a été testé et s'est avéré être conforme aux limites établies pour un dispositif numérique de classe B, conformément à l'alinéa 15 des règles de la FCC. Ces limites sont conçues pour assurer une protection raisonnable contre l’interférence nuisible à une installation réseau. Cet équipement génère, utilise et peut irradier de l'énergie à fréquence radio et, si non installé et utilisé selon les instructions du fabricant, peut causer une interférence nocive aux communications radio. Cependant, il n'est pas exclu qu'une interférence se produise lors d'une installation particulière. Si cet équipement cause une interférence nuisible au signal radio ou télévisé, ce qui peut-être déterminé par l'arrêt puis le réamorçage de celui-ci, l'utilisateur est encouragé à essayer de corriger l'interférence en s'aidant d'une ou plusieurs des mesures suivantes: • Réorientez ou replacez l'antenne de réception. • Augmentez l'espace de séparation entre l'équipement et le récepteur. • Consultez le revendeur ou un technicien expérimenté radio/TV pour de l’aide. • Français • Reliez l’équipement à une sortie sur un circuit différent de celui auquel le récepteur est relié. L’utilisation de câbles protégés pour le raccordement du moniteur à la carte de graphique est exigée pour assurer la conformité aux règlements de la FCC. Les changements ou les modifications apportés à cette unité n'étant pas expressément approuvés par la partie responsable de la conformité pourraient annuler l’autorité de l’utilisateur à manipuler cet équipement. 169 Avertissement concernant l’exposition aux RF Cet équipement doit être installé et opéré conformément aux instructions fournies et l’antenne utilisée par cet émetteur doit être installée de sorte à garantir une distance de séparation d’au moins 20 cm entre l’antenne et l’utilisateur, et ne doit pas être colocalisée ou opérée conjointement avec d’autres antennes ou émetteurs. Les utilisateurs et installateurs doivent être en possession des instruction d’installation de l’antenne et des conditions d’opération de l’émetteur pour assurer la conformité en matière d’exposition aux radiofréquences. Rapport du Département Canadien des Communications Cet appareil numérique ne dépasse pas les limites de classe B en terme d'émissions de nuisances sonore, par radio, par des appareils numériques, et ce conformément aux régulations d’interférence par radio établies par le département canadien des communications. (Cet appareil numérique de la classe B est conforme à la norme ICES-003 du Canada.) Note relative aux produits de Macrovision Corporation Français Ce produit comprend une technologie de protection de copyright protégée par certains brevets déposés aux U.S.A. et autres droits de propriété intellectuelle appartenant à Macrovision Corporation et autres détenteurs de droits. L’usage de cette technologie doit être autorisé par Macrovision Corporation, et n’est destiné qu’à un usage familial ou autres usages limités de même sorte à moins d’une autorisation par Macrovision Corporation. Rétro-ingénierie et démontage sont interdits. Avertissement relatif aux batterie Lithium-Ion ATTENTION : Danger d’explosion si la batterie n’est pas remplacée correctement. Remplacer uniquement avec une batterie de type semblable ou équivalent, recommandée par le fabricant. Mettez au rebut les batteries usagées conformément aux instructions du fabricant. Services de reprise et de recyclage d’ASUS Les programmes de recyclage et de reprise d’ASUS découlent de nos exigences en terme de standards élevés de respect de l’environnement. Nous souhaitons apporter à nos clients permettant de recycler de manière responsable nos produits, batteries et autres composants ainsi que nos emballages. Veuillez consulter le site http://csr.asus.com/english/Takeback. htm pour plus de détails sur les conditions de recyclage en vigueur dans votre pays. 170 Consignes de sécurité Déconnectez le cordon d’alimentation et tous les périphériques avant tout entretien. Nettoyez l’ordinateur portable avec une éponge en cellulose propre ou un chiffon en peau de chamois humide et une solution détergeante non abrasive et quelques gouttes d’eau tiède puis nettoyez les surfaces humides ‘à l’aide d’un chiffon sec. • • • • • • • • • • • • NE PAS placer sur une surface irrégulière ou instable. Contactez le service après-vente si le châssis a été endommagé. NE PAS utiliser dans des environnements sales ou poussiéreux. NE PAS utiliser lors d’une fuite de gaz. NE PAS placer, faire tomber ou insérer d’objets sur/dans l’ordinateur. NE PAS exposer à des champs magnétiques ou électriques trop forts. NE PAS exposer ou utiliser à proximité de liquides, de la pluie ou d'environnements humides. NE PAS utiliser le modem lors d'un orage. Avertissement de sécurité concernant la batterie : NE PAS jeter au feu. NE PAS courtcircuiter les contacts. NE PAS désassembler la batterie. Utilisez ce produit dans des environnements dont la température ambiante est comprise entre 0˚C (32̊F) et 35˚C (95̊F). NE PAS bloquer les ouvertures destinées à la ventilation de l’ordinateur pour éviter que celui-ci ne surchauffe. NE PAS utiliser un cordon d’alimentation, accessoire ou autre périphérique endommagé. Pour éviter tout choc électrique, déconnectez le câble d’alimentation de la prise électrique avant tout déplacement du système. Français • Demandez l’assistance d’un professionnel avant d’utiliser un adaptateur ou une rallonge. Ces équipements peuvent interrompre le circuit de mise à la terre. Assurez-vous que le bloc d’alimentation est bien réglé sur le voltage approprié à votre région. Si vous ‘êtes pas certain du voltage à utiliser, contactez votre fournisseur électrique. Si le bloc d’alimentation est endommagé, n’essayez pas de le réparer vous-même. Contactez un technicien électrique qualifié ou votre revendeur. 171 Conventions utilisées dans ce manuel Pour être sûr que vous effectuiez certaines tâches correctement, veuillez prendre notes des symboles suivants. DANGER/AVERTISSEMENT: Ces informations vous permettront d’éviter de vous blesser lors de la réalisation d’une tâche. ATTENTION : Informations destinées à éviter d’endommager le matériel lors d’une tâche. IMPORTANT : Instructions que vous devez suivre pour terminer une tâche. REMARQUE : Informations additionnelles destinées à certaines situations spécifiques.. Où trouver plus d’informations Français 172 Consultez les sources suivantes pour plus d’informations ou pour la mise à jour du produit et/ou des logiciels. Sites Web ASUS Le site Web ASUS offre des informations à jour sur le matériel ASUS et sur les logiciels afférents. Reportez-vous au site Web d’ASUS sur www.asus.com. Support technique ASUS local Visitez le site de support d’ASUS sur http://support.asus.com/contact pour prendre contact avec un ingénieur de support technique. Contenu de la boîte Ordinateur de bureau ASUS Essentio Clavier de jeu ASUS ROG U9N x1 Souris de jeu ASUS GX900 x1 Cordon d’alimentation x1 Logiciel de gravure de DVD Nero 9 x1 (optionnel) Guide d’installation x1 Carte de garantie x1 DVD de support x1 (optionnel) DVD de restauration x1 (optionnel) • • Français Installation Guide Si l’un des éléments est endommagé ou manquant, contactez votre revendeur. • Les illustrations ci-dessus sont données à titre indicatif. Les spécifications du produit peuvent varier en fonction des modèles.. • Pour plus de détails sur le clavier et la souris de jeu, consultez les sections Utiliser le clavier de jeu ASUS ROG et Utiliser la souris de jeu ASUS GX900. 173 Français 174 Chapitre�� 1 Démarrer Bienvenue ! Merci pour votre achat d’un ordinateur de bureau ASUS Essentio���������� CG8565 ! Les séries d’ordinateurs de bureau ASUS Essentio�������������������������������������� CG8565 ������������������������������ offrent des performances à la pointe de l’industrie, une fiabilité sans faille et des utilitaires variés et conviviaux. Le tout dans un boîtier au style futuriste et stylisé. Lisez la carte de garantie ASUS avant de configurer votre ordinateur de bureau ASUS. Français Faire connaissance avec votre ordinateur Les illustrations sont uniquement données à titre indicatif. Les ports et leur emplacement ainsi que la couleur du châssis peuvent varier en fonction des modèles. Panneau avant 8 7 6 9 10 11 12 1 2 3 4 5 ASUS CG8565 175 1. Bouton d’alimentation. Appuyez sur ce bouton pour allumer l’ordinateur. 2. Fente pour carte Secure Digital™ / MultiMediaCard. Insérez une carte mémoire Secure Digital™ ou MultiMediaCard dans cette fente. 3. Baie pour lecteur ���������������� optique. Cette baie intègre un lecteur de disque optique.� 4. Baie pour disque dur (vide). Cette baie permet d’acceuillir un disque dur additionnel. 5.������������������� LED d’alimentation. Ce voyant lumineux s’allume lorsque l’ordinateur est allumé. 6. Fente pour carte Memory ���������������������������������� Stick™ / Memory Stick Pro™. Insérez une carte mémoire Memory Stick™ / Memory Stick Pro™ dans cette fente. 7.����������������������������� Fente pour carte CompactFlash® / Microdrive™. Insérez une carte mémoire CompactFlash® / Microdrive™ dans cette fente. 8. Bouton d’overclocking. Ce bouton permet d’ajuster le profil de la fonction d’overclocking System Level Up. Français 9.�������������� Ports USB 3.0. Ces ports USB (Universal Serial Bus) 3.0 permettent de connecter des périphériques disposant de ports USB 3.0 (souris, imprimante, PDA, appareil photo). • NE PAS connecter de clavier / souris USB 3.0 lors de l’installation de Windows®. • En raison de certaines limitations du contrôleur USB 3.0, les périphériques USB 3.0 ne peuvent être utilisés que sous environnement Windows® et après l’installation du pilote USB 3.0. • Les périphériques USB 3.0 ne peuvent être utilisés que comme dispositifs de stockage des données. • Il est fortement recommandé de connecter vos périphériques USB 3.0 à l’un des ports USB 3.0 disponibles pour obtenir de meilleures performances 10.�������������� Ports USB 2.0. Ces ports USB (Universal Serial Bus) 2.0 permettent de connecter des périphériques disposant de ports USB 2.0 (souris, imprimante, PDA, appareil photo). 11.���������������� Port microphone. Ce port permet de connecter un micro. 12. ������������ Port casque. Se connecte à des écouteurs stéréo ou à une paire d’enceintes 176 Chapitre 1 : Démarrer Panneau arrière 16 E-SATA 1 2 13 3 17 4 18 5 7 8 9 19 6 20 10 11 12 13 14 15 Français 21 1.��������������� Ports USB 2.0. Ces ports USB (Universal Serial Bus) 2.0 permettent de connecter des périphériques disposant de ports USB 2.0 (souris, imprimante, PDA, appareil photo). 2.������������ Port eSATA. Ce port permet de connecter un disque dur ou un lecteur optique SATA externe. 3.�������������������������������� Port de sortie S/PDIF optique. Ce port sert à être relié à un périphérique audio externe via un câble optique S/PDIF. 4.���������� Port HDMI. Ce port (compatible HDCP) permet de connecter un moniteur HDMI ou tout autre équipement doté d’un connecteur HDMI.��������� content. 5.����������� Port DVI-D. Ce port (compatible HDCP) permet de connecter un moniteur DVI-D ou tout autre équipement doté d’un connecteur DVI��� -D. 6.����� Ports USB 3.0. Ces ports USB (Universal Serial Bus) 3.0 permettent de connecter des périphériques disposant de ports USB 3.0. •������������������������������������������������������������������������������ NE PAS connecter de clavier / souris USB 3.0 lors de l’installation de Windows®. • En raison de certaines limitations du contrôleur USB 3.0, les périphériques USB 3.0 ne peuvent être utilisés que sous environnement Windows® et après l’installation du pilote USB 3.0. • Les périphériques USB 3.0 ne peuvent être utilisés que comme dispositifs de stockage des données. • Il est fortement recommandé de connecter vos périphériques USB 3.0 à l’un des ports USB 3.0 disponibles pour obtenir de meilleures performances ASUS CG8565 177 7.������������������������������������������������� Port de sortie pour haut-parleurs latéraux (gris). Ce port permet de connecter les haut-parleurs latéraux d’un système d’enceintes 8 canaux. 8.������������������������������������������������� Port de sortie pour haut-parleurs arrières (noir). Ce port permet de connecter les haut-parleurs arrières d’un système d’enceintes 4, 6 et 8 canaux. 9.������������������������������������������������������������������ Port de sortie pour haut-parleur central/Caisson de basse (orange). Ce port permet de connecter le haut-parleur central ou le caisson de basse d’un système d’enceintes. 10.������������������������ Microphone port (pink). This port connects to a microphone. 11.���������������������������� Port de sortie audio (vert). Ce port permet de connecter un casque audio ou un hautparleur. En configuration audio 4, 6 ou 8 canaux, ce port se connecte aux haut-parleurs avants d’un système d’enceintes. 12.��������������������������������� Port d’entrée audio (bleu clair). Ce port permet de connecter un lecteur CD/DVD ou toute autre source audio. Configurations audio 2, 4, 6 et 8 canaux Français Port Casque/2 canaux 4 canaux 6 canaux 8 canaux Bleu clair Entrée audio Entrée audio Entrée audio Entrée audio Vert Sortie audio Sortie haut-parleurs avants Sortie haut-parleurs avants Sortie haut-parleurs avants Rose Entrée micro Entrée micro Entrée micro Entrée micro Orange – – Haut-parleur central/ Caisson de basse Haut-parleur central/ Caisson de basse Noir – Sortie haut-parleurs arrières Sortie haut-parleurs arrières Sortie haut-parleurs arrières Gris – – – Sortie haut-parleurs latéraux 13. B����������������� ouches d’aération. Ces ouvertures du châssis permettent la ventilation de l’air. NE PAS couvrir les bouches d’aération du châssis 14. Connecteur d’alimentation. Branchez le cordon d’alimentation sur ce connecteur. 15.������������������������������ Interrupteur d’alimentation. Déplacez cet interrupteur pour alimenter ou non l’ordinateur en courant électrique. 16. Module Bluetooth. Permet d’établir une connexion Bluetooth avec d’autres périphériques compatibles pour le transfert de données sans fil. 17.����������� Port VGA. Permet de connecter un moniteur d’affichage ou tout autre périphérique doté d’un connecteur VGA. Tension nominale : 110-120Vca / 220-240Vca, 6/3A, 50/60Hz. 178 Chapitre 1 : Démarrer 18.���������������������� Port réseau (RJ-45). Ce port permet une connexion Gigabit à un réseau local par le biais d’un hub réseau. Indicateurs LED réseau LED Activité/Lien État Description ORANGE Lié ÉTEINTE Pas de lien Activité de données LED vitesse État Description ORANGE Connexion 100Mbps ÉTEINTE VERTE LED ACT/ LED LIEN VITESSE Connexion 10Mbps Connexion 1Gbps Port réseau 19.������������������������������������ Prises pour carte son (amovible). Ces ports se connectent à différents équipements audio comme un casque, des écouteurs ou un système de haut-parleurs. 20.������������������������������������������������������ Carte graphique ASUS (sur une sélection de modèles). Les ports de sortie vidéo disponibles sur cette carte graphique ASUS optionnelle varient en fonction des modèles. 21.���������������������� Supports métalliques. Retirez ces supports métalliques pour insérer une carte d’extension. ASUS CG8565 Français Reportez-vous au tableau de configuration audio ci-dessous pour une description de la fonction des ports audio en configuration 2, 4, 6 ou 8 canaux. 179 Configurer votre ordinateur Cette section vous offre des informations sur la connexion des composants principaux de l’ordinateur tels que le moniteur, le clavier, la souris et le cordon d’alimentation. Connecter un moniteur externe Utiliser la carte graphique ASUS (disponible sur une sélection de modèles) Pour connecter un moniteur externe à la carte graphique ASUS : 1. Connectez votre moniteur à l’un des ports d’affichage de la carte graphique ASUS. 2. Connectez le moniteur à une source d’alimentation. Les ports d’affichage de la carte graphique ASUS peuvent varier en fonction des modèles. Français 180 Chapitre 1 : Démarrer Utiliser les ports d’affichage de la carte mère Pour connecter un moniteur externe à l’un des ports d’affichage de la carte mère : Connectez un moniteur VGA au port VGA, ou un moniteur DVI-D au port DVI-D, ou un moniteur HDMI au port HDMI localisé à l’arrière de votre ordinateur. 2. Connectez le moniteur à une source d’alimentation. Français 1. • Si votre ordinateur est accompagné d’une carte graphique, celle-ci est définie par défaut comme source d’affichage primaire dans le BIOS. Veillez donc à connecter votre moniteur à l’un des ports d’affichage disponibles sur la carte graphique. • Pour connecter plusieurs moniteurs à votre ordinateur, consultez la section Connecter plusieurs périphériques d’affichage du Chapitre 3 de ce manuel pour plus de détails. ASUS CG8565 181 Connecter un clavier et une souris USB Connectez un clavier et/ou une souris USB aux ports USB situés à l’arrière de votre ordinateur. Français 182 Connecter le cordon d’alimentation Connectez une extrémité du cordon d’alimentation au connecteur d’alimentation situé à l’arrière de votre ordinateur et l’autre extrémité à une prise électrique. Chapitre 1 : Démarrer Allumer ou éteindre l’ordinateur Cette section décrit comment éteindre ou allumer votre ordinateur. Allumer votre ordinateur Pour allumer votre ordinateur : 1.������������������������������������������������������������������������������������������ Placez l’ordinateur sous tension en mettant l’interrupteur d’alimentation sur la position “I”, 2.����������������������������������������������������������������������� Appuyez sur le bouton d’alimentation pour mettre en route l’ordinateur. Bouton d’alimentation Français E-SATA 3. Patientez le temps que le système d’exploitation se charge automatiquement. Éteindre votre ordinateur Pour éteindre votre ordinateur : 1. Fermez toutes les applications en cours d’exécution. 2. Cliquez sur 3. Cliquez sur ASUS CG8565 dans le Bureau de Windows®. pour fermer le système d’exploitation. 183 Français 184 Chapitre 1 : Démarrer Chapitre 2 Utiliser Windows® 7 Démarrer pour la première fois Lorsque vous démarrez votre ordinateur pour la première fois, une série d’écrans apparaissent pour vous guider dans la configuration des paramètres de base du système d’exploitation Windows® 7. 1. Allumez votre ordinateur. Patientez quelques minutes jusqu’à ce que l’écran Configurer Windows apparaisse. 2. Dans le menu déroulant, sélectionnez votre langue. Cliquez sur Suivant. 3. Dans les menus déroulant, sélectionnez votre Pays ou région, Formats d’horaires et monétaires et Disposition du clavier. Cliquez sur Suivant. 4. Entrez un identifiant unique dans les champs nom d’utilisateur et nom de l’ordinateur. Cliquez sur Suivant. 5. Entrez les informations nécessaires à la configuration du mot de passe, puis cliquez sur Suivant. Vous pouvez aussi cliquer sur Suivant pour ignorer cette étape. Français Pour démarrer pour la première fois : Si vous souhaitez définir un mot de passe ultérieurement, référez-vous à la section Configurer un compte d’utilisateur et un mot de passe de ce chapitre. 6. Lisez attentivement les termes du contrat de licence. Cochez J’accepte les termes du contrat de licence puis cliquez sur Suivant. 7. Sélectionnez Utiliser les paramètres recommandés ou Installer uniquement les mises à jour importantes pour configurer les paramètres de sécurité de votre ordinateur. Pour ignorer cette étape, sélectionnez Me redemander ultérieurement. 8. Vérifiez vos paramètres de date et d’heure. Cliquez sur Suivant. Le système charge les nouveaux paramètres et redémarre. Vous pouvez dès lors commencer à utiliser votre ordinateur. ASUS CG8565 185 Utiliser le Bureau de Windows® 7 Cliquez sur l’icône Démarrer Windows® 7. > Aide et support pour obtenir plus d’informations sur Utiliser le menu Démarrer Le menu Démarrer vous donne accès aux programmes, utilitaires et autres outils utiles pour votre ordinateur. Il permet également d’obtenir plus d’informations sur Windows 7 par le biais de la fonctionnalité Aide et support. Lancer des éléments du menu Démarrer Pour exécuter un élément du menu Démarrer : 1. Dans la barre des tâches de Windows®, cliquez sur l’icône Démarrer 2. Dans le menu Démarrer, sélectionnez l’élément à exécuter. . Français Vous pouvez épingler les programmes que vous souhaitez voir apparaître dans le menu Démarrer. Pour plus de détails, référez-vous à la section Épingler des programmes dans le menu Démarrer ou la barre des tâches de ce chapitre. Utiliser l’élément Mise en route La fonctionnalité Mise en route du menu Démarrer contient des informations sur les tâches de base comme la personnalisation de Windows®, l’ajout de nouveaux utilisateurs et le transfert de fichiers pour vous aider à vous familiariser avec Windows® 7. Pour utiliser la fonctionnalité Mise en route : 1. Dans la barre des tâches de Windows®, cliquez sur l’icône Démarrer menu Démarrer. 2. Sélectionnez Mise en route. La liste des tâches disponibles apparaît. 3. Sélectionnez une tâche. pour ouvrir le Utiliser la barre des tâches La barre des tâches vous permet de démarrer et de gérer les programmes ou outils installés sur votre ordinateur. Lancer un programme depuis la barre des tâches Pour lancer un programmes depuis la barre des tâches : • Dans la barre des tâches de Windows®, cliquez sur une icône pour lancer le programme/utilitaire associé. Cliquez de nouveau sur l’icône pour masquer le programme. Vous pouvez épingler les programmes que vous souhaitez voir apparaître dans la barre des tâches. Pour plus de détails, référez-vous à la section Épingler des programmes dans le menu Démarrer ou la barre des tâches de ce chapitre. 186 Chapitre 2 : Utiliser Windows® 7 Épingler des éléments dans la liste des liens Lorsque vous faites un clic droit sur une icône de la barre des tâches, une liste apparaît pour offrir un accès rapide à certains liens des programmes ou éléments. Vous pouvez épingler divers éléments dans la liste de liens comme la liste de vos sites Web favoris, les dossiers fréquemment utilisés ou vos fichiers multimédia préférés. Pour épingler des éléments à la liste de liens : 1. Dans la barre des tâches, faites un clic droit sur une icône. 2. Dans la liste des liens, faites un clic droit sur l’élément à épingler, puis sélectionnez Épingler à cette liste. Détacher des éléments de la liste de liens 1. Dans la barre des tâches, faites un clic droit sur une icône. 2. Dans la liste des liens, faites un clic droit sur l’élément à supprimer de la liste des liens, puis sélectionnez Détacher de cette liste. Épingler des programmes au menu Démarrer ou à la barre des tâches Pour épingler des programmes au menu Démarrer ou à la barre des tâches : 1. Dans la barre des tâches de Windows®, cliquez sur l’icône Démarrer menu Démarrer. pour ouvrir le 2. Faites un clic droit sur l’élément à épingler au menu Démarrer ou à la barre des tâches. 3. Sélectionnez Épingler à la barre des tâches ou Épingler au menu Démarrer. Français Pour détacher des éléments de la liste de liens : Vous pouvez aussi faire un clic droit sur l’icône d’un programme en cours d’exécution de la barre des tâches, puis sélectionner Épingler ce programme à la barre des tâches. Détacher des programmes du menu Démarrer Pour détacher des programmes du menu Démarrer : 1. Dans la barre des tâches de Windows®, cliquez sur l’icône Démarrer menu Démarrer. pour ouvrir le 2. Dans le menu Démarrer, faites un clic droit sur le programme à détacher, puis sélectionnez Supprimer de cette liste. Détacher des programmes de la barre des tâches Pour détacher des programmes de la barre des tâches : 1. Dans la barre des tâches, faites un clic droit sur le programme à supprimer, puis sélectionnez Détacher ce programme de la barre des tâches. ASUS CG8565 187 Utiliser la zone de notification Par défaut, la zone de notification affiche les trois icônes suivantes : Centre de maintenance Cliquez sur cette icône pour afficher tous les messages d’alerte/notifications et ouvrir le Centre de maintenance Windows®. Connexion réseau Cette icône affiche l’état et la puissance du signal de la connexion avec ou sans fil. Volume Cliquez sur cette icône pour ajuster le volume. Afficher une notification d’alerte Pour afficher une notification d’alerte : • Cliquez sur l’icône , puis cliquez sur le message pour l’ouvrir. Français Pour plus de détails, reportez-vous à la section Utiliser le Centre de maintenance Windows® de ce chapitre. Personnaliser les icônes et les notifications Vous pouvez choisir d’afficher ou de masquer les icônes et les notifications de la barre des tâches ou de la zone de notification. Pour personnaliser les icônes et les notifications : 1. Dans la zone de notification, cliquez sur l’icône . 2. Cliquez sur Personnaliser. 3. Dans le menu déroulant, sélectionnez le comportement de chaque icône ou élément. Gérer vos fichiers et vos dossiers Utiliser Windows® Explorer Windows® Explorer vous permet de visualiser, gérer et organiser vos fichiers et dossiers. Lancer Windows® Explorer Pour démarrer Windows Explorer : 188 1. Dans la barre des tâches de Windows, cliquez sur l’icône Démarrer menu Démarrer. 2. Cliquez sur Ordinateur pour lancer Windows Explorer. pour ouvrir le Chapitre 2 : Utiliser Windows® 7 Explorer les fichiers et les dossiers Pour explorer les fichiers et les dossiers de votre ordinateur : 1. Lancez Windows Explorer. 2. Localisez vos données à partir du volet de navigation ou d’affichage. 3. Dans la barre de navigation, cliquez sur la flèche pour afficher le contenu du disque dur ou du dossier. Personnaliser l’affiche des fichiers/dossiers Pour personnaliser l’affichage de vos fichiers/dossiers : 1. Lancez Windows Explorer. 2. Localisez vos données à partir du volet de navigation. 3. Dans la barre d’outils, cliquez sur l’icône Affichage 4. Dans le menu Affichage, déplacez le curseur pour sélectionner le mode d’affichage à utiliser. Vous pouvez aussi cliquer n’importe où sur le volet d’affichage, cliquer sur Affichage, et sélectionner le type d’affichage désiré. Français . Organiser vos fichiers Pour organiser vos fichiers : 1. Lancez Windows Explorer. 2. Dans le champ Organiser par, cliquez pour afficher le menu déroulant. 3. Sélectionnez le type d’organisation désiré. Trier vos fichiers Pour trier vos fichiers : 1. Lancez Windows Explorer. 2. Faites un clic droit n’importe où sur le volet d’affichage. 3. Dans le menu contextuel apparaissant à l’écran, sélectionnez Trier par, puis sélectionnez la méthode de tri désirée. Grouper vos fichiers Pour grouper vos fichiers : 1. Lancez Windows Explorer. 2. Faites un clic droit n’importe où sur le volet d’affichage. 3. Dans le menu contextuel apparaissant à l’écran, sélectionnez Regrouper par, puis sélectionnez la méthode de groupage désirée. ASUS CG8565 189 Créer un nouveau dossier Pour créer un nouveau dossier : 1. Lancez Windows Explorer. 2. Dans la barre d’outils, cliquez sur Nouveau dossier. 3. Spécifiez un nom pour le nouveau dossier. Vous pouvez aussi faire un clic droit n’importe où sur le volet d’affichage et cliquer sur Nouveau > Dossier. Sauvegarder vos fichiers Configurer une sauvegarde Pour configurer une sauvegarde : Français > Tous les programmes > Maintenance > Sauvegarder et restaurer. 1. Cliquez sur 2. Cliquez sur Configurer la sauvegarde. Cliquez sur Suivant. 3. Sélectionnez l’emplacement de sauvegarde. Cliquez sur Suivant. 4. Sélectionnez Laissez Windows choisir (recommandé) ou Me laisser choisir comme mode de sauvegarde. Si vous sélectionnez Laisser Windows choisir, Windows ne sauvegardera pas les programmes, les fichiers au format FAT, les fichiers contenus dans la corbeille ou les fichiers temporaires dont la taille est supérieure ou égale à 1Go. 5. Suivez les instructions apparaissant à l’écran pour terminer le processus de sauvegarde. Restaurer le système La fonctionnalité Restauration du système de Windows® crée un point de sauvegarde de vos paramètres système à une certaine date et heure. Cette fonction vous permet de restaurer ou annuler les modifications apportées au système sans que ce la n’affecte vos données personnelles. Pour restaurer votre système : 190 1. Fermez toutes les applications en cours d’exécution. 2. Cliquez sur > Tous les programmes > Accessoires > Outils système > Restauration du système. 3. Suivez les instructions apparaissant à l’écran pour terminer le processus de restauration. Chapitre 2 : Utiliser Windows® 7 Protéger votre ordinateur Utiliser le Centre de maintenance de Windows® 7 Dans le Centre de maintenance de Windows® 7 vous pourrez trouver des messages d’alerte, des informations sur la sécurité et la maintenance du système et la possibilité de dépanner automatiquement certains problèmes ordinaires de l’ordinateur. Vous pouvez personnaliser les notifications. Pour plus de détails, référez-vous à la section Personnaliser les icônes et les notifications de ce chapitre. Lancer le Centre de maintenance de Windows® 7 1. Pour ouvrir le Centre de maintenance de Windows 7, cliquez sur l’icône , puis cliquez sur Ouvrir le Centre de maintenance. 2. Dans le Centre de maintenance de Windows 7, sélectionnez l’une des tâches disponibles. Utiliser Windows® Update Windows Update vous permet de vérifier et installer les dernières mises à jour pour améliorer la sécurité et les performances de votre ordinateur. Français Pour ouvrir le Centre de maintenance de Windows® 7 : Lancer Windows® Update Pour ouvrir Windows® Update : 1. Dans la barre des tâches de Windows®, cliquez sur l’icône Démarrer menu Démarrer. 2. Sélectionnez Tous les rogrammes > Windows Update. 3. À partir de l’écran de Windows Update, sélectionnez la tâche à effectuer. pour ouvrir le Configurer un compte d’utilisateur et mot de passe Vous pouvez créer des comptes d’utilisateurs et mot de passe pour les personnes utilisant l’ordinateur. Configurer un compte d’utilisateur Pour configurer un compte d’utilisateur : > Mise en route > Ajouter de 1. Dans la barre des tâches de Windows®, cliquez sur nouveaux utilisateurs à mon ordinateur. 2. Sélectionnez Gérer un autre compte. 3. Sélectionnez Créer un nouveau compte. 4. Spécifiez le nom du nouvel utilisateur. 5. Définissez le type d’utilisateur sur Utilisateur standard ou Administrateur. 6. Une fois terminé, cliquez sur Créer un compte. ASUS CG8565 191 Définir un mot de passe utilisateur Pour configurer un mot de passe utilisateur : 1. Sélectionnez l’utilisateur pour lequel vous souhaitez définir un mot de passe. 2. Sélectionnez Créer un mot de passe. 3. Entrez le mot de passe et confirmez-le. Définissez un indice de mot de passe. 4. Un fois terminé, cliquez sur Créer un mot de passe. Activer le logiciel anti-virus Trend Micro Internet Security est un logiciel anti-virus pré-installé sur votre ordinateur. Après l’avoir activé, vous bénéficierez d’une période d’essai de 60 jours avant que le logiciel n’expire. L’achat d’une clé de licence est nécessaire une fois la période d’essai terminée. Pour activer Trend Micro Internet Security : Français 1. Exécutez l’application Trend Micro Internet Security. 2. Lisez attentivement les termes de la licence. Cliquez sur Agree & Activate. 3. Entrez votre adresse e-mail et sélectionnez votre emplacement géographique. Cliquez sur Suivant. 4. Cliquez sur Finish pour terminer l’activation. Centre d’Aide et support Windows® Le centre d’Aide et de support Windows® vous guide dans l’utilisation de la plate-forme Windows® 7. Pour lancer le centre d’Aide et support Windows®, cliquez sur > Aide et support. Assurez-vous d’être connecté à Internet pour obtenir les derniers fichiers d’aide pour Windows®. 192 Chapitre 2 : Utiliser Windows® 7 Chapitre 3 Connecter des périphériques Connecter un périphérique de stockage USB Cet ordinateur de bureau dispose de ports USB 2.0/1.1 et USB 3.0 sur les panneaux avant et arrière. Les ports USB vous permettent de connecter des périphériques USB tels que des dispositifs de stockage. Pour connecter un périphérique de stockage USB : • Insérez le périphérique de stockage USB sur l’un des ports USB de votre ordinateur. Français Panneau avant Panneau arrière Pour retirer le périphérique de stockage USB : 1. Cliquez sur l’icône située dans la zone de notification de Windows, puis cliquez sur Éjecter (Nom de votre disque amovible USB2.0 ou 3.0). 2. Lorsque le message Le matériel peut être retiré en toute sécurité apparaît, déconnectez le périphérique de stockage USB de votre ordinateur. NE PAS retirer le périphérique de stockage USB lorsque des données sont en cours de transfert. Le faire peut causer la perte de données ou endommager le périphérique de stockage USB. ASUS CG8565 193 Connecter un microphone ou un système de haut-parleurs Cet ordinateur de bureau intègre un port micro et plusieurs ports audio localisés sur le panneau avant et arrière. Les ports audio situés à l’arrière de l’ordinateur permettent de configurer un système de haut-parleurs à 2, 4; 6 ou 8 canaux. Connecter un casque audio ou un micro Français Connecter un système de haut-parleurs 2.0 194 Chapitre 3 : Connecter des périphériques Connecter un système de haut-parleurs 6.1 ASUS CG8565 Français Connecter un système de haut-parleurs 4.1 195 Connecter un système de haut-parleurs 8.1 Français 196 Chapitre 3 : Connecter des périphériques Connecter plusieurs périphériques d’affichage Votre ordinateur de bureau dispose de ports VGA, HDMI, et DVI vous permettant de connecter plusieurs périphériques d’affichage. Lorsqu’une carte graphique est installée sur votre ordinateur, connectez les moniteurs sur les ports de sortie intégrés à la carte graphique. Configurer plusieurs affichages Lors de l’utilisation de plusieurs moniteurs, vous pouvez définir le mode d’affichage. Vous pouvez utiliser le moniteur secondaire pour dupliquer l’écran principal ou pour étendre le Bureau de Windows. 1. Éteignez votre ordinateur. 2. Connectez les deux moniteurs à l’ordinateur et les cordons d’alimentation aux moniteurs. Voir section Configurer votre ordinateur du chapitre 1 pour plus de détails sur la connexion d’un moniteur à votre ordinateur. Français Pour configurer plusieurs affichages : Sur certains modèles de cartes graphiques, seul le moniteur défini comme source d’affichage principale affiche du contenu lors du POST. Le double affichage ne fonctionnant que sous le système d’exploitation Windows. ASUS CG8565 197 Français 198 3. Allumez votre ordinateur. 4. Suivez l’une des méthodes suivantes pour ouvrir l’écran Résolution d’écran : •Cliquez sur > Panneau de configuration > Apparence et personnalisation > Affichage > Modifier les paramètres d’affichage. •Faites un clic droit n’importe où sur le Bureau de Windows. Dans le menu contextuel, cliquez sur Personnaliser > Affichage > Modifier les paramètres d’affichage. 5. Sélectionnez un mode d’affichage dans le menu déroulant Affichages multiples. •Dupliquer ces affichages : sélectionnez cette option pour que le moniteur additionnel duplique le contenu de votre moniteur principal. •Étendre ces affichages : sélectionnez cette option pour étendre le Bureau de Windows sur le moniteur additionnel. Cette option permet d’accroître la taille du Bureau. •Afficher le Bureau uniquement sur 1 / 2 : sélectionnez cette option pour n’afficher le contenu que sur l’un des deux moniteurs. • 6. Cliquez sur Appliquer ou OK, puis cliquez sur Conserver les modifications à l’apparition du message de confirmation. Supprimer cet affichage : sélectionnez cette option pour supprimer l’affichage sélectionné. Chapitre 3 : Connecter des périphériques Connecter un téléviseur HD Reliez votre ordinateur à un téléviseur Haute Définition (HDTV) par le biais du port HDMI. • Vous devez faire l’achat d’un câble HDMI pour connecter un téléviseur HD à votre ordinateur. Le câble HDMi est vendu séparément. Français • Pour obtenir une qualité d’image optimale, utilisez un câble HDMI d’une longueur inférieure à 15 mètres. ASUS CG8565 199 Français 200 Chapitre 3 : Connecter des périphériques Chapitre 4 Utiliser votre ordinateur Posture recommandée lors de l’utilisation de l’ordinateur Lorsque vous utilisez votre ordinateur de bureau, maintenir une posture adéquate est nécessaire afin d’éviter de fatiguer vos poignets, vos mains et autres articulations ou muscles. Cette section offre des astuces permettant d’éviter les éventuelles gênes physiques ou les blessures pouvant résulter de l’utilisation de votre ordinateur de bureau. Repose-pied Français Niveau du regard fixé vers le haut du moniteur Angle de 90o Pour maintenir une posture adéquate : • Positionnez votre chaise de telle sorte que vos coudes soient au même niveau ou légèrement plus haut que le clavier afin d’assurer un meilleur confort de frappe. • Ajustez la hauteur de votre chaise de telle sorte que vos genoux soient à une hauteur légèrement plus haute que vos hanches afin de relaxer l’arrière de vos cuisses. Si nécessaire, utilisez un repose-pied pour surélever le niveau de vos genoux. • Ajustez le dossier de votre chaise de telle sorte que la base de votre colonne vertébral soit fermement supportée et légèrement inclinée vers l’arrière. • Maintenez-vous droit avec vos genoux, coudes et hanches à un angle approximatif de 90º lorsque vous faites face à votre ordinateur. • Placez le moniteur directement en face de vous, et ajustez l’angle d’inclinaison du moniteur sur votre angle de vision de sorte à ce que votre regard soit légèrement incliné vers le bas. • Maintenez la souris à proximité du clavier, et si nécessaire, utilisez un repose-poignet pour réduire la pression sur vos poignets lors de la saisie au clavier. • Utilisez votre ordinateur dans un environnement à l’éclairage confortable, et maintenez-le à distance des rayons du soleil ou de sources éblouissantes telles que des fenêtres. • Prenez des mini-pauses régulières en cas d’utilisation prolongée de l’ordinateur. ASUS CG8565 201 Utiliser le lecteur de cartes mémoire Les appareils photos numériques et autres équipements d’imagerie numérique utilisent des cartes mémoire pour stocker des photos numériques ou des fichiers multimédia. Le lecteur de carte mémoire intégré en façade de votre ordinateur permet la lecture et l’écriture de données sur une variété de formats de cartes mémoire. Français Pour utiliser une carte mémoire : 1. Soulevez le capot situé en façade. 2. Insérez la carte dans la fente appropriée à votre format de carte mémoire. • Une carte mémoire est conçue de telle sorte qu’elle ne puisse être insérée que dans une seule direction. NE PAS forcer l’insertion de la carte mémoire pour éviter de l’endommager. • Vous pouvez insérer plusieurs cartes mémoire à la fois et les utiliser indépendamment. Ne placez toutefois qu’une seule carte mémoire par fente. 3. Sélectionnez l’action à effectuer lors de l’apparition de la fenêtre d’Exécution automatique pour accéder à vos fichiers. • Si l’Exécution automatique n’est pas activée sur votre ordinateur, cliquez d’abord sur le bouton Démarrer de la barre des tâches de Windows® 7, puis sur Ordinateur et doublecliquez sur l’icône de la carte mémoire à laquelle vous souhaitez accéder. • Chaque fente pour carte mémoire possède sa propre icône de lecteur et apparaît dans le volet d’affichage de l’écran Ordinateur. • Le voyant LED du lecteur de carte mémoire s’allume et clignote lorsque des données sont lues ou écrites sur la carte mémoire. 4. Une fois terminé, faites un clic droit sur l’icône de la carte mémoire de l’écran Ordinateur, cliquez sur Éjecter puis retirez la carte. Ne retirez jamais une carte mémoire lors de la lecture, de la copie, du formatage ou de la suppression de données sur la carte. Le faire peut entraîner la perte de vos données. Pour éviter les pertes de données, utiliser la fonctionnalité “Retirer le périphérique en toute sécurité et éjecter le média” de la zone de notification de Windows avant de retirer votre carte mémoire. 202 Chapitre 4 : Utiliser votre ordinateur Utiliser le lecteur optique Pour insérer un disque optique : 1. Lorsque votre ordinateur est allumé, appuyez sur le bouton PUSH. 2. Appuyez sur le bouton d’éjection pour ouvrir le plateau du lecteur optique. 3. Placez le disque sur le plateau avec la face imprimée tournée vers le haut. 4. Poussez légèrement le plateau pour le refermer. 5. Sélectionnez l’action à effectuer lors de l’apparition de la fenêtre d’Exécution automatique pour accéder à vos fichiers. Français Insérer un disque optique Si l’Exécution automatique n’est pas activée sur votre ordinateur, cliquez d’abord sur le bouton Démarrer de la barre des tâches de Windows® 7, puis sur Ordinateur et doublecliquez sur l’icône du lecteur de CD/DVD auquel vous souhaitez accéder. Retirer un disque optique Pour retirer un disque optique : 1. 2. Lorsque votre ordinateur est allumé, effectuez l’une des actions suivantes pour ouvrir le plateau du lecteur optique. • Appuyez sur le bouton d’éjection. • Faites un clic droit sur l’icône du lecteur CD/DVD de l’écran Ordinateur, puis cliquez sur Éjecter. Retirez le disque du plateau. ASUS CG8565 203 Utiliser le clavier de jeu ASUS ROG U9N Votre ordinateur de bureau CG8565 Essentio est accompagné d’un clavier de jeu ASUS ROG U9N pour garantir une expérience de jeu optimale. Consultez la section Contenu de la boîte pour visualiser le contenu de la boîte du clavier de jeu ASUS ROG U9N. Installer le clavier de jeu ASUS ROG U9N Utilisez l’adaptateur PS/2-vers-USB fourni pour connecter le clavier à l’un des ports USB 2.0 de votre ordinateur. . Alignez et insérez le repose poignets sur les slots du clavier (A). À l’aide de vos deux pouces, poussez le repose poignets jusqu’à ce qu’il soit bien sécurisé au clavier (B). Français 1. A 3. 204 B Redémarrez l’ordinateur. Windows® installe automatiquement les pilotes logiciels nécessaires pour le clavier. Chapitre 4 : Utiliser votre ordinateur Utiliser la souris de jeu ASUS GX900 Votre ordinateur de bureau CG8565 Essentio est accompagné d’un clavier de jeu ASUS GX900 pour offrir un contrôle de jeu extrême�. Consultez la section Contenu de la boîte pour visualiser le contenu de la boîte du clavier de jeu ASUS GX900. Français Votre souris de jeu ASUS GX900 intègre un bouton droit, un bouton gauche, une molette de défilement, deux boutons latéraux, un bouton DPI ainsi qu’un interrupteur de sélection de profil. Touche Description 1 Bouton gauche 3 4 5 Molette de défilement 2 6 Bouton droite Touche Description 7 8 9 Interrupteur DPI 10 Indicateur/bouton de sélection de profil* 11 LED DPI** 12 Logo GX900 Bouton Suivant pour IE Bouton Retour pour IE Patins de la souris Capteur laser Twin-Eye Compartiment de stockage des poids (5 x poids de 4.5g)*** *** V ous pouvez ajuster la masse de la souris en ajoutant ou retirant des poids. ASUS CG8565 205 * Indications du voyant de sélection de profil Couleur LED Indications Aucune Verte Rouge Orange Profil normal Profil 1 Profil 2 Profil 3 ** Indications du voyant de l’interrupteur DPI Nombre de voyants allumés Indications 4 Niveau DPI 2 2 Niveau DPI 1 Français Démarrer le programme Le CD de support accompagnant votre souris inclut un programme que vous pouvez installer pour profiter pleinement de toutes les fonctions de votre souris. Placez le CD dans votre lecteur optique et suivez les instructions à l’écran pour lancer l’application. Si l’Exécution automatique n’est pas activée sur votre ordinateur, parcourez le contenu du CD de support pour localiser le fichier GX900.exe. Double cliquez sur le fichier GX900.exe puis suivez les instructions apparaissant à l’écran pour lancer le programme. Configurer la souris de jeu ASUS GX900 Assurez-vous que votre souris de jeu soit bien connectée à l’un des ports USB de votre ordinateur. Le programme détecte la souris et affiche automatiquement le menu de configuration principal. 206 Chapitre 4 : Utiliser votre ordinateur Français Menu principal Éléments Descriptions 1 2 3 4 5 6 7 8 9 10 11 Cliquez sur l’un des onglets pour afficher le menu du profil sélectionné. Affiche l’icône du profil configurable dans le menu des onglets Profil 1~3. Cliquez pour restaurer la configuration DPI dans les derniers paramètres enregistrés. Déplacez le curseur pour ajuster la valeur DPI de chaque niveau.* Cliquez pour restaurer le réglage des derniers paramètres enregistrés des boutons. Cliquez pour afficher la signification de différentes couleur du sélecteur de profil. Cliquez pour charger un profil précédemment enregistré. Cliquez pour enregistrer les paramètres sous forme de profil sur votre disque dur. Cliquez pour réinitialiser les paramètres par défaut de la souris. Cliquez pour enregistrer les modifications apportées. Cliquez pour enregistrer les modifications apportées et quitter le programme. * Chaque profil intègre deux niveaux DPI. Deux voyants DPI s’allument pour indiquer l’utilisation du niveau 1, et quatre voyants s’allument pour indiquer l’utilisation du niveau 2. ASUS CG8565 207 Menu du Profil 1 Français Éléments Descriptions 1. 2. 3. 4. Éléments Descriptions Bouton G Le bouton émulera un clic gauche de la souris. Le bouton émulera un clic droit de la souris. Le bouton émulera un clic central de la souris. Le bouton émulera le bouton Retour d’Internet Explorer. Appuyez pour retourner à la page précédente. Le bouton émulera le bouton Suivant d’Internet Explorer. Appuyez pour retourner à la page suivante. Bouton D Bouton C Retour IE Suivant IE 208 Cliquez pour ouvrir le menu d’édition permettant de modifier le nom et l’icône du profil. Entrez le nom du profil à utiliser. Cliquez pour localiser le fichier image à utiliser comme icône de profil. Assignez une fonction à chaque bouton / action à partir du menu déroulant. * Voir le tableau ci-dessous pour plus de détails. Chapitre 4 : Utiliser votre ordinateur Éléments Clavier Descriptions Permet d’émuler une frappe ou une séquence de frappe au clavier. Permet d’exécuter une commande ou une série de commande pouvant être éditées via le menu d’édition des macros. Voir page 12 pour les détails. Scripte #1~6 Permet d’exécuter un scripte pouvant être édité via le menu d’édition des scriptes. Voir page 13 pour les détails DPI[+] Permet d’accroître la valeur DPI. DPI[-] Permet de baisser la valeur DPI. Niveau DPI 1/2 Permet d’utiliser le Niveau DPI 1 / 2. Sélecteur de profil Permet d’émuler l’interrupteur de sélection de profil. Profil normal Permet d’activer le profil normal de la souris. Profil perso. 1/2/3 Permet d’activer le profil personnalisé 1/2/3 de la souris. Molette [gauche] / Permet d’émuler l’inclinaison latérale gauche ou droite de la molette de [droite] la souris. REMARQUE : cette fonction ne fonctionne qu’avec les applications Microsoft® Office sous Windows® 7 / Vista. Rafale [souris] Permet d’effectuer un tir en rafale dans un jeu où le clic de la souris est utilisé pour tirer. Cette action est identique à un triple clic gauche rapide de la souris. Rafale [touche] Permet d’effectuer un tir en rafale dans un jeu où la barre d’espace du clavier est utilisés pour tirer. Cette action est identique à une triple frappe rapide de la barre d’espace du clavier. Navigateur Web Permet d’ouvrir votre navigateur Internet par défaut. E-mail Permet d’ouvrir votre application de messagerie par défaut. Lecteur multimédia Permet d’ouvrir votre lecteur multimédia par défaut. Français Macro Lecture/Pause Arrêt Piste suivante Ces assignations émulent les boutons de contrôle de votre lecteur multimédia. Piste précédente Volume + / Sourdine Calculatrice Poste de travail Désactiver ASUS CG8565 Permet d’augmenter / baisser le volume. Permet d’activer / désactiver le son. Permet d’ouvrir l’application Calculatrice. Permet d’ouvrir la fenêtre Poste de travail/Ordinateur (selon le système d’exploitation). Sélectionnez cette option pour désactiver le bouton. 209 Menu d’édition des macros Français Éléments Édition de macro Descriptions Cliquez pour ouvrir le menu d’édition de macro. Cochez cette option pour enregistrer le délai compris entre la pression et la relâche d’un bouton. (Valeur par défaut : 12ms) Insertion Cochez cette option pour que la nouvelle instruction soit insérée devant l’instruction sélectionnée. Sinon, une instruction aléatoire aura la priorité. Démarrer* Démarre l’enregistrement des frappes au clavier et/ou clics de souris. Arrêter Arrête l’enregistrement des frappes au clavier et/ou clics de souris. Effacer Cliquez pour effacer le jeu d’instructions enregistré. Monter/descendre Cliquez pour faire monter ou descendre l’instruction sélectionnée. Durée de cycle des Lorsque l’option Minutage est décochée, le délai d’attente des actions instructions sera sélectionnable dans le menu déroulant. Exécution en boucle Permet d’activer/désactiver la macro via un simple clic de souris. Tirer Permet d’activer la macro via un clic de souris. Tir continu Permet d’activer la macro via une pression continue du bouton et de l’arrêter lorsque le bouton est relâché. Exporter Cliquez pour enregistrer la macro actuelle sur votre disque dur. Importer Cliquez pour charger une macro stockée sur votre disque dur. Minutage 210 Chapitre 4 : Utiliser votre ordinateur Éléments Édition���������� de script Descriptions Français Menu d’édition de scripts Cliquez pour ouvrir le menu d’édition de script. Cochez cette option pour enregistrer le délai compris entre la pression et la relâche d’un bouton. (Valeur par défaut : 12ms) Insertion Cochez cette option pour que la nouvelle instruction soit insérée devant l’instruction sélectionnée. Sinon, une instruction aléatoire aura la priorité. Démarrer Démarre l’enregistrement des frappes au clavier et/ou clics de souris. Arrêter Arrête l’enregistrement des frappes au clavier et/ou clics de souris. Effacer Cliquez pour effacer le jeu d’instructions enregistré. Monter/descendre Cliquez pour faire monter ou descendre l’instruction sélectionnée. Durée de cycle des Lorsque l’option Minutage est décochée, le délai d’attente des actions instructions sera sélectionnable dans le menu déroulant. Exécution en boucle Permet d’activer/désactiver la macro via un simple clic de souris. Tirer Permet d’activer la macro via un clic de souris. Tir continu Permet d’activer la macro via une pression continue du bouton et de l’arrêter lorsque le bouton est relâché. Exporter Cliquez pour enregistrer le script actuel sur votre disque dur. Importer Cliquez pour charger un script stocké sur votre disque dur. Minutage ASUS CG8565 211 Français 212 Chapitre 4 : Utiliser votre ordinateur Chapitre 5 Se connecter à Internet Connexion filaire Utilisez un câble RJ-45 pour connecter votre ordinateur à un modem câble/ADSL ou à un réseau local. Connexion via un modem câble/ADSL Pour vous connecter via un modem câble/ADSL : 1. Configurer votre modem câble/ADSL. 2. Français Pour plus de détails, reportez-vous à la documentation accompagnant votre modem câble/ADSL. Connectez une extrémité du câble RJ-45 au port réseau (RJ-45) situé à l’arrière de votre ordinateur et l’autre extrémité à un modem câble/ADSL. Modem Câble RJ-45 3. Allumez le modem câble/ADSL et votre ordinateur. 4. Configurez les paramètres de connexion Internet appropriés. Contactez votre FAI (Fournisseur d’accès à Internet) pour plus de détails sur la configuration de vos paramètres Internet. ASUS CG8565 213 Connexion via un réseau local Pour vous connecter à un réseau local : 1. Connectez une extrémité du câble RJ-45 au port réseau (RJ-45) situé à l’arrière de votre ordinateur et l’autre extrémité au hub réseau de votre réseau local. Français Réseau local Câble RJ-45 2. Allumez votre ordinateur. 3. Configurez les paramètres de connexion Internet appropriés. Contactez votre administrateur réseau pour toute assistance ou détails sur la configuration de votre connexion Internet. 214 Chapitre 5 : Se connecter à Internet Chapitre 6 Utiliser les utilitaires Le DVD de support et le DVD de restauration peuvent ne pas être inclus dans la boîte de votre ordinateur. Vous pouvez utiliser la partition de restauration pour créer un DVD de support et de restauration. Pour plus de détails, référez-vous à la section Restaurer le système de ce chapitre. ASUS AI Suite II ASUS AI Suite II est une interface tout-en-un intégrant divers utilitaires ASUS pouvant être exécutés simultanément. Installer AI Suite II Pour installer AI Suite II : 2. 3. Français 1.����������������������������������������������������������������������������������������� Placez le DVD de support dans votre lecteur optique. L’onglet d’installation des pilotes apparaît si la fonction d’Exécution automatique a été activée pour votre lecteur optique. Cliquez sur l’onglet Utilitaires, puis cliquez sur AI Suite II. Suivez les instructions apparaissant à l’écran pour terminer l’installation. Utiliser AI Suite II AI Suite II démarre ����������������������������������������������������������������� automatiquement lors de l’ouverture d’une session Windows® . L’icône AI Suite II apparaît dans la zone de notification de Windows®. Cliquez sur cette icône pour ouvrir la barre des menus d’AI Suite II. Cliquez sur l’un des boutons pour lancer l’utilitaire désiré, surveiller l’état du système, mettre à jour le BIOS de la carte mère, afficher les informations relatives au système ou personnaliser les paramètres d’AI Suite II. Sélection d’un utilitaire Surveillance du système Mise à jour du BIOS de la carte mère Infos système Réglages • Les applications du menu Tool (Outils) varient en fonction des modèles. • Les captures d’écran d’AI Suite II apparaissant dans ce manuel ne sont données qu’à titre indicatif et peuvent varier en fonction du modèle. ASUS CG8565 215 Menu des utilitaires Le menu Tool (Outils) intègre les fonctions DIGI+ VRM, EPU, Probe II, Sensor Recorder et Ai Charger+. Lancer et configurer DIGI+ VRM ASUS DIGI+ VRM vous permet d’ajuster le voltage et la fréquence de modulation du régulateur de tension pour améliorer la stabilité et la fiabilité. Il offre également un champ de régulation du voltage important pour garantir la durée de vie des composants et réduire les pertes d’alimentation. Pour exécuter DIGI+ VRM : • Cliquez sur� Tool (Outils) > DIGI+ VRM à partir de la barre des menus d’AI Suite II. 6 Français 1 Aide 2 7 3 4 5 Annule les modifications Applique les modifications N° Description de la fonction 1 Load-line Calibration (Calibration de ligne de charge) Une calibration de ligne de charge élevée permet d’obtenir une tension plus élevée et de meilleurs résultats d’overclocking mais accroît la pression thermique du CPU et du régulateur de tension. 2 CPU Current Capability (Capacités électriques du CPU) Cette fonction permet d’obtenir un champ d’alimentation plus important pour l’overclocking. Une valeur élevée a pour effet d’accroître la distribution en courant du régulateur de tension. 3 Frequency (Fréquence) La modification de la fréquence affecte le temps de réponse transitoire du régulateur de tension et la pression thermique des composants. Une fréquence élevée permet d’obtenir un temps de réponse transitoire plus rapide. • Le niveau de performance varie en fonction des spécifications de votre CPU. •��������������������������������������������������������������������������� Ne retirez pas le module thermique. Les conditions thermiques doivent être constamment surveillées. 216 Chapter 6: Using the utilities Description de la fonction 4 Phase Control (Contrôle des phases) Utilisez un plus grand nombre de phases lorsque la charge du système est élevée afin d’obtenir de meilleures capacités thermiques. Réduisez le nombre de phases lorsque la charge du système est faible pour accroître l’efficacité du régulateur de tension. 5 Duty Control (Contrôle des phases) Cette fonction permet d’ajuster le courant et les capacités thermiques de chaque phase du régulateur de tension. 6 iGPU Load-line Calibration (Calibration de ligne de charge iGPU) Une calibration de ligne de charge élevée permet d’obtenir une tension iGPU plus élevée et de meilleurs performances mais accroît la pression thermique du CPU et du régulateur de tension. 7 iGPU Current Capability (Capacités électriques du iGPU) Cette fonction permet d’obtenir un champ d’alimentation plus important pour l’overclocking pour accroîtres les performnces du iGPU. System Level Up System Level Up vous permet d’overclocker le système sous Windows® via divers profils de configuration. Pour exécuter System Level up, cliquez sur Tool (Outils) > System Level Up à partir de la barre des menus d’AI Suite II. ASUS CG8565 Français N° 217 Pour configurer cette fonction, assignez les raccourcis clavier à chaque profil d’utilisation. Vous pouvez définir vos propres raccourcis clavier. Voir l’illustration ci-dessous pour plus de détails. Français Vous pouvez dès lors utiliser System Level Up via l’une des deux méthodes suivantes : BIOS Dans le programme de configuration du BIOS, cliquez sur AI Tweaker > System Level Up, et sélectionnez l’option désirée. Bouton d’overclocking Appuyez sur le bouton d’overclocking situé dans la partie supérieure gauche du panneau avant du châssis. 218 Chapter 6: Using the utilities Lancer et configurer Probe II Probe II est un utilitaire qui contrôle l’activité des composants cruciaux de l’ordinateur ; il détecte et vous avertit de tout problème survenant sur l’un de ces composants. PC Probe II surveille entre autres la vitesse de rotation des ventilateurs, la température du CPU, et les voltages du système. Grâce à cet utilitaire, vous serez assuré que votre ordinateur fonctionne dans des conditions d’opération saines. Pour exécuter Probe II : • Cliquez sur� Tool (Outils) > Probe II à ��������������������������������������������� partir de la barre des menus d’AI Suite II. Pour configurer Probe II : •��������������������� Cliquez sur l’onglet Preference (Préférences) pour personnaliser certains paramètres de Probe II comme le cycle de détection et l’unité de mesure de la température. Français •������������������������ Cliquez sur les onglets Voltage/Temperature/Fan Speed (Voltage/Température/ Vitesse des ventilateurs) pour activer les sondes ou ajuster les valeurs seuil des sondes. Enregistre la configuration Charge un profil de configuration ASUS CG8565 Restaure les valeurs seuil par défaut des sondes Applique les modifications 219 Lancer et configurer Sensor Recorder Sensor Recorder ������������������������������������������������������������������������ vous permet de surveiller les changements intervenus dans votre système tels que la température, le voltage et la vitesse de rotation des ventilateurs. Vous pouvez aussi visualiser un historique des évènements. Pour exécuter Sensor Recorder : • Cliquez sur� Tool (Outils) > Sensor Recorder à ������������������������������������ partir de la barre des menus d’AI Suite II. Pour configurer Sensor Recorder : •��������������������� Cliquez sur l’onglet Voltage/Temperature/Fan Speed et sélectionnez les éléments à surveiller. •��������� L’onglet History Record (Historique) permet d’enregistrer les informations obtenues par les sondes de surveillances activées. Français Sélectionnez les sondes de surveillance à activer Faites glisser pour afficher l’état pour une période spécifique Cliquez pour restaurer le mode par défaut 220 Cliquez pour faire un zoom avant/arrière sur l’axe Y Cliquez pour faire un zoom avant/arrière sur l’axe X Chapter 6: Using the utilities BT GO! BT GO! permet de connecter un périphérique Bluetooth (BT) à la carte mère via une connexion sans fil Bluetooth pour le transfert, la gestion et la synchronisation de fichiers, la lecture de fichiers audio et de multiples fonctions de contrôle à distance. Lancer BT GO! Après avoir installé AI Suite II à partir du DVD de support de la carte mère, lancez BT GO! en cliquant sur Tool (Outils) > > BT GO! dans la barre des menus d’AI Suite II. Utiliser BT GO! Liste des fonctions S’allume lorsqu’une fonction est activée Français Liste des périphériques Cliquez pour afficher le panneau de configuration correspondant sur la droite • Cliquez sur et pour faire défiler la liste des périphériques. •C liquez sur l’icône du périphérique auquel vous souhaitez vous connecter pour que BT GO! recherche automatiquement les fonctionnalités supportées par l’appareil. •C liquez sur l’une des icônes de l’appareil pour établir une connexion et activer / désactiver la fonction sélectionnée Fonction Shot and send (Capture & envoi) BT Transfer (Transfert BT) Description Permet de capturer une image et de l’envoyer vers l’appareil BT connecté. Permet de partager les fichiers stockés sur le périphérique BT hôte vers d’autres appareils BT connectés. Folder Sync (Synchro.de dossiers) Permet de faire une copie de sauvegarde ou de synchroniser un dossier entre les appareils BT sélectionnés et l’ordinateur. Personal Manager (Gestionnaire perso.) Permet de synchroniser la liste des contacts et les informations de calendrier entre le périphérique sélectionné et l’ordinateur. BT to Net (Partage de connexion) Autorise le système à accéder à Internet via le réseau partagé par le dispositif Bluetooth. Music Player (Lecteur audio) ASUS CG8565 Permet de lire les fichiers audio sélectionnés contenus sur l’appareil BT via le système de haut-parleurs de l’ordinateur. 221 Lancer et configurer Ai Charger+ Ai Charger+ est une fonction unique pour le chargement USB rapide de dispositifs USB mobiles compatibles avec la norme ����������������������������������������������������� BC 1.1*���������������������������������������������� . La vitesse de chargement peut atteindre une vitesse jusqu’à 3 fois supérieure aux dispositifs USB traditionnels**. • * Consultez la documentation accompagnant votre périphérique mobile pour vérifier s’il supporte le standard BC 1.1. • ** La vitesse de chargement varie en fonction des périphériques USB. • Assurez-vous de retirer puis de reconnecter votre périphérique USB après l’activation ou la désactivation d’ Ai Charger+ pour garantir un chargement normal. Pour exécuter Ai Charger+ : • Cliquez sur� Tool (Outils) > Ai Charger+ à ��������������������������������������������� partir de la barre des menus d’AI Suite II. Français 222 Chapter 6: Using the utilities Menu de surveillance Le menu� Monitor (Surveillance) ��������������������������������� permet de visionner la liste des sondes de surveillance et l’état de la fréquence du CPU. Sensor (Sondes) Le panneau Sensor permet de visionner la liste des sondes surveillant la vitesse de rotation des ventilateurs, la température du CPU et les tensions. Pour ouvrir le panneau de surveillance : •������������ Cliquez sur Monitor (Surveillance) > Sensor (Sondes) à partir de la barre des menus d’AI Suite II pour afficher ce panneau. CPU Frequency� (Fréquence du CPU) Pour ouvrir le panneau de surveillance de la fréquence du CPU �: •������������ Cliquez sur Monitor (Surveillance) > CPU Frequency (Fréquence du CPU) à partir de la barre des menus d’AI Suite II pour afficher ce panneau. Affichage sur le volet d’informations du système ASUS CG8565 Sondes Français Le panneau CPU Frequency affiche la fréquence et l’usage actuel du CPU. Fréquence du CPU 223 Menu de mise à jour du BIOS Le menu Update (Mise à jour) permet de mettre à jour le BIOS et le logo de démarrage de la carte mère. ASUS Update ASUS Update est un utilitaire vous permettant de gérer, sauvegarder et mettre à jour le BIOS de la carte mère sous Windows®. Fonctionnalités d’ASUS Update : Mise à jour directe du BIOS à partir d’Internet, téléchargement de la dernière version du BIOS sur Internet, mise à jour du BIOS à partir d’un fichier BIOS, sauvegarde du fichier BIOS actuel, visualisation des informations de version du BIOS. Mise à jour du BIOS Mise à jour à partir d’Internet Dans la liste des options, sélectionnez Update BIOS from Internet (Mettre à jour le BIOS depuis Internet) et cliquez sur Next (Suivant). 2. Sélectionnez le site FTP ASUS le plus proche. Cochez les deux options disponibles pour activer la mise à niveau inférieure et la sauvegarde automatique du BIOS. 3. Sélectionnez la version du BIOS à télécharger et cliquez sur Next (Suivant). Si aucune nouvelle version du BIOS n’est disponible, un message apparaîtra à l’écran. Français 1. 224 Chapter 6: Using the utilities 4. Cliquez sur Yes (Oui) si vous souhaitez modifier le logo de démarrage du BIOS, soit l’image apparaissant lors du POST (PowerOn Self-Tests). Cliquez sur No (Non) pour continuer. 5. Suivez les instructions apparaissant à l’écran pour compléter la mise à jour. 1. Dans la liste des options, sélectionnez Update BIOS from file (Mettre à jour le BIOS à partir d’un fichier BIOS) puis cliquez sur Next (Suivant). 2. Cliquez sur Browse (Parcourir) pour localiser le fichier du BIOS puis cliquez sur Next (Suivant). 3. Cliquez sur Yes (Oui) pour modifier le logo de démarrage du BIOS, soit l’image apparaissant lors du POST (Power-On Self-Tests). Cliquez sur No (Non) pour continuer. 4. Suivez les instructions apparaissant à l’écran pour compléter la mise à jour. ASUS CG8565 Français Mise à jour à partir d’un fichier BIOS 225 Menu d’informations du système Le menu System Information (Infos système) affiche des informations concernant la carte mère, au CPU et aux modules mémoire. •��������������������� Cliquez sur l’onglet MB (Carte mère) pour afficher les détails sur la fabricant de la carte mère, le nom du produit, la version et le BIOS. Français •��������������������� Cliquez sur l’onglet CPU (Processeur) pour visualiser les informations relatives au processeur et à la mémoire cache. •��������������������� Cliquez sur l’onglet Memory (Mémoire) puis sélectionnez un module mémoire pour afficher les détails sur ce module mémoire. 226 MB CPU Memory Chapter 6: Using the utilities Menu des réglages • Application Permet de sélectionner l’application à activer. • Bar (Barre) Permet de modifier les paramètres de la barre. • Skin (Apparence) Permet de personnaliser le contraste, la luminosité, la saturation, la teinte et la correction gamma de l’interface. ASUS CG8565 Français Cliquez sur Settings (Paramètres) pour personnaliser les options de la barre des menus. 227 ASUS AI Manager ASUS AI Manager est un utilitaire offrant un accès rapide et aisé aux applications les plus fréquemment utilisées. Installer AI Manager Pour installer AI Manager : 1. Placez le DVD de support dans votre lecteur optique. Si l'Exécution automatique est activée, l'assistant d'installation des pilotes apparaît. Si l’Exécution automatique est désactivée sur votre ordinateur, localisez le fichier setup.exe contenu dans le dossier ASUS AI Manager du DVD de support. 2. Cliquez sur l’onglet Utilitaires, puis cliquez sur ASUS AI Manager. 3. Suivez les instructions apparaissant à l’écran pour terminer l’installation. Français Lancer AI Manager Pour démarrer AI Manager depuis le Bureau de Windows®, cliquez sur Démarrer > Tous les programmes > ASUS > AI Manager 1.xx.xx > AI Manager. La barre de lancement rapide d'AI Manager apparaît sur le Bureau. Après avoir démarré l'application, l'icône AI Manager apparaît dans la zone de notification de Windows®. Faites un clic droit sur cette icône pour basculer entre la barre de lancement rapide et la fenêtre principale et démarrer AI Manager. 228 Chapter 6: Using the utilities Barre de lancement rapide La barre de lancement rapide de AI Manager permet de gagner de l’espace à l’écran, lancer les utilitaires ASUS ou afficher les informations système en toute simplicité. Cliquez sur l’onglet Principal, Mes favoris, Support ou Informations pour en afficher le contenu. Fermer Basculer en mode complet Réduire Princicpal Mes favoris Support Informations Menu principal Le menu Principal intègre cinq utilitaires: AI Disk, AI Security et AI Boosting. Cliquez sur les flèches du menu Principal pour faire défiler les utilitaires. Français Cliquez sur le bouton pour basculer entre la barre de lancement rapide et la fenêtre complète. Cliquez sur le bouton Réduire pour conserver AI Manager sur la barre des tâches. Cliquez sur le bouton Fermer pour fermer AI Manager. Cliquez pour étendre ou réduire AI Disk AI Disk permet d’effacer les fichiers temporaires, les cookies, les URL, et l’historique de Internet Explorer, ou de vider la corbeille. Cliquez sur l’icône AI Disk de la barre de lancement rapide pour afficher la fenêtre complète de AI Disk et sélectionnez les éléments à supprimer. Cliquez sur Appliquer une fois terminé. ASUS CG8565 229 AI Security AI Security permet de définir un mot de passe destiné à sécuriser vos périphériques (disque flash USB / CD/DVD) et ainsi empêcher les accès non autorisés. Pour verrouiller un périphérique : 2. Confirmez le mot de passe. 3. Saisissez un indice de mot de passe (recommandé). 4. Une fois terminé, cliquez sur� Ok. 5. Sélectionnez le périphérique à verrouiller puis appuyez sur Appliquer. 6. Entrez le mot de passe précédemment saisi, puis cliquez sur Ok. ������������������������������������������������������������������������������������ 1.Lors de la première utilisation de AI Security, la saisie d’un mot de passe est demandée. Entrez un mot de passe composé d’un maximum de 20 caractères alphanumériques. Français Pour déverrouiller un périphérique : 1. 2.Entrez le mot de passe, puis cliquez sur Ok. Pour modifier le mot de passe : 230 Décochez la case du périphérique à déverrouiller, puis cliquez sur Appliquer. •Cliquez sur Modifier le mot de passe, puis suivez les instructions apparaissant à l’écran pour changer de mot de passe. Chapter 6: Using the utilities AI Booting Pour spécifier la séquence de démarrage : 1. Sélectionnez un périphérique, puis cliquez sur les boutons gauche/droite pour spécifier la séquence de démarrage. 2. Une fois terminé, appuyez sur Appliquer. Mes favoris Mes favoris vous permet d’ajouter à la liste de vos favoris les applications que vous utilisez le plus fréquemment afin d’en faciliter l’accès. Français AI Booting permet de spécifier la séquence de démarrage de vos périphériques. Pour ajouter une application: 1. Cliquez sur Ajouter, puis localisez l’application à ajouter à la liste de vos favoris. 2. Cliquez sur Ouvrir dans la fenêtre d’ouverture de fichier. L’application est ajoutée à la liste Mes favoris. Faites un clic droit sur l’icône de l’application pour démarrer, supprimer, ou renommer l’application sélectionnée. Vous pouvez aussi double cliquer sur l’icône pour démarrer l’application sélectionnée. ASUS CG8565 231 Support Cliquez sur l’un des liens de la fenêtre Support pour accéder à l’un des sites Web d’ASUS (site Web international, site Web d’assistance en ligne, site de téléchargement, et informations de contact). Français 232 Informations Cliquez sur l’un des onglets de la fenêtre Informations pour afficher des informations détaillées sur votre ordinateur (système, carte mère, CPU, BIOS, périphériques installés, et modules mémoire). Chapter 6: Using the utilities Nero 9 Installer Nero 9 Pour installer Nero 9 : 1. Insérez le DVD de Nero 9 DVD dans votre lecteur optique. 2. Si l’Exécution automatique est activée, le menu principal apparaît automatiquement à l’écran. Français Nero 9 vous permet de créer, copier, graver, éditer, partager et mettre à jour différents types de données. Si l’Exécution automatique est désactivée sur votre ordinateur, localisez le fichier SeupX.exe contenu dans le répertoire principal du DVD de Nero 9. 3. Dans le menu principal, cliquez sur Nero 9 Essentials. ASUS CG8565 233 Français 234 4. Sélectionnez la langue de l’assistant d’installation. Cliquez sur Suivant. 5. Cliquez sur Suivant pour continuer. 6. Cochez la case J’accepte les conditions du contrat de licence. Une fois terminé, cliquez sur Suivant. Chapter 6: Using the utilities Sélectionnez Normale puis cliquez sur Suivant. 8. Cochez la case Oui, je veux aider en envoyant des données d’applications anonymes à Nero puis cliquez sur Suivant. 9. Une fois terminé, cliquez sur Quitter. ASUS CG8565 Français 7. 235 Graver des fichiers Pour graver des fichiers : Français 236 1. À partir du menu principal, cliquez sur Gravure de données > Ajouter. 2. Sélectionnez les fichiers à graver. Une fois terminé, cliquez sur Ajouter. Chapter 6: Using the utilities Après avoir sélectionné les fichiers à graver, cliquez sur Graver pour lancer la gravure des fichiers sur un disque. Pour plus de détails sur l’utilisation de Nero 9, référez-vous au site Web de Nero sur www.nero.com Restaurer le système Français 3. Utiliser la partition de restauration La partition de restauration permet de restaurer les logiciels de votre ordinateur à leur état de fonctionnement initiale. Avant d’utiliser la partition de restauration, copiez vos données (telles que les fichiers PST de Outlook) vers des disques de stockage ou un lecteur réseau, et veillez à noter vos configurations personnalisées (telles que votre configuration réseau). À propos de la partition de restauration La partition de restauration est un espace dédié de votre disque dur ; elle est utilisée pour restaurer le système d’exploitation, les pilotes et les utilitaires installés sur votre ordinateur à sa sortie d’usine. IMPORTANT : NE PAS EFFACER LA PARTITION NOMMÉE “RECOVERY”. La partition de restauration a été créée à l’usine et ne peut être restaurée par l’utilisateur si elle est effacée. Apportez votre PC portable à un service après-vente agréé par ASUS si vous rencontrez des problèmes lors de la procédure de restauration. Utiliser la partition de restauration : 1. Appuyez sur [F9] pendant le démarrage. 2. Appuyez sur [Entrée] pour sélectionner Windows Setup [EMS Enabled]. ASUS CG8565 237 3. Sélectionnez l’une des méthodes de restauration suivantes. System Recovery: System Image Backup: Cette option permet de restaurer le système dans sa configuration d’usine. Cette option vous permet de graver une image du système d’exploitation sur un DVD, pour une restauration future du système dans sa configuration d’usine. System DVD Backup: 4. Suivez les instructions à l’écran pour terminer la procédure de restauration. Cette option permet de créer une copie de sauvegarde du DVD de support. Veuillez vous rendre sur le site www.asus.com pour une mise à jour des pilotes et des utilitaires. Utiliser le DVD de restauration (sur une sélection de modèles) Français Préparez suffisement de DVD vierges (entre 1 et 3) pour créer un DVD de restauration. Retirez tout disque dur externe connecté à l’ordinateur avant d’effectuer la restauration du système. Selon Microsoft, vous risquez de perdre des données importantes en installant Windows sur le mauvais disque dur ou en formatant la partition du mauvais disque dur. Pour utiliser le DVD de restauration : 1. Insérez le DVD de Restauration dans le lecteur optique. L’ordinateur doit être SOUS TENSION. 2. Redémarrez l’ordinateur et appuyez sur <Echap> au démarrage, puis sélectionnez le lecteur optique (apparaît normalement comme “CD/DVD”) grâce au curseur. Appuyez ensuite sur <Entrée> pour démarrer à partir du DVD de Restauration. 3. Sélectionnez OK pour lancer la restauration de l’image. 4. Sélectionnez OK pour lancer la restauration du système. La restauration supprimera les données de votre disque dur. Assurez-vous de sauvegarder vos données importantes avant de restaurer le système. 5. Suivez les instructions à l’écran pour compléter la procédure de restauration. Ne retirez pas le DVD de Restauration (à moins que vous y soyez invité) durant la procédure de restauration, ou vos partitions seront inutilisables. Veuillez visiter www.asus.com pour obtenir les pilotes et les utilitaires mis à jour. 238 Chapter 6: Using the utilities Chapitre 7 Dépannage Dépannage Ce chapitre présente les problèmes éventuels et leurs solutions que vous serez peut être amené à rencontrer lors de l’utilisation de votre ordinateur. ? ? ? Mon ordinateur ne s’allume pas et le voyant LED d’alimentation du panneau avant reste éteint • Vérifiez que tous les câbles de l’ordinateur sont correctement connectés. • Vérifiez que votre prise électrique murale fonctionne correctement. • Vérifiez que la position de l’interrupteur du bloc d’alimentation soit bien sur la position “I” (sous tension). Référez-vous à la section Allumer ou éteindre l’ordinateur du Chapitre 1. Français ? Mon ordinateur se bloque • Suivez les instructions suivantes pour fermer les programmes ne répondant plus : 1.Appuyez simultanément sur les touches <Alt> + <Ctrl> + <Suppr> du clavier, puis cliquez sur Gestionnaire des tâches. 2. Cliquez sur l’onglet Applications. 3. Sélectionnez le programme à fermer, puis cliquez sur Fin de tâche. • Si le clavier est défaillant, maintenez enfoncé le bouton d’alimentation du châssis jusqu’à ce que l’ordinateur s’éteigne. Puis, appuyez de nouveau sur le bouton d’alimentation pour le rallumer. Je ne peux pas me connecter à un réseau sans fil via une carte réseau sans fil ASUS* (*disponible sur une sélection de modèles). • Assurez-vous d’avoir entrer la clé de sécurité appropriée pour le réseau sans fil auquel vous souhaitez vous connecter. • Connectez les antennes externes (optionnel) aux connecteurs pour antenne de la carte réseau sans fil ASUS et placez les antennes sur le châssis de l’ordinateur pour une meilleure qualité de signal sans fil. Les touches fléchées du pavé numérique ne répondent pas. ASUS CG8565 Assurez-vous que la touche de verrouillage des majuscule (Verr. maj.) du clavier ne soit pas activée. Si celle-ci est activée, les touches du pavé numérique ne peuvent être utilisée que pour la saisie de chiffres. Désactivez cette touche pour pouvoir utiliser les touches fléchées. 239 ? ? Français ? ? Aucun contenu affiché sur le moniteur. • Vérifiez que le moniteur est bien allumé. • Assurez-vous que votre moniteur est correctement connecté au port de sortie vidéo de votre ordinateur. • Si votre ordinateur intègre une carte graphique, assurez-vous que votre moniteur est correctement connecté au port de sortie vidéo de la carte. • Vérifiez que les broches du connecteur vidéo du moniteur ne sont pas pliées. Si c’est le cas, remplacez le câble vidéo du moniteur. • Vérifiez que le moniteur est connecté à une source d’alimentation. • Référez-vous à la documentation accompagnant votre moniteur pour plus d’informations de dépannage. Lors de l’utilisation de plusieurs moniteurs, un seul d’entre eux affiche du contenu. • Assurez-vous que les deux moniteurs sont allumés. • Lors du POST, seul le moniteur connecté au port VGA peut afficher du contenu. Le double affichage ne fonctionne que sous Windows. • Si votre ordinateur intègre une carte graphique, assurez-vous que votre moniteur est correctement connecté au port de sortie vidéo de la carte. • Vérifiez les paramètres d’affichage. Voir section Connecter plusieurs périphériques d’affichage du Chapitre 3 pour plus de détails. L’ordinateur ne détecte pas le périphérique de stockage USB externe. • Lors de la première connexion de votre périphérique de stockage USB à votre ordinateur, Windows installe automatiquement le pilote approprié. Patientez un moment et ouvrez le volet de navigation Ordinateur pour vérifier si le périphérique de stockage a bien été détecté. • Connectez votre périphérique de stockage USB à un autre ordinateur pour tester son fonctionnement. Je souhaite restaurer ou annuler les paramètres système de mon ordinateur sans que cela n’affecte mes données personnelles. 240 La fonction Restauration du système de Windows® vous permet de restaurer ou annuler certains paramètres du système sans que cela n’affecte vos données personnelles (ex : photos, documents). Pour plus de détails, référezvous à la section Restaurer votre système du Chapitre 2. Chapter 7: Troubleshooting L’image sur mon téléviseur HD déborde de l’écran. • Ce problème est causé par les différentes résolutions prises en charge par votre moniteur et votre téléviseur HD. Ajustez le résolution d’écran de sorte à ce que la totalité du contenu s’affiche correctement. Pour modifier la résolution de votre écran : 1. Suivez l’une des méthodes suivantes pour ouvrir l’écran Résolution d’écran : • Cliquez sur > Panneau de configuration > Apparence et personnalisation > Affichage > Modifier les paramètres d’affichage. ? 2.Référez-vous à la documentation accompagnant votre téléviseur HD pour plus d’informations sur le changement de résolution. 3.Cliquez sur Appliquer ou sur OK. Puis cliquez sur Conserver les modifications à l’apparition du message de confirmation. Mon système de haut-parleurs n’émet pas de son. • Assurez-vous d’avoir connecté votre système de haut-parleurs au port de sortie audio (vert) situé en façade ou à l’arrière du châssis. • Vérifiez votre système de haut-parleurs est connecté à une source d’alimentation et allumé. • Ajustez le volume de votre système de haut-parleurs. • Assurez-vous que le son de votre ordinateur n’a pas été désactivé. • Si le son a été désactivé, l’icône de volume apparaît . Pour activer le son du système, cliquez sur l’icône de la zone de notification de Windows, puis cliquez sur . • • ? ? • F aites un clic droit n’importe où sur le Bureau de Windows. Dans le menu contextuel, cliquez sur Personnaliser > Affichage > Modifier les paramètres d’affichage. Si le son n’a pas été désactivé, cliquez sur volume à l’aide du curseur. Français ? et ajustez le niveau du Connectez votre système de haut-parleurs à un autre ordinateur pour vérifiez qu’il fonctionne correctement. Le lecteur de DVD ne parviens pas à lire un disque. • Vérifiez que la position du disque dans le plateau est correcte. • Vérifiez que le disque est bien centré dans le plateau. En particulier si le disque est de taille ou de forme non standard. • Assurez-vous que le disque ne soit pas rayé ou endommagé. Le bouton d’éjection du lecteur DVD ne fonctionne pas. > Ordinateur. 1. Cliquez sur 2. Faites un clic droit sur ASUS CG8565 , puis cliquez sur Éjecter. 241 Alimentation Problème Pas d’alimentation (l’indicateur d’alimentation est éteint) Action Français Voltage incorrect • P lacez l’interrupteur d’alimentation sur le type de voltage supporté dans votre pays/région. • Ajustez les paramètres de voltage. Assurez-vous que le cordon d’alimentation n’est pas raccordé à une prise électrique. L’ordinateur n’est pas allumé Appuyez sur le bouton de mise en route situé à l’avant du châssis. Le cordon d’alimentation n’est pas correctement raccordé • A ssurez-vous que le cordon d’alimentation est correctement raccordé. • Utilisez un autre cordon d’alimentation. Dysfonctionnement du bloc d’alimentation Essayez d’installer un autre bloc d’alimentation dans le châssis de l’ordinateur. Raison possible Action Le câble de signal vidéo n’est pas connecté au port d’affichage approprié de votre ordinateur • C onnectez le câble de signal au port d’affichage approprié de l’ordinateur (port d’affichage dédié de la carte mère ou port d’affichage de la carte graphique). • Si vous utilisez une carte graphique, connectez le câble de signal vidéo au port d’affichage de la carte graphique. Câble de signal endommagé Essayez de connecter l’ordinateur à un autre périphérique d’affichage externe. Affichage Problème Aucun affichage après la mise en route de l’ordinateur (écran noir) 242 Raison possible Chapter 7: Troubleshooting Réseau Impossible d’accéder à Internet Raison possible Action Problème de câble réseau Assurez-vous que le voyant réseau est allumé. Si ce n’est pas le cas, utilisez un autre câble. Si le problème persiste, contactez le service après vente d’ASUS. L’ordinateur n’est pas correctement connecté à un routeur ou hub réseau Assurez-vous que votre ordinateur est correctement raccordé à un routeur ou un hub réseau. Paramètres réseau Contactez votre FAI (Fournisseur d’accès à Internet) pour obtenir les paramètres réseau appropriés. Le câble réseau n’est pas connecté Problème causé par un logiciel anti-virus Problème de pilote logiciel Connectez le câble réseau à votre ordinateur. Fermez le logiciel anti-virus. Réinstallez le pilote réseau Audio Problème Raison possible Le système de hautparleurs ou le casque audio est connecté au mauvais port audio Pas de son Le système de hautparleurs ou le casque audio ne fonctionne pas Les ports audio avants et arrières ne fonctionnent pas Problème de pilote logiciel ASUS CG8565 Français Problème Action • R eportez-vous au manuel d’utilisation de l’ordinateur pour localiser l’emplacement de chaque port audio. • Déconnectez puis reconnectez le système de haut-parleurs ou le casque à votre ordinateur. Essayez d’utiliser un autre système de haut-parleurs ou casque audio. Essayez les ports audio avants et arrières. Si l’un des ports ne fonctionne pas, vérifiez qu’il est défini en mode multi-canal. Réinstallez le pilote audio. 243 Système Problème Le système est trop lent Français Le système se bloque fréquemment Raison possible Trop de programmes en cours d’exécution Fermez les programmes non utilisés. Attaque de virus informatique • U tilisez un logiciel anti-virus pour localiser et éliminer les virus informatiques présents sur votre ordinateur. • Réinstallez le système d’exploitation. Dysfonctionnement du disque dur • Envoyez le disque dur endommagé au service après-vente d’ASUS. • Remplacez le disque dur défectueux. Problème causé par les modules mémoire • R emplacez les modules mémoire incompatibles. • Enlevez les modules mémoire additionnels installés. Ventilation du système insuffisante Déplacez votre ordinateur dans un endroit offrant une meilleure circulation de l’air. Installation de logiciels incompatibles 244 Action éinstallez le système d’exploitation R et n’installez que des logiciels compatibles. Chapter 7: Troubleshooting Problème Système trop bruyant lors de la mise en route de l’ordinateur Système trop bruyant lors de son utilisation Raison possible Action Votre ordinateur est en cours de démarrage Ceci est normal. Le ventilateur fonctionne à sa vitesse maximale lors de la mise en route du système. La vitesse du ventilateur diminuera lors de l’accès au système d’exploitation. Les paramètres du BIOS ont été modifiés Restaurez les paramètres par défaut du BIOS. Version de BIOS Mettez à jour le BIOS dans sa version la plus récente. Visitez le site Web de support d’ASUS sur http:// support.asus.com pour télécharger la dernière version du BIOS. Le ventilateur du processeur à été remplacé Assurez-vous d’utiliser un ventilateur de CPU compatible ou recommandé par ASUS. Ventilation insuffisante Déplacez votre ordinateur dans un endroit offrant une meilleure circulation de l’air. La température du système est trop élevée • M ettez le BIOS à jour. • Si vous savez comment réinstaller la carte mère, essayez de nettoyer l’espace localisé sous la carte. Français Processeur Si cette section ne vous a pas aidé à résoudre votre problème, reportez-vous à la carte de garantie de votre ordinateur de bureau et contactez le service après-vente d’ASUS. Visitez le site Web de support d’ASUS sur http://support.asus.com pour obtenir les coordonnées du service après-vente le plus proche. ASUS CG8565 245 Informations de contact ASUS ASUSTeK COMPUTER INC. Adresse Téléphone Fax E-mail Site Web Support technique Téléphone Support en ligne 15 Li-Te Road, Peitou, Taipei, Taiwan 11259 +886-2-2894-3447 +886-2-2890-7798 [email protected] www.asus.com.tw +86-21-38429911 support.asus.com ASUS COMPUTER INTERNATIONAL (Amérique) Adresse Téléphone Fax Site Web Support technique Téléphone Support fax Support en ligne ASUS France SARL Adresse Téléphone Site Web Support technique Téléphone Fax Support en ligne 800 Corporate Way, Fremont, CA 94539, USA +1-510-739-3777 +1-510-608-4555 usa.asus.com +1-812-282-2787 +1-812-284-0883 support.asus.com 10, Allée de Bienvenue, 93160 Noisy Le Grand, France +33 (0) 1 49 32 96 50 www.france.asus.com +33 (0) 8 21 23 27 87 +33 (0) 1 49 32 96 99 support.asus.com Fabricant ASUSTeK Computer Inc. Adresse No.150, LI-TE RD., PEITOU, TAIPEI 112, TAIWAN Représentant légal en Europe ASUS Computer GmbH Adresse HARKORT STR. 21-23, 40880 RATINGEN, ALLEMAGNE Equipo de sobremesa ASUS Essentio CG8565 Manual del usuario S6763 Primera edición Agosto 2011 Copyright © 2011 ASUSTeK Computer Inc. Todos los derechos reservados. Español Se prohíbe la reproducción, transmisión, transcripción, almacenamiento en un sistema de recuperación o traducción a cualquier idioma de este manual, íntegra o parcialmente, incluidos los productos y el software que en él se describen, de ninguna forma ni a través de ningún medio, a excepción de que tales actividades sean llevadas a cabo por el comprador con fines de conservación, sin autorización expresa por escrito de ASUSTeK Computer Inc. (“ASUS”). La garantía y los servicios de reparación vinculados al producto no serán de aplicación si: (1) el producto ha sido reparado, modificado o alterado, a excepción de que tal reparación, modificación o alteración haya sido autorizada por escrito por ASUS; o (2) no sea posible determinar el número de serie del producto o aquél no se encuentre presente. ASUS PROPORCIONA ESTE MANUAL “TAL CUAL”, SIN GARANTÍAS DE NINGÚN TIPO, NI EXPRESAS NI IMPLÍCITAS, INCLUIDAS, ENTRE OTRAS, LAS GARANTÍAS IMPLÍCITAS O CONDICIONES DE COMERCIABILIDAD O AJUSTE A UNA FINALIDAD EN PARTICULAR. NI ASUS, NI SUS DIRECTORES, RESPONSABLES, EMPLEADOS O AGENTES SERÁN RESPONSABLES DE NINGÚN DAÑO INDIRECTO, ESPECIAL, ACCIDENTAL O CONSECUENTE (INCLUIDOS AQUÉLLOS DERIVADOS DE PÉRDIDAS DE BENEFICIOS, PÉRDIDAS DE OPORTUNIDADES COMERCIALES, IMPOSIBILIDAD DE USAR EL EQUIPO, PÉRDIDAS DE DATOS, INTERRUPCIONES DE LA ACTIVIDAD COMERCIAL Y OTROS PERJUICIOS DE CARÁCTER SIMILAR), AÚN CUANDO ASUS HAYA SIDO ADVERTIDA DE LA POSIBILIDAD DE QUE TALES DAÑOS TENGAN LUGAR COMO RESULTADO DE ALGÚN DEFECTO O ERROR EN ESTE MANUAL O EN EL PRODUCTO. LAS ESPECIFICACIONES Y LA INFORMACIÓN QUE CONTIENE ESTE MANUAL SE PONEN A DISPOSICIÓN DEL PROPIETARIO CON FINES EXCLUSIVAMENTE INFORMATIVOS; AMBAS SE ENCUENTRAN SUJETAS A CAMBIOS EN CUALQUIER MOMENTO SIN AVISO PREVIO Y NO DEBEN CONSIDERARSE UN COMPROMISO EMPRENDIDO POR ASUS. ASUS NO ASUME RESPONSABILIDAD U OBLIGACIÓN ALGUNA EN RELACIÓN CON AQUELLOS ERRORES O IMPRECISIONES QUE ESTE MANUAL PUDIERA CONTENER, INCLUIDOS LOS PRODUCTOS Y EL SOFTWARE QUE EN ÉL SE DESCRIBEN. Los nombres de productos y empresas que aparecen en este manual podrían ser o no marcas comerciales registradas o estar vinculados a derechos de autor en posesión de sus respectivas empresas propietarias; su uso se lleva a cabo exclusivamente con fines de identificación y explicación y en beneficio del propietario del producto, sin intención alguna de infringir los derechos indicados. 248 Índice Avisos ....................................................................................................... 251 Información de seguridad........................................................................... 253 Convenciones a las que se atiene esta guía.............................................. 254 Más información......................................................................................... 254 Contenido del paquete............................................................................... 255 Capítulo 1 Primeros pasos ¡Bienvenido!................................................................................................ 257 Familiarícese con el equipo........................................................................ 257 Instalación del equipo................................................................................. 262 Encendido/apagado del equipo.................................................................. 265 Capítulo 2 Uso de Windows® 7 Primer inicio del equipo.............................................................................. 267 Uso del escritorio de Windows® 7............................................................... 268 Administración de archivos y carpetas....................................................... 270 Restauración del sistema........................................................................... 272 Protección del equipo................................................................................. 273 de Windows®............................................................................................. 274 Capítulo 3 Conexión de dispositivos al equipo Conexión de un dispositivo de almacenamiento USB................................ 275 Conexión de un micrófono y unos auriculares........................................... 276 Español Uso de la función Help and Support (Ayuda y soporte técnico) Conexión de varias pantallas externas....................................................... 279 Conexión de un televisor HDTV................................................................. 281 Capítulo 4 Uso del equipo Postura correcta durante el uso del PC de sobremesa.............................. 283 Uso del lector de tarjetas de memoria........................................................ 284 Uso de la unidad óptica.............................................................................. 285 Utilizar el teclado para juegos ASUS ROG U9N......................................... 286 Utilizar el ratón para juegos ASUS GX900................................................. 287 Capítulo 5 Conexión a Internet Conexión por cable..................................................................................... 295 249 Índice Capítulo 6 Uso de las utilidades ASUS AI Suite II.......................................................................................... 297 ASUS AI Manager....................................................................................... 310 Nero 9 ....................................................................................................... 315 Recuperación del sistema.......................................................................... 319 Capítulo 7 Resolución de problemas Resolución de problemas........................................................................... 321 Español 250 Avisos REACH En cumplimiento del marco reglamentario REACH (Registro, evaluación, autorización y restricción de productos químicos), hemos publicado las sustancias químicas que contienen nuestros productos a través del sitio web ASUS REACH, al que es posible acceder a través de la dirección http://green.asus.com/english/REACH.htm. Declaración de la Comisión Federal de las Comunicaciones Este dispositivo satisface los requisitos establecidos en el Apartado 15 de la normativa FCC. Su funcionamiento se encuentra sujeto a las dos condiciones siguientes: • este dispositivo no puede causar interferencias perjudiciales; y este dispositivo debe aceptar cualquier interferencia recibida, incluidas aquéllas que pudieran causar un funcionamiento no deseado. Este equipo ha sido probado y se ha determinado que no excede los límites establecidos para un dispositivo digital de Clase B, de acuerdo con el Apartado 15 de la normativa FCC. Tales límites han sido diseñados para proporcionar un nivel de protección razonable contra interferencias perjudiciales en una instalación residencial. Este equipo genera, usa y puede irradiar energía de radiofrecuencia y, si no se instala y usa de acuerdo con las instrucciones del fabricante, podría causar interferencias perjudiciales para las comunicaciones por radio. No es posible, no obstante, garantizar que no se produzcan interferencias en una instalación particular. Si este equipo causa interferencias perjudiciales para la recepción de ondas de radio o televisión, lo cual puede determinarse encendiéndolo y apagándolo, se recomienda al usuario tratar de corregir la interferencia poniendo en práctica una o más de las siguientes medidas: • Cambiar la orientación o ubicación de la antena receptora. • Aumentar la separación entre el equipo y el receptor. • Pedir ayuda al distribuidor o a un técnico experto en radio o televisión. • Conectar el equipo a una toma de suministro eléctrico perteneciente a un circuito diferente de aquél al que se encuentra conectado el receptor. Español • El monitor debe conectarse a la tarjeta gráfica empleando un cable blindado con objeto de garantizar el cumplimiento de la normativa FCC. Los cambios o modificaciones no autorizados expresamente por la parte responsable del cumplimiento podrían anular la autorización del usuario para usar el equipo. 251 Advertencia acerca de la exposición a ondas de radiofrecuencia Este equipo debe instalarse y utilizarse de acuerdo con las instrucciones suministradas. La antena o antenas que emplea este transmisor deben instalarse de modo que mantengan una distancia mínima de separación de 20 cm con cualquier persona y no deben ubicarse junto a otra antena o transmisor ni funcionar en conjunto con tales componentes. A fin de satisfacer los requisitos de conformidad con los límites de exposición a ondas de radiofrecuencia, deben hacerse llegar las instrucciones de instalación de la antena y las condiciones de funcionamiento del transmisor a los usuarios finales e instaladores. Declaración del Departamento Canadiense de Comunicaciones Este aparato digital no supera los límites de emisión de ruido de radio establecidos para aparatos digitales de Clase B en la normativa de interferencias de radio del Departamento Canadiense de Comunicaciones. Este aparato digital de Clase B satisface los requisitos de la norma canadiense ICES-003. Aviso de Macrovision Corporation acerca del producto Este producto incorpora una tecnología de protección de los derechos de autor protegida por métodos descritos en ciertas patentes de los EE. UU. y otros derechos de propiedad intelectual en posesión de Macrovision Corporation y otros titulares legales. El uso de esta tecnología de protección de los derechos de autor debe ser autorizado por Macrovision Corporation y está destinado a la restricción de la visualización en entornos domésticos y otros de carácter limitado, a menos que Macrovision Corporation autorice lo contrario. Se prohíben las prácticas de ingeniería inversa o desmontaje. Advertencia acerca de la batería de ion-litio Español PRECAUCIÓN: La sustitución incorrecta de la batería podría constituir un peligro de explosión. Sustituya la batería únicamente por otra similar o de tipo equivalente recomendado por el fabricante. Elimine las baterías usadas de acuerdo con las instrucciones proporcionadas por el fabricante. Servicios de reciclaje/retorno de ASUS Los programas de reciclaje y retorno de ASUS emanan de nuestro compromiso con el cumplimiento de las normas más estrictas en materia de protección medioambiental. Como parte de dicho compromiso, proporcionamos a nuestros clientes los medios necesarios para reciclar de forma responsable nuestros productos, baterías y demás componentes, así como los materiales empleados en el embalaje de los mismos. Visite el sitio web http://csr.asus. com/english/Takeback.htm si desea obtener información detallada acerca de los servicios de reciclaje disponibles en las diferentes regiones. 252 Información de seguridad Desconecte el cable de alimentación AC y todos los periféricos conectados antes de limpiar el equipo. Limpie el equipo de sobremesa empleando una esponja de celulosa limpia o una gamuza humedecida en una solución de detergente suave y algunas gotas de agua templada; elimine después la humedad restante con un paño seco. • • • • • • • • • • • • NO coloque el equipo sobre una superficie irregular o inestable. Solicite asistencia técnica si la carcasa resulta dañada. NO instale el equipo en entornos sometidos a niveles elevados de suciedad o polvo. NO use el equipo durante una fuga de gas. NO coloque objetos ni los deje caer sobre la parte superior del equipo de sobremesa; no introduzca materiales extraños en el interior del mismo. NO someta el equipo a campos magnéticos o eléctricos de gran intensidad. NO exponga el equipo a líquidos, lluvia o humedad, ni lo use cerca de ninguno de tales elementos. NO use el módem durante tormentas eléctricas. Advertencia de seguridad acerca de la batería: NO elimine la batería arrojándola al fuego. NO cortocircuite los contactos de la batería. NO desmonte la batería. Use este producto en entornos sometidos a una temperatura ambiente comprendida entre 0 ˚C (32 ˚F) y 35 ˚C (95 ˚F). NO cubra los orificios de ventilación del equipo de sobremesa para evitar que el sistema se caliente en exceso. NO use cables de alimentación, accesorios o periféricos de otro tipo dañados. A fin de evitar posibles descargas eléctricas, desconecte el cable de alimentación de la toma de suministro eléctrico antes de cambiar la posición del sistema. Consulte con un profesional antes de usar un adaptador o cable prolongador. Tales dispositivos podrían impedir el correcto funcionamiento del circuito de conexión a tierra. Asegúrese de que la fuente de alimentación se encuentre configurada al nivel de voltaje correspondiente a su región. Si no está seguro del nivel de voltaje que entrega la toma de suministro eléctrico que está usando, póngase en contacto con la compañía eléctrica. Español • No intente reparar la fuente de alimentación personalmente si se avería. Póngase en contacto con un técnico de mantenimiento autorizado o con su distribuidor. 253 Convenciones a las que se atiene esta guía Con objeto de garantizar la correcta puesta en práctica de ciertas tareas, se recomienda al usuario familiarizarse con los siguientes símbolos, que encontrará a lo largo de este manual. PELIGRO/ADVERTENCIA: Información destinada a mitigar la posibilidad de lesión personal al efectuar una tarea. PRECAUCIÓN: Información destinada a mitigar la posibilidad de dañar los componentes al efectuar una tarea. IMPORTANTE: Instrucciones que SE DEBEN respetar al llevar a cabo una tarea. NOTA: Sugerencias e información complementaria que facilitan al usuario la realización de una tarea. Más información Consulte las siguientes fuentes si desea obtener más información o mantenerse al día en cuanto a las actualizaciones del producto y el software. Español 254 Sitios web de ASUS El sitio web de ASUS contiene la información más reciente acerca de los productos de hardware y software ASUS. Visite el sitio web de ASUS: www.asus.com. Sitio web de asistencia técnica local de ASUS Si desea obtener información de contacto acerca de su ingeniero de asistencia técnica local, visite el sitio web de ASUS: http://support.asus.com/contact. Contenido del paquete Equipo de sobremesa ASUS Essentio Paquete de teclado para juegos ASUS ROG U9N x1 Paquete de ratón para juegos ASUS GX900 x1 Cable de alimentación x 1 DVD con el software de grabación Nero 9 x 1 (opcional) Guía de instalación x 1 Tarjeta de garantía x 1 Soporte para DVD x1 (opcional) DVD de recuperación x1 (opcional) • Si alguno de los artículos anteriores falta o se encuentra dañado, póngase en contacto con su distribuidor. Español Installation Guide • Las ilustraciones de los artículos anteriores deben interpretarse únicamente como referencia. Las especificaciones del producto real podrían variar en función del modelo. • Para obtener detalles sobre el uso del teclado y ratón para juegos incluidos, consulte la secciones Utilizar el teclado para juegos ASUS ROG y Utilizar el ratón para juegos ASUS GX900. 255 Español 256 Capítulo 1 Primeros pasos ¡Bienvenido! Gracias por adquirir un equipo de sobremesa ASUS Essentio CG8565. El equipo de sobremesa ASUS Essentio CG8565 desarrolla un elevado rendimiento, proporciona la máxima fiabilidad sin compromisos y permite al usuario disfrutar como centro de un útil entorno. Todas estas características se concentran en el interior de una atractiva, futurista y elegante carcasa. Lea la Tarjeta de garantía de ASUS antes de comenzar a instalar su nuevo equipo de sobremesa ASUS. Familiarícese con el equipo Las ilustraciones que aparecen a continuación deben emplearse sólo como referencia. Los puertos y su ubicación, así como el color del chasis, podrían variar en función del modelo. 8 7 6 9 10 11 12 Español Panel frontal 1 2 3 4 5 ASUS CG8565 257 1. Botón de encendido. Presione este botón para encender el equipo. 2. Ranura para tarjetas Secure Digital™ / MultiMediaCard.Inserte una tarjeta Secure Digital™ o MultiMediaCard en esta ranura. 3. Bahía de unidad de disco óptico. Contiene una unidad de disco óptico. 4. Bahía de intercambio en caliente (vacía). En esta bahía, puede instalar una unidad de disco duro adicional. 5. LED de alimentación. Este LED se ilumina cuando enciende el equipo. 6. Ranura para tarjetas Memory Stick™ / Memory Stick Pro™. Inserte una tarjeta Memory Stick™ / Memory Stick Pro™ en esta ranura. • NO conecte un teclado/ratón a un puerto USB 3.0 sin instalar antes un sistema operativo Windows®. • Debido a las limitaciones que presenta el controlador USB 3.0, los dispositivos USB 3.0 sólo se pueden usar en sistemas operativos Windows® y después de instalar el controlador USB 3.0. • Los dispositivos USB 3.0 sólo se pueden usar como almacenes de datos. • Se recomienda encarecidamente conectar los dispositivos USB 3.0 a puertos USB 3.0; ello les permitirá desarrollar toda su velocidad y rendimiento. Español 7. Ranura para tarjetas CompactFlash® / Microdrive™. Inserte una tarjeta CompactFlash® / Microdrive™ en esta ranura. 8. Botón OC. Este botón permite ajustar el perfil System Level Up (Subir de nivel el sistema) del equipo. 9. Puertos USB 3.0. Estos puertos de Bus serie universal 3.0 (USB 3.0) admiten la conexión de dispositivos USB 3.0 como ratones, impresoras, escáneres, cámaras y PDAs, entre otros. 10. Puertos USB 2.0. Estos puertos de Bus serie universal 2.0 (USB 2.0) admiten la conexión de dispositivos USB 2.0 como ratones, impresoras, escáneres, cámaras y PDAs, entre otros. 11. Puerto de micrófono. Este puerto permite conectar un micrófono. 12. Puerto de auriculares. Este puerto permite conectar unos auriculares o un juego de altavoces. 258 Capítulo 1: Primeros pasos Panel posterior 16 E-SATA 1 2 13 3 17 4 18 5 7 8 9 19 6 20 21 10 11 12 13 14 15 2. Puerto E-SATA. Este puerto permite conectar una unidad de disco duro o una unidad de disco óptica. 3.����������������������������� Puerto de salida S/PDIF_OUT. Este puerto permite conectar un dispositivo de salida de audio externo empleando un cable óptico S/PDIF. 4.�������������� Puerto HDMI. Este puerto permite conectar dispositivos High-Definition Multimedia Interface (HDMI) y es compatible con la tecnología HDCP, por lo que admite la reproducción de discos HD DVD, Blu-ray y otros soportes protegidos. Español 1.������������������ Puertos USB 2.0. Estos puertos de Bus serie universal 2.0 (USB 2.0) admiten la conexión de dispositivos USB 2.0 como ratones, impresoras, escáneres, cámaras y PDAs, entre otros. 5.�������������� Puerto DVI-D. Este puerto permite conectar dispositivos con interfaz DVI-D y es compatible con la tecnología HDCP, por lo que admite la reproducción de discos HD DVD, Blu-ray y otros soportes protegidos. 6. Puertos USB 3.0. Estos puertos de Bus serie universal 3.0 (USB 3.0) admiten la conexión de dispositivos USB 3.0 como ratones, impresoras, escáneres, cámaras y PDAs, entre otros. • NO conecte un teclado/ratón a un puerto USB 3.0 sin instalar antes un sistema operativo Windows®. • Debido a las limitaciones que presenta el controlador USB 3.0, los dispositivos USB 3.0 sólo se pueden usar en sistemas operativos Windows® y después de instalar el controlador USB 3.0. • Los dispositivos USB 3.0 sólo se pueden usar como almacenes de datos. • Se recomienda encarecidamente conectar los dispositivos USB 3.0 a puertos USB 3.0; ello les permitirá desarrollar toda su velocidad y rendimiento. ASUS CG8565 259 7.��������������������������������������������� Puerto de salida de altavoz lateral (gris). Este puerto permite conectar un altavoz lateral en la configuración de audio de 8 canales. 8. Puerto de salida de altavoz posterior (negro) Este puerto permite conectar un altavoz posterior en las configuraciones de audio de 4, 6 y 8 canales. 9.����������������������������������������������� Puerto de altavoz central/subwoofer (naranja). Este puerto permite conectar un altavoz central/subwoofer. 10.����������������������������� Puerto de micrófono (rosa). Este puerto permite conectar un micrófono. 11.����������������������������������� Puerto de salida de línea (lima). Este puerto permite conectar unos auriculares o un juego de altavoces. En una configuración de 4, 6 u 8 canales, este puerto se convierte en salida de altavoz frontal. 12.����������������������������������������� Puerto de entrada de línea (azul claro). Este puerto permite conectar un reproductor de cinta, CD o DVD, o una fuente de audio de otro tipo. Configuración de audio de 2, 4, 6 u 8 canales Puerto Auriculares 2 canales 4 canales 6 canales Azul claro Entrada de línea Entrada de línea Entrada de línea Entrada de línea Lima Salida de línea Salida de altavoz frontal Salida de altavoz frontal Salida de altavoz frontal Rosa Entrada de micrófono Entrada de micrófono Entrada de micrófono Entrada de micrófono Naranja – – Altavoz central/ subwoofer Altavoz central/ subwoofer Negro – Salida de altavoz posterior Salida de altavoz posterior Salida de altavoz posterior Gris – – – Salida de altavoz lateral 8 canales Español 13. Orificios de ventilación. Estos orificios están destinados a la ventilación del equipo. NO obstruya ni cubra los orificios de ventilación del chasis. Garantice siempre la ventilación correcta al equipo. 14. Conector de alimentación. Conecte el cable de alimentación a este conector. 15.���������������������������� Interruptor de encendido. Accione este interruptor para encender/apagar la fuente de alimentación del equipo. 16. Módulo Bluetooth. Puede enchufar cualquier dispositivo Bluetooth, como por ejemplo teléfonos móviles, para disfrutar de transferencia inalámbrica de datos. 17. Puerto VGA. Este puerto permite conectar dispositivos con interfaz VGA (como, por ejemplo, un monitor VGA). 260 Capítulo 1: Primeros pasos 18.�������������������� Puerto LAN (RJ-45). Este puerto permite establecer una conexión Gigabit con una red de área local (LAN) a través de un hub de red. Indicadores LED del puerto LAN Indicador LED de actividad/enlace Estado Descripción Estado NARANJA Con enlace NARANJA Apagado Sin enlace INTERMITENTE Transmisión de datos Apagado VERDE Indicador LED de velocidad Descripción Conexión de 10 Mbps Conexión de 100 Mbps Conexión de 1 Gbps INDICADOR LED ACT/LINK INDICADOR (ACTIVIDAD/ LED SPEED ENLACE) (VELOCIDAD) Puerto LAN Consulte la tabla de configuración de audio que figura a continuación si desea conocer la función que cumple cada uno de los puertos en las configuraciones de 2, 4, 6 y 8 canales. 20. Tarjeta gráfica ASUS (disponible sólo en determinados modelos). Los puertos de salida de pantalla de la tarjeta gráfica ASUS (opcional) podrían variar en función del modelo. 21.����������������������������������� Abrazadera de ranura de expansión. Retire la abrazadera de la ranura de expansión para instalar una tarjeta de expansión. ASUS CG8565 Español 19.��������������������������������������������� Puertos de tarjeta de sonido (extraíbles). Estos puertos permiten conectar dispositivos de salida, como por ejemplo micrófonos, auriculares y altavoces. 261 Instalación del equipo Siga los pasos descritos en este apartado para conectar al equipo los principales dispositivos de hardware (como un monitor externo, un teclado, un ratón y el cable de alimentación). Conexión de un monitor externo A través de la tarjeta gráfica ASUS (disponible sólo en determinados modelos) Conecte el monitor al puerto de salida de pantalla de la tarjeta de gráficos discretos ASUS. Para conectar un monitor externo a través de la tarjeta gráfica ASUS: 1. Conecte un monitor a uno de los puertos de salida de pantalla de la tarjeta gráfica ASUS. 2. Conecte el monitor a una fuente de alimentación. Los puertos de salida de pantalla de la tarjeta gráfica ASUS podrían variar en función del modelo. Español 262 Capítulo 1: Primeros pasos Uso de los puertos de salida de pantalla integrados en la placa Conecte el monitor al puerto de salida de pantalla integrado en la placa. Para conectar un monitor externo a través de un puerto de salida de pantalla integrado en la placa: Conecte un monitor VGA al puerto VGA, un monitor DVI-D al puerto DVI-D o un monitor HDMI al puerto HDMI situados en el panel posterior del equipo. 2. Conecte el monitor a una fuente de alimentación. Español 1. • Si el equipo incluye una tarjeta gráfica ASUS, ésta habrá sido configurada como dispositivo de pantalla principal en el BIOS. Conecte en tal caso el monitor a uno de los puertos de salida de pantalla de la tarjeta gráfica ASUS. • Si desea obtener información acerca de la conexión de más de un monitor externo al equipo, consulte el apartado Conexión de varios monitores externos en el Capítulo 3 de este manual. ASUS CG8565 263 Conexión de un teclado USB y un ratón USB Conecte un teclado USB y un ratón USB a los puertos USB situados en el panel posterior del equipo. Conexión del cable de alimentación Español 264 Conecte un extremo del cable de alimentación al conector de alimentación situado en el panel posterior del equipo y el otro extremo a una fuente de alimentación. Capítulo 1: Primeros pasos Encendido/apagado del equipo Siga los pasos descritos en este apartado para aprender a encender/apagar el equipo una vez instalado. Encendido del equipo Para encender el equipo: 1. Encienda el monitor. 2. Coloque el conmutador de alimentación en la posición de ENCENDIDO y, a continuación, presione el botón de alimentación para encender el equipo. Botón de encendido Espere mientras el sistema se carga automáticamente. Apagado del equipo Para apagar el equipo: 1. Cierre todas las aplicaciones en ejecución. 2. En el escritorio de Windows®, haga clic en 3. Haga clic en ASUS CG8565 Español E-SATA 3. . para cerrar el sistema operativo. 265 Español 266 Capítulo 2: Uso de Windows® 7 Capítulo 2 Uso de Windows® 7 Primer inicio del equipo Al iniciar el equipo por primera vez, aparece una serie de pantallas cuyo objetivo es guiarle a través de la configuración de los parámetros básicos del sistema operativo Windows® 7. Para iniciar el equipo por primera vez: 1. Encienda el equipo. Espere unos minutos hasta que aparezca la pantalla Set Up Windows (Configuración de Windows). 2. Seleccione su idioma en la lista desplegable. Haga clic en Next (Siguiente). 3. Seleccione los valores que correspondan en las listas desplegables Country or region (País o región), Time and currency (Hora y moneda) y Keyboard layout (Distribución del teclado). Haga clic en Next (Siguiente). 4. Introduzca nombres únicos en los campos User Name (Nombre de usuario) y Computer Name (Nombre del equipo). Haga clic en Next (Siguiente). 5. Introduzca la información necesaria para establecer su contraseña y haga clic en Next (Siguiente). O bien, puede hacer clic en Next (Siguiente) para omitir este paso sin introducir información. 6. Lea detenidamente los términos de la licencia. Active la casilla de verificación I accept the license terms (Acepto los términos de licencia) y haga clic en Next (Siguiente). 7. Seleccione la opción Use recommended settings (Usar la configuración recomendada) o Install important updates only (Instalar sólo las actualizaciones importantes) para establecer la configuración de seguridad del equipo. Si desea omitir este paso, seleccione la opción Ask me later (Preguntarme más tarde). 8. Revise la configuración de fecha y hora. Haga clic en Next (Siguiente). El sistema cargará la nueva configuración y se reiniciará. Ya puede comenzar a usar el equipo. ASUS CG8565 Español Si desea establecer una contraseña para su cuenta más tarde, consulte el apartado Configuración de una cuenta de usuario y una contraseña en este capítulo. 267 Uso del escritorio de Windows® 7 Haga clic en el icono Start (Inicio) > Help and Support (Ayuda y soporte técnico) si desea obtener información complementaria acerca de Windows® 7. Uso del menú Start (Inicio) El menú Start (Inicio) proporciona acceso a programas, utilidades y demás componentes útiles del equipo. También permite obtener información complementaria acerca de Windows 7 a través de la función Help and Support (Ayuda y soporte técnico). Inicio de componentes desde el menú Start (Inicio) Para iniciar componentes desde el menú Start (Inicio): 1. En la barra de tareas de Windows®, haga clic en el icono Start (Inicio) 2. En el menú Start (Inicio), seleccione el componente que desee iniciar. . Puede anclar programas al menú Start (Inicio) para que se muestren siempre al abrirlo. Si desea obtener más información, consulte el apartado Anclaje de programas al menú Start (Inicio) o a la barra de tareas en este capítulo. Uso del componente Getting Started (Tareas iniciales) Español El componente Getting Started (Tareas iniciales) del menú Start (Inicio) contiene información acerca de ciertas tareas básicas que le ayudarán a familiarizarse con el uso de Windows® 7 (como la personalización de Windows®, la agregación de nuevos usuarios y la transferencia de archivos). Para usar el componente Getting Started (Tareas iniciales): 1. 2. 3. En la barra de tareas de Windows®, haga clic en el icono Start (Inicio) menú Start (Inicio). para abrir el Seleccione la opción Getting Started (Tareas iniciales). Aparecerá una lista de tareas disponibles. Seleccione la tarea que desee llevar a cabo. Uso de la barra de tareas La barra de tareas permite iniciar y administrar programas y componentes instalados en el equipo. Inicio de un programa desde la barra de tareas Para iniciar un programa desde la barra de tareas: • En la barra de tareas de Windows®, haga clic en un icono para iniciarlo. Haga clic en el icono de nuevo para ocultar el programa correspondiente. Puede anclar a la barra de tareas aquellos programas que desee que se muestren constantemente. Si desea obtener más información, consulte el apartado Anclaje de programas al menú Start (Inicio) o a la barra de tareas en este capítulo. 268 Capítulo 2: Uso de Windows® 7 Anclaje de componentes a una Jump List (Lista de acceso rápido) Al hacer clic con el botón secundario del ratón en un icono de la barra de tareas, se abre una Jump List (Lista de acceso rápido) que permite acceder rápidamente a determinados vínculos relacionados con el programa o componente. Puede anclar componentes (como sitios web, carpetas o unidades que abra con frecuencia o archivos multimedia reproducidos recientemente) a una Jump List (Lista de acceso rápido). Para anclar un componente a una Jump List (Lista de acceso rápido): 1. 2. En la barra de tareas, haga clic con el botón secundario del ratón en un icono. En la Jump List (Lista de acceso rápido), haga clic con el botón secundario del ratón en el componente que desee anclar y, a continuación, seleccione la opción Pin to this list (Anclar a esta lista). Desanclaje de componentes de una Jump List (Lista de acceso rápido) Para desanclar un componente de una Jump List (Lista de acceso rápido): 1. 2. En la barra de tareas, haga clic con el botón secundario del ratón en un icono. En la Jump List (Lista de acceso rápido), haga clic con el botón secundario del ratón en el componente que desee quitar de la Jump List (Lista de acceso rápido) y, a continuación, seleccione la opción Unpin from this list (Desanclar de esta lista). Anclaje de programas al menú Start (Inicio) o a la barra de tareas Para anclar un programa al menú Start (Inicio) o a la barra de tareas: 2. 3. En la barra de tareas de Windows®, haga clic en el icono Start (Inicio) menú Start (Inicio). para abrir el Haga clic con el botón secundario del ratón en el componente que desee anclar al menú Start (Inicio) o a la barra de tareas. Seleccione la opción Pin to Taskbar (Anclar a la barra de tareas) o Pin to Start menu (Anclar al menú Inicio). O bien, haga clic con el botón secundario del ratón en el icono de un programa en ejecución que aparezca en la barra de tareas y seleccione la opción Pin this program to taskbar (Anclar este programa a la barra de tareas). Español 1. Desanclaje de programas del menú Start (Inicio) Para desanclar un programa del menú Start (Inicio): 1. 2. En la barra de tareas de Windows®, haga clic en el icono Start (Inicio) menú Start (Inicio). para abrir el En el menú Start (Inicio), haga clic con el botón secundario del ratón en el programa que desee desanclar y, a continuación, seleccione la opción Remove from this list (Quitar de esta lista). Desanclaje de programas de la barra de tareas Para desanclar un programa de la barra de tareas: 1. En la barra de tareas, haga clic con el botón secundario del ratón en el programa que desee quitar de la barra de tareas y, a continuación, seleccione la opción Unpin this program from taskbar (Desanclar este programa de la barra de tareas). ASUS CG8565 269 Uso del área de notificación De forma predeterminada, el área de notificación muestra los tres iconos siguientes: Notificación de Action Center (Centro de actividades) Haga clic en este icono para abrir el panel Action Center (Centro de actividades) de Windows® y ver todos los mensajes de alerta y notificaciones. Conexión de red Este icono muestra el estado de conexión y la intensidad de la señal correspondientes a una conexión de red por cable o inalámbrica. Volumen Haga clic en este icono para ajustar el volumen. Visualización de una notificación de alerta Para ver una notificación de alerta: • Haga clic en el icono Notification (Notificación) mensaje para abrirlo. ; a continuación, haga clic en un Si desea obtener más información, consulte el apartado Uso del panel Action Center (Centro de actividades) de Windows® en este capítulo. Personalización de iconos y notificaciones Español Puede optar por mostrar u ocultar determinados iconos y notificaciones en la barra de tareas o el área de notificación. Para personalizar los iconos y notificaciones: 1. En el área de notificación, haga clic en el icono con forma de flecha . 2. Haga clic en Customize (Personalizar). 3. En la lista desplegable, seleccione los comportamientos de los iconos o componentes que desee personalizar. Administración de archivos y carpetas Uso del Explorador de Windows® El Explorador de Windows® permite ver, administrar y organizar archivos y carpetas. Inicio del Explorador de Windows® Para iniciar el Explorador de Windows: 270 1. En la barra de tareas de Windows®, haga clic en el icono Start (Inicio) menú Start (Inicio). 2. Haga clic en Computer (Equipo) para iniciar el Explorador de Windows. para abrir el Capítulo 2: Uso de Windows® 7 Exploración de archivos y carpetas Para explorar archivos y carpetas: 1. Inicie el Explorador de Windows. 2. En los paneles de navegación o vista, navegue hasta la ubicación en la que se encuentren los datos. 3. En la barra de ruta de navegación, haga clic en la flecha para ver el contenido de la unidad o carpeta. Personalización de la vista de archivos y carpetas Para personalizar la vista de archivos y carpetas: 1. Inicie el Explorador de Windows. 2. En el panel de navegación, seleccione la ubicación en la que se encuentren los datos. 3. En la barra de herramientas, haga clic en el icono View (Vista) 4. En el menú View (Vista), desplace el control deslizante para seleccionar un modo de visualización de archivos y carpetas. . También puede hacer clic con el botón secundario del ratón en cualquier punto del panel View (Vista) y seleccionar el tipo de vista que desee. Organización de archivos 1. Inicie el Explorador de Windows. 2. En el campo Arrange by (Organizar por), haga clic para abrir la lista desplegable. 3. Seleccione el tipo de organización que prefiera. Ordenación de archivos Para ordenar los archivos: 1. Inicie el Explorador de Windows. 2. Haga clic con el botón secundario en cualquier punto del panel View (Vista). 3. En el menú que aparecerá a continuación, seleccione la opción Sort by (Ordenar por) y, a continuación, el tipo de ordenación que prefiera. Español Para organizar los archivos: Agrupación de archivos Para agrupar los archivos: 1. Inicie el Explorador de Windows. 2. Haga clic con el botón secundario en cualquier punto del panel View (Vista). 3. En el menú que aparecerá a continuación, seleccione la opción Group by (Agrupar por) y, a continuación, el tipo de agrupación que prefiera. ASUS CG8565 271 Agregación de una carpeta nueva Para agregar una carpeta nueva: 1. Inicie el Explorador de Windows. 2. En la barra de herramientas, haga clic en New folder (Nueva carpeta). 3. Introduzca el nombre que desee asignar a la nueva carpeta. También puede hacer clic con el botón secundario del ratón en cualquier punto del panel View (Vista) y, a continuación, seleccionar las opciones New (Nuevo) > Folder (Carpeta). Realización de una copia de seguridad de archivos Configuración de una copia de seguridad Para configurar una copia de seguridad: 1. Haga clic en > All Programs (Todos los programas) > Maintenance (Mantenimiento) > Backup and Restore (Copias de seguridad y restauración). 2. Haga clic en Set up backup (Configurar copia de seguridad). Haga clic en Next (Siguiente). 3. Seleccione la ubicación de destino de la copia de seguridad. Haga clic en Next (Siguiente). 4. Seleccione la opción Let Windows choose (recommended) (Dejar a Windows que elija (recomendado)) o Let me choose (Dejarme elegir) para establecer el modo de copia de seguridad. Español Si selecciona la opción Let Windows choose (Dejar a Windows que elija), Windows no incluirá en la copia de seguridad los programas, los archivos en formato FAT, los archivos almacenados en la papelera de reciclaje ni los archivos temporales de tamaño equivalente o superior a 1 GB. 5. Siga las instrucciones que aparecerán en la pantalla para finalizar el proceso. Restauración del sistema La función System Restore (Restaurar sistema) de Windows® crea puntos de restauración siempre que la configuración del sistema cambia y los vincula a una fecha y una hora. De este modo, facilita la restauración o reversión de los cambios aplicados a la configuración del equipo sin que ello afecte a los datos personales. Para restaurar el sistema: 272 1. Cierre todas las aplicaciones en ejecución. 2. Haga clic en > All Programs (Todos los programas) > Accessories (Accesorios) > System Tools (Herramientas del sistema) > System Restore (Restaurar sistema). 3. Siga las instrucciones que aparecerán en la pantalla para llevar a cabo el proceso. Capítulo 2: Uso de Windows® 7 Protección del equipo Uso del panel Action Center (Centro de actividades) de Windows® 7 El panel Action Center (Centro de actividades) de Windows® 7 proporciona notificaciones de alerta, información de seguridad e información de mantenimiento del sistema y ofrece la posibilidad de solucionar y corregir automáticamente algunos de los problemas informáticos más comunes. Es posible personalizar las notificaciones. Si desea obtener más información, consulte el apartado Personalización de iconos y notificaciones en este capítulo. Inicio del panel Action Center (Centro de actividades) de Windows® 7 Para iniciar el panel Action Center (Centro de actividades) de Windows® 7: 1. Para iniciar el panel Action Center (Centro de actividades) de Windows 7, haga clic en el icono Notification (Notificación) y, a continuación, en Open Action Center (Abrir Centro de actividades). 2. En el panel Action Center (Centro de actividades) de Windows 7, haga clic en la tarea que desee llevar a cabo. Uso de Windows® Update Windows Update permite buscar e instalar las actualizaciones más recientes con objeto de mejorar la seguridad y el rendimiento del equipo. Para iniciar Windows® Update: 1. En la barra de tareas de Windows®, haga clic en el icono Start (Inicio) menú Start (Inicio). para abrir el 2. Seleccione All Programs (Todos los programas) > Windows Update. 3. En la pantalla Windows Update, haga clic en la tarea que desee llevar a cabo. Español Inicio de Windows® Update Configuración de una cuenta de usuario y una contraseña Puede crear cuentas de usuario y contraseñas para la gente que use el equipo. Configuración de una cuenta de usuario Para configurar una cuenta de usuario: 1. En la barra de tareas de Windows®, haga clic en > Getting Started (Tareas iniciales) > Add new users (Agregar nuevos usuarios). 2. Seleccione la opción Manage another account (Administrar otra cuenta). 3. Seleccione la opción Create a new account (Crear una nueva cuenta). 4. Introduzca el nombre que desee asignar al nuevo usuario. 5. Seleccione la opción Standard user (Usuario estándar) o Administrator (Administrador) para asignar un tipo al usuario. 6. Cuando haya terminado, haga clic en Create Account (Crear cuenta). ASUS CG8565 273 Configuración de una contraseña de usuario Para configurar una contraseña de usuario: 1. Seleccione el usuario para el que desee establecer una contraseña. 2. Seleccione la opción Create a password (Crear una contraseña). 3. Introduzca una contraseña y confírmela. Introduzca un indicio de contraseña. 4. Cuando haya terminado, haga clic en Create password (Crear contraseña). Activación del software antivirus El equipo cuenta con el software Internet Security de Trend Micro instalado de fábrica. Se trata de un software antivirus de otro fabricante que permite proteger un equipo frente a ataques de virus. Debe adquirirse por separado. Dispondrá de un periodo de prueba de 60 días tras la activación. Para activar el software Internet Security de Trend Micro: 1. Ejecute la aplicación Internet Security de Trend Micro. 2. Lea detenidamente los términos de la licencia. Haga clic en Agree & Activate (Aceptar y activar). 3. Introduzca su dirección de correo electrónico y seleccione su ubicación. Haga clic en Next (Siguiente). 4. Haga clic en Finish (Finalizar) para finalizar la activación. Español Uso de la función Help and Support (Ayuda y soporte técnico) de Windows® La función Help and Support (Ayuda y soporte técnico) de Windows® ofrece acceso a guías y respuestas acerca del uso de aplicaciones en la plataforma Windows® 7. Para iniciar la función Help and Support (Ayuda y soporte técnico) de Windows®, haga clic en > Help and Support (Ayuda y soporte técnico). Asegúrese de que el equipo cuente con conexión a Internet si desea recibir la ayuda en línea más reciente para Windows®. 274 Capítulo 2: Uso de Windows® 7 Capítulo 3 Conexión de dispositivos al equipo Conexión de un dispositivo de almacenamiento USB Este equipo de sobremesa cuenta con puertos USB 2.0/1.1 tanto en el panel frontal como en el posterior. Los puertos USB permiten conectar dispositivos USB como, por ejemplo, dispositivos de almacenamiento. Para conectar un dispositivo de almacenamiento USB: • Inserte el dispositivo de almacenamiento USB en el equipo. Panel frontal Español Panel posterior Para quitar un dispositivo de almacenamiento USB: 1. Haga clic en el icono que se encuentra en el área de notificación de Windows del equipo y, a continuación, haga clic en Eject USB2.0 FlashDisk (Expulsar disco flash USB2.0) o Eject USB3.0 FlashDisk (Expulsar disco flash USB 3.0) si utiliza la unidad flash USB3.0 o dispositivos compatibles con USB3.0. 2. Cuando aparezca el mensaje Safe to Remove Hardware (Es seguro quitar el hardware), quite el dispositivo de almacenamiento USB del equipo. NO quite un dispositivo de almacenamiento USB durante una transferencia de datos. Si lo hace, podrían producirse pérdidas de datos y el dispositivo de almacenamiento USB podría resultar dañado. ASUS CG8565 275 Conexión de un micrófono y unos auriculares Este equipo de sobremesa cuenta con puertos de micrófono y auriculares tanto en el panel frontal como en el posterior. Los puertos de E/S de audio situados en el panel posterior permiten conectar sistemas de altavoces estéreo de 2, 4, 6 y 8 canales. Conexión de unos auriculares y un micrófono Español Conexión de un sistema de altavoces de 2 canales ENTRADAS DE AUDIO 276 Capítulo 3: Conexión de dispositivos al equipo Conexión de un sistema de altavoces de 4 canales ENTRADAS DE ENTRADAS DE AUDIO AUDIO Posterior Frontal Español Conexión de un sistema de altavoces de 6 canales ENTRADAS DE ENTRADAS DE ENTRADAS DE AUDIO AUDIO AUDIO Posterior ASUS CG8565 Frontal Altavoz central/ subwoofer 277 Conexión de un sistema de altavoces de 8 canales Posterior ENTRADAS DE AUDIO Lateral Frontal ENTRADAS DE AUDIO Altavoz central/ subwoofer Español 278 Capítulo 3: Conexión de dispositivos al equipo Conexión de varias pantallas externas Puede que el PC de sobremesa disponga de puertos VGA, HDMI o DVI; úselos para conectar varias pantallas externas. Si el equipo cuenta con una tarjeta gráfica instalada, conecte los monitores a los puertos de salida de la tarjeta gráfica. Configuración de varias pantallas Es posible establecer los modos de pantalla durante el uso de varios monitores. Puede usar el monitor complementario como duplicado de la pantalla principal o como extensión (para ampliar el espacio del escritorio de Windows). Para configurar varias pantallas: Apague el equipo. 2. Conecte los dos monitores al equipo y, a continuación, conecte los cables de alimentación a los monitores. Consulte el apartado Instalación del equipo en el Capítulo 1 si desea obtener más información acerca de la conexión de un monitor al equipo. Español 1. Algunas tarjetas gráficas sólo presentan información a través de la pantalla configurada como principal durante la etapa POST. La función de pantalla dual sólo funciona en Windows. ASUS CG8565 279 3. Encienda el equipo. 4. Lleve a cabo cualquiera de las acciones descritas a continuación para abrir la pantalla de configuración Screen Resolution (Resolución de pantalla): •Haga clic en > Control Panel (Panel de control) > Appearance and Personalization (Apariencia y personalización) > Display (Pantalla) > Change display settings (Cambiar la configuración de pantalla). 5. •Haga clic con el botón secundario en cualquier punto del escritorio de Windows. Cuando aparezca el menú emergente, haga clic en Personalize (Personalizar) > Display (Pantalla) > Change display settings (Cambiar la configuración de pantalla). Seleccione un modo de pantalla en la lista desplegable Multiple displays: (Varias pantallas:). •Duplicate these displays (Duplicar estas pantallas): Seleccione esta opción si desea que el monitor complementario refleje la imagen representada en la pantalla principal. •Extend these displays (Extender estas pantallas): Seleccione esta opción si desea que el monitor complementario actúe como una extensión de la pantalla principal. Ello le permitirá ampliar el espacio del escritorio. •Show desktop only on 1 / 2 (Mostrar escritorio sólo en 1/2): Seleccione esta opción si desea que el escritorio se muestre sólo en el monitor 1 o en el monitor 2. •Remove this display (Quitar esta pantalla): Seleccione esta opción si desea quitar la pantalla seleccionada. Español 6. 280 Haga clic en Apply (Aplicar) o en OK (Aceptar). A continuación, haga clic en Keep Changes (Conservar cambios) en el mensaje de confirmación. Capítulo 3: Conexión de dispositivos al equipo Conexión de un televisor HDTV El equipo admite la conexión de un televisor de alta definición (HDTV) al puerto HDMI. • Es preciso usar un cable HDMI para conectar un televisor HDTV al equipo. El cable HDMI debe adquirirse por separado. Español • A fin de garantizar la máxima calidad de imagen, asegúrese de que la longitud del cable HDMI sea inferior a 15 metros. ASUS CG8565 281 Español 282 Capítulo 3: Conexión de dispositivos al equipo Capítulo 4 Uso del equipo Postura correcta durante el uso del PC de sobremesa Es aconsejable adoptar la postura correcta durante el uso del PC de sobremesa con objeto de evitar la sobrecarga de muñecas, manos y otros músculos y articulaciones. Este apartado contiene sugerencias que le permitirán evitar la incomodidad física y las posibles lesiones que podría sufrir durante el uso y disfrute del PC de sobremesa. LaEye parte superior la of pantalla level to thedetop del monitor debe quedar a la the monitor screen altura de los ojos Ángulos de 90º90˚ angles Español Reposapiés Foot rest Para mantener la postura correcta: • Coloque la silla de tal modo que los codos queden a la altura del teclado o ligeramente por encima; ello le permitirá escribir con más comodidad. • Ajuste la altura de la silla de tal modo que las rodillas queden a una altura ligeramente superior a la de las caderas para que la parte posterior de los muslos permanezca relajada. Si es necesario, use un reposapiés para elevar la altura de las rodillas. • Ajuste el respaldo de la silla de modo que la base de la columna quede apoyada firmemente e inclinada ligeramente hacia atrás. • Siéntese derecho con las rodillas, los codos y las caderas formando un ángulo aproximado de 90° al trabajar con el PC. • Coloque el monitor frente a usted y ajuste la parte superior de la pantalla del monitor a la altura de los ojos, de tal modo que mire ligeramente hacia abajo al contemplar la imagen representada en la pantalla. • Mantenga el ratón cerca del teclado y, si es preciso, use un reposamuñecas para reducir la presión soportada por las muñecas al escribir. • Use el PC de sobremesa en una zona bien iluminada; manténgalo alejado de fuentes de resplandor, como ventanas o lugares expuestos a la incidencia directa de la luz solar. • Lleve a cabo breves descansos periódicos durante el uso del PC de sobremesa. ASUS CG8565 283 Uso del lector de tarjetas de memoria Las cámaras digitales y otros dispositivos de captura de imágenes usan tarjetas de memoria para almacenar imágenes digitales o archivos multimedia en ellas. El lector de tarjetas incorporado en el panel frontal del sistema permite leer y escribir datos en tarjetas de memoria de diferentes tipos. Para usar una tarjeta de memoria: 1. Inserte la tarjeta de memoria en la ranura para tarjetas que corresponda. • Las tarjetas de memoria cuentan con una muesca que impide introducirlas en una posición incorrecta. NO trate de insertar una tarjeta en una ranura por la fuerza; la tarjeta podría resultar dañada. Español • Puede insertar medios en una o más ranuras para tarjetas y usarlos todos independientemente. No inserte más de una tarjeta de memoria en una ranura. 2. Seleccione un programa en la ventana AutoPlay (Reproducción automática) para acceder a los archivos. • Si la función AutoPlay (Reproducción automática) NO está habilitada en el equipo, haga clic en el botón Start (Inicio) de Windows® 7 en la barra de tareas; haga clic en Computer (Equipo) y, a continuación, haga doble clic en el icono de la tarjeta de memoria para acceder a los datos almacenados en ella. • Cada una de las ranuras para tarjetas dispone de un icono de unidad propio en la pantalla Computer (Equipo). • El indicador LED del lector de tarjetas de memoria se iluminará y parpadeará durante la lectura o escritura de datos en la tarjeta de memoria correspondiente. 3. Cuando haya terminado, haga clic con el botón secundario del ratón en el icono de la unidad de tarjeta de memoria en la pantalla Computer (Equipo) y, a continuación, haga clic en Eject (Expulsar); quite la tarjeta a continuación. No quite una tarjeta durante una operación de lectura, copia, formato o eliminación de los datos contenidos en ella; de lo contrario, los datos podrían perderse. Use la función “Safely Remove Hardware and Eject Media” (Quitar hardware de forma segura y expulsar el medio), accesible a través del área de notificación de Windows, para quitar la tarjeta de memoria. 284 Capítulo 4: Uso del equipo Uso de la unidad óptica Inserción de un disco óptico Para insertar un disco óptico: 3. 4. 5. Con la alimentación del sistema encendida, presione el botón PUSH (PULSAR). Presione el botón de expulsión situado debajo de la tapa de la bahía de la unidad para abrir la bandeja. Coloque un disco en la unidad óptica con la etiqueta orientada hacia arriba. Presione la bandeja para cerrarla. Seleccione un programa en la ventana AutoPlay (Reproducción automática) para acceder a los archivos. Si la función AutoPlay (Reproducción automática) NO está habilitada en el equipo, haga clic en el botón Start (Inicio) de Windows® 7 en la barra de tareas; haga clic en Computer (Equipo) y, a continuación, haga doble clic en el icono de la unidad de CD/DVD para acceder a los datos almacenados en ella. Español 1. 2. Extracción de un disco óptico Para extraer un disco óptico: 1. 2. Con el sistema encendido, lleve a cabo cualquiera de las siguientes acciones para expulsar la bandeja: • Pulse el botón de expulsión situado bajo el embellecedor de la bahía de unidad. • Haga clic con el botón secundario del ratón en el icono de la unidad de CD/ DVD en la pantalla Computer (Equipo) y, a continuación, haga clic en Eject (Expulsar). Extraiga el disco de la bandeja de disco. ASUS CG8565 285 Utilizar el teclado para juegos ASUS ROG U9N Su PC de sobremesa CG8565 Essentio incluye un teclado para juegos ASUS ROG U9N que proporciona una experiencia de juegos óptima. Consulte la sección Contenido del paquete para saber los artículos contenidos en el paquete del teclado para juegos ASUS ROG U9N. IInstalar el teclado para juegos ASUS ROG U9N Español 1. Utilice el adaptador PS/2 a USB para conectar el teclado para juegos al puerto USB 2.0 del equipo. . Alinee e inserte la almohadilla para la muñeca en las ranuras del teclado para juegos diseñadas para tal fin (A). Mediante los dos dedos pulgares, empuje hacia abajo la almohadilla para la muñeca hasta que quede encajada en su lugar (B). A 3. 286 B Reinicie el equipo. Windows® instala automáticamente todos los controladores necesarios para el teclado. Capítulo 4: Uso del equipo Utilizar el ratón para juegos ASUS GX900 Su PC de sobremesa CG8565 Essentio incluye un ratón para juegos ASUS GX900 que le permite controlar totalmente el juego. Consulte la sección Contenido del paquete para saber los artículos contenidos en el paquete del teclado para juegos ASUS ROG U9N. Teclas Descripción Teclas Descripción 2 Botón derecho 8 Botón Adelante de IE 1 3 4 5 6 Botón izquierdo Rueda de desplazamiento Conmutador de resolución de PPP Botón de cambio de perfil/Indicador de perfil* Indicador LED PPP** 7 9 10 Español El ratón para juegos ASUS GX900 incluye un botón izquierdo, un botón derecho, una rueda de desplazamiento, dos botones laterales, un botón PPP y un botón de cambio de perfil con un diseño especial. Logotipo de GX900 Botón Atrás de IE Pies del ratón 11 Pies del ratón y sensor láser Twin-Eye 12 Base de contrapesos (5 bloques de 4,5 g)*** ***Para ajustar el peso del ratón, agregue o quite contrapesos. ASUS CG8565 287 *Indicaciones de LED de cambio de perfil Colores de LED Indicaciones Verde Rojo Naranja Perfil 1 Ninguna Perfile normal Perfil 2 Perfil 3 **Indicaciones de LED de conmutación de PPP Colores de LED Indicaciones 4 Nivel de PPP 2 2 Nivel de PPP 1 Iniciar el programa El CD de soporte incluido contiene un programa especialmente diseñado que permite configurar el ratón para juegos ASUS GX900 para aprovechar todas sus funciones. Inserte el CD de soporte en la unidad óptica y siga las instrucciones de la pantalla para iniciar el programa. Español Si la función de ejecución automática NO está habilitada en el equipo, examine el contenido del CD de soporte para buscar el archivo GX900.exe. Haga doble clic en el archivo GX900.exe para iniciar el programa. Configurar el ratón para juegos ASUS GX900 Asegúrese de que el ratón para juegos está conectado al puerto USB del equipo. El programa detectará automáticamente el ratón y mostrará el menú principal. 288 Capítulo 4: Uso del equipo Elementos Descripción 1 2 3 4 5 6 7 8 9 10 11 Haga clic en cada ficha para mostrar el menú del perfil seleccionado. Muestra de cono de perfil para configurar los menús 1-3 del perfil. Haga clic para restablecer la configuración previamente guardada de PPP. Arrastre el control deslizante para ajustar el valor de PPP para cada nivel. Haga clic para restablecer la configuración anterior de los botones. Haga clic para mostrar los diferentes indicadores de color de perfil y sus estados. Haga clic para cargar el perfil guardado en el ratón. Haga clic para guardar la configuración del perfil actual en la unidad de disco duro. Haga clic para restablecer la configuración predeterminada de fábrica del ratón. Haga clic para guardar la configuración realizada. Haga clic para guardar la configuración realizada y salir del programa. Español Menú principal * Cada perfil proporcionados niveles de PPP. Cuando se iluminan dos LED de conmutación de PPP, significa que se está utilizando el Nivel 1; cuando se iluminan cuatro LED, significa que se está utilizando el Nivel 2. ASUS CG8565 289 Perfil 1 Español Elementos Descripción 1 2 3 4 Haga clic para abrir el menú Edit (Editar) y cambiar el nombre y el icono de perfil. Inserte el nombre de perfil que desee. Haga clic para buscar el archivo de imagen que desee utilizar como icono de perfil. Seleccione la función para cada botón y acción en la lista desplegable. *Consulte la tabla siguiente para obtener más detalles. Funciones Descripción Atrás en IE Función de botón Atrás de IE Si se selecciona, presione el botón para retroceder a la página anterior. Botón L Función de botón izquierdo del ratón. (izquierdo) Botón R Botón de botón derecho del ratón. (derecho) Botón M (central) Función de botón central del ratón. Adelante en IE 290 Función de botón Adelante de IE Si se selecciona, presione el botón para ir a la página siguiente. Capítulo 4: Uso del equipo Teclado Macro Script nº 1-6 PPP [+] PPP [-] Nivel de PPP 1/2 Cambio de perfil Perfile normal Perfil de usuario 1/2/3 Rueda (izquierda/ derecha) Disparo rápido (ratón) Disparo rápido (tecla) Descripción Presione el botón para realizar una pulsación o una secuencia de pulsaciones. Presione el botón para ejecutar un comando o serie de comandos que puede editar a través del menú Edit Macro (Editar macro). Consulte la sección Menú Macro para obtener más detalles. Presione el botón para ejecutar un script que puede editar a través del menú Edit Script (Editar script). Consulte la sección Menú script para obtener más detalles. Presione el botón para aumentar el valor de PPP. Presione el botón para reducir el valor de PPP. Presione el botón para utilizar el Nivel de PPP 1/2. Botón de función de cambio de perfil. Presione el botón para utilizar el perfil normal. Presione el botón para utilizar el perfil personalizado 1/2/3. Presione el botón para desplazarse hacia la izquierda o hacia la derecha según lo haga la rueda de inclinación. Esta función solamente está disponible para aplicaciones de Microsoft® Office en los sistemas operativos Windows® 7 y Vista. Presione el botón para realizar un disparo rápido en juegos de ataque, lo equivale a hacer clic tres veces con el botón izquierdo del ratón. Presione el botón para realizar un disparo rápido en un juego utilizando la barra espaciado hora para atacar, lo que equivale a presionar tres veces la barra espaciadora del teclado. Presione el botón para iniciar el explorador Web predeterminado. Pulse el botón para iniciar la aplicación de correo electrónico predeterminada. Presione el botón para iniciar el reproductor multimedia predeterminado. Explorador Web Correo electrónico Reproductor multimedia Reproducir/Pausa Detener Estos botones se convierten en los botones de control de reproducción de un reproductor multimedia activo. Pista siguiente Pista anterior Subir/Bajar Presione el botón para subir o bajar el volumen del sistema. volumen Presione el botón para activar o desactivar el modo de silencio del Silencio volumen. Calculadora Presione el botón para iniciar la aplicación Calculator (Calculadora). Mi PC Presione el botón para abrir la ventana Mi PC. Seleccione este elemento para desactivar el botón seleccionado del Deshabilitado ratón. ASUS CG8565 Español Funciones 291 Menú Edit Macro (Editar macro) Elementos Edit Macro (Editar macro) Español Timing (Temporización) Insert (Insertar) Start (Inicio)* Stop (Detener) Clear (Desactivar) Move up/down (Subir/ Bajar) Instruction cycle time (Tiempo de ciclo de instrucción) Loop (Bucle) Fire (Fuego) Keeping fire (Seguir disparando) Export (Exportar) Import (Importar) 292 Descripción Haga clic para abrir el menú Edit Macro (Editar macro). Active este elemento para grabar el tiempo que transcurre entre que se presiona botón y se suelta. (Valor predeterminado: 12 milisegundos) Cuando activa esta casilla, la nueva instrucción se inserta antes de la instrucción seleccionada. De lo contrario, se dará prioridad a cualquier instrucción. Haga clic para iniciar la grabación de las pulsaciones y/o acciones del ratón. Haga clic para detener la grabación de las pulsaciones y/o acciones del ratón. Haga clic para borrar todas las instrucciones guardadas. Haga clic para subir o bajar la instrucción seleccionada. Cuando la casilla Timing (Temporización) está desactivada, el tiempo de retardo de todas las acciones será el valor elegido en la lista desplegable. Establece la macro para ejecutarse al hacer clic y detenerse al hacer clic nuevamente. Establece la macro para ejecutarse una vez al hacer clic. Establece la macro para ejecutarse cuando se mantiene presionado el botón y para detenerse cuando se suelta dicho botón. Haga clic para guardar la macro actual en la unidad de disco duro. Haga clic para cargar una macro desde la unidad de disco duro. Capítulo 4: Uso del equipo Menú Edit Script (Editar script) Descripción Edit Script (Editar Haga clic para abrir el menú Edit Script (Editar script). script) Timing Active este elemento para grabar el tiempo que transcurre entre que se (Temporización) presiona botón y se suelta. (Valor predeterminado: 12 milisegundos) Cuando activa esta casilla, la nueva instrucción se inserta antes de la Insert (Insertar) instrucción seleccionada. De lo contrario, se dará prioridad a cualquier instrucción. Haga clic para iniciar la grabación de las pulsaciones y/o acciones del Start (Inicio) ratón. Haga clic para detener la grabación de las pulsaciones y/o acciones del Stop (Detener) ratón. Clear (Desactivar) Haga clic para borrar todas las instrucciones guardadas. Move up/down Haga clic para subir o bajar la instrucción seleccionada. (Subir/Bajar) Instruction cycle Cuando la casilla Timing (Temporización) está desactivada, el tiempo time (Tiempo de retardo de todas las acciones será el valor elegido en la lista de ciclo de desplegable. instrucción) Establece el script para ejecutarse al hacer clic y detenerse al hacer clic Loop (Bucle) nuevamente. Fire (Fuego) Establece el script para ejecutarse una vez al hacer clic. Keeping Establece el script para ejecutarse cuando se mantiene presionado el fire (Seguir botón y para detenerse cuando se suelta dicho botón. disparando) Export (Exportar) Haga clic para guardar la macro actual en la unidad de disco duro. Import (Importar) Haga clic para cargar una macro desde la unidad de disco duro. ASUS CG8565 Español Elementos 293 Español 294 Capítulo 5: Conexión a Internet Capítulo 5 Conexión a Internet Conexión por cable Use un cable RJ-45 para conectar el equipo a un módem DSL/por cable o a una red de área local (LAN). Conexión a través de un módem DSL/por cable Para establecer una conexión a través de un módem DSL/por cable: 1. Instale el módem DSL/por cable. Consulte la documentación que incluye el módem DSL/por cable. Conecte un extremo del cable RJ-45 al puerto LAN (RJ-45) situado en el panel posterior del equipo y el otro extremo a un módem DSL/por cable. 3. Encienda el módem DSL/por cable y el equipo. 4. Configure los parámetros necesarios para establecer una conexión a Internet. Español 2. Póngase en contacto con su proveedor de servicios de Internet (ISP) si desea obtener información o asistencia acerca de la configuración de la conexión a Internet. ASUS CG8565 295 Conexión a través de una red de área local (LAN) Para establecer una conexión a través de una red LAN: Español 296 1. Conecte un extremo de un cable RJ-45 al puerto LAN (RJ-45) situado en el panel posterior del equipo y el otro extremo a la red LAN. 2. Encienda el equipo. 3. Configure los parámetros necesarios para establecer una conexión a Internet. Póngase en contacto con el administrador de la red si desea obtener más información o asistencia acerca de la configuración de la conexión a Internet. Capítulo 5: Conexión a Internet Capítulo 6 Uso de las utilidades Puede que el paquete no incluya los DVDs de soporte y recuperación. No obstante, el sistema le permitirá grabarlos personalmente si lo desea. Consulte el apartado Recuperación del sistema si desea obtener más información. ASUS AI Suite II ASUS AI Suite II es una interfaz integrada que incorpora diferentes utilidades ASUS y permite al usuario iniciarlas y usarlas simultáneamente. Instalación de AI Suite II Para instalar AI Suite II: 1. 2. 3. Coloque el DVD de soporte en la unidad óptica. Si la función Autorun (Ejecución automática) está habilitada en el equipo, aparecerá la pestaña Drivers installation (Instalación de controladores). Haga clic en la pestaña Utilities (Utilidades) y, a continuación, en ASUS AI Suite II. Siga las instrucciones que aparecerán en la pantalla para llevar a cabo la instalación. Uso de AI Suite II AI Suite II se inicia automáticamente al acceder al sistema operativo (SO) Windows®. El icono de AI Suite II aparece en el área de notificación de Windows®. Haga clic en el icono para abrir la barra de menús principal de AI Suite II. Español Haga clic en los diferentes botones para seleccionar e iniciar una utilidad, consultar el estado del sistema, actualizar el BIOS de la placa base, mostrar la información del sistema o personalizar la configuración de AI Suite II. Haga clic para personalizar la configuración de la interfaz Haga clic para mostrar la información del sistema Haga clic para actualizar el BIOS de la placa base Haga clic para consultar el estado de los sensores o la frecuencia de la CPU Haga clic para seleccionar una utilidad • Las aplicaciones del menú Tool (Herramientas) varían en función del modelo. • Las capturas de pantalla de AI Suite II de este manual son solamente para referencia. Las capturas de pantalla reales varían en función del modelo. ASUS CG8565 297 Herramientas El menú Tool (Herramientas) incluye los paneles DIGI+ VRM, EPU, Probe II, Sensor Recorder (Grabadora de sensores) y Ai Charger+. DIGI+ VRM ASUS DIGI+ VRM permite ajustar el voltaje VRM y la modulación de frecuencia para mejorar la fiabilidad y estabilidad. También proporciona la mejor eficiencia energética, generando menos calor para prolongar el período de vida útil de los componentes y minimizar la pérdida de energía. Para iniciar DIGI+ VRM,Haga clic en Tool (Herramientas) > DIGI+ VRM en la barra de menús principal de AI Suite II. 6 1 Ayuda para la aplicación 2 7 3 4 Deshacer todos los cambios sin aplicar 5 Español Aplicar todos los cambios inmediatamente Funciones Descripción de la función 1 DIGI+VRM Load-line Calibration (Calibración de la línea de carga DIGI+VRM) Una calibración de línea de carga más alta podría dar lugar a más voltaje y a un buen rendimiento de aumento de la velocidad del reloj, pero aumentaría la temperatura de la CPU y de VRM. 2 Protección de la capacidad de corriente de la CPU DIGI+ VRM La función DIGI+ VRM CPU Current Capability (Protección de la capacidad de corriente de la CPU DIGI+ VRM) proporciona un intervalo de potencia total más amplio para aumentar la velocidad del reloj. Cuanto mayor sea el valor, mayor será la entrega de consumo de potencia de VRM. 3 298 DIGI+VRM Frequency (Frecuencia DIGI+VRM) El cambio de frecuencia afectará a la respuesta transitoria VRM y a la temperatura de los componentes. Cuanto mayor sea la frecuencia, más rápida será la respuesta transitoria. Capítulo 6: Uso de las utilidades Funciones Descripción de la función 4 Control de fase DIGI+ VRM Aumente el número de fases bajo la carga pesada del sistema para obtener más transitorios y mejorar el rendimiento térmico. Reduzca el número de fases bajo la carga ligera del sistema para aumentar la eficiencia VRM. 5 DIGI+VRM Duty Control (Control de servicio DIGI+VRM) El control de servicio DIGI+VRM ajusta la fase VRM de corriente y la condición térmica de cada componente de fase. 6 Calibración de la línea de carga iGPU Cuanto mayor sea la calibración de la línea de carga, más amplio será el intervalo de potencia total para aumento de la velocidad del reloj. Cuanto mayor sea el valor, mayor será la entrega de consumo de potencia de VRM. 7 Capacidad de corriente iGPU La función iGPU Current Capability (Capacidad de corriente iGPU) proporciona un intervalo de potencia total más amplio para aumentar la velocidad del reloj. Un valor elevado amplía el intervalo de potencia total y extiende el intervalo de frecuencia de aumento de la velocidad del reloj simultáneamente. La opción System Level Up (Subir de nivel el sistema) permite aumentar la velocidad del reloj del sistema en un entorno Windows® mediante la configuración del perfil. Para iniciar System Level Up (Subir de nivel el sistema), haga clic en Tool (Herramientas) > System Level Up (Subir de nivel el sistema) en la barra de menús AI Suite II. ASUS CG8565 Español System Level Up (Subir de nivel el sistema) 299 En la configuración de la función, asigne las teclas de acceso directo para intercambiar el perfil para subir de nivel sistema. Puede ajustar la configuración de las teclas directas manualmente. Consulte la sección siguiente para obtener más detalles. Puede ajustar la opción System Level Up (Subir de nivel el sistema) mediante dos métodos: Español 300 BIOS En el programa BIOS Setup (Configuración del BIOS), haga clic en AI Tweaker > System Level Up (Subir de nivel el sistema) y seleccione la opción que desee. Botón OC Presione el botón OC situado en la esquina superior izquierda del panel frontal. Capítulo 6: Uso de las utilidades Probe II Probe II es una utilidad que permite consultar el estado de los principales componentes del equipo y detecta y avisa de cualquier problema relacionado con tales componentes. Probe II controla la velocidad de rotación del ventilador, la temperatura de la CPU y los voltajes del sistema, entre otros parámetros. Gracias a esta utilidad, podrá asegurarse de que el equipo se encuentre siempre en correcto estado de funcionamiento. Inicio de Probe II Una vez instalada la interfaz AI Suite II desde el DVD de soporte, inicie Probe II haciendo clic en Tool (Herramientas) > Probe II en la barra de menús principal de AI Suite II. Configuración de Probe II Español Haga clic en las pestañas Voltage (Voltaje)/Temperature (Temperatura)/Fan Speed (Velocidad del ventilador) para ajustar los valores de umbral del sensor correspondiente. La pestaña Preference (Preferencias) permite personalizar el intervalo de tiempo asociado a las advertencias de cada sensor y cambiar la unidad de temperatura. Permite guardar la configuración Permite cargar la configuración guardada ASUS CG8565 Permite cargar los valores de umbral predeterminados de cada sensor Permite aplicar los cambios 301 Sensor Recorder Sensor Recorder permite consultar y registrar los cambios que tienen lugar en el voltaje del sistema, la temperatura y la velocidad del ventilador. Inicio de Sensor Recorder • Una vez instalada la interfaz AI Suite II desde el DVD de soporte, haga clic en Tool (Herramientas) > Sensor Recorder en la barra de menús principal de AI Suite II para iniciar PC Probe. Configuración de Sensor Recorder • Haga clic en las pestañas Voltage (Voltaje)/Temperature (Temperatura)/Fan Speed (Velocidad del ventilador) y seleccione los sensores cuyos valores desee consultar. • La pestaña History Record (Registro histórico) permite registrar los cambios que tienen lugar en los sensores habilitados. Seleccione los sensores que desee consultar Español Arrastre si desea consultar el estado del sensor seleccionado durante un determinado periodo de tiempo Haga clic para volver al modo predeterminado 302 Haga clic para acercar/alejar el eje Y Haga clic para acercar/alejar el eje X Capítulo 6: Uso de las utilidades BT GO! BT GO! permite conectar un dispositivo Bluetooth con la placa base a través de la conexión Bluetooth para transferir archivos, sincronizar archivos, reproducir música, administrar información personal y varias funciones remotas. Iniciar BT GO! Para iniciar BT GO!, haga clic en Tool (Herramientas) > BT GO! en la barra de menús de AI Suite II. Utilizar BT GO! Lista de dispositivos Lista de funciones Se ilumina cuando la función está habilitada • • • Haga clic en y en para recorrer la lista de dispositivos y la lista de funciones. Haga clic en cualquiera de los iconos de dispositivo para seleccionar el dispositivo Bluetooth; BT GO! buscará automáticamente las funciones admitidas para el dispositivo seleccionado. Haga clic en cualquiera de los iconos de dispositivo o función para conectar el dispositivo seleccionado y habilitar o deshabilitar la función elegida. Funciones Shot and send (Disparar y enviar) Descripción Permite capturar una pantalla y enviarla al dispositivo Bluetooth conectado. BT Transfer (Transferencia BT) Permite compartir los archivos almacenados en el dispositivo Bluetooth anfitrión con otros dispositivos Bluetooth conectados. Folder Sync (Sincronización de carpetas) Permite sincronizar la carpeta seleccionada o hacer una copia de seguridad de la misma entre el dispositivo Bluetooth elegido y el equipo. Personal Manager (Administrador personal) Permite sincronizar los contactos personales y la información del calendario entre el dispositivo Bluetooth y el equipo. BT to Net (BT a red) Permite al equipo acceder a Internet a través de la red compartida mediante el dispositivo Bluetooth. Music Player (Reproductor de música) Permite reproducir los archivos de música seleccionados en el equipo utilizando el dispositivo Bluetooth. ASUS CG8565 Español Haga clic para mostrar el panel correspondiente en el lado derecho 303 Iniciar y configurar Ai Charger+ Ai Charger+, un software exclusivo y de carga rápida, permite cargar los dispositivos móviles BC 1.1* a través del puerto USB del equipo tres veces más rápido que los dispositivos USB estándar**. • * Consulte al fabricante de su dispositivo USB para comprobar si este es totalmente compatible con la función BC 1.1. • ** La velocidad de carga real puede variar en función de las condiciones del dispositivo USB. • Asegúrese de quitar y volver a conectar el dispositivo USB después de habilitar o deshabilitar la función Ai Charger+ para garantizar la función de carga normal. Para iniciar Ai Charger+, haga clic en Tool (Herramientas) > Ai Charger+ en la barra de menús principal de AI Suite II. Español 304 Capítulo 6: Uso de las utilidades Monitor La sección Monitor incluye los paneles Sensor y CPU Frequency (Frecuencia de la CPU). Sensor El panel Sensor muestra el valor actual correspon- diente a alguno de los sensores del sistema, como aquél asociado a la velocidad de rotación del ventilador, la temperatura de la CPU o los voltajes. Haga clic en Monitor > Sensor en la barra de menús principal de AI Suite II para abrir el panel Sensor. Frecuencia de la CPU El panel CPU Frequency (Frecuencia de la CPU) muestra la frecuencia actual de la CPU y su nivel de uso. Haga clic en Monitor > CPU Frequency (Frecuencia de la CPU) en la barra de menús principal de AI Suite II para abrir el panel CPU Frequency (Frecuencia de la CPU). Panel Sensor Panel CPU Frequency (Frecuencia de la CPU) Español Aspecto del panel derecho (área de información del sistema) ASUS CG8565 305 Actualización La sección Update (Actualización) permite actualizar el BIOS de la placa base y el logotipo de arranque del BIOS a través de las utilidades de actualización diseñadas por ASUS. ASUS Update (Actualización de ASUS) ASUS Update (Actualización de ASUS) es una utilidad que permite administrar, guardar y actualizar el BIOS de la placa base a través del SO Windows®. La utilidad ASUS Update (Actualización de ASUS) permite actualizar el BIOS directamente desde Internet, descargar el archivo de BIOS más reciente desde Internet, actualizar el BIOS empleando un archivo de BIOS actualizado, guardar el archivo del BIOS actual o ver la información relacionada con la versión del BIOS. Actualización del BIOS a través de Internet Para actualizar el BIOS a través de Internet: Español 1. En la pantalla de ASUS Update (Actualización de ASUS), seleccione la opción Update BIOS from Internet (Actualizar el BIOS desde Internet) y, a continuación, haga clic en Next (Siguiente). 2. Seleccione el sitio FTP de ASUS más cercano a su ubicación para evitar el tráfico de red. 3. 306 Si desea habilitar las funciones de retroceso de versión del BIOS y copia de seguridad automática del BIOS, active las casillas de verificación situadas junto a las dos opciones correspondientes de la pantalla. Seleccione la versión del BIOS que desee descargar. Haga clic en Next (Siguiente). Si no se detecta ninguna versión posterior a la instalada, se mostrará la pantalla representada en la ilustración de la derecha. Capítulo 6: Uso de las utilidades 4. 5. Si lo desea, puede cambiar el logotipo de arranque del BIOS; dicho logotipo es la imagen que se muestra en la pantalla durante las pruebas automáticas de encendido (POST, por sus siglas en inglés). Haga clic en Yes (Sí) si desea cambiar el logotipo de arranque o en No para continuar. Siga las instrucciones que aparecerán en la pantalla para llevar a cabo el proceso de actualización. Actualización del BIOS a través de un archivo de BIOS 1. En la pantalla de ASUS Update (Actualización de ASUS), seleccione la opción Update BIOS from file (Actualizar el BIOS desde un archivo) y, a continuación, haga clic en Next (Siguiente). 2. Busque el archivo de BIOS en la ventana Open (Abrir); haga clic en Open (Abrir) y, a continuación, en Next (Siguiente). 3. Si lo desea, puede cambiar el logotipo de arranque del BIOS. Haga clic en Yes (Sí) si desea cambiar el logotipo de arranque o en No para continuar. 4. Español Para actualizar el BIOS a través de un archivo de BIOS: Siga las instrucciones que aparecerán en la pantalla para llevar a cabo el proceso de actualización. ASUS CG8565 307 Información del sistema La sección System Information (Información del sistema) muestra información acerca de la placa base, la CPU y las ranuras de memoria. Haga clic en la pestaña MB (Placa base) si desea ver los datos correspondientes al fabricante de la placa base, el nombre del producto, la versión y el BIOS. • Haga clic en la pestaña CPU si desea ver los datos correspondientes al procesador y la memoria Caché. • Haga clic en la pestaña SPD (Detección de presencia serie) y seleccione una ranura de memoria si desea ver los datos correspondientes al módulo de memoria instalado en la ranura seleccionada. Español • 308 MB CPU Memory Capítulo 6: Uso de las utilidades Configuración La sección Settings (Configuración) permite personalizar la configuración de la barra de menús principal y la máscara de la interfaz. La pestaña Application (Aplicación) permite al usuario seleccionar la aplicación que desee habilitar. • La pestaña Bar (Barra) permite modificar la configuración de la barra. • La pestaña Skin (Máscara) permite personalizar el contraste, el brillo, la saturación, el matiz y el valor gamma de la interfaz. Español • ASUS CG8565 309 ASUS AI Manager ASUS AI Manager es una utilidad que facilita el acceso a las aplicaciones de uso más frecuente de forma rápida y sencilla. Instalación de AI Manager Para instalar AI Manager: 1. Coloque el DVD de soporte en la unidad óptica. Si la función Autorun (Ejecución automática) está habilitada, aparecerá el asistente Drivers installation (Instalación de controladores). Si la función Autorun (Ejecución automática) está deshabilitada, acceda a la carpeta ASUS AI Manager del DVD de soporte y haga doble clic en el archivo setup.exe. 2. Haga clic en la pestaña Utilities (Utilidades) y, a continuación, en ASUS AI Manager. 3. Siga las instrucciones que aparecerán en la pantalla para llevar a cabo la instalación. Inicio de AI Manager Para iniciar AI Manager desde el escritorio de Windows®, haga clic en Start (Inicio) > All Programs (Todos los programas) > ASUS > AI Manager > AI Manager 1.xx.xx. La barra rápida de AI Manager aparecerá en el escritorio. Español 310 Una vez iniciada la aplicación, aparecerá el icono de AI Manager en la barra de tareas de Windows®. Haga clic con el botón secundario en el icono para alternar entre la barra rápida y la ventana principal e iniciar AI Manager desde la barra rápida o la barra de tareas. Capítulo 6: Uso de las utilidades Barra rápida de AI Manager La barra rápida de AI Manager reduce el espacio que ocupa la aplicación en el escritorio y facilita el inicio de las utilidades ASUS y la presentación de información acerca del sistema. Haga clic en las pestañas Main (Principal), My Favorites (Mis favoritos), Support (Soporte) o Information (Información) para ver el contenido del menú correspondiente. Botón de salida Cambiar a la ventana principal Agregar a la barra de herramientas Principal Mis favoritos Soporte Información Haga clic en el botón Maximize (Maximizar)/Restore (Restaurar) para alternar entre los modos de ventana completa y barra rápida. Haga clic en el botón Minimize (Minimizar) para mantener AI Manager en la barra de tareas. Haga clic en el botón Close (Cerrar) para salir de AI Manager. Principal Haga clic para desplegar o plegar el menú AI Disk AI Disk facilita la eliminación de los archivos temporales, las cookies, las URLs y el historial de IE, así como la de aquellos archivos conservados en la papelera de reciclaje. Haga clic en el icono de AI Disk en la barra rápida para abrir la ventana de AI Disk y seleccionar los elementos que desee borrar. Cuando haya terminado, haga clic en Apply (Aplicar). ASUS CG8565 Español El menú Main (Principal) contiene tres utilidades: AI Disk, AI Security y AI Booting. Haga clic en la flecha que contiene el icono del menú Main (Principal) para explorar las utilidades del menú principal. 311 AI Security AI Security permite establecer una contraseña a través de la cual proteger dispositivos como un disco Flash USB o un disco CD/DVD frente a intentos de acceso no autorizado. Para bloquear un dispositivo: 2. Confirme la contraseña. 3. Introduzca un indicio de contraseña (recomendado). 4. Cuando haya terminado, haga clic en Ok (Aceptar). 5. Seleccione el dispositivo que desee bloquear y haga clic en Apply (Aplicar). 6.Introduzca la contraseña que estableció anteriormente y haga clic en Ok (Aceptar). 1.Si es la primera vez que usa AI Security, la aplicación le pedirá que establezca una contraseña. Introduzca una contraseña de 20 caracteres alfanuméricos como máximo. Español Para desbloquear el dispositivo: 1.Desactive la casilla de verificación correspondiente al dispositivo bloqueado y haga clic en Apply (Aplicar). 2.Introduzca la contraseña que estableció anteriormente y haga clic en Ok (Aceptar). Para cambiar la contraseña: 312 •Haga clic en Change Password (Cambiar contraseña) y siga las instrucciones que aparecerán en la pantalla para cambiar la contraseña. Capítulo 6: Uso de las utilidades AI Booting AI Booting permite especificar la prioridad de los distintos dispositivos en la secuencia de arranque. Para especificar una secuencia de arranque: 1.Seleccione un dispositivo y haga clic en la flecha hacia la izquierda/derecha para especificar su prioridad en la secuencia de arranque. 2. Cuando haya terminado, haga clic en Apply (Aplicar). Mis favoritos Español My Favorites (Mis favoritos) permite reunir aplicaciones de uso frecuente con objeto de evitar la necesidad de buscarlas en el equipo. Para agregar una aplicación: 1. Haga clic en Add (Agregar) y busque la aplicación que desee agregar a My Favorites (Mis favoritos). 2. Haga clic en Open (Abrir) en la ventana de búsqueda de archivos. La aplicación se agregará a la lista My Favorites (Mis favoritos). Haga clic con el botón secundario del ratón en el icono de una aplicación para iniciarla, eliminarla o cambiar su nombre. También puede hacer doble clic para iniciar la aplicación seleccionada. ASUS CG8565 313 Soporte Haga clic en cualquiera de los vínculos de la ventana Support (Soporte) para acceder al sitio web, el sitio web de asistencia técnica, el sitio web de descargas de soporte o la información de contacto de ASUS. Información Haga clic en alguna de las pestañas de la ventana Information (Información) si desea ver información detallada acerca del sistema, la placa base, la CPU, el BIOS, los dispositivos instalados y la memoria. Español 314 Capítulo 6: Uso de las utilidades Nero 9 Nero 9 permite crear, copiar, grabar, editar, compartir y actualizar diferentes tipos de datos. Instalación de Nero 9 1. Inserte el DVD de Nero 9 en la unidad óptica. 2. Si la función Autorun (Ejecución automática) está habilitada, el menú principal aparecerá automáticamente. Si la función Autorun (Ejecución automática) está deshabilitada, acceda al directorio principal del DVD de Nero 9 y haga doble clic en el archivo SeupX.exe. 3. En el menú principal, haga clic en Nero 9 Essentials. Español Para instalar Nero 9: 315 Seleccione el idioma en el que desee que se muestre el asistente Installation Wizard (Asistente para instalación). Haga clic en Next (Siguiente). 5. Haga clic en Next (Siguiente) para continuar. 6. Active la casilla de verificación I accept the License Conditions (Acepto las condiciones de la licencia). Cuando haya terminado, haga clic en Next (Siguiente). Español 4. 316 Seleccione la opción Typical (Típica) y haga clic en Next (Siguiente). 8. Active la casilla de verificación Yes, I want to help by sending anonymous application data to Nero (Sí, deseo colaborar enviando a Nero datos anónimos acerca de la aplicación) y haga clic en Next (Siguiente). 9. Cuando haya terminado, haga clic en Exit (Salir). Español 7. 317 Grabación de archivos Para grabar archivos: Español 318 1. En el menú principal, haga clic en Data Burning (Grabación de datos) > Add (Agregar). 2. Seleccione los archivos que desee grabar. Cuando haya terminado, haga clic en Add (Agregar). 3. Una vez seleccionados los archivos que desee grabar, haga clic en Burn (Grabar) para grabar los archivos en un disco. Si desea obtener más información acerca del uso de Nero 9, visite el sitio web de Nero (www.nero.com). Recuperación del sistema La partición de recuperación permite restaurar rápidamente el software del PC de sobremesa a su estado original de funcionamiento. Antes de usar la partición de recuperación, copie sus archivos de datos (como, por ejemplo, sus archivos PST de Outlook) a un dispositivo de almacenamiento USB o una unidad de red y anote los datos correspondientes a aquellos parámetros cuya configuración haya personalizado (como, por ejemplo, los correspondientes a la configuración de red). Acerca de la partición de recuperación Español Uso de la partición de recuperación La partición de recuperación es un espacio reservado del disco duro que se usa para restaurar el sistema operativo, los controladores y las utilidades instalados de fábrica en el PC de sobremesa. NO elimine la partición llamada RECOVERY (RECUPERACIÓN). La partición de recuperación se crea en la fábrica y no se puede restaurar si se elimina. Acuda a un centro de asistencia técnica autorizado por ASUS con el PC de sobremesa si experimenta algún problema relacionado con el proceso de recuperación. Uso de la partición de recuperación: 1. Pulse <F9> durante la secuencia de arranque. 2. Pulse <Enter (Entrar)> para seleccionar la opción Windows Setup [EMS Enabled] (Instalación de Windows [EMS habilitada]). 319 3. Seleccione una de las siguientes opciones de recuperación. System Image Backup (Copia de seguridad de la imagen del sistema): Esta función permite grabar una copia de seguridad de la imagen del sistema en un conjunto de discos DVD que podrá usar posteriormente para restaurar el sistema a su configuración predeterminada. 4. System Recovery (Recuperación del sistema): Esta función permite restaurar el sistema a su configuración predeterminada de fábrica. System DVD Backup (Copia de seguridad del DVD del sistema): Esta función permite crear una copia de seguridad del DVD de soporte. Siga las instrucciones que aparecerán en la pantalla para llevar a cabo el proceso de recuperación. Visite el sitio web de ASUS a través de la dirección www.asus.com si desea descargar los controladores y utilidades más recientes. Uso del DVD de recuperación (disponible sólo en determinados modelos) Prepare de 1 a 3 DVDs grabables en blanco del modo indicado para crear el DVD de recuperación. Español Quite la unidad de disco externa antes de llevar a cabo la recuperación del sistema en el PC de sobremesa. De acuerdo con Microsoft, podría perder datos importantes si Windows se instala en una unidad de disco incorrecta o se formatea la partición errónea. Para usar el DVD de recuperación: 1. Inserte el DVD de recuperación en la unidad óptica. El PC de sobremesa debe encontrarse encendido. 2. Reinicie el PC de sobremesa y pulse <F8> durante la secuencia de arranque; a continuación, seleccione la unidad óptica (puede que se llame “CD/DVD”) y pulse <Enter (Entrar)> para arrancar desde el DVD de recuperación. 3. Haga clic en OK (Aceptar) para iniciar la restauración de la imagen. 4. Haga clic en OK (Aceptar) para confirmar la recuperación del sistema. El proceso de restauración causará la eliminación de todos los datos almacenados en el disco duro. Asegúrese de crear una copia de seguridad de todos los datos importantes antes de llevar a cabo la recuperación del sistema. 5. Siga las instrucciones que aparecerán en la pantalla para llevar a cabo el proceso de recuperación. Durante el proceso de recuperación, NO extraiga el disco de recuperación a menos que así se lo indique el sistema; dicha acción podría inutilizar las particiones. Visite el sitio web de ASUS a través de la dirección www.asus.com si desea descargar los controladores y utilidades más recientes. 320 Capítulo 7 Resolución de problemas Resolución de problemas Este capítulo describe problemas comunes a los que el usuario podría enfrentarse durante el uso del equipo y aporta posibles soluciones para los mismos. ? El equipo no se puede encender; el indicador LED de encendido situado en el panel frontal no se ilumina. • Compruebe que el equipo se encuentre conectado correctamente. • Compruebe que la toma de suministro eléctrico funcione. • Compruebe que la fuente de alimentación se encuentre encendida. Consulte el apartado Encendido/apagado del equipo en el Capítulo 1 si desea obtener más información. El equipo se bloquea. • Lleve a cabo los pasos descritos a continuación para cerrar los programas que no respondan: 1.Pulse las teclas <Alt> + <Ctrl> + <Borrar> en el teclado y haga clic en Start Task Manager (Iniciar el Administrador de tareas). 2. ? ? Haga clic en la pestaña Applications (Aplicaciones). 3. Seleccione el programa que no responda y haga clic en End Task (Finalizar tarea). • Si el teclado no responde, mantenga pulsado el botón de encendido situado en la parte superior del chasis hasta que el equipo se apague. Pulse de nuevo el botón de encendido a continuación para encender el equipo. Español ? No puedo conectarme a una red inalámbrica empleando la tarjeta WLAN ASUS (disponible sólo en determinados modelos). • Asegúrese de haber introducido la clave de seguridad de red correcta para la red inalámbrica a la que desee conectarse. • Conecte las antenas externas (opcionales) a los conectores de antena de la tarjeta WLAN ASUS y colóquelas en la parte superior del chasis del equipo para maximizar el rendimiento de la conexión inalámbrica. Las teclas de dirección del teclado numérico no funcionan. ASUS CG8565 Compruebe si el indicador LED Number Lock (Bloq Num) está apagado. Si el indicador LED Number Lock (Bloq Num) está encendido, las teclas del teclado numérico sólo permitirán introducir números. Pulse la tecla Number Lock (Bloq Num) para apagar el indicador LED si desea usar las teclas de dirección del teclado numérico. 321 ? ? Español ? ? El monitor no muestra ninguna imagen. • Compruebe que el monitor se encuentre encendido. • Asegúrese de que el monitor se encuentre conectado correctamente al puerto de salida de vídeo del equipo. • Si el equipo cuenta con una tarjeta de gráficos discretos, asegúrese de conectar el monitor a un puerto de salida de vídeo perteneciente a la tarjeta de gráficos discretos. • Compruebe si alguna de las patillas del conector de vídeo del monitor está torcida. Si detecta la existencia de patillas torcidas, sustituya el cable del conector de vídeo del monitor. • Compruebe que el monitor se encuentre conectado correctamente a una fuente de alimentación. • Consulte la documentación suministrada con el monitor si desea obtener más información acerca de la resolución de problemas. Durante el uso de varios monitores, sólo uno de ellos muestra imágenes. • Asegúrese de que ambos monitores se encuentren encendidos. • Es normal que sólo el monitor conectado al puerto VGA muestre imágenes durante la etapa POST. La función de pantalla dual sólo funciona con Windows. • Si el equipo cuenta con una tarjeta gráfica instalada, asegúrese de conectar los monitores a los puertos de salida de la tarjeta gráfica. • Compruebe si la configuración para el uso de varias pantallas es correcta. Consulte el apartado Conexión de varias pantallas externas en el Capítulo 3 si desea obtener más información. El equipo no detecta un dispositivo de almacenamiento USB. • La primera vez que se conecta un dispositivo de almacenamiento USB a un equipo, Windows instala automáticamente el controlador correspondiente. Espere unos minutos y acceda a Mi PC para comprobar si el equipo ha detectado el dispositivo de almacenamiento USB. • Conecte el dispositivo de almacenamiento USB a otro equipo para comprobar si está averiado o no funciona correctamente. Deseo restaurar o deshacer los cambios que he aplicado a la configuración de sistema del equipo sin que ello afecte a mis archivos o datos personales. 322 La función System Restore (Restaurar sistema) de Windows® permite restaurar o deshacer cambios aplicados a la configuración de sistema del equipo sin que ello afecte a los datos personales (como, por ejemplo, a documentos o fotos). Si desea obtener más información, consulte el apartado Restauración del sistema en el Capítulo 2. Chapter 7: Troubleshooting ? La imagen no presenta la relación de aspecto correcta en un televisor HDTV. • Este efecto se debe al uso de diferentes resoluciones por parte del monitor y el televisor HDTV. Ajuste la resolución de pantalla a aquélla que corresponda al televisor HDTV. Para cambiar la resolución de pantalla: 1. Lleve a cabo cualquiera de las acciones descritas a continuación para abrir la pantalla de configuración Screen Resolution (Resolución de pantalla): • Haga clic en > Control Panel (Panel de control) > Appearance and Personalization (Apariencia y personalización) > Display (Pantalla) > Change display settings (Cambiar la configuración de pantalla). • Haga clic con el botón secundario del ratón en cualquier punto del escritorio de Windows. Cuando aparezca el menú emergente, haga clic en Personalize (Personalizar) > Display (Pantalla) > Change display settings (Cambiar la configuración de pantalla). Los altavoces no reproducen sonido. • • • • Asegúrese de conectar los altavoces al puerto de salida de línea (de color lima) situado en el panel frontal o el panel posterior. Compruebe que los altavoces se encuentren conectados a una fuente de alimentación eléctrica y encendidos. Ajuste el volumen de los altavoces. Asegúrese de no haber desactivado el sonido del sistema. •Si lo ha hecho, el icono de volumen presentará este aspecto: . Para habilitar el sonido del sistema, haga clic en de Windows y, a continuación, haga clic en • • ? Si el sonido del sistema no está desactivado, haga clic en el control deslizante para ajustar el volumen. y arrastre Conecte los altavoces a otro equipo para comprobar si funcionan correctamente. La unidad DVD no lee un disco. • • ? en el área de notificación . Español ? 2.Ajuste la resolución. Consulte la documentación suministrada con el televisor HDTV si desea conocer su resolución. 3.Haga clic en Apply (Aplicar) o en OK (Aceptar). A continuación, haga clic en Keep Changes (Conservar cambios) en el mensaje de confirmación. • Compruebe si ha colocado el disco con la etiqueta orientada hacia arriba. Compruebe que el disco se encuentre centrado en la bandeja, en especial si su forma o tamaño son poco frecuentes. Compruebe si el disco está arañado o deteriorado de cualquier otro modo. El botón de expulsión de la unidad DVD no responde. > Computer (Equipo). 1. Haga clic en 2. Haga clic con el botón secundario del ratón en continuación, haga clic en Eject (Expulsar) en el menú. ASUS CG8565 y, a 323 Encendido Problema Posible causa El voltaje de alimentación no es correcto. El equipo no se enciende. (El indicador de encendido permanece apagado). El equipo no está encendido. El cable de alimentación del equipo no está conectado correctamente. Existe un problema relacionado con la fuente de alimentación (PSU). Acción • C oloque el conmutador de voltaje de alimentación del equipo en la posición que corresponda a los requisitos de alimentación de su región. • Ajuste la configuración de voltaje. Asegúrese de que el cable de alimentación se encuentre desconectado de la toma de suministro eléctrico. Pulse el botón de encendido situado en el panel frontal y asegúrese de que el equipo se enciende. • Asegúrese de que el cable de alimentación se encuentre conectado correctamente. • Use otro cable de alimentación compatible. Instale otra fuente de alimentación (PSU) en el equipo. Pantalla Español 324 Problema Posible causa La pantalla no muestra ninguna imagen (permanece en color negro) después de encender el equipo. El cable de transmisión de señal no está conectado al puerto VGA correcto del equipo. Existe un problema relacionado con el cable de transmisión de señal. Acción • C onecte el cable de transmisión de señal al puerto de pantalla correcto (aquél de tipo VGA integrado en la placa o perteneciente a la tarjeta de gráficos discretos). • Si está usando una tarjeta VGA de gráficos discretos, conecte el cable de transmisión de señal a su puerto VGA. Intente conectar el equipo a otro monitor. Chapter 7: Troubleshooting Red LAN Posible causa El cable de red LAN no está conectado. Existe un problema relacionado con el cable de red LAN. No se puede acceder a Internet. El equipo no está conectado correctamente a un router o hub. La configuración de red no es correcta. Existe un problema relacionado con el uso del software antivirus. Existe un problema relacionado con el controlador. Acción Conecte el cable de red LAN al equipo. Asegúrese de que el indicador LED LAN se encuentre encendido. Si no es así, pruebe con otro cable de red LAN. Si el problema persiste, póngase en contacto con un centro de asistencia técnica autorizado por ASUS. Asegúrese de que el equipo se encuentre conectado correctamente a un router o hub. Póngase en contacto con su proveedor de servicios de Internet (ISP) y solicite la configuración de red LAN correcta que deba aplicar. Cierre el software antivirus. Vuelva a instalar el controlador de red LAN. Audio Problema Posible causa Los altavoces o auriculares no están conectados al puerto correcto. El equipo no reproduce sonidos. ASUS CG8565 Los altavoces o auriculares no funcionan. Acción • C onsulte el manual del usuario del equipo para determinar la ubicación del puerto correcto. • Desconecte los altavoces del equipo y vuelva a conectarlos a continuación. Español Problema Pruebe con otros altavoces o auriculares. Los puertos de audio frontales o posteriores no funcionan. Pruebe a conectar los altavoces o auriculares a los puertos de audio frontales y posteriores. Si alguno de ellos falla, compruebe si está configurado como puerto multicanal. Existe un problema relacionado con el controlador. Vuelva a instalar el controlador de audio. 325 Sistema Problema El sistema parece demasiado lento. Posible causa Existen demasiados programas en ejecución. El equipo ha sufrido el ataque de un virus. El disco duro ha sufrido un error. El sistema se bloquea o falla con frecuencia. Español 326 Existe un problema relacionado con los módulos de memoria. Acción Cierre algunos programas. • U se un software antivirus para detectar la presencia de virus y reparar el equipo. • Vuelva a instalar el sistema operativo. • Envíe el disco duro dañado a un Centro de asistencia técnica autorizado por ASUS y solicite su reparación. • Sustituya el disco duro por otro nuevo. • S ustituya los módulos de memoria por otros compatibles. • Retire los módulos de memoria complementarios que haya instalado y compruebe si el problema persiste. El equipo no recibe ventilación suficiente. Instale el equipo en una zona en la que disfrute de un flujo de aire más favorable. Se ha instalado software no compatible. Vuelva a instalar el SO y el software compatible. Chapter 7: Troubleshooting CPU Posible causa El equipo se está iniciando. El equipo genera demasiado ruido tras encenderlo. La configuración del BIOS se ha modificado. La versión del BIOS no es la más reciente. El ventilador de la CPU se ha sustituido. El equipo genera demasiado ruido durante el uso. Acción Se trata de un efecto normal; al encender el equipo, el ventilador gira a toda velocidad. La velocidad del ventilador se reduce de nuevo cuando el equipo carga el SO. Restaure la configuración del BIOS a sus valores predeterminados. Actualice el BIOS a la versión más reciente. Visite el sitio web de soporte de ASUS a través de la dirección http://support.asus.com si desea descargar la versión más reciente del BIOS. Asegúrese de usar un ventilador para CPU compatible o recomendado por ASUS. El equipo no recibe ventilación suficiente. Instale el equipo en una zona en la que disfrute de un flujo de aire más favorable. La temperatura del sistema es demasiado elevada. • A ctualice el BIOS. • Si sabe cómo desmontar y montar la placa base, intente limpiar el interior del chasis. Si el problema persiste, consulte la tarjeta de garantía del PC de sobremesa y póngase en contacto con un Centro de asistencia técnica autorizado por ASUS. Visite el sitio web de soporte de ASUS a través de la dirección http://support.asus.com/ si desea obtener información acerca de los centros de asistencia técnica. ASUS CG8565 Español Problema 327 Información de contacto con ASUS ASUSTeK COMPUTER INC. Domicilio de la compañía General (tel) Asistencia (fax) E-mail Dirección web Asistencia técnica General (tel) Asistencia en línea 15 Li-Te Road, Peitou, Taipei, Taiwan 11259 +886-2-2894-3447 +886-2-2890-7798 [email protected] www.asus.com.tw +86-21-38429911 support.asus.com ASUS COMPUTER INTERNATIONAL (América) Domicilio de la compañía General (tel) Asistencia (fax) Dirección web 800 Corporate Way, Fremont, CA 94539, USA +1-510-739-3777 +1-510-608-4555 usa.asus.com General (tel) Asistencia (fax) Contacto en línea +1-812-282-2787 +1-812-284-0883 support.asus.com Asistencia técnica ASUS COMPUTER GmbH (Alemania y Austria) Domicilio de la compañía Asistencia (fax) Dirección web Contacto en línea Asistencia técnica Harkort Str. 21-23, D-40880 Ratingen, Germany +49-2102-959911 www.asus.de www.asus.de/sales Teléfono de componentes +49-1805-010923* +49-2102-9599-11 Asistencia (fax) Asistencia en línea support.asus.com *Coste de la llamada: 0,14 /minuto desde una línea de teléfono fijo en Alemania; 0,42 /minuto desde un teléfono móvil. Fabricante ASUSTeK Computer Inc. Domicilio de la compañía: No. 150, LI-TE RD., PEITOU, TAIPEI 112, TAIWAN R.O.C Representante autorizado en Europa ASUSTeK Computer GmbH Domicilio de la compañía: HARKORT STR. 21-23, 40880 RATINGEN, GERMANY ASUS Essentio Desktop PC CG8565 Gebruikershandleiding DU6763 Eerste uitgave Augustus 2011 Copyright © 2011 ASUSTeK Computer Inc. Alle rechten voorbehouden. Geen enkel deel van deze handleiding, met inbegrip van de producten en de software die hierin is beschreven, mag zonder de uitdrukkelijke schriftelijke toestemming van ASUSTeK Computer Inc. ("ASUS") worden gereproduceerd, verzonden, getranscribeerd, opgeslagen in een ophaalsysteem of in enige taal worden vertaald in enige vorm of door enig middel, behalve documentatie die door de koper wordt gebruikt voor back-updoeleinden. De productgarantie of service zal niet worden verleend als: (1) het product is gerepareerd, gewijzigd of aangepast, tenzij dergelijke reparaties, wijzigingen of aanpassingen schriftelijk zijn toegestaan door ASUS; of (2) als het serienummer van het product onleesbaar is gemaakt of verwijderd. Nederlands ASUS BIEDT DEZE HANDLEIDING “ZOALS ZE IS” ZONDER ENIGE GARANTIES, HETZIJ UITDRUKKELIJK OF IMPLICIET, MET INBEGRIP VAN, MAAR NIET BEPERKT TOT DE IMPLICIETE GARANTIES OF VOORWAARDEN VOOR VERKOOPBAARHEID OF GESCHIKTHEID VOOR EEN BEPAALD DOEL. IN GEEN GEVAL ZAL ASUS, HAAR DIRECTEURS, FUNCTIONARISSEN, WERKNEMERS OF AGENTEN AANSPRAKELIJK ZIJN VOOR ENIGE INDIRECTE, SPECIALE, INCIDENTELE OF GEVOLGSCHADE (INCLUSIEF SCHADE DOOR WINSTDERVING, VERLIES VAN HANDEL, VERLIES VAN GEBRUIK OF GEGEVENS, ONDERBREKING VAN HANDEL EN DERGELIJKE), ZELFS ALS ASUS OP DE HOOGTE WERD GEBRACHT VAN DE MOGELIJKHEID VAN DERGELIJKE SCHADE DIE VOORTVLOEIT UIT FOUTEN IN DEZE HANDLEIDING OF DEFECTEN AAN HET PRODUCT. DE SPECIFICATIES EN INFORMATIE DIE IN DEZE HANDLEIDING ZIJN OPGENOMEN, ZIJN UITSLUITEND INFORMATIEF BEDOELD EN OP ELK OGENBLIK EN ZONDER KENNISGEVING ONDERHEVIG AAN WIJZIGINGEN. ZE MOGEN NIET WORDEN BESCHOUWD ALS EEN VERBINTENIS DOOR ASUS. ASUS AANVAARDT GEEN VERANTWOORDELIJKHEID OF AANSPRAKELIJKHEID VOOR FOUTEN OF ONNAUWKEURIGHEDEN DIE MOGELIJK IN DEZE HANDLEIDING ZIJN VERMELD, INCLUSIEF DE PRODUCTEN EN SOFTWARE DIE ERIN ZIJN BESCHREVEN. Producten en bedrijfsnamen die in deze handleiding zijn vermeld, zijn mogelijk geregistreerde handelsmerken of auteursrechten van hun respectieve bedrijven en worden uitsluitend gebruikt voor identificatie of toelichting en in het voordeel van de eigenaar, zonder de bedoeling te hebben een inbreuk te plegen op hun rechten. 330 Inhoudsopgave Mededelingen............................................................................................. 333 Veiligheidsinformatie................................................................................... 335 Conventies die in deze handleiding worden gebruikt................................. 336 Waar meer informatie te vinden.................................................................. 336 Inhoud verpakking...................................................................................... 337 Hoofdstuk 1 Aan de slag Welkom!...................................................................................................... 339 Uw computer leren kennen......................................................................... 339 Uw computer instellen................................................................................ 344 Uw computer AAN/UIT-schakelen.............................................................. 347 Hoofdstuk 2 Windows® 7 gebruiken De eerste keer opstarten............................................................................ 349 Windows® 7-bureaublad gebruiken............................................................. 350 Uw bestanden en mappen beheren........................................................... 352 Uw systeem herstellen................................................................................ 354 Uw computer beschermen.......................................................................... 355 Hulp en ondersteuning voor Windows® krijgen........................................... 356 Hoofdstuk 3 Apparaten op uw computer aansluiten Een USB-opslagapparaat aansluiten......................................................... 357 Microfoon en luidsprekers aansluiten......................................................... 358 Meerdere externe schermen aansluiten..................................................... 361 Hoofdstuk 4 Uw computer gebruiken Juiste houding bij het gebruik van uw Desktop PC.................................... 365 De geheugenkaartlezer gebruiken............................................................. 366 Het optisch station gebruiken..................................................................... 367 Het ASUS ROG U9N gametoetsenbord gebruiken.................................... 368 Nederlands Een HDTV aansluiten................................................................................. 363 De ASUS GX900 gamemuis gebruiken...................................................... 369 Hoofdstuk 5 Verbinden met het Internet Bekabelde verbinding................................................................................. 377 331 Inhoudsopgave Hoofdstuk 6 De hulpprogramma's gebruiken ASUS AI Suite II.......................................................................................... 379 ASUS AI Manager....................................................................................... 392 Nero 9 ....................................................................................................... 397 Uw systeem herstellen................................................................................ 401 Hoofdstuk 7 Problemen oplossen Problemen oplossen................................................................................... 403 Nederlands 332 Mededelingen REACH Wij publiceerden, met naleving van het regulerend kaderwerk van REACH (Registratie, Evaluatie, Autorisatie en Restrictie van chemische stoffen), op de ASUS REACH-website op http://green.asus.com/english/REACH.htm, de chemische substanties in onze producten. Verklaring van Federale communicatiecommissie Dit apparaat voldoet aan Deel 15 van de FCC-reguleringen. Bediening wordt aan de volgende twee condities onderworpen: • dit apparaat mag geen schadelijke storingen veroorzaken; en • dit apparaat moet enige ontvangen storing accepteren, inclusief storingen die ongewenste werking kunnen veroorzaken. Dit apparaat is getest en is in naleving met de limieten voor een Klasse B digitaal apparaat, volgens Deel 15 van de FCC-reguleringen bevonden. Deze limieten zijn ontworpen om redelijke bescherming te bieden tegen schadelijke storingen in een residentiële installatie. Dit apparaat genereert, gebruikt en kan energie door radiofrequentie uitstralen en, wanneer niet volgens de instructies van de fabrikant geïnstalleerd en gebruikt, kan het schadelijke storingen aan radiocommunicatie veroorzaken. Er bestaat echter geen garantie dat bij een bepaalde installatie zich geen storing zal voordoen. Als dit apparaat schadelijke storing aan radio- of televisie-ontvangst veroorzaakt, wat kan worden vastgesteld door het apparaat aan en uit te schakelen, wordt de gebruiker verzocht te proberen de storing volgens één of meer van de volgende maatregelen te corrigeren: • de ontvangende antenne opnieuw richten of verplaatsen; • de afstand tussen het apparaat en de ontvanger te vergroten; • de dealer of een ervaren radio/tv-monteur om hulp te vragen. het apparaat op een contactdoos van een ander circuit dan die waarop de ontvanger is aangesloten, aan te sluiten; Om compliantie met FCC-reguleringen te verzekeren, wordt voor het verbinden van het scherm aan de grafische kaart het gebruik van afgeschermde kabels vereist. Alle wijzigingen of aanpassingen aan deze eenheid, die niet uitdrukkelijk zijn goedgekeurd door de partij die verantwoordelijk is voor de naleving, kunnen de bevoegdheid van de gebruiker om het apparaat te bedienen nietig verklaren. Nederlands • 333 Waarschuwing RF-blootstelling Dit apparaat moet volgens de geleverde instructies worden geïnstalleerd en bedient en de antenne(s) die voor deze zender word(t/en) gebruikt moet zo worden geïnstalleerd dat van alle personen een scheidende afstand van minstens 20 cm bestaat. Het mag niet in de buurt van een andere antenne of zender worden geplaatst of bedient. Eindgebruikers en installateurs moeten de installatie-instructies van de antenne en de bedieningscondities van de zender ontvangen om een goede compliantie voor RF-blootstelling te verkrijgen. Canadees ministerie van Communicatie Dit digitale apparaat overschrijdt niet de Klasse B-limieten voor geluidshinder van digitale apparaten die in de Reguleringen van radiostoringen van het Canadees ministerie van Communicatie uiteen worden gezet. Dit digitale apparaat van Klasse B voldoet aan de Canadese ICES-003. Productmededeling van Macrovision Corporation Dit product bevat copyright beschermende technologie die door claimmethodes van bepaalde Amerikaanse octrooien en andere intellectuele eigendomsrechten wordt beschermd, die eigendom zijn van Macrovision Corporation en andere rechtmatige eigenaren. Gebruik van deze copyright beschermende technologie moet door Macrovision Corporation worden geauthoriseerd en is alleen voor gebruik thuis en andere beperkt kijken bestemd, tenzij anders toegestemd door Macrovision Corporation. Reverse engineering of demontage is verboden. Waarschuwing lithium-ion batterij VOORZICHTIG: Gevaar van explosie als de batterij onjuist wordt geplaatst. Alleen met hetzelfde of equivalente type die door de fabrikant wordt aangeraden, vervangen. Werp gebruikte batterijen volgens de instructies van de fabrikant weg. ASUS-diensten voor recycling/terugname Nederlands 334 De recyling- en terugnameprogramma’s van ASUS zijn voortgevloeid uit onze inzet voor de hoogste standaarden voor milieubescherming. Wij geloven in het leveren van oplossingen voor u om onze producten, batterijen en andere componenten, evenals het verpakkingsmateriaal, op een verantwoorde manier te recyclen. Ga naar http://csr.asus. com/english/Takeback.htm voor gedetailleerde recyclinginformatie in de verschillende regio’s. Veiligheidsinformatie Voor het reinigen van de AC-stroom en randapparatuur verwijderen. Veeg de Desktop PC met een schone cellulose spons of zeemleren doek die met een niet schurende reinigingsoplossing en enkele druppels warm water is bevochtigd, schoon en verwijder met een droge doek enig overmatige nattigheid. • • • • • • • • • • • • NIET op onegale of instabiele werkoppervlakken plaatsen. Als de behuizing beschadigd is geraakt, dient u hulp bij onderhoud hulp te zoeken. NIET aan vieze of stoffige omgevingen blootstellen. NIET tijdens een gaslekkage bedienen. NIET bovenop objecten plaatsen of laten vallen en geen vreemde voorwerpen in de Desktop PC duwen. NIET aan krachtige magnetische of elektrische velden blootstellen. NIET in de buurt van vloeistoffen, regen of vocht blootstellen of gebruiken. NIET de modem tijdens onweer gebruiken. Waarschuwing ter beveiliging van de batterij: NIET de batterij in vuur werpen. NIET de contacten kortsluiten. NIET de batterij uit elkaar halen. Gebruik dit product in omgevingen met omgevingstemperaturen tussen 0˚C (32°F) en 35˚C (95˚F). NIET de ventilatieopeningen van de Desktop PC afdekken, om oververhitting van het systeem te voorkomen. NIET beschadigde stroomkabels, accessoires of andere randapparatuur gebruiken. Verwijder, voordat u het systeem verplaatst, de stroomkabel uit de contactdoos om elektrische schok te vermijden. Zoek professionele hulp voordat u een adapter of verlengsnoer gebruikt. Deze apparaten kunnen het aardingscircuit onderbreken. Zorg dat uw netvoeding op de juiste spanning in uw gebied hebt ingesteld. Als u niet zeker weet welke spanning op de elektrische contactdoos staat, dient u contact op te nemen met uw lokale energiemaatschappij. Als de netvoeding is beschadigd, mag u niet proberen het zelf te repareren. Neem contact op met een bevoegde servicemonteur of uw handelaar. Nederlands • 335 Conventies die in deze handleiding worden gebruikt Om te verzekeren dat u bepaalde taken juist uitvoert, dient u op de volgende symbolen die in deze handleiding worden gebruikt, te letten. GEVAAR/WAARSCHUWING: informatie om lichamelijke letsels te voorkomen wanneer u een taak probeert uit te voeren. VOORZICHTIG: Informatie om schade aan de onderdelen te voorkomen wanneer u een taak probeert uit te voeren. BELANGRIJK: Instructies die u MOET volgen om een taak te voltooien. OPMERKING: tips en aanvullende informatie om u te helpen bij het voltooien van uw taak. Waar meer informatie te vinden Raadpleeg de volgende bronnen voor aanvullende informatie en voor updates van het product en de software. Nederlands 336 ASUS-websites De ASUS-website biedt bijgewerkte informatie over ASUS-hardware en softwareproducten. Raadpleeg de ASUS-website op www.asus.com. Lokale technische ondersteuning van ASUS Ga voor contactinformatie van de plaatselijke technicus van Technische ondersteuning naar de ASUS-website op http://support.asus.com/contact. Inhoud verpakking ASUS Essentio Desktop PC ASUS ROG U9N gametoetsenbordpakket x1 ASUS GX900 gamemuispakket x1 Installation Guide Stroomkabel x1 Nero 9 brandsoftware dvd x`1 (optioneel) Installatiehandleiding x1 Garantiekaart x1 Ondersteuning voor DVD x1 (optioneel) Herstel-DVD x1 (optioneel) • Als een van de bovenstaande items beschadigd is of ontbreekt, moet u contact opnemen met uw leverancier. • Meer informatie over het gebruik van het bijgeleverde gametoetsenbord en de gamemuis, vindt u in de hoofdstukken Het ASUS ROG gametoetsenbord gebruiken en De ASUS GX900 gamemuis gebruiken. Nederlands • De hierboven weergegeven items zijn alleen ter referentie. Feitelijke productspecificaties kunnen bij verschillende modellen variëren. 337 Nederlands 338 Hoofdstuk 1 Aan de slag Welkom! Dank u voor de aankoop van de ASUS Essentio CG8565 Desktop PC! De ASUS Essentio CG8565 Desktop PC biedt ultramoderne prestaties, ongecomprimeerde betrouwbaarheid en op gebruikers gerichte hulpprogramma's. Al deze waarden worden in een prachtige futuristische en stijlvolle systeembehuizing ingesloten. Lees de ASUS-garantiekaart voordat u uw ASUS Desktop PC opstelt. Uw computer leren kennen Afbeeldingen zijn alleen ter referentie. De poorten en hun locaties, evenals de chassiskleur kunnen bij de verschillende modellen anders zijn. Voorpaneel 8 7 6 9 10 11 12 1 2 3 Nederlands 4 5 ASUS CG8565 339 1. Aan-/uit-knop. Druk op deze knop om uw computer in te schakelen. 2. Sleuf voor Secure Digital™ / MultiMediaCard. Plaats in deze sleuf een Secure Digital™- of MultiMediaCard-kaart. 3. Sleuf van optisch schijfstation. In deze sleuf bevindt zich een optisch schijfstation. 4. Hot Swap-sleuf (leeg). in deze sleuf kunt u een extra harde schijf installeren. 5. Voedings-LED. Deze LED brandt als u uw computer inschakelt. 6. Kaartsleuf voor Memory Stick™/Memory Stick Pro™. Plaats in deze sleuf een Memory Stick™-/ Memory Stick Pro™-kaart. 7. CompactFlash®-/Microdrive™-kaartsleuf. Plaats in deze sleuf een CompactFlash®/Microdrive™-kaart. 8. OC-knop. Deze knop past het profiel voor Systeemniveau omhoog van uw computer aan. 9. USB 2.0-poorten. Deze universele seriële bus 3.0 (USB 3.0) poorten sluit USB 3.0apparatuur aan zoals een muis, printer, scanner, camera, PDA en anderen. • Bij het installeren van het Windows®-besturingsysteem GEEN toetsenbord/muis op een USB 3.0-poort aansluiten. • Wegens beperkingen van de USB 3.0-controller, kunnen USB 3.0-apparaten alleen in een omgeving van een Windows®-besturingsysteem en na installatie van het USB 3.0stuurprogramma worden gebruikt. • USB 3.0-apparaten kunnen alleen voor gegevensopslag worden gebruikt. • Wij raden u ten zeerste aan dat u de USB 3.0-apparaten op USB 3.0 poorten aansluit om zo een snellere en betere prestatie voor uw USB 3.0-apparaten te verkrijgen. 10. USB 2.0-poorten. Deze universele seriële bus 2.0 (USB 2.0) poorten sluit USB 2.0apparatuur aan zoals een muis, printer, scanner, camera, PDA en anderen. 11. Microfoonpoort (rose). Op deze poort kan een microfoon worden aangesloten. 12. ��������������������������� Koptelefoonpoort (limoen). Op deze poort kan een koptelefoon of luidspreker worden aangesloten. Nederlands 340 Hoofdstuk 1: Aan de slag Achterpaneel 16 E-SATA 1 2 13 3 17 4 18 5 7 8 9 19 6 20 21 10 11 12 13 14 15 1.������������������ USB 2.0-poorten. Deze universele seriële bus 2.0 (USB 2.0) poorten sluit USB 2.0apparatuur aan zoals een muis, printer, scanner, camera, PDA en anderen. 2. E-SATA-poort. Deze poort wordt gebruikt voor het aansluiten van een extern HDD/ ODD-station. 3.���������������������������� Optische S/PDIF_OUT-poort. Op deze poort wordt via een optische S/PDIF-kabel een extern audio-uitvoerapparaat aangesloten. HDMI-poort. Deze poort is voor een High-Definition Multimedia Interface (HDMI)connector en is compliant aan HDCP waardoor HD-dvd, Blue-ray en andere beschermde inhoud kan worden afgespeeld. 5.������������� DVI-D-poort. Deze poort is voor een DVI-D compatibel apparaat en is compliant aan HDCP waardoor HD-dvd, Blue-ray en andere beschermde inhoud kan worden afgespeeld. 6.����������������� USB 3.0-poorten. Deze universele seriële bus 3.0 (USB 3.0) poorten sluit USB 3.0apparatuur aan zoals een muis, printer, scanner, camera, PDA en anderen. Nederlands 4. • Bij het installeren van het Windows®-besturingsysteem GEEN toetsenbord/muis op een USB 3.0-poort aansluiten. • Wegens beperkingen van de USB 3.0-controller, kunnen USB 3.0-apparaten alleen in een omgeving van een Windows®-besturingsysteem en na installatie van het USB 3.0stuurprogramma worden gebruikt. • USB 3.0-apparaten kunnen alleen voor gegevensopslag worden gebruikt. • Wij raden u ten zeerste aan dat u de USB 3.0-apparaten op USB 3.0 poorten aansluit om zo een snellere en betere prestatie voor uw USB 3.0-apparaten te verkrijgen. ASUS CG8565 341 7. Poort luidspreker zijkant Uit (grijs). Deze poort wordt in een audio-configuratie van 8-kanalen met de luidsprekers aan de zijkant verbonden. 8.����������������������������������������� Poort achterste luidspreker Uit (zwart). Deze poort wordt in een audio-configuratie van 4-, 6- en 8-kanalen met de luidsprekers aan de achterkant verbonden. 9.���������������������������������� Poort Centrum/Subwoofer (oranje). Deze poort wordt met de centrum/subwooferluidsprekers verbonden. 10.����������������������� Microfoonpoort (rose). Op deze poort kan een microfoon worden aangesloten. 11.������������������������� Poort lijn Uit (limoen). Op deze poort kan een koptelefoon of luidspreker worden aangesloten. Bij een configuratie van 4-, 6- of 8-kanalen wordt de functie van de poort Voorste luidspreker Uit. 12.���������������������������� Poort lijn In (lichtblauw). Deze poort wordt met een cassette-, cd-, dvd-speler of andere audiobronnen verbonden. Audio 2, 4, 6, of 8-kanalenconfiguratie Poort Koptelefoon 2-kanalen 4-kanalen 6-kanalen Lichtblauw Lijn In Lijn In Lijn In Lijn In Voorste luidspreker Uit Voorste luidspreker Uit 8-kanalen Limoen Lijn Uit Voorste luidspreker Uit Rose Mic In Mic In Mic In Mic In Oranje – – Centrum/subwoofer Centrum/subwoofer Zwart – Achterste luidspreker Uit Achterste luidspreker Uit Achterste luidspreker Uit Grijs – – – Luidspreker zijkant Uit 13. Ventilatieopeningen. Deze ventilatieopeningen maken luchtventilatie mogelijk. NIET de ventilatieopeningen op het chassis blokkeren. Zorg altijd dat uw computer goede ventilatie ontvangt. Nederlands 342 14. �������������������� Voedingsconnector. Steek in deze connector de stroomkabel. 15.���������������� Aan-/uit-knop. Schakel de voeding naar uw computer AAN/UIT. 16. Bluetooth-module. Sluit een Bluetooth-apparaat, zoals een mobiele telefoon, aan voor een draadloze gegevensoverdracht. 17.������������� ����������� VGA-poort. Deze poort is voor VGA-compatibele apparaten zoals een VGA-monitor. Hoofdstuk 1: Aan de slag 18. LAN (RJ-45)-poort. Deze poort maakt het mogelijk om via een netwerk-hub een Gigabit-verbinding naar een Local Area Network (LAN) te maken. LED-indicaties LAN-poort Activiteiten-/koppelings-LED Snelheids-LED Status Beschrijving Status Beschrijving ORANJE Gekoppeld ORANJE 100 Mbps-verbinding UIT KNIPPEREN Geen koppeling UIT GROEN 10 Mbps-verbinding 1 Gbps-verbinding ACT/ KOPPELINGS-LED SNELHEIDS-LED LAN-poort Raadpleeg de tabel voor audioconfiguratie voor de functies van de audiopoorten in een configuratie van 2-, 4-, 6- of 8-kanalen. 19.����������������������������������������� Poorten geluidskaarten (verwisselbaar). Deze poorten dienen voor het aansluiten van uw uitvoerapparaten, zoals een microfoon, headset en luidsprekers. 20.��������������������������������������������������������� ASUS grafische kaart (alleen op geselecteerde modellen). De displayuitvoerpoorten op de optionele ASUS grafische kaart kunnen bij de verschillende modellen anders zijn. Nederlands 21.������������������������� Beugel sleufuitbreiding. Verwijder de beugel voor sleufuitbreiding als u een uitbreidingskaart installeert. ASUS CG8565 343 Uw computer instellen Deze paragraaf leidt u door het verbinden van de belangrijkste hardware-apparatuur, zoals de externe monitor, het toetsenbord, de muis en stroomkabel aan uw computer. Een externe monitor verbinden Gebruik de ASUS grafische kaart (alleen op geselecteerde modellen) Verbind uw monitor via de display-uitvoerpoort met de discrete ASUS grafische kaart. Ga als volgt te werk om met een ASUS grafische kaart een externe monitor te verbinden: 1. Verbind uw monitor via een display-uitvoerpoort met de discrete ASUS grafische kaart. 2. Steek de stekker van de monitor in een stopcontact. De display-uitvoerpoorten op de ASUS grafische kaart kunnen bij de verschillende modellen anders zijn. Nederlands 344 Hoofdstuk 1: Aan de slag De onboard display-uitvoerpoorten gebruiken Verbind uw monitor met de onboard display-uitvoerpoort. Ga als volgt te werk om een externe monitor via de onboard display-uitvoerpoorten aan te sluiten: Sluit op het achterpaneel van uw computer een VGA-monitor aan op de VGA-poort, of een DVI-D-monitor op de DVI-D-poort, of een HDMI-monitor op de HDMI-poort. 2. Steek de stekker van de monitor in een stopcontact. Nederlands 1. • Als uw computer met een ASUS grafische kaart komt, wordt de grafische kaart in de BIOS als het primaire display-apparaat ingesteld. Sluit uw monitor vervolgens aan op een display-uitvoerpoort op de grafische kaart aan. • Raadpleeg Meerdere externe monitors aansluiten in Hoofdstuk 3 van deze gebruikershandleiding voor details over hoe meerdere externe monitors op uw computer aan te sluiten. ASUS CG8565 345 Een USB-toetsenbord en een USB-muis aansluiten Sluit op het achterpaneel van uw computer een USB-toetsenbord en een USB-muis op de USB-poorten aan. De stroomkabel verbinden Sluit één uiteinde van de stroomkabel aan op de stroomconnector op het achterpaneel van uw computer en het andere uiteinde van een voedingsbron. Nederlands 346 Hoofdstuk 1: Aan de slag Uw computer AAN/UIT-schakelen Deze paragraaf beschrijft hoe uw computer aan/uit te schakelen nadat u uw computer hebt opgezet. Uw computer AAN-schakelen Ga als volgt te werk om uw computer AAN te schakelen: 1. Schakel uw monitor AAN. 2. Zet de voedingsschakelaar AAN en druk vervolgens op de voedingsknop op uw computer. Aan-/uit-knop E-SATA 3. Wacht tot het besturingsysteem automatisch wordt geladen. Uw computer UIT-schakelen Ga als volgt te werk om uw computer UIT te schakelen: 1. Sluit alle werkende applicaties. 2. Klik 3. Klik op ASUS CG8565 om het besturingssysteem te sluiten. Nederlands op het Windows®-bureaublad. 347 Nederlands 348 Hoofdstuk 1: Aan de slag Hoofdstuk 2 Windows® 7 gebruiken De eerste keer opstarten Wanneer u uw computer voor de eerste keer opstart, verschijnen een reeks schermen die u begeleiden bij de configuratie van de basisinstellingen van het besturingsysteem van uw Windows®7. Om voor de eerste keer op te starten: 1. Zet uw computer aan. Wacht enkele minuten totdat het scherm Set Up Windows (Windows installeren) verschijnt. 2. Selecteer van het vervolgkeuzelijst uw taal. Klik op Next (Volgende). 3. Selecteer van de vervolgkeuzelijsten uw Country or region (Land of regio), Time and currency (Tijd en valuta) en Keyboard layout (Toetsenbordindeling). Klik op Next (Volgende). 4. Typ unieke namen voor de user name (gebruikersnaam) en computer name (computernaam). Klik op Next (Volgende). 5. Typ de nodige informatie om uw wachtwoord in te stellen en klik daarna op Next (Volgende). U mag ook op Next (Volgende) klikken om, zonder enige informatie in te voeren, deze stap over te slaan. 6. Lees aandachtig de licentievoorwaarden. Vink I accept the license terms (Ik accepteer de licentievoorwaarden) aan en klik op Next (Volgende). 7. Selecteer Use recommended settings (Aanbevolen instellingen gebruiken) of Install important updates only (Alleen belangrijke updates installeren) om de beveiligingsinstellingen voor uw computer in te stellen. Selecteer Ask me later (Vraag me later) om deze stap over te slaan. 8. Controleer uw datum- en tijdinstellingen. Klik op Next (Volgende). Het systeem laadt de nieuwe instellingen en start opnieuw. U mag nu uw computer beginnen te gebruiken. ASUS CG8565 Nederlands Raadpleeg de paragraaf Een gebruikersaccount en wachtwoord instellen in dit hoofdstuk als u later voor uw account een wachtwoord wilt instellen. 349 Windows® 7-bureaublad gebruiken Klik op de pictogram Start Windows® 7. > Help en Ondersteuning voor meer informatie over Het startmenu gebruiken Het startmenu biedt u toegang tot programma's, hulpprogramma's en andere nuttige items op uw computer. Ook biedt het u via de functie Help and Support (Help en ondersteuning) meer informatie over Windows 7. Items vanaf het startmenu lanceren Ga als volgt te werk om items vanaf het startmenu te lanceren: 1. Klik op de Windows®-takenbalk op de pictogram Start 2. Selecteer vanaf het Startmenu het item dat u wilt lanceren. . U kunt programma's die u continu op het startmenu wilt weergeven, vastpinnen. Raadpleeg in dit hoofdstuk de paragraaf Programma's op het startmenu of de takenbalk vastpinnen voor meer details. Het item Om te beginnen gebruiken Het item Getting Started (Om te beginnen) op het startmenu bevat enkele basistaken zoals Windows® verpersoonlijken, nieuwe gebruikers toevoegen, bestanden overdragen. Hiermee wordt u geholpen om bekend te raken met het gebruik van Windows® 7. Ga als volgt te werk om het item Om te beginnen te gebruiken: 1. 2. 3. Klik op de Windows®-takenbalk op de pictogram Start om het startmenu te lanceren. Selecteer Getting Started (Om te beginnen). De lijst beschikbare taken verschijnt. Selecteer de taak die u wilt uitvoeren. De takenbalk gebruiken Nederlands Met de takenbalk kunt u programma's en items die op uw computer zijn geïnstalleerd, lanceren en beheren. Van de takenbalk een programma lanceren Ga als volgt te werk om van de takenbalk een programma te lanceren: • Klik op de Windows®-takenbalk op een pictogram om het te lanceren. Klik opnieuw op de pictogram om het programma te verbergen. U kunt programma's die u continu op te takenbalk wilt weergeven, vastpinnen. Raadpleeg in dit hoofdstuk de paragraaf Programma's op het startmenu of de takenbalk vastpinnen voor meer details. 350 Hoofdstuk 2: Windows® 7 gebruiken Items op de Jump Lists vastpinnen Als u met de rechtermuisknop op de takenbalk op een pictogram klikt, biedt een jump list u snelle toegang tot de aan de programma's of items verwante koppelingen. U kunt items, zoals favoriete websites, vaak bezochte mappen of stations, of onlangs afgespeelde mediabestanden op de jump list vastpinnen. Ga als volgt te werk om items op de jump list vast te pinnen: 1. Klik met de rechtermuisknop op een pictogram op de takenbalk. 2. Klik vanuit de jump list met de rechtermuisknop op het item dat u wilt vastpinnen en selecteer dan Pin to this list (Aan deze lijst vastpinnen). Vastgepinde items van de jump list verwijderen Ga als volgt te werk om vastgepinde items van de jump list te verwijderen: 1. Klik met de rechtermuisknop op een pictogram op de takenbalk. 2. Klik vanuit de jump list met de rechtermuisknop op het item dat u wilt vastpinnen en selecteer dan Unpin from this list (Van deze lijst verwijderen). Programma's op het startmenu of de takenbalk vastpinnen Ga als volgt te werk om programma's op het startmenu of de takenbalk vast te pinnen: 1. Klik op de Windows®-takenbalk op de pictogram Start 2. Klik met de rechtermuisknop op het item dat u op het startmenu of de takenbalk wilt vastpinnen. om het startmenu te lanceren. 3. Selecteer Pin to Taskbar (Aan takenbalk vastpinnen) of Pin to Start menu (Aan startmenu vastpinnen). U kunt ook met de rechtermuisknop op de takenbalk op het pictogram van een actief programma klikken en dan Pin this program to taskbar (Dit programma aan takenbalk vastpinnen) selecteren. Programma's van het startmenu verwijderen 1. Klik op de Windows®-takenbalk op de pictogram Start lanceren. om het startmenu te 2. Klik vanuit het startmenu met de rechtermuisknop op het item dat u wilt verwijderen en selecteer dan Remove from this list (Van deze lijst verwijderen). Nederlands Ga als volgt te werk om programma's van het startmenu te verwijderen: Programma's van de takenbalk verwijderen Ga als volgt te werk om programma's van de takenbalk te verwijderen: 1. Klik vanuit de takenbalk met de rechtermuisknop op het item dat u van de takenbalk wilt verwijderen en selecteer dan Unpin this program from taskbar (Dit programma van takenbalk verwijderen). ASUS CG8565 351 Het systeemvak gebruiken Het systeemvak toont standaard deze drie pictogrammen: Notificatie Actiecentrum Klik op deze pictogram om alle waarschuwingsberichten/-notificaties weer te geven en om het Windows® Actiecentrum te lanceren. Netwerkverbinding Deze pictogram geeft de verbindingstatus en signaalsterkte van de bedrade of draadloze netwerkverbinding weer. Volume Klik op deze pictogram om het volume af te stellen. Een waarschuwingsnotificatie weergeven Ga als volgt te werk om een waarschuwingsnotificatie weer te geven: • Klik op de pictogram Notificatie en klik daarna op het bericht om het te openen. Raadpleeg in dit hoofdstuk de paragraaf Windows® Actiecentrum gebruiken voor meer details. Pictogrammen en notificaties aanpassen U kunt ervoor kiezen om op de takenbalk of in het notificatiegebied de pictogrammen en notificaties weer te geven of te verbergen. Ga als volgt te werk om pictogrammen en notificaties aan te passen: Nederlands 1. Klik vanuit het notificatiegebied op de pictogram met de pijl . 2. Klik op Customize (Aanpassen). 3. Selecteer vanuit de vervolgkeuzelijst de gedragsvormen van de pictogrammen of items die u wilt aanpassen. Uw bestanden en mappen beheren Windows® Verkenner gebruiken Met Windows® Verkenner kunt u uw bestanden en mappen weergeven, beheren en organiseren. Windows® Verkenner lanceren Ga als volgt te werk om Windows Verkenner te lanceren: 352 1. Klik op de Windows®-takenbalk op de pictogram Start lanceren. 2. Klik op Computer om Windows Verkenner te lanceren. om het startmenu te Hoofdstuk 2: Windows® 7 gebruiken Bestanden en mappen verkennen Ga als volgt te werk om bestanden en mappen te verkennen: 1. Lanceer Windows Verkenner. 2. Blader vanuit het navigatie- of weergavescherm naar de locatie van uw gegevens. 3. Klik vanuit de breadcrumb-balk op de pijl om de inhoud van het station of de map weer te geven. De weergave van bestand/map aanpassen Ga als volgt te werk om de weergave van bestand/map aan te passen: 1. Lanceer Windows Verkenner. 2. Selecteer vanuit het navigatiescherm op de locatie van uw gegevens. 3. Klik vanuit de werkbalk op de Weergavepictogram 4. Schuif vanuit het Weergavemenu de schuifbalk om te selecteren hoe u het bestand/de map weer te geven. . U kunt ook ergens op het weergavescherm met de rechtermuisknop klikken. Klik op View (Weergave) en selecteer het type weergave die u wilt. Uw bestanden rangschikken Ga als volgt te werk om uw bestanden te rangschikken: 1. Lanceer Windows Verkenner. 2. Klik vanuit het veld Arrange by (Rangschikken op) om de vervolgkeuzelijst weer te geven. 3. Selecteer het type rangschikking van uw voorkeur. Uw bestanden sorteren 1. Lanceer Windows Verkenner. 2. Klik met de rechtermuisknop ergens op het Weergavescherm. 3. Selecteer vanuit het menu dat verschijnt, Sort by (Sorteren volgens) en selecteer dan het type sortering van uw voorkeur. Uw bestanden groeperen Ga als volgt te werk om uw bestanden te groeperen: 1. Lanceer Windows Verkenner. 2. Klik met de rechtermuisknop ergens op het Weergavescherm. 3. Selecteer vanuit het menu dat verschijnt, Group by (Groeperen volgens) en selecteer dan het type groepering van uw voorkeur. ASUS CG8565 Nederlands Ga als volgt te werk om uw bestanden te sorteren: 353 Een nieuwe map toevoegen Ga als volgt te werk om een nieuwe map toe te voegen: 1. Lanceer Windows Verkenner. 2. Klik vanuit de werkbalk op New folder (Nieuwe map). 3. Typ een naam voor de nieuwe map. U kunt ook ergens op het Weergavescherm met de rechtermuisknop klikken en daarna op New (Nieuw) > Folder (Map) klikken. Een back-up van uw bestanden maken Een back-up instellen Ga als volgt te werk om een back-up in te stellen: 1. Klik op > All Programs (Alle programma's) > Maintenance (Onderhoud) > Backup and Restore (Back-up en Herstellen). 2. Klik op Set up backup (Back-up instellen). Klik op Next (Volgende). 3. Selecteer de bestemming van uw back-up. Klik op Next (Volgende). 4. Selecteer Let Windows choose (recommended) (Laat Windows kiezen (aanbevolen)) of Let me choose as your backup mode (Laat mij als uw backupmodus kiezen). Als u Let Windows choose (Laat Windows kiezen) selecteert, maakt Windows geen back-up van uw programma's, FAT-geformatteerde bestanden, bestanden in de Prullenbak of tijdelijke bestanden die 1 GB of meer zijn. 5. Volg de instructies op het scherm om het proces te voltooien. Uw systeem herstellen Nederlands 354 De functie Windows® Systeemherstel maakt een herstelpunt waar de systeeminstellingen van de computer op een bepaald tijdstip en bepaalde datum worden opgeslagen. Hiermee kunt u de systeeminstellingen van uw computer herstellen of veranderingen ongedaan maken, zonder uw persoonlijke gegevens te beïnvloeden. Ga als volgt te werk om uw systeem te herstellen: 1. Sluit alle werkende applicaties. 2. Klik op > All Programs (Alle programma's) > Accessoires > System Tools (Systeemwerkset) > System Restore (Systeemherstel). 3. Volg de instructies op het scherm om het proces te voltooien. Hoofdstuk 2: Windows® 7 gebruiken Uw computer beschermen Windows® 7 Actiecentrum gebruiken Het Windows® 7 Actiecentrum biedt u waarschuwingsnotificaties, beveiligingsinformatie, informatie over systeemonderhoud en de optie om automatische problemen op te lossen en enkele algemene computerproblemen op te lossen. U kunt de notificaties aanpassen. Raadpleeg in dit hoofdstuk de vorige paragraaf Pictogrammen en notificaties aanpassen voor meer details. Windows® 7 Actiecentrum lanceren Ga als volgt te werk om het Windows® 7 Actiecentrum te lanceren: 1. Klik op de Notificatiepictogram , en klik daarna op Open Action Center (Actiecentrum openen) om het Windows 7 Actiecentrum te lanceren. 2. Klik vanuit het Windows 7 Actiecentrum op de taak die u wilt uitvoeren. Windows® Update gebruiken Met Windows Update kunt u de nieuwste updates controleren en installeren om de beveiliging en prestaties van uw computer te verbeteren. Windows® Update lanceren Ga als volgt te werk om Windows® Update te lanceren: 1. Klik op de Windows®-takenbalk op de pictogram Start lanceren. om het startmenu te 2. Selecteer All Programs (Alle programma's) > Windows Update. 3. Klik vanaf het scherm Windows Update op de taak die u wilt uitvoeren. Een gebruikersaccount en wachtwoord instellen Een gebruikersaccount instellen Ga als volgt te werk om een gebruikersaccount in te stellen: 1. Klik vanaf de Windows®-takenbalk op > Getting Started (Om te beginnen) > Add new users (Nieuwe gebruikers toevoegen). 2. Selecteer Manage another account (Een andere account beheren). 3. Selecteer Create a new account (Een nieuwe account maken). 4. Typ de naam van de nieuwe gebruiker. 5. Selecteer Standard user (Standaardgebruiker) of Administrator (Beheerder) al gebruikerstype. 6. Wanneer voltooid, klikt u op Create Account (Account maken). ASUS CG8565 Nederlands Voor mensen die uw computer zullen gebruiken, kunt u gebruikersaccounts en wachtwoorden maken. 355 Een gebruikerswachtwoord instellen Ga als volgt te werk om een gebruikerswachtwoord in te stellen: 1. Selecteerde gebruiker waarvoor u een wachtwoord wilt instellen. 2. Selecteer Create a password (Een wachtwoord maken). 3. Typ een wachtwoord en bevestig deze. Typ een hint voor uw wachtwoord. 4. Klik op Create password (Wachtwoord maken) als u klaar bent. De antivirus-software activeren Trend Micro Internet Security wordt vooraf op uw computer geïnstalleerd. Dit is een antivirussoftware van een derde partij die uw computer tegen virusaanvallen beschermt. Het wordt afzonderlijk gekocht. Na activering hebt u een proefperiode van 60 dagen. Ga als volgt te werk om Trend Micro Internet Security te activeren: 1. Activeer de applicatie Trend Micro Internet Security. 2. Lees aandachtig de licentievoorwaarden. Klik op Agree & Activate (Akkoord & Activeren). 3. Voer uw e-mailadres in en selecteer uw locatie. Klik op Next (Volgende). 4. Klik op Voltooien om de activering te voltooien. Hulp en ondersteuning voor Windows® krijgen Windows® Help en ondersteuning bieden u richtlijnen en antwoorden voor het gebruik van de applicaties in het Windows® 7-platform. Klik, om Windows® Help en ondersteuning te lanceren, op ondersteuning). > Help and Support (Help en Zorg dat u met het internet bent verbonden om de nieuwste Windows ® online help te krijgen. Nederlands 356 Hoofdstuk 2: Windows® 7 gebruiken Hoofdstuk 3 Apparaten op uw computer aansluiten Een USB-opslagapparaat aansluiten Deze desktop PC biedt USB 2.0/1.1-poorten op de voor- en achterpanelen. Met de USBpoorten kunt u USB-apparaten, zoals opslagapparaten, aansluiten. Ga als volgt te werk om een USB-opslagapparaat aan te sluiten: • Plaats het USB-opslagapparaat in uw computer. Voorpaneel Achterpaneel 1. Klik op in het systeemvak van Windows op uw computer en klik vervolgens op Eject USB2.0 FlashDisk (USB2.0 FlashDisk uitwerpen) of Eject USB3.0 FlashDisk (USB3.0 FlashDisk uitwerpen) als u het USB3.0-flashstation of USB3.0-compatibele apparaten gebruikt. 2. Als het bericht Safe to Remove Hardware (Veilig om hardware te verwijderen) verschijnt, verwijdert u het USB-opslagapparaat van uw computer. Nederlands Ga als volgt te werk om een USB-opslagapparaat te verwijderen: NIET een USB-opslagapparaat verwijderen als nog gegevens worden overgedragen. Dit kan namelijk gegevensverlies of schade aan het USB-opslagapparaat veroorzaken. ASUS CG8565 357 Microfoon en luidsprekers aansluiten Deze desktop PC komt met poorten voor microfoon en luidsprekers op zowel het voor- als achterpaneel. De audio I/O-poorten bevinden zich op het achterpaneel en hiermee kunt u stereoluidsprekers met 2, 4, 6, en 8 kanalen aansluiten. Koptelefoon en mic aansluiten Luidsprekers met 2 kanalen aansluiten Nederlands 358 Hoofdstuk 3: Apparaten op uw computer aansluiten Luidsprekers met 4 kanalen aansluiten Nederlands Luidsprekers met 6 kanalen aansluiten ASUS CG8565 359 Luidsprekers met 8 kanalen aansluiten Nederlands 360 Hoofdstuk 3: Apparaten op uw computer aansluiten Meerdere externe schermen aansluiten Uw desktop PC kan met VGA-, HDMI- of DVI-poorten komen en laat u meerdere externe schermen aansluiten. Als in uw computer een grafische kaart is geïnstalleerd, sluit u de schermen op de uitvoerpoorten van de grafische kaart aan. Meerdere schermen instellen Als u meerdere schermen gebruikt, kunt u weergavemodi instellen. U kunt het aanvullende scherm als duplicaat van uw hoofdscherm gebruiken, of als uitbreiding ervan om uw Windows desktop te vergroten. 1. Schakel uw computer uit. 2. Verbind de twee schermen met uw computer en verbindt de stroomkabels van de schermen. Raadpleeg in Hoofdstuk 1 de paragraaf Uw computer instellen voor details over op uw computer een monitor aan te sluiten. Bij sommige grafische kaarten heeft alleen het scherm die als hoofdscherm is ingesteld, tijdens POST weergave. De dubbele schermfunctie werkt alleen onder Windows. ASUS CG8565 Nederlands Ga als volgt te werk om meerdere schermen in te stellen: 361 3. Doe één van het volgende om het instellingenscherm Screen Resolution (Schermresolutie) te openen: •Klik op > Control Panel (Configuratiescherm) > Appearance and Personalization (Verschijning en verpersoonlijking) > Display (Weergave) > Change display settings (Weergave-instellingen wijzigen). 5. Nederlands 362 Zet uw computer aan. 4. 6. •Klik ergens op uw Windows-bureaublad met de rechtermuisknop. Als het pop-upmenu verschijnt, klikt u op Personalize (Verpersoonlijken) > Display (Weergave) > Change display settings (Weergave-instellingen wijzigen). Selecteer van de vervolgkeuzelijst Multiple displays: (Meerdere schermen:) de weergavemodus. •Deze schermen dupliceren: Selecteer deze optie om het aanvullende scherm als een duplicaat van uw hoofdscherm te gebruiken. •Deze schermen uitbreiden: Selecteer deze optie om het aanvullende scherm als uitbreidingsscherm te gebruiken. Dit vergroot de ruimte op uw bureaublad. •Bureaublad maar op 1 / 2 tonen: Selecteer deze optie om het scherm alleen op scherm 1 of scherm 2 weer te geven. •Dit scherm verwijderen: Selecteer deze opties om het geselecteerde scherm te verwijderen. Klik op Apply (Toepassen) of op OK. Klik daarna op het bevestigingsbericht op Keep Changes (Wijzigingen bewaren). Hoofdstuk 3: Apparaten op uw computer aansluiten Een HDTV aansluiten Sluit op de HDMI-poort van uw computer een High Definition-tv (HDTV) aan. • Om de HDTV op de computer aan te sluiten, hebt u een HDMI-kabel nodig. De HDMIkabel is afzonderlijk verkrijgbaar. Nederlands • Voor de beste weergaveprestatie mag uw HDMI-kabel niet langer dan 15 meter zijn. ASUS CG8565 363 Nederlands 364 Hoofdstuk 3: Apparaten op uw computer aansluiten Hoofdstuk 4 Uw computer gebruiken Juiste houding bij het gebruik van uw Desktop PC Als u uw Desktop PC gebruikt, is het belangrijk de juiste houding te bewaren om spanning op uw polsen, handen en andere gewrichten of spieren te vermijden. Deze paragraaf biedt u tips over hoe fysieke ongemakken en mogelijk letsel te vermijden terwijl u uw Desktop PC gebruikt en ervan geniet. Eye level tonaar the top Oogniveau deof the monitorvan screen bovenkant het computerscherm Foot rest 90˚ angles • Plaats uw werkstoel om te verzekeren dat uw ellebogen ter hoogte of iets boven het toetsenbord zijn om een comfortabele typhouding te verkrijgen. • Stel de hoogte van uw stoel af om te verzekeren dat uw knieën iets hoger zijn dan uw heupen om de achterkant van uw dijen te ontspannen. Indien nodig, dient u een voetsteun te gebruiken om de hoogte van uw knieën te verhogen. • Stel de rug van uw stoel zo af dat de basis van uw ruggengraat stevig wordt ondersteund en iets naar achteren wordt gebracht. • Zit rechtop met uw knieën, ellebogen en heupen in een hoek van ongeveer 90° terwijl u achter de computer zit. • Plaats het scherm recht voor u en draai de bovenkant van het computerscherm op oogniveau zodat uw ogen iets naar beneden zijn gericht. • Houd de muis naast het toetsenbord en, indien nodig, gebruik een polssteun ter ondersteuning om tijdens het typen de druk van uw polsen te halen. • Gebruik uw Desktop PC in een goed verlichte ruimte en houdt het uit de buurt van bronnen die glinsteren, zoals ramen of rechtstreeks zonlicht. • Neem regelmatig kleine pauzes van het gebruik van uw Desktop PC. ASUS CG8565 Nederlands Ga als volgt te werk om de juiste houding te behouden: 365 De geheugenkaartlezer gebruiken Digitale camera's en andere digitale beeldapparatuur gebruiken geheugenkaarten om digitale foto's of mediabestanden op te slaan. Met de ingebouwde geheugenkaartlezer op het voorpaneel van uw systeem kunt u van en naar verschillende geheugenkaartstations lezen en schrijven. Ga als volgt te werk om de geheugenkaart te gebruiken: 1. Plaats de geheugenkaart in de kaartsleuf. • Een geheugenkaart is gesleuteld zodat het in maar één richting past. Om schade aan de kaart te vermijden, mag u een kaart NIET in een sleuf forceren. • U kunt de media in één of meer kaartsleuven plaatsen en elke media onafhankelijk gebruiken. Plaats per keer maar één geheugenkaart in een sleuf. 2. Selecteer van het venster AutoPlay (automatisch afspelen) een programma voor toegang tot uw bestanden. Nederlands • Als AutoPlay NIET op uw computer is ingeschakeld, klikt u op de takenbalk op de knop Windows® 7 Start en klikt u op Computer. Daarna dubbelklikt u op de pictogram van de geheugenkaart om toegang tot de gegevens op de schijf te nemen. • Elke kaartsleuf heeft zijn eigen stationspictogram die op het scherm Computer wordt weergegeven. • De LED van de geheugenkaartlezer brandt en knippert terwijl van en naar de geheugenkaart de gegevens worden gelezen of geschreven. 3. Wanneer voltooid, klikt u met de rechtermuisknop op het pictogram van het geheugenkaartstation op het scherm Computer. Daarna klikt u op Eject (Uitwerpen) en verwijdert u de kaart. Verwijder kaarten nooit tijdens of direct na het lezen, kopiëren, formatteren of verwijderen van gegevens op de kaart, anders kan zich gegevensverlies voordoen. Om gegevensverlies te voorkomen, gebruikt u in het Windows-notificatiegebied de optie "Hardware veilig verwijderen en media uitwerpen" voordat u de geheugenkaart verwijdert. 366 Hoofdstuk 4: Uw computer gebruiken Het optisch station gebruiken Een optische schijf plaatsen Ga als volgt te werk om een optische schijf te plaatsen: 1. Druk op de knop PUSH terwijl het systeem is ingeschakeld. 2. Druk op de uitwerpknop onder de klep van de stationssleuf om de lade te openen. 3. Plaats de schijf in het optische station met het label naar boven gericht. 4. Duw de lade om het te sluiten. 5. Selecteer van het venster AutoPlay (automatisch afspelen) een programma voor toegang tot uw bestanden. Als AutoPlay NIET op uw computer is ingeschakeld, klikt u op de takenbalk op de knop Windows® 7 Start en klikt u op Computer. Daarna dubbelklikt u op de pictogram van het cd/dvd-station om toegang tot de gegevens op de schijf te nemen. Een optische schijf verwijderen 1. 2. Terwijl het systeem aan is, moet u één van het volgende doen om de lade uit te werpen: • Druk onder de stationlade op de uitwerpknop. • Druk met de rechtermuisknop op het pictogram van het cd/dvd-station op het scherm Computer en klik daarna op Eject (Uitwerpen). Nederlands Ga als volgt te werk om een optische schijf te verwijderen: Verwijder de schijf uit het schijfstation. ASUS CG8565 367 Het ASUS ROG U9N gametoetsenbord gebruiken Uw CG8565 Essentio Desktop PC wordt geleverd met het ASUS ROG U9N gametoetsenbord voor een optimale spelervaring. Raadpleeg het hoofdstuk Inhoud verpakking voor de inhoud van de verpakking van het ASUS ROG U9N gametoetsenbord. Het ASUS ROG U9N gametoetsenbord installeren 1. Gebruik de bijgeleverde PS/2-naar-USB-adapter om uw speltoetsenbord aan te sluiten op de USB 2.0-poort van uw computer. . Lijn de polssteun uit en stop deze in de polssteunsleuven (A) van het gametoetsenbord. Gebruik beide duimen om de polssteun omlaag te drukken tot deze op zijn plaats klikt (B). Nederlands A 3. 368 B Start uw computer opnieuw op. Windows® installeert automatisch alle benodigde stuurprogramma’s voor uw toetsenbord. Hoofdstuk 4: Uw computer gebruiken De ASUS GX900 gamemuis gebruiken Uw CG8565 Essentio Desktop PC wordt geleverd met het ASUS GX900 gamemuis voor een intense gamebesturing. Raadpleeg het hoofdstuk Inhoud verpakking voor de inhoud van de verpakking van het ASUS ROG U9N gametoetsenbord. De ASUS GX900 gamemuis is voorzien van een linkerknop, een rechterknop, een scrollwiel, twee zijknoppen, een DPI-knop en een speciaal ontworpen knop voor het schakelen van profielen. 1 Linkerknop 3 4 5 6 Scrollwiel 2 Rechterknop DPI-schakelaar Profielschakelknop/profielindicator LED DPI-indicator** Toetsen Beschrijving 8 Knop IE Volgende 7 9 10 11 12 GX900-logo Knop IE Vorige Muisvoet Muisvoet en lasersensor met twee ogen Gewicht voet (5 x 4,5 g blokken)*** Nederlands Toetsen Beschrijving ***Om het muisgewicht aan te passen, voegt u gewichtblokken toe of neemt u er weg. ASUS CG8565 369 *LED-indicaties profielschakelaar LED-kleuren Indicaties Geen Groen Rood Oranje Normaal profiel Profiel 1 Profiel 2 Profiel 3 **LED-indicaties DPI-schakelaar LED-kleuren Indicaties 2 4 DPI-niveau 1 DPI-niveau 2 Het programma starten De bijgeleverde ondersteunings-cd bevat een speciaal ontworpen programma waarmee u de ASUS GX900-gamemuis kunt instellen zodat u kunt genieten van al zijn functies. Plaats de ondersteunings-cd in het optische station en volg de instructies op het scherm om het programma te starten. Als Autorun NIET is ingeschakeld op uw computer, bladert u door de inhoud van de ondersteunings-cd om het bestand GX900.exe te zoeken. Dubbelklik op het bestand GX900.exe om het programma te starten. De ASUS GX900 gamemuis instellen Controleer of de gamemuis is aangesloten op de USB-poort van uw computer. Het programma detecteert automatisch de muis en toont het hoofdmenu. Nederlands 370 Hoofdstuk 4: Uw computer gebruiken Hoofdmenu 1 2 3 4 5 6 7 8 9 10 11 Beschrijving Klik op elk tabblad om het geselecteerde profielmenu weer te geven. Toont het profielpictogram om de profielmenu’s 1-3 te configureren. Klik om de DPI-configuratie opnieuw in te stellen naar de eerder opgeslagen instellingen. Sleep de schuifregelaar om de DPI-waarde voor elk niveau aan te passen. Klik om de knopinstellingen opnieuw in te stellen naar de vorige instellingen Klik om de verschillende kleurindicators van het profiel en hun status weer te geven. Klik om het opgeslagen profiel te laden naar uw muis. Klik om de huidige profielinstellingen op te slaan naar uw harde schijf. Klik om alle muisinstellingen opnieuw in te stellen naar de standaard fabrieksinstellingen. Klik om de instellingen die u hebt opgegeven, op te slaan. Klik om de instellingen die u hebt opgegeven, op te slaan en het programma af te sluiten. Nederlands Items Elk profiel biedt twee DPI-niveaus. Twee LED’s van de DPI-schakelaar lichten op om aan te geven dat u Niveau 1 gebruikt en vier LED’s lichten op om aan te geven dat u Niveau 2 gebruikt. ASUS CG8565 371 Profiel 1 menu Items 1 2 3 Nederlands 4 Beschrijving Klik om het menu Edit (Bewerken) te openen en de profielnaam en het profielpictogram te wijzigen. Voer de gewenste profielnaam in. Klik om het afbeeldingsbestand te zoeken dat u als het profielpictogram wilt gebruiken. Selecteer de functie voor elke knop/actie in de vervolgkeuzelijst *Raadpleeg de onderstaande tabel voor meer informatie. Functies Beschrijving Knop R Functie rechtermuisknop Knop L Knop M IE Vorige IE Volgende 372 Functie linkermuisknop Functie middelste muisknop Functie knop IE Vorige Indien dit geselecteerd is, drukt u op de knop om terug te keren naar de vorige pagina. Functie knop IE Volgende Indien dit geselecteerd is, drukt u op de knop om naar de volgende pagina te gaan. Hoofdstuk 4: Uw computer gebruiken Functies Beschrijving Druk op de knop om een toetsaanslag of een reeks toetsaanslagen uit te voeren. Druk op de knop om een opdracht of een reeks opdrachten uit Macro te voeren die u kunt bewerken via het menu Edit Macro (Macro bewerken). Zie Het menu Macro voor meer informatie. Druk op de knop om een script uit te voeren dat u kunt Script #1-6 bewerken via het menu Edit Script (Script bewerken). Zie Het menu Edit Script (Script bewerken) voor meer informatie. DPI [+] Druk op knop om de DPI-waarde te verhogen. DPI [-] Druk op knop om de DPI-waarde te verlagen. DPI-niveau 1/2 Druk op knop om het DPI-niveau 1/2 te gebruiken. Profielschakelaar Functie knop Profielschakelaar. Normaal profiel Druk op de knop om het normale profiel te gebruiken. Gebruikersprofiel Druk op knop om het aangepaste profiel 1/2/3 te gebruiken. 1/2/3 Toetsenbord Deze functie werkt alleen voor Microsoft® Officetoepassingen onder de besturingssystemen Windows® 7/Vista. Druk op de knop om snel te vuren in een “klik om aan te Snel vuren (muis) vallen”-game. Dit is hetzelfde als drie keer klikken met de linkermuisknop. Druk op de knop om snel te vuren in een game door de Snel vuren (toets) spatiebalk in te drukken om aan te vallen. Dit is hetzelfde als drie keer drukken op de spatiebalk. Webbrowser Druk op de knop om uw standaard webbrowser te starten. E-mail Druk op de knop om de standaard e-mailtoepassing te starten. Mediaspeler Druk op de knop om uw standaard mediaspeler te starten. Afspelen/ Pauzeren Deze knoppen worden knoppen voor de weergavebediening in Stop een actieve mediaspeler. Volgend nummer Vorig nummer Volume hoger/ Druk op de knop om het systeemvolume te verhogen/verlagen. lager Druk op de knop om het dempen van het volume in/uit te Dempen schakelen. Rekenmachine Druk op deze knop om de rekenmachinetoepassing te starten. Deze computer Druk op de knop om het venster Deze computer te openen. Selecteer dit item om de geselecteerde knop van de muis te Uitgeschakeld deactiveren. ASUS CG8565 Nederlands Wiel (links/rechts) Druk op de knop om naar links/rechts te schuiven, zoals een kantelwiel. 373 Het menu Edit Macro (Macro bewerken) Functies Nederlands 374 Beschrijving Macro bewerken Klik om het menu Edit Macro (Macro bewerken) te openen. Schakel dit item in om de tijd tussen het indrukken en loslaten van een Timing knop te registreren. (Standaard: 12 milliseconden) Wanneer deze optie is ingeschakeld, wordt de nieuwe instructie Invoegen ingevoegd voor de geselecteerde instructie. Anders krijgt elke nieuwe instructie de eerste prioriteit. Start* Klik om de registratie van de toetsaanslagen en/of muisacties te starten. Klik om de registratie van de toetsaanslagen en/of muisacties te Stop stoppen. Wissen Klik om alle opgeslagen instructies te wissen. Omhoog/omlaag Klik om de geselecteerde instructie omhoog/omlaag te verplaatsen. verplaatsen Tijd Wanneer Timing is uitgeschakeld, zal de vertragingstijd van alle acties instructiecyclus de waarde zijn die u kiest in de vervolgkeuzelijst. Stelt de macro in die moet worden uitgevoerd met één klik en die moet Lus worden gestopt wanneer opnieuw wordt geklikt. Vuren Stelt de macro in om eenmaal te worden uitgevoerd in één klik. Stelt de macro in om te worden uitgevoerd wanneer u de knop Blijven vuren ingedrukt houdt en stopt wanneer u de knop loslaat. Exporteren Klik om de huidige macro op te slaan naar uw harde schijf. Importeren Klik om een macro te laden van uw harde schijf. Hoofdstuk 4: Uw computer gebruiken Edit Script menu Beschrijving Script bewerken Klik om het menu Edit Script (Script bewerken) te openen. Schakel dit item in om de tijd tussen het indrukken en loslaten van een Timing knop te registreren. (Standaard: 12 milliseconden) Wanneer deze optie is ingeschakeld, wordt de nieuwe instructie Invoegen ingevoegd voor de geselecteerde instructie. Anders krijgt elke nieuwe instructie de eerste prioriteit. Start* Klik om de registratie van de toetsaanslagen en/of muisacties te starten. Klik om de registratie van de toetsaanslagen en/of muisacties te Stop stoppen. Wissen Klik om alle opgeslagen instructies te wissen. Omhoog/omlaag Klik om de geselecteerde instructie omhoog/omlaag te verplaatsen. verplaatsen Tijd Wanneer Timing is uitgeschakeld, zal de vertragingstijd van alle acties instructiecyclus de waarde zijn die u kiest in de vervolgkeuzelijst. Stelt het script in dat moet worden uitgevoerd met één klik en die moet Lus worden gestopt wanneer opnieuw wordt geklikt. Vuren Stelt het script in om eenmaal te worden uitgevoerd in één klik. Stelt het script in om te worden uitgevoerd wanneer u de knop ingedrukt Blijven vuren houdt en stopt wanneer u de knop loslaat. Exporteren Klik om de huidige macro op te slaan naar uw harde schijf. Importeren Klik om een macro te laden van uw harde schijf. ASUS CG8565 Nederlands Functies 375 Nederlands 376 Hoofdstuk 4: Uw computer gebruiken Hoofdstuk 5 Verbinden met het Internet Bekabelde verbinding Gebruik een RJ-45-kabel om uw computer met een DSL/kabelmodem of een local area network (LAN-netwerk) te verbinden. Via een DSL/kabelmodem verbinden Ga als volgt te werk om een DSL/kabelmodem te verbinden: 1. Stel uw DSL/kabelmodem in. Raadpleeg de documentatie die met uw DSL/kabelmodem wordt geleverd. 2. Verbind één uiteinde van een RJ-45-kabel met de LAN-poort (RJ-45) op het achterpaneel van uw computer en het andere uiteinde met een DSL/kabelmodem. Nederlands Modem RJ-45-kabel 3. Schakel de DSL/kabelmodem en uw computer in. 4. Configureer de benodigde instellingen voor internetverbinding. Neem contact op met uw Internet serviceprovider (ISP) voor details of hulp bij het instellen van uw internetverbinding. ASUS CG8565 377 Verbinden via het local area network (LAN-netwerk) Ga als volgt te werk om via LAN te verbinden: 1. Verbind één uiteinde van een RJ-45-kabel met de LAN-poort (RJ-45) op het achterpaneel van uw computer en het andere uiteinde met uw LAN. RJ-45-kabel 2. Zet uw computer aan. 3. Configureer de benodigde instellingen voor internetverbinding. LAN Neem contact op met uw netwerkbeheerder voor details of hulp bij het instellen van uw internetverbinding. Nederlands 378 Hoofdstuk 5: Verbinden met het Internet Hoofdstuk 6 De hulpprogramma's gebruiken De ondersteunings-dvd en herstel-dvd zijn mogelijk niet in het pakket opgenomen. U kunt deze zelf branden. Raadpleeg Recovering your system (Uw systeem herstellen) voor details. ASUS AI Suite II ASUS AI Suite II is een één-in-alles-interface die uit diverse ASUS-hulpprogramma's bestaat en waarmee gebruikers deze hulpprogramma's gelijktijdig kunnen lanceren en gebruiken. ASUS AI Suite II installeren Ga als volgt te werk om Al Suite II te installeren: 1. Plaats de ondersteunings-dvd in het optische station. Het tabblad voor installatie van de stuurprogramma's verschijnt als op uw computer de functie Autorun is ingeschakeld. 2. Klik op het tabblad Utilities (Hulpprogramma's) en klik daarna op ASUS AI Suite II. 3. Volg de instructies op het scherm om de installatie te voltooien. ASUS AI Suite II gebruiken De Al Suite II start automatisch als u het Windows®-besturingsysteem (OS) ingaat. Het pictogram van de AI Suite II icon verschijnt in het Windows®-notificatiegebied. Klik op de pictogram om de hoofdmenubalk van de Al Suite II te openen. Klik om de systeeminformatie te tonen Klik om de interface-instellingen aan te passen Klik om het moederbord BIOS bij te werken Klik om sensors of CPUfrequentie te controleren Klik hier om een hulpprogramma te selecteren ASUS CG8565 379 Nederlands Klik op elke knip om een hulpprogramma te selecteren en te lanceren, om het systeem te controleren, om de moederbord-BIOS bij te werken, om de systeeminformatie weer te geven en om de instellingen van de Al Suite II aan te passen. Extra Het menu Tool (Extra) bevat de panelen DIGI+ VRM, EPU, Probe II, Sensor Recorder en Ai Charger+. DIGI+ VRM starten en configureren Met ASUS DIGI+ VRM kunt u de VRM-spanning en frequentiemodulatie aanpassen voor meer betrouwbaarheid en stabiliteit. Dit biedt ook de hoogste vermogensefficiëntie waarbij minder warmte wordt gegenereerd zodat de levensduur van de component wordt verlengd en vermogensverlies wordt geminimaliseerd. DIGI+ VRM starten: Klik in de hoofdmenubalk van AI Suite II op Tool (Extra) > DIGI+ VRM. • 6 1 Helpbestanden toepassing 2 7 3 4 Alle wijzigingen ongedaan maken zonder ze toe te passen 5 Alle wijzigingen onmiddellijk toepassen Functie Nederlands 380 Functiebeschrijving 1 DIGI+VRM kalibratie laadlijn Door een hogere laadlijnkalibratie kunt u een hogere spanning en goede overklokprestaties bereiken, maar de thermische omstandigheden van de CPU en VRM versterken. 2 Beveiliging CPU-stroomcapaciteit DIGI+ VRM Beveiliging CPU-stroomcapaciteit DIGI+ VRM biedt een groter totaal stroombereik voor overklokken. Een hogere waarde-instelling krijgt een hogere toelevering van VRM-stroomverbruik. 3 DIGI+VRM-frequentie Het schakelen van de frequentie zal de tijdelijke respons van de VRM en de warmte van de component beïnvloeden. Een hogere frequentie krijgt een snellere tijdelijke respons. Hoofdstuk 6: De hulpprogramma's gebruiken Functie Functiebeschrijving 4 DIGI+ VRM-fasebeheer Verhoog het fasenummer onder de zware systeembelasting voor een betere stroomvoorziening en betere thermische prestaties. Verlaag het fasenummer onder een lichte systeembelasting om de VRM-efficiëntie te verhogen. 5 DIGI+VRM Duty Control (DIGI+VRM bedrijfsbesturing) DIGI+VRM Duty Control (DIGI+VRM bedrijfsbesturing) past de huidige VRM-fase en de thermische omstandigheden van elke fasecomponent aan. 6 Kalibratie iGPU laadlijn Hogere laadlijn-kalibratie biedt een groter totaal vermogensbereik voor overklokken. Een hogere waarde-instelling krijgt een hogere toelevering van VRM-stroomverbruik. 7 iGPU-stroomcapaciteit Beveiliging iGPU-stroomcapaciteit biedt een groter totaal stroombereik voor overklokken. Een hogere waarde brengt een breder totaal vermogensbereik en breidt tegelijk het frequentiebereik voor het overklokken uit. System Level Up (Systeemniveau omhoog) Nederlands Met System Level Up (Systeemniveau omhoog) kunt u het systeem overklokken in de Windows®-omgeving met de profielinstellingen. Om System Level up (Systeemniveau omhoog) te starten, klikt u op Tool (Extra) > System Level Up (Systeemniveau omhoog) op de AI Suite II-menubalk. ASUS CG8565 381 Bij het instellen van de functies, moet u de sneltoetsen voor de profieluitwisseling System level up (Systeemniveau omhoog) toewijzen. U kunt de instellingen voor de sneltoetsen handmatig aanpassen. Raadpleeg de onderstaande afbeelding voor details. Pas System Level Up (Systeemniveau omhoog) aan via twee methoden: BIOS Klik in het BIOS Setup-programma op AI Tweaker > System Level Up (Systeemniveau omhoog) en selecteer uw gewenste optie. OC-knop Druk op de OC-knop in de linkerbovenhoek van het voorpaneel. Nederlands 382 Hoofdstuk 6: De hulpprogramma's gebruiken Probe II Probe II is een hulpprogramma dat de vitale componenten van de computer controleert en enige problemen met deze componenten detecteert en u hierover waarschuwt. Probe II voelt ondermeer ventilatorrotaties, CPU-temperatuur en systeemspanningen. Met dit hulpprogramma bent u verzekerd dat uw computer altijd in een gezonde bedrijfsconditie is. Probe II lanceren Na van de ondersteunings-dvd Al Suite II te installeren, lanceert u de Probe II door op de hoofdmenubalk van de Al Suite II op Tool (Extra) > Probe II te klikken. Probe II configureren Klik op de tabbladen Voltage/Temperature/Fan Speed (Spanning/Temperatuur/Ventilatorsnelheid) om de sensors te activeren of om de drempelwaarden van de sensors bij te stellen. Met het tabblad Preference (Voorkeur) kunt u de tijdsinterval van de waarschuwingen van de sensors aanpassen, of de temperatuurseenheid wijzigen. Laadt uw opgeslagen configuratie ASUS CG8565 Laadt de standaard drempelwaarden voor elke sensor Past uw wijzigingen toe Nederlands Slaat uw configuratie op 383 Sensor Recorder Met Sensor Recorder kunt u de wijzigingen in de systeemspanning, temperatuur en ventilatorsnelheid controleren en de wijzigingen opnemen. Sensor Recorder lanceren Na van de ondersteunings-dvd AI Suite II te installeren, klikt u op Tool (Extra) > Sensor Recorder op de hoofdmenubalk van AI Suite II om PC Probe te lanceren. Sensor Recorder configureren Klik op de tabbladen Voltage/Temperature/Fan Speed (Spanning/Temperatuur/Ventilatorsnelheid) en selecteer de sensors die u wilt controleren. Met het tabblad History Record (Historie-opname) kunt u de wijzignigen in de sensors die u hebt ingeschakeld, opnemen. Selecteer de sensors die u wilt controleren. Sleep om gedurende een bepaalde tijdsperiode de status weer te geven Klik om naar de standaardmodus terug te keren Klik om de Y-as in/uit te zoomen Klik om de X-as in/uit te zoomen Nederlands 384 Hoofdstuk 6: De hulpprogramma's gebruiken BT GO! BT GO! verbindt een Bluetooth-apparaat met het moederbord via een Bluetooth-verbinding voor bestandsoverdracht, bestandssynchronisatie, muziekweergave, persoonlijke beheer en meerdere externe functies. BT GO! starten Om BT GO! te starten, klikt u op Tool (Extra) > BT GO! in de AI Suite II-hoofdmenubalk. BT GO! gebruiken Apparaatlijst Functielijst Licht op wanneer de functie is ingeschakeld Klik om het overeenkomende deelvenster aan de rechterzijde weer te geven • Klik op en om te bladeren door de apparaatlijst en de functielijst. Klik op een van de apparaatpictogrammen om het Bluetooth-apparaat te selecteren. BT GO! zoekt automatisch de ondersteunde functies voor het geselecteerde apparaat. Klik op een van de apparaat-/functiepictogrammen om een verbinding te maken met het geselecteerde apparaat en de geselecteerde functie in/uit te schakelen. Functies Opnemen en verzenden BT-overdracht Mapsynchronisatie Beschrijving Hiermee kunt u een schermopname maken en deze naar het verbonden Bluetooth-apparaat verzenden. Hiermee kunt u de bestanden die zijn opgeslagen op het Bluetooth-hostapparaat delen met andere verbonden Bluetooth-apparaten. Hiermee kunt u de geselecteerde map synchroniseren tussen uw geselecteerd Bluetooth-apparaat en uw computer en een back-up maken van deze map. Persoonlijk beheer Hiermee kunt u de persoonlijke contacten en agendagegevens synchroniseren tussen het Bluetooth-apparaat en uw computer. BT naar net Hiermee krijgt uw computer toegang tot internet via het netwerk dat wordt gedeeld door het Bluetooth-apparaat. Muziekspeler Hiermee kunt u de geselecteerde muziekbestanden op uw computer afspelen met het Bluetooth-apparaat. ASUS CG8565 Nederlands • • 385 Ai Charger+ starten en configureren Ai Charger+ is een unieke en snel-ladende software waarmee u uw BC 1.1* mobiele apparaten drie keer sneller dan de standaard USB-apparaten** kunt opladen via de USB-poort van uw computer. • * Raadpleeg de fabrikant van uw USB-apparaat als dit de BC 1.1-functie volledig ondersteunt. • ** De werkelijke oplaadsnelheid kan verschillen afhankelijk van de voorwaarden van uw USB-apparaat. • Zorg dat u het USB-apparaat loskoppelt en opnieuw aansluiten nadat u Ai Charger+ hebt in- of uitgeschakeld om zeker te zijn van een normale oplaadfunctie. Om Ai Charger+ te starten, klikt u op Tool (Extra) > Ai Charger+ in de AI Suite IIhoofdmenubalk. Nederlands 386 Hoofdstuk 6: De hulpprogramma's gebruiken Scherm De sectie Monitor (Scherm) omvat de panelen Sensor en CPUfrenquentie. Sensor Het paneel Sensor geeft de huidige waarde van een systeemsensor weer, zoals ventilatorrotatie, CPU-temperatuur en spanningen. Klik op de hoofdmenubalk van Al Suite II op Monitor (Scherm) > Sensor om het paneel Sensor te lanceren. CPU-frequentie Het paneel CPU-frequentie geeft de huidige CPU-frequentie en CPU-gebruik weer. Klik op de hoofdmenubalk van Al Suite II op Monitor (Scherm) > CPU Frequency (CPUfrequentie) om het paneel CPU-frequentie te lanceren. Paneel Sensor Paneel CPU-frequentie Nederlands Bevindt zich in het rechterpaneel (gebied voor systeeminformatie) ASUS CG8565 387 Update Met de sectie Update kunt u de moederbord-BIOS bijwerken, evenals de BIOS-startlogo met de voor ASUS ontworpen hulpprogramma's voor bijwerken. ASUS update De ASUS Update is een hulpprogramma waarmee u de moederbord-BIOS in het Windows®-besturingsysteem kunt beheren, opslaan en bijwerken. Met het hulpprogramma ASUS Update kunt u de BIOS rechtstreeks vanaf de internet bijwerken, het nieuwste BIOS-bestand van het internet downloaden, de BIOS vanaf een bijgewerkt BIOSbestand bijwerken, het huidige BIOS-bestand opslaan of de informatie van de BIOS-versie weergeven. De BIOS via de internet bijwerken Ga als volgt te werk om de BIOS via de internet bij te werken: 1. Selecteer van het scherm ASUS Update, Update BIOS from Internet (Update BIOS van internet) en klik daarna op Next (Volgende). 2. Selecteer de dichtstbijzijnde ASUS FTPsite on netwerkverkeer te vermijden. Nederlands 388 3. Als u de functie voor BIOS-downgrade en de functie Automatische BIOS back-up wilt inschakelen, schakelt u op het scherm de keuzevakken voor de twee items in. Selecteer de BIOS-versie die u wilt downloaden. Klik op Next (Volgende). Als geen bijgewerkte versie wordt gedetecteerd, wordt het als het scherm op de rechterzijde weergegeven. Hoofdstuk 6: De hulpprogramma's gebruiken 4. 5. U kunt beslissen of u het BIOSstartlogo, wat de afbeelding is die tijdens de Power‑On Self-Tests (POST) op het scherm verschijnt, wilt veranderen. Klik op Yes (Ja) als u het startlogo wilt wijzigen of op No (Nee) om door te gaan. Volg de instructies op het scherm om het updateproces te voltooien. De BIOS via een BIOS-bestand bijwerken 1. Selecteer van het scherm ASUS Update, Update BIOS from file (Update BIOS van bestand) en klik daarna op Next (Volgende). 2. Zoek via het scherm Open het BIOSbestand, klik op Open en klik op Next (Volgende). 3. U kunt beslissen of u het startlogo van de BIOS wilt wijzigen. Klik op Yes (Ja) als u het startlogo wilt wijzigen of op No (Nee) om door te gaan. 4. Nederlands Ga als volgt te werk om de BIOS via een BIOS-bestand bij te werken: Volg de instructies op het scherm om het updateproces te voltooien. ASUS CG8565 389 Systeeminformatie De sectie Systeeminformatie geeft de informatie over het moederbord, de CPU en geheugensleuven weer. Nederlands 390 • Klik op het tabblad MB om de details van de fabrikant van het moederbord, de naam van het product, de versie en de BIOS weer te geven. • Klik op het tabblad CPU om de details op de processor en de Cache weer te geven. • Klik op het tabblad SPD en selecteer de geheugensleuf om de details op de geheugenmodule die op de overeenkomende sleuf zijn geïnstalleerd, weer te geven. MB CPU Memory Hoofdstuk 6: De hulpprogramma's gebruiken Instellingen • Met Applicatie kunt u de applicatie selecteren die u wilt inschakelen. • Met Balk kunt u de balkinstellingen modificeren, • Met Weergave kunt u het contrast, de helderheid, de intensiteit, de tint en de gamma van de interface aanpassen. ASUS CG8565 Nederlands Met de sectie Instellingen kunt u de instellingen van de hoofdmenubalk en de weergave van de interface aanpassen. 391 ASUS AI Manager ASUS AI Manager is een hulpprogramma waarmee u snel een eenvoudig toegang tot regelmatig gebruikte applicaties krijgt. AI Manager installeren Ga als volgt te werk om Al Manager te installeren: 1. Plaats de ondersteunings-dvd in het optische station. Als Autorun is ingeschakeld, verschijnt de Wizard installatie stuurprogramma's. Als Autorun is uitgeschakeld, dubbelklikt u op het bestand setup.exe file in de map ASUS AI Manager op de ondersteunings-dvd. 2. Klik op het tabblad Utilities (Hulpprogramma's) en klik daarna op ASUS AI Manager. 3. Volg de instructies op het scherm om de installatie te voltooien. Al Manager laceren Om de AI Manager vanaf het Windows®-bureaublad te lanceren, klikt u op Start > All Programs (Alle Programma's) > ASUS > AI Manager > AI Manager 1.xx.xx. De snelbalk van Al Manager verschijnt op het bureaublad. Na de applicatie te lanceren, verschijnt in de Windows®-takenbalk de pictogram van Al Manager. Klik met de rechtermuisknop op deze pictogram om tussen de snelbalk en het hoofdvenster te wisselen en om de Al Manager vanaf de snelbalk of takenbalk te lanceren. Nederlands 392 Hoofdstuk 6: De hulpprogramma's gebruiken Al Manager-snelbalk De Al Manager-snelbalk bespaart ruimte op het bureablad en laat u de ASUShulpprogramma's lanceren of de systeeminformatie eenvoudig weergeven. Klik op één van de tabbladen Hoofdmenu, Mijn favorieten, Ondersteuning of Informatie om de inhoud van de menu's weer te geven. Knop Afsluiten Naar hoofdvenster schakelen Aan werkbalk toevoegen Hoofdmenu Ondersteuning Mijn favorieten Informatie Klik op de knop Maximaliseren/herstellen om tussen volledig scherm en snelbalk te wisselen. Klik op de knop Minimaliseren om de Al Manager op de takenbalk te houden. Klik op de knop Sluiten om de AI Manager te sluiten. Hoofdmenu Het Hoofdmenu bevat drie hulpprogramma's: AI Disk (Al schijf), AI Security (Al beveiliging) en AI Booting (Al opstarten). Klik met de pijl op het pictogram van het hoofdmenu om door de hulpprogramma's in het hoofdmenu te bladeren. Klik om uit te breiden of te herstellen Al schijf Nederlands Met Al Disk (Al schijf) kunt u gemakkelijk tijdelijke IE-bestanden, IE-cookies, IE URL's, IE-historie of de Prullenbak wissen. Klik op de snelbalk op de pictogram Al Disk (Al schijf) om het volledige Al Disk (Al schijf)-venster weer te geven en de items te selecteren die u wilt wissen. Klik op Apply (Toepassen) wanneer u klaar bent. ASUS CG8565 393 Al-beveiliging Met Al Security (Al-beveiliging) kunt u een wachtwoord instellen om uw apparatuur, zoals USB flash-disks en cd/dvd-schijven tegen onbevoegde toegang te beveiligen. Ga als volgt te werk om een apparaat te vergrendelen: 1.Wanneer u Al Security (Al-beveiliging) voor de eerste keer gebruikt, wordt u gevraagd een wachtwoord in te stellen. Typ een wachtwoord met maximaal 20 alfanumerieke tekens in. 2. Bevestig het wachtwoord. 3. Typ de hint voor het wachtwoord in (aanbevolen). 4. Klik op Ok wanneer u klaar bent. 5.Selecteer het apparaat dat u wilt vergrendelen en klik daarna op Apply (Toepassen). 6. Typ het wachtwoord in dat u eerder hebt ingesteld en klik daarna op Ok. Nederlands Ga als volgt te werk om het apparaat te ontgrendelen: 1. Deselecteer het vergrendelde apparaat en klik op Apply (Toepassen). 2.Typ het wachtwoord in dat u eerder hebt ingesteld en klik daarna op Ok. Ga als volgt te werk om het wachtwoord te veranderen: 394 •Klik op Change Password (Wachtwoord wijzigen) en volg de instructies op het scherm om het wachtwoord te veranderen. Hoofdstuk 6: De hulpprogramma's gebruiken Al opstarten Met Al Booting (Al opstarten) kunt u de voorkeursvolgorde voor het opstarten van apparaten aangeven. Ga als volgt te werk om de opstartvolgorde aan te geven: 1.Selecteer een apparaat en klik met de linker/rechter-knop om de opstartvolgorde aan te geven. 2. Klik op Apply (Toepassen) wanneer u klaar bent. Mijn favorieten Ga als volgt te werk om een applicatie toe te voegen: 1. Klik op Add (Toevoegen) en zoek dan de applicatie die u aan My Favorites (Mijn favorieten) wilt toevoegen. 2. Klik op het venster voor bestanden zoeken op Open. De applicatie wordt aan de lijst My Favorites (Mijn favorieten) toegevoegd. Nederlands Met My Favorites (Mijn favorieten) kunt u applicaties toevoegen die u regelmatig gebruikt. Dit spaart u tijd om in uw computer naar de applicaties te zoeken. Klik met de rechtermuisknop op de pictogram van de applicatie om de geselecteerde applicatie te lanceren, verwijderen of te hernoemen. U kunt ook dubbelklikken om de geselecteerde applicatie te lanceren. ASUS CG8565 395 Ondersteuning Klik op het venster Support (Ondersteuning) op een willekeurige koppeling om naar de ASUS-website, website voor technische ondersteuning, website voor ondersteuning bij downloaden of website met contactinformatie te gaan. Informatie Klik op het venster Information (Informatie) op het tabblad om de gedetailleerde informatie over uw systeem, moederbord, CPU, BIOS, geïnstalleerde apparaten en het geheugen te zien. Nederlands 396 Hoofdstuk 6: De hulpprogramma's gebruiken Nero 9 Met Nero 9 kunt u verschillende soorten gegevens maken, kopiëren, branden, bewerken, delen en bijwerken. Nero 9 installeren Ga als volgt te werkt om Nero 9 te installeren: 1. Plaats de Nero 9-dvd in uw optische station. 2. Als Autorun is ingeschakeld, wordt het hoofdmenu automatisch weergegeven. Als Autorun is uitgeschakeld, dubbelklikt u vanuit de hoofdmap van uw Nero 9-dvd op het bestand SeupX.exe. Klik in het hoofdmenu op Nero 9 Essentials (Essentiële instellingen Nero 9). Nederlands 3. ASUS CG8565 397 Nederlands 398 4. Selecteer de taal die u voor de Installatiewizard wilt gebruiken. Klik op Next (Volgende). 5. Klik op Next (Volgende) om door te gaan. 6. Vink I accept the License Conditions (Ik accepteer de licentievoorwaarden) aan. Klik op Next (Volgende) wanneer u klaar bent. Hoofdstuk 6: De hulpprogramma's gebruiken Selecteer Typical (Typisch) en klik daarna op Next (Volgende). 8. Vink Yes, I want to help by sending anonymous application data to Nero (Ja, ik wil helpen door anonieme applicatiegegevens naar Nero te sturen) aan en klik daarna op Next (Volgende). 9. Klik op Exit (Afsluiten) wanneer u klaar bent. ASUS CG8565 Nederlands 7. 399 Bestanden branden Ga als volgt te werk om bestanden te branden: 1. Klik op het hoofdmenu op Data Burning (Gegevens branden) > Add (Toevoegen). 2. Selecteer de bestanden die u wilt branden. Klik op Add (Toevoegen) wanneer u klaar bent. Nederlands 400 Hoofdstuk 6: De hulpprogramma's gebruiken 3. Klik, nadat u de bestanden hebt geselecteerd die u wilt branden, op Burn (Branden) om de bestanden naar een schijf te branden. Raadpleeg de Nero-website op www.nero.com voor meer details over het gebruik van Nero 9. Uw systeem herstellen Gebruik de Herstellingspartitie De Herstellingspartitie herstelt de software op uw Desktop PC snel terug naar de oorspronkelijke bedrijfsstatus. Voordat u de Herstellingspartitie gebruikt, moet u uw gegevensbestanden (zoals de Outlook PST-bestanden) naar USB-opslagapparatuur of naar een netwerkstation kopiëren en enige aangepaste configuratie-instellingen (zoals netwerkinstellingen) noteren. De Herstellingspartitie is een gereserveerde ruimte op het station voor uw vaste schrijf. Het wordt gebruikt om besturingssystemen, stuurprogramma's en hulpprogramma's die in de fabriek op uw Desktop PC werden geïnstalleerd, te herstellen. U mag de partitie met de naam RECOVERY (HERSTEL) NIET verwijderen. De Herstellingspartitie is in de fabriek gemaakt en kan niet worden hersteld als u deze verwijderd. Breng uw Desktop PC naar een bevoegd ASUS-servicecentrum als u problemen ondervindt met het herstellingsproces. Nederlands Info over de Herstellingspartitie Ga als volgt te werk om de Herstellingspartitie te gebruiken: 1. Druk tijdens het opstarten op <F9>. 2. Druk op <Enter> om Windows-instellingen [EMS ingeschakeld] te selecteren. ASUS CG8565 401 3. Selecteer één van de volgende herstelopties. Systeemherstel: Back-up Systeemafbeelding: Met deze functie kunt u het systeem naar de standaard-fabrieksinstellingen herstellen. Met deze functie kunt u een back-up van de systeemafbeelding naar dvd-schijven branden. Deze kunt u later gebruiken om het systeem naar zijn standaardinstellingen te herstellen. Back-up Systeem-dvd: 4. Volg de instructies op het scherm om het herstelproces te voltooien. Met deze functie kunt u van de ondersteunings-dvd een back-upkopie maken. Ga naar de ASUS-website op www.asus.com voor bijgewerkte stuurprogramma's en hulpprogramma's. De Herstel-dvd (op geselecteerde modellen) gebruiken Bereid naar instructies 1~3 lege schrijfbare dvd's voor om de Herstel-dvd te maken. Verwijder de externe vaste schijf voordat u op uw Desktop PC een systeemherstel uitvoert. Volgens Microsoft kunt u belangrijke gegevens verliezen omdat Windows op de verkeerde schijfstation kan worden geïnstalleerd of omdat de onjuiste stationpartitie kan worden geformatteerd. Ga als volgt te werk om de Herstel-dvd te gebruiken: Nederlands 1. Plaats de herstel-dvd in het optische station. Uw Desktop PC moet worden INgeschakeld. 2. Herstart de Desktop PC en druk tijdens het opstarten op <F8> en selecteer het optische station (kan als "CD/DVD" zijn gelabeld) en druk op <Enter> om de Hersteldvd te starten. 3. Selecteer OK om te beginnen met het herstellen van de afbeelding. 4. Selecteer OK om het systeemherstel te bevestigen. Het herstellen zal uw vaste schijf overschrijven. Zorg dat u, voordat u het systeem herstelt, van al uw belangrijke gegevens een back-up maakt. 5. Volg de instructies op het scherm om het herstelproces te voltooien. Tenzij u hiervoor instructies krijgt mag u de Herstelschijf NIET verwijderen tijdens het herstelproces want anders worden uw partities onbruikbaar. Ga naar de ASUS-website op www.asus.com voor bijgewerkte stuurprogramma's en hulpprogramma's. 402 Hoofdstuk 6: De hulpprogramma's gebruiken Hoofdstuk 7 Problemen oplossen Problemen oplossen Dit hoofdstuk presenteert enkele problemen die u kunt tegenkomen en de mogelijke oplossingen. ? Mijn computer kan niet worden ingeschakeld en de vermogen-LED op het voorpaneel brandt niet. • Controleer of uw computer goed is aangesloten. • Controleer of de contactdoos werkt. • Controleer of de voedingseenheid is ingeschakeld. Raadpleeg de sectie Uw computer AAN/UIT-schakelen in Hoofdstuk 1. Mijn computer blijft hangen. • Doe het volgende om de programma's die niet reageren, te sluiten: 1.Druk gelijktijdig op de toetsen <Alt> + <Ctrl> + <Delete> op het toetsenbord en klik daarna op Start Task Manger (Taakbeheer starten). 2. ? ? Klik op het tabblad Applications (Applicaties). 3.Selecteer het programma dat niet reageert en klik daarna op End Task (Taak beëindigen). • Als het toetsenbord niet reageert. Houd de aan/uit-knop bovenop uw chassis ingedrukt totdat de computer uitschakelt. Druk daarna op de aan/uit-knop om het in te schakelen. Ik kan niet via de ASUS WLAN-kaart (alleen op geselecteerde modellen) verbinding maken met een draadloos netwerk? • Zorg dat u voor het draadloze netwerk waarmee u verbinding wilt maken, de juiste netwerkbeveiligingscode invoert. • Sluit de externe antennes (optioneel) aan op de antenneconnectoren op de ASUS WLAN-kaart en plaats de antennes voor de beste draadloze prestaties, bovenop het chassis van uw computer. Nederlands ? De pijltoetsen op het numerieke toetsenbord werken niet. ASUS CG8565 Controleer of het Number Lock-LED uit is. Als de Number Lock-LED brandt, worden de toetsen op het numerieke toetsenbord alleen voor invoering van nummers gebruikt. Druk op de toets Number Lock om de LED uit te schakelen als u de pijltoetsen op het numerieke toetsenbord wilt gebruiken. 403 ? ? ? Nederlands ? Geen weergave op het scherm. • Controleer of het scherm is ingeschakeld. • Zorg dat uw scherm goed op de video-uitvoerpoort op uw computer is aangesloten. • Als uw computer met een discrete grafische kaart wordt geleverd, dient u uw scherm op een video-uitvoerpoort op de discrete grafische kaart aan te sluiten. • Controleer of er enige pennen van de videoconnector van het scherm zijn verbogen. Als u verbogen pennen ontdekt, dient u de videoconnector-kabel van het scherm te vervangen. • Controleer of uw scherm juist in een voedingsbron is gestoken. • Raadpleeg de documentatie die met uw scherm werd geleverd voor meer informatie over probleemoplossen. Wanneer meerdere schermen worden gebruikt, heeft maar één scherm weergave. • Zorg dat beide schermen zijn ingeschakeld. • Tijdens POST heeft alleen het scherm die op de VGA-poort is aangesloten, weergave. De dubbele schermfunctie werkt alleen onder Windows. • Als in uw computer een grafische kaart is geïnstalleerd, dien u te verzekeren dat de schermen op de uitvoerpoorten van de grafische kaart zijn aangesloten. • Controleer of de instellingen voor meervoudige weergave juist zijn. Raadpleeg de sectie Meerdere externe schermen aansluiten in Hoofdstuk 3 voor details. Mijn computer kan mijn USB-opslagapparaat niet te vinden. • De eerste keer dat u uw USB-opslagapparaat op uw computer aansluit, installeert Windows er automatisch een stuurprogramma voor. Wacht even en ga naar Mijn computer om te controleren of het USB-opslagapparaat is gedetecteerd. • Sluit uw USB-opslagapparaat op een andere computer aan om te zien of het USB-opslagapparaat beschadigd of defect is. Ik wil wijzigingen aan de systeeminstellingen van mijn computer opslaan of ongedaan maken, zonder mijn persoonlijke bestanden of gegevens te beïnvloeden. 404 Met de functie Windows®-systeemherstel kunt u veranderingen aan de systeeminstellingen van uw computer herstellen of ongedaan maken, zonder uw persoonlijke gegevens zoals documenten of foto's te beïnvloeden. Raadpleeg de sectie Uw systeem herstellen in Hoofdstuk 2 voor meer details. Hoofdstuk 7: Problemen oplossen ? Het beeld op de HDTV is uitgerekt. • Het wordt door verschillende resoluties van uw scherm en uw HDTV veroorzaakt. Stel de schermresolutie aan zodat het bij uw HDTV past. Ga als volgt te werk om de schermresolutie te veranderen: 1.Doe één van het volgende om het instellingenscherm Screen Resolution (Schermresolutie) te openen: • Klik op > Control Panel (Configuratiepaneel) > Appearance and Personalization (Verschijning en verpersoonlijking) > Display (Weergave) > Change display settings (Weergave-instellingen wijzigen). • Klik ergens op uw Windows-bureaublad met de rechtermuisknop. Als het pop-upmenu verschijnt, klikt u op Personalize (Verpersoonlijken) > Display (Weergave) > Change display settings (Weergave-instellingen wijzigen). 2.Stel de resolutie bij. Raadpleeg voor de resolutie, de documentatie die met uw HDTV werd geleverd. 3.Klik op Apply (Toepassen) of OK. Klik daarna op het bevestigingsbericht op Keep Changes (Wijzigingen bewaren). Mijn luidsprekers produceren geen geluid. • • • • • ? Het dvd-station kan geen disk lezen. • • • ? Zorg dat u uw luidsprekers op de Poort lijn Uit (limoen) op het voor- of achterpaneel aansluit. Controleer of uw luidspreker op een elektrische bron is aangesloten en is ingeschakeld. Stel het volume van uw luidsprekers bij. Zorg dat het geluid van uw computersysteem niet is gedempt. •Als het is gedempt, wordt het volumepictogram als volgt weergegeven: . Om het systeemgeluid in te schakelen, klikt u vanuit het Windowsnotificatiegebied op en daarna op . •Als het niet wordt gedempt, klikt u op en sleept u de schuifbalk om het volume bij te stellen. Sluit uw luidsprekers op een andere computer aan om te testen of de luidsprekers goed werken. Controleer of de disk met het label opwaarts is geplaatst. Controleer of de disk in het midden van de la is geplaatst, vooral bij disks met een niet-standaard afmeting of vorm. Controleer of de disk is bekrast of beschadigd. Nederlands ? De uitwerpknop van het dvd-station reageert niet. > Computer. 1. Klik op 2. Klik met de rechtermuisknop op menu op Eject (Uitwerpen). ASUS CG8565 en klik daarna vanuit het 405 Voeding Probleem Mogelijke oorzaak Onjuiste voedingsspanning Geen voeding (de voedingsindicator is uit) Uw computer is niet ingeschakeld. De stroomkabel van uw computer is niet goed aangesloten. Problemen met PSU (Power supply unit, voedingseenheid) Actie • S tel de schakelaar voor voedingspanning van uw computer in op de voedingsvereisten van uw gebied. • Stel de spanningsinstellingen bij. Zorg dat de stroomkabel uit de contactdoos is getrokken. Druk op het voorpaneel op de aan/uit-knop om te verzekeren dat uw computer is ingeschakeld. • Zorg dat de stroomkabel goed is aangesloten. • Gebruik een andere compatibele stroomkabel. Probeer een andere PSU op uw computer te installeren. Scherm Probleem Mogelijke oorzaak Actie Na het inschakelen van de computer is geen beelduitvoer (zwart scherm) De signaalkabel is niet op de juiste VGA-poort op uw computer aangesloten. • S luit de signaalkabel op de juiste signaalpoort (onboard VGA- of discrete VGA-poort) aan. • Als u een discrete VGA-kaart gebruikt, sluit u de signaalkabel aan op de discrete VGA-poort. Problemen signaalkabel Probeer op een ander scherm aan te sluiten. Nederlands 406 Hoofdstuk 7: Problemen oplossen LAN Probleem Kan geen toegang krijgen tot het internet. Mogelijke oorzaak Actie Problemen LAN-kabel Verzeker of de LAN-LED brandt. Zo niet, probeer een andere LANkabel. Als het nog niet werkt, dient u contact op te nemen met het ASUSservicecentrum. De LAN-kabel is niet aangesloten. Uw computer is niet goed op een router of hub aangesloten. Netwerkinstellingen Problemen door de antivirus-software veroorzaakt Problemen stuurprogramma's Sluit de LAN-kabel aan op uw computer. Verzeker of uw computer goed op een router of hub is aangesloten. Neem contact op met uw internet service-provider (ISP) voor de juiste LAN-instellingen. Sluit de antivirus-software. Installeer het LAN-stuurprogramma opnieuw Audio Geen audio Mogelijke oorzaak Luidspreker of koptelefoon is op de verkeerde poort aangesloten. • R aadpleeg de gebruikershandleiding van uw computer betreffende de juiste poort. • Verwijder en sluit de luidspreker opnieuw op uw computer aan. Luidspreker of koptelefoon werkt niet. Probeer een andere luidspreker of koptelefoon te gebruiken. De audiopoorten op de voor- en achterkant werken niet. Probeer de audiopoorten op de vooren achterkant. Als één poort faalt, dient u te controleren of de poort op een multi-kanaal is ingesteld. Problemen stuurprogramma's ASUS CG8565 Actie Installeer het audio-stuurprogramma opnieuw Nederlands Probleem 407 Systeem Probleem Systeemsnelheid is te langzaam Mogelijke oorzaak Er zijn te veel programma's werkzaam. Virusaanval op computer Storing station vaste schijf Het systeem blijft vaak hangen of bevriest. Actie Sluit enkele programma's. • G ebruik een antivirus-software om voor virussen te scannen en repareer uw computer. • Installeer het besturingsysteem opnieuw. • Stuur het beschadigde station van de vaste schijf naar het ASUSservicecentrum voor service. • Vervang met een nieuw station voor vaste schrijf. Problemen geheugenmodule • V ervang met compatibele geheugenmodules. • Verwijder de extra geheugenmodules die u hebt geïnstalleerd en probeer opnieuw. Er is niet genoeg luchtventilatie voor uw computer. Verplaats uw computer naar een plek met betere luchtstroom. Incompatibele softwares zijn geïnstalleerd. Installeer het besturingsysteem opnieuw en installeer compatibele softwares. Nederlands 408 Hoofdstuk 7: Problemen oplossen CPU Mogelijke oorzaak Uw computer is aan het opstarten. Meteen na het aanzetten van de computer is er te veel lawaai. De BIOS-instellingen zijn veranderd. Oude BIOS-versie De CPU-ventilator is vervangen. Computer is te luidruchtig tijdens het gebruik. Er is niet genoeg luchtventilatie voor de computer. De systeemtemperatuur is te hoog. Actie Dit is normaal. De ventilatoren werken op volle snelheid als de computer opstart. De ventilator zal langzamer werken nadat de computer het besturingsysteem ingaat. Herstel de BIOS naar de standaardinstellingen. Werk de BIOS bij naar de nieuwste versie. Ga naar de site voor ASUSondersteuning op http://support. asus.com om de nieuwste BIOSversies te downloaden. Zorg dat u een compatibele of door ASUS aangeraden CPU-ventilator gebruikt. Verplaats uw computer naar een plek met betere luchtstroom. • W erk de BIOS bij. • Als u weet hoe het moederbord opnieuw te installeren, dient u de interne ruimte van de chassis te proberen reinigen. Als het probleem aanhoudt, dient u de garantiekaart van uw Desktop PC te raadplegen en contact op te nemen met het ASUS-servicecentrum. Ga naar de site voor ASUS-ondersteuning op http://support.asus.com voor informatie betreffende het servicecentrum. ASUS CG8565 Nederlands Probleem 409 ASUS contact informatie ASUSTeK COMPUTER INC. Adres 15 Li-Te Road, Peitou, Taipei, Taiwan 11259 Telefoon +886-2-2894-3447 Fax +886-2-2890-7798 E-mail [email protected] Web site www.asus.com.tw Technisch Ondersteuning Telefoon Online ondersteuning +86-21-38429911 support.asus.com ASUS COMPUTER INTERNATIONAL (America) Adres Telefoon Fax Web site 800 Corporate Way, Fremont, CA 94539, USA +1-812-282-3777 +1-510-608-4555 usa.asus.com Technisch Ondersteuning Telefoon Fax ondersteuning Online support +1-886-678-3688 +1-812-284-0883 support.asus.com ASUS COMPUTER GmbH (Germany and Austria) Adres Fax Web site Online contact Harkort Str. 21-23, D-40880 Ratingen, Germany +49-2102-959911 www.asus.de www.asus.de/sales Technisch Ondersteuning Telefoon Fax ondersteuning Online ondersteuning +49-1805-010923* +49-2102-9599-11* support.asus.com Nederlands *EUR 0,14/minuut vanaf een vaste Duitse landlijn; EUR 0,42/minuut vanaf een mobiele telefoon. Fabrikant ASUSTeK Computer Inc. Tel: +886-2-2894-3447 Adres: No. 150, LI-TE RD., PEITOU, TAIPEI 112, TAIWAN R.O.C ASUSTeK Computer GmbH Erkende vertegenwoordiger Adres: HARKORT STR. 21-23, 40880 in Europa RATINGEN, GERMANY 410 Hoofdstuk 7: Problemen oplossen