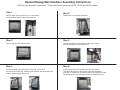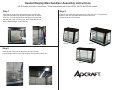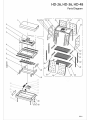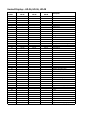
1
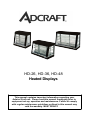
HD-26, HD-36, HD-48
Heated Displays
This manual contains important information regarding your
Admiral Craft unit. Please read this manual thoroughly prior to
equipment set-up, operation and maintenance. Failure to comply
with regular maintenance guidelines outlined in this manual may
void the warranty. MUST READ!!!
WARNINGS
• Fire, injury or death hazard – have this unit installed by a qualified installer in accordance with all deferral, state
and local codes. Failure to install this equipment properly can result in injury or death.
• Fire hazard – this unit is designed to be used with legs. Do not use without legs installed. Use of this equipment
without legs can cause the unit to overheat and cause a fire.
• Fire and burn hazard – fire and burn injuries can occur if this equipment is not used properly. To reduce the risk
of injury or death:
o Do not touch any hot surfaces
o Plug only into a 3-hole grounded electrical outlet
o Do not immerse unit, cord or plug in liquid at any time
o Unplug cord from outlet when not in use and before cleaning
o Do not operate unattended
o Do not use this unit for anything other than intended use
o Do not use outdoors
o Always use on a firm, dry and level surface at least 12” from walls or any other obstruction
o Do not use if unit has a damaged cord or plug, in the event the appliance malfunctions, or has been damaged in
any manner
o Keep children and animals away from unit
o Any incorrect installation, alterations, adjustments and/or improper maintenance can lead to property
loss and injury. All repairs should be done by authorized professionals only
o Ensure that the designated power supply is adequate for continual usage and the voltage is correct
*This unit is intended to be used as a merchandiser for hot food in commercial food service operations only. It
is not intended for household use.
TO INSTALL
1. Remove all packing material and tape, as well as any protective plastic or tape
2. Clean off any glue or tape residue
3. Place the unit in the desired position and level using the included adjustable feet
4. Installing doors: Note the longer doors are for the front or sloped side and the shorter doors are for the back or
straight side. The doors are fitted with the handles facing outside of the unit. Place the top of the door into the
top track and slide the door up to clear and lower into the bottom track.
5. Installing shelves: Place the uprights into the provided slots. Make sure that the longer tab in on top and the
flat sides face inwards. Place the shelf supports at the desired locations and position the shelf on these
supports.
NOTE: The shelf supports and shelves can be positioned level or sloping forward for improved presentation.
6. Plug the unit into a properly grounded electrical supply that matches the data plate rating. Damage to the unit
may occur if incorrect power is supplied to the unit.
TO USE
1. Set the thermostat to the desired heat
2. Preheat the unit for approximately 15 minutes, until the unit reaches the set temperature. The pilot light will
cycle on and off when the unit has reached the set temperature.
3. Use the toggle switch to operate the light
4. If moisture is required, fill the humidity pan with 20 ounces of water and monitor the water level
CLEANING – NOTE: To maintain cleanliness and increase service life, the oven should be cleaned daily. Do not
immerse the unit in water or any other liquid. If liquid enters the electrical compartment it may cause a short circuit or
electrical shock
1. Unplug the unit and allow to cool completely before cleaning
2. Using a damp cloth or sponge dipped in soapy water, carefully
3. Wipe the unit dry and wait at least a half hour before using the unit.
VER811
Heated Display Merchandiser Assembly Instructions
HD-26 model pictured in instructions. These instructions are for the HD-26, HD-36 and HD-48 models.
Step 1
Step 4
With the back of the unit facing you, un-screw both
screws located under the top cover of the unit.
Repeat step 3 for the other side glass.
Step 2
Step 5
Remove the top cover and set aside.
Put top cover back on and tighten screws (leave a little
loose for fitting the front glass pieces in).
Step 3
Step 6
Loosen the bottom screws located on the side. Do not take
the screws out all the way. Slide the glass between the posts and when
properly aligned tighten the screws.
Insert the top of the front left glass into the top inner slot.
Then place the bottom of the front left glass into the bottom
inner slot. If need be, lift up the top cover a bit to fit glass in under.
Remember to hold onto side glass pieces so they don’t fall out.
Heated Display Merchandiser Assembly Instructions
HD-26 model pictured in instructions. These instructions are for the HD-26, HD-36 and HD-48 models.
Step 7
Step 9
Insert the top of the front right glass into the top outer slot.
Then place the bottom of the front left glass into the bottom
outer slot. Turn unit around once front glass is in place and
with the rear of the unit facing you, put in shelf adjustment
bars to desired height. Insert shelves.
Insert the top of the rear right glass into the top inner slot. Then place the
bottom of the rear right glass into the bottom inner slot.
Tighten inside top cover screws.
HD-36
HD-26
Step 8
Insert the top of the rear left glass into the top inner slot.
Then place the bottom of the rear left glass into the bottom inner slot.
HD-48
Heated Displays ‐ HD‐26, HD‐36, HD‐48
Reference
Number
Part Number
HD‐26
Part Number
HD‐36
Part Number
HD‐48
1
3
4
5
6
7
8
9
10
11
12
13
14
15
16
17
18
19
20
22
23
24
25
27
28
30
31
32
33
34
36
37
38
39
40
41
42
43
44
46
47
49
52
‐
200N2
‐
‐
‐
‐
HD26‐8
‐
‐
‐
‐
‐
HD‐14
HD‐15
HD‐16
HD‐17
HD‐18
HD‐19
HD-20
HD‐22
‐
HD-24
HD-25
‐
‐
‐
‐
‐
HD-33
HD26‐34
HD26‐36
HD26‐37
HD-38
HD26‐39
HD26‐40
HD26‐41
‐
HD26‐43
‐
HD26‐46
HD‐47
HD‐49
‐
‐
200N2
‐
‐
‐
‐
HD36‐8
‐
‐
‐
‐
‐
HD‐14
HD‐15
HD‐16
HD‐17
HD‐18
HD‐19
HD-20
HD‐22
‐
HD-24
HD-25
‐
‐
‐
‐
‐
HD-33
HD36‐34
HD36‐36
HD36‐37
HD-38
HD36‐39
HD36‐40
HD36‐41
‐
HD36‐43
‐
HD36‐46
HD‐47
HD‐49
‐
‐
200N2
‐
‐
‐
‐
HD48‐8
‐
‐
‐
‐
‐
HD‐14
HD‐15
HD‐16
HD‐17
HD‐18
HD‐19
HD-20
HD‐22
‐
HD-24
HD-25
‐
‐
‐
‐
‐
HD-33
HD48‐34
HD48‐36
HD48‐37
HD-38
HD48‐39
HD48‐40
HD48‐41
‐
HD48‐43
‐
HD48‐46
HD‐47
HD‐49
‐
Top Plate
Steam Pan
Screw M5x16
Protective Plate for Element
Level Plate
Slide Groove
Element
Support for Element
Screw M4x12
Flat Washer
Spring Washer
Nut
Power Cord and Strain Relief
Knob
Hot Light indicator -Orange
Power Switch - Green
Lamp Switch
Thermostat ‐ EGO
Control Plate
Side Plate
Screw M4x12
Foot with Rubber Insert
Clips for Glass
Screw M5x10
Screw M6x20
Nut
Element Support Plate
Element Assembly Plate
Support Rack (Left)
Gasket
Front Glass
Bottom shelf
Support Rack (Right)
Middle Shelf
Top Shelf
Vertical Post
Angle Post for Lamp (Left)
Side Glass
Screw
Back Glass
Transformer
Starter
Body Rack
53
54
55
HD-53
HD-54
HD-53
HD-54
HD-53
HD-54
-
-
-
Lamp Base
Lamp
Angle Post for Lamp (Right)
VER811
Description
ACE Equipment One Year Limited Warranty
Admiral Craft Equipment Corp. (ACE) warrants its equipment against defects in materials and workmanship, subject
to the following conditions:
ACE Equipment is warranted for one year, effective from the date of purchase by the original owner. A copy of the
original receipt or other proof of purchase is required to obtain warranty coverage. This warranty applies to the original
owner only, and is not assignable.
Should any product fail to function in its intended manner under normal use within the limits defined in this
warranty, at ACE’s discretion, such product will be repaired, replaced with a refurbished unit, or replaced with a new
unit by ACE, after defective unit has been inspected and defect has been confirmed. ACE does not assume any liability
for extended delays in replacing any item beyond its control. This warranty does not apply to rubber and non-metallic
synthetic parts that may need to be replaced due to normal usage, wear or lack of preventative maintenance.
This warranty covers products shipped into the 48 contiguous United States, Hawaii, and metropolitan areas of Alaska
and Canada. Warranty coverage on products used outside the 48 contiguous United States, Hawaii and metropolitan
areas of Alaska and Canada may vary. Contact ACE for details at 1-800-223-7750
The following conditions are not covered by warranty:
•
•
•
•
•
Equipment failure relating to improper installation, improper utility connection or supply and problems due to
improper ventilation.
Equipment that has not properly been maintained, damage from improper cleaning, and water damage
to controls.
Equipment that has not been used in an appropriate manner, or has been subject to misuse, neglect, abuse,
accident, alteration, negligence, damage during transit, delivery or installation, fire, flood, riot, or act of God.
Equipment that has the model number or serial number removed or altered.
Equipment on which the security seal has been broken.
If the equipment has been changed, altered, modified, or repaired without express written permission from ACE, then the
manufacturer shall not be liable for any damages to any person or to any property, which may result from the use of this
equipment thereafter.
This equipment is intended for commercial use only and this warranty is void if equipment is used in other than a
commercial application.
For warranty and non-warranty related issues please call ACE at 1-800-223-7750 ext 3 to speak to technical support.
When calling please have your model number, serial number and proof of purchase ready. To purchase replacement
parts, receive online technical support or fill out a warranty claim visit www.admiralcraftequipment.com. It is not
necessary to contact the place where you originally purchased your product from.
“THE FOREGOING WARRANTY IS IN LIEU OF ANY AND ALL WARRANTIES EXPRESSED OR IMPLIED
INCLUDING ANY IMPLIED WARRANTY OF MERCHANTABILTY OR FITNESS FOR PARTICULAR
PURPOSES AND CONSTITUES THE ENTIRE LIABILITY OF ACE. IN NO EVENT DOES THE LIMITED
WARRANTY EXTEND BEYOND THE TERMS STATED HEREIN.”
VER0112