1
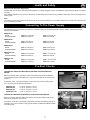
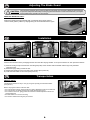
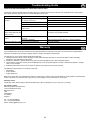
GB Operators Manual
US Operators Manual
- Spare Parts Book
- Pièces détachées
- Libro Despiece
F
Manuel De L'Opérateur
E
Manual del Operador
4
12
20
28
36
1
870/30006/0
Health and Safety
GB
PPE (Personal Protective Equipment).
Suitable PPE must be worn when using this equipment i.e. Safety Goggles, Gloves, Ear Defenders, Dust Mask and Steel Toe capped
footwear.
Wear clothing suitable for the work you are doing. Tie back long hair and remove any jewellery which may catch in the equipment’s
moving parts.
Dust.
The sawing process will occasionally produce dust, which may be hazardous to your health. Always wear a mask that is suited to the
type of dust being produced.
Connecting To The Power Supply
GB
The machine is to be connected to the mains by a residual current circuit breaker (RCCB) or class II isolation transformer with the
following characteristics:
MINITILE 180
RCCB
TRANSFORMER
230V In 3 A Id 20 mA
230V 50 Hz 650 W
115V In 6 A Id 20 mA
115V 50 Hz 650 W
MINITILE 200
RCCB
TRANSFORMER
230V 5 A Id 20 mA
230V 50 Hz 650 W
115V 6 A Id 20 mA
115V 50 Hz 650 W
MINITILE 230
RCCB
TRANSFORMER
230V 10 A Id 20 mA
230V 50 Hz 1500 W
115V 16 A Id 20 mA
115V 50 Hz 1500 W
MAGIKTILE 180
RCCB
TRANSFORMER
230V In 6 A Id 20 mA
230V 50 Hz 650 W
115V In 3 A Id 20 mA
115V 50 Hz 650 W
MAXITILE 260
RCCB
TRANSFORMER
230V In 5 A Id 20 mA
230V 50 Hz 1000 W
115V In 10 A Id 20 mA
115V 50 Hz 1000 W
Pre-Start Checks
GB
THE MINITILE / MAGIKTILE MACHINE IS DESIGNED FOR WORKING WITH
WATER.
Before and during cutting operations, make sure that the water level is sufficient to
cover the diamond part of the blade. Fill or top up the basin directly, as shown in the
picture 1a.
In particular cases, it may be necessary to use a tray to recover the cooling water.
If so, use a tray with the following dimensions:
MINITILE 180
MINITILE 200
MINITILE 230
MAGIKTILE 180
1a
= L 50 cm, P 60 cm, H 10 cm
= L 50 cm, P 60 cm, H 10 cm
= L 60 cm, P 60 cm, H 10 cm
= L 50 cm, P 60 cm, H 10 cm
THE MAXITILE MACHINE IS DESIGNED FOR WORKING WITH WATER.
Before any cutting operation, make sure that the water level inside the basin is the
same as the one shown in picture 1b.
Through an on-off valve it is possible to adjust the water flow according to the type of
material to be cut. An innovative cooling system makes it possible and allows the disk
to be always wet.
7
1b
Adjusting The Blade Guard
GB
CAUTION
The machine is equipped with a continuous diamond rim blade. Even though this blade has been designed
for operator safety if unintentionally touched, pay particular attention to avoid contact between your fingers
and the blade during operation of the machine.
MINITILE & MAGIKTILE ONLY!!
Position the blade guard approximately half a centimetre above the tile surface.
Lock the blade guard in position by fully tightening the screw illustrated in the figure.
2
Installation
GB
3a
3b
3c
MAXITILE ONLY!!
Remove the machine from the packaging with the aid of the side carrying handles. To set up the machine for work proceed as follows:
1) Remove the leg lock pin and raise the rear side (pump side) of the machine with the handle until the leg is fully extended
(See picture 3a).
2) Raise the leg by sliding it inside the slot.
3) Repeat the operation for the front side of the machine (See picture 3b).
4) Insert the tube-holder rod in its seat (See picture 3c).
GB
Transportation
MAXITILE ONLY!!
The MAXITILE machine is easy to carry by using the specially provided side handles
(See picture 4).
Before carrying the machine make sure that:
• the motor slide is locked in place with the two cutting adjustment knobs on the slide rail;
• the motor slide is completely lowered and locked with the locking lever;
• the machine is in the 45° (jolly) position and that the inclination adjustment knobs are
properly tightened;
• the tube-holder rod is out of its housing;
• the feet are closed and the leg lock pin inserted.
8
4
Operating Instructions
GB
MINITILE & MAGIKTILE ONLY!!
Cutting at 90°
Position the cutting guide and lock it by tightening the knobs fully. (See Figure 5a)
The picture on the right shows how to position hands correctlyduring cutting at 90°. The
forward movement of the piece must be proportional to the blade cutting capacity, to
prevent hazardous fragments that would involve accidents or injuries from breaking off.
Cutting a surface at 45°
5a
Position the tilting table as shown in figure 5b, then lock it in place with the knobs.
Position the cutting guide approx. 2 mm from the diamond blade, then lock it in place by
tightening the knobs fully.
Position the tile with the enamel surface downwards; make sure that the diamond blade
does not come into contact with the tile enamel. Adjust the position of the cutting guide
as necessary.
5b
CAUTION
Figure 5b illustrates the correct position of the hands in the case of 45° angle cuts. Note that the right
hand holds the piece in contact with the diamond blade, while the left hand moves the piece forward.
The forward movement of the piece must be proportional to the blade cutting capacity, to prevent
hazardous fragments which would involve accidentsor injuries from breaking off.
MAXITILE ONLY!!
Cutting at 90°
Thanks to the great versatility of the MAXITILE machine it is possible to carry out different
types of cutting.
Adjust the blade to the 0° position with the inclination adjustment knobs (See picture 6a).
Position the piece which needs cutting on the working table and make sure that it is
properly up against the tile-stop. If necessary, a square can be of help.
6a
In order to carry out any diagonal cutting lean the tile against the square the way it is
shown in picture 6b and go on with the cutting operation.
CAUTION
The millimetre ruler placed on the Working table helps only for
linear Cutting.
Cutting at 45°
6b
Adjust the blade to the 45° position with the
inclination adjustment knobs (See picture 6b)
Lock the motor carriage at the max. cutting depth with the locking lever. Picture 6c shows
the proper way the machine should be used.
6c
In order to carry out special working it is possible to set out any cutting inclination ranging
from 0° to 45° as marked on the machine side (See picture 6d).
CAUTION
Before any cutting make sure that the Tile to be cut is properly
up against The tile-stop.
With the MAXITILE machine it is also possible to set out:
6d
a- the cutting length with the cutting adjustment knobs;
b- the cutting depth with the locking lever;
c- the straight cut measurement with the tile bearing square as well as the ruler placed
on the working table;
d- the cutting adjustment with the specially provided indicator and ruler placed on the
slide rail.
9
Maintenance
GB
CAUTION
Before performing any maintenance operation, ensure the machine is disconnected from the power
supply.
MINITILE & MAGIKTILE ONLY!!
DIAMOND BLADE DISASSEMBLY
Remove the blade guard.
Use the 4mm Allen Key to hold the motor shaft. Unscrew the blade flange block nut with
the 19mm spanner.
After removing the blade, clean the blade flange thoroughly and check for wear.
Lubricate surfaces with fine oil, then fit new blade.
7a
MAXITILE ONLY!!
After dismantling the blade, clean the blade
flanges carefully and check them for wear.
Grease any surface with fine oil and go on
with the assembly of a new blade.
Check for correct direction of rotation as
clearly indicated on the blade.
MOTOR CARRIAGE ADJUSTMENT
The motor carriage is provided with a register
for the vertical play adjustment. If any
excessive play of the motor carriage should
take place, act as follows:
1) Loosen the register fixing nut with a
10mm spanner;
2) Screw down the dowel with a 4 mm Allen
Key until the play is eliminated;
3) Lock the register again with the fixing nut.
7b
7c
7d
7e
CLEANING
It is extremely easy to clean the MAXITILE machine by loosening the side knobs and
dismantling the working table.
Through the side drain remove any residue (See picture 7d).
When necessary clean the sprayer as shown in pictures 7e and 7f.
7f
10
Troubleshooting Guide
GB
HAVE YOUR MACHINE REPAIRED BY A QUALIFIED PERSON ONLY
This electric machine complies with the relevant safety rules. Repairs should only be carried out by qualified persons using original
spare parts, otherwise this may result in considerable danger to the user.
Fault
The machine does not
function.
Cause
The power supply cable is damaged or
not properly connected.
No voltage in the socket.
Switch is damaged.
Diamond blade is bent due to
incorrect use.
The sprayer unit is clogged.
If lubrication does not
arrive at the blade with the
pump running.
Motor gives off unpleasant Water may have seeped through inside
odour.
the motor.
Capacitor is damaged.
Machine is difficult to start. Motor bearings are damaged.
Remedy
Press the plug firmly into the power socket.
Have the socket checked.
Consult local dealer.
Replace diamond blade.
Dismantle the sprayer assembled inside the blade cover
and remove any possible residuals.
Unplug the power supply cable and consult local dealer.
Unplug the power supply cable and consult local dealer.
Consult local dealer.
Warranty
GB
Your new Belle Group Tile Saw is warranted to the original purchaser for a period of one-year (12 months) from the original date of
purchase. The Belle Group warranty is against defects in design, materials an workmanship.
The following are not covered under the Belle Group warranty:
1. Damage caused by abuse, misuse, dropping or other similar damage caused by or as a result of failure to follow assembly,
operation or user maintenance instructions.
2. Alterations, additions or repairs carried out by persons other than Belle Group or their recognised agents.
3. Transportation or shipment costs to and from Belle Group or their recognised agents, for repair or assessment against a warranty
claim, on any machine.
4. Materials and/or labour costs to renew, repair or replace components due to fair wear and tear.
The following components are not covered by warranty:
• Drive belt(s)
• Engine air filter
• Engine spark plug
Belle Group and/or their recognised agents, directors, employees or insurers will not be held liable for consequential or other damages,
losses or expenses in connection with or by reason of or the inability to use the machine for any purpose.
Warranty Claims
All warranty claims should firstly be directed to Belle Group, either by telephone, by Fax, by Email, or in writing.
For warranty claims:
Belle Group Warranty Department,
Unit 5, Bode Business Park
Ball Haye Green
Leek
Staffordshire
ST13 6BW.
England.
Tel : +44 (0)1538 380000
Fax : +44 (0)1538 380038
Email : [email protected]
11
No.1 for Light Construction Equipment
www.BelleGroup.com
Belle Group Head Office
Sheen, nr. Buxton
Derbyshire. SK17 OEU GB.
Tel: +44 (0)1298 84000
Fax: +44 (0)1298 84722
email: [email protected]
Belle Poland sp. z.o.o.
96-200 Rawa Mazowiecka
Ul. Mszczonowska 36,
Polska
Tel: +48 (0) 46 8144091
Fax: +48 (0) 46 8144700
Belle Group France
70, av du Général de Gaulle
94022 Creteil, Cedex.
FRANCE
Tel: +33 (0) 1 49 81 68 32
Fax: +33 (0) 1 43 39 94 40
Ventes : 0800 902 461
SAV : 0800 905 336
SAV Fax : 0800 909 895
Belle Group Portugal
Rua Laura Alves, 225, 2° F
2775-116 Parede
Portugal
Tel: +35 1 (21) 453 59 91
Fax: +35 1 (21) 453 59 91
Belle Equipos SL
Calle Doctor Calero Cial 19,
Local 22, 28220 Majadahonda
Madrid, Spain
Tel: +34 (0) 91 636 2043
Fax: +34 (0) 91 634 1535
email:[email protected]
Belle Group Belguim
Tel: 0800 80295
Belle Group Deutschland
Husumer Straße 45 a,
D-33729,
Bielefield
Deutschland
Tel : +49(0) 5217 707505
Fax : +49 (0) 5217 707506
Sales: 0800 1808069
Spares: 0800 1816673
www.BelleGroup.com
COMPACTING...
MIXING...
Belle Group (GB), Shanghai Office
Room 213, Zhonghuang Building,
1007 Zhongshan Nan Er Road,
Xuhui, Shanghai 200030 China
Tel: 00 - 86 - 21 - 5461 5228
Mobile: 00 - 86 - 133 8172 2653
Fax: 00 - 86 - 21 - 5461 5369
email: [email protected]
Belle Group Inc
3959 Electric Rd
Roanoake
Suite 360
VA 24018. USA.
Tel: +1.540.345.5090
Fax: +1.540.345.5091
Toll free 866 540 5090
e-mail: [email protected]
Belle Group Netherlands
Tel: 0800 249861
Belle Group Austria
Tel: 0800 291544
Belle Group Russia
64 Nevsky pr.
St, Petersburg
Russia
Tel : +7(812)314-81-34
Moscow : +7(495)589-64-32
Belle Group South East Asia
21, Jalan Ara AD 7/3B,
Pandar Sri Damansara
S2200 Kuala Lumpar, Malaysia
Tel: +60 (0) 3 62721678
+60 (0) 3 6272 9308
Fax: +60 (0) 3 6272 9528
Belle Group World Parts Centre
Unit 5, Bode Business Park
Ball Haye Green,
Leek,
Staffordshire,
ST13 8BW
Tel: 44+ 1538 380000
Fax: 44+ 1538 380038
No.1 for Light Construction Equipment
CONCRETING...
46
CUTTING...
BREAKING...
MOVING