1
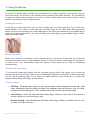
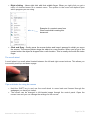
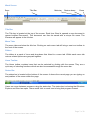
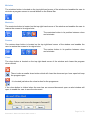
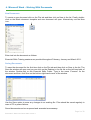
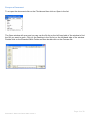
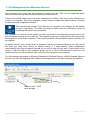
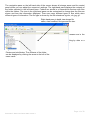
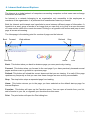
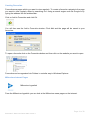
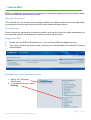
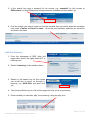
Essential IT Skills User Guide
Millennium Training Team ℡ 1692
Essential IT Skills User Guide 2003 Version 1
January 2011
Contents
1.
Logging On/Off, Locking The PC And Shutting Down ....................................................................... 3
2.
Using The Mouse .............................................................................................................................. 4
3.
Microsoft Word .................................................................................................................................. 6
4.
Microsoft Word – Working With Documents ...................................................................................... 9
5.
File Management And Windows Explorer........................................................................................ 13
6.
Intranet And Internet Explorer ......................................................................................................... 15
7.
What is ESR? ................................................................................................................................. 17
8.
Terminology .................................................................................................................................... 19
Page 2 of 20
Essential IT Skills User Guide 2003 Version 1
1. Logging On/Off, Locking The PC And Shutting Down
Logging On/Off
Enter your:
•
•
•
Smartcard and your Code
User name and password
PC default user eg train 9 and password training
To log off click on the Start button and select Log Off
Locking the PC
Hold down the Ctrl, Alt and Delete keys on the keyboard. Click on Lock this Computer.
Shutting Down
Click on the Start icon and select Shut Down
Page 3 of 20
Essential IT Skills User Guide 2003 Version 1
2. Using The Mouse
A mouse is a device which controls the movement of the cursor or pointer on the screen. As you
move the mouse, the pointer on the display screen moves in the same direction. The mouse has
at least one button and sometimes as many as three. Some newer mice also include a scroll
wheel for scrolling through long documents.
Holding the mouse
If you lay your entire hand over your mouse it usually ends up in the right spot. Try to have your
thumb resting on the desk on one side and your little finger on the other side. See the picture
below. Now you can see that your index finger sits on the left mouse button and your middle finger
rests on the right mouse button. You can use either your index finger or your middle finger to move
the centre scroll wheel.
Moving the mouse
When your mouse is connected to the computer and you move the mouse with your hand the
onscreen arrow will move on the computer screen. It is best to have a clear space for the mouse
to move in as if you accidentally bump into objects it may cause you to click on something
unintentionally.
Clicking with the mouse
To click gently press and release the left computer mouse button. Be careful not to move the
mouse while you are clicking. If you do move accidentally slide the mouse back to where you want
it to be and try clicking again. Try to keep your hand relaxed on the mouse as you press and
release without lifting your finger off the button.
Clicking actions
•
Clicking - Pressing down gently on the mouse button while holding the mouse still. New
users sometimes jerk the mouse as they click because they are trying to click too hard.
Instructions which simply say "click" usually mean click with the left mouse button.
•
Left clicking - Users left click with their index finger. When you left click on the mouse it
usually means you are selecting an item.
•
Double clicking - Users double click with their index finger. When you double click on a file
or folder it will open the item.
Page 4 of 20
Essential IT Skills User Guide 2003 Version 1
•
Right clicking - Users right click with their middle finger. When you right click you get a
menu of choices known as a context menu. The options in the menu will depend upon
which program you are using.
Example of a context menu from
Word used whilst creating this
document.
•
Click and Drag - Gently press the mouse button and keep it pressed in whilst you move
the mouse. The mouse pointer drags the object to a new location. When you let go of the
mouse button the object is dropped into a new location. This is usually done with the index
finger.
The scroll wheel
A scroll wheel is a small wheel located between the left and right mouse buttons. This allows you
to smoothly scroll up and down a page.
Tips and tricks for using the mouse
•
•
Hold the SHIFT key in and use the scroll wheel to move back and forward through the
webpages you have just visited.
The mouse can be changed to left-handed usage through the control panel. Open the
mouse icon and you can change the settings for the mouse.
Page 5 of 20
Essential IT Skills User Guide 2003 Version 1
3. Microsoft Word
Microsoft Word is a word processing application. The current version is
Starting Word
Word can be opened by double-clicking on the Word icon on the desktop.
Alternatively users can start Word by clicking on the Start button at the bottom left-hand corner of
the screen and slide the mouse up to the Microsoft Word option and left click. Word can also be
opened via the All Programs option on the Start menu.
Start button
Other windows open:
Windows Explorer
Word
Page 6 of 20
Essential IT Skills User Guide 2003 Version 1
Word Screen
Save
Title Bar
Minimise
Restore down
Close
Title Bar
The Title bar is located at the top of the screen. Each time Word is opened a new document is
opened entitled Document1. This document can then be saved with a unique file name. The
filename will appear in the title bar.
Menu Tabs
The menu tabs are below the title bar. Clicking on each menu tab will bring a new icon toolbar to
the front of the screen.
Ribbon
The ribbon is a panel of icons and drop-down lists linked to a menu tab. Within each menu tab
various related options are grouped together.
Home Toolbar
The Home toolbar contains icons that can be selected by clicking with the mouse. They are a
quick way of selecting functions which can also be accessed through the menu bar.
Status Bar
The status bar is located at the bottom of the screen it shows the current page you are typing on
and position of the cursor within the page.
Users can move between programs using the status bar. The status bar is showing that Windows
Explorer and Word are open. Users would click on each icon to bring that program forward.
Page 7 of 20
Essential IT Skills User Guide 2003 Version 1
Minimise
The minimise button is located on the top right-hand corner of the window and enables the user to
minimize a program screen to a small button on the Status Bar.
Maximise
The maximise button is located on the top right-hand corner of the window and enables the user to
restore the screen to its original size.
The maximise button in its position between close
and minimise.
Restore
The restore down button is located on the top right-hand corner of the window and enables the
user to restore the screen to its original size.
The restore button in its position between close
and minimise.
Close
The close button is located on the top right-hand corner of the window and closes the program
when clicked.
There is also a smaller close button which will close the document you have open but keep
the program open.
It is located just below the close button for the programme.
If the close button is clicked when the user has an unsaved document open an alert window will
open to enable the user to save the document.
Page 8 of 20
Essential IT Skills User Guide 2003 Version 1
4. Microsoft Word – Working With Documents
New Documents
To create a new document click on the File tab and then click on New in the list. Finally doubleclick on the Blank document template and new document will open. Alternatively use the New
icon.
Enter text into the document as follows:
Essential Skills Training sessions are provided throughout February, January and March 2011.
Saving Documents
To save the document for the first time click on the File tab and then click on Save in the list. The
Save As window will open and you can click on the Desktop in the file list on the left-hand side of
the window. Double-click on the Essential Skills Folder. Type in the name “Courses” for the
document and then click Save on the bottom right-hand corner of the window.
Use the Save option to save any changes to an existing file. Files should be saved regularly in
case of PC or power failures.
Saved documents can be re-opened and amended as necessary.
Page 9 of 20
Essential IT Skills User Guide 2003 Version 1
Re-open a Document
To re-open the document click on the File tab and then click on Open in the list.
The Open window will open and you can use the file list on the left-hand side of the window to find
the file you want to open. Click on the Desktop in the file list on the left-hand side of the window.
Double-click on the Essential Skills Folder and then double-click on the Courses file.
Page 10 of 20
Essential IT Skills User Guide 2003 Version 1
Cut, Copy and Paste
To Cut and Paste highlight the word “January” in the document and click on the Cut icon (or rightclick and select Cut).
Move the mouse and position the cursor before the word February in the document and click on
the Paste icon (or right-click and select Paste). Type in a comma after the word January which has
just been pasted into the document.
To Copy and Paste highlight the words “Essential Skills Training” in the document and click on the
Copy icon (or right-click and select Copy).
Move the mouse and position the cursor before the word Essential in the document and press the
Return/Enter key on the keyboard twice. Click on the Paste icon (or right-click and select Paste)
Your text should now look as follows:
Page 11 of 20
Essential IT Skills User Guide 2003 Version 1
Save As
To save an existing document with a different name or to a different location use the Save As
option. Click on the File tab and then click on Save As in the list. The Save As window will open
and you can choose where you want to save the file in the file list on the left-hand side of the
window. Type a name for the document and then click Save on the bottom right-hand corner of the
window.
To resave the Courses document with a different name click on the File menu and then click on
Save As. In the File Name input box in the Save As window click in after the word Courses and
type in “2011”. Click the Save button and the file will now be renamed Courses 2011. The original
Courses file will still exist in the folder without the changes made using the cut and copy icons.
Printing Documents
To print a document click on the File tab and then click on Print option in the list. Finally click on
the Print icon.
Page 12 of 20
Essential IT Skills User Guide 2003 Version 1
5. File Management And Windows Explorer
Any information you enter into the computer is saved on a file. Files can be organised within
folders in the same way that files can be stored in a filing cabinet.
Folders are usually shown as icons which resemble file folders. Files are usually displayed on
screen in a hierarchy. Some file managers contain features inspired by web browsers, including
forward and back navigational buttons
This icon denotes a folder. The folder on the computer is a metaphor for the folders
we use in real offices. The folder icon helps to show users the unfamiliar in terms of
something with which they are familiar.
Any changes you make to the file whilst it is open are saved to the temporary memory and not to
the permanent memory on the computer. The temporary memory is emptied when the user closes
the program or turns off the computer. Files must be saved to the permanent memory so they can
be retained.
As power cuts can occur at any time it is sensible to save your files periodically or you will lose all
the work you have done during an editing session if it ends abruptly. Many applications
automatically save files at regular intervals so you do not lose all your work. Files should not be
stored in the hard disk on the computer known as the C Drive. Files should be saved on the
network so they can be accessed by the user from any computer on the network.
The file management system in Microsoft Windows is Windows Explorer. Within Windows Explorer
the user can view all programs, files, folders and storage devices on their computer and network.
Desktop
Memory stick – DVD
drive storage
Page 13 of 20
Essential IT Skills User Guide 2003 Version 1
The navigation pane on the left-hand side of the screen shows all storage areas and the control
panel where you can adjust the computer’s settings. The right-hand pane displays the contents of
the folder selected in the left-hand pane. Folders are stored in a hierarchical structure with files
within the folders. The view in the right-hand pane can be customized to change how the files are
shown and how the information displayed. There are many different types of files which store
different types of information. The file type is shown by the file extensions eg doc, xls, jpg, gif.
Right-hand pane in detail view shows file
name, date modified, file type and file size.
File and folder management functions such as cut, copy, paste, delete and rename are in the
Organize menu.
Files can be searched including a full-text search of documents and searching by date or a
specified time period such as “modified within the last week”), size, and file type.
Folders and sub-folders. The contents of the folder
can be displayed by clicking the arrow to the left of the
folder name.
Page 14 of 20
Essential IT Skills User Guide 2003 Version 1
6. Intranet And Internet Explorer
The Internet is a global network of computers connecting computers so that users can exchange
information and news etc
An Intranet is a network belonging to an organisation only accessible to the employees or
members of the organisation. It is protected from unauthorised users by a firewall.
Both the Internet and Intranets use hyperlinks to move between different pages of information. A
hyperlink is a word, group of words or an image that you can click on to jump to a new document
or a new section within the current document. Clicking on a hyperlink with mouse and jump to next
page is known as browsing.
The Homepage is the starting point for a series of pages on the Internet.
Back
Forward
Web address
Favorites
Refresh
Stop
Home
Print
Back: This button takes you back to whatever page you were previously viewing.
Forward: This button takes you forward to the next page if you have previously browsed several
pages and then want to go back to a previous page.
Refresh: This button will reload the current document that you are viewing. It is useful if the page
updates very frequently so that you can view these changes as soon as they are available.
Stop: The stop button stops a requested page from loading.
Home: This button returns you to the page you have selected as the default start-up page for
Internet Explorer.
Favorites: This button will open up the Favorites menu. You can open a favorite from your list,
add a favorite to your list, or organize your favorites from this menu.
Print: The print button will open the Print dialog box.
Page 15 of 20
Essential IT Skills User Guide 2003 Version 1
Creating Favourites
Favourites are pages which you want to view regularly. To create a favourite navigate to the page
you want to view regularly either by searching for it using a search engine such as Google or by
typing the address into the address bar.
Click on Add to Favourites and click Ok.
You will then see the Add a Favourite window. Click Add and the page will be saved to your
favourites.
To open a favourite click on the Favourites button and then click on the website you want to open.
Favourites can be organised into Folders in a similar way to Windows Explorer.
Millennium Intranet Pages
Millennium hyperlink
From the Millennium hyperlink you can look at the Millennium news pages on the intranet.
Page 16 of 20
Essential IT Skills User Guide 2003 Version 1
7. What is ESR?
ESR is an application that allows each employee to access and update personal information about
themselves and book directly onto a course.
Employee Self-Service
This is where you can access online payslips, update your address and bank account and check
your absence record as well as book yourself onto a classroom based course.
E-learning User
Some courses are provided as e-learning modules, such as the yearly fire safety awareness and
you can book yourself and access the e-learning courses via this route.
Logging into ESR
1.
2.
Double click the ESR via Smartcard icon. Your individual ESR homepage will open.
Your screen should look similar to this, however your’s will probably not contain 427 Learning
Administration:
Enrolling onto a classroom based course
1. Select 427 Employee
Self Service.
2. In the right hand menu select
learning.
Page 17 of 20
Essential IT Skills User Guide 2003 Version 1
3. In the search box type a keyword for the course, e.g. ‘essential’ for this course or
‘Millennium’ for when Millennium training becomes available and then select ‘go’.
4. Find the course you want to enroll on from the list and then you would select the envelope
icon under ‘Choose or Enroll in class’. Once the icon has been selected you would be
enrolled in the class.
NHS Elite Elearning
1. From the homepage of ESR (from this
page select home, top right) select 427 elearning user.
2. Select ‘e-learning’ in the middle column.
3. Search in the search box for the course
you would like to enroll on through elearning, e.g. ‘NHS Elite’ and then click
‘go’.
4. The course will show up in a list on this page and click enroll as previously.
5. Once enrolled you can then ‘play’ the e-learning using the play icon.
Page 18 of 20
Essential IT Skills User Guide 2003 Version 1
8. Terminology
Cancel/Exit
Check box
Click
Click and Drag
Context menu
Default
Desktop
Stops an action or closes a window.
A small square box with associated text options which can be
selected by clicking with the mouse. When an option(s) is/are
selected the check box shows an x mark. When an option is
not selected the check box is blank.
Pressing down gently on the mouse button while holding the
mouse still.
Gently press the mouse button and keep it pressed in whilst
you move the mouse. When you let go of the mouse button
the object is dropped into a new location.
Offers a limited set of options that are available in the current
context of the program.
A value or setting that a device or program automatically
selects if you do not specify a substitute.
Shaded or coloured backdrop of the screen which displays all the
application icons. The desktop simulates an office desktop in which
the screen represents the top of the desk on which documents and
folders can be placed.
Double click
Two clicks of the left button on the mouse usually carried out
with the index finger.
Drop down menu
List box which contains options which vary depending upon
where you are in the application. To access a drop down
menu click on the down pointing triangle or arrow next to an
option.
GUI (Graphical User May contain squares, boxes, words, icons, and buttons.
Interface)
Provides visual indicators (icons) as opposed to textbased/typed commands or text navigation.
Icons
Pictures which you click on to perform a function or start a
program.
White rectangular box in which users can enter data from the
Input box
keyboard.
Left click
Left clicks are carried out with the index finger. When you left
click with the mouse it usually means you are selecting an
item.
Maximise
Button usually located on the right-hand corner of the window
which enables a user to restore the screen to its original size.
Menu bar
Bar of options below the Title Bar which provides access to
other options in the program via a drop-down menu.
Button usually located on the right-hand corner of the window
which enables a user to minimize a program screen to a small
button on the Status Bar.
A device which controls the movement of the cursor or pointer
on the screen. As the mouse is moved the pointer on the
display screen moves in the same direction.
This consists of a selectable circle and associated text which
enables a user to select a single choice among many. The
action of a radio button selection is not processed until a push
button is selected. This allows the user to change the radio
button and not have the action updated until the push button
does the processing. The selection of a radio button deselects any previous choice.
Minimise
Mouse
Radio button
Page 19 of 20
Essential IT Skills User Guide 2003 Version 1
Refresh
Restore
Right click
To update something with new data.
Button on the Status Bar which when clicked returns a
window to its original size.
Users right click with their middle finger. When you right click
you get a menu of choices. The options in the menu will
depend upon which program you are using.
Scroll bar
Bar with up and down arrows which enables users to move (scroll)
up and down the computer screen.
Status bar
Bar along the bottom of the computer screen that shows the
Start button, the time and all open programs. It displays brief
messages that indicate the progress of a command or task.
The bar can be moved to the side of the screen.
Bar at the top of every window containing the title of the
window. The user can drag the title bar to move the window.
When a window is active the title bar is highlighted.
Bar which displays small icons which represent tools. Clicking
an icon will open a tool or perform a function that might also
exist on the menu bar in the program.
Title bar
Toolbar
Page 20 of 20
Essential IT Skills User Guide 2003 Version 1