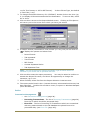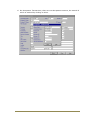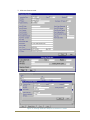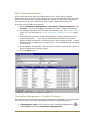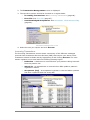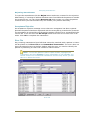
1
Vision 3 Registration Links User Guide Copyright © INPS Ltd 2014 The Bread Factory, 1A Broughton Street, Battersea, London, SW8 3QJ T: +44 (0) 207 501700 F:+44 (0) 207 5017100 W: www.inps.co.uk Copyright Notice © 2014 INPS All Rights Reserved. No part of this document may be photocopied, reproduced, stored in a retrieval system or transmitted in any form or by any means, whether electronic, mechanical, or otherwise, without the prior written permission of INPS. No warranty of accuracy is given concerning the contents of the information contained in this publication. To the extent permitted by law, no liability (including liability to any person by reason of negligence) will be accepted by INPS, its subsidiaries or employees for any direct or indirect loss or damage caused by omissions from or inaccuracies in this document. INPS reserves the right to change without notice the contents of this publication and the software to which it relates. Product and company names herein may be the trademarks of their respective owners. INPS Ltd. The Bread Factory 1a Broughton Street London SW8 3QJ Website: www.inps.co.uk Contents REGISTRATION LINKS 7 What's New in Registration Links 7 Getting Started in Registration Links Accessing Registration Links Overview Electronic Data Interchange Downloads and Uploads Day-to-day Transactions and Transmission Linked and Manual GP Codes Switching Registration Links on Access and Daily Status Summary Daily routine Menu options and toolbar File Action Security (England & Wales only) Utilities (England & Wales only) View Help Security in Registration Partners for Scotland Partners - Existing Registration Forms Partners - Electronic Transactions Scotland and England Differences for Registration Links 7 7 7 7 8 8 9 9 10 14 15 16 16 17 19 19 19 20 20 20 20 21 22 Transaction Management Summary of Registration Transaction Messages Transaction Types Amendment Transactions AMG/AMF Acceptance Transaction ACG Approval Transaction APF Deduction Transactions DEF Deduction Request Transaction DER Deduction Request Rejection DRR Rejection Transactions REF/REG Medical Records Transactions MRF/MRS When a patient is removed When a new patient is registered FP69 Prior Notification FPN Unmatched transactions Accessing Transaction Management General notes about Transaction screens Change criteria Incoming Transactions 25 25 25 26 26 27 27 28 28 28 29 29 29 30 31 31 32 33 34 iii Incoming Amendment 35 Incoming Deduction 37 Registration Re-acceptance for all other Deduction Reasons 40 Registration Re-acceptance for Deduction Reason - New TP/HB/CSA Same GP40 Registration Re-acceptance for Deductions Reason - Removal to new TP/HB/CSA 41 Incoming (Wrong TP) Rejection 41 Incoming Deduction Request Rejection 42 Dealing with the Error File 42 Unmatched - Incoming Approval 44 Unmatched - Deduction 44 Unmatched - Amendment 45 Unmatched - Medical Record Flag 45 Unacknowledged Acceptances (Frozen Patients) 46 Viewing Unacknowledged Acceptances 46 If the Health Board have received the New Patient Registration 48 If the Health Board have not received the New Patient Registration 48 On Receipt of the Patient's Record 49 Completed Transactions 50 Daily Transactions 58 Daily Transaction Backup 63 Transaction Management - Scottish Practices 63 In-coming Transactions 64 Deductions 65 Amendments 66 Acceptance Rejection 67 Error File 67 Unmatched - Incoming Approval 68 Unmatched - Deduction 68 Unmatched - Amendment 69 Unmatched - Medical Record Flag 69 Unacknowledged Acceptances (Frozen Patients) 70 If PSD have received the New Patient Registration 71 If PSD have not received the New Patient Registration 71 On Receipt of the Patient's Record 71 Reports Reports Processing Output of a Report Window Export Data Send a report by Email File Printer Standard Forms Transaction Reports Summary Daily Transaction Summary Daily Transactions Backup File Deductions requested by TP Report Completed Transactions Report Records Required/Sent reports Unacknowledged Acceptances Report Error File Reports 73 73 75 76 76 78 80 81 83 84 84 84 84 84 85 85 85 Archive Quarterly Archive Archive in England and Wales 85 85 85 iv Clear Outstanding transactions before archive Outstanding Transactions Running the Archive in England & Wales Archive in Scotland Archive overview in Scotland Quarterly Archive in Scotland Interim Archive in Scotland Retrieve and Purge Archive Retrieve Archive from Floppy Purge On-Line Archive Purge Retrieved Archive INDEX 87 87 88 91 91 92 94 94 94 95 95 97 v Registration Links What's New in Registration Links DLM 470 (11/06/2014) Registration Re-acceptance for Deductions - You can now change the GP and/or TP/HB/CSA when re-accepting Deductions in Registration Links. See Incoming Deduction (page 37). Getting Started in Registration Links Accessing Registration Links To access Registration Links: 1. Go to the Vision front screen. 2. Select Messaging - Registration Links . 3. The Registration Links module now opens. Overview Electronic Data Interchange The Health Authority/GP Links Project will allow Electronic Data Interchange (EDI) between GP practices and active Health Authorities in England and Wales, mainly using the HealthLink network. In Scotland, Partners is the national project to introduce EDI between general practices and Health Board's Primary Care Departments, using X.400 message handling service. The links permit the two-way exchanges of data initially covering Registration changes. In this on-screen help, the phrase Registration Links implies those linked in both England & Wales, as well as the Partners link in Scotland, and those in Northern Ireland. For the purposes of communication, Health Authorities are known as Trading partners (TP) and all Health Authority fields in this help are called TP, where formerly the title was either FHSA or HA. TP thus refers to all linked Health Authorities in England, 7 Wales, and the HB in Scotland and CSA or NI in Northern Ireland. link, the abbreviation HA, HB or CSA is still used. Where there is no In England and Wales, once Registration Links are established and the databases at the practice and the TP are reconciled, Items of Service claims can also be processed electronically. Downloads and Uploads Reconciliation of the practice and the TP patient databases takes place by the practice downloading their data to the TP, who run list matching software, and upload any discrepancies to the practice. Downloads and uploads can be done electronically or by floppy disks. Patient amendments from the TP in the upload, once accepted by the practice, automatically update Registration. Note - You should first read Downloads and Uploads and carry this out before switching on the link between the TP and practice. See Database Reconciliation. Day-to-day Transactions and Transmission Once the link has been established between an active TP and a practice, then any addition or amendment to certain details on the Registration screen for a permanent patient will generate a transaction. Temporary Residents, emergency or private patients are not relevant for Registration Links (though they may be for Items of Service claims). Via GP Communicator, transactions should then be transmitted daily to the TP (X.400 message handling service). At the same time, any incoming transactions from the TP are picked up by the practice. These may also include Deductions (patients removed) or Approvals of new patients, and once accepted by the practice, will automatically update the patient's Registration screen. Full audit trails of all data exchanged between the TPs and the practices is possible. The practice must run a Quarterly Archive once they have been notified that the previous quarter has been closed. The Archive removes all Completed Transactions for that quarter to archive disk, and produces a Quarterly Certificate and Capitation Report of all registration transactions for each TP and each GP. One copy is sent to the TP. 8 Linked and Manual Practices can only link, either electronically or manually, to a TP which is deemed active - that is, it is the viable TP covering the practice's area or county. The link is set in Vision File Maintenance in Organisation Details for the relevant TP, setting Link to Yes (there is an electronic link), No (no electronic link) or Down (usually there is a link but it is not operational at present). In Options - Setup – System, from the Vision front screen, Select Registration Links needs to be checked. Note - where practices have patients on the border of England and Scotland, the choice has to be made for the responsible HA or HB to be in either England or Scotland. (ie running English Registration Links, or Scottish Partners). If practices are not linked electronically to a TP, they are said to be manual, for example, if a practice deals with a main, responsible TP where it is linked, but has a secondary fringe HA that is not. The term HA stands for Health Authority where there is no link. Manual links may also be used if there is any breakdown in communications between the TP and the practice, or in the initial stages of establishing Registration Links. A practice with more than one TP may establish an electronic link with the main TP, yet remain manual initially with another HA. Standard Forms (page 83) can be printed for Registration changes of patients registered under an HA at a practice which is manually linked, and sent to the HA. GP Codes The GP Code is essential in order to match the FHSREG messages within Registration Links Phase 2 and GPC3 (formerly, REGIS messages were used with GPC version 2 and Registration Links Phase 1, and still will be in Scotland with Partners). In Vision File Maintenance – Staff, display each GP's details in turn and check in Identifiers that there are following, and if not, add them. If in doubt, you may need to contact your HA. A GMC code which is 7 numeric digits (the last is a check digit). unique for each GP. There is no associated organisation. This is A GP Code. Under Identifier Type, select TP/HB/CSA. CHECK WITH YOUR HEALTH AUTHORITY WHETHER THERE ARE NEW GP CODES. There should be a GP code for each TP with which you have patients registered. A combination of the GMS Code and GP code forms the new GP Code. This contains the GMC national code followed by the local GP code separated by a comma, for example, 1234567,ABC123. It is this code that the system will use in Registration Links. 9 Switching Registration Links on File Maintenance - GPs Make sure each GP on the File Maintenance – Staff screen has an Identifier number for each (if more than one) Health Board (TP/HB/CSA) in Staff - Identifiers. The code will begin with the cipher of the HA, eg BU for Bucks, or the HB in Scotland, eg C for Argyll & Clyde. 10 Trader Details in GP Communicator The Trader details are entered in GP Communicator under Addresses. The same reference number entered in File Maintenance – Organisation – Identifiers is used as the Name and Reference code. The Trading Partner (TP) cipher is the two or three characters codes in England and Wales. In Scotland, it is the single character for that Health Board. Make sure Currently active is ticked. Refer to the on-screen help within GPC for help with other entries and EDI options. Switch Registration Links on From the Vision front menu, select Options – Setup and then the System tab. Either England and Wales or Scotland box should be checked. Check the box Registration Links. Click OK. 11 File Maintenance – Organisation (TP/HB/CSA) Go into File Maintenance. Click on Organisations. select the TP/HB/CSA set up for your local HA/HB. At the list, double click to Change the Link option from No to Yes. In Scotland, if your practice is eligible to claim Footpath Miles and Water Miles, make sure these boxes are ticked. In Identifiers, add the reference number for the HA/HB that will be used in messages to identify the HA/HB. This is a five character code, beginning with F followed usually by 1, 2 or 3 zeros followed by the HA/HB cipher. For example, in England and Wales, F00BU for Bucks, F0LDS for Leeds. In Scotland the single character HB cipher, eg for Argyll & Clyde (C), F000C. If the Cipher has two letters, then reduce the number of zeros to two. Click OK. Click on the Addresses tab. Then click on Add under Communication Nos. In Contact Number, type the HB/TP code, eg F000C for Argyll and Clyde, and in Type of Contact Number, select Health Link Mailbox. The link between the transactions (Reg Links, IOS) created in Vision and the address entry in the Personal Address Book of GP Communicator is this Health Link Mailbox code. Otherwise messages may be in error with "Unknown Recipient". 12 Testing the transmission At the second training day, at least 2-4 weeks after the first, the trainer will make a test transmission to the Health Board. Before that time, you should have received your upload from the Health Board and dealt with the amendments. Registration messages in GP Communicator Messages in GPC from Registration Links have the icon . Below is a typical example. Refer to the on-screen help within GPC for further help with GPC. 13 Access and Daily Status Summary From the Vision Start-up menu, click on Messaging then Registration Links, or select Modules – Registration Links, or Alt-M, L. The system will check for outstanding medical records required (see below). In England and Wales, the first screen you see is the Daily Status Report screen. This screen will remind you if any quarterly archive is due for the selected TP, and if so, this must be run. It also reminds you if there are any patient records of deducted patients outstanding that should be sent to the TP. 14 TP: Select the TP (the Health Authority to which you are linked) if more than one. Quarter Archive due - Carry out the archive if due (see Quarterly Archive (page 85)). Quarter End Date - The end date of the quarter just closed. There are rules governing which new and transferred out patients are included in which quarter. Close Quarter Transaction received: This incoming transaction is sent by the TP to let you know the previous quarter is now closed, and that you can carry out a quarterly archive. Outstanding Transactions are those "suspended" for some reason and will need to be cleared in Incoming Transactions before an archive is carried out (see Clear Outstanding transactions before archive (page 87)). Medical Records outstanding – These two warnings are not related to the archive, but are a reminder (FP22) that the TP is waiting for records of deducted patients from you. Warning – At least one patient exists for the selected TP with the Medical Record flag set for more than 14 days for which no date is stored, indicating that the patient's Medical Records were forwarded to the TP. Remedy – Records Requested by TP is ticked but Date Records Sent to TP is blank: ie, the patient has been removed, the TP has sent a MRF transaction – Records Requested by TP - but you have not responded, ie there is no date in Date Records sent to TP, so they assume you have not sent them the records yet. To find the patient, run the report Medical Records not sent to TP in Registration - Action. Highlight the patient, Edit, then in the Other tab, enter a date in Date Records sent to TP. Send the records off to the TP. Warning – At least one patient exists for the selected TP with the Medical Record flag set for which more than 14 days have passed since the date entered by the Practice, indicating that the records have been forwarded to the TP. Remedy – The patient has been removed. You have entered a date in Date Records Sent to TP (more than 14 days ago) and sent the records off. But the HA don't seem to have received them – if they had, they would have removed the Medical Records flag. In Registration – Action, run the report Medical Records not received by TP. Check you have actually sent their records off. If there's a suspicion they have been lost in the post, contact your HA. Close the Daily Status Report by clicking on Close. from the Utilities menu – Daily Status. You can re-open it at any time Daily routine If this is your first visit to Registration Links, the whole process of Downloads and uploads in Database Reconciliation needs to be carried out before you can start transmitting registration details. See also Menu options and toolbar (page 16). If you are regularly transmitting nightly to the TP, you will need to view and action Registration Links on a regular basis. 15 Check in Transaction Management - Incoming Transactions (page 34) for approvals, deductions and incoming amendments from the TP Check in Transaction Management - Error File (page 42) for unmatched transactions and delete these Check in Transaction Management - Unacknowledged Acceptances (page 46) to see which newly registered patients are still "frozen" At the end of the day, view from Transaction Management – Daily Transactions (page 58), and print out from Reports – Daily Transaction Summary (page 84). Menu options and toolbar In England and Wales, the Registration Links module has menu options of File, Action, Securities, Utilities, View and Help. In Scotland, the menu options for Partners are File, Action, View, and Help. File To save a report to file directly from the Reports screen, having selected the criteria and report you want, click on Process. 1. Select File as the Output Type, if you want to generate the report in ASCII format for export into third-party software (see Output of a Report (page 75)). Click on OK to start the report processing. 2. At the Select Output Filename screen, click in the window File name, and type in a title for the report (up to eight characters), with a suitable extension (eg 16 .txt for Text format, or .dif for DIF format). is Text Files (*.txt). In Save File as Type, the default 3. To change the default directory of C:\EXTRACT, double click on the drive (eg C:) to display all directories and select the destination. To save to disk, select the a: drive. 4. Click on OK to return to the Output Method screen. Clicking on File Options will return you to the screen from which you have just exited. 5. In Output Format, the default is Text Format (ie *.txt), but you can click on to display the options and select from: Record format Tab separated Text Format DIF Format Comma Separated Value Tab Separated Text Note - You can at this point change the Output Type to either Printer or Window if you decide not to proceed with File. 6. Click on OK to start the report processing. You may be asked to confirm or amend the Output file name, and this is an opportunity to change the extension, eg to .csv. 7. When finished, select Exit from the Report Selection Criteria screen. 8. The report can be found in the c:\extract directory unless another directory has been specified. Double click on this to view it, or open it in Windows Notepad (from Accessories). Action Transaction Management 17 See Transaction Management (page 24). Incoming Transactions - The list of Incoming Transactions (page 34) from the TP which should be processed daily. Error File - The list of incoming TP Transactions which are unmatched with any patient details on the GP database are placed here to be processed daily (see Error File (page 42)). Unacknowledged Acceptances - New Patient Acceptances awaiting an Approval from the TP (see Unacknowledged Acceptances (page 46)). Completed Transactions - A list of all incoming or outgoing transactions, which have been completed and not yet archived (see Completed Transactions (page 50)). Daily Transactions - A list of the day's transactions generated by the GP practice, which will form the basis of the end-of-day transmission (see Daily Transactions (page 58)). Daily Transaction Backup - A list of batches of daily transactions, which have been transmitted. See Daily Transactions Backup File (page 84). See Reports Processing (page 73) Completed Transactions - A printout of the Completed Transactions file (see Completed Transactions (page 50)). Daily Transaction Summary - A printout of the daily transactions. It might be advantageous to print this at the end of each day in case of data loss (see Daily Transaction Summary (page 84)). Daily Transaction Backup File - Once View Daily Transactions has been cleared following the day's transmission, those transactions are stored in batches until the next quarterly archive in the Daily Transactions Backup File, which can be printed out at this Reporting option (see Daily Transactions Backup File (page 84)). Deductions Requested by TP – A list of deductions for patients who have died, left the area or embarked, requested by the practice in order to generate a return Deduction Transaction. See Deductions requested by TP (page 84). Records Required by TP Report - A printout of deducted patients whose Records requested by TP flag is set to Y on Registration (see Records Required/Sent reports (page 85)). Records Sent by TP Report - A printout of new patients whose Records Sent by TP is set to Y on Registration but no date received has been entered by the practice (see Records Required/Sent reports (page 85)). Standard Forms - If the practice is manual and not linked electronically to a TP, a standard form replaces electronic transmissions, and is printed to send to the TP after GP amendments or acceptances are made. A transmission must be run first from the DOS workstation to generate these forms, whether there are any linked TPs or not (see Standard Forms (page 83)). Unacknowledged Acceptances Report - A printout of the new patients awaiting TP approval, whose Registration screens are "frozen" (see Unacknowledged Acceptances (page 46)). Error File printouts (see Error File Reports (page 85)): Reports - Unmatched Amendments - Unmatched Approvals - Unmatched Deduction Request Rejections - Unmatched Deductions 18 - Unmatched FP69 Flag Removal - Unmatched FP69 Prior Notification - Unmatched Medical Records Flag Removal - Unmatched Medical Records Sent - Unmatched Rejections Archive See Quarterly Archive (page 85), Archive in England and Wales (page 85) and Archive in Scotland (page 91). Quarterly Archive - To archive on to floppy disk the quarter's transactions. Quarterly archiving is mandatory, and takes place on or after the third day of the following quarter, making sure there are no acceptances awaiting acknowledgement. Interim Archive – Scotland only. Retrieve Archive from Floppy - To load an archive stored on a floppy disk to the computer. Purge On-line Archive - To delete transactions stored in the on-line archive - not normally necessary unless short of space on the hard disk. Purge Retrieved Archive - To delete an archive retrieved from a floppy disk. Database Reconciliation See Database Reconciliation. The options here allow a download of the patient register on to floppy disk or electronically via the network and GP Communicator for sending to the TP. Once the TP has processed the download, they reply with an upload and Process Upload records finally accepts by processing the patient amendments in the upload and made by the TP to the practice. Reconciliation of the databases should then be complete before electronic exchange (linking) begins. Security (England & Wales only) Quarterly Archive - If the Close Quarter Notification transaction is not received, in exceptional circumstances the quarterly archive for a TP may be run from Security – Quarterly Archive. Unless an archive is due, this icon will be greyed out. See Archive in England and Wales (page 85). Utilities (England & Wales only) Daily Status - Re-display the Daily Status Summary screen seen when first entering Registration Links. See Access and Daily Status Summary (page 14). View 19 Toolbar - Choose whether or not to display the toolbar with its icons in order to make selections from these. If not displayed (that is, when Toolbar is not ticked on the menu), you may select functions from the menu options. Status bar - Choose whether or not to display the Status bar. Useful information is displayed here, such as the menu options associated with icons. Help Help Click on the Help icon, or click on Help on the top menu line, or press F1. You will often reach the help screen directly related to the screen or menu options you are using. See How to use on-screen help. Security in Registration If the link is not working or faulty for linked practices, or an unmatched transaction has been received, one of the following security functions can be used to override a normally forbidden procedure. This is carried out in the Registration module in Security, (refer to the Registration on-screen help for details of these screens). Note that completed Security functions will be included in the Completed Transactions file. These transactions are not generated for transmission but for the audit trail: Deduct Patient - To enter the details of a patient who has transferred out from the practice list if they have removed, changed address, died etc. (DEH) Amend NHS Number - This allows the practice to amend an NHS number, normally a task only undertaken by the TP. (AMH) England & Wales only. Amend CHI Number (Scotland only) – This allows the practice to amend a CHI number. (CMH) Clear Medical Records flag - To clear the Records Requested flag or the Records sent by TP flag on Registration and reset either to No. (MRH) Approve patient - This will "unfreeze" the Registration screen of a newly registered patient so that editing becomes possible, ie Manual approval of patient acceptance (by GP). In Scotland, the patient's CHI number will be required. (APH) Clear FP69 Status – This removes an FP69 status from a patient for whom an FP69 Notification has been sent. (FFH) England & Wales only. Partners for Scotland Partners - Existing Registration Forms PARTNERS automates the submission of the following Registration forms/cards: The patient acceptance forms/cards currently sent by GP Practices to Primary Care Departments ( GPR, GP4, FP13, GP58) The patient detail amendments currently sent by GP Practices to Primary Care (typically GP1(c)) The patient notification of deduction printout currently sent by Primary Care to GP Practices (GP22) 20 The patient detail amendments currently sent by Primary Care to GP Practices The confirmation by the Health Board of a patient registration at a GP Practice currently sent by Primary Care to GP Practices (GP 7A- Male/8AFemale) Partners - Electronic Transactions The transactions introduced by PARTNERS are broadly similar to those introduced by the HA/GP Links Project in England. The initial in brackets (eg, ACG) refer to the way the transaction is coded. A single Acceptance transaction (ACG, outgoing GP to HB) replaces the following paper forms: - GPR (application to go on a Doctor’s list) - GP4 (medical card) - FP13 (Ex-Services form) - GP 58 (White ‘Baby Card’) An Approval transaction (APF, incoming HB to GP) replaces notification of confirmation of a patient registration by the Health Board Primary Care Department (GP 7A/8A) Any changes to patient information on the GP System automatically generate an Amendment transaction (AMG, outgoing) for transmission from GP to that patient’s Health Board. Any changes to patient information held on the Health Board CHI automatically generate an Amendment transaction (AMF, incoming) for transmission from HB to that patient’s GP Practice. A Deduction transaction (DEF, incoming) will replace notification of deductions from a GP’s list originating from the Health Board Primary Care Department. (GP 22) Two transactions assist in the monitoring of patient record movements and both transmitted by the Health Board: - The Medical Records Flag Removal Transaction (MRF, incoming) - The Medical Records Sent Transaction (MRS, incoming) Similar to the HA/GP Links Project, two transactions permit rejection of transactions in specific circumstances: - The Rejection (Wrong HB) transaction, HB to GP (REF, incoming) - The Removal (Out of Area) transaction, GP to HB (REG, outgoing) Security transactions - The functions of these Security options are normally carried out automatically by the Registration Links software, but can be manually implemented from within Registration if the link is not operational. - Deduct patient (Alt-C, D) - Instead of waiting for a HA-generated Deduction Transaction, the practice can transfer a patient out, for example, after change of address out of the area, or death. - Amend CHI Number (Alt-C, ) – Allows a Scottish practice to amend a CHI number. 21 - Clear Medical Records flag (Alt-C, C) - To clear the Records Requested flag or the Records sent by HB flag on Registration and reset to No. - Approve patient (Alt-C, A) - This will "unfreeze" the Registration screen of a newly registered patient so that editing becomes possible. Note - Full details about Registration and Registration Links can be found from the respective on-screen help, or from the Vision Training Guide. Scotland and England Differences for Registration Links Partners is by and large very similar to Registration Links for England and Wales, covered in the Registration Links and Registration on-screen help. There are a few differences: CHI number – This provides one of the main identification factors for patients in Scotland. Although it is not mandatory at the time of registering, a GP4 card should contain this information. So new patients on an Approval Transaction may or may not contain the NHS number, but will often contain the CHI number. Because the first six digits of the CHI number are the patient's date of birth, changes to the date of birth should be avoided if possible, and will generate a new CHI number. If you reject an incoming Amendment Transaction, then it will not update your system, unless it contains a change to the patient's CHI number. When entering a CHI number on a patient's Registration screen, just enter the last four digits in the second box – the patient's date of birth will be filled in as the first six digits automatically. Note - the second to last digit is odd if male, and even if female. NHS number - The inclusion of the NHS number if not mandatory in Scotland, but should be if known. No query NHS number should be used. The format of the NHS number is not validated but the characters used within it are, and it must be unique. The NHS number can be amended, regardless of link status; no Amendment Transaction is generated for linked practices. There is no Security – Amend NHS Number option in a Vision Registration for a Scottish practice. Title - Amendments to a patient's title do not generate an Amendment transaction in Scotland. Birth Surname - The patient's Birth Surname is part of the patient's details, though not mandatory. Sex - The Sex field can only be male or female (and not unknown or indeterminate) as the second to last CHI number digit relies on this. Institution codes in Scotland are the equivalent of residential institute codes in England. Institution codes are not widely used by every HB and are optional. Changes to the institute code will result in an Outgoing Amendment transaction. Institute codes will be included in an Acceptance transaction. As with England, institutes are added in File Maintenance – Organisation with a category of Residential Institute, and the institute code added in Identifiers selecting an Identifier Type of RI 22 Code, and in Organisation, the relevant HB as TP/HB/CSA, and the code in Identifier Value. Place of birth – This is included in an Acceptance transaction. Rural mileage is covered by Road miles, Footpath miles and Water miles. Road miles must be between 3 and 99, or blank. Water and Footpath miles, relevant for some HBs, must be checked in File Maintenance – Organisation – [HB] in order for them to appear as prompts on a patient's Registration screen. Two digits (01-99) plus two decimal places can be used for Water and Footpath miles. Addresses - Long Address lines may be truncated. Flat numbers should be entered in House Name. Two localities can be entered on the same Locality line, separated by a comma and a space. Where there is a second thoroughfare, it should be entered in Number and Road after the first thoroughfare, separated by a comma and space. Where there is insufficient space in Number and Road for both thoroughfares, the First Thoroughfare (including the building number) should be inserted in House Name where this is blank, and the Second Thoroughfare in Number and Road. Or, if House Name is not blank, the Second Thoroughfare should be inserted in Locality where this is blank. If it remains impossible to insert the Second Thoroughfare, it should not be inserted. Change Address/Same or different HB - An Acceptance Transaction will be generated automatically if a GP wishes to re-accept a patient where the patient has moved within the same HB (if the GP believes a Deduction Transaction is in error) or a different HB but remains within the practice area. In Scotland there is no New Health Board / Same GP Deduction Reason. Deducted patients - The Deduction reason list differs in Scotland. following are used in Scotland, but not in England and Wales: - Enlistment - Institution - Transfer within Practice - Linkage - Untraced – Miscellaneous - Untraced – Immig - Untraced – GP Resign - Untraced – College - Untraced – outwith Practices - Untraced - outwith HB - Multiple Transfer - Intro – consortium transfer The The following English Deduction Reasons are used in England but not in Scotland: - Mental Hospital (not used in Scotland) - Embarkation (not used in Scotland) – the patient has left the country (for more than three months) 23 - New TP / Same GP (not used in Scotland) – the patient has changed address which is now under a new TP, but is still with the same practice and GP - Adopted Child (not used in Scotland) - Services (not used in Scotland) STAR - Health Boards will use the STAR (Striving Towards Accurate Records) program in Scotland to eliminate inflation from GP lists and to reconcile any data differences between the HB and the practice, particularly during downloads and uploads for data reconciliation. Uploads received from the Health Board on floppy disk will only contain details of the information which has been changed at the HB. Unchanged information fields will not be advised to the practice. The % sign is not used to indicate that the contents of a field should be erased. Security functions - Use of the Security functions within Registration always require the patient's CHI number. There is an addition option Amend Patient's CHI number. The English option of Security – Amend NHS number (generating AMH transaction) is removed for Scotland. Capitation Report – The Age Bands differ from England. they are under 65, 65-74 and 75 and over. Transfer menu on English Registration screens (Partnership Reallocation, Bulk Transfer) is not available in Scotland. Daily Status screen - not seen by Scottish practices. Archive - see Archive in Scotland (page 91) In Scotland 24 Transaction Management Summary of Registration Transaction Messages Various transaction messages are generated as a result of additions and changes to the patient register in Registration. Any change made to certain details on a Registration screen of an active (permanent) patient will generate an outgoing Amendment Transaction to the TP from Registration Links. Any new patient added to Registration will generate an outgoing Acceptance Transaction ACG (page 26) to the TP. Transactions are either incoming from the TP to the practice, or outgoing from practice to TP. A regular automatic transmission should be run from GP Communicator which sends the outgoing transactions generated by the practice. Transaction Types Transaction Types include those listed below. Note - You may not be able to display all transaction types at some screens, for example, only Incoming Transactions can be displayed in Incoming Transactions. Outgoing Transactions from GP to the TP: ACG - Acceptance Transaction - FP1/GP1 – application to go on doctor's list, FP4/GP4 medical card, FP13 Ex-services, FP58/GP58 pink/white baby card AMG - Amend Out - Amendment Transaction from GP – Changes in personal, address and registration details of permanent patients REG – Rejection Transaction or Removal transaction - address change outside GP area (see Rejection Transactions REF/REG (page 28)). DER - Deduction Request Transaction - request to deduct patient if died, left area or embarked (England & Wales only) DEH - Security - Deduct patient AMH – Security – Amend NHS Number (England & Wales only) CMH – Security – Amend CHI Number (Scotland only) MRH – Security – Clear Medical Records Flag APH – Security – Approve Patient FFH – Security – FP69 Flag Removal (England & Wales only) (see Security in Registration (page 20)). Incoming Transactions from the TP to GP: 25 AMF - Amend In (Amendment Transaction from TP) DEF - Deduction Transaction (FP22/GP22) (removes patient from list, ie transfers out) APF - Approval Transaction (Z68 / GP7A/8A) (approve new patient on list) REF - Rejection Transaction (see Rejection Transactions REF/REG (page 28)) MRF - Medical Records Flag Removal Transaction (see Medical Records Transactions MRF/MRS (page 29)) MRS - Medical Records Sent Flag Transaction DRR - Deduction Request Rejection Transaction (England & Wales only) FPN – FP69 Prior Notification Transaction (England & Wales only) FFR – FP69 Flag Removal Transaction (England & Wales only) Amendment Transactions AMG/AMF There are two sorts of Amendment Transactions – those generated by the practice (Outgoing) and those generated by the TP (Incoming). An outgoing Amendment Transaction (Out)(AMG) results from any change made by the practice to certain details of an active (permanent) patient on a Registration screen The transactions can be viewed in Transaction Management under Daily Transactions (page 58). From DLM 290, amendment messages are automatically generated after a PDS/Vision update. An incoming Amendment Transaction (In) (AMF) results from any Registration amendment made by the TP and transmitted to the practice, including any changes to the NHS or CHI numbers, which can only be amended by the TP. Newly transmitted Amend-In Transactions can be viewed in Transaction Management under Incoming Transactions (see Incoming Amendment (page 35)), and you have the option to reject them. Below is a list of the fields that generate amendment transactions. Amending some fields, such as changing a patient's GP or address may also have other implications, for example, a change of address out of the practice area may result in a Deduction Transaction being sent by the TP, and removal of the patient from the list. GP Code*, GP Ref**, Surname, Forename(s), Previous Surname, Birth Surname**, CHI Number**, NHS Number, Title*, Sex, Date of birth, Address (5 fields), Postcode, Drugs Dispensed Marker, Rural Mileage (Blocked/Special/Walking in England/Wales; Road, Footpath and Water Miles in Scotland), Residential Institution Code*, Institution Code ** * in England and Wales only; ** in Scotland only Acceptance Transaction ACG Any new patient added to the permanent practice list will generate an outgoing Acceptance Transaction (ACG to the TP. This patient has a registration status of Applied, and is then classed as an Unacknowledged Acceptance. The new patient's Registration screen remains temporarily "frozen" and cannot be edited, until the TP confirm the acceptance with a replying Approval Transaction (APF) (see Approval Transaction APF (page 27)), usually within a few days. Note - an acceptance transaction will be generated automatically if a GP receives an Incoming Deduction (page 37) transaction under the following special circumstances: If the GP disagrees with the deduction and wishes to re-accept the patient who has changed address into a different TP area but is staying 26 with the same GP. In England, the deduction reason is New TP / Same GP, and the GP is forced to re-accept the patient, generating an Acceptance transmission. In Scotland, the re-acceptance is optional. If there is a change of GP (internal transfer) within the practice. Approval Transaction APF New patients, who have just been added in Registration and once a transmission has been run, are classed as Unacknowledged Acceptances (see Unacknowledged Acceptances (page 46)). An Acceptance Transaction is generated to the TP. An incoming Approval Transaction (APF) a few days later from the TP confirms a new patient on the practice list. This then unfreezes the patient's Registration screen and updates the patient’s registration status from Applied to Permanent automatically. The Medical Records freeze flag is set to N, and if an NHS number was present in the Acceptance transaction, the patient's NHS number is updated in England and Wales, and in Scotland, updated if available. Approval Transactions can be viewed in Completed Transactions. Note - in exceptional circumstances, such as the link between the TP and the practice being down, Security - Approve Patient can be used in Registration (see Security in Registration (page 20)). Deduction Transactions DEF An incoming Deduction Transaction (DEF) from the TP means that the patient has transferred out (for example, registered with another practice, or died) and is being deducted from the practice list. The practice is reminded to send the medical records back to the TP (see Medical Records Transactions MRF/MRS (page 29)). Only the TP can deduct an active patient. The practice cannot actively transfer out a patient by changing the registration status to transferred out. You can, however: Make a request for a deduction within Registration if you know the patient has died, moved away or embarked. This generates a Deduction Request Transactions, to which the TP will respond with a Deduction Transaction (if not rejected). In extraordinary circumstances, you can use the option Security - Deduct Patient within Registration- see Security in Registration (page 20)). Newly transmitted Deduction Transactions can be viewed in Incoming Transactions see Incoming Deduction (page 37). A list of Deduction Transactions requested by the TP can be printed out from Reports. A list of Deduction reasons and their codes is given later - see Deduction reason. 27 Deduction Request Transaction DER In England and Wales only, your practice can generate a outgoing Deduction Request transaction for a patient registered with a linked HA (TP). Previously, if a patient died or moved away, you had to wait for a Deduction Transaction from the HA, while in the meantime, the patient’s records remained on the practice database. There are two possible scenarios for the Deduction Request Transaction: To advise the TP that you want a patient deducted because you know they have left or died, ie for one of these Deduction reasons: Death of Patient, Patient Left Area, Patient Embarkation. To ask the TP to deduct the patient as a result of a FP69 Notification transaction (see FP69 Prior Notification FPN (page 30)). A Deduction Request is generated within Registration using Action – Request Patient be Deducted. Note the following: The Deduction Request reason can be either Death, Embarkation or Left Area. When entering the Deduction Date, this must reflect the date of the event, not the deduction request. If the transferred out reason is death, then you should manually enter a date for the date of death, rather than the date of the record. Similarly, for Embarkation or Left Area, the date the patient moved away should be entered. If these dates are not known, an approximate date should be entered, and a free text explanation must be entered in the GP Notes field. Deduction Request Rejection DRR In England and Wales only, if, for some reason, the TP do not agree with the practice’s Deduction Request Transaction DER (page 28), they may reply with a Deduction Requested Rejected transaction. The reason will be displayed on view of the patient’s Deduction Request Rejection transaction screen. The GP can then authorise the received Deduction Request Rejection to be applied to the patient’s record. Rejection Transactions REF/REG There are three sorts of Rejection Transactions which allow the GP or the TP to "reject" certain transactions: Rejection Transaction from the TP to GP in response to a GP's Acceptance Transaction being transmitted to the incorrect TP (REF) (see Incoming (Wrong TP) Rejection (page 41)); A Deduction Request Rejection DRR (page 28) from the TP to GP in response to a Deduction Request by the practice to deduct a patient (DRR) (see Incoming Deduction Request Rejection (page 42)) – in England and Wales only; and from the GP to TP (REG), a GP can reject a Deduction Transaction if the patient is out of the practice area, if the GP wants to keep the patient on the list. The TP will only generate a Rejection Transaction (REF) if an Acceptance has been forwarded by the GP practice to the incorrect TP (see Incoming Deduction (page 37)). 28 Medical Records Transactions MRF/MRS Medical Records Transactions keep track of medical records for new patients and those deducted, between the TP and the practice. There are two Medical Records Transactions which are incoming from the TP to the practice for electronically linked practices. Medical Records Flag Removal Transaction (MRF) Medical Records Sent Transaction (MRS) The progress of the patient's records through the system after the patient changes GP or is deducted from a list is monitored by means of these two Transactions. Both are raised at the TP and transmitted to the practice. When a patient is removed 1. When a patient is removed, a Deduction Transaction from an TP will automatically check the box Records requested by TP on the Registration Other screen and Date Records requested by TP is filled in. The registration status is changed to Transferred out (see Incoming Deduction (page 37)). 2. The practice should enter the date the records are posted off to the TP in Date Records sent to TP on the Registration - Other screen. 3. Once the TP has safely received the records, it replies with a MRF Medical Records Flag Removal Transaction which resets the Records requested by TP? back to a blank. Note - The medical records flag is not set if the deduction has the reason Internal Transfer within Practice The practice should regularly run the two reports within Registration – Action: Medical Records not received by TP, and Medical Records not sent to TP. The Medical Records not received by TP Report finds patients with Records requested by TP? checked and a date entered in Date Records Sent to TP. This means the practice have sent the records off to the TP, but the TP have not received them – if they had, they would send the Medical Records Flag Removal. Follow the lost records up with your TP. The Medical Records not sent to TP Report finds patients with Records requested by TP? checked and no date entered in Date Records Sent to TP. This means the TP has requested the records but the practice have not sent them off, or have not entered a date in Date Records Sent to TP. Pack the records up, enter the date and send them off to the TP. Within Registration Links, you can run a Report called Records required by TP, and filter this by TP (see Records Required/Sent reports (page 85)). When a new patient is registered 29 When a new patient is registered, the TP request and receive the patient's medical records from the previous GP. They are then forwarded to the GP practice, and a MRS Medical Records Sent Transaction will automatically set the Records sent by TP check box to a tick on the Registration screen, and enter a date in Date records sent by TP. Once the records are received at the practice, unchecks Records sent by TP for each approved patient. Note - in circumstances where the electronic link is faulty, the practice can use Security - Medical Records Flag Removal in Registration - see Security in Registration (page 20). FP69 Prior Notification FPN In England & Wales only, an FP69 status is allocated to a patient if, for some reason, there is some doubt as to whether that patient actually still lives within the area covered by that patient’s GP practice. Often it follows an unanswered letter from the HA to the patient. An FP69 Prior Notification transaction will be sent to the practice from the HA and "attached" to a patient. FP69 Prior Notification transactions will be listed and can be viewed – a further filter will narrow the list down to those with an FP69 expiry date less than 14 days from today’s date. Using the option in Registration – Action – Respond to FP69 Prior Notification, the GP will be able to: Either change the registration information (the address), and generate an Amendment transaction. Either you can find the patient on your system and they are at a different address. Or you can look for the address given on the FP69. On the Select Patient screen in Registration, change Search Attribute to Road Name, then type part of a road name in Search Details, even as little as one or two letters. Highlight the road you want and press Find. See if you have a patient at the FP69 address. Or confirm to the TP the latest registration information held, and additionally, the date last seen by the practice, and/or a reason why the patient may not be able to respond to correspondence from the TP. All this is conveyed to the TP in an Amendment transaction. Or request that the patient is deducted – notified to the TP within a new Deduction Request transaction. The reason can be either Death of patient, Patient left area, or Patient embarkation. Or take no action. Depending on which of the above are received, the TP can remove the FP69 flag via an FP69 Flag Removal transaction. There is a Security option Clear FP69 Status which allows a manual removal of an FP69 status for a patient. The existing Security – Deduct Patient option has also been amended to remove the FP69 status against a patient if the function is used to deduct a patient on the GP system having an FP69 status. A Deduction code of 14 – Returned Undelivered is used - if the TP deducts a patient from the practice as a result of an FP69, the Deduction will be notified to the practices with a deduction code of 14. Two new reports can be run from Registration – Action: Respond to FP69 Prior Notification View Patients whose FP69 is expiring (or expired) If an incoming FP69 Prior Notification Transaction cannot be matched to a patient on the current patients database, then the unmatched FP69 Prior Notification Transaction will be copied to an error file for investigation by the GP. A List of unmatched FP69 Prior Notification Transactions can be printed and deleted. 30 Unmatched transactions If transactions are sent which cannot be matched with any patient on the database, perhaps because of incorrect NHS Number or Transaction Number, they are placed in the Process Error File (page 42). This screen should be viewed daily within Registration Links, and as far as possible, the GP practice should try and trace the reason for the unmatched transaction, which may be deleted if found to be irrelevant. Each transaction will have a transaction number sequentially generated by the system when being translated into a transmission. The term translation refers to incorporating the various transactions into a form suitable for transmission to the TP as part of the Links process. Accessing Transaction Management To access Transaction Management: 1. Either click on the Transaction Management icon Transaction Management. ; or click on Action - 2. Select one of the options from the displayed screen by clicking on that line, then click on Process. The choice is: Incoming Transactions (page 34) Error File (page 42) Unacknowledged Acceptances (page 46) Completed Transactions (page 50) Daily Transactions (page 58) Daily Transaction Backup (page 63) Transaction Management Screen 31 General notes about Transaction screens The layout of all the screens within Transaction Management options is similar. The top part of the screen shows the selection of Trading Partner/Health Board, GP, Transaction Type and a date range. The default is all is each category. This can be changed by clicking on Change Criteria (see Change criteria (page 33)). The relevant transactions are then listed line by line. Further details can be viewed, and in some cases, processed for each transaction by either double clicking on one of these lines, or by clicking on a line then clicking Process or View. Figure 1: Layout of Transaction screen Details on the initial screen for each transaction are: Transaction date - The date the transaction was created and transmitted. Transaction types - These are abbreviated forms of the transactions that are relevant to the screen you are viewing (see Transaction Types (page 25)). Surname, Forename, Date of birth - The patient's details. GP – The GP code of the patient's registered GP. up of the GMC code, and the GP code. TP/HB - The cipher of the TP/HB (Health Authority) to which the transaction will be transmitted. File status type – You will see the file status on some transactions screens. These are codes which denote the status of the file within the transaction / transmission process: -A Audit Trail File -B Daily Transaction Backup File -C Completed Transaction File -E Error File -I Incoming Transaction File The GP code is made 32 -K Matched, completed APF/ REF Transactions -P Daily Transaction Print File -S Suspended Incoming Transactions AMF, DEF and REF awaiting practice approval -T Daily Transaction File -U Upload File -W Unacknowledged Acceptance File (ie Waiting) -Y On-line Archive file of valid APF/REF/APH Transactions; and Retrieved Archive of valid APF/REF Transactions -Z On-Line and Retrieved Archive File The button options include Change criteria (page 33), either View or Process (depending on the sort of Transaction), Close and Help. Change criteria On any of the Transaction Management screens, there is a button to Change Criteria. This will allow you to choose a particular TP or GP, rather than the default of all TPs and all GPs. You may also choose to display a single Transaction type rather than displaying all. Finally, you may restrict the Transaction types within a date range, by entering dates in either From date and To date prompts or one of these. Figure 2: Change Criteria To make a change to TP/HB, GP or Transaction Type, click on options and click on your selection. Click on OK to finish and exit to the Transaction list. 33 to display the Incoming Transactions The incoming transactions that originate from the TP are picked up in the transmission at the same time as the practice sends transaction. The following can be seen on the Incoming Transactions file within Transaction Management, and need a response from the practice. AMF Amend In (Amendment Transaction)- An Incoming Amendment will occur if there is an amendment by the TP to one of the specified fields, eg the patient’s NHS number (see Incoming Amendment (page 35)). The Amendment Transaction is processed automatically and the practice need take no action. DEF Deduction Transaction (FP22/GP22) – (see Incoming Deduction (page 37)), when a TP is deducting a patient from the GP List for one of several deduction reasons. ACG Acceptance Rejection Transaction – See Incoming (Wrong TP) Rejection (page 41) – The TP reject in response to a GP's Acceptance Transaction being transmitted to the incorrect TP. DRR - Deduction Request Rejection Transaction (see Deduction Request Rejection DRR (page 28)) (England and Wales only) The following are also Incoming Transactions but you will not see these on the Incoming Transactions file as they are applied to the patients records directly – you can however list them for the current quarter (until archived) in the Completed Transactions File: APF Approval Transaction (Z68 / GP7A/8A) - (see Approval Transaction APF (page 27)) This approves an Applied-For newly registered patient on to the practice list, making them permanent. MRF Medical Records Flag Removal Transaction – This sets a flag when a patient is deducted from the patient list until the records are sent back to the TP. See Medical Records Transactions MRF/MRS (page 29). MRS Medical Records Sent Flag Transaction – This sets a flag when a patient is added to the patient list until the records are received from the TP by the practice. FPN – FP69 Prior Notification Transaction (see FP69 Prior Notification FPN (page 30)) (England and Wales only) FFR – FP69 Flag Removal Transaction (England and Wales only) Incoming transactions, which do not require a response from the practice - Approval and Medical Records transactions - will be applied automatically to the patients' Registration details, and do not appear in the Incoming Transactions file, but can be viewed under Completed Transactions. If the incoming transaction cannot be matched (ie an NHS number match, or a Transaction number match), then it will be placed in the Error File (page 42), and should be processed from Error File. The screen should be viewed daily by a user with an authority of S or higher, and any appropriate action taken. For example, Deduction Transactions should prompt the GP practice to send the medical records back to the TP and enter the date posted on the patient's Registration screen. 1. Select Transaction Management. 2. Select Incoming Transactions. 3. Click on the Process button. 34 4. The transactions listed are those of all linked TPs, all GPs and all Transaction Types. 5. See Change criteria (page 33), if you do not want to display all TPs or GPs, but want to filter the display to one TP, or one GP, or one Transaction Type. You can also choose a date range of transactions. Refer also to General notes about Transaction screens (page 32). 6. From the initial Incoming Transactions screen, display a second more detailed screen either by double clicking on a line, or highlighting a line using the scroll arrow keys then Process. 7. Any required action is taken at this second screen: Incoming Amendment – either accept the change or Remove OA (remove the patient as address change means patient is now out of practice area) Incoming Deduction – Re-accept patient, or Deduct (continue with removal) Incoming Rejection – Re-accept after correct TP entered. Incoming Amendment An incoming Amendment (AMF) results from an update by the TP to one of the following fields on a patient's Registration screen: GP Code*, GP Ref**, Surname, Forename(s), Previous Surname, Birth Surname**, CHI Number**, NHS Number, Title*, Sex, Date of birth, Address (5 fields), Postcode, Drugs Dispensed Marker, Rural Mileage (Blocked/Special/Walking in England/Wales; Road, Footpath and Water Miles in Scotland), Residential Institution Code*, Institution Code ** * England and Wales only ** Scotland only Incoming amendments from the TP can be rejected if the amendment contains changes with which the GP disagrees. A reason for the Rejection is prompted for, which should be entered in free text. An Outgoing amendment from the practice to the TP then contains the existing details. The original matched amendment is copied and marked as rejected in the Completed Transactions file. Using Reject is not permitted, however, if the incoming amendment is a new NHS number, or in Scotland, the CHI number. If the incoming amendment has a new NHS or CHI number and other fields, then you may reject the other fields, but not the new NHS or CHI number. Note - a practice can usually not amend a patient's NHS or CHI Number; this has to be done by the Health Authority. If the electronic link is faulty, Security - Amend NHS/CHI No. can be used in Registration - refer to Security in Registration (page 20). Refer also to Amendment Transactions AMG/AMF (page 26). 1. Display details of an Incoming Amendment line from Incoming Transactions, by double clicking on the relevant line; or click on a line, then click Process. 35 2. On the resulting screen, the left side gives current details for the patient, held on the practice database, while the right-hand shows the amendments the TP are making. Note - a percentage sign, %, indicates that the contents of the field are to be removed (England and Wales only). The commands are: Accept - click on Accept if you feel the amendment is justified and are happy with it. This will automatically amend the patient's Registration screen. Reject - click on Reject if you do not want to accept the incoming amendment. You will be asked to enter free text for a reason. Remove OA - This is only displayed if there are changes to the address lines. A GP may not reject an incoming Amendment transaction, unless it includes a change of address, which the GP then decides is out of the practice area. Click on Remove OA if you wish to confirm that this patient is to be removed because they will be out of the practice area. This will generate an Outgoing Rejection Transaction which is generated back to the TP; the TP will write to the patient on the GP's behalf advising the patient to change GP. If a rejection is generated, the reason for rejection should be entered in free text so that this can be viewed in Completed Transactions. 3. Close - Exit to Incoming Transactions screen. 36 Incoming Deduction A notification of the deduction (removal) of a patient from the TP to a GP practice (replacing the FP22/GP22) is a Deduction Transaction (DEF) (see Deduction Transactions DEF (page 27)). A Deduction Transaction from an TP can be viewed and processed either by selecting the Deduct option from Incoming Transactions. This then automatically sets the Records requested by TP to Y on the Registration – Other screen, sets a Date Records Requested by TP, and changes the registration status to Transferred Out. The GP practice cannot reject a Deduction Transaction directly, but if he/she disagrees with the deduction, the patient can be re-accepted on the list, generating an Acceptance transaction. Similarly, if the deduction is made for a change of address, which takes the patient to another TP but with the same GP, the GP may also disagree and re-accept the patient to the new TP. 1. Display details of a Deduction Transaction from Incoming Transactions, by double clicking on the relevant line; or click on a line, then click Process. 2. At the top of the resulting screen is detailed the Deduction date and the reason for deduction (see below for the codes used). If the deduction reason is Removal to new TP (or in Scotland, Removed to Another Health Board Area), then the new TP / HB is shown. Note - The removal reason may be Internal Transfer, or in Scotland, Transfer within Practice, if you have changed the registered GP for the patient. This Deduction Transaction removes the patient from the previous GP list. The commands are: Deduct - This will confirm the deduction; change the patient's registration status to Transferred Out on Registration; and the transferred out date is set to the deduction transaction date. If the patient is transferred to another TP, the patient's TP is updated. The flag Records Requested by TP is set to Y on Registration. The appropriate action for the GP practice is to pack up and post the medical records to the TP 37 as they would if receiving a FP22, and on the patient's Registration screen, to enter the date posted on Date records sent to TP. Re-accept - You may re-accept a patient if the patient's change of address is within the practice area, but with a different TP with whom the practice is active. ie New TP/Same GP. An Outgoing Acceptance transaction is generated. If the patient's TP, for which they are being re-accepted, is the same as the patient's current TP, then entering GP Notes is mandatory. If the patient's TP has changed, then the Current TP is updated. 3. Close - Clicking on Close will return you to the Incoming Transactions screen. The codes used for the Deduction reason are (England and Wales only): Death Removal to new TP/HB/CSA - Internal Transfer – For Internal Transfers for reasons other than address change (typically, at the patient's request, the patient being dissatisfied with his or her current GP). Mental Hospital (not used in Scotland) Embarkation (not used in Scotland) – the patient has left the country (for more than three months) New TP / Same GP (not used in Scotland) – the patient has changed address which is now under a new TP, but is still with the same practice and GP Adopted Child (not used in Scotland) Services (not used in Scotland) Deduction at GP's Request – A GP has requested that the patient is removed from the practice list Registration Cancelled Service Dependent Deduction at Patient's Request Other Reason Returned Undelivered – specifically for patients deducted as a result of FP69 status, often as a result of an unanswered letter from the HA to the patient (see FP69 Prior Notification FPN (page 30)) Internal Transfer – Address Change – Patient has changed address within the HA area. Introduced to differentiate specifically between an Internal Transfer within the TP (the patient having changed address but staying with the practice), and an Internal Transfer within the TP for some other reason (see Internal Transfer above) Internal Transfer within Partnership – Deduction corresponding to an Acceptance received from the Practice representing an Internal Transfer within the Partnership. Correspondence states 'gone away' Practice advise outside of their area Practice advise patient no longer resident Practice advise removal via screening system the patient has left the practice area 38 Practice advise removal via vaccination data Removal from Residential Institute The following are used in Scotland, but not in England and Wales: Enlistment Institution Transfer within Practice Linkage Untraced – Miscellaneous Untraced – Immig Untraced – GP Resign Untraced – College Untraced – outwith Practices Untraced - outwith HB Multiple Transfer Intro – consortium transfer Note the following: 39 If the deduction reason is Transfer within Practice, no Medical Record Flag is set. A list of Deduction Transactions requested by the TP can be printed out from Reports. Deduction of patients from the GP List can only be made by the TP sending a Deduction Transaction, and cannot be made directly by the GP system. There are two exceptions to this rule: An option in Registration under Security - Deduct Patient, only used in an emergency when the electronic link is either not working, or the link between the TP and practice is manual and not electronic (see Security in Registration (page 20)). The ability for the practice to request a deduction – also carried out in Registration – called a Deduction Request Transaction. If the patient is known to have died, left the area, embarked, or be no longer active as a patient after an FP69 investigation (see Deduction Request Transaction DER (page 28)). Registration Re-acceptance for all other Deduction Reasons For all other deduction reasons, you see the following prompt when you re-accept a patient: Deduction Re-acceptance GP Notes - This allows you to enter a freetext note (is it mandatory?) Place of Birth - This only appears if the patient does not have a NHS/H+C number or if it the number is invalid Registration Re-acceptance for Deduction Reason - New TP/HB/CSA Same GP If the deduction is a Removal to new TP/HB/CSA Same GP you see the following prompt when you re-accept the patient: The HB and GP are all enabled for all countries (check this!) Re-acceptance for Deduction Reason - New TP/HB/CSA Same GP GP Notes - This allows you to enter a freetext note TP/CSA/HB - Choose the TP/HB/CSA Registered TP - The registered GP is the patient's current registered GP 40 Registration Re-acceptance for Deductions Reason - Removal to new TP/HB/CSA England, Northern Ireland and Wales If the deduction is a Removal to new TP/HB/CSA you see the following prompt when you re-accept the patient: Re-acceptance for a deduction "Removal to new TP/HB/CSA" GP Notes - This allows you to enter a freetext note (is it mandatory?) TP - The TP is disabled Registered TP - The registered GP is the patient's current registered GP Place of Birth - This will only appear if the patient does not have a NHS/H+C number or if it the number is invalid Scotland For practices in Scotland, If the deduction is a Removal to new TP/HB/CSA you see the following prompt when you re-accept the patient: Scotland - Re-acceptance for a deduction "Removal to new TP/HB/CSA" GP Notes - This allows you to enter a freetext note (is it mandatory?) HB - The HB can be changed (I assume this is the new HB) Incoming (Wrong TP) Rejection An Incoming Rejection (REF) from the TP, displayed on Incoming Transactions, is only generated if the GP has generated an Acceptance Transaction for a new patient but specified the wrong TP; it has then been transmitted to the incorrect TP. The 41 patient's record is placed in a suspended file until the GP re-accepts this rejection. See Rejection Transactions REF/REG (page 28). 1. You can display details of an Incoming Rejection Transaction from Transaction Management – Incoming Transactions, by double clicking on the relevant line; or click on a line, then click Process. 2. The command is Re-accept. If by mistake a new patient has been added in Registration, but under the wrong TP, when that TP receive the Acceptance Transaction, they will reject the registration, and generate a Rejection Transaction. The GP may re-accept the patient on the practice list, after making sure that the correct TP is entered. 3. Close - Clicking on Close will return you to the Incoming Transactions screen. Incoming Deduction Request Rejection England and Wales only - The incoming Deduction Request Rejection (DRR) is from the TP to the GP, in response to a GP requesting a patient be deducted from the practice list because they have either died, left the area, embarked, or no longer are valid as a result of a FP69 Notification investigation. View the details of the transaction from within Transaction Management – Incoming Transactions. Viewing the transaction should include the reason that the TP has rejected this Deduction Request. You can either delete the transaction once viewed or re-process it. Dealing with the Error File Any incoming transactions from the Health Board that cannot be matched with a patient in Vision will be placed in the Error File as an Unmatched Transaction. The 42 error does not show the patient's name so before dealing with the error you need to identify the patient by searching on their NHS/H+C number or Date of Birth. Note - To find the patient's NHS/H+C Number or Date of Birth, highlight the Transaction and click Process. If this information is not available you cannot resolve the unmatched transaction and the only action you can take is to delete the error. Error File The following section explains the errors and how to deal with them: Note - To resolve errors you may need to use the Security Controlled Functions in Registration, only System Managers have access to these options. 43 Unmatched - Incoming Approval If there is an Approval in the Error file it indicates that an acceptance has been sent for a new patient but it could not be matched to the patient. You need find the patient in Registration by searching on the NHS/H+C number and dependent on their registration status do one of the following: Permanent If the patient is Permanent it means the patient has already been accepted and is on your practice list. The approval in the error file may be a duplicate so all you need to do is delete it. To do this select Transaction Manager - Error File in Registration Links. Highlight the error, click Process and choose Delete. Applied If the patient is still Applied it means they are not registered with your practice and you need to security approve the patient. 1. In Registration, go to Security - Approve Patient. Security Approve Patient 2. Select the patient and the security approved screen is displayed. 3. Enter the patient's NHS/H+C number and click OK. 4. You now need to delete the error by selecting Transaction Manager - Error File in Registration Links. 5. Highlight the error, click Process and choose Delete. Unmatched - Deduction Sometimes a deduction is sent that cannot be matched to a patient and will appear in the Error File. Normally deductions are initiated by the Health Board and practices should not deduct patients but in this scenario you can security deduct the patient; otherwise the patient will remain on your list as permanent. 1. In Registration from the Security menu option, choose Security Deduct. 2. Select the patient and enter the date of the deduction and choose a deduction reason eg Other Reason. 3. Click OK. 4. You now need to delete the error, select Transaction Manager - Error File in Registration Links. 44 5. Highlight the error, click Process and choose Delete. Error File - Deduction Unmatched - Amendment If the Health Board make an amendment to the patient's registration data which cannot be matched to one of your patients it will appear in the Error File. You should check what the amendment is and update the information in the patient's registration screen, then delete the error. Unmatched - Medical Record Flag Medical Record flags are notifications (flags) that are sent to and from the Health Board when records are sent and received. When the Health Board send a new patient's paper records a Medical Record Flag sent is set which the practice should remove on receipt of the records. When a patient is deducted a Medical Record Flag Removal is set which should be removed when the Health Board receive the patient's records. If the flags are not matched to the patient they will appear in the Error file. 1. To clear the Medical Record Flag, select Security from the menu in Registration and select the patient. 2. Choose Clear Medical Records Flag. 3. The Registration Security screen is displayed, tick the box "Confirm you wish to Clear Medical Record Flag" and click OK. 45 Security - Clear Medical Record Flag Training Tip - For more information on what Medical Record Flags are and how to deal with them, please refer to the on-screen help. Unacknowledged Acceptances (Frozen Patients) When you add a new patient in Registration, this will generate an Acceptance Transaction. This is sent in the next transmission to the Health Board and the patient's Registration screen becomes "frozen" and they are placed in the Unacknowledged Acceptances file. Once an approval is received from the Health Board the patient's name is automatically removed from this file, they have a NHS/H+C number and their registration details are "unfrozen". You should view your Unacknowledged Acceptances on a regular basis to make sure all new patients have been accepted. For patients who have been registered for more than a week and are still in this file, you should contact the Health Board to see if they have received the registration. Below is a summary of what you need to do: Unacknowledged Acceptances - Process Viewing Unacknowledged Acceptances 1. Select Unacknowledged Acceptances from Transaction Management, and click on Process. 46 2. To change the default of all TPs/HBs and all GPs, click on Change criteria. (Refer also to General notes about Transaction screens (page 32)). 3. To view the details of a patient, select a line by double clicking on that line; or click on a line, then click View. 4. This then displays the first Acceptance Details screen showing general registration details. 47 5. Click on More for Acceptance - Further Details for details of place of birth, Acceptance date, dates the patient left and entered the UK, previous GP and TP, dates of enlistment and service dependent. 6. Click on Close to exit. Note - A list of unacknowledged acceptances can be printed out from Reports. If the Health Board have received the New Patient Registration 1. Obtain the patient's NHS/H+C number from the Health Board and contact the Helpline who will advise on how to Security Approve the patient. 2. Select Registration and choose Security from the menu followed by Approve Patient. 3. Select the patient and the security approved screen is displayed. Enter the patient's NHS/H+C number and click OK. If the Health Board have not received the New Patient Registration If the Health Board have not received the new patient registration you need to do the following steps: 1. Make a note of the date that the Unacknowledged Acceptance was sent to the Board. 2. In Messaging, select GP Communicator. 3. Find any files sent on the same date or within a couple of days of the unacknowledged acceptance. Make a note of the Interchange number and contact the Board to see if they have received it. 48 4. If the Board have not received the file, you can right click on the file and choose the option to Re-Transmit. 5. If you cannot find the file or if the Board have already received it, contact the Helpline. On Receipt of the Patient's Record When the records are received you should record their receipt by updating the Registration screen. 1. Select the patient in Registration. 2. Click the Other tab. 3. Remove the tick from box Records Sent by TP and click OK. This sends an acknowledgment back to the Health Board that you have received the patient's paper record. Records received by HB Recording a Read code It is no longer a QOF requirement to summarise the patient's records within 8 weeks, however, we still recommend that you record when the records are received and when they are summarised in the patient's journal by Read coding: 49 Read code #9134 - Lloyd George record received. Read code #9344 - Notes summary on computer. Completed Transactions The Completed Transactions screen is for viewing only, and there is no action required. It contains a copy of all incoming and outgoing transactions, within the current quarter, and forms the basis of the Audit Trail. See Transaction Types for a complete list of the different Transaction Types. explanation of each transaction, see Summary of Transactions. For an Completed Transactions also includes transactions which have been carried out from the Security menu on Registration (see Security in Registration). The list of completed transactions is archived quarterly (see Quarterly Archive) and can be printed out from Reports. 1. Select Transaction Management - Completed Transactions, then select Process. To change the default of all TPs, GPs, Transaction Types, see Change criteria, and refer also to General notes about Transaction screens. 2. The Transactions are listed in Transaction Date order. To view further details about a transaction, either double click on that line; or click on the line, then click on View. 3. On Acceptance Transactions, there are two Acceptance screens, the second of which is reached by clicking on More. 50 4. Click on Close to exit. 51 52 53 54 55 56 57 Daily Transactions Daily outgoing transactions are listed in Transaction Management – Daily Transactions. Change Criteria can vary the GP, TP and all or one of the following Transaction types.) ACG - Acceptance Transaction (FP1/GP1 – application to go on doctor's list, FP4/GP4 medical card, FP13 Ex-services, FP58/GP58 pink/white baby card AMG - Amend Out (Amendment Transaction from GP) – Changes in personal, address and registration details of permanent patients REG - Rejection (Removal) Transaction (address change outside GP area - see Rejection Transactions REF/REG (page 28))). DER - Deduction Request Transaction (request to deduct patient if died, left area or embarked) (England and Wales only) Once the end-of-day transmission has taken place, the screen will clear and the transactions will be transferred to the Completed Transaction File. They will also be stored in daily transmission batches which can be viewed in Daily Transaction Backup 58 (page 63) (Transaction Management) and printed out from Reports. print-out might be advisable in case of data loss. A daily The daily outgoing transactions result from the GP practice: Either adding new patients (outgoing Acceptance Transaction (page 26)s); and automatically generated Acceptance Transactions resulting from rejecting Deduction transactions (see Incoming Deduction (page 37)). or making amendments to certain details of permanent patients on the Registration screen (Outgoing Amendment Transaction (page 26)s). These include changes to the following fields in Registration: GP Code*, GP Ref**, Surname, Forename(s), Previous Surname, Birth Surname**, CHI Number**, NHS Number, Title*, Sex, Date of birth, Address (5 fields), Postcode, Drugs Dispensed Marker, Rural Mileage (Blocked/Special/Walking in England/Wales; Road, Footpath and Water Miles in Scotland), Residential Institution Code*, Institution Code ** * England and Wales only ** Scotland only Note the following about amendments: An NHS number or CHI number cannot usually be amended by a practice. This has to be done by the Health Authority / Health Board and sent in an incoming amendment transaction. However, if the electronic link is faulty, Security - Amend NHS No. / Amend CHI No. can be used in Registration - refer to Security in Registration (page 20). A change of GP within the practice in Scotland will generate an Acceptance Transaction, while in England and Wales, an Amendment Transaction will be generated. Amendments to a patient's date of birth and sex in Scotland, both part of the CHI number, will result in the patient being re-registered and a new CHI number being generated. A change of address may result in the Health Authority / Health Board replying with a Deduction Transaction if the patient has moved outside the practice area. 1. First select Daily Transactions from Transaction Management menu options, to display the View Daily Transaction File. 59 2. Then click on Process. Figure 3: Layout of Transaction screen 3. To change the default of all TPs, GPs, Transaction Types, see Change criteria (page 33), and refer also to General notes about Transaction screens (page 32). 4. The transaction types are all outgoing: Acceptances, outgoing Amendments, outgoing Rejections and Deduction Requests. 5. You can view further details about a transaction by either double clicking on that line; or clicking on a line, then clicking on View. A more detailed screen is displayed, for viewing only. No amendments can be made at this screen. 60 6. On Acceptance Transactions, there are two Acceptance screens, the second of which is reached by clicking on More. 61 7. Click on Close to exit. Figure 4: Viewing Deduction Request Transaction in detail 62 Daily Transaction Backup At the end of each day when the transmission is run, all the day's outgoing transactions will not only be transmitted to the TP, but will also clear from the View Daily Transactions screen and be available for viewing on Completed Transactions. They will also be stored in batches by day on Daily Transaction Backup File. A printout can be made from Reports. 1. Select Transaction Management - View Daily Transaction Backup, then Process. The screen displays are identical to those in Daily Transactions. 2. To change the default of all TPs, GPs, Transaction Types, see Change criteria (page 33), and refer also to General notes about Transaction screens (page 32). 3. The transaction types are outgoing Acceptance, outgoing Amendment and outgoing Rejection. View further details about a transaction by either double clicking on that line; or clicking on a line, then clicking on View. A more detailed screen is displayed, for viewing only. No amendments can be made at this screen. 4. On Acceptance Transactions, there are two Acceptance screens, the second of which is reached by clicking on More. 5. Click on Close to exit. Transaction Management - Scottish Practices You must check the incoming and outgoing registration messages on a regular basis. This is done in the Transaction Management screen in Registration Links. 1. In Registration Links, click on the first icon Transaction Management select Action and choose Transaction Management. 63 or 2. The Transaction Management screen is displayed. 3. The top three options should be checked on a regular basis: In-coming Transactions. See In-coming Transactions (page 64). Error File. See Error File (page 67). Unacknowledged Acceptances. See Unmatched - Medical Record Flag (page 69). Transaction Management screen 4. Select the one you require and click Process. In-coming Transactions The Incoming Transactions screen shows a summary of the different messages received from Practitioner Services Division (PSD) that require your action. Each Transaction should be dealt with by highlighting it and clicking Process. The next section explains how to deal with the following message types: Deduction - A deduction is received when your patient is being removed from the practice list. Amend In - An amendment is received when PSD update a patient's registration details. Acceptance (Rej) - An acceptance rejection is received when a patient has been registered with the wrong HB. 64 In-coming Transactions Training Tip - You can print any of the incoming Transactions before processing them by selecting Action - Reports in Registration Links, or choosing the Report icon. Deductions Patient deductions sent by PSD are listed in Incoming Transactions and can either be accepted or rejected. The following topics tell you how to deal with both scenarios: Accepting the Deduction Training Tip - Before accepting the deduction you may want to print the deduction list in order to pull the patient's record. You can do this by selecting Action and Reports in Registration Links, or choosing the Report requested by HB icon. Change the report type to Deductions and choose Process. Highlight the deduction and click Process. At the top of the screen is the reason for the deduction. If you are happy for the patient to be transferred out, click the Deduct button. This will automatically change the patient's registration status to Transferred Out with the Reason provided by PSD. This is shown in the patient's registration screen on the Registration tab. When the records are returned to the HB the date that the records are sent back should be recorded in the patient's registration screen. To do this: 1. Select the patient in Registration. 2. Click the Other tab 3. Add the date returned to HB in the "Date records sent to HB" box. Registration - Other tab 4. Click OK to save the changes. 65 Training Tip - You now need to export the patient's record using the Export facility in Docman. Rejecting the Deduction You can reject the deduction by choosing the Re-accept button. You are prompted to enter a reason in the GP Notes box. This should be a brief explanation of why you do not want the patient to be removed from your list. Click OK and the rejection message is sent back to PSD. Rejecting a Deduction Amendments Amend in transactions are amendments sent from PSD and they can either be accepted or rejected. Highlight the amendment and choose Process. Below is a summary of how to deal with both scenarios: Accepting Amendments Amendments from PSD appear on the right hand side of the screen. To approve the amendment click the Accept button which will automatically change the details in the patient's registration screen. Note - A percentage % sign indicates that the contents of the box are to be removed. 66 Accepting Amendments Rejecting Amendments To reject the amendment click the Reject button and enter a reason for the rejection. Alternatively, if a change of address has been sent from PSD and the patient is outside the practice area, you can choose Remove OA which means you want the patient removed from your list because they are outside your practice boundary. Acceptance Rejection An acceptance rejection message occurs where an acceptance has been rejected because the patient has been registered with the wrong HB eg cross border practices. The acceptance is rejected by one HB and the patient needs to be re-accepted with the correct HB. To do this click the Re-accept button and enter a free text note in GP notes. Click OK to complete the transaction. Error File Any incoming transactions from PSD that cannot be matched with a patient in Vision will be placed in the Error File as an Unmatched Transaction. The error does not show the patient's name so before dealing with the error you need to identify the patient by searching on their CHI number or Date of Birth. Note - To find the patient's CHI or Date of Birth, highlight the Transaction and click Process. If this information is not available you cannot resolve the unmatched transaction and the only action you can take is to delete the error. Error File 67 The following section explains the errors and how to deal with them: Note - To resolve errors you may need to use the Security Controlled Functions in Registration, only System Managers have access to these options. Unmatched - Incoming Approval If there is an Approval in the Error file it indicates that an acceptance has been sent for a new patient but it could not be matched to the patient. You need find the patient in Registration by searching on the CHI number and dependent on their registration status do one of the following: Permanent If the patient is Permanent it means the patient has already been accepted and is on your practice list. The approval in the error file may be a duplicate so all you need to do is delete it. To do this select Transaction Manager - Error File in Registration Links. Highlight the error, click Process and choose Delete. Applied If the patient is still Applied it means they are not registered with your practice and you need to security approve the patient. 1. In Registration, go to Security - Approve Patient. Security Approve Patient 2. Select the patient and the security approved screen is displayed. 3. Enter the patient's CHI number and click OK. 4. You now need to delete the error by selecting Transaction Manager - Error File in Registration Links. 5. Highlight the error, click Process and choose Delete. Unmatched - Deduction Sometimes a deduction is sent that cannot be matched to a patient and will appear in the Error File. Normally deductions are initiated by PSD and practices should not deduct patients but in this scenario you can security deduct the patient; otherwise the patient will remain on your list as permanent. 1. In Registration from the Security menu option, choose Security Deduct. 2. Select the patient and enter the date of the deduction and choose a deduction reason eg Other Reason. 3. Click OK. 4. You now need to delete the error, select Transaction Manager - Error File in Registration Links. 68 5. Highlight the error, click Process and choose Delete. Error File - Deduction Unmatched - Amendment If PSD make an amendment to the patient's registration data which cannot be matched to one of your patients it will appear in the Error File. You should check what the amendment is and update the information in the patient's registration screen, then delete the error. Unmatched - Medical Record Flag Medical Record flags are notifications (flags) that are sent to and from PSD when records are sent and received. When PSD send a new patient's A4 paper records a Medical record Flag sent is set which the practice should remove on receipt of the records. When a patient is deducted a Medical Record flag Removal is set which should be removed when PSD receive the patient's records. If the flags are not matched to the patient they will appear in the Error file. 1. To clear the Medical Record flag, select Security from the menu in Registration and select the patient. 2. Choose Clear Medical Records Flag. 3. The Registration Security screen is displayed, tick the box "Confirm you wish to Clear Medical Record Flag" and click OK. Security - Clear Medical Record Flag 69 Training Tip - For more information on what Medical Record Flags are and how to deal with them, please refer to the on-screen help. Unacknowledged Acceptances (Frozen Patients) When you add a new patient in Registration, this will generate an Acceptance Transaction. This is sent in the next transmission to PSD and the patient's Registration screen becomes "frozen" and they are placed in the Unacknowledged Acceptances file. Once an approval is received from PSD the patient's name is automatically removed from this file, they have a CHI number and their registration details are "unfrozen". You should view your Unacknowledged Acceptances on a regular basis to make sure all new patients have been accepted. For patients who have been registered for more than a week and are still in this file, you should contact PSD to see if they have received the registration. Below is a summary of what you need to do: Unacknowledged Acceptances – Process 70 If PSD have received the New Patient Registration 1. Obtain the patient's CHI number from PSD and contact the Helpline who will advise on how to Security Approve the patient. 2. Select Registration and choose Security from the menu followed by Approve Patient. 3. Select the patient and the security approved screen is displayed. Enter the patient's CHI number and click OK. If PSD have not received the New Patient Registration If PSD have not received the new patient registration you need to do the following: 1. Make a note of the date that the Unacknowledged Acceptance was sent to PSD. 2. In Messaging, select GP Communicator. 3. Find any files sent on the same date or within a couple of days of the unacknowledged acceptance. Make a note of the Interchange number and contact PSD to see if they have received it. 4. If PSD have not received the file, you can right click on the file and choose the option to Re-Transmit. 5. If you cannot find the file or if the Board have already received it, contact the Helpline. Training Tip - When a patient's record is approved by PSD, the paper record is sent and the electronic record can be imported via the Import facility in Docman. On Receipt of the Patient's Record When the records are received you should record their receipt by updating the Registration screen. 1. Select the patient in Registration. 2. Click the Other tab. 71 3. Remove the tick from box Records Sent by HB and click OK. This sends an acknowledgment back to PSD that you have received the patient's A4 paper record. Records received by HB Recording a Read code It is no longer a QOF requirement to summarise the patient's records within 8 weeks, however, we still recommend that you record when the records are received and when they are summarised in the patient's journal by Read coding: Read code #9125 - Patient MRE received from FPC Read code #9344 - Notes summary on computer 72 Reports Reports Processing The Reports options generate printouts of various categories of transactions. For those practices that are not linked, or for linked practices where the link is down, standard patient acceptance and amendment forms can be printed for despatch to the TP. All reports can be displayed on screen, printed, or saved in text format. 1. First select Reports, or click on the Reports icon . 2. The default for the reports is all TPs and all GPs. If you want to change these criteria, or the date range, which can be specified in From Date and To Date, see Change criteria (page 33). 3. To select which report to print, click on various transaction type report options. from the Reporting menu are: 73 under Report to display the Click on your selection. The options Completed Transactions (page 50), Daily Transaction Summary (page 84), Daily Transactions Backup File (page 84), Deductions requested by TP (page 84), Records required by TP, Records sent by TP Standard Forms (page 83) Unacknowledged Acceptances (page 46) And Unmatched (Amendments, Approvals, *Deduction Request Rejection, Deductions, *FP69 Flag Removal, *FP69 Prior Notification, Medical Records Flag Removal, Medical Records Sent, Rejections) * (England and Wales only) 4. Choose whether to print a Summary Report or a Detailed Report. Detailed report contains many more patient details. The 5. Click on Process to display the Output Method choice. 6. In Output Type (see Output of a Report (page 75)), you can choose Window (page 76) (the default) which shows the report on screen, and then allows printing or Export Data (page 76); or File (page 16), or Printer (page 81). We recommend that if printing, you choose Window initially, then print from the on-screen display. 7. Click on OK to start processing 8. See also Transaction Reports Summary (page 84). 74 Output of a Report You may choose to output a report either to a screen display or to print it, or as an ASCII file format for use at a later date. 1. At a Reports screen, when you have finished choosing the criteria for the report, click on Process to start processing of the report. The Reporting Output Method is displayed. 2. Window (page 76) is displayed as the default. Click on OK to proceed if you want to display the report on screen; and then either print, or Export Data (page 76). If you want to print, or save to a text file format, click on the selection arrow in Output Type, and select Printer (page 81) for a printed report and the Print Options; File (page 16) for a text file format. Note - when producing reports which require long processing, you could output to Window initially and print or export from there. If you output to Printer directly, and the paper then jams in the printer, the report processing would have to be repeated. 75 Window Click on Print, then select Window as the Output Type for a report (see Output of a Report (page 75)). Click on OK to start the report processing. The report will be displayed on-screen. options: Across the top of the screen is a toolbar of Use the horizontal arrows off-screen. You can also use the larger arrows: (far left) Go to first page of report (disabled (grey rather than black) if you are already at the top of the report); or (left) Go to previous page (disabled if there is no previous page). (right) Go to next page (disabled, if there is no next page); or (far right) Go to last page of report. You may also use the PgDn key. to display sections of the report which are Use the percentage selection to adjust your display larger or smaller. Print from on-screen display 1. Click on the Print icon (see Printer (page 81)). If you do, choose whether to print all or some of the pages, and whether one copy (the default) or more. Click on OK. 2. Export - See Export Data (page 76). 3. Close – click on at the top right. Export Data You can export report data directly from the Reports screen, explained below. can also send reports by email (see Send a report by Email (page 78)). You 1. Having selected the criteria and report you want, click on Process. 2. Display the report on screen by selecting Window as the Report Output (see Reports Processing (page 73) and Output of a Report (page 75)). 3. Click on the Export icon screen. from the toolbar options at the top of the 76 4. You may see a message about setting a default Mail client – you will need to do this later if you want to send data by e-mail, but if you are only exporting, click OK to this message. 5. You can choose a wide variety of formats from the following: Character-separated values Comma-separated values (CSV) Crystal Reports (RPT) Data Interchange Format (DIF) Excel 2.1 (XLS), Excel 3.0 (XLS), Excel 4.0 (XLS), Excel 5.0 (XLS), Excel 5.0 (Extended ) (XLS) HTML 3.0 (Draft Standard), HTML 3.2 (Extended), HTML 3.2 (Standard) Lotus 1-2-3 (WK1), Lotus 1-2-3 (WK3), Lotus 1-2-3 (WK5) ODBC – dBase Files, ODBC – dBase Files – Word, ODBC – Excel Files, ODBC – FoxProFiles – Word, ODBC – MS Access Database, ODBC – Visual FoxPro Database, ODBC – Visual FoxPro Tables Paginated Text Record style (columns of values) Report Definition Rich Text Format Tab-separated text Tab-separated values Text Word for Windows document 6. The Destination (ie where you export to) can be: 77 Either to Disk file (though later you have the option to save to a directory on the hard disk) Or Exchange Folder Or Lotus Notes Database Or Microsoft Mail MAPI (see Send a report by Email (page 78)) (rich text format is a possible file format) 7. You may be prompted for further options, such as the format of Numbers and Dates, if for example, you have chosen tab separated; or the separator options. In this case, if you want these the same as the report, check the boxes. Click on OK. 8. If you chose the Export Data option, the Choose Export File screen displayed the default directory is \EXTRACT. Click on OK if this is OK, or select another directory, or if you want to save to disk, change the drive to a:. 9. Click on OK to start processing; a progress bar is displayed. 10. When finished, the report is re-displayed on screen. Click on Close to exit. 11. Find your file in the directory you chose. Send a report by Email 1. Run the report in the usual way – In Report output, select Output Type to Window. 78 2. When the Report is displayed on the screen select the Export icon 3. At the Export screen, select the required report format (for example Rich Text) in Format, and ensure that the Destination is set to Mail via MAPI. 4. Complete the email, adding addresses and message as appropriate. 5. Click the Send button and the Email will be sent in the normal way. The recipient will receive the file as an attachment. 79 File To save a report to file directly from the Reports screen, having selected the criteria and report you want, click on Process. 1. Select File as the Output Type, if you want to generate the report in ASCII format for export into third-party software (see Output of a Report (page 75)). Click on OK to start the report processing. 2. At the Select Output Filename screen, click in the window File name, and type in a title for the report (up to eight characters), with a suitable extension (eg .txt for Text format, or .dif for DIF format). In Save File as Type, the default is Text Files (*.txt). 3. To change the default directory of C:\EXTRACT, double click on the drive (eg C:) to display all directories and select the destination. To save to disk, select the a: drive. 4. Click on OK to return to the Output Method screen. Clicking on File Options will return you to the screen from which you have just exited. 5. In Output Format, the default is Text Format (ie *.txt), but you can click on to display the options and select from: Record format Tab separated 80 Text Format DIF Format Comma Separated Value Tab Separated Text Note - You can at this point change the Output Type to either Printer or Window if you decide not to proceed with File. 6. Click on OK to start the report processing. You may be asked to confirm or amend the Output file name, and this is an opportunity to change the extension, eg to .csv. 7. When finished, select Exit from the Report Selection Criteria screen. 8. The report can be found in the c:\extract directory unless another directory has been specified. Double click on this to view it, or open it in Windows Notepad (from Accessories). Printer There are two ways to print a report. We recommend selecting Window as the initial report output, to display the report on-screen, and then print the report from this screen jams. . That way you do not have to repeat the processing if the printer The second option is to print directly from the Reports screen. the criteria and report you want, click on Process: Having first selected 1. Make sure Printer is selected as the Report Type (see Output of a Report (page 75)). 2. When you click on OK, the report will start processing and printing straightaway using the default print set-up. Click on Print Options if you want to amend: 81 the number of copies other than 1 print all pages or selected pages the paper size, by clicking on Properties: if you have a laser printer, the size is A4 Letter 210 x 297 mm. For dot matrix printers using continuous paper, choose Letter 8 1/2 x 11 in. The reports are printed in portrait orientation rather than landscape. Click on OK to exit from Properties. 3. Make sure the printer is on-line and loaded with paper. 4. Click on OK to start the report processing. 82 Standard Forms After adding a new patient or making a patient amendment, if the practice is manual and not linked electronically to an active TP, standard forms for Patient Acceptances and Amendments to Patient Detail can be printed and sent to the TP. These can replace electronic transmissions. Note - a transmission must be run first from the GPC workstation to generate these forms, whether there are any linked TPs or not. During the transmission process, the system checks to see whether the link is operational. If it is, the transactions can be sent electronically. If the link is down (see Linked and Manual (page 9)), then the transactions will go to a Print File and the patient details are merged into the relevant standard form. Select Standard Forms from the Reports menu. Refer to Reports Processing (page 73) for the way to print forms. Note - if there is more than one type of form, you may need to prompt the system between each form. Figure 5: Patient Acceptance Standard Form - England and Wales 83 Figure 6: Scottish Amendment Transaction - Standard Form Transaction Reports Summary Daily Transaction Summary The Daily Transaction Summary provides a print-out of the daily transactions. It might be advantageous to print this at the end of each day in case of data loss. See Daily Transaction Summary (page 84). Daily Transactions Backup File Once View Daily Transactions has been cleared following the day's transmission, those transactions are stored in batches until the next quarterly archive in the Daily Transactions Backup File, which can be printed out using the Daily Transactions Backup File (page 84) Reports option. Deductions requested by TP Report A list of Deduction Transactions requested by the TP / Health Board / CSA can be printed out from Reports – Deductions Requested by TP (see "Deduction Transactions (page 27)"). Completed Transactions Report The Completed Transactions Report provides a printout of the Completed Transactions file. See "Completed Transactions (page 50)". 84 Records Required/Sent reports The Medical Records Flags are explained in "Medical Records Transactions (page 29)". Records Required by TP Report A printout of deducted patients whose Records requested by TP flag is set to Y on Registration. Records Sent by TP Report A printout of new patients whose Records Sent by TP is set to Y on Registration but no date received has been entered by the practice. Unacknowledged Acceptances Report The Unacknowledged Acceptances Report is a print-out of the new patients awaiting TP approval, classed as Unacknowledged Acceptance, whose Registration screens are "frozen" (see "Unacknowledged Acceptances (page 46)") Error File Reports The Error File Reports print out the following: Unmatched Amendments, Unmatched Approvals, Unmatched Deductions, Unmatched Medical Records Sent, Unmatched Rejections, and Unmatched Med Records Flag Removal, Unmatched FP69 Flag Removal, Unmatched FP69 Prior Notification. See "Error File (page 42)". Archive Quarterly Archive Every quarter you must carry out a Quarterly Archive. The TP/HB advises you when the Quarterly Archive is due and when you must run it (usually on or after the third day of the quarter month but it varies between Health Authority). See Archive in England and Wales (page 85) and Archive in Scotland (page 91). Archive in England and Wales The Close Quarter Notification Transaction is a transaction sent from your linked TP (Health Authority). With this, the TP advises "linked" practices that the previous Registration Quarter has been closed on the TP system. You will be notified on the Daily Status Report when you access Registration Links or re-display it from Utilities – Daily Status (see "Access and Daily Status Summary (page 14)"). First Select the TP (the Health Authority to which you are linked) if more than one and note the dates as follows: Quarter Archive Due [date] Quarter End Date [date] Close Quarter Transaction received: Yes / No / N/a Once received, a Quarterly Archive can be carried out. This clears all the Completed Transactions for that quarter on to floppy disk, so they are retained for safe storage. 85 An On-Line Archive is created at the same time as a Quarterly Archive, storing all the quarterly Deduction transactions (DEF) in the computer, in case they are needed to be used for incoming Medical Records Flag Removal (MRF) Transaction matching. Part of the archive process is to print Quarterly Certificates and Quarterly Capitation Reports for each TP and GP, which are then sent to the relevant TP. A quarterly archive cannot be undertaken for a TP until a Close Quarter Notification transaction has been received from that TP. If the Close Quarter Notification transaction is not received, in exceptional circumstances the quarterly archive for a TP may be run from an option in Security – Quarterly Archive within Registration Links. Before you run an archive, you have to make sure there are no outstanding transactions – this is explained in the next section (see "Clear Outstanding transactions before archive (page 87)"). After a Close Quarter Notification has been received, the practice will know that no more Deduction transactions will be received from that TP with a Deduction Date in the old quarter. 86 Clear Outstanding transactions before archive In England and Wales, the Daily Status Summary lists any reason(s) why the Quarterly Archive for that TP cannot yet be undertaken. You will need to clear each of these outstanding transactions from the old quarter that you are warned about, before you can carry out the archive. First select the TP on the Daily Status Summary screen and see which of the warnings below are shown, before taking the appropriate remedy. Outstanding Transactions Unacknowledged Acceptance Warning - At least one Acceptance Awaiting Acknowledgement transaction for the selected TP exists with an Acceptance Date either prior to or equal to the second day of the new quarter. Remedy - Go to Transaction Management - Unacknowledged Acceptances (page 46) to find out who the patient(s) is. All Acceptance Transactions must be matched with either an Approval Transaction or a Rejection (Wrong HA) Transaction. 87 All outstanding acceptances should be checked with the TP to determine if they have received them or not. If the TP confirm receipt of the acceptance, they should be able to confirm the interchange number of the file containing the acknowledgement that has been transmitted to the practice. You should check GPC for this interchange using the Find function in GPC. (Note - if the file is older than 14 days, remember to search the archive folders as well - to include archived messages in any Find Search, switch on View - Archive Folders on before the search, then switch off again after the search). If this file has not been received, you should request that the TP retransmits the interchange. If the file has been received, you should contact the HelpLine. In exceptional circumstances, if the patient is permanent, and if you have their NHS number (ask the TP for this), use Security – Approve Patient in Registration. If the patient has not been received by the HA, then you can security approve them with a dummy NHS number i.e. FAKE12345 then Security Deduct them and re-apply them. If the TP cannot confirm receipt of the acceptance, you should check GPC for the Registration files transmitted on or immediately following the Transaction date shown in the Unacknowledged Acceptances screen. You should find a file which has not been successfully delivered to the TP. Make a note of the interchange number of this file and confirm that your TP has not received this file. Once you have confirmed the TP did not receive this file, you should retransmit the file to the TP. If you cannot find the file containing the acknowledgements or the TP claim to have received the file, you should contact the HelpLine. Deduction Transaction Warning - At least one unprocessed Deduction transaction for the selected TP exists with a Date of Deduction either prior to or equal to the last day of the quarter to be archived. Remedy - All Deduction transactions generated by a TP System up until that TP close a particular Registration Quarter will always be dated in that old quarter. Go to Transaction Management - Incoming Transactions (page 34), select the correct TP if more than one, find the Incoming Deduction (page 37) transaction, Process, and either Deduct or Re-Accept them. Amendment Transaction Warning - At least one unprocessed Amendment transaction for the selected TP exists with a Transaction Date either prior to or equal to the second day of the new quarter. Remedy – Go to Transaction Management – Incoming Transactions, select the correct TP if more than one, find the Incoming Amendment (page 35)Transaction, Process, and Accept the transaction, or if an address change which you do not accept, select Remove OA. Rejection Transaction Warning - At least one unprocessed Rejection (Wrong TP) transaction from the selected TP exists with a Transaction Date either prior to or equal to the second day of the new quarter. Remedy – Go to Transaction Management, Incoming Transactions, select the correct TP if more than one, find the Incoming (Wrong TP) Rejection (page 41) Transaction, Process, and Re-Accept. Deduction Request Rejection (England and Wales only) Warning - At least one unprocessed Deduction Request Rejection transaction from the selected TP exists with a Transaction Date either prior to or equal to the second day of the new quarter. Remedy - Go to Transaction Management, select the correct TP if more than one, find the Incoming Deduction Request Rejection (page 42) Transaction, Process, and accept it. Running the Archive in England & Wales Before archiving: Make sure all outstanding transactions are cleared, as shown up on the Daily Status Summary screen. See "Clear Outstanding transactions before archive (page 87)" on page . Make sure you have done a recent backup Have ready newly formatted disks if that is your preferred storage medium. 88 To archive: 1. Select Action – Archive or click on , and then select Quarterly Archive. If this menu option is disabled, then either the Quarterly Archive is not due (look on the Daily Status screen to see if it is), or you have not cleared all the outstanding transactions. 2. Click on Process. 3. Select the Quarter to archive, then the TP if more than one. Click on OK. 4. Either place an empty formatted disk in drive A and click OK, or if you prefer, click OK and select a destination folder. 89 5. Archiving begins, and a progress chart is displayed. message is displayed: Quarterly Archive complete. When finished, a 6. The Daily Status screen will now show the Quarter Archive due as n/a, quarter end Date n/a, and Close Quarter Transaction received: n/a. 7. Printing of the Quarterly Capitation Report and Certificates begins. As a result of carrying out the Quarterly Archive: All relevant Completed Transactions for the quarter are archived, as well as any matching Approval, Rejection or Security Approval. All Completed Transactions are deleted as well as any matching Approval, Rejection or Security Approval. An exception is completed DEF Deduction transactions which are moved to the on-line archive file in case they are needed to be used for incoming Medical Records Flag Removal (MRF) Transaction matching. A Quarterly Archive Certificate and Capitation Report will be printed, a copy of which should be signed and sent to the TP. The Quarterly Archive will remove the corresponding Close Quarter Notification transaction. After the archive: The Quarterly Archive archives Completed Transactions file to be performed separately for each individual TP that the practice is linked to. The Quarterly Archive produces the required Quarterly Certificates and Quarterly Capitation Reports both for each GP and each TP, a copy of which should be sent to each respective TP: Quarterly Certificates represent a summary of the Links Registration activity for each GP and each TP with which the practice has registered patients. The Quarterly Capitation Reports represent an age/sex patient capitation breakdown of each GP for each TP with which the Quarterly Archive for that TP must be undertaken. 90 Previously, the figures on the Quarterly Capitation Report generated by the practice have differed from those at the TP for various reasons: the date of the quarterly archive did not always correspond to the end of the Registration Quarter; outstanding deductions and outstanding amendments of changes of GP around the quarter end dates; ill-defined age ranges for capitation reports; the quarterly archive not being performed immediately after all Acceptance transactions with Acceptance Dates up to and including the second day of the new quarter have been matched with a corresponding acknowledgement. This has led to the TP not being able to reconcile the Quarterly Certificates accompanying the Quarterly Capitation Reports. Introducing the Close Quarter Notification Transaction should solve this. Consequently, the Quarterly Capitation Report will: Exclude patients with a date of acceptance after the second day of the new quarter. Patients with a date of acceptance equal to the second day of the new quarter will be included on the capitation report. Exclude patients with a date of Deduction either prior to or equal to the last day of the quarter being archived. Included are patients who you have marked as deceased if no Notification of Deduction has yet been received for that patient from the TP. Immediately after a TP has closed a Registration Quarter: They will start to approve Acceptance transactions from linked practices dated in the new quarter. Some may already have been approved within Registration before the quarterly archive is run. These will not be archived and the corresponding patients not included in the capitation counts. They will start to generate Deduction Transactions with Deduction Dates in the new Registration quarter. Some may already have been applied within Registration before the quarterly archive is run. These will not be archived in the subsequent archive. The Quarterly Archive will remove the corresponding Close Quarter Notification transaction from the "Close Quarter Notification" file at the end of processing the archive. Archive in Scotland Archive overview in Scotland When you click on the Registration Links icon from the Vision start-up menu, you may see the reminder: A Quarterly Archive is Due - OK You will need to carry out a Quarterly Archive straightaway. The quarterly archive should be carried out on or after the third day of the quarter month (see Quarterly Archive). This archives Completed Transactions for the quarter on to floppy disk so they are retained for safe storage. If it is your first time accessing Registration Links, you may see the message: No completed transactions to Archive for Quarter ending [date]. to advance the Quarter end date to [date + 3 months]? Yes / No 91 Do you wish This will allow you to extend the current quarter for another three months until the next quarter end, before another archive reminder is given. Archive can be selected from the top menu options, or by clicking on the Archive icon . Then select Quarterly Archive (see Quarterly Archive in Scotland (page 92)). After running the quarterly archive, a Quarterly Archive Certificate will be printed, a copy of which should be sent to the HB. An On-Line Archive is created at the same time as a Quarterly Archive, storing all the quarterly Deduction transactions (DEF) in the computer. Should you wish to refer to a quarter's transactions, these can be viewed or printed from On-Line Archive, rather than retrieving from floppy disk. An interim archive (see Interim Archive) would only be carried out during a quarter at the request of the HB in the light of, say, a practice dispute. This will archive from the last archive to the present date. Quarterly Archive in Scotland Quarterly Archive will archive on to floppy disk the quarter's completed transactions. Quarterly archiving is mandatory, and takes place at the beginning of each quarter, unless you are given the option to extend the quarter (see Archive Overview). You should carry out a Quarterly Archive on or after the third day of a quarter month, 3rd January, 3rd April, 3rd July, or 3rd October. In fact, you will be prevented from carrying out a Quarterly Archive too early. Before archiving: Make sure first there are no unacknowledged acceptances awaiting approval (see Unacknowledged Acceptances (page 46)). There should also be no outstanding deductions from the quarter just finished (see Incoming Transactions (page 34)). Do a backup Have ready newly formatted disks if you are using floppy disks. To archive: 1. Select Archive - Quarterly Archive. 92 2. Click on Process. 3. Either put an empty formatted disk in the disk drive and click on OK; or if no floppy disk drive A select a destination folder.. Make sure the printer is on-line. 4. The archive process will continue automatically from this point and a message is shown when completed successfully. 5. The Quarterly Certificates and Capitation Reports will now be printed. 6. Store the archive disks in a safe place away from the surgery, and if required, send to the HB. The Quarterly Archive Report is of all the quarter's outgoing and incoming Registration transactions sent and received up until the second day of the quarter. It must be signed by a nominated GP or Practice staff member indicating that the transmission of all transactions listed on the certificate has been undertaken with the full authority, knowledge and permission of that GP practice's staff. One signed copy should be held at the practice and the other sent to the HB. Outgoing Acceptance Transactions will include those with an Acceptance Date either prior to or equal to the second day of that quarter. Outgoing Amendment or Rejection Transactions will include those with a Transaction Date either prior to or equal to the second day of the quarter. Incoming Amendments, Deductions, Medical Records Removal and Medical Records Sent transactions will include those with a Transaction Date either prior to or equal to the second day of the quarter. As a result of carrying out the Quarterly Archive: All Completed Transactions for the quarter will be removed on to a floppy disk A Quarterly Archive Certificate will be printed, a copy of which should be signed and sent to the HA/HB. After the archive: 93 Each quarter's Deduction transactions will also be stored on the computer's hard disk in the On-Line Archive, and they can be retrieved or purged from Archive, or printed from Reports. Interim Archive in Scotland In Scotland only, you may only need to use the Interim Archive option at the request of the HB. This will archive the Completed Transactions File from the date of the last archive to the present date, and will produce an Interim Quarterly Certificate. It could possibly be used during a quarter after a practice dispute, for example. Before starting the archive, carry out a backup of your medical system. 1. Select Action - Archive, then click on Interim Archive. 2. Click on Process. 3. Confirm the date with OK. date. The Interim Archive will include records up to this 4. You will be advised if there are no completed transactions to archive. 5. Confirm that you have carried out a recent backup. If so, continue. 6. Insert a formatted disk into the disk drive or select a destination folder and make sure the printer is on-line and loaded. Continue. 7. Make sure the printer is on-line and loaded with paper, as the Interim Certificate will now be printed. 8. You will be warned if you do not have a valid archive disk in the disk drive. 9. Once the files have been copied to disk and the certificates have printed successfully, you can confirm, or reprint the certificate. 10. Store the archive disks in a safe place away from the surgery, and if required, send to the HB. Retrieve and Purge Archive The Quarterly Archive removes the quarter's transactions from the Completed Transactions File to a floppy disk, and completed DEF Deduction transactions are moved to the on-line archive file in case they are needed to be used for incoming Medical Records Flag Removal (MRF) Transaction matching. They can be retrieved or purged from Archive. Select Action – Archive or click on , Retrieve Archive from Floppy Retrieve Archive from Floppy will load an archive stored on a floppy disk to the computer. If you have not purged the On-Line Archive, you may view transactions from there. However, using Retrieve Archive from Floppy, you may retrieve the quarter's transactions from floppy disk. 94 Purge On-Line Archive The On-Line Archive will store each quarter's transactions after a Quarterly Archive has been run. Purge On-Line Archive will allow the quarters' DEF transactions to be deleted from the On-Line Archive. There is no need to purge the On-Line Archive to remove the stored transactions, unless you have a problem of lack of space on your hard disk. In any case, you are advised to keep the last two quarter's transactions in the On-Line Archive. Purge Retrieved Archive Once you have retrieved an Archive from floppy disk, you may purge the retrieved archive using Purge Retrieved Archive. 95 Export Data • 74, 75, 76 F Index File • 16, 74, 75, 80 FP69 Prior Notification FPN • 28, 30, 34, 38 G A Acceptance Rejection • 67 Acceptance Transaction ACG • 25, 26, 59 Access and Daily Status Summary • 14, 19, 85 Accessing Registration Links • 7 Accessing Transaction Management • 31 Action • 17 Amendment Transactions AMG/AMF • 26, 35, 59 Amendments • 66 Approval Transaction APF • 26, 27, 34 Archive • 85 Archive in England and Wales • 19, 85 Archive in Scotland • 19, 24, 85, 91 Archive overview in Scotland • 91 C Change criteria • 32, 33, 35, 60, 63, 73 Clear Outstanding transactions before archive • 15, 86, 87, 88 Completed Transactions • 18, 31, 50, 73, 84 Completed Transactions Report • 84 Copyright Notice • ii General notes about Transaction screens • 32, 35, 47, 60, 63 Getting Started in Registration Links • 7 GP Codes • 9 H Help • 20 I If PSD have not received the New Patient Registration • 71 If PSD have received the New Patient Registration • 71 If the Health Board have not received the New Patient Registration • 48 If the Health Board have received the New Patient Registration • 48 Incoming (Wrong TP) Rejection • 28, 34, 41, 88 Incoming Amendment • 26, 34, 35, 88 Incoming Deduction • 7, 26, 27, 28, 29, 34, 37, 59, 88 Incoming Deduction Request Rejection • 28, 42, 88 Incoming Transactions • 15, 17, 31, 34, 88, 92 In-coming Transactions • 64 In-coming Transactions • 64 Interim Archive in Scotland • 94 D Daily routine • 15 Daily Transaction Backup • 31, 59, 63 Daily Transaction Summary • 16, 18, 73, 84 Daily Transactions • 16, 18, 26, 31, 58 Daily Transactions Backup File • 18, 73, 84 Day-to-day Transactions and Transmission • 8 Dealing with the Error File • 16, 17, 31, 34, 42, 85 Deduction Request Rejection DRR • 28, 34 Deduction Request Transaction DER • 28, 39 Deduction Transactions DEF • 27, 37, 84 Deductions • 65 Deductions requested by TP Report • 18, 73, 84 Downloads and Uploads • 8 E Electronic Data Interchange • 7 Error File • 64, 67 Error File Reports • 18, 85 97 L Linked and Manual • 9, 83 M Medical Records Transactions MRF/MRS • 26, 27, 29, 34, 85 Menu options and toolbar • 15, 16 O On Receipt of the Patient's Record • 49, 71 Output of a Report • 16, 74, 75, 76, 80, 81 Outstanding Transactions • 87 Overview • 7 P Partners - Electronic Transactions • 21 Partners - Existing Registration Forms • 20 Partners for Scotland • 20 Printer • 74, 75, 76, 81 Purge On-Line Archive • 95 Purge Retrieved Archive • 95 Unmatched - Incoming Approval • 44, 68 Unmatched - Medical Record Flag • 45, 64, 69 Unmatched transactions • 31 Utilities (England & Wales only) • 19 V View • 19 Viewing Unacknowledged Acceptances • 46 Q Quarterly Archive • 15, 19, 85 Quarterly Archive in Scotland • 92 R W What's New in Registration Links • 7 When a new patient is registered • 29 When a patient is removed • 29 Window • 74, 75, 76 Records Required/Sent reports • 18, 29, 85 Registration Links • 7 Registration Re-acceptance for all other Deduction Reasons • 40 Registration Re-acceptance for Deduction Reason - New TP/HB/CSA Same GP • 40 Registration Re-acceptance for Deductions Reason Removal to new TP/HB/CSA • 41 Rejection Transactions REF/REG • 25, 26, 28, 42, 58 Reports • 73 Reports Processing • 18, 73, 76, 83 Retrieve and Purge Archive • 94 Retrieve Archive from Floppy • 94 Running the Archive in England & Wales • 88 S Scotland and England Differences for Registration Links • 22 Security (England & Wales only) • 19 Security in Registration • 20, 25, 27, 30, 35, 39, 59 Send a report by Email • 76, 77, 78 Standard Forms • 9, 18, 73, 83 Summary of Registration Transaction Messages • 25 Switching Registration Links on • 10 T Transaction Management • 17, 25 Transaction Management - Scottish Practices • 63 Transaction Reports Summary • 74, 84 Transaction Types • 25, 32 U Unacknowledged Acceptances (Frozen Patients) • 16, 18, 27, 31, 46, 70, 73, 85, 87, 92 Unacknowledged Acceptances Report • 85 Unmatched - Amendment • 45, 69 Unmatched - Deduction • 44, 68 98