1
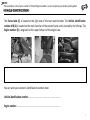
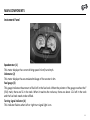
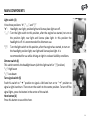
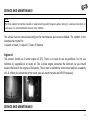
Owner’s manual Neon 50 Nipponia S.A. OWB001-‐EN INTRODUCTION This Owner’s Manual contains basic instructions on how to operate, inspect and maintain your scooter. Please read it carefully and thoroughly. Correctly operating, maintaining and repairing your scooter will minimise any possible risks and result in its best performance. The authorised Nipponia service points will be glad to provide you with more detailed instructions. Important information contained in this manual is marked using the following symbols: NOTE: Important information or instructions ! ATTENTION: Important information or instructions. Failure to follow these instructions may result in damage to your scooter or minor injury ! WARNING: Important information or instructions. Failure to follow these instructions may result in heavy damage to your scooter, serious injury or even death This manual is an integral part of the scooter and must always accompany it, even in the event of a resale. If you have any questions concerning the contents of this manual or need further information regarding the operation of your scooter, do not hesitate to contact your local Nipponia dealer. This booklet is compiled with the latest available information. However, due to constant improvements, modifications or alterations may be made without prior notification. Updated versions can be downloaded from the Nipponia website www.nipponia.com. 1 CONTENTS Introduction Contents Safety Information Safe riding Protective clothing Vehicle modifications Loading Accessories Vehicle Identification Vehicle Description Left view Right view Instruments and controls Main Components Instrument panel Speedometer Odometer Fuel gauge Turning signal indicator Oil level indicator High beam indicator 1 2 4 4 5 5 5 6 7 8 8 9 10 11 11 11 11 11 11 12 12 Clock and regulation buttons 12 Controls 12 Seat Storage compartment Fuel Tank 15 15 16 Main/Ignition switch Steering lock Start button Light switch Dimmer switch Turn signal switch Horn button 12 13 13 14 14 14 14 Fuel 16 Kick starting 19 Driving Instructions Pre-‐operation Inspection Starting the Engine Driving Braking Parking Engine Break-‐in 17 17 18 20 20 21 22 2 CONTENTS Service and Maintenance Maintenance Schedule Engine oil Gear (transmission) oil Gear oil replacement Air Cleaner Spark Plug 23 23 24 25 25 26 27 Spark plug inspection and replacement 27 Hydraulic brake fluid inspection Brakes inspection 29 30 Tyres Brakes Battery 28 28 31 Battery removal 32 Use after storage 34 Electric Fuse Care and Storage Guide Long-‐term storage Cleaning Specifications Wiring Diagram 32 34 34 35 36 37 3 SAFETY INFORMATION Safe riding 1. Always perform the pre-‐operation inspection before driving. 2. The scooter should not be used by anyone who does not hold a valid driving license. 3. Many accidents involve motorcycles not seen by other drivers, so please pay attention to the following: • Wear bright coloured clothes. • Do not drive too close to other vehicles or in another driver’s blind spot. • Avoid overtaking. 4. Always follow local traffic regulations. • Driving above the speed limit is the reason for many accidents. Driving speed must not exceed the limit specified by traffic regulations and allowed by road conditions. • Always signal when turning or changing lanes in order to attract the attention of the other drivers. 5. Never drive under the influence of alcohol or other drugs; it dramatically increases the risk of accidents. 6. Exercise special attention when driving over crossroads or parking area exits. 7. When driving you must hold the handlebars with both hands and place your feet on the footboard. The passenger should hold the handgrips or the driver and place his feet on the footrests. 8. This scooter is designed for on-‐road use only. It is not suitable for off-‐road use. 4 SAFETY INFORMATION Protective clothing 1. For your safety, the driver and passenger should both wear helmets. Use of additional safety apparel (gloves, glasses, protective wear) is recommended. 2. Do not wear loose clothing, as it may be caught by the handle levers, the kick starter or the wheels and could lead to an accident. 3. During or after operation, the muffler’s temperature is very high. Exercise extreme caution as it can cause burns. Vehicle modifications Making any modifications to the scooter or replacing the original components can affect its performance and safety and/or render it illegal for use. Observe applicable laws and all national and local regulations concerning vehicle equipment. Additionally, such modifications will cancel the warranty. Loading Adding accessories or cargo to your scooter can adversely affect stability and handling if the weight distribution of the scooter is changed. Use extra care when riding a scooter with extra load. Here are some general guidelines to follow when loading cargo or adding accessories to your scooter: 1. All accessories must be fastened securely on the vehicle in order to minimise vibration that could cause instability. 2. Any extra load should be placed as close to the gravity centre as possible and must be equally 5 SAFETY INFORMATION distributed on both sides of the scooter to avoid imbalance and instability. 3. The tyre pressure must be adapted to the weight of the load and road conditions. 4. Make sure that extra load is securely attached to the vehicle to prevent it from falling and being lost. 5. Do not hang any load on the handlebars or the suspension. 6. The total weight of the driver, passenger, accessories and cargo must not exceed the maximum load limit of the scooter (170kg). Accessories When installing accessories not approved by Nipponia, attention should be paid to the following points: 1. The installation of the accessories must not affect the suspension travel, the light position and the steering angle. 2. Do not obstruct the ventilation duct, to ensure cooling of the engine. 3. Avoid installing any accessories that could hinder your access to vehicle controls and movement of your hands and feet as it could impair your reaction in an emergency event. 4. Do not install a bulb with higher power than that specified. It could burn the fuse or cause problems to the electrical system due to low voltage. 5. Do not add a sidecar to the scooter. 6 NOTE: -‐ Please make a note of your scooter’s VIN and Engine number, so you can place your orders quickly when purchasing spare parts from Nipponia. VEHICLE IDENTIFICATION The Frame label (1) is located at the right side of the main stand bracket. The Vehicle identification number-‐VIN (2) is located on the main front bar of the scooter frame and is covered by the VIN cap. The Engine number (3) is engraved on the upper left part of the engine case. You can write your scooter’s identification numbers here: Vehicle identification number: ……………………………………………………………… Engine number: …………………………………………………………………………………….. 7 VEHICLE DESCRIPTION Left view 1: Side stand, 2: Battery cover, 3: Seat, 4: Handgrip, 5: Seat lock, 6: Pillion footrest, 7: Kick Starter, 8: Main Stand, 9: Air filter 8 VEHICLE DESCRIPTION Right view 4 1: Exhaust muffler, 2: Rear fender, 3: Rear light, 4: Fuel tank, 5: Storage compartment, 6: Oil tank, 7: Front turn signal light, 8: Headlight 9 VEHICLE DESCRIPTION Instruments and controls 1: Horn button, 2: Turn signal switch, 3: Rear brake lever, 4: Left, rear view mirror 5: Dimmer switch, 6: Instrument panel, 7: Light switch, 8: Right, rear view mirror, 9: Front, brake lever, 10: Throttle grip, 11: Start button, 12: Main/Ignition switch 10 MAIN COMPONENTS Instrument Panel Speedometer (1) This meter displays the current driving speed in km/h and mph. Odometer (2) This meter displays the accumulated mileage of the scooter in km. Fuel gauge (3) This gauge indicates the amount of fuel left in the fuel tank. When the pointer of the gauge reaches the F (Full) mark, there are 5L in the tank. When it reaches the red area, there are about 1.2L left in the tank and the fuel tank needs to be refilled. Turning signal indicator (4) This indicator flashes when left or right turn signal light is on. 11 MAIN COMPONENTS ! ATTENTION: -‐ Oil If the oil level indicator indicator l(ights pressure 5) during normal engine operation, it is advisable to check the engine oil level. In the event that the indicator is still on, even with a normal oil level, you should visit an authorised Nipponia This indicator lights when the oil level is low. When the indicator lights the oil tank needs to be refilled. service point. High Beam indicator (6) This indicator lights when the dimmer switch is in the high beam position. Clock and set buttons (7) This mini screen functions as a clock. The time can be set by the two buttons, one on each side of the screen. Controls Main/Ignition switch (1) The main switch is located at the upper right part of the frame body. It is used to control the ignition and electrical systems and to lock the steering wheel. To use it insert the ignition key. The switch can then be turned to the following positions: 12 WARNING: ! NOTE: -‐ When locking the steering, the handlebars must be turned to full left position and the key should be pressed -‐ Never turn the key to “ ” or to “ ” position while driving as it may cause an accident. properly. MAIN COMPONENTS -‐ A fter locking the steering, move the handlebars slightly to check whether they have locked. “ ” ON: The engine and the electrical system are on and the key cannot be removed. “ ” OFF: The engine and the electrical system are off and the key can be removed. “ ” Steering lock: The steering is locked and cannot be turned, the engine and the electrical system are off and the key can be removed. Steering lock To lock the steering, turn the handlebars all the way to the left and insert the key in the main switch (1). Then press down and, while pressing, turn to “ ” position to lock. To unlock the steering, insert the key and turn it to “ ” position. To prevent from theft, always lock the steering when parked. Start button (2) To start the engine using the start button make sure to raise the side stand and hold the front or rear brake. Then press the start button to start the engine. 13 MAIN COMPONENTS Light switch (3) It has three positions: “●”, “ ” and “ ” “●”: Headlight, rear light, position light and license plate light are off. “ ”: Turn the light switch to this position, after the engine has started, to turn on the position light, rear light and license plate light. In this position the headlight is off. It is recommended for afternoon use. “ ”: Turn the light switch to this position, after the engine has started, to turn on the headlight, position light, rear light and license plate light. It is recommended for use while driving at night in reduced visibility conditions. Dimmer switch (4) This switch controls the headlight beam (with the light switch in “ ”position). “ ”: High beam “ ”: Low beam Turn signal switch (5) Push this switch to “ ” position to signal a left-‐hand turn or to “ ” position to signal a right-‐hand turn. Then return the switch to the centre position. To turn off the signal lights, press the button in the centre of the switch. Horn button (6) Press this button to sound the horn. 14 NOTE: -‐ BTe he careful turn signal while sw witch ashing does your not scooter, turn off as automatically. the storage compartment You must press may it gtet o swwitch et. off after turning otherwise -‐ MAIN it D mo ay not affect keep the valuable drivers items around in tyhe ou. storage compartment. COMPONENTS Seat To open the seat, first unlock it from the seat lock turning the key clockwise and then lift it up. To close the seat, lower it down and push the rear part of the seat until you hear a clicking sound. This indicates that the seat is locked. Then you can remove the key from the lock. Always make sure that the seat is securely locked before driving. Storage compartment The storage compartment is located under the seat. Its maximum loading capacity is 5kg. 15 ! WARNING: 1: Fuel tank cap -‐ G -‐ You should not exceed the maximum loading weight (5kg) of the storage compartment, as it may affect the Wasoline hen refuelling, is highly bflammable e careful naot nd to msay pill bae ny explosive. gasoline Aolways ut of tthe urn tank. off the After engine refuelling, before prlease efuelling. check around the -‐ MAIN control Nfuel ever tank asnd moke or tability awny hile gasoline orf efuelling your ascooter. nd am nd ake avoid sure sparks, it is dry flames before or starting any other the seource ngine. that could ignite the fuel. CfsOMPONENTS -‐ D -‐ As the storage compartment is near the engine, which can reach high temperatures, avoid storing any low Avoiding o not overfill breathing the taank. ny gAasoline fter refuelling, vapours. always make sure that the cap is securely closed. -‐ Keep away from children. items. heat-‐resistant or flammable Fuel Tank The fuel tank is located under the seat. To refuel lift the seat and turn the fuel tank cap (1) counter-‐clockwise to open it. After refuelling make sure to close the fuel tank tightly by turning the fuel tank cap clockwise. Fuel Use only 90-‐97 octane unleaded gasoline. 16 DRIVING INSTRUCTIONS Pre-‐operation Inspection Always perform the pre-‐operation inspection, before driving your scooter. Failure to do so may result in vehicle damage or an accident. The time required to perform the necessary inspection is very short. However, it both ensures your safe driving and, in the long term, saves you time from vehicle repairs. Make sure to inspect the following items: Item Fuel Inspection -‐ Check the fuel level and refuel if necessary -‐ Inspect the fuel circuit for any fuel leakage Engine oil and -‐ Check the engine oil and the gear oil and refill to the specified level if necessary gear oil -‐ Inspect the scooter for any oil leakage Front and rear -‐ Check operation of the brakes brakes -‐ Inspect condition of the brake pads -‐ Check the brake fluids and refill to the specified level if necessary -‐ Inspect the hydraulic system for any leakage Wheels and tyres -‐ Check tyre condition and tyre wear -‐ Check for any potential damage to the wheels or tyres -‐ Inspect the air pressure and adjust if necessary 17 ! WARNING: -‐ If any item in the Pre-‐operation inspection list is not functioning properly, have it inspected and repaired before operating the scooter. DRIVING INSTRUCTIONS Item Throttle grip Brake levers Lights and instruments Inspection -‐ Check operation of the throttle grip. It should be able to turn smoothly and be fully opened and closed -‐ Inspect condition and free play of the cable -‐ Check whether the brake levers operate smoothly and lubricate the joints if necessary -‐ Inspect operation of the headlight, rear light, brake light, turn signal lights, horn and panel instruments If you need assistance on how to perform any of the above-‐mentioned tasks, do not hesitate to contact an authorised Nipponia service point. Starting the Engine Before starting the engine make sure to raise the side stand. You can rest the scooter on the main stand. 1. Turn the main switch to “ ” position 2. Close the throttle completely and do not turn it 3. Press the start button while holding the rear brake lever to start the engine. 18 ATTENTION: ! NOTE: -‐ A R If eview lways the eangine the pply safety tdhe oes riear nformation not bsrake tart d after uring contained pressing engine in sthe tarting this start manual to button prevent before for t3he d-‐4 riving. sscooter econds, from turn mtoving he throttle forward. grip open a little. It R -‐ ADRIVING m elease lways ay make pterform he tshe tart etngine he button pre-‐operation easier once to the start. eingine nspection has sbtarted. efore driving. INSTRUCTIONS -‐ D o not press the inactivity start button while he ngine is running, as tihe t could cause amage. A fter long term periods it tm ay eb e difficult to start engine. In sduch a case, hold the start button a little more than usual and turn the throttle grip open a little. -‐ After starting in a cold state, allow the engine to warm up for approx. 3 minutes. -‐ If the engine does not start with the electric starter, try using the kick starter. Kick starting Make sure to raise the side stand and rest the scooter on the main stand 1. Turn the main switch to “ ” position 2. Close the throttle completely and do not turn it 3. Step down the kick starter with force and the engine will start. 19 ! N WARNING: OTE: -‐ D AThe pplying o not driving turn only tspeed he one throttle ois f the controlled gbrip rakes too (afront by bruptly the or throttle rtear) o avoid results grip. falling iTurn n roeduced ff the the throttle vbehicle. raking grip power. open to increase the speed and close it to decrease it. DRIVING INSTRUCTIONS Driving 1. Start the engine as previously described 2. Push the vehicle off the main stand, holding the rear brake lever 3. Get on the scooter, keeping at least one foot on the ground to support and prevent it from falling 4. Adjust the rear-‐view mirrors 5. Before taking off, turn on the signal light and make sure it is safe to go 6. Release the brake and gradually turn the throttle grip open Braking When you need to brake, close the throttle grip and use both front and rear brakes. Press the brake levers smoothly, gradually increasing the pressure. 20 ! WARNING: ATTENTION: -‐ W Avoid hen bdraking riving dwownhill, hile turning close as the it ctould hrottle cause grip the and scooter use both to b skid rakes or afall. lternatively, maintaining a low speed. -‐ When driving on a wet or slippery road the braking distance is longer than usual. Reduce the driving speed -‐ DRIVING Do not hold tIhe brake levers while driving, as it may cause abnormal wear to the brakes. Also, it will turn the NSTRUCTIONS brake light on, affecting the drivers behind you. and brake in advance, or you may lose balance and fall. Parking 1. Switch on the turn signal light in advance and check for approaching vehicles. 2. Close the throttle grip and apply the brakes slowly, so the brake light will turn on and warn vehicles from behind. 3. When the vehicle stops, switch off the turn signal light. 4. Turn the main switch to “ ” position to stop the engine. 5. Rest the scooter on the main stand. 6. To prevent from theft, always lock the steering when parking (main switch on “ ” position) and remove the ignition key. 21 ! WARNING: -‐ Park the scooter on a flat and stable surface to prevent it from falling. -‐ W hen you park on a slope, position the scooter facing upwards to prevent it from falling. DRIVING INSTRUCTIONS -‐ Do not turn the ignition switch to “ ” position during driving. It may cause a malfunction in the electrical system and lead to an accident. Engine Break-‐In Breaking-‐in your scooter is very important, as it helps to prolong the life of the engine. The break-‐in period is the first 1000km, with the following speed variation: During the period from 0 to 500km, driving speed should not exceed 20km/h, while from 500 to 100km it should not exceed the maximum speed, according to the engine version (25/30/45km/h). During the engine break-‐in period do not put heavy loads on the scooter and avoid driving at full throttle or constant speed for a long time. 22 SERVICE AND MAINTENANCE Maintenance Schedule Item Engine oil Gearbox oil Air filter element Spark plug Fuel Pipes Carburettor (idle speed) Throttle function Braking system/pads/fluids Clutch weights Brake switch Transmission belt Transmission system check for leakage Engine check for leakage Fasteners-‐bolts-‐screws-‐ nuts Headlight beam setting Suspension Wheels/tyres Steering stem bearings First 500 Every 1000 Period of maintenance in km Every Every Every 3000 6000 12000 First replacement at 300km and then every 2000km. Check the oil level every 500km, refill engine oil when it is not enough. R I I I I I I I Replace every 4000 km C R I I I I I I I I I I I I I I I I I Reference pages 24 R R 25 26 27 _ _ _ 28 _ _ _ _ _ I _ I I I I _ _ _ _ 23 SERVICE AND MAINTENANCE Note: The filter element should be cleaned or replaced with greater frequency when driving in a dusty environment. In such cases, it is recommended to clean it every 500 km. The vehicle must be serviced according to the maintenance and service schedule. The symbols in the schedule chart stand for: I: Inspect or clean, A: Adjust, C: Clean, R: Replace. Engine oil This scooter should use 2-‐stroke engine oil (FC). There is no need to use any additives. Do not use common oil, vegetable oil or castor oil. The 2-‐stroke engine consumes the lubricant, so you should inspect the level of the engine oil frequently. The oil tank is behind the centre cover and has a capacity of 1.2L. When you unlock the centre cover, you can reach the tank and refill if necessary. SERVICE AND MAINTENANCE 24 ! ATTENTION: -‐ After the engine has been running, the oil temperature is high. Exercise care to avoid injury from burning. -‐ If oil comes into contact with the skin, wash it away with soap or a cleaning agent. Gear (transmission) oil Use gear oil for 2-‐stroke gasoline engines. Recommended oil type: SAE 80W/90. Gear oil replacement 1. Set the scooter on the main stand on a level surface. 2. Remove the filling bolt (1) and the drain bolt (2). 3. It is better to replace the gear oil when the engine is warm, as it will be easier to drain out the residue of the gear oil. 4. After the gear oil has been drained out completely, clean the drain bolt and tighten it. 5. Pour about 100ml of new gear oil. 6. Tighten the filling bolt to prevent the gear oil from flowing out. 7. For a new scooter, replace the gear oil after the first 500 km. After that, replace every year or every 6000 km. SERVICE AND MAINTENANCE 25 ! ATTENTION: -‐ T This his wmork odel should uses ao nly paper be ad one dry-‐type at an aair uthorised cleaner. W Nipponia hen cleaning, service use point. high pressure air and not oil type solvent. -‐ R If eplace the air the cleaner gear ois il nw ot hile installed the engine correctly; is warm dust and can wbith e stucked he scooter directly set into on at he level engine surface cylinder. to ensure This that may the cause oil piston owut drains ear, completely. reduce engine power and shorten the life of the engine. -‐ Replace the gear oil more frequently than recommended in the following conditions: 1: Frequent use in wet weather 2: Prolonged riding time 3: Riding with a loaded scooter Air cleaner The air cleaner must be maintained periodically. Especially after driving in a dusty environment, maintenance must be enhanced. 1. Remove air cleaner fixing bolts. 2. Remove air cleaner tightening bolts, take the air cleaner out. 3. Clean or replace filter element. Re-‐install the air cleaner in reverse order. SERVICE AND MAINTENANCE 26 ! WARNING: 1: Electrode gap -‐ The spark plug must be screwed in fully. Otherwise, leakage from spark plug base and temperature increase 2: Side electrode may occur esulting in engine damage. Spark Prlug -‐ DRecommended o not use a spark sp lug wpith heat value; the engine could e severely damaged. park lug incorrect for standard use: Botherwise PR7HS (NGK), E7TC or Eb7RTC (BAILIAN) Spark plug inspection and replacement 1. Remove the dirt around the spark plug socket. 2. Take the spark plug cap off and remove the plug with the spark plug wrench from the tool bag. 3. Measure the gap between pole and electrode with a thickness gauge and adjust to 0.6 -‐ 0.7 mm. 4. When re-‐installing the spark plug, screw it in by hand and then tighten with the wrench (1/2 turn for a new plug, 1/8-‐1/4 turn for a used one). 5. Put on the spark plug cap. Tyres The inflated tyre pressure must be checked daily and regulated according to the following table. Cracks, damage, and wear on the tyres cause unsteady steering or even tyre blow-‐out. Note that tyre pressure is measured with cold tyres. SERVICE AND MAINTENANCE 27 ! ATTENTION: 1: Wear mark -‐ If tyre 2: pressure exceeds the standard value, the tyre can easily be damaged; if tyre pressure is below the Wear limit indication standard value, it may cause loss of control while driving or the tyre being dislodged from the rim. Tyre pressure in cold state Tyre specifications Rider and Rider only passenger Front wheel 120/70-‐12 1.75 bar 2.30 bar Rear wheel 120/70-‐12 2.25 bar 2.30 bar Note: 1 bar = 1 kgf/cm2 = 100 kPa Driving with worn tyres is very dangerous. The tyres must be replaced before the tread is worn to the wear mark (1). Brakes This scooter is equipped with hydraulic disk type front brake and rear brake. Periodic maintenance and adjustment of the braking system should be performed to prevent accidents. SERVICE AND MAINTENANCE 28 1: Screws 2: Reservoir cap 3: Reservoir pad 4: Reservoir seal 5: Reservoir Hydraulic brake fluid inspection Frequently scheduled inspections of hydraulic fluid level and wear condition of brake pads must be carried out. If the free play of the brake lever is excessive (>2-‐3cm) and the brake pad wear is within its specified limits, air may be trapped in the braking system. It must be expelled. Take your scooter to an authorized Nipponia service point for brake maintenance. When the hydraulic fluid level has fallen to the MIN mark, refill the fluid in the reservoir. 1. Remove the handlebar cover, reservoir cap, pad and seal (2, 3 and 4) 2. Add DOT3 or DOT4 brake fluid from a sealed closed container into the reservoir until the fluid level is at the MAX mark. 3. Reinstall the reservoir pad, reservoir cap and handlebar cover and tighten the screws (1). SERVICE AND MAINTENANCE 29 ATTENTION: ! NOTE: -‐ TBhe efore brake riding fluid wm ith ust newly be handled installed wb ith rake care, pads, as it first can ddepress amage tthe he bprake aint slever urfaces several and ptimes lastic tpo arts. extend the brake pad fully arefilling nd restore ormal fluid, resistance, aking the fluid circulation stable. -‐ When the nbrake make m sure the reservoir is set level otherwise fluid will spill out when you remove the reservoir cap. -‐ Only use DOT3 or DOT4 brake fluid from a sealed container. -‐ Do not mix pollutants such as oil, mud or water with the brake fluid in the reservoir. -‐ Inspect that the fluid level is above the MIN mark, when resting the motorcycle in a vertical position. -‐ The brake fluid can cause soreness and inflammation to the skin. Do not allow it to come into contact with your skin and eyes. If contact is made with the skin, wash it thoroughly with water. If contact is made with the eyes, wash out with plenty of water and consult a doctor immediately. -‐ Do not mix different types of brake fluid. Brakes inspection You should check the braking system for breakages and leaks before riding. 1. Depress the brake lever several times to determine whether there is a leak. 2. Check the wear condition of the brake pads. SERVICE AND MAINTENANCE 30 Wear condition of brake pads varies according to the use of the vehicle, riding style and road conditions. Generally speaking, the brake 1: Wear mark pads may wear faster when driving on wet and dirty roads. Brake pad wear should be checked at every scheduled maintenance. In a hydraulic brake system, the thickness of brake disk and brake pad must be checked. Check the wear mark (1) on each brake pad, if one of the two brake pads is worn to the wear mark, replace both pads. If the thickness of brake disk is worn to its limit, the disk must be replaced at once. Battery This model uses a 12V 7Ah maintenance-‐free sealed battery. The battery will be prepared for use before you take delivery of the scooter. Please note the following: 1. If the motorcycle is stored for a long time, the battery must be removed and charged fully, then stored in a cool dry place. If the battery is left on the vehicle, remove the negative cable from the battery pole. 2. When removing the battery, the ignition switch should be in “ ” position and the negative cable removed. When installing, connect the positive cable first, then the negative one. 3. Battery poles erode easily. Brush them clean with a needle brush then apply a film of Vaseline or grease. 4. When installing the battery, terminal bolts must be screwed tightly. 31 ! Remove WARNING: ATTENTION: 1. the cover screw and open the battery case 1: Noegative -‐ -‐ When starting the engine, do not use the starter motor for more than 5 seconds at a time. Alternatively, the T he b attery may produce explosive gas. Keep away from any spark r flame. cable cover. 2: Battery -‐ SERVICE kick-‐starter The battery can contains be used. cid. Avoid contact with the skin or eyes. Keep away from children. A ND MaAINTENANCE 2. Disconnect the negative cable from the battery first, -‐ When the battery requires recharging, use 0.9A charging current 3: and 12.5V ccable harging voltage. Positive then t he positive cable. 3. Take the battery out of the battery case. Battery removal Electric fuse The fuse is located at the battery and can withstand up to 15A. The fuse can be rendered useless due to overloading of the electrical system or short circuiting. Switch off the main switch (turn to “ ” position) in advance to avoid a short circuit when replacing and/or inspecting a fuse. 32 ! WARNING: -‐ Use of fuses of rating other than specified may result in damage to the electrical system, loss of engine power or SERVICE even fire. AND MAINTENANCE 33 ! WARNING: -‐ Fuel is flammable. When draining and refilling the fuel tank, the engine should be switched off. CARE AND STORAGE GUIDE Long-‐term storage When stored for a long time, your scooter must be protected against moisture, sunlight and rain. Before storing, the following steps should be taken: 1. Replace the engine oil. 2. Drain the fuel completely out of fuel tank and carburettor and fill the fuel tank with anti-‐rust fluid. 3. Disconnect and remove the battery and put it in a cool place. 4. After cleaning your scooter, apply a colour fixing or preserving agent on coloured parts and grease on moving metal parts. 5. Inflate tyres to specified pressure and then lift the scooter onto blocks to keep the wheels off the ground. 6. Finally, cover your scooter. Use after storage 1. Take the cover off and clean your scooter. If the scooter has been stored for more than 4 months, replace the engine oil. 2. Recharge the battery and install it. 3. Drain the anti-‐rust fluid from the fuel tank, then refill with fuel. 4. Pre-‐operation inspection should be carried out before riding (see page 17). 34 ! ATTENTION: -‐ Washing with high-‐pressure water may damage some parts. The following parts should not be washed in this fashion: muffler end, storage compartment, main switch and speedometer. CARE WAheel ND hubs, STORAGE GUIDE Cleaning Cleaning the scooter periodically will help keeping the painting coat bright. 1. The scooter should be washed after it is stored in order to wash out the accumulated dust. The plastic parts should be cleaned with a cloth or sponge using a neutral cleaning agent. 2. After drying, let the engine run at idle for several minutes. 3. Before riding, the brakes should be inspected carefully. 35 SPECIFICATIONS Neon 50 Item Overall length (mm) Overall width (mm) Data 1856 672 Overall height (mm) 1131 Wheel base (mm) 1347 Weight with oil and fuel (kg) Max. load (kg) (including driver) Front tyre 90 Item Displacement (ml) Ignition type Max. power (kW/rpm) Max. torque (Nm/rpm) Idling speed (rpm) 165 Fuel consumption at 30km/h speed (L/100km) ≤2.0 120/70-‐12 Spark plug BPR7HS Rear tyre 120/70-‐12 Spark plug gap (mm) 0.6~0.7 Climbing ability ≥18o Engine oil capacity (L) 1.2 ≤21 m Fuel tank capacity (L) 5.0 12V 7Ah 15A High/low beam light Position light Taillight /brake light / license plate light Turn signal lights 12V-‐35W/35W 12V-‐5W 12V-‐5W/21W/5W 12V-‐10W x 4 Braking distance (m) (initial speed 40 km/h) Battery Fuse Front disc brake (mm) Rear disc brake (mm) 180 180 Data 49.2 DC CDI 25 or 30km/h speed limit 2.2 / 6500 45km/h speed limit 3.1 / 7500 25 or 30km/h speed limit 3.2 / 5500 45km/h speed limit 4.0 / 6500 1800±180 Note: All data obtained under laboratory conditions in accordance with relevant standards. 36 WIRING DIAGRAM 37