1
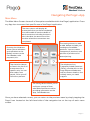
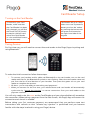
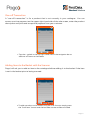
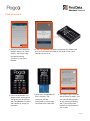
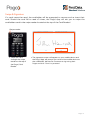
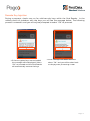
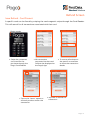
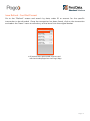
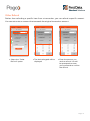
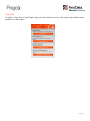
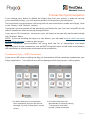
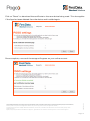
Pogo>® User Guide for iPhone®, iPad® and iPod touch® Introduction to Pogo> This document provides detailed information on how best to use the Pogo>® application to benefit your business. The intention is to convey all the necessary information about Pogo> to get you up and running and accepting credit and debit card payments. Please take the time to read this carefully to ensure that you maximise the benefits and potential of Pogo>. What is Pogo> Pogo> provides a simple and low cost solution for small to medium sized businesses to accept card payments anywhere/anytime using a smartphone or tablet device. What can Pogo> offer to your business? Quick, secure and reliable credit and debit card payment acceptance Funding received within a few days Compact, robust design and long battery life Free online account management and support materials Sign up today! Simply complete our online application form to start taking card payments. For more information, visit pogopayments.co.uk Page | 2 Table of Contents Introduction to Pogo> ............................................................................................................................................. 2 What is Pogo> ........................................................................................................................................................ 2 What can Pogo> offer to your business? ........................................................................................................ 2 Sign up today! ....................................................................................................................................................... 2 Table of Contents ..................................................................................................................................................... 3 Downloading & Installing the Pogo> App ........................................................................................................... 4 Supported Versions ................................................................................................................................................. 4 Activation & Sign In to the Pogo> App ................................................................................................................ 4 Navigating the Pogo> App ..................................................................................................................................... 5 Main Menu .............................................................................................................................................................. 5 Card Reader Setup................................................................................................................................................... 6 Turning on the Card Reader .............................................................................................................................. 6 Pairing Devices ...................................................................................................................................................... 6 Catalogue Screen ..................................................................................................................................................... 7 Adding Products to the Catalogue .................................................................................................................. 7 Sale Screen ................................................................................................................................................................. 7 Adding Items to the Basket ............................................................................................................................... 7 One-off Transaction............................................................................................................................................. 8 Adding Items to the Basket with the Scanner ............................................................................................... 8 Take a Payment..................................................................................................................................................... 9 Swipe & Signature .............................................................................................................................................. 10 Receipts ................................................................................................................................................................. 11 Remote Key Injection......................................................................................................................................... 12 History ....................................................................................................................................................................... 13 Transaction History ............................................................................................................................................ 13 Refund Screen ......................................................................................................................................................... 14 Issue Refund - Card Present ............................................................................................................................ 14 Issue Refund - Card Not Present .................................................................................................................... 15 Other Refund ....................................................................................................................................................... 16 Settings Screen ........................................................................................................................................................ 17 Device Settings .................................................................................................................................................... 17 Sign Out ................................................................................................................................................................ 18 Help Screen .............................................................................................................................................................. 19 Transaction Synchronisation ................................................................................................................................20 Transaction Sync – WIFI Connection .............................................................................................................20 Transaction Sync – Mobile Data Connection ............................................................................................... 21 Appendix A: Certificate Reset on the Online Account .................................................................................. 22 Page | 3 Downloading & Installing the Pogo> App Once you have registered as a Pogo> Merchant, you can download the Pogo> App from the App StoreSM. Select the App store from your devices home screen and proceed to download the application. Supported Versions The supported iPhone Operating Systems for Pogo> are versions 7.0 and above. NOTE: There are known issues related to Bluetooth connectivity for iOS version 7.1.2. Please check your iOS version and if its 7.1.2, we would highly recommend updating the iOS version of your device. Activation & Sign In to the Pogo> App Search for the Pogo> App in the iOS application menu, click on the App and enter your username and password. If you have forgotten your password select the "lost password" option from the log in screen and call the number presented on the screen. To start the Pogo> App, press the Pogo> App Icon The Pogo> splash screen will be displayed Page | 4 Navigating the Pogo> App Main Menu The Main Menu Screen shows all of the options available within the Pogo> application. Press any App Icon to access that specific area of the Pogo> application. The History Button will display all transactions that you have completed. You will be able to see the details of each transaction including the items sold, the date, the amount and the location where the transaction was completed. The Catalogue Button is used to add, delete and edit your catalogue of available products. You can create categories of products, add pictures of products and amend pricing. Pressing the Sale Button allows you to add items and quantities to the Basket connect to the Card Reader, take payments, etc. Tap the Refund Button to search the list of all transactions for a specific sale. You can then select from partial, full or one off refunds to perform. The Help Button lists Frequently Asked Questions (FAQs), provides links to the Pogo Payment Website as well as contact details in the unlikely event you need support. The Settings Button allows you to configure a range of User selectable features as well as providing information on the App, Card Reader etc. Once you have selected a menu, you can return to the previous menu by simply tapping the Pogo> Icon located at the left-hand side of the navigation bar at the top of each menu screen. Page | 5 Card Reader Setup Turning on the Card Reader To switch on your Card Reader, make sure that the Card Reader has been fully charged, you will find the Power On/Off button located on the left-hand side of the Card Reader (it’s the small black button set into the case). The Reader will go to ‘sleep’ when not in use to preserve battery and can be ‘woken’ by pressing the button with the green tick located on the right-hand side of the keypad. Pairing Devices For first time use, you will need to connect the card reader to the Pogo> App via pairing and using Bluetooth™. To make the initial connection follow these steps: 1. To connect your handset and/or tablet via Bluetooth® to the card reader, turn on the card reader and wait for the Bluetooth® symbol to start flashing. Select the card reader name and pair from the list of local devices on your handset. Then press the green tick on your card reader to complete the process. 2. All done - you’re now ready to start taking card payments! 3. When you transact for the first time, your mobile device and card reader will automatically synchronise by “remote key injection” to secure connections from your card reader to the payment networks. You will only need to do this once as the Card Reader and your phone/tablet will remember the connection. When taking a payment from the Sale Screen, the Pogo> App will restart this connection each time it is needed. Before taking your first customer payment, we recommend that you perform some test transactions and refunds so that "remote key injection" is performed and you become familiar with the steps involved in using your Pogo> device. Page | 6 Catalogue Screen Adding Products to the Catalogue The Pogo> application enables you to store information about your products within the catalogue such as: description, price, photos and the product barcode. Sale Screen Adding Items to the Basket You can click and search for the name of a particular product in your catalogue in the sale screen by clicking on "Add Item" and selecting the item that you want to add. Press the “Add Item” button to enter more Items to the basket Page | 7 One-off Transaction A “one-off transaction” is for a product that is not currently in your catalogue. You can access one-time payment on the upper right-hand side of the sale screen, enter the product description and price and accept the payment from your customer. Tap the + symbol in the top right-hand side of the navigation bar to add one-off Items to the basket Adding Items to the Basket with the Scanner Pogo> will ask you to add an item to the catalogue before adding it to the basket if the item is not in the basket prior to being scanned. To add a product to the basket using the scan function simply press the “Scan Item” button and the barcode scanner will be activated Page | 8 Take a Payment Once you have built the basket select the “Next” option, the Pogo> App will automatically connect to the Card Reader If the Card Reader has been powered-off, please use the On/Off button located on the side of the Card Reader to turn it on If the Card Reader is in sleep mode, simply push the green tick button on the Card Reader to wake the reader up ready for payment Hand the Card Reader to the customer. The customer will be prompted to insert their card and enter their PIN The Pogo> App will track the processing steps; you can cancel the payment at any time by pressing the “Cancel Payment” button at the bottom of the screen Page | 9 Swipe & Signature If a card cannot be read, the cardholder will be prompted to remove and re-insert their card. Should the card fail to read x3 times, the Pogo> App will ask you to swipe the cardholders card in the swipe reader located at the top of the Card Reader*. *Swipe reader Swipe the card through the swipe reader at the top of the Pogo> Card Reader The signature screen will appear on your mobile device and the Pogo> App will prompt you to hand the mobile device to the cardholder. Advise the customer to sign using their finger and click “Save” to proceed Page | 10 Receipts Once a payment has been made, you can send an electronic receipt to the customer by using the “Would you like a receipt?” functionality which appears after the payment has been approved. Simply enter your customer’s email address and select “Yes” and then click “OK” to continue. If a customer requests a receipt after the payment has been completed, go into the “History” menu, search for the specific transaction, select the “Details” option and input the customer’s email address. This can also be found in the “Refund” screen of the Pogo> App. Page | 11 Remote Key Injection During a payment, checks are run for valid security keys within the Card Reader. In the unlikely event of problems with the keys you will see the message below. The following process is automatic and you will only be prompted to select “OK” to proceed. If the encryption keys are not loaded this message will be displayed. Select “OK” to proceed and the Card Reader will automatically retrieve the keys Once the keys have been retrieved select “OK” and you will be taken back to the payment processing screen Page | 12 History Transaction History All transactions are stored within the Pogo> App and can be reviewed by selecting the “History” button on the Main Menu screen. Select the “History” button on the Main Menu screen By selecting the “Items” option, a list detailing each item in that specific transaction is listed All transactions will be listed here. To search for a specific customer transaction, simply enter the last four digits of their card The Pogo> App uses Geo-tagging which shows the location where the transaction took place Once you have selected a specific transaction, you can view detailed information about the transaction by selecting one of the options at the top of the screen You can resend the receipt to the merchant by using “Options” in the “History” screen Page | 13 Refund Screen Issue Refund - Card Present A specific card can be found by swiping the card magnetic stripe through the Card Reader. This will search for all transactions associated with that card. *Swipe reader Swipe the customers card used for the purchase through the Pogo> Card Reader All transactions processed via that card will then be displayed on the Pogo> App Tap on the “Items” option to show all products within the transaction To start a refund tap on the specific transaction to show the transaction details Tap here to refund the transaction Page | 14 Issue Refund - Card Not Present Go to the "Refund" screen and search by date, order ID or amount for the specific transaction to be refunded. Once the transaction has been found, click on the transaction and select the "Items" menu to refund any of the items from the original basket. All transactions processed via that card will then be displayed on the Pogo> App Page | 15 Other Refund Rather than refunding a specific item from a transaction, you can refund a specific amount. You cannot enter an amount that exceeds the original transaction amount. Select the “Other Refund” option The device keypad will be displayed Enter the amount you wish to refund. You will be prompted to enter your password to confirm the refund Page | 16 Settings Screen To access the “Settings” Menu, select the “Settings” button on the Main Menu screen. Select the “Settings” option from the Main Menu. To turn on/off any setting select the check box To access the “Application Settings” Menu, select the "Settings" button on the Main Menu screen and scroll down to the “Application Settings” section. Information in this section is non-configurable and used for support services - you may be asked to provide these details when speaking to our Merchant Support Services. Device Settings To access the “Device Settings” Menu, select the “Settings” button on the Main Menu screen and scroll down to ”Device Settings”. Page | 17 Sign Out In order to Sign Out of the Pogo> App, you will need to click on the upper right hand corner padlock on the screen. d r e Page | 18 Help Screen To access the “Help” Menu, select the “Help” button on the Main Menu screen. Tap on the “Help” button to access a range of Frequently Asked Questions (FAQs) Page | 19 Transaction Synchronisation If you change your device or delete the Pogo> App from your phone, in order to recover your transaction history, you will need to perform a transaction synchronisation. The transaction synchronisation will bring back all past transactions made with Pogo>, both in the “History” and “Refund” screens. Transaction synchronisation will be seamlessly performed for you if you are using Wifi as the default connection when accessing the application. If you are on 3G connection, transaction sync will need to be manually performed through the “Settings” Menu. NOTE: If you are installing the App on a new device, you will need to do a certificate reset on the online account in order to gain access. NOTE2: Transaction synchronisation will bring back the list of transactions and detail regarding each of the transactions, but will NOT bring back each of the items associated to the transaction or the location associated to the transaction. Transaction Sync – WIFI Connection If you are on Wifi when installing the App, all transactions will be seamlessly updated on your Pogo> application. Two notifications will be displayed while the process is taking place: On Wifi transaction synchronisation starts seamlessly and you will see the message “Syncing Transactions” on the screen Once all transactions are downloaded, a message stating “Transactions have been synced” will be presented Page | 20 Transaction Sync – Mobile Data Connection If you are not on Wifi when installing the App, the transactions will not synchronise automatically and you will need to manually activate the synchronisation of the transactions. In order to synchronise transactions, you will need to go to “Settings” and click “Accept” to continue with the process using your data connection. Select “Synchronise Transactions” in the “Settings” Menu Accept the usage of your mobile data to download transactions Page | 21 Appendix A: Certificate Reset on the Online Account When a new device is used for Pogo>, you will need to access the online account and perform a certificate reset in order to enable Pogo> to grant you access to the App on the new device. Access your online account, and click on “Administration” in the dashboard. Once you reach the “Administration” Menu, click on “Reset certificate download failed attempts”. Page | 22 Click on “Reset” to download the certificate to the new device being used. This also applies if the App has been deleted from the device and installed again. First Data Merchant Solutions is a trading name of First Data Europe Limited, a private limited company incorporated in England (company number 02012925) with a registered address at Janus House, Endeavour Drive, Basildon, Essex, SS14 3WF. First Data Europe Limited is authorised by the UK Financial Conduct Authority under the Payment Service Regulations 2009 for the provision of payment services (FCA register No. 582703). © 2015 First Data Corporation. All Rights Reserved. All trademarks, service marks, and trade names referenced in this material are the property of their respective owners. Apple, the Apple logo and iPhone are trademarks of Apple Inc., registered in the U.S. and other countries. App Store is a service mark of Apple Inc. 21960 (6681)/0315 Once complete, a successful message will appear on your online account. Page | 23 © 2013 First Data Corporation. All Rights Reserved. All trademarks, service marks, and trade names referenced in this material are the property of their respective owners.