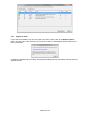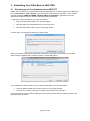
1
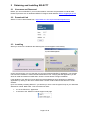
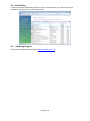
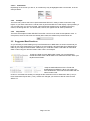
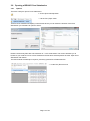
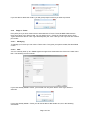
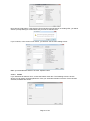
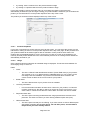
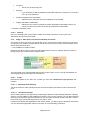
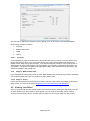
SELECTT User Guide
Date
09 July 2015
Version
1.6.0.1
Document Status
Sixth Release
Author
CMU
Page 1 of 32
Contents
1
2
3
Overview ......................................................................................................................................... 4
1.1
Technology Used ...................................................................................................................... 4
1.2
Minimum System Requirements ............................................................................................... 4
Obtaining and Installing SELECTT ................................................................................................. 5
2.1
Username and Password ......................................................................................................... 5
2.2
Download Link .......................................................................................................................... 5
2.3
Installing .................................................................................................................................... 5
2.4
Uninstalling ............................................................................................................................... 6
2.5
Obtaining Support ..................................................................................................................... 6
Using SELECTT .............................................................................................................................. 7
3.1
Opening SELECTT and Logging On ........................................................................................ 7
3.2
Exiting the Application .............................................................................................................. 7
3.3
Initial Screen and Menus .......................................................................................................... 8
3.3.1
The Menus ......................................................................................................................... 8
3.3.2
The Buttons ..................................................................................................................... 10
3.4
3.4.1
Additional Information ...................................................................................................... 11
3.4.2
Mandatory Fields ............................................................................................................. 11
3.4.3
Invalid Entries .................................................................................................................. 11
3.4.4
Prompts ........................................................................................................................... 12
3.4.5
Drop Downs ..................................................................................................................... 12
3.5
Suggested Best Practices ...................................................................................................... 12
3.6
Opening a BRAVO Price Submission..................................................................................... 13
3.6.1
Options ............................................................................................................................ 13
3.6.2
Tender Details ................................................................................................................. 14
3.6.3
Opened ............................................................................................................................ 14
3.6.4
Suggested Offer Flow Process........................................................................................ 14
3.7
4
General Conventions .............................................................................................................. 11
Saving a Price Submission ..................................................................................................... 15
3.7.1
Menus .............................................................................................................................. 15
3.7.2
Offer Wizard .................................................................................................................... 15
Making your Offer .......................................................................................................................... 17
4.1
Suggested Process Flow to complete your tender ................................................................. 17
4.1.1
Stage 1 - My Contacts ..................................................................................................... 17
4.1.2
Stage 2 - Terms ............................................................................................................... 19
4.1.3
Starting or Continuing the Offer Process ........................................................................ 22
4.1.4
Stage 3 - NHS CMU Product Selection ........................................................................... 22
4.1.5
Stage 4 - Your Product .................................................................................................... 24
4.1.6
Stage 5 - Offer Prices, Volume Price Breaks and Terms ................................................ 26
4.1.7
Stage 6 - Manufacturing Lead Times .............................................................................. 28
4.1.8
Stage 7 - Offer Summary ................................................................................................ 28
Page 2 of 32
4.1.9
4.1.10
4.2
Stage 9 - Finish ............................................................................................................ 29
Viewing Your Offers ................................................................................................................ 29
4.2.1
5
Stage 8 - Make another offer........................................................................................... 29
Export To Excel ............................................................................................................... 30
Submitting Your Offer Back to NHS CMU ..................................................................................... 31
5.1
Exporting your Price Submission from SELECTT .................................................................. 31
Page 3 of 32
1 Overview
SELECTT is NHS CMU's “Supplier ELECtronic Tender Tool“ enabling Pharmaceutical Suppliers to
make price submissions (‘offers’) against NHS CMU Pharmacy Tenders.
SELECTT is a Microsoft Windows application that is installed locally onto your computer via a secure
web link. An Internet connection is required to install the application and then every time you use it.
Because of SELECTT's Internet capability NHS CMU is able to provide updates as and when
required.
1.1
Technology Used
SELECTT uses proprietary Microsoft technology called ClickOnce that addresses the following
objectives:
•
Ability to run application offline
•
Rich end user experience
•
Stronger security
•
Increased performance and scalability
•
Self Updating
•
Self Contained
ClickOnce applications are easily deployed and managed (much like a web application) but have the
rich responsive user interface users expect from Windows desktop applications.
1.2
Minimum System Requirements
To install SELECTT you need the following prerequisites:
Windows 8 / 8.1
With .NET Framework 3.5 SP1 – see http://msdn.microsoft.com/enus/library/hh506443.aspx
Windows Vista / Windows 7
Windows XP
With .NET Framework 2.0 SP2 or .NET Framework 3.5 SP1
Windows Server 2012 R2
With .NET Framework 3.5 SP1
Windows Server 2012
With .NET Framework 3.5 SP1
Windows Server 2008 R2 SP1 / Windows Server 2008 SP2 / Windows Server 2003
•
Active Internet connection
The application install has been tested against:
•
Microsoft Internet Explorer 7+, Firefox and Chrome
Page 4 of 32
2 Obtaining and Installing SELECTT
2.1
Username and Password
Before you can use SELECTT you must first obtain a username and password from NHS CMU.
Please request this via our dedicated SELECTT Support email address [email protected]
2.2
Download Link
SELECTT can be downloaded from https://www.cmu.nhs.uk/phacter/selectt/publish.htm
2.3
Installing
When you click on the install link the following two screens appear consecutively:
On the second screen you can see that you can now install the SELECTT application. You will also
notice that the Publisher is ‘NHS Commercial Medicines Unit’ verifying that the application you are
about to install is indeed from NHS CMU. Click the ‘Install’ button to begin installation.
If the details are not ‘SELECTT’ and ‘NHS Commercial Medicines Unit’ please do not install the
application by clicking on the ‘Don’t Install’ button. Please contact CMU via the SELECTT email
address.
Upon successfully installing SELECTT you will find you have a new Program Group in your Windows
Start Menu named ‘NHS CMU’. This will contain two links:
•
to run the ‘SELECTT’ application
•
a web link to the ‘SELECTT online support’ web page
Page 5 of 32
2.4
Uninstalling
As with conventional applications SELECTT can be uninstalled from your computer using the
Add/Remove Programs icon in the Control Panel.
2.5
Obtaining Support
Please use our dedicated email address [email protected]
Page 6 of 32
3 Using SELECTT
3.1
Opening SELECTT and Logging On
You have now successfully downloaded SELECTT to your local computer.
To run the application navigate to your Windows Start menu -> All Programs-> NHS CMU ->
SELECTT.
As SELECTT is a ClickOnce Application it always checks to ensure that the latest version is installed.
If a new version is available you must install it as shown below.
You do have the option to install it at a later date but you will be unable to use SELECTT again until
the latest version is installed.
Logging into SELECTT requires you to have an active Internet connection. This is so your logon
credentials can be validated. If your credentials are invalid you will not be able to logon.
The logon screen requires you to enter the Username and Password. These are case sensitive so
please enter them carefully before clicking the ‘Logon’ button. To provide an extra layer of security
your Password will be masked with asterixes.
If your logon credentials are invalid you will shown an appropriate message. (For security we will not
tell you which part of your credentials were invalid.) If you are unable to logon please contact NHS
CMU for support. This can be done by clicking on the ‘Logon Help / Forgotten password’ link at the
bottom of the logon screen which will create a new email to SELECTT support
[email protected].
During the logon process you will be shown feedback on the current action being performed. If your
logon is successful you will be shown the main SELECTT Window.
3.2
Exiting the Application
To exit SELECTT navigate to ‘File -> Exit’
Page 7 of 32
3.3
Initial Screen and Menus
Following a successful logon the main SELECTT Window will be shown. This will have the look and
feel of a standard Windows application.
You will notice that your Supplier Name is displayed at the top left hand side of the Menu bar (here
‘Quick Medicines’ is shown).
Below this are a series of Menus and Icons that will allow access to the various parts of SELECTT.
Until you have loaded a Tender/Price Submission some of these will be greyed out. These are only
relevant once you have opened a file and will not be activated until then.
3.3.1
3.3.1.1
The Menus
File Menu
The ‘File’ menu is used to Open, Close and Export your Price
Submission. You can also Exit SELECTT. Once you have opened a
file, it is then available via the ‘Recent Price Submissions’ menu.
3.3.1.2
Edit Menu
The ‘Edit’ menu is used to provide common shortcuts for Cut, Copy, Paste
and Select All. You can use the standard shortcut keys, as shown, within
textboxes.
3.3.1.3
My Contacts Menu
The ‘My Contacts’ menu provides a way of accessing the contacts that can be
assigned to, or used in, the currently opened Price Submission. You have the option
to Add, Edit and Delete a contact. This will be covered in My Contacts
3.3.1.4 Terms Menu
Page 8 of 32
The Terms menu provides access to any Terms you have created. You have the option to Add, Edit
and Delete. This will be covered in Terms
3.3.1.5
Price Submission Menu
The Price Submission menu allows you to start / continue your offer process. SELECTT will establish
which menu to show depending on the state of the currently opened Price
Submission. This will be covered in Making your Offer
3.3.1.6
My Offers Menu
This menu is only enabled if you have started at least one offer. Unlike the other menus it
has no dropdowns. Instead, as soon as you click on it a screen is shown with all your current offers.
This will be covered in My Offers.
3.3.1.7
Help Menu
The ‘About’ menu item provides information about SELECTT.
The ‘Terms And Conditions’ option shows SELECTT’s Terms and
Conditions.
‘About Tender’ displays the NHS CMU Tender Header information for
the currently opened Price Submission.
‘Online User Guide’ opens the SELECTT webpage, where you can view the user guide.
3.3.1.7.1
About
This provides basic details about SELECTT, including the current version.
There is also a link to the SELECTT webpage and an option to create an email to NHS CMU by
clicking on the ‘Support Email’ link.
Page 9 of 32
3.3.1.7.2
About Tender
This provides an overview of the Tender for which the currently opened Price Submission is for. It
includes the Tender header information (Code, Description), Start Date and End Dates of the
framework, CMU Contact Details, the Lots and Buying Groups in the Tender and any Award Criteria.
3.3.2
The Buttons
In addition to the menus, there is also a series of shortcut icons (buttons) that can be used for
common tasks.
3.3.2.1
Open
This is used to open a Price Submission file.
3.3.2.2
Save
This is used to save your Price Submission.
Please note that when you are in midway through the offer wizard, the save button is disabled.
Instead, you must use the ‘Save and Continue’ button to save your Price Submission.
3.3.2.3
My Offers
This button is only enabled if you have made at least one offer. When you click on it a list of your
existing offers is shown. This will be discussed in My Offers.
3.3.2.4
Export
Once you have a fully completed Price Submission/Offer this button can be used to export your
data. This will be covered in Exporting your Price Submission from SELECTT
3.3.2.5
Start / Continue Offer Process.
This allows you to Start or Continue the Offer Process. SELECTT will establish which button to
show depending on the state of the currently opened Price Submission. This will be discussed
in Making your Offer
Page 10 of 32
3.4
General Conventions
SELECTT has been designed to follow standards for Windows applications and will therefore take on
any colours/appearance styles you have used for your Windows environment. Note that the font used
by SELECTT will remain consistent regardless of your Windows settings.
3.4.1
Additional Information
On certain screens there may be additional information available. Such information can be accessed
via any of the
icons by hovering your mouse over it. A small popup (tooltip) will be displayed with
additional information, as in this example:
3.4.2
Mandatory Fields
For screens that have mandatory fields that need to be provided these will be highlighted in bold on
the screen.
In the example below, the First Name, Last Name and Phone Number or Fax Number are shown in
bold indicating that they are mandatory fields. In this case you will be unable to Update the record
until there are entries in each of these fields.
3.4.3
Invalid Entries
To maintain consistency, and to prevent incomplete Price Submissions being returned to NHS CMU,
SELECTT will ensure that entries you do make are valid and in the correct format. When entries are
invalid, missing or in the incorrect format, SELECTT will highlight these to you as below.
3.4.3.1
Error Icon
If you try to save and continue when you haven’t entered required information, a small flashing icon
will be displayed against each missing field. You can hover over this icon with your mouse to get
additional information, as in the example below, which will explain what is required to complete this
field correctly:
Page 11 of 32
3.4.3.2
Red Border
Depending on the screen you are on, an invalid entry may be highlighted with a red border, as in the
example below.
3.4.4
Prompts
There are many actions that can be performed within SELECTT. Many of these could have a big
impact on your Offer. Whenever a critical action is performed SELECTT will display a prompt asking if
you are really sure you want to proceed. This should stop accidents such as deleting the wrong
contact, the wrong offer etc. You should still, however, be vigilant with all actions performed.
3.4.5
Drop Downs
There are several places within SELECTT that offer a choice to be made via a dropdown menu. In
such places, where a choice has not already been made, the default entry will be shown as:
3.5
Suggested Best Practices
As you are likely to make making many Price Submissions to NHS CMU we would recommend you
keep all your Price Submissions in one place, such as making a ‘My NHS CMU Price Submissions’
folder in you’re My Documents folder. Within this you could then create a sub-folder for each NHS
CMU Tender using the relevant Tender Code. Here is an example:
Create one folder for each NHS CMU Tender you are interested in.
Create this folder within a NHS CMU Price Submissions folder within your
My Documents folder.
Keep the default filename for the Tender file
downloaded from BRAVO. When you export your
Price Submission, save it back to the folder with the
same Tender Code.
Under no circumstances should you change the file extensions of Price Submission files (*.xml) or
Price Submission Export files (*.cmu). If these are changed you will not be able to use them with
SELECTT.
Page 12 of 32
3.6
3.6.1
Opening a BRAVO Price Submission
Options
There are 3 ways to open a Price Submission:
<- via the Open toolstrip button
<- via the File | Open menu
These first two methods will display a new window where you can select the location of the Price
Submission you would like to open as shown:
Please note that only files with a file extension of “*.xml” will be listed. This screen will allow you to
browse to your local file. Once a Price Submission file has been selected please click the ‘Open Price
Submission File’ button.
The third method will attempt to reopen a previously opened Price Submission file.
<- via the File | Recent menu
Page 13 of 32
3.6.2
Tender Details
Once a Price Submission file has been selected you will be presented with a preview screen
summarising Tender information. This allows you to verify that you are opening the correct file. There
is the option to continue opening the submission file (‘Yes’) or not (‘No’).
3.6.3
Opened
Once a Price Submission file has been opened the SELECTT window will be shown again but this
time with any previously disabled menus now enabled.
3.6.4
Suggested Offer Flow Process
Making a Price Submission against a NHS CMU Tender can be complicated. For this reason we
suggest you use the following systematic approach:
Stages
1. Contacts. We would suggest entering your contacts first. Currently two contacts can be used
within a Price Submission:
•
the Tender contact
Page 14 of 32
•
the Order contact for all Terms that use a Direct distribution route
If you don’t specify these first SELECTT will prompt you when it needs them.
2. Terms. It is then best to enter all your Terms. Because some Terms require contact
information, such as those using a Direct distribution route, you can easily select from those
contacts you have already entered.
You can now begin the Price Submission Wizard. The wizard will only let you enter your offer in the
correct sequence, so you don’t have to worry about missing something out. Because some Tenders
require specific information, such as Volume Price Breaks or Manufacturing Lead Times, SELECTT
will only show those screens or elements when they are required as part of your tender submission.
3. Product Selection. Now go through and select all the products you would like to make an
offer against.
4. Your Product Details. Now click on each product you have selected to begin making your
offer. First you need to enter your products details.
5. Offer Prices, Volume Price Breaks & Term Assignment. Now enter your offer prices,
volume price breaks if applicable, and Terms for your product.
6. Manufacturing Lead Times. If applicable, enter your manufacturing lead times. This is your
delivery lead time based on the date the order was raised by a Trust.
7. Offer Summary. Review your product offer
8. When you get to the end of an offer, you have the option to make another offer, or Export.
9. Finish
3.7
Saving a Price Submission
When you use SELECTT you interact with it in one of two ways either via the Menus or by using the
Offer Wizard.
3.7.1
Menus
You can Add / Edit / Delete both Terms and Contacts via the appropriate menu. Whenever you make
a change SELECTT keeps track of it. When you close or exit SELECTT if any changes were made
you will be asked if you want to save these changes:
If you do not choose Yes any changes made via the menus will be lost.
3.7.2
Offer Wizard
The main screens within SELECTT are used via the Start/Continue Price Submission options. As
soon as you select this option, a wizard style interface is opened, starting with stage 1 and allowing
you to continue until you have made a complete offer against a product. These screens all share a
common footer containing buttons to navigate back and forth between these stages. These are shown
below:
Once in the Wizard, your changes are automatically saved when you click the ‘Save & Continue
button’ (or the ‘Finish’ button if available).
If the ‘Previous’ button is available, and you click it, you will lose any changes made in the current
stage. You also have the option ‘Cancel’ at any point of the Wizard. If you click this button you will
lose all changes made whilst in the wizard, not just the current stage. If you click the Previous or
Cancel buttons you will receive a prompt indicating that any changes made will be lost, giving you the
option to continue or not:
Page 15 of 32
The ‘Finish’ button is only available on the first and last stages of making your offer. Clicking on it will
take you to the export stage, covered in the section Exporting your Price Submission from SELECTT.
Page 16 of 32
4 Making your Offer
4.1
Suggested Process Flow to complete your tender
4.1.1
4.1.1.1
Stage 1 - My Contacts
Tender Contact
As part of your offer you must specify a contact for this Tender. This will be the details of the person
NHS CMU should contact if they have any queries with your Price Submission. You are only allowed
to allocate one Tender Contact per tender.
4.1.1.2
Order Contact
An Order Contact is required for any Term that uses a distribution route of Direct. If you have more
than one direct Term then the same contact will be used for all.
4.1.1.3
Managing
To manage your contacts you can use the ‘My Contacts’ menu. This gives you options to Add, Edit
and Delete a contact.
4.1.1.4
Add
You can currently enter up to two contacts against a single Price Submission file – a Tender contact
and an Order contact. Click on the ‘Add’ menu item. The following screen is shown:
Enter the details of the contact, and then check whether or not they are the Tender Contact, Order
Contact (or both!). If you do not specify this now then SELECTT will prompt you later when contacts
are required.
If you have already entered 2 contacts you will not be able to add another one. The following screen
will be shown:
4.1.1.5
Edit
To edit an existing contact, click on the ‘Edit’ menu item. The following screen is shown where you
can select via the dropdown the contact you would like to edit:
Page 17 of 32
Select the contact you want to make from the drop down, and click the ‘Edit’ button. The following
screen displays:
Make the necessary amendments the click ‘Update’. To cancel out of the window or disregard your
changes click ‘Cancel’. Please note you can only assign the current contact as the Tender or Order
Contact if they are not already those. If you do this and they are assigned to another contact, you will
get a prompt as below:
4.1.1.6
Delete
If you would like to delete a contact, choose the Delete menu item. The following screen is shown
where you can select via the dropdown the contact you would like to delete. Once a Contact has been
selected, their details are displayed.
If the contact is assigned as the Order Contact you will not be able to delete it until you have assigned
another contact as the Order Contact, as in the following screen:
Page 18 of 32
If you are able to delete the contact, you will get a prompt to ensure you want to proceed.
4.1.2
Stage 2 - Terms
Every offer price you enter must have an associated set of Terms. These let NHS CMU know the
terms upon which your offer is made. You can assign up to 7 Terms per Tender with varying Term
Types. Note that a ‘Stores’ Term Type will always be your Term 7 and you can only have one of these
per Tender.
4.1.2.1
Managing
To manage your Terms you can use the Terms menu. This gives you options to Add, Edit and Delete
a Term.
4.1.2.2
Add
You can currently enter up to 7 Terms against a single Price Submission file. Click on the ‘Add’ menu
item. The following screen is shown:
If you have already added 6 Terms, your seventh can only be a ‘Stores’ Term Type, which is
enforced.
If you have already added 7 Terms you will not be able to add another one, as in the following
screenshot:
Page 19 of 32
4.1.2.2.1
•
Fields
Term Type*
o
This is the distribution route for the Term. Because you can only have one Stores
Term if this has already been setup it will not appear as an entry. Once you have
selected a Type from the drop down, additional fields may become visible to the right.
These are:
o
Order Contact*
If the Term Type uses a distribution route of Direct, you will need to enter your
Order Contact.
o
Distributors*
If the Term Types use a distribution route of Distributor, you will need to enter the
distributors that can be used, up to a maximum of 6.
•
Term Number
o
•
Lead Time*
o
•
Whether or not you can accept electronic orders
E Invoicing*
o
•
Information on delivery charges
E Ordering*
o
•
This is your minimum order value to supply a product(s)
Delivery Charge Info
o
•
This is your lead time to fulfil a request to supply a product.
Min. Order Value
o
•
This is the number for the Term and is automatically generated using the next lowest
number available.
Whether or not you are able to generate electronic invoices
Additional Information
o
Any additional information you would like to enter, up to 300 characters.
* : Denotes a mandatory field. Order Contact and Distributors only mandatory if the relevant Term
Type is selected.
4.1.2.3
Edit
To edit an existing Term, click on the Edit menu item. The following screen is shown where you can
select via the dropdown the Term you would like to edit. Once the Term has been selected its details
are shown.
Page 20 of 32
Now click the ‘Edit’ button. If the selected Term has been used as part of an existing offer, you will be
shown a prompt asking for confirmation that you want to edit this Term:
If you continue, or the screen is not shown, you will then see the main editing screen:
Make your amendments and then click the ‘Update’ button.
4.1.2.4
Delete
If you would like to delete a Term, choose the Delete menu item. The following screen is shown
where you can select via the dropdown the Term you would like to delete: Once the Term has been
selected, its details are shown.
Page 21 of 32
If the Term has not been used as part of an existing offer you will get a confirmation prompt. If the
Term has been used against an existing offer, you will be given a warning that you cannot delete a
Term that forms part of an offer, as below:
4.1.2.5
Term Types
Whenever you choose a Term Type of ‘Store’ it will default to Term Number 7. This is by design and
cannot be changed. As you can only have a single ‘Store’ Term per Price Submission once you have
added one you it will no longer appear for selection in the Term Type dropdown.
4.1.3
Starting or Continuing the Offer Process
Now that you have setup your Contacts and Terms, you can now begin making your offers. You can
do this by using the Price Submission menu, or the ‘Start / Continue’ button.
4.1.4
Stage 3 - NHS CMU Product Selection
The stage begins the offer wizard. You begin by selecting the products you are interested in making
an offer against. There are several ways you can select products to help make the selection as easy
as possible.
4.1.4.1
Filtered Searching
Because the number of NHS CMU Products being tendered may be large, SELECTT has a simple
and quick way of filtering the products so they are more manageable. You can either showing
Products starting with a certain letter, or find them by using a freetext search.
4.1.4.1.1
Product Letter
As soon as you enter this screen a listing of letters is displayed showing the first letter of all products
within the tender. By clicking on the appropriate letter you can filter the product dropdown to only
show products starting with this letter that are not currently selected. As soon as you click on a letter it
is marked with an underscore, and you will be shown a prompt indicating if any products were found
that have not already been added to your basket. The following screenshots show where the letter B
has been selected.
4.1.4.1.2
Freetext Search
You can enter any freetext you like and it will be looked for in the Product name when you click ‘Find’.
Page 22 of 32
4.1.4.1.3
Adding all Filtered Products
If you would like to add all the Products found using one of the filters, click the ‘Add all Filtered
Products to Basket’ button. Note this button is only enabled if you have clicked on a Product letter or
searched using the free text option, and then only if filtered products were found that are not already
in your basket.
4.1.4.2
Unfiltered Searching
If you would like to show all products not currently selected, click the ‘Show All’ button and all
Products not currently selected will be shown in the products dropdown. Alternatively if you would like
to add all products not selected click the ‘Add all Products to Basket’ button.
4.1.4.3
Product Dropdown
All Products that match the current search criteria (filtered or unfiltered) which have not already been
added to your basket are shown in the product dropdown. From this dropdown you can select any
single Product and use the ‘Add to Basket’ button to add it to your basket.
4.1.4.4
Cherry Picking
If you would like to add a number of products at once you can “cherry pick” those you are interested in
by clicking the ‘Cherry Pick Products’ button. This opens a new screen showing all the Products that
were in the product dropdown. Click the checkbox in the last column for each Product you are
interested in, as in the screenshot:
Once you have selected all the Products you want to cherry pick, click ‘Add to basket’.
4.1.4.5
Product Basket
At the bottom of this screen is a list of all the Products you have currently selected, which is known as
your Product Basket. For each selected Product you can see its ‘Status’, view its ‘Offer Summary’,
and directly jump to its offer. There is also a counter showing how many products you have selected.
4.1.4.6
Jump to Your Product
If you would like to quickly jump to a particular Product’s offer, click the Product name. This will take
you to the Product entry screen, covered in the section Your Product
Page 23 of 32
4.1.4.7
View Summary
For all Products in your Basket that have an offer against them, an icon will appear in the Summary
column. Clicking on this icon will show a screen detailing the offer details entered. This is covered is
the section Viewing Your Offers
4.1.4.8
Sorting
You can sort your Basket by clicking on one of the following column headings.
•
Status
•
Product
•
Pack Size
•
NPcode
As you do your Basket is sorted by that column, the sort direction being indicated by a small up or
down arrow at the right hand side of the column heading. In the following screenshot the Product
column has been sorted in ascending order:
4.1.4.9
Offer Status
The first column of your basket shows the current status of your offer for each product. It is colour
coded as follows:
Green
Has fully completed offer
Amber
Has partially completed offer
Red
No offer made
For a reminder of these hover your mouse over the coloured icon for a helpful tooltip.
4.1.4.10 Removing a Single Product Offer
To remove a single Product offer from your basket, click on the ‘Remove’ icon in the right hand
column. You will be prompted for confirmation before the delete occurs. By confirming the deletion,
your offer for that product will be permanently deleted, so proceed with caution.
4.1.4.11 Removing all Products Without an Offer
If you would like to remove all Products from your basket that do not currently have an offer, click on
the ‘Remove Products without an offer’ button at the bottom of your basket.
4.1.4.12 General
If you add all the available Products to your basket all the searching and adding controls will become
disabled. They will only be enabled again once you have removed a product from your basket.
Once you have selected all the Products you are interested in please click ‘Save & Continue’ button to
be taken to the next stage, Your Product. When you click this button your Price Submission will be
automatically saved for you, and you will no longer be able to manually save.
4.1.5
Stage 4 - Your Product
This stage is where you enter the details of your actual product offer for the currently selected NHS
CMU Product (for example you may be offering a different pack size to that requested). You can
arrive at this screen by one of two ways:
Page 24 of 32
•
by clicking ‘save & continue’ from the product selection stage
•
by clicking on a product Name from the product selection stage
If you have arrived by clicking a product name in your basket, the fields on the screen are
automatically enabled and you can begin entering your product details. Otherwise you must select the
product you are interested in via the product dropdown at the top of the screen.
The product you clicked on will be displayed at the top of the screen.
4.1.5.1
Product Dropdown
If you have not clicked on a product name to arrive at this screen, you can select the product you are
interested in making an offer on via the product dropdown at the top of the page. All the products from
your product basket will be listed, together with an indication of each products offer status. The
products are sorted alphabetically by name. As soon as you click on an item in the dropdown, any
currently entered product details are reset. If the selected product has an existing offer its details are
automatically entered for you.
4.1.5.2
Usage
Once a product has been selected, its estimated usage is displayed. This shows the breakdown for
each Buying Group in each Lot.
Fields
•
GTIN*
o
•
Brand Name
o
•
Licence information will either be the licence number for your product, or if this has
not been received yet, the date on which you expect to receive your licence. If you
enter a date, it cannot be less than the current date. CE marks can also be added.
Requested Pack Size
o
•
This is the brand name of your product if one is available.
Licensing Information*
o
•
This is the “Global Trade Identification Number” (former EAN code) of your product.
This consists of 13 or 14 digits and will be validated before you can continue to the
next stage. Note this validation only ensures the GTIN has been entered in the
correct format not that it is the correct code for your product.
This is the pack size being tendered and the usage quoted will be relevant to this
pack size. This does not restrict you from offering a different pack size (next).
Offered Pack Size*
o
This is the pack size that you are offering. If you have chosen to offer a different pack
size please remember that all your prices, list and offer prices, should relate to
the pack size you have actually offered
Page 25 of 32
•
List Price*
o
•
Remarks
o
•
If you would like to add any additional information about your product you can enter it
here, up to 30 characters.
Products Registered on PharmaQC*
o
•
This is your product’s list price.
Indicates if your products have been registered on PharmaQC.
Images Uploaded to PharmaQC*
o
Indicates if your product’s images have been uploaded to PharmaQC. Note if you
choose Yes then your product must also be registered on PharmaQC.
* : Denotes a mandatory field.
4.1.5.3
General
Once you are happy with your product’s details, click ‘Save & Continue’ to save your Price
Submission and go to the next stage.
4.1.6
Stage 5 - Offer Prices, Volume Price Breaks and Terms
This screen is where you enter your actual offer prices, volume price breaks*, discounts* and Terms
for supplying your product to NHS CMU. At the top of the screen your product name and pack size is
shown along with its list price.
* : only available on certain Tenders.
Below this are all the Lots for which the NHS CMU Product is used in, together with the number of
buying groups they contain and the usage for each:
The total usage of the selected NHS CMU Product is also shown, and you can get a breakdown for
each Buying Group by hovering over the help icon
4.1.6.1
Fields
Each field is specific to one “offer row”, of which you can have a maximum of 7 per product, and
contains:
4.1.6.1.1
Minimum Order Quantity
This is the minimum order quantity that each trust would need to purchase in order to achieve this
price.
4.1.6.1.2
Volume Price Break
Some Tenders give you the opportunity of specifying a Minimum Order Quantity (MOQ) for a Buying
Group or Trust in addition to the standard Per Order by Trust. In this scenario, you can add a further 6
offer rows per product as required. Please note you can’t have more than 6 offer rows with a volume
price break of per year by Buying Group or per year by Trust.
If volume price breaks are applicable for the current Tender, you will be given a dropdown from which
you can select the appropriate volume price break, as in the following screenshot:
Page 26 of 32
•
per order by trust
•
per year by buying group
•
per year by trust
If volume price breaks are not applicable, the dropdown and heading will not be visible.
4.1.6.1.3
Offer Prices
You enter your offer prices against the number of buying groups within a Lot that you are interested in
supplying. In the screenshot above, an offer price of £15.00 has been given to supply 1 Buying Group
in the Lot, whilst another offer price of £10.00 has been given to supply 2 Buying Groups in the Lot.
You must enter at least one offer price, but you can enter as many offer prices per row as there are
Buying Groups in each Lot.
The offer price must be less than or equal to your product’s list price.
4.1.6.1.4
Discounts
A Supplier Discount is an additional discount that you are willing to apply to all offer prices for the
current MOQ row, should you be awarded a certain percentage of the Buying Groups available
(currently threshold set to 50% and 66%). You are only able to enter a discount if you have entered
offer prices against these required percentages. A discount must be between 0% and 100%.
Supplier Discounts are only applicable on certain Tenders, therefore they will only be shown when
appropriate. When they are shown they will appear at the end of each offer row, as in the following
screenshot:
4.1.6.1.5
Terms
Each offer row must specify the Terms that are applicable for the offers on the current row. You have
the choice of using the same Term for all Buying Groups that your offer prices cover, or you can
specify a Term against each Buying Group. Terms can be selected via the Term options at the end of
the row, as in the following screenshot:
4.1.6.1.6
Using the Same Term
To use the same Term for all Buying Groups select the required Term from the dropdown. If you have
not entered any Terms yet, or you would like to add a new one, please choose the [New] option
where you will be taken to the ‘Add Term’ screen. For more information on adding Terms see the
section Terms
Page 27 of 32
4.1.6.1.7
Using Different Terms
If you would like to assign different Terms to buying groups, you can uncheck the ‘Use same Term for
all Buying Groups’ option. On doing this, you will then be shown all the Buying Groups for each Lot
that has at least one offer price, and in the following screenshot:
The Terms for each Buying Group are only enabled in Lots that have at least one offer price. As you
can see above, Lots 1 and 2 have offer prices so the Buying Group Term dropdowns are enabled. Lot
3 has no offers so the dropdown remain disabled.
Select the Term you would like to apply to each Buying Group using the dropdowns. Once a Term
has been selected you can hover over the help (‘?’) icon to see the full details of that Term.
If you decide you would like to revert to using the same Term for all Buying Groups, re-check the Use
same Term for all Buying Groups option.
4.1.6.2
Deleting an Offer Row
If you would like to delete an offer row, click on the red cross at the end of the row. You will be asked
for confirmation before the row is deleted.
4.1.6.3
General
Once you have completed your Offer Prices, Volume Price Breaks, Discounts and Terms click ‘Save
& Continue’ to save your Price Submission and go to the next stage.
4.1.7
Stage 6 - Manufacturing Lead Times
A Manufacturing Lead Time is the time required by your company to manufacture and release
sufficient product to cover orders for the lots for which you are making an offer.
Manufacturing Lead Times are only applicable on certain Tenders therefore you may not see this
stage.
If they are applicable you must enter your lead time for each Lot that you have given an offer price for.
The lead time is a free text field and can be up to 50 characters long.
Once you have completed the lead times, click ‘Save & Continue’ to save your Price Submission and
go to the next stage.
4.1.8
Stage 7 - Offer Summary
Once you have entered a full offer against an product you will then be shown a summary of your offer,
as in the following screenshot.
Page 28 of 32
The summary is split across 3 tabs for easier viewing, click on each tab to view that tabs details.
At this stage you have 4 options:
•
Previous
•
Make another offer
•
Finish
•
Cancel
4.1.8.1
Previous
If you would like to make an amendment to the current offer you can use the ‘Previous’ button to go
back to the previous stage. You can go back all the way to your Product Basket but will lose the
details of each stage you go previous from. If you want to keep the majority of your products offer, it
will be easier to select make another offer and reselect your now fully completed product offer from
your basket. You can then navigate to the appropriate stage, make amendments as necessary, and
save and continue in the normal way.
4.1.9
Stage 8 - Make another offer
If you would like to make another offer click the ‘Make another offer’ button and you will be returned to
your product basket where you can continue to make another offer.
4.1.10 Stage 9 - Finish
If you have finished entering all your product offers, click the ‘Finish’ button to be taken to the export
stage, which is covered in the section Exporting your Price Submission from SELECTT
4.2
Viewing Your Offers
Once you have made one offer the My Offers menu will be enabled. Clicking this will show you a list
of all the products you have made an offer against. You can view the summary of each offer by
clicking in the summary column. You also have the option of removing an offer from this screen.
Page 29 of 32
4.2.1
Export To Excel
If you have Excel installed you can now export your offers. Simply click on the Export to Excel
button. This may take a few seconds if you have lots of offers. A spreadsheet will be created and a
link to it displayed:
In addition to displaying all your offers, term details and Buying Group information are also shown on
separate sheets.
Page 30 of 32
5 Submitting Your Offer Back to NHS CMU
5.1
Exporting your Price Submission from SELECTT
Before you can send your Price Submission back to NHS CMU you must first export it from SELECTT
in to a new format on your computer. This new format will have the file extension “*.cmu”. Please
note that exporting DOES NOT SEND YOUR FILE BACK TO BRAVO, it generates your Price
Submission locally so that you can then manually submit it to BRAVO.
To export your Price Submission you have two options:
•
Click the Export button when not in the offer wizard
•
Click the Export Price Submission entry on the File menu
•
Click the Finish Button when you are in the offer wizard
In either case, you will then be shown the export screen:
When you click the ‘Export Price Submission’ file button, if you have any products in your basket
without a fully completed offer you will be shown a screen listing them:
If you would like to make an offer on any of the products listed, you have two options:
•
Click the ‘Make another offer’ button to return to your product basket
•
Click on any ‘Product’ to be taken to start the offer wizard for that product
If you would like to continue without making any more offers, please click the ‘Continue’ button. The
following screen is shown:
Page 31 of 32
A standard ‘Save as’ dialog is now shown where you can select the folder you would like to export
your Price Submission. Please note the filename has automatically been created for you, and consists
of the Tender Code followed by your Supplier Code. We recommend you leave this filename as is.
Please note the file type has defaulted to “*.cmu”, indicating this is a NHS CMU Export file. It is this
file that has to be uploaded to BRAVO. You cannot read this file back into SELECTT - once exported
this file cannot be used with SELECTT again.
You can, however, continue using your Xml file with SELECTT if you would like to make further
amendments.
On successfully exporting your Price Submission, you are reminded that you must now send this back
to BRAVO (following the familiar online BRAVO submission process). When you OK this dialog,
SELECTT will close your Price Submission.
Page 32 of 32