1
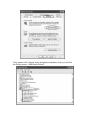
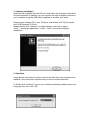
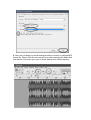
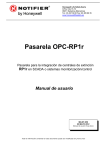
TEX2 Tape Capture Tape to Digital Converter User Guide Customer Helpline 0845 555 4440 For correct usage, please read this user guide carefully and keep in a safe place for future reference. Introduction Rediscover those old songs with Tape Capture Tape To Digital by turning your tapes into MP3 ’s to use on your computer ,iPod or in the car! Tape To Digital is a portable, handheld USB tape player that works with all kinds of tapes.It has an easy-to-use USB connection for converting the music on your tapes into MP3 files. You can listen to MP3’s on your computer, load them onto your portable music player, or record them onto a CD and listen in your car. Its portable size allows it to fit in virtually any bag and enables you to play and transfer music anywhere. It runs on battery or USB power when connected to your computer for flexible operation. The supplied easy-to-use software program guides you through transferring your music and even can integrate with your iTunes Music Library. In addition to transferring your tapes, Tape To Digital has an audio output that enables you to listen on your stereo, headphones, or other speaker systems for hours of enjoyment! Product features - Enjoy again your old cassette tapes on the go Convert your old mix tapes and cassettes to MP3 to playback on iPods/MP3 players or burn to CD Portable design fits in virtually any bag and enables you to play and transfer anywhere Plug and Play USB device, no drivers required Flexible battery or USB – powered operation Comes with Tape Converter software to guide you through digital transfer Audio output enables you to listen on your stereo, headphones, or other speaker system. Unpacking the Tape to Digital Converter Make sure that the items listed below are included in the box: Tape Capture Tape to Digital converter CD USB Cable User guide Inserting/replacing the batteries If you wish, you can run the Tape To Digital Converter via batteries. To insert the batteries, slide back switch 1 to open the tape to digital converter. Open the battery compartment and insert 2 x AA battery (making sure the battery is correctly aligned) and replace the battery compartment. Description of parts 1. Eject: Slide this switch to open the cassette holder. 2. Volume: Adjusts the volume of the headphones and USB connection 3. Headphones: You can connect 1/8” (3.5mm) headphones here 4. USB Connection: Use the included USB cable to connect Tape to digital to your computer. For transferring your recordings to your computer, we have provided a software package on the included CD. 5. Play: Press to play the tape 6. Stop: Press to stop the tape. 7. FF/REW: Press to fast forward or rewind the tape. Note that these buttons will become “reversed” when the tape changes direction. 8. DIR: Selects the direction of tape playback. This is useful if you want to play the other side of the tape without having to eject it. 9. Play Mode: Selects what the tape does when it reaches the end of a side. When set to the “loop” icon, the tape will automatically switch direction and begin playing the opposite side when one side has finished. When set to the single arrow icon, the tape will simply stop when a side has finished. Hardware and Software Installation 1. Hardware Installation The Audio Capture device doesn’t need any driver installation, Windows OS will install the driver automatically. Please connect audio capture USB connector into your computer’s free USB2.0 port. The system will note “Found new hardware.” Please wait for a Moment until system will note “The device is ready to use”. Please check hardware installing correctly. Right click “My Computer” and select “Properties”, and select “Hardware” Option, please click “Device Manager” key. Then, please click “Sound, video and game controllers”, then you will find the Device name –“USB Audio Device”. 2. Software Installation Insert the CD (supplied) into the CD drive and follow the onscreen instructions. Once the software is installed, you can connect the tape to digital converter to your computer using the USB cable (supplied) to transfer your audio. Please insert software CD in your CD drive, and double click ”My Computer” And “USB Cassette” CD icon. Please double click “Audacity” to install software, and click or select “Next”, ”I accept the agreement ” and/or “ finish” to finish the software Installation. 3. Operation. It may be the case that you need to remove the lead from your computer and reattach it (to prompt the computer that you have a device attached.) A, Double click “Audacity” icon on your computer’s desktop, please select your Language first, then click ”OK”. Please click “Edit” key on the software panel, and select “Preferences”. Please select recording device to be “USB Audio Device”, and channels to be “2(Stereo)”. Then select ”Play other tracks while recording new one” and “Software Play through (Play new track while Recording it)”, then click “OK”. B. Now, we can begin to record analogue audio to convert to a digital MP3 format file. Please click the red record key to start recording the audio that you wanted. And when you want to finish, please click yellow stop key. For the initial usage, you will need to do more steps if we want to export as MP3 file. Click “File”, and select “Export As MP3”. You need to specify a file name and location now. Now, you can produce MP3 files from your analogue audio device – these files are perfect for MP3 players or you iPod! Customer Helpline 0845 555 4440