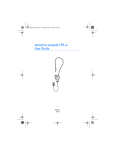
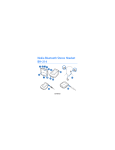
1
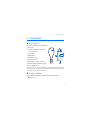
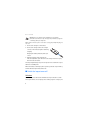
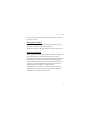
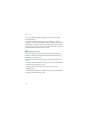
Nokia Wireless Loopset LPS-5
User Guide
9212931
Issue 1 EN
DECLARATION OF CONFORMITY
Hereby, NOKIA CORPORATION declares that this LPS-5 product is in compliance
with the essential requirements and other relevant provisions of Directive 1999/5/
EC. A copy of the Declaration of Conformity can be found at http://
www.nokia.com/phones/declaration_of_conformity/.
© 2009 Nokia. All rights reserved.
Nokia, Nokia Connecting People and the Nokia Original Accessories logo are trademarks or
registered trademarks of Nokia Corporation. Other product and company names mentioned
herein may be trademarks or tradenames of their respective owners.
Reproduction, transfer, distribution, or storage of part or all of the contents in this document in
any form without the prior written permission of Nokia is prohibited.
Bluetooth is a registered trademark of Bluetooth SIG, Inc.
Nokia operates a policy of ongoing development. Nokia reserves the right to make changes and
improvements to any of the products described in this document without prior notice.
TO THE MAXIMUM EXTENT PERMITTED BY APPLICABLE LAW, UNDER NO CIRCUMSTANCES
SHALL NOKIA OR ANY OF ITS LICENSORS BE RESPONSIBLE FOR ANY LOSS OF DATA OR INCOME
OR ANY SPECIAL, INCIDENTAL, CONSEQUENTIAL OR INDIRECT DAMAGES HOWSOEVER
CAUSED.
THE CONTENTS OF THIS DOCUMENT ARE PROVIDED "AS IS". EXCEPT AS REQUIRED BY
APPLICABLE LAW, NO WARRANTIES OF ANY KIND, EITHER EXPRESS OR IMPLIED, INCLUDING,
BUT NOT LIMITED TO, THE IMPLIED WARRANTIES OF MERCHANTABILITY AND FITNESS FOR A
PARTICULAR PURPOSE, ARE MADE IN RELATION TO THE ACCURACY, RELIABILITY OR CONTENTS
OF THIS DOCUMENT. NOKIA RESERVES THE RIGHT TO REVISE THIS DOCUMENT OR WITHDRAW
IT AT ANY TIME WITHOUT PRIOR NOTICE.
The availability of particular products may vary by region. Please check with your Nokia dealer
for details.
Export controls
This device may contain commodities, technology or software subject to export laws and
regulations from the US and other countries. Diversion contrary to law is prohibited.
9212931/Issue 1 EN
Contents
1. Introduction ......................... 5
3. Basic use ............................. 12
Bluetooth wireless technology........... 6
Set up .....................................................
Adjust the loopset volume................
Adjust the sidetone volume .............
Select vibration mode........................
Calls ........................................................
Manage two calls................................
Listen to music.....................................
Clear settings or reset........................
Troubleshooting...................................
2. Get started ........................... 7
Keys and parts......................................... 7
Charge the battery ................................ 7
Switch the loopset on or off............... 8
Switch on.............................................. 8
Switch off ............................................. 9
Pair and connect to another
device ........................................................ 9
Disconnect the loopset .................. 11
Reconnect the loopset ................... 11
4
12
12
12
13
13
14
15
15
15
4. Battery and charger
information ............................ 17
Introduction
1. Introduction
The Nokia Wireless Loopset LPS-5 is designed for people with hearing aids
to use their compatible mobile phone or music player together with a
telecoil (T-coil) equipped hearing aid.
When using the loopset for calling, you can speak directly into the
internal microphone, and you do not need to hold the phone near your
ear.
You can use this inductive loopset with compatible devices that support
Bluetooth wireless technology. The loopset wirelessly transmits sound
from the phone to a hearing aid that is in T mode. The quality of sound
depends on the type of hearing aid used and is affected by
electromagnetic disturbances from the surroundings.
Read this user guide carefully before using the loopset. Also, read the user
guide for the device that you connect to the loopset.
For the latest version of the user guide and additional information related
to your Nokia product, see www.nokia.com/support or your local Nokia
website. For more information about loopsets and other accessibility
solutions, see www.nokiaaccessibility.com (in English).
The product may contain small parts. Keep them out of the reach of small
children.
The surface of this device is nickel-free.
5
Introduction
■ Bluetooth wireless technology
Bluetooth wireless technology allows you to
connect compatible devices without cables. The
<10m
loopset and the other device do not need to be
in line of sight, but they should be within 10
metres (33 feet) of each other. The closer the
loopset and the other device are to each other,
the better the performance. The optimal
operating range is shown in dark grey in the
picture. The connection is subject to
interference from distance and obstructions (shown in light grey) or other
electronic devices.
The loopset is compliant with the Bluetooth Specification 2.1 + EDR
supporting the Headset Profile 1.1, the Hands-Free Profile (HFP) 1.5, and
the Advanced Audio Distribution Profile (A2DP) 1.0. Check with the
manufacturers of other devices to determine their compatibility with this
device.
6
Get started
2. Get started
■ Keys and parts
The loopset contains the following parts:
1. Neck loop
2. Indicator light (inside the rubber
sleeve at the top)
2
1
4
5
3. Volume keys
4. Microphone
1
3
5. Multifunction key
6. Charger connector
Before using the loopset, you must
charge the battery and pair the loopset
with a compatible device.
6
Parts of the device are magnetic. Metallic materials may be attracted to the device.
Do not place credit cards or other magnetic storage media near the device, because
information stored on them may be erased.
■ Charge the battery
Before charging the battery, carefully read “Battery and charger
information”, p. 17.
7
Get started
Warning: Use only chargers approved by Nokia for use with this
particular model. The use of any other types may invalidate any approval
or warranty, and may be dangerous.
When you disconnect the power cord of any accessory, grasp and pull the plug, not
the cord.
1. Connect the charger to a wall outlet.
2. Connect the charger cable to the charger
connector. The indicator light is red during
charging.
Charging the battery fully may take up to
1 hour.
3. When the battery is fully charged, the
indicator light turns green. Disconnect the charger from the loopset,
then from the wall outlet.
The fully charged battery has power for up to 6 hours of talk time or up to
110 hours of standby time.
When the battery is discharged, the loopset beeps about every 5 minutes,
and the indicator light slowly flashes red.
■ Switch the loopset on or off
Switch on
To switch on, press and hold the multifunction key for about 2 seconds.
The loopset vibrates once and plays an ascending sequence of beeps, and
8
Get started
the green indicator light is displayed. The loopset tries to connect to the
last used device.
When the loopset is connected to your device and is ready for use, the
indicator light slowly flashes blue. If the loopset has not been paired with
a device, it automatically enters pairing mode (see “Pair and connect to
another device”, p. 9).
Switch off
To switch off, press and hold the multifunction key for over 5 seconds. The
loopset vibrates twice and plays a descending sequence of beeps, and the
red indicator light is briefly displayed.
If the loopset is not connected to a paired device within about 30
minutes, it switches off automatically.
■ Pair and connect to another device
If your phone supports the A2DP Bluetooth profile and has a music player
feature, you can use the phone to also play music through the loopset.
If your phone does not support the A2DP Bluetooth profile, you can
separately pair the loopset with the phone and a music player that
supports this profile. If you have paired and connected the loopset to your
phone, disconnect the loopset before pairing the loopset with the music
player.
1. Ensure that your phone or music player is switched on.
9
Get started
2. To pair the loopset if it has not been previously paired with a device,
switch on the loopset. The loopset enters pairing mode, and the
indicator light quickly flashes blue.
To pair the loopset if it has been previously paired with another device,
ensure that the loopset is switched off, and press and hold the
multifunction key (for over 5 seconds) until the indicator light quickly
flashes blue.
3. Within about 5 minutes, activate the Bluetooth feature on your phone
or music player, and set it to search for Bluetooth devices. For details,
see the user guide of your device.
If the pairing is not initiated within about 5 minutes, the loopset
switches off.
4. Select the loopset (Wireless Loopset LPS-5) from the list of found
devices on your phone or music player.
5. If necessary, enter the passcode 0000 to pair and connect the loopset
to your device. If your device does not have a keypad, it may use this
passcode by default.
In some devices, you may need to make the connection separately
after pairing.
If pairing is successful, the loopset appears in the menu of your device
where you can view the currently paired Bluetooth devices.
When the loopset is connected to your device and is ready for use, the
indicator light slowly flashes blue.
10
Get started
You can pair the loopset with up to eight devices but connect it to only
one device at a time.
Disconnect the loopset
To disconnect the loopset from your device, switch off the loopset, or
disconnect it in the Bluetooth menu of your device.
You do not need to delete the pairing with the loopset to disconnect it.
Reconnect the loopset
If the loopset loses the connection to your device when it is switched on,
the loopset vibrates three times and beeps about once a minute.
To reconnect the loopset to the phone or music player that you have last
used with it, switch the loopset off and back on. Alternatively, if the
loopset is switched on, make the connection in the Bluetooth menu of
your device, or press the multifunction key. When the connection is
established, the loopset vibrates once and beeps twice.
You may be able to set your device so that the loopset connects to it
automatically. To activate this feature in a Nokia device, change the
paired device settings in the Bluetooth menu.
11
Basic use
3. Basic use
■ Set up
Ensure that the loopset is paired and
connected to your phone or music player.
Detach one end of the loop from the loopset,
place the loop around your neck, and plug the
loop end back into the loopset.
Switch your hearing aid to T mode.
Wear the loopset around your neck when you use it with your hearing aid.
■ Adjust the loopset volume
To adjust the strength of the magnetic field that the loopset produces for
the hearing aid, press a volume key during a call or while you listen to
music. The loopset vibrates (if vibration is enabled) and beeps at the
selected volume level, and the hearing aid changes the audio volume
accordingly.
■ Adjust the sidetone volume
Sidetone is the sound that is picked up by the loopset microphone and
routed to the hearing aid during a call.
To adjust the sidetone volume, press the multifunction key twice during a
call, and press a volume key within 15 seconds.
12
Basic use
■ Select vibration mode
You can set the loopset to vibrate in different situations.
To select the desired vibration mode during a call (when there is no other
call waiting or on hold), press and hold the multifunction key for about 2
seconds one or more times:
• If the loopset beeps once, the loopset vibrates when you press a key or
receive a call.
• If the loopset beeps twice, the loopset vibrates when you press a key.
• If the loopset beeps three times, the loopset vibrates when you receive
a call. This is the default setting.
• If the loopset beeps four times, the vibration is turned off.
■ Calls
To make a call, use your mobile phone in the normal way when the loopset
is connected to it.
To redial the number you last called (if your phone supports this feature
with the loopset), when no call is in progress, press the multifunction key
twice.
To activate voice dialling (if your phone supports this feature with the
loopset), when no call is in progress, press and hold the multifunction key
for about 2 seconds. Proceed as described in the phone user guide. To
cancel voice dialling, press the multifunction key.
To answer or end a call, press the multifunction key, or use the phone keys.
To reject a call, press the multifunction key twice. When you receive a call,
13
Basic use
the loopset vibrates and plays a ringing tone, and the indicator light
quickly flashes blue.
To switch a call from the loopset to the connected device, switch the
loopset off, or use the related feature of your device (the loopset remains
switched on). To switch the call back to the loopset, switch the loopset on
(and connect it to your device), or if the loopset is switched on, press and
hold the multifunction key for about 2 seconds.
■ Manage two calls
To use these features, your mobile device must support the Bluetooth
Hands-Free Profile 1.5, and call waiting must be activated in the device.
Call waiting is a network service.
To answer a waiting call and end the active call, press the multifunction
key.
To answer a waiting call and put the active call on hold, press and hold the
multifunction key for about 2 seconds.
To end the active call and make the call on hold active, press the
multifunction key.
To switch between the active call and the call on hold, press and hold the
multifunction key for about 2 seconds.
14
Basic use
■ Listen to music
To listen to music through the loopset, connect the loopset to a
compatible device that supports the A2DP Bluetooth profile. To play
music, use the playback controls on the connected device.
If your device supports the HFP and A2DP Bluetooth profiles and you
receive or make a call while listening to music, the music may be paused
until you end the call, depending on the device.
■ Clear settings or reset
To clear your pairing, loopset volume, sidetone, and vibration mode
settings from the loopset, switch on the loopset, and press and hold the
multifunction key and the volume up key for about 5 seconds. The
indicator light alternates red, green, and blue twice, and the loopset
enters pairing mode.
To reset the loopset if it stops functioning, even though it is charged,
connect the loopset to a charger while you press and hold the
multifunction key. The reset does not clear the settings.
■ Troubleshooting
If you cannot connect the loopset to your compatible device, check that
the loopset is charged, switched on, and paired with the device.
Also check that the loopset is within 10 metres (33 feet) of the device that
you have connected to it.
15
Basic use
If you still have problems, reset the loopset. See “Clear settings or reset”,
p. 15.
16
Battery and charger information
4. Battery and charger information
This device has an internal, nonremovable, rechargeable battery. Do not attempt to
remove the battery from the device as you may damage the device. This device is
intended for use when supplied with power from the following chargers: AC-8 and
DC-9. The exact charger model number may vary depending on the type of plug.
The plug variant is identified by one of the following: E, EB, X, AR, U, A, C, or UB. The
battery can be charged and discharged hundreds of times, but it will eventually
wear out. Recharge your battery only with Nokia approved chargers designated for
this device. Use of an unapproved charger may present a risk of fire, explosion,
leakage, or other hazard.
If a battery is being used for the first time or if the battery has not been used for a
prolonged period, it may be necessary to connect the charger, then disconnect and
reconnect it to begin charging the battery. If the battery is completely discharged,
it may take several minutes before the charging indicator light is displayed.
Unplug the charger from the electrical plug and the device when not in use. Do not
leave a fully charged battery connected to a charger, since overcharging may
shorten its lifetime. If left unused, a fully charged battery will lose its charge over
time.
Always try to keep the battery between 15°C and 25°C (59°F and 77°F). Extreme
temperatures reduce the capacity and lifetime of the battery. A device with a hot or
cold battery may not work temporarily. Battery performance is particularly limited
in temperatures well below freezing.
Do not dispose of batteries in a fire as they may explode. Batteries may also
explode if damaged.
Never use any charger that is damaged.
17
Battery and charger information
Important: Battery talk and standby times are estimates only and depend
on the type of the connected device, features used, battery age and
condition, temperatures to which battery is exposed, and many other
factors. The amount of time a device is used for calls will affect its standby time.
Likewise, the amount of time that the device is turned on and in the standby mode
will affect its talk time.
18
Care and maintenance
Care and maintenance
Your device is a product of superior design and craftsmanship and should be
treated with care. The following suggestions will help you protect your warranty
coverage.
• Keep the device dry. Precipitation, humidity, and all types of liquids or moisture
can contain minerals that will corrode electronic circuits. If your device does
get wet, allow it to dry completely.
• Do not use or store the device in dusty, dirty areas. Its moving parts and
electronic components can be damaged.
• Do not store the device in hot areas. High temperatures can shorten the life of
electronic devices, damage batteries, and warp or melt certain plastics.
• Do not store the device in cold areas. When the device returns to its normal
temperature, moisture can form inside the device and damage electronic
circuit boards.
• Do not attempt to open the device.
• Do not drop, knock, or shake the device. Rough handling can break internal
circuit boards and fine mechanics.
• Do not use harsh chemicals, cleaning solvents, or strong detergents to clean the
device.
• Do not paint the device. Paint can clog the moving parts and prevent proper
operation.
These suggestions apply equally to your device, charger, or any accessory. If any
device is not working properly, take it to the nearest authorised service facility for
service.
19
Care and maintenance
Recycle
The crossed-out wheeled-bin symbol on your product, battery, literature, or
packaging reminds you that all electrical and electronic products, batteries,
and accumulators must be taken to separate collection at the end of their
working life. This requirement applies in the European Union. Do not dispose of
these products as unsorted municipal waste. For more environmental information,
see the product Eco-Declarations at www.nokia.com/environment.
Always return your used electronic products, batteries, and packaging materials to
a dedicated collection point. This way you help prevent uncontrolled waste
disposal and promote the recycling of materials. More detailed information is
available from the product retailer, local waste authorities, national producer
responsibility organisations, or your local Nokia representative. Check how to
recycle your Nokia products at www.nokia.com/werecycle, or if browsing on a
mobile device, www.nokia.mobi/werecycle.
20