1
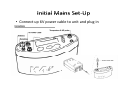
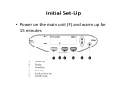
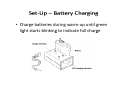
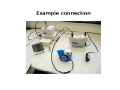
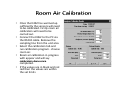
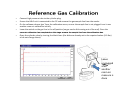
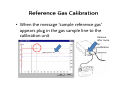
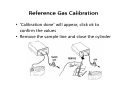
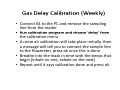
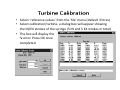
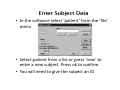
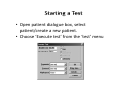
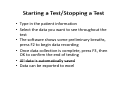
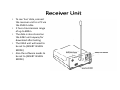
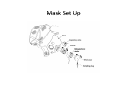
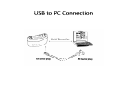
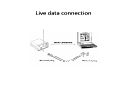
Cosmed K4b2
User Guide
Initial Mains Set Up
Initial Mains Set‐Up
• Connect up 6V power cable to unit and plug in Connect up 6V power cable to unit and plug in
Initial Set Up
Initial Set‐Up
• Power on the main unit (F) and warm up for 15 minutes
Set Up Battery Charging
Set‐Up –
Battery Charging
• Charge batteries during warm‐up until green g
g
g
light starts blinking to indicate full charge
Example connection
Example connection
Room Air Calibration
Room Air Calibration
•
•
•
•
•
Once the K4b2 has warmed up Once
the K4b2 has warmed up
sufficiently the sensors will need to be calibrated. Firstly room air calibration will need to be carried out.
Connect the K4b2 to the PC via the RS232 cable. Remove the sampling line from the unit also.
l l f
h
l
Select the calibration tab and run calibration program ‐ choose room air
room air. Room air calibration in progress with appear and will say calibration done once
calibration done once completed.
If the values are in black and not red then the values are within the set limits
Reference Gas Calibration
Reference Gas Calibration
•
Reference gas calibration with the following gas concentration (O2 = 16%, CO2 = 5%, N2 = Balance) is required.
5%, N2 Balance) is required.
Reference Gas Calibration
Reference Gas Calibration
•
•
•
•
•
Connect high pressure tube to the cylinder plug.
Ensure the K4b2 unit is connected to the PC and remove the gas sample line from the reader.
On the software choose ‘gas’ from the calibration menu, ensure the sample line is not plugged in as it runs another room air calibration initially
Leave the switch on the gas line in the off position (no gas can be felt coming out of the end). Once the room air calibration has completed on this stage remove the sample line from the calibration box
room air calibration has completed on this stage remove the sample line from the calibration box.
Open the cylinder valve by turning the black lever (the dials are already set to the required values (3‐5 Bar) so do not change these).
Leave unplugged after another room air measure is done
Reference Gas Calibration
Reference Gas Calibration
• When the message ‘sample reference gas’ pp
p g
g
p
appears plug in the gas sample line to the calibration unit
Remove after room air calibration
Reference Gas Calibration
Reference Gas Calibration
• ‘Calibration done’ will appear, click ok to confirm the values
• Remove the sample line and close the cylinder
Gas Delay Calibration (Weekly)
Gas Delay Calibration (Weekly)
• C
Connect K4 to the PC and remove the sampling t K4 t th PC d
th
li
line from the reader
• Run calibration program and choose ‘delay’ from Run calibration program and choose ‘delay’ from
the calibration menu
• A room air calibration will take place initially, then A room air calibration will take place initially then
a message will tell you to connect the sample line to the flowmeter, press ok once this is done
to the flowmeter, press ok once this is done
• Breathe into the mask in time with the beeps that begin (inhale on one, exhale on the next)
g (
,
)
• Repeat until it says calibration done and press ok
Turbine Calibration Assembly
Turbine Calibration ‐
Turbine Calibration
Turbine Calibration
• Select ‘reference values’ from the ‘file’ menu (default 3 litres)
• Select calibration/turbine, a dialog box will appear showing the IN/EX strokes of the syringe (5 IN and 5 EX strokes in total)
• The box will display the
h b
ll d l h
% error. Press OK once
completed
Enter Subject Data
Enter Subject Data
• In the software select ‘patient’ from the ‘file’ p
menu
• Select patient from a list or press ‘new’ to p
p
enter a new subject. Press ok to confirm.
• You will need to give the subject an ID
You will need to give the subject an ID
Starting a Test
Starting a Test
• Open patient dialogue box, select p
patient/create a new patient.
p
• Choose ‘Execute test’ from the ‘test’ menu
Starting a Test/Stopping a Test
Starting a Test/Stopping a Test
• Type in the patient information
i h
i
i f
i
• Select the data you want to see throughout the test
• The software shows some preliminary breaths, p
y
press F2 to begin data recording
• Once data collection is complete, press F3, then Once data collection is complete, press F3, then
OK to confirm the end of testing
• All data is automatically saved
All data is automatically saved
• Data can be exported to excel
Receiver Unit
Receiver Unit
• To see ‘live’ data, connect the receiver unit to a PC via
the receiver unit to a PC via the RS232 cable
• It has a transmission range p
of up to 800m
• The data is also stored on the K4b2 unit anyway for download after testing
• The K4b2 unit will need to be set to (INSERT WHICH MODE)
• Also the software needs to be set to (INSERT WHICH MODE)
Mask Set Up
Mask Set Up
USB to PC Connection
USB to PC Connection
Live data connection
Live data connection