1
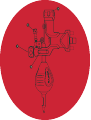
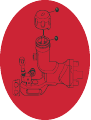
Sabre User Guide
sabretattoosupplies.com
Operation
The Sabre tattoo machine is designed to operate over
a variable voltage range depending on personal preference
and the type of work being created.
It can be connected to a power supply using an RCA or clip cord.
The tube clamp is operated by turning the vice (1) in an anti-clockwise direction
until the hole in the grip block aligns with the hole in the plastic body.
A tube is then fitted from the bottom and clamped by turning the vice in a
clockwise direction.
If the vice is unscrewed too far the tube grip block (4) can become disconnected.
Care should be taken not to unscrew the vice too far as parts can become
disconnected.
If this happens, be careful not to lose any parts.
Gently align the screw thread with the tapped hole in the grip block and screw it back
in a clockwise direction.
The Sabre is fitted with a “one touch” hit adjuster (3), settings are altered by rotating
the metal adjuster knob at the top of the unit. The full range of settings can be
achieved with less than one rotation. When the metal tab is covering the number 1,
the machine is set to its lightest hit. When number 11 is covered, the machine is set
to its hardest hit.
The needle retainer (2) can be tightened and loosened using the adjuster knob.
Screw the knob gently in a clockwise direction until the pulley is in contact
with the needle and keeps it in place on the rubber nipple. Do not over
tighten as this will put unwanted strain on the motor.
As with most tattoo machines the rubber nipple component
should be replaced after each use.
This is a push fit onto the needle bar.
Care
A small amount of Sabrelube is used to lubricate the piston.
It is recommended to re apply a small amount of Sabrelube for every
100 hours of use.
To apply, remove the hit adjuster knob (3) by twisting and pulling it upwards.
It will come off its retaining O ring.
When the knob is removed, the piston (5) can be seen in the bore.
Push the piston down to its lowest point of travel.
Apply a small amount of Sabrelube to the visible piston bore.
The hit adjuster knob is then re fitted by aligning the central groove with the
piston and gently pushing it down onto the O-ring whilst turning gently.
A light coating of Sabrelube can be applied to the O-ring to make re assembly easier.
If grease is excessively applied it may work its way out of the piston area over time.
This should not cause damage, and any grease can be wiped off the machine with a
soft cloth.
The rear of the machine contains electronic components and should not need to
be accessed at any time.
Unless stated in this user manual, parts or screws should not be removed
or tampered with as this may affect the function of the machine.
We recommend using alcohol wipes for general cleaning.
Use of any abrasive chemicals or cleaning products could
result in surface scratching.
3
5
Technical Specification
Motor: Maxon 12V DC, 4.5w
Stroke length: 4.0mm
Body: Injection moulded scratch resistant ABS
Metal components: Machined anodised aluminium
Weight: 125g
Warranty
The Sabre machine comes with a 12 month warranty
from date of purchase.
In the unlikely event the machine is faulty or develops
a problem please return to:
Sabre Tattoo Supplies
Units 2/3 Deanfield Way
Link 59 Business Park
Clitheroe
Lancs
BB71QU
UK
Designed, rigorously tested and
manufactured in the U.K.
sabretattoosupplies.com