1
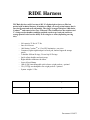
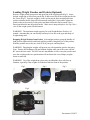
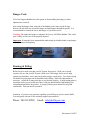
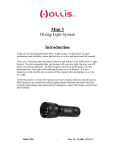
RIDE Harness
User’s Guide
HOLLIS GEAR
2002 Davis Street, San Leandro, CA 94577
Phone: 888-383-DIVE Fax: 510-729-5115
www.hollisgear.com
E-mail: [email protected]
EC Type examination conducted by:
SGS United Kingdom Ltd, Weston-super-Mare, BS22 6WA, UK
Notified Body No: 0120’
Compliance with EN 1809:1997
Compliance with EN 250:2000
Document #12-4075
Introduction
This User’s Guide describes the unique functions and features of Hollis buoyancy
compensators (BC) and various optional accessories. The more acquainted that you
become with your new BC, the more you will enjoy your diving experience. By
following the instructions in this guide, you will understand how your BC product works,
how to make best use of its features and how to ensure it is set up best for your needs.
All Hollis BC’s are constructed with the highest quality materials and utilize the latest
computer aided design and manufacturing techniques to ensure their highest performance
and reliability. There are a number of Hollis BC systems that are designed to match your
type of diving. With a selection of bladder systems and accessories, a diver can
configure his or her BC system to work in any environment they are operating in.
WARNINGS:
□ Hollis BC’s are intended for use by divers who have successfully completed a
nationally recognized course in scuba diving.
□ Hollis BC’s must not be used by untrained persons who may not have knowledge
of the potential risks and hazards of scuba diving
□ As with all underwater life support equipment, improper use or misuse of this
product can cause serious injury or death.
□ Improper use of the oral Inflation/ Deflation or dump valve assemblies may allow
water to enter the BC with a subsequent reduction in buoyancy. Reducing
buoyancy can cause a loss of buoyancy control resulting in serious injury or
death.
□ Temperature conditions for use (1 to 40 degrees C)
□ Limitations of dimensions of cylinders (20L single cylinder, or Twin 15 litre
cylinders)
□ This is not a lifejacket it does not guarantee a head up position of the wearer at the
surface.
□ DO NOT depend on any Hollis BC to save your life under any circumstances.
□ Prior to each dive, inspect and test your BC for proper operation. If any part does
not function properly, DO NOT USE!
□ In an emergency, Hollis BC’s may not provide face-up flotation in all cases for all
persons.
□ DO NOT inhale gases from within any Hollis BC.
□ On the Hollis dual bladder, the bladder against the diver’s back is the primary
bladder. Do not inflate both bladders at the same time, this could decrease the
overall lift provided by the bladder.
Document #12-4075
□ If you do not fully understand how to use your Hollis BC, or if you have any
questions regarding its functions, you should seek instruction in its use from your
authorized Hollis dealer before you utilize this product.
□ Read and understand the owner’s guide completely before diving with any Hollis
BC.
□ Have your Hollis equipment inspected and serviced annually or any time you
have any concern about your equipment’s function or condition by an authorized
Hollis dealer.
Care and Maintenance:
Your Hollis BC is a reliable piece of equipment that was designed to withstand the rigors
of diving and will last for many years if cared for properly. Follow the procedures below
to ensure a long life for your BC.
You should have the entire BC inspected and serviced annually by an authorized Hollis
dealer to ensure it is operating properly and that no components are showing signs of
wear.
Pre Dive Care
Before each dive check to make sure your equipment is working properly. If any piece of
equipment is not working properly, DO NOT USE!, and return to your authorized Hollis
Dealer for repair.
□ Under pressure, attach the Low Pressure Inflator Hose to the Inflator and depress
the inflator button to make sure it is working properly.
□ Check for leaks at connection of inflator.
□ Check Oral Inflation/Deflation button is working properly.
□ Fill the BC System with air and check to make sure there are no leaks in the
Bladder. (Test both Bladders separately on Dual Bladder System)
□ Check all dump valves to make sure air is not leaking in the closed position and
that the air can be easily dumped.
□ If using Integrated Weight System, make sure weight pockets are securely
fastened.
Post Dive Care
To keep your BC in top condition, follow these procedures, in sequence, after each day of
diving:
□ Fill the BC one third full of fresh water through the inflator mouthpiece.
□ Inflate fully, then rotate and shake, ensuring a complete internal rinse.
□ Hold upside down and completely drain the water through the mouthpiece.
Document #12-4075
□ Thoroughly rinse the outside of the BC with fresh water.
□ Store partially inflated out of direct sunlight in a cool, dry place.
□ Periodically add BC disinfectant (available in dive stores) to rinse water to kill
any bacterial growth.
□ Transport your BC in a padded carrying case or equipment bag, separated from
sharp items (e.g., dive knife, spear gun, etc.) that might puncture the bladder.
□ You should also protect the inflation system from damage from heavy objects
(e.g., dive light, weights, first stage, etc.).
Assessment of Risk
Hollis BC’s are designed and intended for use by divers who have successfully
completed a nationally recognized course in scuba diving. Hollis gear must NOT be used
by untrained persons who may not have knowledge of the potential risks and hazards of
scuba diving. As with all underwater life support equipment, improper use or misuse of
this product can cause serious injury or death.
Document #12-4075
RIDE Harness
TECHnically the world’s best travel BC. It’s lightweight at just over 5lbs but
packed with technical features. It includes a simple yet strong nylon harness that is
one size fits most and easily adjustable. The wing is a rugged one-piece 1000 denier
CorduraTM and comes in two sizes: 23lbs and 37lbs. Standard are the stainless steel
2" d-rings on the shoulders and hips, padded crotch strap, back pad and lower
storage pouch. It also has the ability to dive singles or twins (depending on wing
size).
□
□
□
□
□
□
□
□
□
□
□
Lift capacity 23 lbs. & 37 lbs.
One size fits most
1000 denier CorduraTM w/ 15 mil PU lamination - one piece
Contoured, lightweight backpack w/back pad, lumbar support & storage
pouch
2 shoulder SS bent D-rings, 2 lower hip SS D-rings
Quick adjust shoulder and waist strap
Right shoulder inflation with elbow
Lower left pull dump
10lb (4.5kg) interchangeable quick release weight pockets - optional
5 lb (2.27kg) non-dumpable rear weight pockets - optional
System weight: 5.5 lbs
208.1170.023
BC, RIDE, 23lbs Wing
208.1170.037
BC, RIDE, 37lbs Wing
Document #12-4075
RIDE Harness
(Front View)
RIDE Harness Adjustment
Adjustment to the RIDE harness is made by simply unthreading the shoulder
straps on both the left and right sides to match. The harness comes
preassembled and with enough webbing to allow a one size fits most
arrangement.
Document #12-4075
RIDE Harness
(Rear View)
Document #12-4075
Adjusting Tank Straps
For the most secure tank attachment, use the following steps to weave the cam band to
the buckle. Nylon may loosen when wet, so for an extra secure hold, soak the straps in
water before tightening:
□ Pull the band through SS attachment at the base of the buckle (Labeled 1) so the
band is now on the on the outside of the buckle (Fig.1).
□ Now weave the band through the middle slot (Labeled 2) from outside to inside
(Fig.2).
□ Now weave the band through the bottom slot (Labeled 3) of the buckle so the
band is against the tank (Fig. 3 & 4). Pull band tight to make sure there is no
slack around the tank or in the buckle weave (Fig.5).
□ With the band tight, weave the band through the top slot (Labeled 4) of the buckle
form inside to outside (Fig.6). Pull tight and fold the buckle over so it snaps
against the tank (Fig.7 & 8). Now attach remaining webbing to the webbing
against the tank using the attached Velcro (Fig.9).
Steps in Fig.6 through Fig.9 can be done without the tank to make weaving the cam
straps through the buckles easier. Make sure to leave enough slack to insert tank.
Fig.1
Fig.2
Fig.3
Fig.4
Fig.5
Fig.6
Fig.7
Fig.8
Fig.9
Document #12-4075
Loading Weight Pouches and Pockets (Optional)
Remove weight pouch from pocket and open flap of the weight pouch (Fig.1). Insert
desired weight (up to 10lbs) into pouch (Fig.2) and secure flap of the weight pouch with
the Velcro (Fig.3). Once the weight is secure on the pouch, insert weight pouch into
pocket so that the buckle flap will fold outwards toward the Velcro patch. Adjust the
pouch so that it fits securely in the pocket and then fold buckle flap to attach Velcro.
Insert pouch buckle into the pocket buckle. Make sure it snaps into place. See Fig.4 for a
view of the weight system for this harness.
WARNING: The maximum weight capacity for each Weight Release Pocket is 10
pounds. Amounts that you can actually load may be less due to the type and shape of
weights being used.
Dropping Weight Pouches from Pocket: In an upright position, grasp the handles of
both pockets (right and left) and firmly pull the pouches completely out of the pockets.
Hold the pouches out so they are clear of all of your gear, and drop them.
WARNING: Dropping the weights will present you with immediate positive buoyancy.
Note: Practice this technique with and without weights while out of the water with the
BC removed from a tank. DO NOT use the drop handles to lift or carry the pouches and
store the weight pouches in a position that will not distort the curved shape (weights
down or removed).
WARNING: Use of the weight drop system may not afford the diver with face up
flotation, especially if the weights are loaded towards the front of the pouches.
Fig.1
Fig.2
Fig.3
Fig.4
Document #12-4075
Adjusting Waist Buckle & Crotch Strap
Waist Cam Buckle: Insert waist cam buckle on left side webbing. See Fig.1 for
recommended buckle weave.
Fig.1
Crotch Strap: Opposite of looped end of the crotch strap, insert slide leaving about 8”
of webbing between the slide and the end of the webbing. Then weave webbing through
the larger bottom middle slot and back through slide. This is where adjustment to the
crotch strap will be made. The looped end will thread onto the waist strap.
Document #12-4075
Bungee Cord
All of our bungeed bladders have the option of disassembling the bungee to allow
adjustment or removal.
First unclip the bungee from each side of the bladder on the lower inside D-rings.
Remove the clip from one end of the bungee and pull bungee through the guides. It is
recommended to reattach the clip to the bungee so you do not lose it.
Warning: The tighter the bungee is adjusted, the less air will fill the bladder. This could
pose a safety or trim issue if not properly adjusted.
Important: If using this kit to mount double tanks using our doubles bands, wing bungee
should be removed completely.
Donning & Fitting
Before any dive make sure that your BC System fits properly. With your required
exposure suit on, don your BC System. Make sure it fits snugly, but is not too tight
around your shoulders, waist, and crotch (when using a crotch strap). Two fingers laying
flat should fit snugly between the shoulders and webbing. Make any adjustments as
necessary. Adjust the D-rings and clips to your desired position. A good starting point is
a position where you can reach your chest, with your hand held flat, and holding your
arm and hand parallel to the ground. A properly fitted system should feel snug and
comfortable. Fine tune the fit as needed.
Attention: If you have any questions regarding your Hollis gear, please contact Hollis
Gear and speak with one of our technical support representatives.
Phone: 888.383.DIVE
Email: [email protected]
Document #12-4075