1
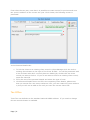
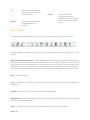
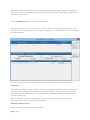
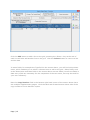
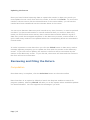
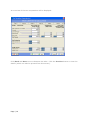
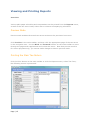
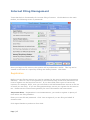
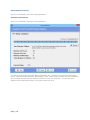
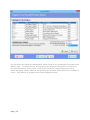
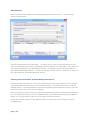
User Guide
Page | 1
Table of Contents
Introduction ....................................................................................................... 3
Starting Trust Tax .............................................................................................. 3
Sorting and Filtering Clients ............................................................................... 4
Print Summary and Print Proforma Letters ............................................................. 4
Converting Returns from Previous Years ............................................................ 5
Maintaining Client Details .................................................................................... 5
Creating a New Client ......................................................................................... 5
Tax Office .......................................................................................................... 6
Creating Returns for Previous Tax Years ................................................................ 7
Adding Supplementary Forms .............................................................................. 7
Adding/Deleting Supplementary Pages and Copies .................................................. 7
Navigating Trust Tax .......................................................................................... 8
Navigation Tree .................................................................................................. 8
Minor Toolbar ..................................................................................................... 8
Main Toolbar ...................................................................................................... 9
Data Entry and Data Views ................................................................................ 10
Normal Mode ................................................................................................... 10
Data Entry Mode .............................................................................................. 10
Reviewing and Filing the Return ...................................................................... 13
Computation .................................................................................................... 13
Viewing and Printing Reports ........................................................................... 15
Preview Mode................................................................................................... 15
Printing the Main Tax Return .............................................................................. 15
Output to PDF .................................................................................................. 16
Form 64-8 ....................................................................................................... 16
Internet Filing Management ............................................................................. 17
Registration ..................................................................................................... 17
Username/Password.............................................................................................................. 18
Checking the Return.............................................................................................................. 18
Attachments ............................................................................................................................. 20
Printing the Declaration and Submitting the Return ................................................ 20
Backing Up and Restoring Data ........................................................................ 21
Page | 2
Introduction
Keytime Trust Tax allows you to create an unlimited number of returns for trusts and
estates. Trust Tax features a built in internet filing module, which installs automatically.
Starting Trust Tax
Open Client Manager and click the Trust Tax 2015 button from the Programs group in the
Navigation Pane; you will be presented with the following screen:
If this is the first time you have used Trust Tax this screen will contain only the demo tax
return details, if you have used Trust Tax already then your clients and returns will be
displayed.
Page | 3
Sorting and Filtering Clients
In the bottom of the Open Tax Return Screen you have several options for sorting and
filtering clients:
Filter Clients by Tax Year: In the Select Tax Year frame click the tax year you wish to
work with; clients with returns in that year are then displayed, or click All to display all
clients.
Sort Client List: You can sort clients by clicking the drop down in the Sort List By field
and selecting one of the options. You can present clients in either ascending or
descending order by clicking AZ or ZA buttons.
Search for a Client: To search for a return first click Search for Return, in the Search
for field type the client name or part thereof and click the Search button. To cancel the
search results click the Cancel Search button, which appears to the right of the Search
button.
Tip: When you first install Trust Tax you may find a welcome screen keeps appearing
when you start the application, to suppress the welcome screen uncheck the Show Help
on Startup option in the bottom centre of the Open Tax Return screen.
Print Summary and Print Proforma Letters
Print summary presents various print options; you can select any combination of options
and produce a report. Check the Select and print Proforma's option to select a range of
clients and generate proforma letters:
Page | 4
Click the Print button, select the required clients and click Print, the proformas will
appear initially on screen, click the Print button on the top left. Note that each proforma
consists of a letter and checklist (2 pages).
To amend the proforma letter open any tax return, click the Tools menu then Amend
Proforma Letter and amend the wording, click Save and Exit.
Converting Returns from Previous Years
If you have created tax returns using an earlier version of Trust Tax these returns can be
automatically brought forward into this year’s version of the software. You will be
prompted as part of the year end process to create tax returns for all active clients, click
Yes to create tax returns for the new year. If you click No you can create tax returns for
the new tax year by clicking on the individual’s previous year’s return.
The current year return is created based on the previous year return. The original return
is retained and you will see the return listed for each of the years.
Maintaining Client Details
From the Open Tax Return screen you will notice two other tabs; Client Details and Utils
(we discuss utils later in the manual), click the Client Details tab; you can enter details
into any enabled field, the detail in the disabled fields comes from the main tax return.
Creating a New Client
You create clients in Client Manager and add jobs to clients by selecting job types in the
Jobs frame of the Practice tab in the client record. Adding an SA900 job and selecting a
tax year to a client record will make the client available in the Trust Tax module and
create a tax return for the year specified.
Alternatively, you may create the client in the Trust Tax module and either add the client
or link it to an existing record in Client Manager. To create the client in the Trust Tax
module click the Create Return button in the Open Tax Return screen.
Page | 5
First select the tax year, note that it is possible to create returns for previous and next
tax years in addition to the current tax year. Click Create, the following screen is
presented:
In the Personal details tab:
1. To link the client to an existing client record in Client Manager click the Link to
existing client button to the right of the Client ID field. You will be presented with
a list of clients who don’t currently have an SA900 job, double click the client
record you want to link to. If you do not want to link to an existing client record,
enter the client ID
2. Fill in the rest of the personal details and select the type of trust.
3. Click Personal Details Cont. and fill in the remaining client details, please note
that you cannot file a tax return without a UTR; you can create the return without
it, but you will not be able to file until you have the correct client UTR.
Tax Office
Trust Tax now defaults to the standard national HMRC address. If you need to change
this an override button is available
Page | 6
Creating Returns for Previous Tax Years
You can create a tax return for a prior tax year based on the header information in the
current year tax return. To create a return for a prior year proceed as follows:
•
Open the current year return of the client you need to create the return for
•
Click the File menu, select Create previous return
•
Choose the tax year you need to create (the list contains missing years)
Adding Supplementary Forms
Click the Tax Return Forms tab and select the required supplementary forms and
number of copies. It is possible to add/amend these pages once the return has been
started (see below).
Adding/Deleting Supplementary Pages and Copies
It is possible to add and remove supplementary pages once the tax return has been
started, proceed as follows:
To Add Supplementary Pages or Copies
Click the Client button on the main toolbar; you will be taken back to the tax form
details. Click the Tax Return Forms tab and select the supplementary form you wish to
add, enter the number of copies required. If you need extra copies, just increase the
number of copies of the relevant supplement. Click Finish and the pages will be added.
To Delete Supplementary Pages or Copies
Click the Edit menu, select Delete Supplement, select the supplementary page to delete
then select the copy to remove.
Page | 7
Navigating Trust Tax
Navigation Tree
The pages of the return can be found in the navigation tree down the left of the main
screen:
Minor Toolbar
At the top of the left hand navigation tree are six small (or minor) icons:
+
Expands all items in the
Navigation tree.
Tick
-
Page | 8
Collapses all items in the
Navigation tree.
Marks selected pages of
the return as complete, for
your own reference only.
X
Notes
Marks selected pages as
incomplete, for your own
reference only.
Check
The Notes button allows
general notes to be
entered.
The Check button
launches the return
validation routine (checks
for errors before internet
filing).
Main Toolbar
In addition to the drop down menus there is a main tool bar, which looks like this:
We will address the Normal, Data Entry and Preview Mode buttons a little later in this
section.
Back and Forward Buttons: Move between sections and pages, using these buttons at
the end of every page you will be prompted to mark that page is complete, note that this
option affects only the appearance of the pages as they are listed in the navigation tree
(down the left of the main screen) and has absolutely no effect on the completeness of
the return; it is not necessary to mark all the pages as complete before filing your return.
Save: Saves changes.
Start: Click Start to go back to the Open Tax Return screen without closing the application
completely.
Client: Click Client to return to the tax form header details.
Data Entry: Clicking Data Entry launches a transactional data entry screen for the page
you are currently working on.
Print: Launches various options for printing and previewing the tax return.
Page | 9
Calculate: Use calculate to view a breakdown of the tax computation once you have
finished capturing data.
Exit: Closes the application
Data Entry and Data Views
Trust Tax has 3 separate modes for entering / reviewing data on screen:
Normal
Rapid Data Entry
Preview
Use the icons on the toolbar in the top left hand corner of the screen to switch between
these modes.
Normal Mode
Trust Tax launches in Normal mode by default and basically offers the user an intelligent
form filler for data entry. For some clients it may well be that this mode can simply be
used for completing the entire return.
Use the Navigation Tree on the left hand side of the screen in conjunction with the
Back and Forward buttons on the toolbar to move through the tabs and pages,
capturing data by entering figures and text in appropriate boxes.
Data Entry Mode
Whilst normal mode is possibly the best (and quickest) data entry method for certain
clients (and specific sections of the tax return) this isn’t always the case.
Page | 10
Data Entry mode provides a more comprehensive means of capturing data. Data Entry
allows you to enter transactions and detailed information that make up the contents of
the boxes in the form.
Click the Data Entry button on the main toolbar.
Note that the sections of the tax return remain visible on the left hand navigator tree,
but that the individual pages are no longer displayed. The buttons on the minor toolbar
are also disabled.
Click on a section in the navigation tree to launch that section in data entry mode.
Overview
In the above sample screen, a series of tabs are displayed related to various aspects of
the form, click on the tab heading to move between tabs. In the example above, the
Furnished Holiday tab appears once you click the Furnished Holiday Letting box in the
property detail grid.
Data is captured in some of these tabs in the form of a grid, in others you will be
presented with a series of tick and text boxes.
Working with the Grid
Grids are displayed as in the screen below:
Page | 11
Click the Add button to add a line to the grid, pressing the <Enter> key at the end of
each line will also add another line to the grid. Click the Delete button to remove a line
and its data.
In some fields, for example the Type field in the screen above, you will find a drop down
menu, which enables you to select a relevant item to add to the grid. Other fields, such
as the Description and Date fields in the screen above are text fields (not all text fields in
data entry mode are necessary for the completion of the tax return, but may be used for
your own reference).
Note the Copy Number field in the bottom right hand corner of the screen where there
are multiple supplementary pages. Click the back and forward arrows either side of the
copy number to move between copies.
Page | 12
Updating the Return
Once you have finished capturing data to a particular section in data entry mode you
must update the tax return form with the results, to do this click Finish. To review the
results in the tax return click the Normal button on the main toolbar, you will see the
results have been transferred into the relevant boxes in the return.
You can move between data entry and normal at any time, however, it must be pointed
out that if you have made entries in normal mode and then you move to data entry
mode you will find that some entries, that is entries that would be added to a grid in
data entry mode do not appear anywhere in the data entry screens; entries made in a
grid in data entry mode are not updated when the corresponding boxes are amended in
normal mode.
It is also important to note that when you click the Finish button in data entry mode a
message appears prompting you to update the form with the entries in the data entry
screen. If you click Yes to update, the entries in the form will be overwritten by the
entries in the data entry screen. If you click No, the screen will close and the entries in
the form will not be overwritten.
Reviewing and Filing the Return
Computation
Once data entry is complete, click the Calculate button on the main toolbar
Note that there is an option by default to launch the Keytime website to search for
program updates, selecting Launch will take you to the system where available updates
can be downloaded. You can suppress this message if you wish.
Page | 13
An overview of the tax computation will be displayed:
Click Back and Next to move between the tabs. Click the Preview button to view the
SA951 (which can also be printed from this screen).
Page | 14
Viewing and Printing Reports
Overview
Various plain paper schedules and computations can be printed from the Reports menu,
as well as the tax return itself, either with or without accompanying schedules.
Preview Mode
Preview mode enables the actual tax return sections to be previewed on screen.
Click Preview in the main toolbar, and then click the appropriate page of the tax return
in the navigation tree. Use the Back and Forward buttons on the main toolbar to move
through the pages and supplements and review the return. Note that preview mode is
for review purposes only; you cannot make changes to data in preview mode.
Printing the Main Tax Return
Click the Print button on the main toolbar or click the Reports menu, select Tax Form,
the following screen is presented:
Page | 15
Click the required page(s) and/or schedule(s) then click the Preview button in the right
of the window to preview the report on screen, or click the Print button to send directly
to your printer.
Specific schedules can be individually previewed and printed by selecting the appropriate
option with the Reports menu.
Output to PDF
All pages may be output to a PDF file. To output to PDF click the Tools menu, select
Options, then Configure, click the Print Options Tab and from the Print/Preview Report
drop down select PDF or both to simultaneously print and output to PDF.
Form 64-8
Form 64-8 can be printed by clicking the Reports menu, then 64-8. There is also a
Data Entry Screen within the Rapid Data Entry menu to capture relevant information
for the form.
Additional reports and in particular tax calculations can be found by clicking the Reports
menu.
Page | 16
Internet Filing Management
Trusts has built in functionality for internet filing of returns. Click Submit on the main
toolbar, the following screen is presented:
Once you begin to file returns, the system will log submission results. This log can be
viewed in the form of a report by clicking the History button. Click Next.
Registration
Before you can file tax returns you need to register for the service with the Government
Gateway. There is a link to the gateway in the internet filing screen and instructions on
how to register can be found on the site. If you have filed other types of returns by
internet, for example, P35’s, then you will need to add self-assessment returns to the list
of items you are filing. If you are filing partnerships, ensure you register for this service
too. Please see the Government gateway for more information and instructions.
Important Note: Registration is not instantaneous; you need to register in plenty of
time before the filing deadline.
Enter your user ID and password. Click I am an Agent if you are filing on behalf of
someone else.
Click Agent Details to produce a form 64-8
Page | 17
Username/Password
Store your Gateway user name and password.
Checking the Return
Store your Gateway user name and password.
You can see from the example above that there are a number of errors and warnings.
Errors must be resolved before attempting to file, notice that the Next button is disabled
at this stage and will not be enabled until the errors are resolved. To see the error
details click the Details button, the screen looks like this:
Page | 18
You can filter the results by clicking Pass, Warn or Fail or any combination of those in the
bottom right. To resolve errors, you must exit the Internet Filing screen and return to
the relevant section of the return. Click Print to produce a report listing the errors,
which also gives further details of the problem and is useful where there are a number of
errors. Click Return to go back to the main validation screen.
Page | 19
Attachments
Click the Attachments button to manage attachments to the return. The following
screen is presented:
A file is created within the Tax folder. To attach a file, click the browse button to the
right of the Selected File field, navigate to the file location and click Open. The path and
file name will appear in the Attachment frame. Click Attach and the file will appear in
the Added Attachments frame. To preview the file, double click it. Click Exit to return to
the main Internet Filing Management screen.
Printing the Declaration and Submitting the Return
Once you have resolved any errors you will be able to proceed to filing, to print a hard
copy declaration click the Print HC Declaration button. To submit the return, click the
Submit button. Tax will attempt to contact the gateway and submit the return; you will
see the progress on screen as this happens.
Once you start to submit returns a log of submissions and their results will start to build
up. To access the history click the History button in the Internet Filing History Options
frame, or click the History (All) to see a history of all tax returns.
Check the various options in the Status frame to record the various stages of filing
completeness.
Page | 20
Backing Up and Restoring Data
We cannot stress enough the importance of maintaining proper backups of your client
data. This will ensure that should the worse happen with your hardware or your place of
work, you will be able to quickly get back up and running and your business will
continue.
All Keytime products ship with a build in backup utility. You have two options available:
Backup an individual return, or backup all returns.
To backup an individual return, go to the Open Tax Return window (click the Start
button on the main toolbar if you are already in a return) and click the Itils tab, click
Backup/Restore tax returns. Click Backup button and select the return(s) you wish to
backup, click Backup. You will be prompted for a location to save the backup file,
navigate to a suitable location and click Save, the backup will commence.
To restore and individual return, follow the instructions above but click the Restore
option rather than Backup.
To backup all returns, exit Trust Tax and click the Start button on your computer,
select All Programs and locate the Keytime group of icons, select Trusts 2009 and click
the Utils folder, select Backup. You must ensure that Trust Tax is closed before you
continue with the backup, otherwise the backup will fail. Navigate to a suitable location
to save your backup file and click Save, the backup will commence.
To restore all returns, follow the instructions above but click the Restore option rather
than Backup.
Page | 21