1
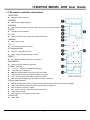
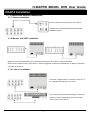
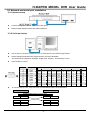
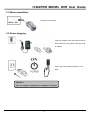
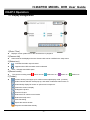
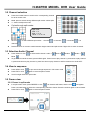
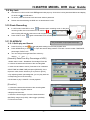
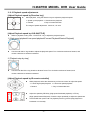
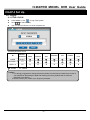
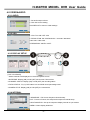
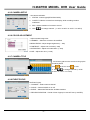
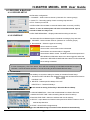
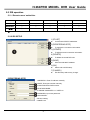
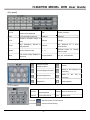
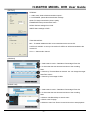
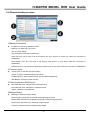
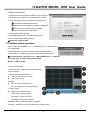
H.264PRO MODEL DVR User Guide
CONTENTS
Date: 2008/09/23 VER: 1.0
Caution
……………………………………………………………….. 3
Package
……………………………………………………………….. 3
Specification
……………………………………………………………….. 4
CHAP.1 Appearance
1-1 Front panel introduction
……………………………………………………………….. 5
1-2 Back panel introduction
……………………………………………………………….. 7
1-3 IR remote controller introduction
……………………………………………………………….. 8
CHAP.2 Installation
2-1 Camera and monitor installation
……………………………………………………………….. 9
2-2 Sensor and alarm installation
……………………………………………………………….. 10
2-3 Network and serial port installation
……………………………………………………………….. 11
2-4 HDD installation
……………………………………………………………….. 12
2-5 Mouse installation
……………………………………………………………….. 13
2-6 Power plugging
……………………………………………………………….. 13
CHAP.3 Operation
3-1 Display configuration
……………………………………………………………….. 14
3-2 Channel switch
……………………………………………………………….. 15
3-3 Audio switch
……………………………………………………………….. 15
3-4 View in sequence
……………………………………………………………….. 15
3-5 Freeze view
……………………………………………………………….. 15
3-6 Zoom view
……………………………………………………………….. 16
3-7 PIP view
……………………………………………………………….. 16
3-8 PTZ control
……………………………………………………………….. 16
3-9 Keylock
……………………………………………………………….. 17
3-10 Panic Record
……………………………………………………………….. 17
3-11 Playback
……………………………………………………………….. 17
CHAP.4 Set up
4-1 Log-in
……………………………………………………………….. 20
4-2 Video & Audio
……………………………………………………………….. 22
4-3 Record & Backup
……………………………………………………………….. 24
4-4 Configuration
……………………………………………………………….. 25
4-5 Network
……………………………………………………………….. 27
4-6 PTZ
……………………………………………………………….. 28
4-7 Others
……………………………………………………………….. 29
-1-
H.264PRO MODEL DVR User Guide
CHAP.5 IRS and Network
5-1 Install Internet Relative Software
………………………………………………………………..
30
5-2 Remote access DVR
………………………………………………………………..
31
5-3 IRS operation
………………………………………………………………..
32
5-4 Remote BACKUP process
………………………………………………………………..
36
5-5 PLAYER operation
………………………………………………………………..
37
1. Router setup
………………………………………………………………..
39
2. System configuration
………………………………………………………………..
43
Appendix
Disclaimer:
z
The product names mentioned in this manual are used as identifications only. The copyright of these names may
belong to other companies.
z
The product specifications and information are for reference only. They may be updated from time to time without
notification.
-2-
H.264PRO MODEL DVR User Guide
Caution
z
For you safety, disconnect the power before moving the DVR, installing, or replacing any parts or hard drive.
z
Make sure all the power cables and wires are properly set up before using the DVR. Contact your distributor
immediately if there is any defect.
z
To avoid a short circuit, don’t leave any unnecessary parts inside the DVR.
z
Please avoid dramatic changes of the environment, such as dust, temperature, and humidity. Keep the DVR in a
temperature ranging from 5℃~40℃.
z
Keep the DVR in a well-ventilated place and away from any heat-generating objects.
z
Do not block the DVR’s fan and vent.
z
Do not expose this unit to direct sunlight.
z
If you are not sure of the installation and setup, please consult the technicians.
z
If there’s any damage to this unit or the power supply, do not fix it yourself. Consult the technician or the distributor.
Package
z
DVR Main unit
×1
z
Power Supply
×1
z
Power Cable
×1
z
Remote Controller
×1
z
User Manual
×1
z
Software CD
×1
z
Accessories
×1
z
AAA Battery
×2
Please contact your distributor immediately if any of the above items is missing.
-3-
H.264PRO MODEL DVR User Guide
Specification
4/8/16 CH H.264 Stand Alone DVR
MODEL
VIDEO
Input
4CH
8CH
16CH
4CH
8CH
16CH
Output
MAIN/SPOT/VGA
Audio Input
AUDIO
1CH
Audio output
1CH
Zoom
Aequence
Available
FPS
RECORD AUDIO
PLAYBACK
Digital Zoom × 2
Available
Resolution
Detection Division 32×24
NTSC–352×240 / PAL–352×288
NTSC-120 IPS
PAL-100IPS
Compression
H.264 DUAL CODEC
Quality
Normal / High /Highest
Storage Device
SATA HDD × 2
Format
G.726 or mp2
Search mode
Jog.shuttle
4CH
1 / 4 / 9 / 16
PIP
Motion
RECORD
2CH
MIC input
Split Screen
LIVE VIEW
1CH
NTSC-240 IPS
PAL-200IPS
NTSC-480 IPS
PAL-400IPS
Percentage/ Time & Date /Event
For Easy Search
Remote Controlle Remote viewer / remote backup
NETWORK
IE
Available
DDNS
Available
remote user access 4 persons or more
Speed Value
BACKUP
ALARM
OTHERS
Backup
Network backup、CD/DVD Backup、USB Backup
Sensor input
4
Relay output
1 (NC/CO)
PTZ Control
RS485,supports PELCO D and other protocols
Control
Language
Mechanism
Adjustable
8
16
Front panel / Mouse / IR remote Controller
English/Spanish/German/France/Chinese…
Dimension/ Weight 430mm(W) x 400mm(D) x 92mm(H) / 8 KG (w/o HDD)
Power
Switching Power (DC 12V, 6.67Amp)
-4-
H.264PRO MODEL DVR User Guide
CHAP.1
Appearance
1-1 面板介紹
1-1 Front panel introduction
1.[DVD-RW]-Built-in DVD-RW for DVD / CD back-up.
2.[USB port]-Backup and up
3. [IR Receiver & LED Lamps]
z
IR Remote Controller Receiver.
z
DVR Status LED:
RUN- Flashes when play picture by picture through J. Shuttle.
ACTIVE- On when the J. Shuttle is ready to use.
REC- On while recording and flashes at stand-by mode, such as no motion triggered at the motion record mode
PLAY- On while playback.
FULL- On when HDD storage is full.
NET- On when the DVR is connected remotely.
4.[ 1~16 Channel Button / PTZ]
z
Switch full screen among channels, 1 for Channel 1, 2 for Channel 2, and so on.
z
Press [PTZ] to enter the PTZ control mode. Press the PTZ buttons to control the PTZ camera directly.
5.[ Control]
z
MODE- Switch among full and split screen displays.
SEQ- Full screen sequencing or the smaller screen sequencing in PIP mode.。
z
PIP- To enter the Picture in Picture mode from full screen mode。
z
ZOOM- To enlarge the picture. Use the direction buttons and move to the area to be enlarged.
z
K.LOCK- Lock the buttons on front panel.
z
PTZ- Freeze in full screen or split screen.
z
FREEZE- Freeze in full screen or split screen.
6.[MENU & ESC]
z
MENU- Enter the menu and set up.
z
ESC- Cancel previous function
-5-
H.264PRO MODEL DVR User Guide
7.[ Jog Shuttle]
z
In playback: inner rim to play picture by picture, outer rim to play fast forward and backward. Turn clockwise to
play fast forward, and counterclockwise to play fast backward.
8.[Record / Playback function]
z
REC- To activate Emergency Record at continuous, Super fine quality and Best resolution. Press STOP to exit
the Emergency Record mode.
z
STOP- Stop the emergency record and return to the record schedule programmed in the Record Setup.
Stop playback and return to the LIVE mode.
z
SEARCH- Enter the Search dialog window to search by percentage, date / time, or the event list.
z
PLAY- Play the recorded video beginning from the end of previous playback.
9.[ Directions & ENTER]
z
Directions- Navigate the menu.
z
ENTER-Confirm the selected options
10.[AUDIO / MIC ]
z
AUDIO- Press to play the audio, and press again to go to the next audio channel.
11.[ + & -]
z
Adjust set-up value.
z
Adjust display orders of channel.
-6-
H.264PRO MODEL DVR User Guide
1-2 Back panel introduction
[4CH]
[8CH]
[16CH]
1.RS485, Relay Output, Sensor Input
z
RS485, for connection to PTZ cameras.
z
16 sensor inputs and 1 relay output.
2.VGA-Connection to a VGA monitor or TFT LCD.
3.RS-232C port - Connection to PC or other DVR control devices.
4.ETHERNET port - Connection to Ethernet device
5.P/S2 port - For PS/2 Mouse connection.
6 Audio Input/Output - Audio input 1~4 channel and Audio output 1 channel
7.[1~16 Camera Input/LOOP Output]
z
CAMERA IN - channel 1~16 camera input.
z
LOOP - channel 1~16 camera loop out。
z
MONITOR - Connection to monitor.
z
SPOT - second monitor output. Once alarm or motion is triggered, it will pop up automatically or display in
sequence according to the set up.。
8. Power Input]
z
DC power input (DC12V)
9. Power Switch - P Power ON/OFF。
-7-
H.264PRO MODEL DVR User Guide
1-3 IR remote controller introduction
1.[DVR LED]
z
Displays current DVR’s ID.
2.[MODE]
z
Multi-screen display selection
3.[AUDIO]
z
Press to play the audio, and press again to go to the next audio channel.
4.[ESC]
z
Cancel previous functions。
5.[1~16]
z
Switch channel in live or playback; password entering.
6.[MENU]
z
Enter menu or exit.
7.[+ / -]
z
For value adjustment in set-up.
8.[ Direction/Enter]
z
Direction - Navigate the menu.
z
Enter - Select or adjust options in setup.
9.[REC]
z
To activate Emergency Record at continuous.
10[SEARCH]
z
Open the search window in playback.
11.[PLAY function]
z
z
z
z
z
z
PLAY - Play the recorded video directly.
PAUSE- Pause playback
STOP- Stop playback and return to the LIVE mode.
REW- Fast rewind, press again to select the speed.
FF- Fast forward, press again to select the speed.
:Rewinds to beginning or forwards to end of the recording
12.[Live view function]
z
z
z
z
z
z
ZOOM- To enlarge the picture. Use the direction buttons and move to the area to be enlarged
SEQ- Automatically display full screen or split screen in sequence.
FRZ- Freeze the screen in display.
PIP- Picture in Picture. Enter PIP mode in full screen.
FUNC-Open tool bar.
PTZ- Enter the PTZ camera control mode.
13.[DVR ID]
z
Select DVR
-8-
H.264PRO MODEL DVR User Guide
CHAP.2 Installation
2-1 Camera and monitor installation
2-1-1 Camera installation
Connect camera to DVR camera in CH1~CH16
※Please do not start the DVR before the camera.
installation is done.
2-1-2 Monitor and SPOT installation
Monitor: Connect the MONTIOR port on the DVR back panel to the “video in” port on the monitor.
SPOT: second monitor output. Once alarm or motion is triggered, it will pop up automatically or display in sequence
according to the set up.
2-1-3 Loop out installation
To monitor a single channel, connect the “loop out” of
the corresponding channel to a monitor.
To record a specific channel individually, connect the
“loop out” of the corresponding channel to a DVR,
VCR, or other record device.
-9-
H.264PRO MODEL DVR User Guide
2-2 Sensor and alarm installation
2-2-1 Input & Output
[4Channel]
[8Channel]
[16Channel]
1.[D1~D16 Alarm Input/GND for Location]
z
16 Sensor inputs, for sensor input installation.
2.[Relay Output NO/NC/COM]
z
The application of relay output is NO+COM + NC+COM.
2-2-2 Sensor installation
z
Alarm will be triggered once one (or more than one)
alarm input (D1~D16) causes short circuit or open circuit
with GND.
2-2-3 Relay output installation
z
Alarm output can be NO or NC, depending on the
settings.
z
NO-COM: the NO and COM terminals are open-circuit,
and it’ll become closed-circuit when alarm triggered.
z
NC-COM: the NC and COM terminals are closed-circuit,
and it’ll become open-circuit when alarm triggered.
- 10 -
H.264PRO MODEL DVR User Guide
2-3 Network and serial port installation
2-3-1 Network setup
z
Connect the network cable to “Ethernet”on back panel.
z
Ethernet Setup between ADSL and Cable is different.
2-3-2 Serial port setup
z
User is able to connect the COM port of PC or other device to the DVR through RS232.
z
RS232 settings (baudrate/ parity/ length/ stop bit ) are NOT adjustable.
The transmission baudrate is 19200bps, length 8 bits, stop bit 1, and the parity is none.
z
ASCII-CODE is 1 BYTE.
connector description
1
2
3
4
5
6
7
8
9
z
DCD
RxD
TxD
DTR
GND
DSR
RTS
CTS
NC
ASCII-CODE
Func. CODE Func. CODE Func. CODE Func. CODE Func. CODE
REC
R
RIGHT
K
MODE
D
CH3
CH11
!
@
STOP
S
NEXT
N
PIP
I
CH4
4
CH12
PLAY
P
ENTER
0X0D
SEQ
Q
CH5
5
CH13
#
SEARCH
E
-
<
J.SHU
L
CH6
6
CH14
$
MENU
M
+
>
KLOCK
C
CH7
7
CH15
%
UP
U
PTZ
T
QPLAY
Y
CH8
8
CH16
^
DOWN
J
ZOOM
Z
CH1
1
CH9
9
LEFT
H
FRZ
F
CH2
2
CH10
0
To connect DVR to a PC, users must use a twisted RS232 cable, as the illustration.
DVMR unit
3
Other device (PC)
D-SUB 9 cable (twisted RS-232C cable)
#2
RxD
RxD
#2
#3
TxD
TxD
#3
#5
GND
GND
#5
- 11 -
H.264PRO MODEL DVR User Guide
2-3-3 PTZ camera installation
z
Please connect the PTZ’s D+ to the DVR’s D+ , and D- to D-.
z
After the connection and the related setup is done, users are able to control the PTZ camera through the front
panel buttons.
2-3-4 Microphone and Speaker installation
[Audio input / Microphone input]
[Audio input]
z
4ch Audio Input is available for 16CH, 2ch for 8CH, 1ch for 4CH.
z
Audio input should be connected according to assigned camera
channels for audio recording.
z
Audio channel 1 is assigned for camera channel 1~4, audio channel
2 for camera channel 5~8, audio channel 3 for camera channel
9~12 and audio channel 4 for camera channel 13~16.
[Microphone]
z
z
1 Microphone Input is available. It does not record microphone
input.
Microphone is to support TWO-WAY Audio, for communication with
remote user.
z
1ch Audio Output is available.
z
Connect a speaker to the audio output, DVR can play the audio
[Audio output]
during the live view and playback.
z
Selected Audio channel at DVR will be output
2-4 HDD installation
[Steps]
1. Disassemble the bolts as illustrated.
2.HDD Installation:
Please insert the first HDD as shown in n,insert the second HDD as
shown in o.
- 12 -
H.264PRO MODEL DVR User Guide
2-5 Mouse installation
PS/2 port in back panel
2-6 Power plugging
Insert the adapter to the rear power socket of
DVR. Insert the power cable to the other side
of adapter.
Plug in the power cable and power on the
DVR.
Caution !
Only the original supplied power adaptor is allowed.
- 13 -
H.264PRO MODEL DVR User Guide
CHAP.3 Operation
3-1 Display configuration
1.[Date / Time]
z
Displays current system time or the recorded time in playback.
2.[Camera title]
z
Camera title of the displayed channel. Camera title can be modified in the setup menu.
3.[Status icon]
z
: Indicates the Audio output channel.
z
: Appears when HDD overwrite mode is selected.
z
100% : Indicates used HDD space.
4.[Record mode]
z
The current recording mode:
Panic record /
continuous rec /
Alarm rec /
5.[Toolbar]
z
Screen division panel pops up for various screen split display mode. (1/4/9/16)
Audio Channel Selection Panel pops up, and audio of selected channel turns on.
Automatically display full screen or split screen in sequence.
Freeze the screen in display
Enlarges the picture
Picture in Picture.
Enters the PTZ camera control mode.
Enters the setup menu.
Panic Recording
Opens the search window.
Plays the recorded video directly.
- 14 -
Motion rec.
H.264PRO MODEL DVR User Guide
3-2 Channel selection
z
Press the number button to switch to the corresponding channel
for its full screen view
z
Mode: press to switch among different split modes: 4/9/16 splits.
z
+/-: button to adjust the order.
z
Cycles through split modes:
Split mode:
4CH: 1 / 4
8CH: 1 / 4 / 9
16CH: 1 / 4 / 9 / 16
z
Click on
channels
z
to select different split modes,1 channel
/ 4 channels
/ 9 channels
/ 16
.
Double left click on mouse to switch between single channel and split screen. Right click to switch channels.
3-3 Selection Audio Channel
z
Press AUDIO or click
to select audio channel .Audio 1
/Audio 2
/Audio 3
/Audio 4
/Mute
z
To go to the next audio channel, press AUDIO again. Press Once to play channel 1; press twice to play channel
2; press three times to play channel 3; press four times to play channel 4 and five times to turn Audio OFF.
3-4 View in sequence
z
Press SEQ or click
z
Press ESC or click
z
Scroll in single channel or split mode.
,to put camera image sequence in full screen mode
again to cancel sequence mode.
3-5 Freeze view
3-5-1 Freeze in split mode
z
In a split screen mode, press FREEZE or click
,all channels will freeze, and the icon
will appear.
Press a number button to select the corresponding channel to freeze. Press the number again to cancel freeze.
z
Press ESC or click
again to cancel sequence mode.
- 15 -
H.264PRO MODEL DVR User Guide
3-6 Zoom in view
z
In LIVE mode, Press ZOOM or click
.The image Zooms in x2. Use the mouse
to move selected frame. Press ESC or click
again to exit zoom mode.
1.[Specific enlarge area]
z Use the direction buttons to choose an area
2.[ Zoom in area ]
z
Show the enlarge area coordinate from full screen channel
3-7 Picture in picture
z
z
z
In LIVE mode, Press PIP or click
Press ESC or click
to enter Picture in Picture mode.
again to exit PIP mode
Press front panl buttons1~16 or left click on mouse to switch
channels at main screen X,sub screen Y scroll automatically.
3-8 PTZ control
z
In LIVE mode, Press PTZ or click
z
PTZ control function:
z
to enter PTZ control mode. then enter passwords
NEAR
FOCUS NEAR
SET
SET PRESET
FAR
FOCUS FAR
CLEAR
CLEAR PRESET
OPEN
IRIS OPEN
GOTO
GOTO PRESET
CLOSE
IRIS CLOSE
AUTO
AUTO SCAN
Use arrow keys or mouse to control PTZ.
Place mouse pointer on the center of screen and use scroll wheel to ZOOM IN/ZOOM OUT。
- 16 -
H.264PRO MODEL DVR User Guide
3-9 Key lock
z
Hold down K.LOCK until K.LOCK dialogue window pops up. Click OK to lock keyboard and Mouse and display
K.LOCK icon
of DVR status.
z
To unlock, press and hold K.LOCK and enter Admin’s password.
z
Please note that rebooting the DVR can not deactivate K.LOCK.
3-10 Panic Recording
z
In LIVE mode, Press REC or click
to activate panic recording mode. In the panic
recording mode, the record mode icon will switch to
.
and recording will start at continuous mode at highest quality.
z
Press STOP or click
again to deactivate Panic recording.
3-11 PLAYBACK
Play and search require passwords input.
3-11-1 Quick play and Search
z
Press PLAY key or click
z
Press SEARCH key or click
to start playback starting from the last playback time.
to open the search dialog window. There are 3 search modes: TIME/DATE,
percentage, EVENT LIST.
z
You can change the target Date/Time values by
clicking “+" and “-".
[Search by Date/Time & by Percentage of HDD]
1.Select search mode – Date&time/ Percentage /Event list
2. It shows the start and end times of the recording data
3. Insert time and date to seach ( Data has to be in between
START TIME and END TIME )and press [SEARCH]. If the
request is valid, the dvr will allow you to press on [PLAY]
4. By adjusting search percentage bar, you can play back the
corresponding part of the recording.
5.PLAY-Start to play / CANCEL- Cancel playback.
[Event list ]
1. It shows the start and end times of the recording data.
2. Event list page navigation buttons.
3.Display total even lists.
4. Shows the time and type of events: Motion detection
(MOTION), Image lost (LOSS), Alarm trigger (ALARM).
5. Event list scroll bar
- 17 -
H.264PRO MODEL DVR User Guide
3-11-2 Playback
1. Shows the date and time of the recording data.
2. [Status icon]
z
: the number represents audio output channel.
: Playback speed from 1/32X to 32X
: Playback status icon
(1X playback)
(Fast forward)
(Slow forward)
(Pause)
3. Record mode mark:
Continuous record /
Alarm record /
Motion record.
4. Playback function key:
Move to Beginning
Move to the end of recording and stop.
Playback in Reverse Direction.
Begin Playback.
Decrease Backward Playback Speed.
Increase Playback Speed
Pause
Exit
z
Click
then click
or
to playback step by step.
- 18 -
H.264PRO MODEL DVR User Guide
3-11-3 Playback speed adjustments
[Adjust Playback speed by Direction key]
z
While playback, using the direction keys to adjust the playback speed.
Speed up the playback Slow down the playback
Rewind
Play in forward direction
The range of speed adjustment: 1/32X~1X, 1X~32X
[Adjust Playback speed by JOG-SHUTTLE ]
z
While in playback mode, press “J.SHUTTLE ” key to adjust the playback speed.
1. [High speed playback/Low speed playback/Forward Playback/Rewind Playback]
z
Use the outer dial of Jog-shuttle to adjust the playback speed. Turn clockwise to advance forward, and
counter-clockwise to advance backward.
2. [Playback step by step]
z
Use the inner dial of the Jog-shuttle to advance frame. Turn clockwise to advance forward, and
counter-clockwise to advance backward.
[Adjust Playback speed by IR remote controller]
z
While playback, select the direction keys of remote control to adjust the speed.
X times high-speed playback. X times low speed playback.
Rewind.
z
Play in forward direction.
Adjust the speed by REW key (High-speed backward playback) or FF key
(High-speed forward Playback). Press the keys repeatedly to adjust the speed rate.
z
Click PAUSE then press can playback picture by picture.(Step playback in
backward or in forward).
- 19 -
H.264PRO MODEL DVR User Guide
CHAP.4 Set Up
4-1 Log-In
4-1-1 DVR LOG-IN
z
Press MENU or click
z
Click
z
Use CH. SELECTORS 0~9 to enter the password.
to login DVR system.
to switch USER.
※Default password & level
ID
Defaule
VIDEO
RECORD
CONFIGURA
SEARCH
NETWORK
PTZ
OTHERS
password
AUDIO
BACKUP
TION
ADMIN
(empty)
○
○
○
○
○
○
○
MANAGER1~3
1~3
X
○
○
X
○
○
X
USER1~6
1~6
X
X
X
X
X
X
X
PLAY
○ – Enable / X – Disable
Caution:
1. It is strongly suggested to change the password after the initial setup. Please keep records of
your passwords. Rebooting the DVR and resetting the factory defaults will not reset the
password to the default.
2. Please contact your reseller if you forget the password.
- 20 -
H.264PRO MODEL DVR User Guide
4-1-2 Main menu
Icon
Selection
Description
VIDEO
AUDIO,VGA,DISPLAY SETUP,INTERVAL,CAMERA SETUP,COLOR ADJUSTMENT,CAMERA TITLE,EVENT
AUDIO
POPUP
RECORD
RECORD SETUP,SCHEDULE,HOLiDAY,USB BACKUP,CD/DVR BACKUP
BACKUP
CONFIGURATION DATE/TIME,PASSWORD SETUP,REMOTE CONTROL,BUZZER,HDD SETUP,HDD INFO,MOTION,ALARM
NETWORK
PTZ
OTERS
ETHERNET,CONECTION,WEB SERVER,DDNS,PPPoE
CHANNEL,PROTOCOL,ID,BAUDRATE,PAN/TILT/ZOOM/FOCUS SPEED
FACTORY DEFAULT,LANGUAGE,UPGRADE,SYSTEM INFORMATION
Return to main menu.
Return to previous menu
Exit setup menu.
save settings
Cancel modifcations.
return to default settings
- 21 -
H.264PRO MODEL DVR User Guide
4-2 VIDEO&AUDIO
4-2-1 AUDIO
1. Set audio output volume.
2. Click OK to save setting.
Click DEFAULT to return to initial settings.
4-2-2 VGA
1. VGA: Turn ON / OFF VGA
2. RESOLUTION: Set VGA Resolution - 640×480 / 800×600 /
1024×768 / 1280×1024。
3.FREQUENCY- 60HZ or 75HZ。
4-2-3 DISPLAY SETUP
[LIVE / PLAYBACK]
- Select contents to be displayed on Live and Playback screen.
1.DATE/TIME- Display (ON) or hide (OFF) the Current / Record time.
2.CHANNEL STATUS- Display (ON) or hide (OFF) the recording status.
3.TOTAL STATUS- Display DVR status icon and HDD record percentage used.
4.CAMERA TITLE- Display (ON) or hide (OFF) the camera title.
4-2-4 INTERVAL
1.SEQUENCE - Full Screen Sequence Interval setup.
2.PIP - Picture in Picture, the sub-picture’s sequence interval setup.
3.SPOT MONITOR - Set up the sequence display interval on spot monitor.
4.MENU - Menu display dwell time.
- 22 -
H.264PRO MODEL DVR User Guide
4-2-5 CAMERA SETUP
- Set camera activation.
1. STATUS –Camera type(NTSC/PAL/LOSS)
2. COVERT –Hide the camera from the display, while recording remains
unaffected
3. REC –Select checkbox of camera to record.
4. Click
to change channel。(1~4CH / 5~8CH / 9~12CH / 13~16CH)
4-2-6 COLOR ADJUSTMENT
- Adjust camera image color.
1.CHANNEL – Select the camera to be modified.
2.BRIGHTNESS – Adjust image brightness.(1 ~ 255)
3.CONTRAST – Adjust color contrast.(1~255)
4.SATURATION – Adjust color saturation. (1~255)
5.HUE – Adjust color hue. (1~255)
4-2-7 CAMERA TITLE
1. Left click any place on the screen to bring up the
virtual keyboard.
Click
2. Click
to save or click
to exit.
to change channels (1~4CH /
5~8CH / 9~12CH / 13~16CH)
4-2-8 EVENT POPUP
-
Set Event Popup.
1. CHANNEL – Select camera channel.
2. POPUP – Select POPUP On or Off.
3. EVENT – Select MOTION and/or ALARM checkbox.
4. RECORD DURATION – Period of time of popup in case of Event.(1~99 SEC)
- 23 -
H.264PRO MODEL DVR User Guide
4-3 RECORD & BACKUP
4-3-1 RECORD SETUP
Set Recorder configuration.
1. CHANNEL – Select camera channel. (Channels of 4-camera groups)
2. QUALITY – Recording quality of each camera group selected.
3.FPS –Frames per second.
4.PRE ALARM –Record data 0-5 seconds before alarm occurred.(1-5 SEC)
*Notice : In case of sudden power off while in Pre-Alarm mode, up to 5
seconds of data loss may occur.
5.REC TIME REMAINING – Displays estimated remaining record time.
4-3-2 SCHEDULE
Set Schedule Record Modes/ Appoint Schedule recording by Day and Hour.
1. CHANNEL –Select camera channel. (Channels of 4-camera groups)
2. Record Mode – Select the types of recording:
Set as continuous record.
Set as motion record when motion is detected.
Set as Alarm record when alarm is triggered.
Set as Alarm+Motion record. The DVR records at the speed set in
RECORD IN ALARM when there is an alarm triggered, and at the
speed set in RECORD IN MOTION where there is motion detected.
No recording scheduled
In case of emergency, click Panic button, and it will start recording at CONTINUOUS MODE at highest
resolution. Unless otherwise specified, it records according to this Schedule Record Setup.
4-3-3 HOLIDAY
Set holidays to record as setting for Sunday in Schedule Record Setup.
1. Set date on SET HOLIDAY and click
and set date will be listed on
HOLIDAY LIST.
2. DELETE – Delete specific holidays from LIST.
DELETE ALL – Delete all holidays。
※It will record as setting for Sunday in Schedule Record Setup.
4-3-4 USB BACKUP
1.HDD INFORMATION – Show total recorded data from Start & End time
2.BACKUP START TIME –Select a starting date and time for backup.
3.BACKUP END TIME –Select an end date and time for backup.
4.SELECT –Input date/time of data to backup and click SELECT button to check
total backup data size.
5.START –Click START to begin backup.
※If total backup data size is bigger than CD/DVD storage, End time will be determined automatically.
- 24 -
H.264PRO MODEL DVR User Guide
4-3-5 CD/DVD BACKUP
1.HDD INFORMATION – Show total recorded data from Start & End time
2.BACKUP START TIME –Select a starting date and time for backup.
3.BACKUP END TIME –Select a end date and time for backup.
4.SELECT –Input date/time of data to backup and click SELECT button to check
total backup data size.
5.START –Click START to begin backup.
※If total backup data size is bigger than USB memory , End time will be
determined automatically.
4-4 CONFIGURATION
4-4-1 DATE/TIME
Set time and date of DVR system.
1.DISPLAY FORMAT –Set Time Display Format.
2.TIME ZONE –Set time and date by selecting your TIME ZONE.
3.DST –Select checkbox to enable DAYLIGHT Saving Time mode.(DST)
4-4-2 PASSWORD SETUP
1.USER
to set User ID.
2.USER PASSWORD – Key in the current password.
3.NEW PASSSWORD – Key in the new password.
4.CONFIRM PASSWORD –Enter the new password again for confirmation.
5.OK- Click OK to save settings
CANCEL –Click CANCEL to cancel settings.
4-4-3 REMOTE CONTROL
1.REMOTE CONTROL –Set Remote Control for DVR.
ALL – Controlled by all remote control IDs.
01~06 – Set DVR to only accept specific remote control ID. DVR and remote control
require identical ID.
- 25 -
H.264PRO MODEL DVR User Guide
4-4-4 BUZZER
1.KEY BEEP –Turn on/off the beep while operating DVR.
2.VIDEO LOSE –Turn on/off the beep when video lose.
3.ALARM IN –Turn on/off the beep when an alarm is triggered.
4.MOTION –Turn on/off the beep when motion is detected.
4-4-5 HDD SETUP
1.START & END –Displays start and end time of data on HDD.
2.HDD STATUS –Indicates the HDD status.
3.CLEAR HDD –To clear the HDD data, enter the ADMIN’s password to execute this
function.
4.OVERWRITE –When the hard drive is full, the system will overwrite the earliest
recorded video. If the DVR has two hard drives, the overwriting starts from the
Master drive.
4-4-6 HDD INFO
1. MODEL –Displays current HDD model number.
2.SERIAL NUMBER –Displays current HDD seriel number.
3.SIZE –Displays current HDD capacity。
4-4-7 MOTION SETUP
1.CHANNEL –Select camera channel.
2.SENSITIVITY –Adjust motion detection sensitivity (LOW / MEDIUM / HIGH /
VERY HIGH)
3.RECORD DURATION –The DVR record for duration from the time motion is
detected. If the DVR detects motion continuosly, the DVR keeps recording through
out the event, and the duration after the last motion event. For example, the duration
is set to 10 seconds and the motion last for 3 minutes. The DVR records for 3
minutes and 10 seconds.。(5~99 sec)
4. Right button mouse to set motion cell area.
- 26 -
H.264PRO MODEL DVR User Guide
[MOTION MASK SETUP]
Cell Setup - Left click mouse to set Motion Mask Zone by selecting or
clearing blocks.
Block Setup - Click selected cell and drag it to desired position.
And then “SELECT","CLEAR" buttons appear.
SELECT –Activates blocks to detect motion.
CLEAR –Deactivate blocks (Grey block).
4-4-8 ALARM
1.CHANNEL - Select alarm sensor input channel.
2.TYPE –Set up the Alarm Input type.
z
N.C- when the alarm is triggered, the circuit turns closed (ON).
N.O- when the alarm is triggered, the circuit turns opened (OFF).
OFF - Turn off alarm input
3.RECORD DURATION –Set up a post- alarm recording and alarm
output duration. The duration setting is applied to both functions. (5~99SEC)
4-5 NETWORK
4-5-1 ETHERNET
1 Setup DVR Network.
Dynamic IP–Select checkbox to enable connection via Cable Modem with
Dynamic IP. Select
to detect IP automatically
※DVR must connect to ROUTER or CABLE MODEM in order to obtain IP
information automatically.
STATIC IP –Select checkbox to enable connection via Stable IP.
2.IP ADDRESS –Set up the DVR’s IP address.
SUBNET MASK - Set up SUBNET MASK.
GATEWAY - Set up GATEWAY.
4-5-2 CONNECTION
1.DHCP TIMEOUT –Limitation of Time Out maximum value.(MSEC- Millisecond)
※Recommendation:
Increase Time Out in slow network environment
Decrease Time Out in fast network environment
2.DHCP RETRY COUNT – Numbers of time for DHCP to retry connection.
3.PORT - Set IP Port (50000 recommended)
- 27 -
H.264PRO MODEL DVR User Guide
4-5-3 WEB SERVER
1.WEB SERVER – Enable / Disable WEB SERVER function
2.WEB PORT - WEB SERVER IP Port.
4-5-4 DDNS
1.DDNS –DDNS Server address.
2.DDNS DOMAIN – DDNS address.
3. DOMAIN –DVR name to be registered to server..
※ Directly place DDNS server address on IE address bar for connection.For
instance:
http://DOMAIN.mvrddns.com:WEB PORT
4-5-5 PPPoE
1.PPPoE –Set PPPoE Connection.
2.ID –Please enter the ID which you received from xDSL service company.
3.USER PASSWORD –Please enter the PW which you received from xDSL
service company
4.ENABLE RETRY – Retry if connection fails.
5.RETRY COUNT –Set up times for client to tries reconnect to the DVR. The client
will quit trying after all attempts fail
6.RETRY INTERVAL – Setup reconnect time interval.
※It will take about 4 min. to confirm the ID/PW and activate the connection.
4-6 PTZ
1.CHANNEL –Select PTZ channel.
2.PROTOCOL –Select PTZ protocol.
3.ID –Select PTZ ID.
4.BAUDRATE –Select Baud Rate for PTZ control code.
5.PAN/TILT/ZOOM/FOCUS –
PAN – Set the PANing speed.
TILT – Set the TILTing speed.
ZOOM – Set the speed of ZOOM IN/OUT.
FOCUS – Set the speed of FOCUS NEAR/FAR.
- 28 -
H.264PRO MODEL DVR User Guide
4-7 OTHERS
4-7-1 FACTORY DEFAULT
- Reset settings to initial settings.
- Select checkbox to reset.
- Click OK to run selected settings.
- Click CANCEL to return to initial settings
1. The DVR cannot reset the password to default by running Factory Default.
2. It is strongly suggested to run Factory Default and HDD CLEAR when you install a new hard drive(s).
4-7-2 LANGUAGE
Select language.
4-7-3 UPGRADE
- Insert an USB memory stick which has the firmware (to be upgraded) into the USB
port on the front.
- Select “UPGRADE" and DVR will detect the USB memory stick automatically.
- Click “START" to begin upgrading.
4-7-4 SYSTEM INFORMATION
Displays System Information.
※To press ENTER button on the Live mode can display system information.
- 29 -
H.264PRO MODEL DVR User Guide
CHAP.5 IRS and remote connect
5-1 Install Internet Relative Software
z
Insert the Install CD into CD-ROM, and the computer will
auto-run the Install program.
z
z Select a Destination Folder.
Click[Install Internet Relative Software].
z When finished, the software will create a shortcut on the
desktop.
1.ID & IP
z
Indicate the IP address and port of DVR.
2.VIEWER
3. IRS SETUP
4. BACKUP PLAYER
5. DVR SETUP
6. BACKUP
7. EXIT
- 30 -
H.264PRO MODEL DVR User Guide
5-2 IRS operation
5-2 -1 Remote users’ authorities
REMOTE VIEWER
REMOTE KEYBOARD
REMOTE SEARCH
REMOTE SETUP
REMOTE BACKUP
ADMIN
○
○
○
○
○
MANAGER
○
×
○
×
○
USER
○
×
×
×
×
○ – Accessible / X – Inaccessible
5-2-2 IRS SETUP
1.[IP LIST]
z
List the saved DVR IP addresses.
2.[REGSTERING SITE]
z
To register the connection information.
3.[UPDATE]
z
To edit the saved connection information.
4.[DELETE]
z
To delete the saved DVR site.
5.[SAVE]
z
Save the selected IP address.
6.[OK]
z
Select and exit IRS setup.
7.[CANCEL]
z
Exit IRS setup without any change.
[REGSTERING SITE]
1.ADDRESS - Enter IP address manually.
2.PORT- Enter port number manually.
3.LOCATION-Enter DVR location.
4.ID & PASSWORDID: ADMIN / MANAGER1~3 / USER1~6
PASSWORD: input user password.
5.OK/CANCELOK-save setting.
CANCEL-exit.
- 31 -
H.264PRO MODEL DVR User Guide
5-3 Remote connect
5-3-1 WEB IRS
Directly place DDNS server address or DVR IP address on IE address
bar for connection and open Web IRS.
※ Directly place DDNS server address or DVR IP address on IE
address bar for connection.For instance:
(1) http://DVR IP : WEB PORT
(2) http://DOMAIN.mvrddns.com:WEB PORT
※ No input is necessary if WEB PORT is 80.
5-3-2 VIEWER
1.Enter DVR IP address (DDNS), port, ID and
password manually, or retrieve information from
IRS setup.
2.Connect / Disconnect / Setup
CONNECT- Connect to DVR
DISCONNECT- Stop the connection with DVR.
SETUP- Enter setup.
3. Shows the current connection status.
4.SEARCH- Search recorded data from HDD
of DVR. (Date/Time Search, Event List)
KEY PNEL- Pop up panel to control CH, REC,
PLAY, STOP.
5.TWO WAY AUDIO- Enable Two Way Audio between DVR and Transmitter.
6. PTZ ON : Pan/Tilt control of PTZ Camera.
PTZ OFF: Function as arrow keys.
7.DVR Virtual Key - Same effects as press the keys in DVR panel.
8.Remote playback function key.
- 32 -
H.264PRO MODEL DVR User Guide
[Key panel]
01~16
REC
PLAY
STOP
MODE
SEQ
Select the channel number of
camera to be displayed
Force Emergency Record
Playback recorded image on
HDD.
Stop Emergency Record or
stop playback.
Screen division mode
Picture In Picture.
UNFRZ
Unfreeze
ZOOM
Enlarge
PAUSE
+ & -
Full screen image displays in
sequence.
PIP
4/8/16 Division.
Stop
playback
for
a short
period of time.
Up/Down button for volume,
channel, page.
4ch, 9ch, 16ch Division.
[Remote playback function key]
Increase reverse
Pause
playback speed
Move to the beginning of
Increase playback speed
recording
Move
Reverse playback x1
to
the
end
recording
Playback x1
Stop playback.
[PTZ control]
PTZ CH
FOCUS
Select 4-channel group
to be displayed.
Focus near and far.
ZOOM
Zoom in ad zoom out.
PTZ
Enable PTZ.
PTZ ON
: Pan/Tilt control of PTZ Camera.
PTZ OFF
: Function as arrow keys.
- 33 -
of
H.264PRO MODEL DVR User Guide
[SETUP]
STREAM1. 128K~512K- Select fixed transmission speed。
2. CUSTOMIZE- personalize transmission settings.
QUALITY-Setup transmission picture quality
FRAMERATE-Setup transmission frame。
READ- Retrieve settings from DVR.
WRITE-Store settings to DVR。
TWO WAY AUDIOMIC - To enable/ disable the MIC to be transmitted to the remote PC.
LIVE/PLAY SOUND –to set up if the audio of LIVE/PLAY will be transmitted to the
remote PC.
CH1~4 - Select audio channel.
[SEARCH]
1. Select search mode – Date&time/ Percentage /Event list
2. It shows that the start time and end time of the recording
Data.
3. Search by Time and Date as entered. You can change the target
Date/Time values
4. Search by Percentage of HDD.
[EVENT LIST]
1. Select search mode – Date&time/ Percentage /Event list
2. It shows that the start time and end time of the recording
Data.
3.Select a Year/Month/Day to search event.
4.Switch event list page.
5.Select an event from Event List and click twice to start playback.
- 34 -
H.264PRO MODEL DVR User Guide
5-3-3 DVR SETUP
Enter DVR IP address, port, ID and password manually, or retrieve information from IRS setup。
z
The functions listed below can be changed over network : CONFIGURATION,RECORD,EXTRNAL DEVICE
[CONFIGURATION]
[RECORD]
[EXTRNAL]
※Remote setup menu is identical to DVR setup. Please refer to Chap 4 -Set Up for details.
- 35 -
H.264PRO MODEL DVR User Guide
5-4 Remote backup process
1.[Backup Information]
z
IP Address: Enter the IP address of DVR.
Network Port: Enter the port of DVR.
User ID: Enter “Admin”.
User Password: Enter Admin’s password.
Save File Path: Set a path to save the backup file (This function is active only when the connection is
established)
Start Backup Time: The start time of file backup (This function is only active under the connection is
established”)
End Backup Time: The end time of file backup (This function is only active under the connection is established”)
2.[Function setup]
z
Connect Test: To test the connection status.
Unlock: To get the record start/End time of DVR.
Set Backup Time: Set the start/end time, size and path of file backup.
Start Backup: Active the backup function.
3.[The information of DVR Server]
z
Recorded Start Time: Indicate the recorded start time.
Recorded End Time: Indicate the recorded end time.
Update: Update the recorded time.
4.[Backup Status]
z
Message: Indicate the backup status.
Receive Rate: Indicate the percentage of backup image received.
Backup Rate: Indicate the completed percentage of backup image received.
Receive bps: Indicate the bps of backup image received.
Save Size: Indicate the size of backup image saved.
- 36 -
H.264PRO MODEL DVR User Guide
[Backup Procedure]
1. Select [Connect Test] to test the status to DVR connection
2. Select [Unlock] to get the record start/End time of DVR
3. Select [Set Backup Time] to setup the backup function
nIndicate the recorded start/end time
oClick [Find] to set the path for saving the backup file
pSet the file size of backup file (30~700MB)
qSet the start/end time of file backup
4. Click [Apply] to apply all setup
5. Select [Start Backup] to active the backup function
(User can stop anytime during backup)
※backup file format is HM4.
5-5 Backup player operation
Please click “HIGH SPEED PC” or “LOW SPEED PC” according to your
PC’s specification.
“HIGH SPEED PC” supports all channel Playback simultaneously.
“LOW SPEED PC” supports up to 4channel playback simultaneously.
※Recommended PC specification for “HIGH SPEED PC" is as below:
Processor Type : Pentium Core2 DUO or better
Memory : 1GB minimum
1. Current time display
2. Status Window - Display backup starting /ending
time and status.
3. Screen division /Channel select
z
User can select screen division.
z
Select CH1~CH16.
4.AUDIO
z
ON: To start the audio function.
Ch1~4: to select the channel with audio.
5. Function keys
z
OPEN: Open the backup file.
EDIT: Edit the backup image.
AVI SAVE: To save the AVI file.
CHANNEL: Popup channel panel.
6.SPEED / DELAY- Adjust the speed of playback.
7.Play bar - Enables to search recorded data by using this bar.
- 37 -
H.264PRO MODEL DVR User Guide
8.[Function bar on playback]
To the beginning
Pause
Forward
Fast Rewind
Rewind
Fast Forward
To the end
※click left button of mouse twice to switch to split or full screen.
5-5-1 Save AVI file
1. Click
to open the backup file and select
2. Click
to open the AVI SAVE function
3.
single channel.
CHANNEL: Select a single channel
FRAMERATE : Set the frame rate
SIZE: Set the file size of AVI SAVE
START: Start AVI SAVE
STOP: Stop AVI SAVE
※
The AVI file path will be saved under C:\WEB_BACKUP
6-4-2Edit tool
1.[CONTRAST]
Increase contrast.
Decrease contrast.
2.[BRIGHTNESS]
Increase brightness.
Decrease brightness.
3.[SHARPNESS]
Increase sharpness.
4.[BLUR]
Increase softness.
5.[SAVE]
Saves video in JPEG file format. It is saved in the folder where player is installed. (‘C:\WEB_BACKUP’)
6.[PRINT]
Print current video.
- 38 -
H.264PRO MODEL DVR User Guide
Appendix.1 Router setup
Network installation and setup
[Via Cable]
z
z
Connect the Network cable of Cable Modem output to DVR.
Enter [SYSTEM MENU]f [EXTERNAL DEVICE] f [TP/IP SETUP]f[DHCP SETUP]f[DHCP MODE].
Place the cursor at DHCP MODE and press ENTER to switch the DHCP MODE to [AUTOMATIC]. Then,
move the cursor over [DETECT IP] and press ENTER to detect IP. DVR will automatically get the IP ADDRESS,
SUBNET MASK, and GATEWAY from the Cable Modem and shows the IP information on the DVR.
z
Press MENU and go back to the previous setup page, [TP/IP SETUP]. Go to [IP CONFIG SETUP] to set up the
port number. You can either use the default port number or assign a new one.
[Via ADSL]
z
First, identiry if you have Static IP or Dynamic IP service. If you do not know, ask your ISP (Internet Service
Provider). If you have Static IP, your ISP should provide you a static IP address, which will never change even
when you reboot your modem.
[Via ADSL with Static IP address]
z
z
Connect the Network cable of Cable Modem output to DVR
Enter [SYSTEM MENU]f [EXTERNAL DEVICE] f [TP/IP SETUP]f [IP CONFIG SETUP]. Enter the IP
address, gateway, subnet mask provided by your ISP. Then, assign a port number to the DVR, or you can use
the default one as well.
z
If you find that you cannot enter or change any addresses, check if DHCP is set to Automatic. Press MENU to
go back to the previous page, [TCP/IP Setup], and then enter [DHCP SETUP]. Select DHCP MODE and press
ENTER to switch DHCP to MANUAL
z
In some very rare cases, we found the DVR did not support certain Static IP Addresses. If it happens, add a
Router to the network system. The setup is the same as the next session, [Via ADSL with Dynammic IP.]
- 39 -
H.264PRO MODEL DVR User Guide
[Via ADSL with Dynamic IP]
z
If you have ADSL with Dynamic IP address, the network administrator assigns
you an IP address from their pool when you or your ISP reboots the network and
you may get a different IP address from time to time.
z
If you are using ADSL service with Dynamic IP, you must add a Router in the
network system, unless your DSL MODEM has a built-in Router.
z
Go to [EXTERNAL DEVICE]f[TCP/IP SETUP]f[IP CONFIG SETUP] to enter the virtual IP address for the DVR
and the IPs of gateway and subnet mask. Then, assign a port number to the DVR or you can use the default port
number as well.
z
If you find that you cannot enter or change any addresses, check if DHCP is set to Automatic. Press MENU to go
back to the previous page, [TCP/IP Setup] and then enter [DHCP SETUP]. Select DHCP MODE and press ENTER
to switch DHCP to MANUAL
z
The Gateway IP is your router’s IP address and the Subnet Mask should match the Subnet Mask IP of your router.
Tip: If you have other computers connected to the router, you can find out the Subnet Mask and Gateway
information from the computers. From the computer desktop’s Start Menu, choose Run. Type "cmd" to open a
command prompt. In this command prompt, type “ipconfig” and hit "ENTER" and it’ll show the computer’s IP
configuration. Your DVR should have the same IP configuration of Subnet Mask and Gateway as the computer, if
they are connected to the same router. In addition, the first 3 segments of the local IP Address should be the same
as well. For example, if your computer’s local IP address is 192.168.1.100, your DVR’s IP address should be
192.168.1.XXX.
z
Set up the router to forward the port to the DVR. After the setup is completed and the DVR can be accessed from
Internet, proceed to the DDNS setup. Since you may get different IP addresses from time to time, setting up the
DDNS service allows you to log in from the remote by using a fixed code name, instead of using the IP addresses
that are constantly changing.
- 40 -
H.264PRO MODEL DVR User Guide
[Router setup]
z
There is a wide selection of routers in the market. They may be very different in terms of configuration and
operation. Here is an example of how to set up a router. For details, please read your router’s manual.
z
First, connect a computer to the router for configuration.
In this example, the DVR’s IP is set to 192.168.1.53 and its port number is 8000. The router model is PCI BLW-04G.
z
Enter the router’s setup and select Static IP or PPPoE.
[WAN connection type]
[Static IP setup]
z
Select the mode in WAN connection Type
z
Enter the static IP Address, Subnet Mask, Gateway, DNS provided by your ISP.
z
Save the settings.
- 41 -
H.264PRO MODEL DVR User Guide
[PPPoE setup]
z
Select PPPoE in WAN connection Type
z
Enter User Name and Passward provided by your ISP.
z
The router will get the IP address upon connection. In this example, we get the
IP address of 211.20.82.39.
[Virtual server setup]
z
Enter Virtual Server setup.
z
Enter DVR’s IP (192.168.1.53) and port number (8000). Enable the port and
check both protocols of TCP and UDP. Save the settings before leaving this
page.
z
Once the routing table is setup, when the client software connects to
211.20.82.39 with PORT 8000, the router will forward the packets to its
matching destination, 192.168.1.53, and thus connect the client to the DVR.
- 42 -
H.264PRO MODEL DVR User Guide
Appendix.2 System configuration
- 43 -