1
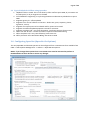
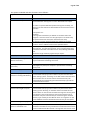
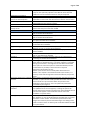
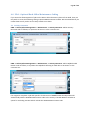
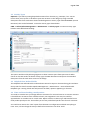
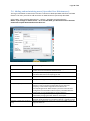
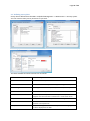
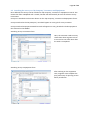
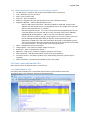
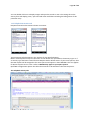
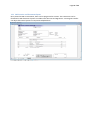
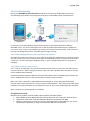
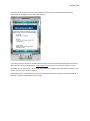
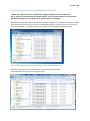
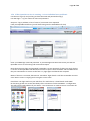
Page 1 of 35 OperaNet – Back Office User Guide Using Opera CRM with OperaNet Mobile Service & Web Portal Version 1.3 Author: Chris Scrivener Date: 23 October 2012 This document aims to assist potential users and resellers to gain a high level understanding of the methods employed to set up and manage the Pegasus Opera CRM Modules when OperaNet Mobile Service & OperaNet Web Portal are in use. Other useful documents: Read in conjunction with the OperaNet Mobile Service Usage Guide if you are a PDA user or field engineer. Read in conjunction with the OperaNet –System Overview for general OperaNet information. Page 2 of 35 Table of Contents 1.0 Aims and assumptions in this document .................................................................................... 4 2.0 Why use OperaNet? .................................................................................................................... 4 2.1 Key Benefits ............................................................................................................................. 4 2.2 Typical Helpdesk Call flow using OperaNet............................................................................. 5 3.0 Configuring OperaNet (OperaNet Set Options) .......................................................................... 5 4.0 PDA – Optional Back-Office Maintenance Coding ...................................................................... 8 4.1 Activity Outcomes ................................................................................................................... 8 4.2 Activity Types .......................................................................................................................... 9 4.3 Helpdesk User Defined Fields.................................................................................................. 9 4.4 Time and Parts booking considerations .................................................................................. 9 5.0 Adding and maintaining users (OperaNet User Maintenance) ................................................. 10 6.0 PDA – Surveys - coding & setup – printing documents ............................................................. 11 6.1 Defining survey data .............................................................................................................. 12 6.2 Attaching the surveys to ‘My Company’, Customers and Equipment .................................. 13 6.3 How the survey appears on the PDA .................................................................................... 14 6.4 Back office view of the survey data ...................................................................................... 14 6.5 Example of a survey document printed from the PDA ......................................................... 15 6.6 Converting PDA printed documents to PDF files stored on the Server ................................ 16 7.0 Sending a call to the engineer PDA or web form ...................................................................... 16 7.1 PDA data loading ................................................................................................................... 16 7.2 When does data return from the PDA? ................................................................................. 17 8.0 PDA monitor .............................................................................................................................. 18 9.0 Managing Helpdesk Calls – suggested procedures ..................................................................... 19 9.1 Engineer rejects call on PDA ................................................................................................... 19 9.2 You don’t allow Rejection and need to cancel the engineer ................................................ 20 9.3 You instruct the engineer (or engineer needs to) complete job at the current state. ......... 20 9.4 What happens when PDA Suspends and Resumes? ............................................................... 21 10.0 Understanding the PDA Job Screen functions ........................................................................ 21 10.1 Understanding the PDA Job Screen command button options .......................................... 21 10.2 Understanding the PDA Job Screen action menu options .................................................. 22 Page 3 of 35 11.0 Data returned from the PDA ..................................................................................................... 22 11.1 Helpdesk History Tab ............................................................................................................ 22 11.2 Helpdesk Activities tab .......................................................................................................... 23 11.3 Helpdesk Call – Notes added on the PDA ............................................................................. 24 12.0 Editing transactions with the Worksheet Entry system .......................................................... 25 12.1 Editing the History entries with the Worksheet Entry option .............................................. 25 13.0 Results in the billing system .................................................................................................... 26 13.1 SOP Invoice and document layout ...................................................................................... 27 14.0 PDAs and Smartphones ........................................................................................................... 28 15.0 Troubleshooting ........................................................................................................................ 29 15.1 Understanding what you have and how it all connects ........................................................ 29 15.2 Likely causes of a service loss ............................................................................................... 29 15.3 Things to check first. ........................................................................................................... 30 15.4 If the OperaNet service is running –Check the Log files ..................................................... 32 15.5 If the OperaNet service is running –Check the Exceptions files.......................................... 32 15.6 If the OperaNet service is running – is it an individual user problem? ............................... 33 15.7 If the OperaNet service is running – but outside user still cannot connect? ...................... 34 15.8 Restarting the OperaNet service (as a last resort!) ............................................................. 34 15.9 Managing the PCL to PDF converter. ................................................................................... 35 15.10 Jobs not appearing on the PDA ? ....................................................................................... 35 Page 4 of 35 1.0 Aims and assumptions in this document At this point your OperaNet server and all web connections should be installed and operational. The OperaNet Windows Service should be running. To operate effectively and be reasonably selfsufficient, you will need an understanding of how to manage the technologies involved at a very rudimentary level. This document aims to provide you with the basic knowledge to configure the system & understand and solve most issues without recourse to your reseller support team. It is assumed that the Pegasus Opera CRM modules have been installed & are operational. You will need to have created CRM contacts in Opera, both Internal (staff and private contractors who work for you) and supplier sub contract contacts who will need an OperaNet login. Whilst your own staff may be supplied PDA’s, suppliers who perform sub contract work can be allowed to receive, enter data and complete their work via OperaNet web forms if required. Important reminder: Remember the key terminology used in the system: A call refers to a Helpdesk Call – calls are not completed by the PDA, this is a back office function. A job refers to the engineer activity scheduled to the PDA. When an engineer marks a job as completed, it is this activity that is marked as cleared (NOT the call) i.e. they are saying they have finished their part in this call. You may have scheduled several engineers to one call and only one has finished today, the others and the call itself are still working. Completed jobs appear on the PDA monitor in the Completed branch – this may prompt you to open, review and close the related Helpdesk Call. You can edit the engineer’s Time, Parts & Expense bookings from within Worksheet Entry. 2.0 Why use OperaNet? OperaNet can provide access to Opera functions through a web or PDA interface without the need for a VPN connection to your Opera system. All that is needed is a browser or compatible PDA / Smartphone. With OperaNet you can deliver a paperless experience for engineer and user and even allow customers ‘self-service’ access if required. 2.1 Key Benefits Eliminate duplication – call data and results are only ever input once, not continually rewritten. Engineer does not need to visit office to collect or deliver paperwork, no lost paperwork Immediate view of call status and completion for billing Improvement of billing times. Maximises use of smartphones and airtime cost. Customer signature capture, photographs and on-site printed certificate production. Page 5 of 35 2.2 Typical Helpdesk Call flow using OperaNet 1. Helpdesk Calls are raised. This can be done by office staff via Opera CRM, by a customer via the web-portal, or by an engineer on the PDA 2. Call scheduled to engineer(s) as a job using the Resource & Summary Schedulers in Opera CRM 3. Engineer agrees job – office updated 4. Engineer has a view of call data on the PDA – books time, parts, expenses, photos, signatures, surveys 5. Engineer can request parts to be ordered and for quotes to be raised 6. Engineer can add and update Equipment records for customer 7. Engineer completes call – may print documents, certificates and pro-forma invoice 8. Office now has all data – reviews and edits if required via worksheet billing 9. Office completes call – may raise follow up, book revisit etc. 10. Office processes call to Worksheet Billing. SOP Invoice raised 3.0 Configuring OperaNet (OperaNet Set Options) The way OperaNet and the PDA operate can be configured from a maintenance form available from CRM –> Sales Pipeline Management –> Utilities –> OperaNet Set Options. NOTE: If you change these options then current PDA users must be instructed to perform a Download Data on their device to receive any changes. Page 6 of 35 The options available and their functions are as follows: Option Functionality PDA Download Options Stock Download Option This option determines the criteria used to download stock records to the PDA when the engineer runs the ‘Download Data’ option. In order to improve download speeds and engineer usability, it is best to limit the stock that is downloaded to the minimum amount possible. Also Include Labour Items Activity Types To Download The options are : All Stock The engineers warehouse (as defined on the Status tab of the engineer’s contact record. This will typically be a van warehouse) A specific warehouse code (enter the warehouse code) A selection of stock categories (enter the categories required) Tick this box if you always wish to download stock items marked as ‘Labour’ items in addition to the criteria specified above. You may have many Activity Types defined within Opera CRM. For the engineer, only the types relevent to his normal working tasks need to be selectable on the PDA such as Time, Mileage, Part Used etc Select the range of Activity Types that you require. Job Completion Options Prevent completion of job without Time entry If this option is ticked, engineers will be prevented from completing a job as without first booking some time. Warn if job completed without Parts entry If this option is ticked, the engineers will be shown a warning messageif they attempt to complete a job without first booking some parts. Time Recording Options Automatically log a time entry between Travelling and Working Default Travelling Activity Type Automatically log a time entry between Working & Complete Default Working Activity Type Automatically log a time entry based on Scheduled Time If this option is ticked, then the engineer will be prompted to choose a time-based Activity Type & to confirm the job Travel start time when setting a job to ‘Travelling’ on the PDA. Notes associated with the start of travel can also be entered. A timesheet entry will automaticially be created using the selected Activity Type and the Travel start & finish times. Sets a default that will be used for any automated Travel entry If this option is ticked, then the engineer will be prompted to choose a time-based Activity Type & to confirm the job start time when setting a job to ‘Working’ on the PDA. Notes associated with the start of work can also be entered. When the engineer sets the job to ‘Completed’, they will be asked to confirm the job finish time. A timesheet entry will automaticially be created using the selected Activity Type and the job start & finish times. The engineer can still record additional manual timesheet entries for the job if required. Sets a default that will be used for any automated Workl entry If this option is ticked, then a timesheet entry will automatically be created on the PDA for each job with the start & end times the same as the scheduled start & end times. The engineer must use the Time Page 7 of 35 entry on the PDA to edit this entry and choose an Activity Type. They can also optionally adjust the start & finish times & record additional manual timesheet entries for the job if required. Automatic Email Options Send pro Forma to Customer Contact on Job Completion Email Body Text BCC List Send details of requests to activity owner Other PDA Options Time Parts Expenses Requests Equipment Register Reject Suspend / Resume Travelling Download worksheet parts Filter parts selection by customer price list Assign rejected jobs back to scheduler Display jobs up to If you print from the PDA (PCL to PDF printer option needed) OperaNet can auto email this document to customer contact email Allow default text for email body to be defined – applies to automated email sent from the system. A BCC email list used to blind copy the OperaNet emails to When PDA creates a Request, a backup email is sent to notify the person that they have a new task in SPM If this option is un-ticked, then the option to book Time entries to a job on the PDA will be disabled. If this option is un-ticked, then the option to book Parts entries to a job on the PDA will be disabled. If this option is un-ticked, then the option to book Expenses entries to a job on the PDA will be disabled. If this option is un-ticked, then the option to book Requests to a job on the PDA will be disabled. If this option is un-ticked, then the option to add & edit Equipment Register records on the PDA will be disabled. If this option is un-ticked, then the option to Reject jobs on the PDA will be disabled. If this option is un-ticked, then the option to Suspend & Resume jobs on the PDA will be disabled. If this option is un-ticked, then the option to set a job status to Travelling on the PDA will be disabled. Selecting this option downloads any parts already entered by the back- office via worksheet entry, or by other engineers, to the PDA during synchronisation. The engineer can view these via the PDA Parts option to ensure that parts are not double booked, and can include them on printed pro-forma invoices if required. Examples of of possible uses are : Where a part for this call has already been delivered to site. Where a ‘kit’ of parts is assumed to be used in (for instance, in a service). It will save the engineer time for the office to pre-process these. If this option is ticked then when the engineer searches for Parts on the PDA, an option will be ticked by default which will restrict the search results to only stock items which are present on the Customer’s special price list. This is an option only and can be overridden by the engineer. If PDA rejects, the job can either have the scheduled job activity left as is (default of the current engineer) or ticking this option will change the planned activity to be the person that scheduled the call. (so it will now appear in the schedulers task list and on the scheduler as a job for them) You may schedule calls to an engineer as far in the future as you like. However, it may not be desirable to send jobs that are not due for weeks or even months. It could make synchronisation take longer than necessary and increase data usage. This setting can be used to control how far in advance jobs are downloaded to the PDA on syncronisation. Page 8 of 35 4.0 PDA – Optional Back-Office Maintenance Coding If you intend to allow Rejection of jobs on the PDA or allow the PDA to place calls on Hold, then you may wish to create the following coding in Opera CRM maintenance tables. We recommend that you create these even if you do not currently intend to use them. 4.1 Activity Outcomes CRM –> Sales Pipeline Management –> Maintenance –> Activity Outcomes. Add an Activity Outcome code as follows, to represent ‘No Access’ to the customer site: CRM –> Sales Pipeline Management –> Maintenance –> Activity Outcomes. Add a Helpdesk Hold Reason code as follows, to represent the Helpdesk call being on hold due to ‘No Access’ to the customer site: If an engineer completes a job and specifies a hold reason of HDNOACCESS then OperaNet will automatically add the ACNOACCESS outcome code to the activity. The PDA Monitor includes an option for excluding activities which include the ACNOACCESS outcome code. Page 9 of 35 4.2 Activity Types Optional: If you will be printing bespoke documents from the PDA, e.g. a Receipt / Pro –Forma Invoice then you may wish to be able to print text sections on the design. By using extended description text from stock items chosen booked against an Activity Type called SERVNARR (Service Narratives) this can be facilitated. Create the activity type shown below. CRM –> Sales Pipeline Management –> Maintenance –> Activity Types: Create an Activity Type linked to Parts Worksheet booking: This option would work by allowing engineer to select narrative parts from Opera stock. When chosen on the PDA under the above activity type, the PDA documents would print the extended description from the stock item as text on the design. 4.3 Helpdesk User Defined Fields The Helpdesk User Defined Fields numbered 19 to 28 can be input on the PDA during job resolution. Set up titles for these from Sales Pipeline Management -> Maintenance -> User Defined Fields Helpdesk type. Setting a blank title will prevent the field / question appearing on the PDA. 4.4 Time and Parts booking considerations You need to consider how you charge different customers for time and services. A common scenario is that different customers have a different hourly rate negotiated. One way this could be approached is to consider time as a stock item. Opera stock has a Labour type and benefits from a ready-made special price list. These allow you to have pre-defined specific rates for each customer. You could even remove the ‘Time’ option from the PDA via configuration and book everything as Parts. Time, call-out charges & even pre-defined narrative lines can all be ‘stock’. Page 10 of 35 5.0 Adding and maintaining users (OperaNet User Maintenance) The log in information created in this section is common to both OperaNet web forms and PDA devices. The users you wish to add must exist as CRM contacts as previously described. Select CRM – Sales Pipeline Management – Utilities – OperaNet User Maintenance. NOTE: If you change or remove a user – to re-use their PDA, you should first ensure the PDA maintenance option Reset Database has been run. The fields available and their functions are as follows: Field Functionality Login ID Password This is a unique name that the user will use to log in to a web form or PDA. It IS case sensitive 10 characters limit Name you wish to display on OperaNet web forms and PDA. Does not affect data and can be anything you like. Case sensitive up to 20 characters Confirm Password Enter password again to help avoid typing errors Default Company Denotes the Opera data set this Login ID updates. NOTE: if a user can receive and post data to more than one company, create another Login ID record linked to the corresponding data set. Multi company use must also have been configured in the installation. Multi company use DOES affect the usage costs of running OperaNet (it counts Login ID’s) You can set the Login ID to expire on a given date. It can be further extended by changing this date. Blank to never expire. If left blank, assumes this is an internal user (My Company Contact) if ticked, allows selection of a prospect /customer / supplier contact. Based on the above flag, allows you to choose the CRM contact this Login ID relates to. User Name Expires External User Linked to contact (this company only) Page 11 of 35 6.0 PDA – Surveys - coding & setup – printing documents The PDA is able to collect data in the form of question and answer sessions. We use the term Survey for this but it can be considered as health and safety, test results, performance figures (in fact, any additional data that you wish the engineer to collect). Survey structures can be designed and attached to ‘My Company’, Customers and Equipment records. Since the PDA knows both the customer and the equipment referred to on a call, it can ensure the correct data is collected. Multiple surveys can be run against any call. For example, your customer may require that the engineer signs in at the gatehouse on arrival (this is called a pre-job survey) and then having carried out the work, collect data on the equipment (this is called a post-job survey). Surveys and any of their individual questions can be made mandatory on the PDA. The data collected during a survey is available in a table and is attached to the customer, call and equipment. It can be used to produce reports and print document s i.e. a test certificate or conformance document. Certain types of work may require on-site production of documents. The PDA is capable of supporting Bluetooth printing and can use a mobile printer. See below for examples of a gas boiler inspection certificate using survey data collected on the PDA at time of visit and then printed. Almost any layout with colour and graphics can be designed. Page 12 of 35 6.1 Defining survey data Survey data is defined from the CRM –>Helpdesk Management –> Maintenance –> Surveys option. You can create as many survey structures as you wish. Define the questions and answers for the survey line. This is the question that will be presented to the PDA user when the survey is in progress The Survey Question Form The fields available and their functions are as follows: Field Functionality Question The test that will be presented to the PDA user Order The order in which the question will appear during the survey Answer Length The length of the answer input field (if Character / Number) Answer Decimals Number of decimal places if numeric Lookup Values You can input a list of possible answers separated by commas.. The engineer can then choose the answer from a list of these values. A unique reference – used for print order or coding. Unique Reference PDF: Display Colour Specifies a PDF document that can be associated with the survey question. For bespoke use. Specifies a background colour that the question will be highlighted in when displayed on the PDA. Page 13 of 35 6.2 Attaching the surveys to ‘My Company’, Customers and Equipment Once defined, the surveys can be attached to ‘My Company’, Customer or Equipment records. This means that when a Helpdesk Call is raised, the PDA will automatically be sent the relevant survey instructions. Surveys are attached via the Action button on the ‘My Company’, Customer and Equipment forms. Surveys attached to the ‘My Company’ record will appear on every job for every customer. Surveys attached to Equipment Model records will appear on every job which includes Equipment that is based on that Model. Attaching survey to Customer form Here, the customer needs an entry check done when engineer arrives at site and an exit check done after the work is completed. Attaching survey to Equipment form After working on the equipment item, engineer must complete the post job surveys for printing on Gas Safety certificates. Page 14 of 35 6.3 How the survey appears on the PDA As the Working and Complete options are selected on the PDA device, the engineer will be prompted to enter your survey results. 6.4 Back office view of the survey data The data being from the PDA surveys can be viewed from the Helpdesk, Equipment or customer forms using Action -> Survey Results. Page 15 of 35 6.5 Example of a survey document printed from the PDA These custom Gas Safety Inspection and Invoice documents have been printed from the Document option on the PDA. Multiple documents can be produced including Pro Forma Invoices. Extra functionality is also available to store an electronic copy of the completed document on the server – this could be sent as email to the customer or even made available as a ‘self-service’ component from the OperaNet portal. Page 16 of 35 6.6 Converting PDA printed documents to PDF files stored on the Server You may need to print immediately from the PDA to a mobile Bluetooth printer. This is common with documents that must be left at site at the time of visit. The PDA document section supports this. The PDA prints in a PCL format – like any other report, the document produced does exist on the server it is created live from PDA data. If you want to also store the print as a PDF file that can be both stored against the helpdesk call and later emailed to the customer, you will need to purchase and install a PCL to PDF creation tool. Once installed, you can also ‘print to PDF’ from the PDA instead of a Bluetooth printer. Your options would then be : no print, print locally, store to PDF and both print locally and store. The PCL to PDF will be installed and managed on the OperaNet Server and its operation once setup should be automatic. If the PCL system fails, the PDA will have trouble synchronising the data it is trying to store. See the Troubleshooting section on maintaining the PCL system. 7.0 Sending a call to the engineer PDA or web form Once you have configured and created your PDA and OperaNet users then you are ready to send calls to the PDA or OperaNet web forms. From the Helpdesk Resource Scheduler or Summary Scheduler, schedule the call to one or more engineers as normal. NOTE: The Activity Type specified in CRM –> Helpdesk -> Set options –> Scheduler Default Activity Type is the one that is used for scheduling purposes. If this Activity Type has the Automatically Send Email to Internal Contact option selected then an email informing the engineer of the job will immediately be sent to engineer’s email address. This is re-sent if the schedule is subsequently changed. The PDA must be configured to receive email. Processing will now commence on the PDA monitor or web form. See the PDA Usage Guide for the engineer’s view of processing your call IMPORTANT: Once an engineer has set the job (activity) to ‘Accepted’, the scheduler tools will no longer allow you to move it to another engineer. The standard Opera activity form however would allow you to change the owner (the engineer). This should be avoided. Changing owner at this stage would remove the job from the PDA mid-process. If this occurs, move the owner back to the original engineer ASAP and ask the engineer to re-sync the PDA if required. 7.1 PDA data loading For instructions on how to install the software onto a PDA, please see the OperaNet and PDA installation document. Once set up, the PDA should be loaded with ‘static’ data that does not change daily by using the ‘Download Data’ option. This downloads items such as stock codes, lookup codes & equipment models. The PDA users should be encouraged to only use this option when: The PDA is first set up. You instruct them to do so because data in Opera itself has changed – for instance, new stock items have been added. You have changed settings in the OperaNet Set Options form. Due to the high volume of data that can be downloaded with this option, it is recommended that it is run when connected to a stable high-speed connection, e.g. via WI-FI or a USB connection. Page 17 of 35 7.2 When does data return from the PDA? Back office data is updated by the PDA by the processes described below. Your engineer may be working in geographical areas or locations i.e. a basement where no there is no phone signal. The PDA is designed to work offline on the data that it has already downloaded. Because synchronising the PDA relies on the availability of phone signal, the PDA users can choose when to send data. The options are as follows: Upon change of job status e.g. Engineer sets the job to ‘Working’. This updates the status of the current job and call. It will also send back any Notes from the PDA. This update is optional – the engineer will be asked if a back-office update is required. When adding a Note This update is optional – the engineer will be asked if a back-office update is required. (Opera requires that you refresh the call screen before notes are visible) Upon completion of job All transactions, survey data and signatures are sent. This update is optional – the engineer will be asked if a back-office update is required. Synchronise option Any unsent transactions remaining from previously processed jobs are sent to the back-office and new jobs collected from the back-office. Upload Images option Photographs can be large (ensure you set the resolution on the camera to the optimal size) – we separate the function of sending job related images so that engineer can choose to send these when the PDA has the best signal available or is connected via WI-FI or a USB connection. PDA Printed Documents If you are printing from the PDA and are using the optional PCL to PDF converter, these documents are sent to the back office during synchronisation. Page 18 of 35 8.0 PDA monitor CRM –> Helpdesk –> Tasks –> PDA Monitor The PDA monitor provides a way for you to see what stage each job and PDA are currently set to. As a PDA user sends information to Opera the job will be moving through the stages ‘Accepted’ (or ‘Rejected’), ‘Travelling’, ‘Working’ and ‘Complete’. A PDA user may also ‘Suspend’ a job in favour of another and ‘Resume’ it again at a later point. The PDA monitor can automatically or manually refresh. The + branches against each stage can be expanded or collapsed. Placing a cursor on any item will display job and call data. Double clicking on an item will open the related Helpdesk Call form. Once a job reaches the ‘Complete’ stage you may wish to open the Helpdesk Call to check and validate the data returned from the PDA, make any adjustments, add Notes and complete the Helpdesk Call. The next stage would be billing & processing stock movements. If you have more than one PDA assigned to this call, then you may need to wait until they have all completed before progressing further. Information on managing calls set to Hold, Rejected and Suspended jobs is given in the PDA – Managing Helpdesk Calls section later in this document. The PDA Monitor Screen Page 19 of 35 9.0 Managing Helpdesk Calls – suggested procedures Several scenarios can occur once a call has been scheduled to the PDA. All transactions processed via the PDA and web forms are activities (to-do’s) in Opera CRM. Completed activities become History entries in Opera CRM. These PDA entries are exactly the same as entries made manually via Helpdesk Processing -> Action -> Worksheet Entry. When managing the transactions sent from the PDA, you can examine them from the Helpdesk Call, Activities (requests) or History (transactions) Tab, select a line and double click to open the activity transaction itself to see more detail. Some common scenarios 9.1 Engineer rejects call on PDA In this example we have found an entry on the PDA monitor showing that engineer Ryan has been unable to gain entry on his job for call ref 1099. The call has been opened, the activity opened. Note the Status field says Rejected and Ryan has entered a note to explain why. IMPORTANT NOTE: The owner of this activity has now been moved from Ryan to Kevin McAlister (as Kevin scheduled Ryan to this call). This job now appears in Kevin’s Task List. The software is attempting via both the PDA monitor and the Task List to ensure that Kevin knows Ryan has rejected the job so that he can decide what action to take next. Page 20 of 35 What could the office (or Kevin) do now? This depends on how you wish to handle this scenario. Firstly, as the PDA has ‘Rejected’ the job, all the options for this job on the PDA will have been deactivated, Ryan cannot perform any further actions on this job. If you were to examine the Scheduler, this call is no longer with Ryan, it has moved to Kevin who is the original scheduler of the job (Kevin must be a member of a Team to be visible on the scheduler). If you wish Ryan or another engineer to re-attend this call at another time – firstly, clear the activity assigned to Kevin. You can do this from the Helpdesk Call or from the Task List. Open the Activity and select Actions – Clear Activity and choose an appropriate Outcome Code. You can now or later reschedule this call when ready from the Helpdesk Call Resource Scheduler or Summary Scheduler. The will effectively create a new job. The completed job (the cleared activity) will still be showing in the Completed section of the PDA monitor but if you chose ACNOACCESS as the Outcome Code, these can be filtered from view. 9.2 You don’t allow Rejection and need to cancel the engineer If the engineer has not yet accepted the job on the PDA, then you can remove the job from the engineer either on the Summary Scheduler or the Helpdesk Processing Resource Scheduler. Alternatively, you can use the Helpdesk Processing – Actions – Allocate option to return the call to Allocated status. This will remove ALL planned activities from the schedulers. When the engineer next synchronises the PDA, the job will be removed from the job list. IMPORTANT NOTE: It is possible that the engineer may accept the deleted job on the PDA and start to enter transactions before doing another synchronise. If this occurs then they will receive a warning message when attempting to synchronise and any transactions entered will not be posted back to the server. 9.3 You instruct the engineer (or engineer needs to) complete job at the current state. The PDA can complete the job at any time once the Working state has been reached with or without collecting data. The engineer can just run the ‘Complete’ option on the PDA. At this point the engineer can fill in the Helpdesk Outcome code and optionally place the call on Hold with a reason e.g. Awaiting Parts. So, in a scenario where the engineer attended site but could not complete the work as they needed more parts, they could complete the job and place the call on Hold with a reason of Awaiting Parts. Further text explaining the reason can be entered; this is added to the Helpdesk Call notes section. Where the engineer could not gain access, the Complete option can be used and if a Hold Reason of HDNOACCESS is chosen, the PDA will automatically update the job outcome with a code of ACNOACCESS – this allows jobs completed In this way to be suppressed in the PDA Monitor (as you will probably re-assign an Engineer at a later date – but the call itself will remain open during this time, albeit placed on hold). Alternatively, you can complete the Helpdesk Call itself and create a ‘follow up’ Helpdesk Call (with a new reference), which can later be assigned to an engineer. Remember, completed calls do not show on the PDA monitor. Page 21 of 35 9.4 What happens when PDA Suspends and Resumes? No time is automatically recorded on the PDA for the suspended period. On completion, the engineer should confirm the amount of time that is to be booked to the jobs concerned. This is because suspension is unlikely during the Working phase of a job (you should really consider making the job Complete if this is the case and rescheduling the engineer when ready). Suspension usually occurs when an engineer has accepted a job as the next one to work on but you change the priority and wish him to suspend in favour of another job. The engineer (or the back office) can adjust and apportion time between any affected jobs as required. 10.0 Understanding the PDA Job Screen functions On the PDA Job screen, the engineer will be working with the following page tab options: Jobs –Shows job states and times with basic call details Desc – Shows description from the call Notes – Shows notes from the call Site – Shows full site address Equip – Shows a list of any associated equipment with serial numbers 10.1 Understanding the PDA Job Screen command button options Agree – Engineer selects this to agree the selected job as the next job to attend Reject – Engineer selects this to reject the selected job for any reason Suspend – Engineer selects this to suspend the current job and move onto another job Travelling – Engineer selects this when they have started Travelling to the job The engineer can add notes at this point. These are activity notes attached to the worksheet entries on the helpdesk call. Working – Engineer selects this when they have arrived and wish to start the clock for Working. The engineer can add notes at this point. These are activity notes attached to the worksheet entries on the helpdesk call. Complete – Engineer selects this to complete the job and send the data back to the office Page 22 of 35 10.2 Understanding the PDA Job Screen action menu options Pre Job Surveys – Question and answer session before work commences Time – Manual entry of Time spent Parts – Entry of Parts used Expenses – Entry of Expenses Requests – Requests for Parts and Quotations for items needed on this job Equipment Register – Add and Edit Equipment items. PDA can add entirely new items – Based on a Model or freehand. These will be added to the site equipment list. The equipment item is also added to the call itself. PDA can edit existing items. i.e. location. PDA Site Equipment option. An ‘on-line’ option that lists all equipment for the site. A tick will appear next to items that are on the call. Other items can be added by highlighting & choosing Menu – Add To Job. Can only add items which are not on a contract (in which case get a warning first) or are on the same contract as the call. Adding the equipment adds all relevant survey requirements etc. Equipment is added to the call in the back-office when job is completed & synced. This is a useful option when the original call does not know specifically the item that has to be worked on – the PDA can be used to assign the item. Notes – Attach Notes to this call and job Image Capture – Use camera to attach images to this job Resolution – Enter a resolution for the job Signature – Capture the customer / engineer signatures for the job Post Job Surveys – Question and answer session after work completes Pro-Forma Invoice – Use PDA to produce a pro forma billing document (custom layout required) Other Documents – Print documents based on job / survey data 11.0 Data returned from the PDA Data returned from the PDA will exist in several areas. 11.1 Helpdesk History Tab The history tab will display the current data that has been synchronised from the PDA This will be Time, Parts, Expenses, Signatures and Photographs. Page 23 of 35 You can double click lines to display images and open the record to view. The costing tab on the activity form will display prices / part used and other useful data including the billing status of this particular entry. 11.2 Helpdesk Activities tab Requests entered on the PDA are shown as activities. These activities will also appear in the Task List for the specified owner. NOTE: a PDA request activity sets the owner to the default user specified on the Activity Type i.e. if an Activity Type has been created for Parts Request with a default owner of your stores person, then the PDA request will be assigned to the stores person and appear in their Task List. This also applies for Quote requests sent to sales. Refer to CRM Activity Types in your Opera system. OperaNet Configuration options also allow these entries to be emailed to the relevant person. The Helpdesk Activity Tab Page 24 of 35 The CRM Task List (shows Requests and Quotes needed) 11.3 Helpdesk Call – Notes added on the PDA ‘Notes’ refers to two different entry types on the PDA (and in SHDM itself) PDA Action menu – ‘Notes’ adds test to the helpdesk call front screen in a date / time / user stamped format. i.e. PDA Actions like Travel / Work / Time / Parts / Expenses add text to the Activities (worksheet entries) that are associated with the call. They can be viewed under History or in Worksheet entry. Page 25 of 35 12.0 Editing transactions with the Worksheet Entry system The transactions will arrive from the PDA into the Helpdesk History tab. 12.1 Editing the History entries with the Worksheet Entry option To edit entries from the PDA, choose Helpdesk Processing -> Actions -> Worksheets. Ensure engineer and date are correct and tick the Amend Existing Worksheet Entries box. Page 26 of 35 Any of the entries made can be edited, added to or removed. A common reason to edit is to ensure the Time being charged for is correct as the PDA may be set to record exact time, whereas you may wish to round or adjust the value and the way that this is presented to the customer. Select Time to view the entries. In this case, three time entries are shown. One is the non chargeable planning time dragged to the scheduler. The other two come from the PDA – you may wish to adjust these. Save and post the worksheets when all is ok. 13.0 Results in the billing system As per normal Worksheet Entries, transactions from the PDA and OperaNet web form are sent to the billing system in Opera CRM. Page 27 of 35 13.1 SOP Invoice and document layout Once passed to SOP as Documents, these can be progressed to Invoices. The transaction can be formatted in SOP document layouts to include items like Time and Signatures. Your Pegasus reseller can adjust document layouts to incorporate Helpdesk data. Page 28 of 35 14.0 PDAs and Smartphones This solution runs on the Windows Embedded Handheld platform (previously known as Windows Mobile 6.5). This platform is available on a range of smartphones and most importantly, ruggedized PDA devices. We are constantly evaluating the marketplace and have other platforms such as Android, Windows 8 and Apple IOS under consideration. The factors that influence this are: Availability on ruggedized devices (nearly all of these are currently built on Windows Embedded Handheld). Availability of the functions this application needs, e.g. Bluetooth printing. Tried and tested mobile platform for ‘Line Of Business’ applications (not just a consumer level smartphone) Whilst it is tempting to run this application on the ‘free’ smartphone you may have been supplied with your airtime contract, such devices may not be rugged or reliable enough to be a front line work tool. You need to carefully consider the working environment the device must operate in. Read the report from the Gartner group here: www.dmpro.co.uk/products/gartnerPDA.pdf We recommend that you contact a ruggedized PDA supplier in order to properly explore the options. A loan device can often be supplied for evaluation. The following are the contact details for a supplier of ruggedized devices: Sash Winspear Renovotec UK LLP Business Development Executive Tel-0845 293 0450 Mob-07715121247 [email protected] Whitwood Lodge, Whitwood Lane, Castleford, WF10 5QD Page 29 of 35 15.0 Troubleshooting Review the OperaNet System Overview document for an overview of OperaNet connections. The following layout shows the components involved in an OperaNet system. (PDA optional) GSM / 3G Web Forms In brief your server (the Windows Server shown above) is hosting both Opera data AND the OperaNet server. The server component runs on the IIS (Internet Information Server) installed on your server. Your server is connecting to the Internet to transmit and receive data. Your server will be using something called a ‘port’ to handle data coming in and out. 15.1 Understanding what you have and how it all connects The important point here is that your server must be running, the components on it must be running and your server must have an Internet connection that will allow both the receipt and transmission of data. So – if it was working and suddenly doesn’t – then it is highly likely that one of these has changed! 15.2 Likely causes of a service loss First – what is not working? Is this just one PDA that cannot connect, or all users? Can YOU connect via your web form? We are trying to ascertain if this is this just a problem with one PDA or has your server stopped communicating. Procedures below will help establish to what level the problem exists. Establishing this will save you calls to support and time! You may even be able to solve the issue internally. Many users have a third party responsible for maintaining their server and network (including Internet and Firewall) connections. It may not be your Opera Reseller. These third parties may apply updates to the network without any consideration to the services (such as OperaNet) that use them. Likely causes for service disruption are as follows: An update has occurred Windows Server update, Firewall Update, Opera Update, OperaNet Update Some updates may be applied automatically by Microsoft. You need to be aware of these. Updates will often stop – BUT NOT RESTART Windows services like OperaNet. Updates to Firewalls or Internet services may block OperaNet or the PORT that your server (and therefore OperaNet) is using to communicate with the outside world. Page 30 of 35 Your Internet Service or phone SIM service is suspended OperaNet cannot communicate if you have no phone or Internet service. Problem Solving It’s best to approach any problem in a logical manner. If you get a report from a user (PDA or subcontractor on a web form) that they cannot log in, send data, have an error message appearing etc. then ask – is it just them? Is everyone else ok? This should help decide if you have a problem relating to a specific user or a system wide issue. If it is system wide but was all working ok previously, has worked for some time and Opera and OperaNet have not been updated –then is it likely to be a problem with OperaNet or is it possible that something else has changed? 15.3 Things to check first. In ALL cases: Check that the OperaNet Service is running First – Check the service this using this method. In a web browser OR on the PDA web browser attempt to navigate to the URL of the web service, for example on the Web: http://operanet.co.uk/OperaNetServer/service.asmx (replace the operanet.co.uk part with whatever the address (or IP) is on your server – we recommend saving this to a favourite for future testing once you have it right!).You should see a screen similar to the one below: If the above screen appears, then the OperaNet service is Running. Choose Available and select Invoke. You should receive a response like this: Provided Available reads true then OperaNet is both Running and Available. In this case – the problem is unlikely to be with the OperaNet service and there should be no need to re-start it. Any attempt to do so will risk losing unsaved data and creating errors for other users. Page 31 of 35 If the service test passes but one or several PDA’s cannot connect then the same test can be performed on the PDA (use the same web address): If you don’t see this screen on the PDA, then it simply means that either the PDA cannot connect to the Internet at all (try connecting to www.google.com to test this) or it cannot connect to your OperaNet site on your server - this is likely to be down to a firewall / port /permissions issue on your server. (Contact your network supplier) If these tests pass, or the web form passes and the PDA side fail then move to the sections below. If they fail, consider an OperaNet service restart. Page 32 of 35 15.4 If the OperaNet service is running –Check the Log files * NOTE These log files are only recorded if the logging settings are active in OperaNet. This is usually only active during installation and test, or set on when problem are experienced. The default setting is OFF as storage of the log files carries an overhead. OperaNet may have been able to record what the issue actually is – for example an invalid or expired licence. Check the log files on the server in the OperaNet directory as shown below. You can open these with Notepad – or send to support. Your support team can enable logging if required. 15.5 If the OperaNet service is running –Check the Exceptions files OperaNet problems may have been recorded in the Exceptions file folder. These XML files will be useful to the support team. Page 33 of 35 15.6 If the OperaNet service is running – is it an individual user problem? Can the user log in (it may be they just have the name and password wrong!) Can YOU log in – try your own user name and password Step one – log in problem or loss of service / connection error reported Load your OperaNet web form (you will have been given the web address for this) Enter your OWN login code and password. If you CAN login and select data it tells you that the OperaNet service is still running and connected to Opera. Now check the users login and password (remember it is case sensitive) If it does not work, check it is correct via the OperaNet User Maintenance form in Opera. Check all details and the CRM contact they are connected to is correct on the form. Try login again until details are accepted. NOTE: if the user is on a PDA, the PDA can ‘remember’ login details. It will also remember incorrect ones! Ensure a user is retyping and is using the correct case! Check their user login works on your web form. If it works there, it should work onthe PDA! On the PDA, get the user to test the validity of the connection via the PDA Menu – Configuration. This will have the web address of your Server. Test Connection. It needs to return ‘Connection ok’ Page 34 of 35 If it does not return ‘OK’ – but YOU can log in from web forms then : The address in the PDA connection bar (OperaNet Domain / IP) is wrong (has anything changed on phone or server?) The phone has no SIM signal or data service (this is an airtime issue) Your web access from outside is being blocked (has your server or firewall changed) Correct mistakes and try again. Contact support for Firewall / Internet issues. 15.7 If the OperaNet service is running – but outside user still cannot connect? The service is running, you can log in on a web form (even using their details) but they can’t? A possible cause is that you may be running not on the Internet, but on your own network directly, i.e. you are in the same building as the server network itself. An external user (on web browser or phone) is trying to access via the Internet. Your Firewall or settings MAY be blocking this access. This scenario usually only occurs after upgrade or maintenance work on the server or Firewall. Contact your Reseller / Network Provider 15.8 Restarting the OperaNet service (as a last resort!) NOTE: Only restart the OperaNet service as a last resort. If the service was still running and you stop / restart it then ALL others users will now be thrown out of the system and forced to log back in – not just the user that you may be currently having a problem with! The service runs on your server, not on your desktop PC. You will need access to your server and to be able to log on as Administrator or a user who has sufficient rights. Your reseller may have set up a VPN access to allow you to do this. * You may also have a batch file set up to Start / Stop the service. This is often used to allow complete backup of the Opera data or Maintenance. This process will also result in the service attempting to restart. Locate the Service and Restart. Your reseller should be informed that you had to restart in order for them to assist in understanding why this occurred in the first place. Page 35 of 35 15.9 Managing the PCL to PDF converter. The Page Technology Marketing toolkit is found in Control Panel on the Server and can be uninstalled / reinstalled if needed. Usually called PCLTSDK. Your support team will advise if this is required in the event of a failure. The PCL Setup program should be run with its default settings and directories Once Installed you may need to change the conversion batch file as the file paths have the version number as part of them. This file is called Xform.bat and resides in : X:\ProgramData\DMPro Software\OperaNet\scripts 15.10 Jobs not appearing on the PDA ? If you have scheduled calls to a PDA (Helpdesk Resource Scheduler) and the engineer says he does not have the job on the PDA – check the following. Are you sure PDA has been synchronised? Can you see the job in the Resource scheduler for that engineer? Is the date and time correct on the engineers PDA – Your OperaNet configuration screen is specifying how far in advance jobs are sent to the PDA. (even if date / time are correct – is the job within these limits? – all jobs in the past are sent, but future obeys the hours set) Helpdesk calls marked as Completed are NOT sent to the PDA, even if on the schedule. Check the scheduled activity itself (Helpdesk Activity Tab) – activities marked as Completed or Rejected are NOT sent to the PDA. As a last resort, return the helpdesk call to Allocated status (Helpdesk Action Menu) and schedule again, then get engineer to sync the PDA.