1
SecureLinxTM Console Manager (SLC)
User Guide
SecureLinx SLC8
SecureLinx SLC16
SecureLinx SLC32
SecureLinx SLC48
Part No. 900-449
Rev. F April 2008
Copyright & Trademark
© 2004, 2005, 2006, 2007, 2008 Lantronix. All rights reserved. No part of the contents of
this book may be transmitted or reproduced in any form or by any means without the
written permission of Lantronix. Printed in the United States of America.
Ethernet is a trademark of XEROX Corporation. UNIX is a registered trademark of The
Open Group. Windows 95, Windows 98, Windows 2000, Windows 2003, and Windows
NT are trademarks of Microsoft Corporation. Netscape is a trademark of Netscape
Communications Corporation.
Open Source Software
Some applications are Open Source software licensed under the Berkeley Software
Distribution (BSD) license or the GNU General Public License (GPL) as published by the
Free Software Foundation (FSF). Redistribution or incorporation of BSD or GPL licensed
software into hosts other than this product must be done under their terms. A machine
readable copy of the corresponding portions of GPL licensed source code is available at
the cost of distribution.
Such Open Source Software is distributed WITHOUT ANY WARRANTY, INCLUDING
ANY IMPLIED WARRANTY OF MERCHANTABILITY OR FITNESS FOR A
PARTICULAR PURPOSE. See the GPL and BSD for details.
A copy of the licenses is available from Lantronix. The GNU General Public License is
available at http://www.gnu.org/licenses/.
Contacts
Lantronix Corporate Headquarters
15353 Barranca Parkway
Irvine, CA 92618, USA
Phone: 949-453-3990
Fax:
949-453-3995
Technical Support
Online: www.lantronix.com/support
Sales Offices
For a current list of our domestic and international sales offices, go to the Lantronix web
site at www.lantronix.com
SecureLinx SLC User Guide
2
Disclaimer & Revisions
Operation of this equipment in a residential area is likely to cause interference, in which
case the user, at his or her own expense, will be required to take whatever measures
may be required to correct the interference.
Note: This equipment has been tested and found to comply with the limits for
Class A digital device pursuant to Part 15 of the FCC Rules. These limits are
designed to provide reasonable protection against harmful interference when the
equipment is operated in a commercial environment. This equipment generates,
uses, and can radiate radio frequency energy and, if not installed and used in
accordance with this User Guide, may clause interference to radio
communications. Operation of this equipment in a residential area is likely to
cause interference, in which case the user will be required to correct the
interference at his own expense.
The user is cautioned that changes and modifications made to the equipment
without approval of the manufacturer could void the user’s authority to operate
this equipment.
Changes or modifications to this device not explicitly approved by Lantronix will void the
user's authority to operate this device.
The information in this guide may change without notice. The manufacturer assumes no
responsibility for any errors that may appear in this guide.
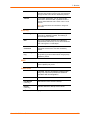
Date Rev. Comments
6/06 A Initial Release
8/06 B Added event configuration, local/remote user authentication
precedence, firmware update via HTTPS, complex passwords,
and port permissions for remote users.
1/07
C
Added dial-in & dial-on-demand modem state, IP filters, active
directory to LDAP section, and additional TACACS+ servers.
4/07
D
Added ability to import site-specific SSL certificates and SSH
host keys, to display a list of web sessions, to set an IP filter
timer, and to save system logs across reboots. Enabled dual
boot-up.
8/07
E
Added gateway page, phone home; alarm delay; SSH v1
logins; trap community; configuration manage option; system
logs beginning and end dates, device port logging to syslog.
4/08
F
New web page design with tabed menus.
Added support for the following: Sensorsoft devices; SecureID
over Radius; command and status of the SLP expansion
chassis; escape and break sequences for remote users;
password aging, iGoogle Gadget; SNMP v3 encryption; ability
to copy boot bank; host lists for outgoing modem and direct
connection at the CLI; new option for local users to display a
custom menu at login.
SecureLinx SLC User Guide
3
Table of Contents
Copyright & Trademark _______________________________________________________ 2
Open Source Software ________________________________________________________ 2
Contacts ___________________________________________________________________ 2
Disclaimer & Revisions _______________________________________________________ 3
1: About This Guide
10
Purpose and Audience__________________________________________________ 10
Chapter Summaries ____________________________________________________ 10
Additional Documentation _______________________________________________ 12
2: Overview
13
SLC Models __________________________________________________________ 14
System Features ______________________________________________________ 15
Protocols Supported_________________________________________________________ 16
Access Control _____________________________________________________________ 16
Device Port Buffer __________________________________________________________ 16
Configuration Options _______________________________________________________ 16
Hardware Features ____________________________________________________ 17
Serial Connections __________________________________________________________ 17
Network Connections ________________________________________________________ 18
PC Card Interface___________________________________________________________ 18
3: Installation
19
What’s in the Box ______________________________________________________ 19
Product Information Label ____________________________________________________ 20
Technical Specifications ________________________________________________ 20
Physical Installation ____________________________________________________ 21
Connecting to a Device Port __________________________________________________ 21
Connecting to a Network Port _________________________________________________ 22
Connecting a Terminal _______________________________________________________ 22
Power ____________________________________________________________________ 23
4: Quick Setup
24
IP Address ___________________________________________________________ 24
Method #1 Using the Front Panel Display ___________________________________ 25
Before You Begin ___________________________________________________________ 25
Front Panel LCD Display and Pushbuttons _______________________________________ 25
Navigating ________________________________________________________________ 26
Entering the Settings ________________________________________________________ 26
Restoring Factory Defaults____________________________________________________ 28
Method #2 Quick Setup on the Web Page___________________________________ 28
Method #3 Quick Setup on the Command Line Interface _______________________ 31
Next Step ____________________________________________________________ 33
5: Web and Command Line Interfaces
34
Web Interface_________________________________________________________ 34
Logging in_________________________________________________________________ 35
Logging off ________________________________________________________________ 36
SecureLinx SLC User Guide
4
Web Page Help ____________________________________________________________ 36
Command Line Interface ________________________________________________ 36
Logging in_________________________________________________________________ 36
Logging out________________________________________________________________ 37
Command Syntax___________________________________________________________ 37
Command Line Help_________________________________________________________ 38
Tips______________________________________________________________________ 38
General CLI Commands _____________________________________________________ 39
6: Basic Parameters
41
Requirements_________________________________________________________ 41
Network Settings ______________________________________________________ 42
Ethernet Counters __________________________________________________________ 45
Network Commands_________________________________________________________ 46
IP Filter______________________________________________________________ 47
Viewing IP Filters ___________________________________________________________ 47
Enabling IP Filters __________________________________________________________ 48
Configuring IP Filters ________________________________________________________ 48
Updating an IP Filter_________________________________________________________ 50
Deleting an IP Filter _________________________________________________________ 50
Mapping a Rule Set _________________________________________________________ 51
IP Filter Commands _________________________________________________________ 51
Routing______________________________________________________________ 52
Routing Commands _________________________________________________________ 53
7: Services
54
SSH/Telnet/Logging____________________________________________________ 54
SNMP_______________________________________________________________ 58
SSH,Telnet, and Logging Commands ___________________________________________ 60
NFS and SMB/CIFS____________________________________________________ 61
NFS and SMB/CIFS Commands _______________________________________________ 63
SecureLinx Network____________________________________________________ 64
SecureLinx Network Commands _______________________________________________ 68
Date and Time ________________________________________________________ 69
Date and Time Commands ___________________________________________________ 70
8: Devices
Connection Methods ___________________________________________________
Permissions __________________________________________________________
Device Status_________________________________________________________
Global Port Settings ____________________________________________________
72
72
73
73
73
Global Commands __________________________________________________________ 76
Device Ports – Settings _________________________________________________ 76
Port Status and Counters _____________________________________________________ 83
Device Ports – SLP _________________________________________________________ 83
Device Port – Sensorsoft Device _______________________________________________ 85
Device Port Commands ______________________________________________________ 86
Device Commands __________________________________________________________ 88
Interacting with a Device Port ____________________________________________ 89
SecureLinx SLC User Guide
5
Device Ports – Logging _________________________________________________ 90
Local Logging ______________________________________________________________ 90
NFS File Logging ___________________________________________________________ 90
PC Card Logging ___________________________________________________________ 90
Email/SNMP Notification _____________________________________________________ 91
Sylog Logging______________________________________________________________ 91
Logging Commands _________________________________________________________ 94
Console Port _________________________________________________________ 95
Console Port Commands _____________________________________________________ 96
Host Lists ____________________________________________________________ 97
Host List Commands _______________________________________________________ 101
9: PC Cards
103
PC Card Commands _______________________________________________________ 110
10: Connections
113
Typical Setup Scenarios for the SLC ______________________________________ 114
Terminal Server ___________________________________________________________ 114
Remote Access Server______________________________________________________ 114
Reverse Terminal Server ____________________________________________________ 115
Multiport Device Server _____________________________________________________ 115
Console Server____________________________________________________________ 116
Connection Configuration ______________________________________________ 117
Connection Commands _____________________________________________________ 119
11: User Authentication
123
Authentication Methods ________________________________________________ 123
Authentication Commands ___________________________________________________ 125
User Rights _________________________________________________________ 126
Local and Remote Users _______________________________________________ 127
Local/Remote User Settings ____________________________________________ 129
Local Users Commands _____________________________________________________ 132
Local User Rights Commands ________________________________________________ 134
Remote User Commands____________________________________________________ 134
NIS ________________________________________________________________ 135
NIS Commands ___________________________________________________________ 138
LDAP ______________________________________________________________ 139
LDAP Commands__________________________________________________________ 142
RADIUS ____________________________________________________________ 143
RADIUS Commands _______________________________________________________ 147
Kerberos ___________________________________________________________ 148
Kerberos Commands _______________________________________________________ 151
TACACS+ __________________________________________________________ 152
TACACS+ Commands ______________________________________________________ 155
SSH Keys___________________________________________________________ 156
Imported Keys ____________________________________________________________ 156
Exported Keys ____________________________________________________________ 156
SSH Commands___________________________________________________________ 161
Custom User Menus __________________________________________________ 163
SecureLinx SLC User Guide
6
Custom User Menu Commands_______________________________________________ 164
Example _________________________________________________________________ 165
12: Maintenance
Firmware & Configurations _____________________________________________
Firmware & Configurations – Web Sessions ________________________________
Firmware & Configurations – SSL Certificate________________________________
iGoogle Gadgets _____________________________________________________
168
168
173
174
176
Administrative Commands ___________________________________________________ 177
System Logs ________________________________________________________ 180
System Log Command______________________________________________________ 183
Audit Log ___________________________________________________________ 183
Diagnostics _________________________________________________________ 184
Diagnostic Commands ______________________________________________________ 187
Status/Reports _______________________________________________________ 189
Status Commands _________________________________________________________ 191
Events _____________________________________________________________ 192
Events Commands _________________________________________________________ 193
13: Application Examples
195
Telnet/SSH to a Remote Device _________________________________________ 196
Dial-in (Text Mode) to a Remote Device ___________________________________ 197
Local Serial Connection to Network Device via Telnet ________________________ 199
14: Command Reference
201
Introduction to Commands______________________________________________ 201
Command Syntax__________________________________________________________ 201
Command Line Help________________________________________________________ 202
Tips_____________________________________________________________________ 202
Administrative Commands ______________________________________________ 203
Audit Log Commands _________________________________________________ 208
Authentication Commands______________________________________________ 209
Kerberos Commands _______________________________________________________ 209
LDAP Commands__________________________________________________________ 210
Local Users Commands _____________________________________________________ 211
NIS Commands ___________________________________________________________ 213
RADIUS Commands _______________________________________________________ 214
TACACS+ Commands ______________________________________________________ 215
User Permissions Commands ________________________________________________ 216
CLI Commands ______________________________________________________
Connection Commands ________________________________________________
Console Port Commands_______________________________________________
Custom User Menu Commands__________________________________________
Date and Time Commands _____________________________________________
Device Commands____________________________________________________
Device Port Commands ________________________________________________
Diagnostic Commands_________________________________________________
End Device Commands ________________________________________________
SecureLinx SLC User Guide
218
220
223
223
225
226
227
230
231
7
Host List Commands __________________________________________________
IP Filter Commands ___________________________________________________
Logging Commands___________________________________________________
Network Commands __________________________________________________
NFS and SMB/CIFS Commands _________________________________________
PC Card Commands __________________________________________________
233
235
236
237
239
240
PC Card Storage Commands ________________________________________________ 240
PC Card Modem Commands _________________________________________________ 242
Routing Commands ___________________________________________________
Services Commands __________________________________________________
SLC Network Commands ______________________________________________
SSH Key Commands __________________________________________________
Status Commands ____________________________________________________
System Log Commands________________________________________________
A: Bootloader
243
243
245
246
248
249
250
Accessing the Bootloader ______________________________________________ 250
Bootloader Commands ________________________________________________ 250
User Commands __________________________________________________________ 250
Administrator Commands____________________________________________________ 251
B: Security Considerations
252
Security Practice _____________________________________________________ 252
Factors Affecting Security ______________________________________________ 252
C: Safety Information
253
Safety Precautions _________________________________________________________ 253
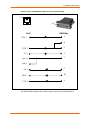
D: Adapters and Pinouts
255
E: Protocol Glossary
261
F: Compliance Information
264
G: Warranty
266
SecureLinx SLC User Guide
8
Figures
Figure 2-1. SLC - 48 Device Ports, 2 Network Ports, 1 Console Port, Dual DC Powered...... 15
Figure 2-2. Device Port Connections ...................................................................................... 17
Figure 2-3. Console Port Connection ...................................................................................... 18
Figure 2-4. Network Connection.............................................................................................. 18
Figure 2-5. PC Card Interface ................................................................................................. 18
Figure 3-1. CAT 5 Cable Connection ...................................................................................... 22
Figure 3-2. AC Power Input and Power Switch (SLCxxxx2N)................................................. 23
Figure 3-3. DC Power Inputs and Power Switch (SLCxxx24T)............................................... 23
Figure 4-1. Front Panel LCD Display and Five Pushbuttons (Enter, Up, Down, Left, Right). 25
Figure 4-2. Beginning of Quick Setup Script ........................................................................... 31
Figure 4-3. Completed Quick Setup ........................................................................................ 33
Figure 5-1. Web Page Layout.................................................................................................. 34
Figure 13-1. SLC Console Manager Configuration ............................................................... 195
Figure 13-2. Remote User Connected to a SUN Server via the SLC ................................... 196
Tables
Table 2-1. SLC Models............................................................................................................ 14
Table 3-1. SLC Technical Specifications................................................................................. 20
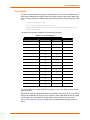
Table 4-1. Methods of Assigning an IP Address ..................................................................... 24
Table 4-2. Front Panel Setup Options with Associated Parameters ....................................... 26
Table 5-1. Actions and Category Options ............................................................................... 37
Table 11-1. User Group Rights.............................................................................................. 126
Table 14-1. Actions and Category Options ........................................................................... 202
SecureLinx SLC User Guide
9
1: About This Guide
Purpose and Audience
This guide provides the information needed to install, configure, and use the products in
the Lantronix SecureLinxTM Console Manager (SLC) family. It is for IT professionals who
must remotely and securely configure and administer servers, routers, switches,
telephone equipment, or other devices equipped with a serial port.
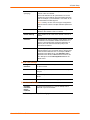
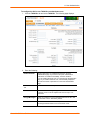
Chapter Summaries
The remaining chapters in this guide include:
Chapter
Summary
2: Overview
Describes the SLC models, their main features, and the
protocols they support.
3: Installation
Provides technical specifications; describes connection
formats and power supplies; provides instructions for
installing the unit in a rack.
4: Quick Setup
Provides instructions for getting your unit up and
running and for configuring required settings.
5: Web and Command Line
Interfaces
Describes the web and command line interfaces
available for configuring the unit.
Note: The configuration chapters (6-12) provide
detailed instructions for using the web interface and
include equivalent command line interface commands.
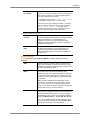
6: Basic Parameters
Provides instructions for configuring network ports,
firewall and routing settings, and date and time.
7: Services
Provides instructions for enabling and disabling system
logging, SSH and Telnet logins, SNMP, SMTP, and the
date and time.
SecureLinx SLC User Guide
10
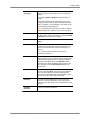
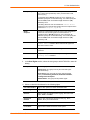
1: About This Guide
Chapter
Summary
8: Devices
Provides instructions for configuring global device port
settings, individual device port settings, and console
port settings.
10: Connections
Provides instructions for configuring connections and
viewing, updating, or disconnecting a connection.
11: User Authentication
Provides instructions for enabling or disabling methods
that authenticate users who attempt to log in via SSH,
Telnet, or the console port. Provides instructions for
creating custom menus.
12: Maintenance
Provides instructions for upgrading firmware, viewing
system logs and diagnostics, generating reports, and
defining events. Includes information about web pages
and commands used to shut down and reboot the SLC.
13: Application Examples
Shows how to set up and use the SLC in three different
configurations.
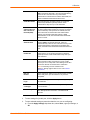
14: Command Reference
Lists and describes all of the commands available on
the SLC command line interface
A: Bootloader
Lists and describes the commands available for the
bootloader command line interface.
B: Security Considerations
Provides tips for enhancing SLC security.
C: Safety Precautions
Lists safety precautions for using the SLC.
D: Adapters and Pinouts
Includes adapter pinout diagrams.
E: Protocol Glossary
Lists the protocols supported by the SLC with brief
descriptions.
F: Compliance Information
Provides information about the SLC’s compliance with
industry standards.
G: Warranty
SecureLinx SLC User Guide
11
1: About This Guide
Additional Documentation
The following information is available on the product CD, the Lantronix web site
(www.lantronix.com), or the product itself:
SLC Quick Start
Describes the steps for getting the SLC up and running;
provided on the CD and in printed form.
SLC Online Help for the
Command Line Interface
Provides online help for configuring the SLC using
commands.
SLC Online Help for the Web
Interface
Provides online help for configuring the SLC using the web
page.
Detector™ Online Help
Provides online help for assigning a static IP address to the
SLC using the Detector™ tool on the product CD.
SecureLinx SLC User Guide
12
2: Overview
SecureLinx SLC Console Managers are members of the Lantronix SecureLinx IT
Management family of products. These products offer systems administrators and other
IT professionals a variety of tools to securely access and manage their resources.
Lantronix has been an innovator in this market with terminal servers and secure console
servers, as well as other remote access devices. The SLC Console Managers build on
that foundation and offer new features and capabilities.
IT equipment can be configured, administered, and managed in a variety of ways, but
most devices have one method in common: an RS-232 serial port, sometimes called a
console, auxiliary, or management port. These ports are often accessed directly by
connecting a terminal or laptop to them, meaning that the administrator must be in the
same physical location as the equipment. SLC Console Managers give the administrator
a way to access them remotely from anywhere there is a network or modem connection.
Many types of equipment can be accessed and administered using Console Managers,
including:
Servers: Unix, Linux, Windows 2003, and others.
Networking equipment: routers, switches, storage networking.
Telecom: PBX, voice switches.
Other systems with serial interfaces: heating/cooling systems,
security/building access systems, UPS, medial devices.
The key benefits of using Console Managers:
Saves money: Enables remote management and troubleshooting without
sending a technician onsite. Reduces travel costs and downtime costs.
Saves time: Provides instant access and reduces response time, improving
efficiency.
Simplifies access: Enables you to access equipment securely and remotely
after hours and on weekends and holidays—without having to schedule visits or
arrange for off-hour access.
Protects assets: Security features provide encryption, authentication,
authorization, and firewall features to protect your IT infrastructure while
providing flexible remote access.
SLC console servers provide features such as convenient text menu systems, break-safe
operation, port buffering (logging), remote authentication, and Secure Shell (SSH)
access. Dial-up modem support ensures access when the network is not available.
SecureLinx SLC User Guide
13
2: Overview
SLC Models
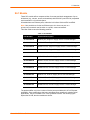
These SLC models offer a compact solution for remote and local management of up to
48 devices (e.g., servers, routers, and switches) with RS-232C (now EIA-232) compatible
serial consoles in a 1U-tall rack space.
All models have two Ethernet ports, referred to in this User Guide as Eth1 and Eth2.
Note: One possible use for the two Ethernet ports is to have one port on a
private, secure network and the other on a public, unsecured network.
This User Guide covers the following products:
Table 2-1. SLC Models
Part Number
Model and Description
SLC00812N-02
SLC8: 8 port, Single AC Supply Secure Console Manager
SLC01612N-02
SLC16: 16 Port, Single AC Supply Secure Console Manager
SLC03212N-02
SLC32: 32 Port, Single AC Supply Secure Console Manager
SLC04812N-02
SLC48: 48 Port, Single AC Supply Secure Console Manager
SLC00822N-02
SLC8: 8 Port, Dual AC Supply Secure Console Manager
SLC01622N-02
SLC16: 16 Port, Dual AC Supply Secure Console Manager
SLC03222N-02
SLC32: 32 Port, Dual AC Supply Secure Console Manager
SLC04822N-02
SLC48: 48 Port, Dual AC Supply Secure Console Manager
SLC00824T-02
SLC8: 8 Port, Dual DC Supply Secure Console Manager
SLC01624T-02
SLC16: 16 Port, Dual DC Supply Secure Console Manager
SLC03224T-02
SLC32: 32 Port, Dual DC Supply Secure Console Manager
SLC04824T-02
SLC48: 48 Port, Dual DC Supply Secure Console Manager
The products differ only in the number of device ports provided and in AC or DC power
availability. Some models have dual entry redundant power supplies for mission critical
applications. They are available in AC or DC powered versions. The following figure
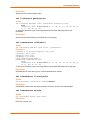
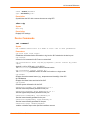
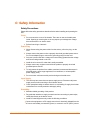
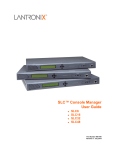
depicts the SLC48; the other models are similar.
SecureLinx SLC User Guide
14
2: Overview
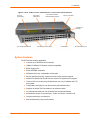
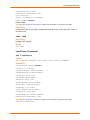
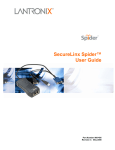
Figure 2-1. SLC - 48 Device Ports, 2 Network Ports, 1 Console Port, Dual DC Powered
Two-Line
LCD Display
Front Panel
Pushbuttons
1U Tall, Self-Contained
Rack-Mountable Chassis
Two PC Card Slots
Console Port
(RS-232)
Two 10/100 Network Ports
RS-232 Device Ports (1-48)
On/Off Switch
Dual DC Power Input
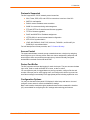
System Features
The SLC has the following capabilities:
Connects up to 48 RS-232 serial consoles
10Base-T/100Base-TX Ethernet network compatibility
Buffer logging to file
Email and SNMP notification
ID/Password security, configurable access rights
Secure shell (SSH) security; supports numerous other security protocols
Network File System (NFS) and Common Internet File System (CIFS) support
Telnet or SSH to a serial port by IP address per port or by IP address and TCP
port number
Configurable user rights for local and remotely authenticated users
Supports an internal PC Card modem or an external modem
No unintentional break ever sent to attached servers (Solaris Ready)
Simultaneous access on the same port - "listen" and "direct" connect mode
Local access through a console port
Web administration (using most browsers)
SecureLinx SLC User Guide
15
2: Overview
Protocols Supported
The SLC supports the TCP/IP network protocol as well as:
SSH, Telnet, PPP, NFS, and CIFS for connections in and out of the SLC
SMTP for mail transfer.
DNS for text-to-IP address name resolution
SNMP for remote monitoring and management
FTP and SFTP for file transfers and firmware upgrades
TFTP for firmware upgrades
DHCP and BOOTP for IP address assignment
HTTPS (SSL) for secure browser-based configuration
NTP for time synchronization
LDAP, NIS, RADIUS, CHAP, PAP, Kerberos, TACACS+, and SecurID (via
RADIUS) for user authentication
For brief descriptions of these protocols, see E: Protocol Glossary.
Access Control
The system administrator controls access to attached servers or devices by assigning
access rights to up to 128 user profiles. Each user has an assigned ID, password, and
access rights. Other user profile access options may include externally configured
authentication methods such as NIS and LDAP.
Device Port Buffer
The SLC supports real-time data logging for each device port. The port can save the data
log to a file, send an email notification of an issue, or take no action.
You can define the path for logged data on a port-by-port basis, configure file size and
number of files per port for each logging event, and configure the device log to send an
email alert message automatically to the appropriate parties indicating a particular error.
Configuration Options
You may use the backlit front-panel LCD display for initial setup and later to view and
configure current network, console, and date/time settings.
Both a web interface viewed through a standard browser and a command line interface
(CLI) are available for configuring the SLC settings and monitoring performance.
SecureLinx SLC User Guide
16
2: Overview
Hardware Features
The SLC hardware includes the following:
1U-tall (1.75 inches) rack-mountable secure console server
Two 10Base-T/100Base-TX network ports
Up to 48 RS-232 serial device ports connected via Category 5 (RJ45) wiring
One serial console port for VT100 terminal or PC with emulation
Two PC Card slots
256 Kbytes-per-port buffer memory for device ports
LCD display and keypad on the front
Universal AC power input (100-240V, 50/60 Hz); options include single input,
single supply or dual input, redundant supplies
-48 VDC power input, dual input, redundant power supplies
Convection cooled, silent operation, low power consumption
Note: For more detailed information, see Technical Specifications on page 20.
All physical connections use industry-standard cabling and connectors. The network and
serial ports are on the rear panel of the SLC, and the console port is on the front.
Required cables and adapters for certain servers, switches, and other products are
available from Lantronix (see www.lantronix.com).
Serial Connections
All devices attached to the device ports and the console port must support the RS-232C
(EIA-232) standard. Category 5 cabling with RJ45 connections is used for the device port
connections and for the console port. (For pinout information, see D: Adapters and
Pinouts.)
Note: RJ45 to DB9/DB25 adapters are available from Lantronix.
Device ports and the console port support eight baud-rate options: 300, 600, 1200, 2400,
4800, 9600, 19200, 38400, 57600, and 115200 baud.
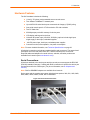
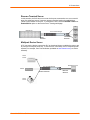
Figure 2-2. Device Port Connections
SecureLinx SLC User Guide
17
2: Overview
Figure 2-3. Console Port Connection
Network Connections
The SLC network interfaces are 10Base-T/100Base-TX connectors for use with a
conventional Ethernet network. Use standard RJ45-terminated Category 5 cables.
Network parameters must be configured before the SLC can be accessed over the
network.
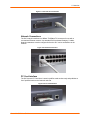
Figure 2-4. Network Connection
PC Card Interface
The SLC has two PC Card slots. Lantronix qualifies cards continuously and publishes a
list of qualified cards on the Lantronix web site.
Figure 2-5. PC Card Interface
SecureLinx SLC User Guide
18
3: Installation
This chapter provides a high-level procedure for installing the SLC followed by more
detailed information about the SLC connections and power supplies.
Caution: To avoid physical and electrical hazards, please be sure to read
B: Safety Information before installing the SLC.
What’s in the Box
In addition to the SLC, the box contains the following items:
Part #
Component Description
Adapters:
200.2066A
Adapter: DB25M (DCE), Sun w/DB25 female
200.2067A
Adapter: DB25F (DCE) to RJ45, Sun w/DB25 male and some HP9000’s
200.2069A
Adapter: DB9M (DCE) to RJ45, SGI Onyx
200.2070A
Adapter: DB9F (DCE) to RJ45, HP9000, SGI Origin, IBM RS6000, and
PC-based Linux servers
ADP010104-01
Adapter: RJ45 rolled serial, Cisco, and Sun Netra
Note: An optional adapter for external modems is also available from Lantronix: 200.2073
Adapter: DB25M (DCE) to RJ45, external modems.
Cables:
200.0063
Cable: RJ45 to RJ45, 6.6 ft (2 m)
500-153
Cable: Loopback
Power Cords:
500-041
For single AC models: one AC power cord
For dual AC models: two AC power cords
083-011
For dual DC models: one accessory kit, containing DC plug connectors
and instructions
Documentation:
CD Case
Quick Start Guide and CD_ROM containing the SecureLinx Console
Manager User Guide
Verify and inspect the contents of the SLC package using the enclosed packing slip or
the table above. If any item is missing or damaged, contact your place of purchase
immediately.
SecureLinx SLC User Guide
19
3: Installation
Product Information Label
The product information label on the underside of the unit contains the following
information about each specific unit:
Part Number
Serial Number Bar Code
Serial Number and Date Code
Regulatory Certifications and Statements
Technical Specifications
Table 3-1. SLC Technical Specifications
Serial Interface
(Device)
RJ45-type 8-conductor connector (DTE)
Speed software selectable (300 to 115,200 baud)
Serial Interface
(Console)
RJ45-type 8-pin connector (DTE)
Speed software selectable (300 to 115,200 baud)
Network Interface
10Base-T/100Base-TX RJ45 Ethernet
Power Supply
Universal AC power input: 100-240 VAC, 50 or 60 Hz
IEC-type regional cord set included
DC power input :
-24 to -60 VDC
Power Consumption
Less than 20 watts
Dimensions
1U, 1.75 in x 17.25 in x 12 in
Weight
10 lbs or less, depending on the options
Temperature
Operating: 0 to 50 °C (32 to 122 °F), 30 to 90 %RH, non-condensing
Storage: -20 to 70 °C (-4 to 158 °F), 10 to 90 %RH, non-condensing
Relative Humidity
Operating: 10% to 90% non-condensing; 40% to 60% recommended
Storage: 10% to 90% non-condensing
Heat Flow Rate
68 BTU per hour
You can install the SLC either in an EIA-standard 19-inch rack (1U tall) or as desktop
unit. The SLC uses convection cooling to dissipate excess heat.
SecureLinx SLC User Guide
20
3: Installation
Physical Installation
To install the unit in a rack:
1. Place the unit in a 19-inch rack.
Warning: Be careful not to block the air vents on the sides of the unit. If
you mount the SLC in an enclosed rack, we recommended that the rack
have a ventilation fan to provide adequate airflow through the unit.
2. Connect the serial device(s) to the SLC device ports. See Connecting to a Device
Port on page 21.
3. Install any PC Cards you intend to use. If you install a modem card, connect to the
phone line. See 9: PC Cards. You have the following options:
a) To configure the SLC using the network, or to monitor serial devices on the
network, connect at least one SLC network port to a network. See Connecting
to a Network Port on page 22.
b) To configure the SLC using a dumb terminal or a computer with terminal
emulation, connect the terminal or PC to the SLC console port. See
Connecting a Terminal on page 22.
4. Connect the power cord, and apply power. See Power on page 23.
5. Wait approximately a minute and a half for the boot process to complete.
When the boot process ends, the SLC host name and the clock appear on the LCD
display.
Now you are ready to configure the network settings as described in 4: Quick Setup.
Connecting to a Device Port
You can connect any device that has a serial console port to a device port on the SLC for
remote administration. The console port must support the RS-232C interface.
Note: Many servers must either have the serial port enabled as a console or the
keyboard and mouse detached. Consult the server hardware and/or software
documentation for more information.
To connect to a device port:
1. Connect one end of the Cat 5 cable to the device port.
2. Connect the other end of the Cat 5 cable to a Lantronix serial console adapter.
Note: To connect a device port to a Lantronix SLP, use the rolled serial cable provided
with the unit, a 200.2225 adapter and Cat 5 cabling, or the ADP010104 adapter that
eliminates the need for an additional Cat5 patch cable between the adapter and the
connected equipment. See D: Adapters and Pinouts for more information about Lantronix
adapters.
3. Connect the adapter to the serial console of the serial device.
SecureLinx SLC User Guide
21
3: Installation
Figure 3-1. CAT 5 Cable Connection
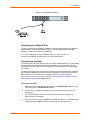
Connecting to a Network Port
The SLC’s network ports (10Base-T/100Base-TX) allow remote access to the attached
devices and the system administrative functions. Use a standard RJ45-terminated
Category 5 cable to connect to the network port.
Note: One possible use for the two Ethernet ports is to have one port on a
private, secure network, and the other on an unsecured network.
Connecting a Terminal
The console port is for local access to the SLC and the attached devices. You may attach
a dumb terminal or a computer with terminal emulation to the console port. The SLC
console port uses RS-232C protocol and supports VT100 emulation. The default baud
rate is 9600.
To connect the console port to a terminal or computer with terminal emulation, Lantronix
offers optional adapters that provide a connection between an RJ45 jack and a DB9 or
DB25 connector. The console port is configured as DTE. For more information,
see D: Adapters and Pinouts and our web site at www.lantronix.com/support. and click
Cable/Adapter Lookup on the Support menu.
.
To connect a terminal:
1. Attach the Lantronix adapter to your terminal (use PN 200.2066A adapter) or your
PC's serial port (use PN 200.2070A adapter).
2. Connect the Cat 5 cable to the adapter, and connect the other end to the SLC
console port.
3. Turn on the terminal or start your computer’s communication program (e.g.,
HyperTerminal for Windows).
4. Once the SLC is running, press Enter to establish connection. You should see the
model name and a login prompt on your terminal. You are connected.
SecureLinx SLC User Guide
22
3: Installation
Power
The SLC consumes less than 20W of electrical power.
AC Input
The SLC has a universal auto-switching AC power supply. The power supply accepts AC
input voltage between 100 and 240 VAC with a frequency of 50 or 60 Hz. Rear-mounted
IEC-type AC power connector(s) are provided for universal AC power input (North
American cord provided).
The SLC0xx12N models have a single supply/input, while the SLC0xx22N models have
dual inputs and dual supplies. The power connector also houses a replaceable protective
fuse (fast-blow 4.0A, maximum 250V AC) and the on/off switch. In addition, we provide
the SLC0xx22N with a “Y” cord. (See SLC Models on page 14.)
Figure 3-2. AC Power Input and Power Switch (SLCxxxx2N)
Note: The SLC48 with dual AC does not have an on/off switch.
DC Input
The DC version of the SLC accepts standard –48 VDC power. The SLC0xx24T models
accept two DC power inputs for supply redundancy. Lantronix provides the DC power
connections using industry standard Wago connectors. One set of connectors is included
with the SLC. You can order additional connectors (part number 721-103/031-000) from
the Wago catalog:
http://www.wagocatalog.com/okv3/index.asp?lid=1&cid=1&str_from_home=first
Figure 3-3. DC Power Inputs and Power Switch (SLCxxx24T)
SecureLinx SLC User Guide
23
4: Quick Setup
This chapter helps get the IP network port up and running quickly, so you can administer
the SLC using your network. To set up the network connections quickly, we suggest you
do one of the following:
Use the front panel LCD display and pushbuttons.
Complete the Quick Setup web page on the web interface.
SSH to the command line interface and follow the Quick Setup script on the
command line interface.
Connect to the console port and follow the Quick Setup script on the command
line interface.
Note: The first time you power up the SLC, Eth1 tries to obtain its IP
address via DHCP. If you have connected Eth1 to the network, and Eth1 is
able to acquire an IP address, you can view this IP address on the LCD or
by running the Detector tool on the product CD. If Eth1 cannot acquire an IP
address, you cannot use Telnet, SSH, or the web interface to run Quick
Setup.
IP Address
Your SLC must have a unique IP address on your network. The system administrator
generally provides the IP address and corresponding subnet mask and gateway. The IP
address must be within a valid range, unique to your network, and in the same subnet as
your PC.
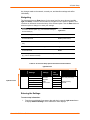
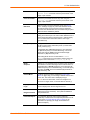
You have the following options for assigning an IP address to your unit.
Table 4-1. Methods of Assigning an IP Address
Method
Description
DHCP
A DHCP server automatically assigns the IP address and
network settings. The SLC is DHCP-enabled by default.
With the Eth1 network port connected to the network, and the
SLC powered up, Eth1 acquires an IP address, viewable on
the LCD.
At this point, you can Telnet into the SLC, or use the web
interface.
BOOTP
Similar to DHCP but for smaller networks.
Detector™
A Windows-based application on the product CD for viewing a
DHCP-provided IP address or for assigning a static IP address
to the SLC. You can use Detector only if you have not already
assigned a static IP address by another method. For more
information, see Detector’s online help.
SecureLinx SLC User Guide
24
4: Quick Setup
Method
Description
Front panel LCD display
and pushbuttons
You manually assign the IP address and other basic network,
console, and date/time settings. If desired, you can restore the
factory defaults.
Serial port login to
command line interface
You assign an IP address and configure the SLC using a
terminal or a PC running a terminal emulation program to the
unit’s serial console port connection.
Method #1 Using the Front Panel Display
Before You Begin
Make sure you know:
An IP address that will be unique and valid on your network (unless automatically
assigned)
Subnet mask (unless automatically assigned)
Gateway
DNS settings
Date, time, and time zone
Console port settings: baud rate, data bits, stop bits, parity, and flow control
Make sure the SLC is plugged in to power and turned on.
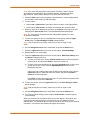
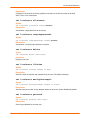
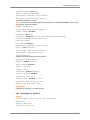
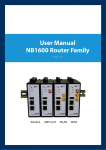
Front Panel LCD Display and Pushbuttons
With the SLC powered up, you can use the front panel display and pushbuttons to set up
the basic parameters.
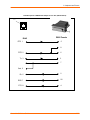
Figure 4-1. Front Panel LCD Display and Five Pushbuttons
(Enter, Up, Down, Left, Right)
The front panel display initially shows the host name and the date and time. Using the
five pushbuttons, you can change the network, console port, and date/time settings and
view the firmware release version. If desired, you can restore the factory defaults.
Note: Have your information handy as the display times out without accepting
any unsaved changes if you take more than 30 seconds between entries.
SecureLinx SLC User Guide
25
4: Quick Setup
Any changes made to the network, console port, and date/time settings take effect
immediately.
Navigating
The front panel has one Enter button (in the center) and four arrow buttons (up, left,
right, and down). Press the arrow buttons to navigate from one option to another, or to
increment or decrement a numerical entry of the selected option. Use the Enter button to
select an option to change or to save your settings.
Action
Button
To move to the next option (e.g., from Network Settings to
Console Settings)
right arrow
To return to the previous option
left arrow
To enter edit mode
Enter (center button)
Within edit mode, to increase or decrease a numerical
entry
up and down arrows
Within edit mode, to move the cursor right or left
right or left arrows
To exit edit mode
Enter
To scroll up or down the list of parameters within an option
(e.g., from IP Address to Mask)
up and down arrows
Table 4-2. Front Panel Setup Options with Associated Parameters
right/left arrow
Normal
Network
Settings
Console
Settings
Date /
Time
Settings
Release
Eth1 IP Address
Baud Rate
Data Bits
Stop Bits
Parity
Flow Control
Time Zone
Firmware version and
date code (view only)
Eth1 Subnet Mask
up/down arrow
Gateway
DNS1
Date/Time
Restore Factory
Defaults
DNS2
DNS3
Entering the Settings
To enter setup information:
1. From the normal display (host name, date and time), press the right arrow button
to display Network Settings. The IP address for Eth1 displays.
SecureLinx SLC User Guide
26
4: Quick Setup
Note: If you have connected Eth1 to the network, and Eth1 is able to acquire
an IP address through DHCP, this IP address displays, followed by the letter
[D]. Otherwise, the IP address displays as all zeros (000.000.000.000).
2. Press the Enter button on the keypad to enter edit mode. A cursor displays below
one character of the existing IP address setting.
3. To enter values:
Use the left or right arrow to move the cursor to the left or to the right position.
Use the up or down arrow to increment or decrement the numerical value.
4. When you have the IP address as you want it, press Enter to exit edit mode, and
then press the down arrow button. The Subnet Mask parameter displays.
Note: You must edit the IP address and the Subnet Mask together for a valid
IP address combination.
5. To save your entries for one or more parameters in the group, press the right
arrow button. The Save Settings? Yes/No prompt displays.
Note: If the prompt does not display, make sure you are no longer in edit
mode.
6. Use the left/right arrow buttons to select Yes, and press the Enter button.
7. Press the right arrow button to move to the next option, Console Settings.
8. Repeat steps 2-7 for each setting.
9. Press the right arrow button to move to the next option, Date/Time Settings, and
click Enter to edit the time zone.
a) To enter a US time zone, use the up/down arrow buttons to scroll through the
US time zones, and then press Enter to select the correct one.
b) To enter a time zone outside the US, press the left arrow button to move up to
the top level of time zones. Press the up/down arrow button to scroll
through the top level.
A time zone with a trailing slash (such as Africa/) has sub-time zones. Use the
right arrow button to select the Africa time zones, and then the up/down
arrows to scroll through them.
Press Enter to select the correct time zone. To move back to the top-level time
zone at any time, press the left arrow.
10. To save your entries, press the right arrow button. The Save Settings? Yes/No
prompt displays.
Note: If the prompt does not display, make sure you are no longer in edit
mode.
11. Use the left/right arrow buttons to select Yes, and press the Enter button.
12. To review the saved settings, press the up or down arrows to step through the
current settings.
When you are done, the front panel returns to the clock display. The network port
resets to the new settings, and you can connect to your IP network for further
administration. You should be able to Telnet or SSH to the SLC through your network
connection, or access the web interface through a web browser.
SecureLinx SLC User Guide
27
4: Quick Setup
Restoring Factory Defaults
To use the LCD display to restore factory default settings:
1. Press the right arrow button to move to the last option, Release.
2. Use the down arrow to move to the Restore Factory Defaults option. A prompt
for the 6-digit Restore Factory Defaults password displays.
3. Press Enter to enter edit mode.
4. Using the left and right arrows to move between digits and the up and down
arrows to change digits, enter the password (the default password is 999999).
Note: The Restore Factory Defaults password is only for the LCD. You can change
it at the command line interface using the admin keypad password command.
5. Press Enter to exit edit mode. If the password is valid, a Save Settings? Yes/No
prompt displays.
6. To initiate the process for restoring factory defaults, select Yes. When the process
is complete, the SLC reboots.
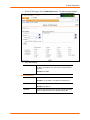
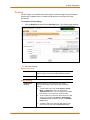
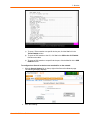
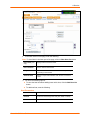
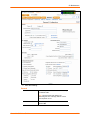
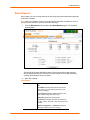
Method #2 Quick Setup on the Web Page
After the unit has an IP address, you can use the Quick Setup web page to configure the
remaining network settings. This page displays the first time you log into the SLC only.
Otherwise, the SLC Home Page displays. (For information about the web interface, see
Web Interface on page 34.)
To complete the Quick Setup page:
1. Open a web browser (Netscape Navigator 6.x and above or Internet Explorer 5.5.
and above, with JavaScript enabled).
2. In the URL field, type https:// followed by the IP address of your SLC.
Note: The web server listens for requests on the unencrypted (HTTP) port (port 80)
and redirects all requests to the encrypted (HTTPS) port (port 443).
3. Log in using sysadmin as the user name and PASS as the password. The first
time you log in to the SLC, the Quick Setup page automatically displays.
Otherwise, the Home page displays.
Note: To open the Quick Setup page at another time, click the Quick Setup tab.
SecureLinx SLC User Guide
28
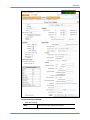
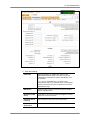
4: Quick Setup
4. To accept the defaults, select the Accept default Quick Setup settings checkbox
in the top portion of the page and click the Apply button at the bottom of the page.
Otherwise, continue with step 5.
Note: Once you click the Apply button on the Quick Setup page, you can
continue using the web interface to configure the SLC further.
5. Enter the following:
Network Settings
Note: Configurations with the same IP subnet on multiple interfaces (Ethernet or
PPP) are not currently supported.
Eth 1 Settings
Disabled: If selected, disables the network port. Default is
Eth1 enabled.
Obtain from DHCP: Acquires IP address, subnet mask,
hostname and gateway from the DHCP server. (The DHCP
server may not provide the hostname gateway, depending
on its setup.) This is the default setting. If you select this
option, skip to Gateway.
Obtain from BOOTP: Lets a network node request
configuration information from a BOOTP "server" node. If
you select this option, skip to Gateway.
Specify: Lets you manually assign a static IP address,
generally provided by the system administrator.
SecureLinx SLC User Guide
29
4: Quick Setup
IP Address (if
specifying)
Enter an IP address that will be unique and valid on your
network. There is no default.
Enter all IP addresses in dot-quad notation. Do not use
leading zeros in the fields for dot-quad numbers less than
100. For example, if your IP address is 172.19.201.28, do
not enter 028 for the last segment.
Note: Currently, the SLC does not support configurations
with the same IP subnet on multiple interfaces (Ethernet or
PPP).
Subnet Mask
If specifying an IP address, enter the network segment on
which the SLC resides. There is no default.
Default Gateway
The IP address of the router for this network. There is no
default.
Hostname
The default host name is slcXXXX, where XXXX is the last
4 characters of the hardware address of Ethernet Port 1.
There is a 64-character limit (contiguous characters, no
spaces). The host name becomes the prompt in the
command line interface.
Domain
If desired, specify a domain name (for example,
support.lantronix.com). The domain name is used for host
name resolution within the SLC. For example, if abcd is
specified for the SMTP server, and mydomain.com is
specified for the domain, if abcd cannot be resolved, the
SLC attempts to resolve abcd.mydomain.com for the
SMTP server.
Date & Time Settings
Change
Date/Time
Select the checkbox to manually enter the date and time at
the SLC’s location.
Date
From the drop-down lists, select the current month, day,
and year.
Time
From the drop-down lists, select the current hour and
minute.
Time Zone
From the drop-down list, select the appropriate time zone.
Administrator Settings
Sysadmin
Password/
Retype
Password
To change the password (e.g., from the default) enter a
password of up to 64 characters.
6. To save your entries, click the Apply button.
SecureLinx SLC User Guide
30
4: Quick Setup
Method #3 Quick Setup on the Command Line Interface
If the SLC does not have an IP address, you can connect a dumb terminal or a PC
running a terminal emulation program (VT100) to access the command line interface.
(See Connecting a Terminal on page 22.) If the unit has an IP address, you can use SSH
or Telnet to connect to the SLC.
Note: By default, Telnet is disabled and SSH is enabled. To enable Telnet, use the
Services web page (see 7: Services), a serial terminal connection, or an SSH connection.
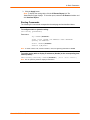
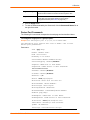
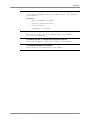
To complete the command line interface Quick Setup script:
1. Do one of the following:
With a serial terminal connection, power up, and when the command line
displays, press Enter.
With a network connection, use an SSH program or Telnet program (if Telnet has
been enabled) to connect to xx.xx.xx.xx (the IP address in dot quad notation),
and press Enter. You should be at the login prompt.
2. Enter sysadmin as the user name and press Enter.
3. Enter PASS as the password and press Enter. The first time you log in, the Quick
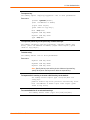
Setup script runs automatically. Normally, the command prompt displays.
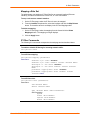
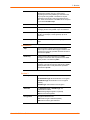
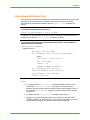
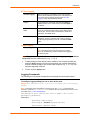
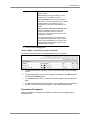
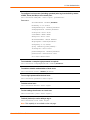
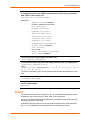
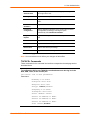
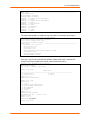
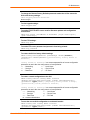
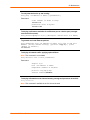
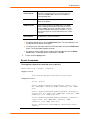
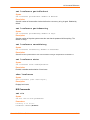
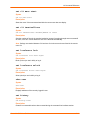
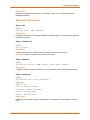
Figure 4-2. Beginning of Quick Setup Script
Welcome to the SecureLinx Console Manager
Model Number: SLC48
Quick Setup will now step you through configuring a few basic settings.
The current settings are shown in brackets ('[]').
You can accept the current setting for each question by pressing <return>.
4. Enter the following information at the prompts:
Note: To accept a default or to skip an entry that is not required, press
Enter.
Configure Eth1
Select one of the following:
<1> obtain IP Address from DHCP: The unit will acquire
the IP address, subnet mask, hostname and gateway from
the DHCP server. (The DHCP server may or may not
provide the hostname and gateway, depending on its
setup.) This is the default setting.
<2> obtain IP Address from BOOTP: Permits a
network node to request configuration information
from a BOOTP "server" node.
<3> static IP Address: Allows you to assign a static IP
address manually. The IP address is generally provided by
the system administrator.
SecureLinx SLC User Guide
31
4: Quick Setup
IP Address (if
specifying)
An IP address that will be unique and valid on your
network and in the same subnet as your PC. There is no
default.
If you selected DHCP or BOOTP, this prompt does not
display.
Enter all IP addresses in dot-quad notation. Do not use
leading zeros in the fields for dot-quad numbers less than
100. For example, if your IP address is 172.19.201.28, do
not enter 028 for the last segment.
Note: Configurations with the same IP subnet on multiple
interfaces (Ethernet or PPP) are not currently supported.
Subnet Mask
The subnet mask specifies the network segment on which
the SLC resides. There is no default. If you selected DHCP
or BOOTP, this prompt does not display.
Default Gateway
IP address of the router for this network. There is no
default.
Hostname
The default host name is slcXXXX, where XXXX is the last
4 characters of the hardware address of Ethernet Port 1.
There is a 64-character limit (contiguous characters, no
spaces).
Note: The host name becomes the prompt in the
command line interface.
Domain
If desired, specify a domain name (for example,
support.lantronix.com). The domain name is used for host
name resolution within the SLC. For example, if abcd is
specified for the SMTP server, and mydomain.com is
specified for the domain, if abcd cannot be resolved, the
SLC attempts to resolve abcd.mydomain.com for the
SMTP server.
Time Zone
If the time zone displayed is incorrect, enter the correct
time zone and press Enter. If the entry is not a valid time
zone, the system guides you through selecting a time
zone. A list of valid regions and countries displays. At the
prompts, enter the correct region and country.
Date/Time
If the date and time displayed are correct, type n and
continue. If the date and time are incorrect, type y and
enter the correct date and time in the formats shown at the
prompts.
Sysadmin
password
Enter a new sysadmin password.
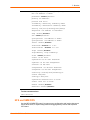
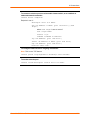
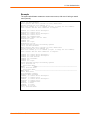
After you complete the Quick Setup script, the changes take effect immediately.
SecureLinx SLC User Guide
32
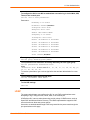
4: Quick Setup
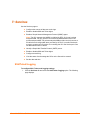
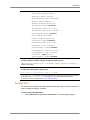
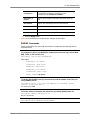
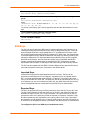
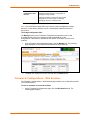
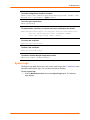
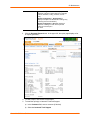
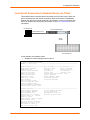
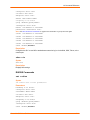
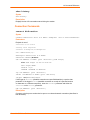
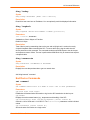
Figure 4-3. Completed Quick Setup
5. To logout, type logout at the prompt and press Enter.
Next Step
After quick starting the SLC, you may want to configure other settings. You can use the
web page or the command line interface for configuration.
For information about the web and the command line interfaces, go to
5: Web and Command Line Interfaces.
To continue configuring the SLC, go to 6: Basic Parameters.
SecureLinx SLC User Guide
33
5: Web and Command Line Interfaces
The SLC offers three interfaces for configuring the SLC: a command line interface (CLI),
a web interface, and an LCD with pushbuttons on the front panel. This chapter discusses
the web and command line interfaces. (4: Quick Setup includes instructions for using the
LCD to configure basic network settings.)
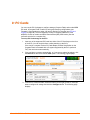
Web Interface
A web interface allows the system administrator and other authorized users to configure
and manage the SLC using most web browsers (Netscape Navigator 6.x and above or
Internet Explorer 5.5. and above, with JavaScript enabled). The Web Telnet and Web
SSH features require Java 1.1 (or later) support in the browser. The SLC provides a
secure, encrypted web interface over SSL (secure sockets layer).
Note: The web server listens for requests on the unencrypted (HTTP) port (port 80) and
redirects all requests to the encrypted (HTTPS) port (port 443).
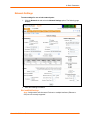
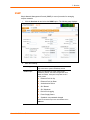
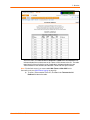
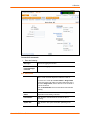
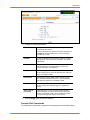
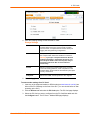
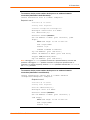
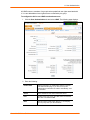
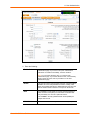
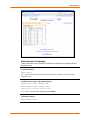
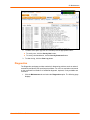
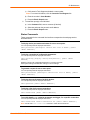
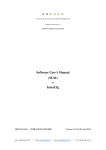
The following figure shows a typical web page:
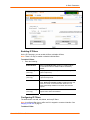
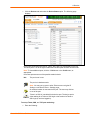
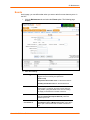
Figure 5-1. Web Page Layout
Logout Button
Port
Number Bar
Icons
Tabs
Options
Help
Button
Entry Fields and
Optons
Apply Button
SecureLinx SLC User Guide
34
5: Web and Command Line Interfaces
The web page has the following components:
Tabs: Groups of settings to configure.
Options: Below each tab are options for specific types of settings.
Note: Only those options for which the currently logged-in user has rights display.
Port Number Bar: Allows you to select a port and display its settings. The E1 and E2
buttons display the Network – Settings page. The A and B buttons display the status of
the power supplies.
Note: Only ports to which the currently logged-in user has rights are enabled.
Entry Fields and Options: Allow you to enter data and select options for the settings.
Note: For specific instructions on completing the fields on the web pages, see
Chapters 6 through 12.
Apply Button: Apply on each web page makes the changes immediately and saves
them so they will be there when the SLC is rebooted.
Icons: The icons in the icon bar above the Main Menu
(from left to right):
Home page.
Information about the SLC and Lantronix contact information.
Configuration site map.
Status of the SLC.
display
Help Button: Provides online Help for the specific web page.
Logout Button: Closes SLC.
Logging in
Only the system administrator or users with web access rights can log into the web page.
More than one user at a time can log in, but the same user cannot login more than once.
To log in to the SLC web interface:
1. Open a web browser (Netscape Navigator 6.x and above or Internet Explorer 5.5.
and above).
2. In the URL field, type https:// followed by the IP address of your SLC.
3. To configure the SLC, use sysadmin as the user name and PASS as the
password. (These are the default values.)
Notes:
The administrator may have changed the password using the method
described in the previous chapter.
When SecurID over RADIUS is used, the user must enter the
passcode corresponding to their RSA token. Depending on the state of the
user, the login pages may also require a new PIN number, the next passcode,
or the next tokencode.
The Lantronix SLC Quick Setup page displays automatically the first time you log in.
Subsequently, the Lantronix SLC Home page displays. (If you want to display the
Quick Setup page again, click Quick Setup on the main menu.)
SecureLinx SLC User Guide
35
5: Web and Command Line Interfaces
Logging off
To log off the SLC web interface:
Click the Logoff button. The “Logging out” message, followed by the login page displays.
Web Page Help
To view detailed information about an SLC web page:
Click the Help button to the right of the web page title.
Command Line Interface
A command line interface (CLI) is available for entering all the commands you can use
with the SLC. In this User Guide, after each section of instructions for using the web
interface, you will find the equivalent CLI commands. You can access the command line
interface using Telnet, SSH, or a serial terminal connection.
Note: By default, Telnet is disabled and SSH is enabled. To enable Telnet, use the
Services web page, a serial terminal connection, or an SSH connection.
(See 7: Services.)
The sysadmin user and users with who have full administrative rights have access to the
complete command set, while all other users have access to a reduced command set
based on their permissions.
Logging in
To log in to the SLC command line interface:
1. Do one of the following:
With a serial terminal connection, power up, and when the command line
displays, press Enter.
If the SLC already has an IP address (assigned previously or assigned by
DHCP), Telnet (if Telnet has been enabled) or SSH to xx.xx.xx.xx (the IP
address in dot quad notation) and press Enter. The login prompt displays.
2. To log in as the system administrator for setup and configuration:
a) Enter sysadmin as the user name and press Enter.
b) Enter PASS as the password and press Enter. The first time you log in, the
Quick Setup script runs automatically. Normally, the command prompt
displays. (If you want to display the Quick Setup script again, use the admin
quicksetup command.)
Note: The system administrator may have changed the password using
one of the Quick Setup methods in the previous chapter.
3.
To log in any other user:
a) Enter your SLC user name and press Enter.
b) Enter your SLC password and press Enter.
SecureLinx SLC User Guide
36
5: Web and Command Line Interfaces
Logging out
To log out of the SLC command line interface:
1. Type logout and press Enter.
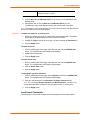
Command Syntax
Commands have the following format:
<action> <category> <parameter(s)>
where
<action> is set, show, connect, admin, diag, pccard, or logout.
<category> is a group of related parameters whose settings you want to configure or
view. Examples are ntp, deviceport, and network.
<parameter(s)> is one or more name-value pairs in one of the following formats:
<parameter name> <aa⏐bb>
User must specify one of the values (aa
or bb) separated by a vertical line ( | ).
The values are in all lowercase and must
be entered exactly as shown. Bold
indicates a default value.
<parameter name> <Value>
User must specify an appropriate value,
for example, an IP address. The
parameter values are in mixed case.
Square brackets [ ] indicate optional
parameters.
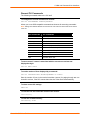
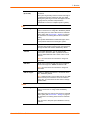
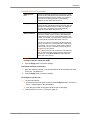
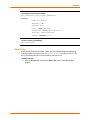
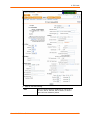
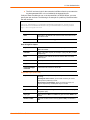
Table 5-1. Actions and Category Options
Action
Category
set
network | ipfilter | routing | datetime | ntp | services |
nfs | cifs | menu | hostlist | auth | localusers |
remoteusers | ldap | radius | kerberos | tacacs+ |
consoleport | deviceport | nis | slcnetwork | command |
sshkey | password | history | cli | locallog |
show
network | ipfilter | routing | datetime | ntp | services |
nfs | cifs | menu | hostlist | auth | localusers | nis |
ldap | radius | kerberos | tacacs+ | consoleport |
deviceport | locallog | sysstatus | syslog | auditlog |
portstatus | sysconfig | portcounters | connections |
slcnetwork | sshkey | history | cli | user | remoteusers
connect
direct | listen | bidirection | unidirection | terminate |
global
diag
ping | loopback | traceroute | arp | lookup | netstat |
perfstat | sendpacket | nettrace | internals
pccard
storage | modem
admin
reboot | shutdown | ftp | config | firmware | version |
banner | keypad | quicksetup | web | events |lcd
logout
Terminates CLI session.
SecureLinx SLC User Guide
37
5: Web and Command Line Interfaces
Command Line Help
For general Help and to display the commands to which you have rights, type:
help
For general command line Help, type:
help command line
For more information about a specific command, type help followed by the command,
for example:
help set network or help admin firmware
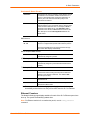
Tips
Type enough characters to uniquely identify the action, category, or parameter
name. For parameter values, type the entire value. For example, you can
shorten:
set network port 1 state static ipaddr 122.3.10.1 mask
255.255.0.0
to
se net po 1 st static ip 122.3.10.1 ma 255.255.0.0
Use the Tab key to automatically complete action, category, or parameter
names. Type a partial name and press Tab either to complete the name if only
one is possible, or to display the possible names if more than one is possible.
Following a space after the preceding name, Tab displays all possible names.
Should you make a mistake while typing, backspace by pressing the Backspace
key and/or the Delete key, depending on how you accessed the interface. Both
keys work if you use VT100 emulation in your terminal access program when
connecting to the console port. Use the left and right arrow keys to move within
a command.
Use the up and down arrows to scroll through previously entered commands. If
desired, select one and edit it. You can scroll through up to 100 previous
commands entered in the session.
To clear an IP address, type 0.0.0.0, or to clear a non-IP address value, type
CLEAR.
When the number of lines displayed by a command exceeds the size of the window (the
default is 25), the command output is halted until the user is ready to continue. To display
the next line, press Enter, and to display the page, press the space bar. You can override
the number of lines (or disable the feature altogether) with the set cli command.
SecureLinx SLC User Guide
38
5: Web and Command Line Interfaces
General CLI Commands
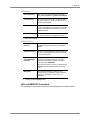
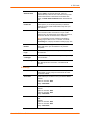
The following commands relate to the CLI itself.
To configure the current command line session:
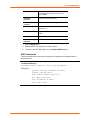
set cli scscommands <enable|disable>
Allows you to use SCS-compatible commands as shortcuts for executing commands:
Note: Settings are retained between CLI sessions for local users and users listed in the remote
users list.
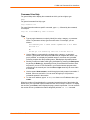
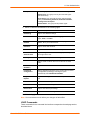
SCS Commands
SLC Commands
info
version
reboot
poweroff
listdev
direct
listen
clear
telnet
ssh
'show sysstatus'
'admin version'
'admin reboot'
'admin shutdown'
'show deviceport names'
'connect direct deviceport'
'connect listen deviceport'
'set locallog clear'
'connect direct telnet'
'connect direct ssh'
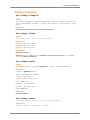
To start a menu if a menu is associated with the current user and was not
displayed at login:
set cli menu start
To set the number of lines displayed by a command:
set cli terminallines <disable|Number of lines>
Sets the number of lines in the terminal emulation (screen) for paging through text one
screenful at a time, if the SLC cannot detect the size of the terminal automatically.
To show current CLI settings:
show cli
To view the last 100 commands entered in the session:
show history
To clear the command history:
set history clear
SecureLinx SLC User Guide
39
5: Web and Command Line Interfaces
To view the rights of the currently logged-in user:
show user
Note: For information about user rights, see 11: User Authentication.
SecureLinx SLC User Guide
40
6: Basic Parameters
This chapter explains how to set the following basic configuration settings for the SLC
using the SLC web interface or the CLI:
Network parameters that determine how the SLC interacts with the attached
network
Firewall and routing
Date and time
Note: If you entered some of these settings using a Quick Setup procedure, you
may update them here.
Requirements
If you assign a different IP address from the current one, it must be within a valid range,
unique to your network, and with the same subnet mask as your workstation.
To configure the unit, you need the following information:
Eth1
IP address: ________. ________ . ________ .________
Subnet mask: ________. ________ . ________ .________
Eth2
IP address (optional): ________. ________ . ________ .________
Subnet mask (optional): ________. ________ . ________ .________
Gateway: ________. ________ . ________ .________
DNS: ________. ________ . ________ .________
SecureLinx SLC User Guide
41
6: Basic Parameters
Network Settings
To enter settings for one or both network ports:
1. Click the Network tab and select the Network Settings option. The following page
displays:
2. Enter the following information:
Eth1 and Eth2 Settings
Note: Configurations with the same IP subnet on multiple interfaces (Ethernet or
PPP) are not currently supported.
SecureLinx SLC User Guide
42
6: Basic Parameters
Eth 1 and/or Eth 2
Settings
Disabled: If selected, disables the network port. Defaults
are Eth1 and Eth2 enabled.
Obtain from DHCP: Acquires IP address, subnet mask,
hostname and gateway from the DHCP server. (The DHCP
server may not provide the hostname gateway, depending
on its setup.) This is the default setting. If you select this
option, skip to Gateway.
Obtain from BOOTP: Lets a network node request
configuration information from a BOOTP "server" node. If
you select this option, skip to Gateway.
Specify: Lets you manually assign a static IP address,
generally provided by the system administrator.
IP Address (if
specifying)
Enter an IP address that will be unique and valid on your
network. There is no default.
Enter all IP addresses in dot-quad notation. Do not use
leading zeros in the fields for dot-quad numbers less than
100. For example, if your IP address is 172.19.201.28, do
not enter 028 for the last segment.
Note: Currently, the SLC does not support configurations
with the same IP subnet on multiple interfaces (Ethernet or
PPP).
Subnet Mask
If specifying an IP address, enter the network segment on
which the SLC resides. There is no default.
Eth 1 and/or Eth2
IPv6 Address
Address of the port in IPv6 format.
Note: The SLC supports IPv6 connections for a limited set
of services: the web, ssh, and Telnet.
IPv6 addresses are written as 8 sets of 4-digit hexadecimal
numbers separated by colons. There are several rules for
modifying the address. For example,
1234:0BCD:1D67:0000:0000:8375:BADD:0057 may be
shortened to 1234:BCD:1D67::8375:BADD:57.
Eth 1 and/or Eth2
Mode
Select the direction (full duplex or half-duplex) and speed
(10 or 100Mbit) of data transmission. The default is Auto,
which allows the Ethernet port to auto-negotiate the speed
and duplex with the hardware endpoint to which it is
connected.
Eth 1 and/or Eth2
Multicast
Displays the multicast address of the Ethernet port.
SecureLinx SLC User Guide
43
6: Basic Parameters
Gateway
Default
IP address of the router for this network.
If this has not been set manually, any gateway acquired by
DHCP for Eth1 or Eth2 displays.
All network traffic that matches the Eth1 IP address and
subnet mask is sent out Eth1. All network traffic that
matches the Eth2 IP address and subnet mask is sent out
Eth 2.
If you set a default gateway, any network traffic that does
not match Eth1 or Eth2 is sent to the default gateway for
routing.
DHCP-Acquired
Gateway acquired by DHCP for Eth1 or Eth2.
(view only)
GPRS-Acquired
(view only)
Displays the IP address of the router if it has been
automatically assigned by General Packet Radio Service
(GPRS).
Precedence
Indicates whether the gateway acquired by DHCP or the
default gateway takes precedence. The default is DHCP
Gateway. If the DHCP Gateway is selected and both Eth1
and Eth2 are configured for DHCP, the SLC gives
precedence to the Eth1 gateway.
Alternate
An alternate IP address of the router for this network, to be
used if an IP address usually accessible through the
default gateway fails to return one or more pings.
IP Address to Ping
IP address to ping to determine whether to use the
alternate gateway.
Ethernet Port to
Ping
Ethernet port to use for the ping.
Delay between
Pings
Number of seconds between pings
Number of Failed
Pings
Number of pings that fail before the SLB uses the alternate
gateway.
Enable IP
Forwarding
IP forwarding enables network traffic received on one
interface (Eth1, Eth2, or an external/PC Card modem
attached to the SLC with an active PPP connection) to be
transferred out another interface (any of the above). The
default behavior (if IP forwarding is disabled) is for network
traffic to be received but not routed to another destination.
Enabling IP forwarding is required if you enable Network
Address Translation (NAT) for any device port modem or
PC Card/ISDN modem. IP forwarding allows a user
accessing the SLC over a modem to access the network
connected to Eth1 or Eth2.
SecureLinx SLC User Guide
44
6: Basic Parameters
Hostname & Name Servers
Hostname
The default host name is slcXXXX, where XXXX is the last
4 characters of the hardware address of Ethernet Port 1.
There is a 64-character limit (contiguous characters, no
spaces). The host name becomes the prompt in the
command line interface.
Domain
If desired, specify a domain name (for example,
support.lantronix.com). The domain name is used for host
name resolution within the SLC. For example, if abcd is
specified for the SMTP server, and mydomain.com is
specified for the domain, if abcd cannot be resolved, the
SLC attempts to resolve abcd.mydomain.com for the
SMTP server.
DNS Servers
DNS Servers
#1 - #3
Configure up to three name servers. #1 is required if you
choose to configure DNS (Domain Name Server) servers.
The first three DNS servers acquired via DHCP through
Eth1 and/or Eth2 display automatically.
DHCP-Acquired DNS Servers
#1 - #3
Displays the IP address of the name servers if
automatically assigned by DHCP.
GPRS-Acquired DNS Servers
#1 - #3
Displays the IP address of the name servers if
automatically assigned by General Packet Radio Service
(GPRS).
TCP Keepalive Parameters
Start Probes
Number of seconds the SLC waits after the last
transmission before sending the first probe to determine
whether a TCP session is still alive. The default is 600
seconds (10 minutes).
Number of Probes
Number of probes the SLC sends before closing a session.
The default is 5.
Interval
The number of seconds the SLC waits between probes.
The default is 60 seconds.
3. To save your entries, click the Apply button. Apply makes the changes
immediately and saves them so they will be there when the SLC is rebooted.
Ethernet Counters
The Network-Settings page displays statistics for each of the SLC’s Ethernet ports since
boot-up. The system automatically updates them.
Note: For Ethernet statistics for a smaller time period, use the diag perfstat
command.
SecureLinx SLC User Guide
45
6: Basic Parameters
Network Commands
The following CLI commands correspond to the web page entries described above.
To set the default and alternate network gateways:
set network gateway <parameters>
Parameters:
default <IP Address>
precedence <dhcp|gprs|default>
alternate <IP Address>
pingip <IP Address>
ethport <1 or 2>
pingdelay <1-250 seconds>
failedpings <1-25>
The alternate gateway is used if an IP address usually accessible through the default
gateway fails to return one or more pings.
To configure Ethernet port 1 or 2:
set network port <1|2> <parameters>
Parameters:
mode <auto|10mbit-half|100mbit-half|
10mbit-full|100mbit-full>
state <dhcp|bootp|static|disable>
[ipaddr <IP Address> mask <Mask>]
[ipv6addr <IP v6 Address|Prefix>]
To configure up to three DNS servers:
set network dns <1|2|3> ipaddr <IP Address>
To set the default gateway:
set network gateway <parameters>
Parameters:
default <IP Address>
precedence <dhcp|default>
To set the SLC host name and domain name:
set network host <Hostname> [domain <Domain Name>]
SecureLinx SLC User Guide
46
6: Basic Parameters
To set TCP Keepalive and IP Forwarding network parameters:
set network <parameters>
Parameters:
interval <1-99999 Seconds>
ipforwarding <enable|disable>
probes <Number of Probes>
startprobes <1-99999 Seconds>
To view all network settings:
show network all
To view Ethernet port settings and counters:
show network port <1|2>
To view DNS settings:
show network dns
To view gateway settings:
show network gateway
To view the host name of the SLC:
show network host
IP Filter
IP filters (also called a rule set) act as a firewall to allow or deny individual or a range of
IP addresses, ports, and protocols. When a network connection is configured to use an
IP filter, all network traffic through that connection is compared, in order, to the rules of
that filter. Network traffic may be allowed to pass, it may be dropped (without notice), or it
may be rejected (sends back an error packet) depending upon the rules of that filter rule
set.
The administrator uses the Network – IP Filter page to view, add, edit, delete, and map IP
filters,
Warning: IP filters configuration is a feature for advanced users. Adding and
enabling IP filter sets incorrectly can disable your SLC.
Viewing IP Filters
You can view a list of filters and a table showing how each filter is mapped to an
interface.
To view a list of IP filters:
1. Click the Network tab and select the IP Filter option. The following page displays:
SecureLinx SLC User Guide
47
6: Basic Parameters
Enabling IP Filters
On the IP Filter page, you can enable all filters or disable all filters.
Note: There is no way to enable or disable individual filters.
To enable IP filters:
1. Enter the following:
Enable IP Filter
Select the Enable IP Filter checkbox to enable all filters,
or clear the checkbox to disable all filters. Disabled by
default.
Packets Dropped
(view only)
Displays the number of data packets that the filter ignored
(did not respond to).
Packets Rejected
(view only)
Displays the number of data packets that the filter sent a
“rejected” response to.
Test Timer
Timer for testing IP Filter rulesets. Select No to disable the
timer. Select Yes, minutes (1-120) to enable the timer and
enter the number of minutes the timer should run. The
timer automatically disables the IP Filters when the time
expires.
Time Remaining
(view only)
Indicates how many minutes are left on the timer before it
expires and IP Filters are disabled.
Configuring IP Filters
The administrator can add, edit, delete, and map IP filters.
Note: A configured filter has no effect until it is mapped to a network interface. See
Mapping a Rule Set on page 51.
To add an IP filter:
SecureLinx SLC User Guide
48
6: Basic Parameters
1. On the IP Filter page, click the Add Ruleset button. The following page displays:
2. Enter the following
Ruleset Name
Name that identifies a filter; may be composed of letters,
numbers, and hyphens only. (The name cannot start with a
hyphen.)
Example: FILTER-2
Rule Parameters
IP Address
Specify a single IP address to act as a filter.
Example: 172.19.220.64 – this specific IP address only
Subnet Mask
Specify a subnet mask to act as a filter.
Example: 255.255.0.0
Protocol
SecureLinx SLC User Guide
From the drop-down list, select the type of protocol through
which the filter will operate. The default setting is All.
49
6: Basic Parameters
Port Range
Enter a range of destination TCP or UDP port numbers to
be tested. An entry is required for TCP, TCP New, TCP
Established, and UDP, and is not allowed for other
protocols. Separate multiple ports with commas. Separate
ranges of ports by colons.
Examples:
22 – filter on port 22 only
23,64,80 – filter on ports 23, 64 and 80
23:64,80,143:150 – filter on ports 23 through 64, port 80
and ports 143 through 150
Action
Select whether to drop, reject, or allow communications for
the specified IP address, subnet mask, protocol, and port
range. Drop ignores the packet with no notification. Reject
ignores the packet and sends back an error message.
Allow permits the packet through the filter.
Generate rule to
allow service
You may wish to “punch holes” in your filter set for a
particular protocol or service.
For instance, if you have configured your NIS server and
wish to create an opening in your filter set, select the NIS
option and click the Add Rule button. This entry adds a new
rule to your filter set using the NIS -configured IP address.
Other services and protocols added automatically generate
the necessary rule to allow their use.
3. Click the right arrow button to add the new rule to the bottom of the Rules list box
on the right.
4. To remove a rule from the filter set, highlight that line and click the left arrow. The
rule populates the rule definition fields, allowing you to make minor changes before
reinserting the rule. To clear the definition fields, click the Clear button.
5. To change the order of priority of the rules in the list box, select the rule to move
and use the up or down arrow buttons on the right side of the filter list box.
6. To save, click the Apply button. The new filter displays in the menu tree.
Note: To add another new filter rule set, click the Back to IP Filter link to return to the
IP Filter page.
Updating an IP Filter
The administrator can update an IP filter rule set.
1. On the IP Filter page, select the IP filter ruleset to be edited and click the Edit
Ruleset button. The IP Filter Ruleset page displays.
2. Edit the information as desired and click the Apply button.
Deleting an IP Filter
The administrator can delete an IP filter rule set.
1. On the IP Filter page, select the IP filter ruleset to be deleted and click the Delete
button.
SecureLinx SLC User Guide
50
6: Basic Parameters
Mapping a Rule Set
The administrator can assign an IP Filter Rule Set to a network interface (Ethernet
interface), a modem connected to a Device Port, or a PC Card modem.
To map a rule set to a network interface:
1. On the IP Filter page, select the IP filter rule set to be mapped.
2. From the Interface drop-down list, select the interface and click the Map Ruleset
button. The Interface and rule set display in the IP Filter Mappings table.
To delete a mapping:
1. On the IP Filter page, select the mapping from the list and click the Delete
Mappings button. The mapping no longer displays.
2. Click the Apply button.
IP Filter Commands
The following CLI commands correspond to the web page entries described above.
To enable or disable IP filtering for incoming network traffic:
set ipfilter state
To set IP filter mapping:
set ipfilter mapping <parameters>
Parameters:
ethernet <1|2> state <disable>
ethernet <1|2> state <enable> ruleset <Ruleset Name>
deviceport <1..48> state <disable>
deviceport <1..48> state <enable> ruleset <Ruleset
Name>
pccardslot <upper|lower> state <disable>
pccardslot <upper|lower> state <enable> ruleset
<Ruleset Name>
To set IP filter rules:
set ipfilter rules <parameters>
Parameters:
add <Ruleset Name>
delete <Ruleset Name>
edit <Ruleset Name> <Edit Parameters>
Edit Parameters:
append
insert <Rule Number>
replace <Rule Number>
delete <Rule Number>
SecureLinx SLC User Guide
51
6: Basic Parameters
Routing
The SLC allows you to define static routes and, for networks using Routing Information
Protocol (RIP)-capable routes, to enable the RIP protocol to configure the routes
dynamically.
To configure routing settings:
1. Click the Network tab and select the Routing option. The following page displays:
2. Enter the following:
Dynamic Routing
Enable RIP
Select to enable Dynamic Routing Information Protocol
(RIP) to assign routes automatically. Disabled by default.
RIP Version
Select the RIP version. The default is 2.
Static Routing
Enable Static
Routing
SecureLinx SLC User Guide
Select to assign the routes manually. The system
administrator usually provides the routes. Disabled by
default.
To add a static route, enter the IP Address, Subnet
Mask, and Gateway for the route and click the
Add/Edit Route button. The route displays in the Static
Routes table. You can add up to 64 static routes.
To edit a static route, select the radio button to the right
of the route, change the IP Address, Subnet Mask,
and Gateway fields as desired, and click the Add/Edit
Route button.
To delete a static route, select the radio button to the
right of the route and click the Delete Route button.
52
6: Basic Parameters
3. Click the Apply button.
Note: To display the routing table, click the IP Routes Report link. The
Status/Reports page displays. To view the report, select the IP Routes checkbox and
click Generate Report.
Routing Commands
The following CLI commands correspond to the web page entries described above.
To configure static or dynamic routing:
set routing [parameters]
Parameters:
rip <enable|disable>
route <1-64> ipaddr <IP Address> mask <Netmask>
gateway <IP Address>
static <enable|disable>
version <1|2|both>
Note: To delete a static route, set the IP address, mask, and gateway parameters to 0.0.0.0.
To set the routing table to display IP addresses (disable) or the corresponding host
names (enable):
show routing [resolveip <enable|disable>] [email <Email Address>]
Note: You can optionally email the displayed information.
SecureLinx SLC User Guide
53
7: Services
Use the Services page to:
Configure the amount of data sent to the logs.
Enable or disable SSH and Telnet logins.
Enable a Simple Network Management Protocol (SNMP) agent.
Note: The SLC supports both MIB-II (as defined by RFC 1213) and a private
enterprise MIB. The SLC product CD includes the MIB definition files for the
private enterprise MIB. The private enterprise MIB provides read-only access to
all statistics and configurable items provided by the SLC. It provides read-write
access to a select set of functions for controlling the SLC and device ports. See
the MIB definition file for details.
Identify a Simple Mail Transfer Protocol (SMTP) server.
Enable or disable SSH and Telnet logins.
Configure an audit log.
View the status of and manage the SLCs on the SecureLinx network.
Set the date and time.
SSH/Telnet/Logging
To configure SSH, Telnet, and Logging settings:
1. Click the Services tab and select the SSH/Telnet /Logging option. The following
page displays.
SecureLinx SLC User Guide
54
7: Services
2. Enter the following settings:
System Logging
In the System Logging section, select one of the following alert levels from the dropdown list for each message category:
Off: Disables this type of logging.
Info: Saves informative message, in addition to warning and error messages.
Warning: Saves message output from a condition that may be cause for concern,
in addition to error messages. This is the default for all message types.
Error: Saves messages that are output because of an error.
Debug: Saves extraneous detail that may be helpful in tracking down a problem,
in addition to information, warning, and error messages.
Network Level
Messages concerning the network activity, for example
about Ethernet and routing.
Services
Messages concerning services such as SNMP and
SMTP.
Authentication
Messages concerning user authentication.
Device Ports
Messages concerning device ports and connections.
Diagnostics
Messages concerning system status and problems.
General
Any message not in the categories above.
SecureLinx SLC User Guide
55
7: Services
Remote Servers
(#1 and #2)
IP address of the remote server(s) where system logs
are stored.
The system log is always saved to local SLC storage. It
is retained through SLC reboots for files up to 200K.
Saving the system log to a server that supports remote
logging services (see RFC 3164) allows the
administrator to save the complete system log history.
SSH
Enable Logins
Enables or disables SSH logins to the SLC to allow
users to access the CLI using SSH. Enabled by default.
This setting does not control SSH access to individual
device ports. (See Device Ports – Settings on page 76
for information on enabling SSH access to individual
ports.)
Most system administrators enable SSH logins, which
is the preferred method of accessing the system.
Web SSH
Enables or disables the ability to access the SLC
command Iine interface or device ports (connect direct)
through the Web SSH window. Disabled by default.
Timeout
If you enable SSH logins, you can cause an idle
connection to disconnect after a specified number of
minutes. Select Yes and enter a value of from 1 to 30
minutes.
Note: You must reboot the unit before a change will
take effect.
SSH Port
Allows you to change the SSH login port to a different
value in the range of 1 - 65535. The default is 22.
Note: You must reboot the unit before a change will
take effect.
SSH V1 Logins
Enables or disables SSH version 1 connections to the
SLC. Enabled by default.
Note: Disabling SSH V1 blocks Web SSH CLI and Web
SSH to device port connections on the SLC Network
page. Also, you must reboot the SLC before a change
will take effect.
Telnet
Enable Logins
Enables or disables Telnet logins to the SLC to allow
users to access the CLI using Telnet. Disabled by
default.
This setting does not control Telnet access to individual
device ports. (See Device Ports – Settings on page 76
for information on enabling Telnet access to individual
ports.)
You may want to keep this option disabled for security
reasons.
SecureLinx SLC User Guide
56
7: Services
Web Telnet
Enables or disables the ability to access the SLC
command Iine interface or device ports (connect direct)
through the Web Telnet window. Disabled by default.
Timeout
If you enable Telnet logins, you can cause an idle
connection to disconnect after a specified number of
minutes. Select Yes and enter a value of from 1 to 30
minutes.
Note: You must reboot the unit before a change will
take effect.
Audit Log
Enable Log
Select to save a history of all configuration changes in
a circular log. Disabled by default. The audit log is
saved through SLC reboots.
Size
The log has a default maximum size of 50 Kbytes
(approximately 500 entries). You can set the maximum
size of the log from 1 to 500 Kbytes.
Include CLI
Commands
Select to cause the audit log to include the CLI
commands that have been executed. Disabled by
default.
Include In System
Log
If enabled, the contents of the audit log are added to
the system log (under the General/Info category/level).
Disabled by default.
SMTP
Server
IP address of your network’s Simple Mail Transfer
Protocol (SMTP) relay server.
Phone Home
Enable
If enabled, the SLC will attempt to phone home
every hour until it has contacted an SLM and
provided it with its configuration.
IP Address
IP address of the SLM.
Last Attempt
(view only)
Date and time of last connection attempt.
Results
(view only)
Indicates whether the attempt was successful.
3. To save, click the Apply button.
SecureLinx SLC User Guide
57
7: Services
SNMP
Simple Network Management Protocol (SNMP) is a set of protocols for managing
complex networks.
1. Click the Services tab and select the SNMP option. The following page displays:
2. Enter the following:
Enable Agent
Enables or disables SNMP agent, which allows readonly access to the system. Disabled by default.
Enable Traps
Traps are notifications of certain critical events.
Disabled by default. This feature is applicable when
SNMP is enabled. Examples of traps that the SLC
sends include:
Ethernet Port Link Up
Ethernet Port Link Down
Authentication Failure
SLC Booted
SLC Shutdown
Device Port Logging
Power Supply Status
Sysadmin user password changed
The SLC sends the traps to the host identified in the
NMS field.
SecureLinx SLC User Guide
58
7: Services
NMS
When SNMP is enabled, an NMS (Network
Management System) acts as a central server,
requesting and receiving SNMP-type information from
any computer using SNMP. The NMS can request
information from the SLC and receive traps from the
SLC. Enter the IP address of the NMS server. Required
if you selected Enable Traps.
Location
Physical location of the SLC (optional). Useful for
managing the SLC using SNMP. Up to 20 characters.
Contact
Description of the person responsible for maintaining
the SLC, for example, a name (optional). Up to 20
characters.
Alarm Delay
Number of seconds delay between outgoing SNMP
traps.
Communities
Trap
The trap used for outgoing generic and enterprise
traps. Traps sent with the Event trigger mechanism still
use the trap community specified with the Event action.
The default is public.
Read-Only
A string that acts like a password for an SNMP
manager to access the read-only data the SLC SNMP
agent provides. The default is public.
Read-Write
A string that acts like a password for an SNMP
manager to access the read-only data the SLC SNMP
agent provides and to modify data where permitted.
The default is private.
Version 3
Security
Levels of security available with SNMP v. 3.
No Auth/No Encrypt: No authentication or encryption.
Auth/No Encrypt: Authentication but no encryption.
(default)
Auth/Encrypt: Authentication and encryption.
Auth with
For Auth/No Encryp or Auth/Encrypt, the
authentication method:
MD5: Message-Digest algorithm 5 (default)
SHA: Secure Hash Algorithm
Encrypt with
Encryption standard to use:
DES: Data Encryption Standard (default)
AES: Advanced Encryption Standard
SecureLinx SLC User Guide
59
7: Services
V3 Read-Only User
User Name
SNMP v3 is secure and requires user-based
authorization to access SLC MIB objects. Enter a user
ID. The default is snmpuser. Up to 20 characters.
V3
Password/Retype
Password
Password for a user with read-only authority to use to
access SNMP v3. The default is SNMPPASS. Up to 20
characters.
Passphrase/
Retype
Passphrase
Passphrase associated with the password for a user
with read-only authority. Up to 20 characters.
V3 Read-Write User
User Name
SNMP v3 is secure and requires user-based
authorization to access SLC MIB objects. Enter a user
ID for users with read-write authority. The default is
snmprwuser. Up to 20 characters.
V3
Password/Retype
Password
Password for the user with read-write authority to use
to access SNMP v3. The default is SNMPRWPASS. Up
to 20 characters.
Passphrase/
Retype
Passphrase
Passphrase associated with the password for a user
with read-write authority. Up to 20 characters.
3. To save, click the Apply button.
SSH,Telnet, and Logging Commands
The following CLI commands correspond to the web page entries described above.
To configure services (system logging, SSH and Telnet access, SSH and Telnet
timeout, SNMP agent, email (SMTP) server, and audit log):
set services <one or more services parameters>
Parameters:
alarmdelay <1-6000 Seconds>
auditlog <enable|disable>
auditsize <Size in Kbytes>
Range is 1-500 Kbytes.
authlog <off|error|warning|info|debug>
clicommands <enable|disable>
contact <Admin contact info>
devlog <off|error|warning|info|debug>
diaglog <off|error|warning|info|debug>
genlog <off|error|warning|info|debug>
includesyslog <enable|disable>
location <Physical Location>
SecureLinx SLC User Guide
60
7: Services
netlog <off|error|warning|info|debug>
nms <IP Address or Name>
phonehome <enable|disable>
phoneip <IP Address>
portssh <TCP Port>
rocommunity <Read-Only Community Name>
rwcommunity <Read-Write Community Name>
servlog <off|error|warning|info|debug>
smtpserver <IP Address or Hostname>
snmp <enable|disable>
ssh <enable|disable>
syslogserver1 <IP Address or Name>
syslogserver2 <IP Address or Name>
telnet <enable|disable>
timeoutssh <disable or 1-30>
timeouttelnet <disable or 1-30>
traps <enable|disable>
trapcommunity <Trap Community>
v1ssh <enable|disable>
v3user <V3 RO User>
v3password <V3 RO User Password>
v3phrase <V3 RO User Passphrase>
v3rwuser <V3 RW User>
v3rwpassword <V3 RW User Password>
v3rwphrase <V3 RW User Passphrase>
v3security <noauth|auth|authencrypt>
v3auth <md5|sha>
v3encrypt <des|aes>
v3password <Password for v3 auth>
v3user <User for v3 auth>
webssh <enable|disable>
webtelnet <enable|disable>
To view current services:
show services
NFS and SMB/CIFS
Use the NFS & SMB/CIFS page if you want to save configuration and logging data onto a
remote NFS server, or export configuration and logging data by means of an exported
CIFS share.
SecureLinx SLC User Guide
61
7: Services
Mounting an NFS shared directory on a remote network server onto a local SLC directory
enables the SLC to store device port logging data on that network server. This
configuration avoids possible limitations in the amount of disk space on the SLC available
for the logging file(s). You may also save SLC configurations on the network server.
Similarly, use SMB/CIFS (Server Message Block/Common Internet File System),
Microsoft’s file-sharing protocol, to export a directory on the SLC as an SMB/CIFS share.
The SLC exports a single read-write CIFS share called "public," with two subdirectories:
The logs directory, which contains the system logs and the device port local
buffers (see System Logs on page 180) and is read-only.
The config directory, which contains saved configurations and is read-write.
The share allows users to access the contents of the directory or map the directory onto
a Windows computer. Users can also access the device port local buffers from the CIFS
share (see Device Ports – Logging on page 90).
To configure NFS and SMB/CIFS:
1. Click the Services tab and select the NFS/CIFS option. The following page
displays:
2. Enter the following for up to three directories:
SecureLinx SLC User Guide
62
7: Services
NFS Mounts
Remote Directory
The remote NFS share directory in the format:
nfs_server_hostname or ipaddr:/exported/path
Local Directory
The local directory on the SLC on which to mount
the remote directory. The SLC creates the local
directory automatically.
Read-Write
If enabled, indicates that the SLC can write files
to the remote directory. If you plan to log port data
or save configurations to this directory, you must
enable this option.
Mount
Select the checkbox to enable the SLC to mount
the file to the NFS server. Disabled by default.
3. Enter the following:
SMB/CIFS Share
Share SMB/CIFS
directory
Select the checkbox to enable the SLC to export
an SMB/CIFS share called “public.” Disabled by
default.
Network Interfaces
Select the network ports from which the share can
be seen. The default is for the share to be visible
on both network ports.
CIFS User
Password/Retype
Password
Only one user special username (cifsuser) can
access the CIFS share. Enter the CIFS user
password in both password fields. The default
user password is CIFSPASS.
More than one user can access the share with the
cifsuser user name and password at the same
time.
Workgroup
The Windows workgroup to which the SLC
belongs. Every PC exporting a CIFS share must
belong to a workgroup. Can have up to 15
characters.
4. To save, click the Apply button.
NFS and SMB/CIFS Commands
The following CLI commands correspond to the web page entries described above.
SecureLinx SLC User Guide
63
7: Services
To mount a remote NFS share:
set nfs mount <one or more parameters>
Parameters:
locdir <Directory>
mount <enable|disable>
remdir <Remote NFS Directory>
rw <enable|disable>
Enables read/write access to remote directory.
Note: The remdir and locdir parameters are required, but if you specified them previously,
you do not need to provide them again.
To unmount a remote NFS share:
set nfs unmount <1|2|3>
To view NFS share settings:
show nfs
To configure the SMB/CIFS share, which contains the system and device port logs:
set cifs <one or more parameters>
Parameters:
eth1 <enable|disable>
eth2 <enable|disable>
state <enable|disable>
workgroup <Windows workgroup>
Note: The admin config command saves SLC configurations on the SMB/CIFS share.
To change the password for the SMB/CIFS share login (default is cifsuser):
set cifs password
To view SMB/CIFS settings:
show cifs
SecureLinx Network
Use the SecureLinx Network option to view and manage SecureLinx Managers and
Spiders on the local subnet.
Note: Status and statistics shown on the web interface represent a snapshot in
time. To see the most recent data, reload the web page.
SecureLinx SLC User Guide
64
7: Services
To view and manage SecureLinx Managers and Spiders on the local network:
1. Click the Services tab and select the SecureLinx Network option. The following
page displays.
2. To manage a SecureLinx device, click its IP Address. A separate browser page
takes the user to the web interface for the selected SecureLinx device (login
required).
3. For SecureLinx Managers, if SSH or Telnet is enabled for the device (to the CLI) or
for a device port and you want to access the device or device port:
a) Click the View link in the Telnet/SSH to Device Ports or CLI column. The
following page displays:
SecureLinx SLC User Guide
65
7: Services
Above the table, the Telnet to the CLI Enabled and SSH to the CLI Enabled fields
indicate whether the unit has been set for Telnet or SSH access to the CLI. The table
page lists all of the unit’s device ports (if applicable), indicates whether they are
Telnet enabled or SSH enabled, and lists their Telnet and SSH port numbers.
Note: For the links to work, you must enable Web Telnet or Web SSH for the
SecureLinx unit (see SSH/Telnet/Logging on page 54).
b) To open a Telnet session to the CLI, click Yes in the Telnet to the CLI
Enabled field above the table.
SecureLinx SLC User Guide
66
7: Services
c) To open a Telnet session to a specific device port, click the Yes link in the
Telnet Enabled column.
d) To open an SSH session to the CLI, click Yes in the SSH to the CLI Enabled
field above the table.
e) To open an SSH session to a specific device port, click the Yes link in the SSH
Enabled column.
To configure how SecureLinx devices are searched for on the network:
1. Click the Search Options link on the top right of the SecureLinx Network page.
The following web page displays:
2. Enter the following:
SecureLinx SLC User Guide
67
7: Services
SecureLinx
Network Search
Select the type of search you want to conduct.
Local Subnet performs a broadcast to detect SecureLinx
devices on the local subnet.
Manually Entered IP Address List provides a list of IP
addresses that may not respond to a broadcast because of
how the network is configured.
The default is Both.
IP Address
If you selected Manually Entered IP Address List or
Both, enter the IP address of the SecureLinx device you
want to find and manage.
3. If you entered an IP address, click the Add IP Address button. The IP address
displays in the IP Address List.
4. Repeat steps 2 and 3 for each IP address you want to add.
5. To delete an IP address from the IP Address List, select the address and click the
Delete IP Address button.
6. Click the Apply button. When the confirmation message displays, click
SecureLinx Network on the main menu. The SecureLinx Network page displays
the SecureLinx devices resulting from the search. You can now manage these
devices.
SecureLinx Network Commands
The following commands for the command line interface correspond to the web page
entries described above.
To detect and view all SLC or user-defined IP addresses on the local network:
set slcnetwork <one or more parameters>
Parameters:
add <IP Address>
delete <IP Address>
search <localsubnet|ipaddrlist|both>
To detect and display all SecureLinx Managers and Spiders on the local network:
show slcnetwork [ipaddrlist <all|Address Mask>]
Note: Without the ipaddrlist parameter, the command searches the network
according to the search setting (see set slcnetwork, below). With the
ipaddrlist parameter, the command displays a sorted list of all IP addresses
or displays the IP addresses that match the mask (for example, 172.19.255.255
would display all IP addresses that start with 172.19).
SecureLinx SLC User Guide
68
Date and Time
You can specify the current date, time, and time zone at the SLC’s location (default), or
the SLC can use NTP to synchronize with other NTP devices on your network.
To set the local date, time, and time zone:
1. From the main menu, select Date & Time. The following page displays:
2. Enter the following:
Change
Date/Time
Select the checkbox to manually enter the date and time at
the SLC’s location.
Date
From the drop-down lists, select the current month, day,
and year.
Time
From the drop-down lists, select the current hour and
minute.
Time Zone
From the drop-down list, select the appropriate time zone.
3. To save, click the Apply button.
To synchronize the SLC with a remote timeserver using NTP:
1. Enter the following:
Enable NTP
SecureLinx SLC User Guide
Select the checkbox to enable NTP synchronization.
NTP is disabled by default.
69
7: Services
Synchronize via
Select one of the following:
Broadcast from NTP Server: Enables the SLC to
accept time information periodically transmitted by
the NTP server. This is the default if you enable
NTP.
Poll NTP Server: Enables the SLC to query the NTP
Server for the correct time. If you select this option,
complete one of the following:
Local: Select this option if the NTP servers are
on a local network, and enter the IP address of
up to three NTP servers. This is the default, and
it is highly recommended.
Public: Select this option if you want to use a
public NTP server, and select the address of the
NTP server from the drop-down list. This is not
recommended because of the high load on many
public NTP servers. All servers in the drop-down
list are stratum-2 servers. (See www.ntp.org for
more information.)
Each public NTP server has its own usage rules -please refer to the appropriate web site before
using one. Our listing them here is to provide
easy configuration but does not indicate any
permission for use.
2. To save, click the Apply button.
Date and Time Commands
The following CLI commands correspond to the web page entries described above.
To set the local date, time, and local time zone (one parameter at a time):
set datetime <one date/time parameter>
Parameters:
date <MMDDYYhhmm[ss]>
timezone <Time Zone>
Note: If you type an invalid time zone, the system guides you through the
process of selecting a time zone.
To view the local date, time, and time zone:
show datetime
SecureLinx SLC User Guide
70
7: Services
To synchronize the SLC with a remote time server using NTP:
set ntp <one or more ntp parameters>
Parameters:
localserver1 <IP Address or Hostname>
localserver2 <IP Address or Hostname>
localserver3 <IP Address or Hostname>
poll <local|public>
publicserver <IP Address or Hostname>
state <enable|disable>
sync <broadcast|poll>
To view NTP settings:
show ntp
SecureLinx SLC User Guide
71
8: Devices
This chapter describes how to view the status of, configure, and use an SLC device port
connected to an external device, such as a server or a modem. Chapter 10: Connections
describes how to use the Connections web page to connect external devices and
outbound network connections (such as Telnet or SSH) in various configurations. The
Console Port page allows you to configure the console port, if desired.
Connection Methods
A user can connect to a device port in one of the following ways:
1. Telnet or SSH to the Eth1 or Eth2 IP address, or connect to the console port, and
log in to the command line interface. At the command line interface, issue the
connect direct or connect listen commands.
2. If Telnet is enabled for a device port, Telnet to <Eth1 IP address>:< telnet port
number> or <Eth2 IP address>:<telnet port number>, where telnet port number is
uniquely assigned for each device port.
3. If SSH is enabled for a device port, SSH to <Eth1 IP address>:<ssh port number>
or <Eth2 IP address>:<ssh port number>, where ssh port number is uniquely
assigned for each device port.
4. If TCP is enabled for a device port, establish a raw TCP connection to <Eth1 IP
address>:<tcp port number> or <Eth2 IP address>:<tcp port number>, where tcp
port number is uniquely assigned for each device port.
5. If a device port has an IP address assigned to it, you can Telnet, SSH, or establish
a raw TCP connection to the IP address. For Telnet and SSH, use the default TCP
port number (23 and 22, respectively) to connect to the device port. For raw TCP,
use the TCP port number defined for TCP In to the device port on the Device Ports
– Settings page.
6. Connect a terminal or a terminal emulation program directly to the device port. If
logins are enabled, the user is prompted for a username and password and logs in
to the command line interface.
For #2, #3, #4, #5, and #6, if logins or authentication are not enabled, the user is directly
connected to the device port with no authentication.
For #1 and #6, if logins are enabled, the user is authenticated first, and then logged into
the command line interface. The user login determines permissions for accessing device
ports.
SecureLinx SLC User Guide
72
8: Devices
Permissions
There are three types of permissions:
Direct (or data) mode: The user can interact with and monitor the device port
(connect direct command).
Listen mode: The user can only monitor the device port (connect listen
command).
Clear mode: The user can clear the contents of the device port buffer (set
locallog <port> clear buffer command).
The administrator and users with local user rights may assign individual port permissions
to local users. The administrator and users with remote authentication rights assign port
access to users authenticated by NIS, RADIUS, LDAP, Kerberos and TACACS+.
Device Status
The Device Status page displays the status of the SLC's ports and PC card slots.
1. Click the Devices tab and select the Device Status option. The following page
displays:
Global Port Settings
On the Device Ports page, you can set up the numbering of Telnet, SSH, and TCP ports,
view a summary of current port modes, establish the maximum number of direct
connections for each device port, and select individual ports to configure.
SecureLinx SLC User Guide
73
8: Devices
1. Click the Devices tab and select the Device Status option. The following page
displays:
Current port numbering schemes for Telnet, SSH, and TCP ports display on the left.
The list of ports 1-16 on the right includes the individual ports and their current mode.
Note: To view additional ports, click the 17-32 button or the 33-48 button, as
appropriate.
Icons that represent some of the possible modes include:
Idle
The port is not in use.
The port is in data/text mode.
Note: You may set up ports to allow Telnet access using the IP
Settings on the Device Ports – Settings page.
An external modem is connected to the port. The user may dial into
or out of the port.
Telnet in or SSH in is enabled for the device port. The device port is
either waiting for a Telnet or SSH login or has received a Telnet or
SSH login (a user has logged in).
To set up Telnet, SSH, and TCP port numbering:
1. Enter the following:
SecureLinx SLC User Guide
74
8: Devices
Telnet/SSH/TCP in Port Numbers
Starting Telnet
Port
Each port is assigned a number for connecting via Telnet.
Enter a number (1025-65535) that represents the first port.
The default is 2000 plus the port number. For example, if
you enter 2001, subsequent ports are automatically
assigned numbers 2002, 2003, and so on.
Starting SSH Port
Each port is assigned a number for connecting via SSH.
Enter a number (1025-65535) that represents the first port.
The default is 3000 plus the port number. For example, if
you enter 3001, subsequent ports are automatically
assigned numbers 3002, 3003, and so on.
Starting TCP Port
Each port is assigned a number for connecting through a
raw TCP connection. Enter a number (1025-65535) that
represents the first port. The default is 4000 plus the port
number. For example, if you enter 4001, subsequent ports
are automatically numbered 4002, 4003, and so on.
You can use a raw TCP connection in situations where a
TCP/IP connection is to communicate with a serial device.
For example, you can connect a serial printer to a device
port and use a raw TCP connection to spool print jobs to
the printer over the network.
Note: When using raw TCP connections to transmit binary
data, or where the break command (escape sequence) is
not required, set the Break Sequence of the respective
device port to null (clear it).
Caution: Ports 1-1024 are RFC-assigned and may conflict with services
running on the SLC. Avoid this range.
2. Click the Apply button to save the settings.
To set limits on direct connections:
1. Enter the maximum number (1-10) of simultaneous direct connections for each
device port. The default is 1.
2. Click the Apply button to save the settings.
To configure a specific port:
1. You have two options:
Select the port from the ports list and click the Configure button. The Device
Ports – Settings page for the port displays.
Click the port number on the green bar at the top of each page.
2. Continue with Device Ports – Settings on page 76.
SecureLinx SLC User Guide
75
8: Devices
Global Commands
The following CLI commands correspond to the web page entries described above.
To configure settings for all or a group of device ports:
set deviceport global <one or more parameters>
Parameters:
maxdirect <1-10>
Sets the maximum number of direct connections for each device port.
sshport <TCP Port>
tcpport <TCP Port>
telnetport <TCP Port>
Port is a port number between 1025 and 65535.
To view global settings for device ports:
show deviceport global
Device Ports – Settings
On the Device Ports - Settings page, configure IP and data (serial) settings for individual
ports, and if the port connects to an external modem, modem settings as well.
To open the Device Ports – Settings page:
You have two options:
In the Device Ports page (described in the previous section), select the port from
the ports list and click the Configure button.
Click the desired port number in the green bar (shown below) at the top of any
page:
The following page displays:
SecureLinx SLC User Guide
76
8: Devices
To enter device port settings:
1. Enter the following:
Mode
SecureLinx SLC User Guide
The status of the port; displays automatically.
77
8: Devices
Name
The name of the port. Valid characters are letters, numbers,
dashes (-), periods, and underscores ( _ ).
Banner
Text to display when a user connects to a device port by
means of Telnet, SSH, or TCP. If authentication is enabled
for the device port, the banner displays once the user
successfully logs in. Blank is the default.
Break Sequence
A series of one to ten characters users can enter on the
command line interface to send a break signal to the external
device. A suggested value is Esc+B (escape key, then
uppercase “B” performed quickly but not simultaneously).
You would specify this value as \x1bB, which is hexadecimal
(\x) character 27 (1B) followed by a B.
Logging
Click the Settings link to configure file logging, email logging,
local logging, and PC Card logging. (See Device Ports –
Logging on page 89.)
Zero Port Counters
Resets all of the numerical values in the Port Counters table
at the bottom of the page to zero (0).
Connected to
The type of device connected to the device port. Presently,
the SLC supports Lantronix’s SecureLinx Remote Power
Manager (SLP8 and SLP16) and Sensorsoft devices. If the
type of device is not listed, select undefined.
If you select anything other than undefined, click Device
Commands. The appropriate web page displays.
IP Settings
Enable Telnet In
Enables access to this port through Telnet. Disabled by
default.
Enable SSH In
Enables access to this port through SSH. Disabled by
default.
Enable TCP in
Enables access to this port through a raw TCP connection.
Disabled by default.
Note: When using raw TCP connections to transmit binary
data, or where the break command (escape sequence) is not
required, set the Break Sequence of the respective device
port to null (clear it).
Port
Automatically assigned Telnet, SSH, and TCP port numbers.
(See 8: Devices for information on setting up the numbering
scheme.) You may override this value, if desired.
Authenticate
If selected, the SLC requires user authentication before
granting access to the port. Authenticate is selected by
default for Telnet in and SSH in, but not for TCP in.
SecureLinx SLC User Guide
78
8: Devices
IP Address
IP address used for this device port so a user can Telnet,
SSH, or establish a raw TCP connection to this address and
connect directly to the device port.
For Telnet and SSH, the default TCP port numbers (22 and
23, respectively) are used to connect to the device port. For
raw TCP, the TCP port number defined for TCP In to the
device port is used.
Web SSH/Telnet
Columns
Number of columns in the Web SSH/Telnet applet when this
device port is accessed via the applet.
Web SSH/Telnet
Rows
Number of rows in the Web SSH/Telnet applet when this
device port is accessed via the applet.
Data Settings
Note: Check the serial device’s equipment settings and documentation for the
proper settings. The device port and the attached serial device must have the
same settings.
Baud
The speed with which the device port exchanges data with
the attached serial device.
From the drop-down list, select the baud rate. Most devices
use 9600 for the administration port, so the device port
defaults to this value. Check the equipment settings and
documentation for the proper baud rate.
Data Bits
Number of data bits used to transmit a character. From the
drop-down list, select the number of data bits. The default
is 8 data bits.
Stop Bits
The number of stop bit(s) used to indicate that a byte of
data has been transmitted. From the drop-down list, select
the number of stop bits. The default is 1.
Parity
Parity checking is a rudimentary method of detecting
simple, single-bit errors. From the drop-down list, select the
parity. The default is none.
Flow Control
A method of preventing buffer overflow and loss of data.
The available methods include none, xon/xoff (software),
and RTS/CTS (hardware). The default is none.
Enable Logins
For serial devices connected to the device port, displays a
login prompt and authenticates users. Successfully
authenticated users are logged into the command line
interface.
Disabled is the default and is the correct setting if the
device port is the endpoint for a connection.
SecureLinx SLC User Guide
79
8: Devices
Show Lines on
Connecting
If enabled, when the user either does a connect direct
from the CLI or connects directly to the port using Telnet or
SSH, the SLC outputs up to 24 lines of buffered data as
soon as the serial port is connected.
For example, an SLC issues a connect direct device
1 command to connect port 1 to a Linux server.
Then the SLC user gets a directory with the ls command
exits the connection. When the SLC user issues another
direct connect device 1”, the output of the ls
command (or some portion of it) is output again, so the
user can know what state the server was left in.
Hardware Signal Triggers
Check DSR on
Connect
If this setting is enabled, the device port only establishes a
connection if DSR (Data Set Ready) is in an asserted state.
DSR should already be in an asserted state, not
transitioning to, when a connection attempt is made.
Disabled by default unless dial-in, dial-out, or dial-back is
enabled for the device port.
Disconnect on
DSR
If a connection to a device port is currently in session, and
the DSR signal transitions to a de-asserted state, the
connection disconnects immediately. Disabled is the
default unless dial-in, dial-out, or dial-back is enabled for
the device port.
Modem Settings
Note: Depending on the State and Mode you select, different fields are
available.
State
Indicates whether an external modem is attached to the
device port. If enabling, set the modem to dial-out, dial-in,
dial-back, dial-on-demand, dial-in/host list, or dial in & dialon-demand. Disabled by default.
Mode
The format in which the data flows back and forth:
Text: In this mode, the SLC assumes that the modem will
be used for remotely logging into the command line. Text
mode can only be used for dialing in or dialing back. Text
is the default.
PPP: This mode establishes an IP-based link over the
modem. PPP connections can be used in dial-out mode
(e.g., the SLC connects to an external network), dial-in
mode (e.g., the external computer connects to the network
that the SLC is part of), or dial-on-demand.
Initialization Script
Commands sent to configure the modem may have up to
100 characters. Consult your modem’s documentation for
recommended initialization options. If you do not specify
an initialization script, the SLC uses a default initialization
string of AT S7=45 SO=0 L1 V1 X4 &D2 &c1 E1 Q0.
Note: We recommend that the modem initialization script
always be preceded with AT and include E1 V1 x4 Q0 so
that the SLC may properly control the modem.
SecureLinx SLC User Guide
80
8: Devices
Modem Timeout
Timeout for all modem connections. Select Yes (default)
for the SLC to terminate
the connection if no traffic is received during the configured
idle time. Enter a value of from 1 to 9999 seconds. The
default is 30 seconds.
Caller ID Logging
Select to enable the SLC to log caller IDs on incoming
calls. Disabled by default.
Note: For the Caller ID AT command, refer to the modem
user guide.
Modem Command
Modem AT command used to initiate caller ID logging by
the modem.
Note: For the AT command, refer to the modem user
guide.
Modem Settings: Text Mode
Timeout
Logins
If you selected Text mode, you can enable logins to time
out after the connection is inactive for a specified number
of minutes. The default is No. This setting is only
applicable for text mode connections. PPP mode
connections stay connected until either side drops the
connection. Disabled by default.
Dial Back
Number
Users with dial-back access can dial into the SLC and
enter their login and password. Once the SLC
authenticates them, the modem hangs up and dials them
back.
Select the phone number the modem dials back on a fixed
number or a number associated with their login. If you
select Fixed Number, enter the number (in the format
2123456789).
Dial-in Host List
From the drop-down list, select the desired host list. The
host list is a prioritized list of SSH, Telnet, and TCP
hosts that are available for establishing outgoing
modem connections or for connect direct at the
CLI. The hosts in the list are cycled through until the
SLC successfully connects to one.
To establish and configure host lists, click the Host Lists
link.
Modem Settings: PPP Mode
Negotiate IP
Address
If the SLC and/or the serial device have dynamic IP
addresses (e.g., IP addresses assigned by a DHCP
server), select Yes. Yes is the default.
If the SLC or the modem have fixed IP addresses, select
No, and enter the local IP (IP address of the port) and
remote IP (IP address of the modem).
SecureLinx SLC User Guide
81
8: Devices
Authentication
Enables PAP or CHAP authentication for modem logins.
PAP is the default. With PAP, users are authenticated by
means of the Local Users and any of the remote
authentication methods that are enabled. With CHAP, the
CHAP Handshake fields authenticate the user.
CHAP Handshake
The host/username (for UNIX systems) or secret/user
password (for Windows systems) used for CHAP
authentication. May have up to 128 characters.
Same
authentication for
Dial-in & Dial-onDemand (DOD)
Select this option to let incoming connections (dial-in) use
the same authentication settings as outgoing connections
(dial-on-demand). If this option is not selected, then the
dial-on-demand connections take their authentication
settings from the DOD parameter settings. If DOD
Authentication is PAP, then the DOD CHAP Handshake
field is not used.
DOD
Authentication
Enables PAP or CHAP authentication for dial-in & dial-ondemand. PAP is the default. With PAP, users are
authenticated by means of the Local Users and any of the
remote authentication methods that are enabled. With
CHAP, the DOD CHAP Handshake fields authenticate the
user.
DOD CHAP
Handshake
For DOD Authentication, enter the host/username for
UNIX systems) or secret/user password (for Windows
systems) used for CHAP authentication. May have up to
128 characters.
Enable NAT
Select to enable Network Address Translation (NAT) for
dial-in and dial-out PPP connections on a per modem
(device port or PC Card) basis. Users dialing into the SLC
access the network connected to Eth1 and/or Eth2.
Note: IP forwarding must be enabled on the
Network - Settings page for NAT to work. See 6: Basic
Parameters.
Dial-out
Number
Phone number for dialing out to a remote system or serial
device. May have up to 20 characters. Any format is
acceptable.
Dial-out
Login
User ID for dialing out to a remote system. May have up to
32 characters.
Dial-out Password
and Retype
Password for dialing out to a remote system. May have up
to 64 characters.
Restart Delay
The number of seconds after the timeout and before the
SLC attempts another connection. The default is 30
seconds.
2. To save settings for just this port, click the Apply button.
3. To save selected settings to ports other than the one you are configuring:
a) From the Apply Settings drop-down box, select none, a group of settings, or
All.
SecureLinx SLC User Guide
82
8: Devices
b) In to Device Ports, type the device port numbers, separated by commas;
indicate a range of port numbers with a hyphen (e.g., 2, 5, 7-10).
Note: It may take a few minutes for the system to apply the settings to multiple
ports.
Port Status and Counters
Port Counters describe the status of signals and interfaces. SLC updates and increments
the port counters as signals change and data flows in and out of the system. These
counters help troubleshoot connections or diagnose problems because they give the user
an overview of the state of various parameters. By setting them to zero and then rechecking them later, the user can view changes in status.
The chart in the middle of the page displays the flow control lines and port statistics for
the device port. The system automatically updates these values. To reset them to zeros,
select the Zero port counters checkbox in the IP Settings section of the page.
Note: Status and statistics shown on the web interface represent a snapshot in time. To
see the most recent data, you must reload the web page.
Device Ports – SLP
On the Device Ports – SLP page, configure commands to send to an SLP or SLP
expansion chassis that expands the number of power ports.
To open the Device Ports – SLP page:
1. In the Connected to field above the IP Settings section of the Device Ports –
Settings page, select an SLP or SLPEXP.
2. Click the Device Commands link. The following page displays:
SecureLinx SLC User Guide
83
8: Devices
To enter SLP commands:
1. Enter the following:
SLP Login
User ID for logging into the SLP.
SLP
Password/Retype
Password
Password for logging into the SLP.
SLP Status/Info
Outlet Status
Note: If there is an SLP and an SLP Expansion chassis, the
SLP is Tower A and the Expansion chassis is Tower B.
For Tower A or Tower B, select All Outlets or Single Outlet
to view the status of all outlets or a single outlet of the SLP. If
you select Single Outlet, enter a value of 1-8 for the SLP8 or
1-16 for the SLP16.
Click the Outlet Status link to see the status of the selected
outlet(s).
Environmental
Status
Click the link to view the environmental status (e.g.,
temperature and humidity) of the SLP.
Infeed Status
Click the link to view the status of the data the SLP is
receiving.
System Info
Click the link to see system information pertaining to the
SLP.
SecureLinx SLC User Guide
84
8: Devices
SLP Commands
Restart SLP
To restart the SLP, select the checkbox.
Control Outlet
For Tower A or Tower B, select All Outlets or Single Outlet
and the number of the outlet to be controlled (1-8 for the
SLP8 or 1-16 for the SLP16) and select the command for the
outlet (No Action, Power On, Power Off, Cycle Power). No
Action is the default.
2. Click the Apply button.
Device Port – Sensorsoft Device
Devices made by Sensorsoft are used to monitor environmental conditions.
1. In the Connected to field above the IP Settings section of the Device Ports –
Settings page, select Sensorsoft.
2. Click the Device Commands link. The following page displays:
3. Select a port and enter or view the following information:
Device Port (view
only)
Number of the SLC port.
Device Name (view
only)
Name of the SLC port.
Temp (°C)
Current temperature (degrees Celsius) on the device the
sensor is monitoring.
Low Temp
Enter the temperature (degrees Celsius) permitted on the
monitored device below which the SLC sends a trap.
High Temp
Enter the temperature (degrees Celsius) permitted on the
monitored device above which the SLC sends a trap.
Humidity (%)
Current relative humidity on the device the sensor is
monitoring.
Low Humidity
Enter the relative humidity permitted on the device the
sensor is monitoring below which the sensor sends a trap to
the SLC.
SecureLinx SLC User Guide
85
8: Devices
High Humidity
Enter the highest relative acceptable humidity permitted on
the device above which the sensor sends a trap to the SLC.
Traps
Select to indicate the SLC should send a trap or configured
Event Alert when the sensor detects an out-of-range
configured threshold. (See Events on page 192.)
4. Click the Apply button.
5. To view the status detected by the Sensorsoft, click the Sensorsoft Status link to
the right of the table.
Device Port Commands
The following CLI commands correspond to the web page entries described above.
To configure a single port or a group of ports:
Example: set deviceport port 2-5,6,12,15-16 baud 2400
set deviceport port <Device Port List or Name> <one or more
device port parameters>
Parameters:
auth <pap|chap>
banner <Banner Text>
baud <300-115200>
breakseq <1-10 Chars>
calleridcmd <Modem Command String>
calleridlogging <enable|disable>
chaphost <CHAP Host or User Name>
chapsecret <CHAP Secret or User Password>
The user defines the secret.
checkdsr <enable|disable>
closedsr <enable|disable>
databits <7|8>
device <none|slp8|slp16>
dialinlist <Host List for Dial-in>
dialoutnumber <Phone Number>
dialoutlogin <User Login>
dialoutpassword <Password>
dialbacknumber <usernumber|Phone Number>
dodauth <pap|chap>
dodchaphost <CHAP Host or User Name>
dodchapsecret <CHAP Secret or User Password>
flowcontrol <none|xon/xoff|rts/cts>
idletimeout <disable|1-9999 seconds>
ipaddr <IP Address>
initscript <Initialization Script>
SecureLinx SLC User Guide
86
8: Devices
A script that initializes a modem.
localipaddr <negotiate|IP Address>
logins <enable|disable>
modemmode <text|ppp>
modemstate
<disable|dialout|dialin|dialback|dialondemand|dial
in+dialondemand|dialinhostlist>
modemtimeout <disable|1-9999 seconds>
name <Device Port Name>
nat <enable|disable>
parity <none|odd|even>
remoteipaddr <negotiate|IP Address>
restartdelay <PPP Restart Delay>
showlines <enable|disable>
sshauth <enable|disable>
sshin <enable|disable>
sshport <TCP Port>
stopbits <1|2>
tcpauth <enable|disable>
tcpin <enable|disable>
tcpport <TCP Port>
telnetauth <enable|disable>
telnetin <enable|disable>
telnetport <TCP Port>
timeoutlogins <disable or 1-30>
webcolumns <Web SSH/Telnet Cols>
webrows <Web SSH/Telnet Rows>
To view the settings for one or more device ports:
show deviceport port <Device Port List or Name>
To view a list of all device port names:
show deviceport names
To view the modes and states of one or more device port(s):
You can optionally email the displayed information.
show portstatus [deviceport <Device Port List or Name>] [email
<Email Address>]
To view device port statistics and errors for one or more ports:
You can optionally email the displayed information.
show portcounters [deviceport <Device Port List or Name>]
[email <Email Address>]
SecureLinx SLC User Guide
87
8: Devices
To zero the port counters for one or more device ports:
show portcounters zerocounters <Device Port List or Name>
Device Commands
The following CLI commands correspond to the web page entries described above.
To send commands to (or control) a device connected to an SLC device port
over the serial port:
Note: Currently the only devices supported for this type of interaction are the SLP
and Sensorsoft devices.
set command <Device Port # or Name or List> <one or more
parameters>
Parameters:
slp auth login <User Login>
Establishes the authentication information to log into the SLP
attached to the device port.
slp restart
Issues the CLI command the SLP uses to restart itself.
slp outletcontrol state <on|off|cyclepower>
[outlet <Outlet #>][tower <A|B>]
Outlet # is 1-8 for SLP8 and 1-16 for SLP16.
The outletcontrol parameters control individual outlets.
slp outletstate [outlet <Outlet #>]
The outletstate parameter shows the state of all outlets or a
single outlet.
slp envmon
Displays the environmental status (e.g., temperature and humidity)
of the SLP.
slp infeedstatus
Displays the infeed status and load of the SLP.
slp system
Provides system information for the SLP.
sensorsoft lowtemp <Low Temperature in C.>
Sets the lowest temperature permitted for the port.
sensorsoft hightemp <High Temperature in C.>
Sets the hightest temperature permitted for the port.
sensorsoft lowhumidity <Low Humidity %>
Sets the lowest humidity pemitted for the port.
sensorsoft highhumidity <High Humidity %>
Sets the lowest humidity permitted for the port.
sensorsoft traps <enable|disable>
Enables or disables traps when specified conditions are met.
sensorsoft status
Displays the status of the port.
SecureLinx SLC User Guide
88
8: Devices
Interacting with a Device Port
Once a device port has been configured and connected to an external device such as the
console port of an external server, the data received over the device port can be
monitored at the command line interface with the connect listen command, as
follows:
To connect to a device port to monitor it:
connect listen deviceport <Port # or Name>
In addition, you can send data out the device port (for example, commands issued to an
external server) with the connect direct command, as follows:
To connect to a device port to monitor and/or interact with it, or to establish an
outbound network connection:
connect direct <endpoint>
endpoint is one of:
deviceport <Port # or Name>
ssh <IP Address> [port <TCP Port>][<SSH flags>]
where:
<SSH flags> is one or more of:
user <Login Name>
version <1|2>
command <Command to Execute>
tcp <IP Address> port <TCP Port>
telnet <IP Address> [port <TCP Port>]
udp <IP Address> port <UDP Port>
hostlist <Host List>
Notes:
To escape from the connect direct command when the endpoint of the
command is deviceport, tcp, or udp and return to the command line
interface, type the escape sequence assigned to the currently logged in user. If
the endpoint is telnet or SSH, logging out returns the user to the command
line prompt.
To escape from the connect listen command, press any key.
Setting up a user with an escape sequence is optional. For any NIS, LDAP,
RADIUS, Kerberos, or TACACS+ user, or any local user who does not have an
escape sequence defined, the default escape sequence is Esc+A.
SecureLinx SLC User Guide
89
8: Devices
Device Ports – Logging
The SLC products support port buffering of the data on the system's device ports as well
as notification of receiving data on a device port. Port logging is disabled by default. You
can enable more than one type of logging (local, NFS file, email/SNMP, or PC Card) at a
time. The buffer containing device port data is cleared when any type of logging is
enabled.
Local Logging
If local logging is enabled, each device port stores 256 Kbytes (approximately 400
screens) of I/O data in a true FIFO buffer. You may view this data (in ASCII format) at the
CLI with the show locallog command or on the Device Ports – Logging web page.
Buffered data is normally stored in RAM and is lost in the event of a power failure if it is
not logged using an NFS mount solution. If the buffer data overflows the buffer capacity,
only the oldest data is lost, and only in the amount of overrun (not in large blocks of
memory).
NFS File Logging
Data can be logged to a file on a remote NFS server. Data logged locally to the SLC is
limited to 256 Kbytes and may be lost in the event of a power loss. Data logged to a file
on an NFS server does not have these limitations. The system administrator can define
the directory for saving logged data on a port-by-port basis and configure file size and
number of files per port.
The directory path must be the local directory for one of the NFS mounts. For each
logging file, once the file size reaches the maximum, a new file opens for logging. Once
the number of files reaches the maximum, the oldest file is overwritten. The file naming
convention is: <Device Port Number>_<Device Port Name>_<File number>.log.
Examples:
02_Port-2_1.log
02_Port-2_2.log
02_Port-2_3.log
02_Port-2_4.log
02_Port-2_5.log
PC Card Logging
Data can be logged to a PC Card Compact Flash that is loaded into one of the PC Card
slots on the front of the SLC and properly mounted (see PC Card Logging on page 90).
Data logged locally to the SLC is limited to 256 Kbytes and may be lost in the event of a
power loss. Data logged to a PC Card Compact Flash does not have these limitations.
The system administrator can define the file size and number of files per port. For each
logging file, once the file size reaches the maximum, a new file opens for logging. Once
the number of files reaches the maximum, the oldest file is overwritten. The file naming
convention is: <Device Port Number>_<Device Port Name>_<File number>.log.
Examples:
02_Port-2_1.log
02_Port-2_2.log
02_Port-2_3.log
02_Port-2_4.log
02_Port-2_5.log
SecureLinx SLC User Guide
90
8: Devices
Email/SNMP Notification
The system administrator can configure the SLC to send an email alert message
indicating a particular condition detected in the device port log to the appropriate parties
or an SNMP trap to the designated NMS (see 7: Services). The email or trap is triggered
when a user-defined number of characters in the log from your server or device is
exceeded, or a specific sequence of characters is received.
Use the Device Ports – Logging page to set logging parameters on individual ports.
Sylog Logging
Data can be logged to the system log. If this feature is enabled, the data will appear in
the Device Ports log, under the Info level. The log level for the Device Ports log must be
set to Info for the data to be saved to the system log. (See 7: Services.)
To set logging parameters:
1. In the top section of the Device Ports – Settings page, click the Settings link in the
Logging field. The following page displays:
2. Enter the following:
Local Logging
Local Logging
SecureLinx SLC User Guide
If you enable local logging, each device port stores 256
Kbytes (approximately 400 screens) of I/O data in a true
FIFO buffer. Disabled by default.
91
8: Devices
Clear Local Log
Select the checkbox to clear the local log.
View Local Log
Click this link to see the local log in text format.
Email/SNMP Traps
Email/Traps
Select the checkbox to enable email and SNMP logging.
Email logging sends an email message to pre-defined
email addresses or an SNMP trap to the designated NMS
(see 7: Services) when alert criteria are met. Disabled by
default.
Send
If you enabled email and SNMP logging, select what type
of notification log to send: Email, SNMP, or Both. Email is
the default.
Trigger on
Select the method of triggering a notification:
Byte Count: A specific number of bytes of data. This is the
default.
Text String Recognition: A specific pattern of characters,
which you can define by a regular expression.
Note: Text string recognition may negatively impact the
SLC’s performance, particularly when regular expressions
are used.
Byte Threshold
The number of bytes of data the port receives before the
SLC captures log data and sends a notification regarding
this port. The default is 100 bytes.
In most cases, the console port of your device does not
send any data unless there is an alarm condition. After the
SLC receives a small number of bytes, it perceives that
your device needs some attention. The SLC notifies your
technician when that point has been passed, and the
notification includes the logged data.
For example, a threshold preset at 30 characters means
that as soon as the SLC receives 30 bytes of data, it
captures log data and sends an email regarding this port.
Email Delay
A time limit of how long (in seconds), after the SLC detects
the trigger, that the device port captures data before
closing the log file (with a fixed internal buffer maximum
capacity of 1500 bytes) and sending a notification. The
default is 60 seconds.
Restart Delay
The number of seconds for the period after the notification
has been sent during which the device port ignores
additional characters received. The data is simply ignored
and does not trigger additional alarms until this time
elapses. The default is 60 seconds.
SecureLinx SLC User Guide
92
8: Devices
Text String
The specific pattern of characters the SLC must
recognize before sending a notification to the
technician about this port. The maximum is 100
characters. You may use a regular expression to
define the pattern. For example, the regular
expression “abc[def]g” recognizes the strings abcdg,
abceg, abcfg.
The SLC supports GNU regular expressions; for more
information, see:
http://www.codeforge.com/help/GNURegularExpr.html
http://www.delorie.com/gnu/docs/regex/regex.html
Email to
The complete email address of the message recipient(s)
for each device port(s). Each device port has its own
recipient list. To enter more than one email address,
separate the addresses with a single space. You can
enter up to 128 characters.
Email Subject
A subject text appropriate for your site. May have up
to 128 characters.
The email subject line is pre-defined for each port with its
port number. You can use the email subject to inform the
desired recipients of the problem on a certain server or
location (e.g., server location or other classification of your
equipment). This is helpful if the email message goes to
the system administrator’s or service technician's mobile or
wireless device (e.g., text messaging by means of email).
Note: The character sequence %d anywhere in the email
subject is replaced with the device port number
automatically.
NFS File Logging
NFS File Logging
Select the checkbox to log all data sent to the device port
to one or more files on an external NFS server. Disabled
by default.
Directory to Log to
The path of the directory where the log files will be stored.
Note: This directory must be a directory exported from an
NFS server mounted on the SLC. Specify the local
directory path for the NFS mount.
Max Number of
Files
The maximum number of files to create to contain log data
to the port. These files keep a history of the data received
from the port. Once this limit is exceeded, the oldest file is
overwritten. The default is 10.
Max Size of Files
The maximum allowable file size in bytes. The default is
2048 bytes. Once the maximum size of a file is reached,
the SLC begins generating a new file.
SecureLinx SLC User Guide
93
8: Devices
PC Card Logging
PC Card Logging
Select to enable PC Card logging. A PC Card Compact
Flash must be loaded into one of the PC Card slots on the
front of the SLC and properly mounted ((see PC Card
Logging on page 90). Disabled by default.
Log To
If port logging is to a PC Card, select the slot (Upper or
Lower) in which the PC Card has been inserted. Upper is
the default.
Max Number of
Files
The maximum number of files to create to contain log data
to the port. These files keep a history of the data received
from the port. Once this limit is exceeded, the oldest file is
overwritten. The default is 10.
Max Size of Files
The maximum allowable file size in bytes. The default is
2048 bytes. Once the maximum size of a file is reached,
the SLC begins generating a new file. The default is 2048
bytes.
Syslog Logging
Syslog Logging
Select to enable system logging.
Note: The logging level for the device ports log must be
set to Info to view Syslog entries for Device Port logging on
the Services page.
Note: To apply the settings to additional device ports, in the Apply settings to Device
Ports field, enter the additional ports, (e.g., 1-3, 5, 6)
3. To apply settings to other device ports in addition to the currently selected port,
select the Apply settings to Device Ports and enter port numbers separated by
commas. Indicate a range of port numbers with a hyphen (e.g., 2, 5, 7-10), and
separate ranges with commas.
4. To save, click the Apply button.
Logging Commands
The following CLI commands correspond to the web page entries described above.
To configure logging settings for one or more device ports:
Example: set deviceport port 2-5,6,12,15-16 baud 2400 locallogging
enable
Note: Local logging must be enabled for a device port for the locallog commands to be
executed. To use the set locallog clear command, the user must have permission to clear
port buffers (see 11: User Authentication).
set deviceport port <Device Port List or Name> <one or more
deviceport parameters>
Parameters:
emaildelay <Email Delay>
emaillogging <disable|bytecnt|charstr>
emailrestart <Restart Delay>
SecureLinx SLC User Guide
94
8: Devices
emailsend <email|trap|both>
emailstring <Regex String>
emailsubj <Email Subject>
emailthreshold <Byte Threshold>
emailto <Email Address>
filedir <Logging Directory>
filelogging <enable|disable>
filemaxfiles <Max # of Files>
filemaxsize <Max Size of Files>
locallogging <enable|disable>
name <Device Port Name>
nfsdir <Logging Directory>
nfslogging <enable|disable>
nfsmaxfiles <Max # of Files>
nfsmaxsize <Size in Bytes>
pccardlogging <enable|disable>
pccardmaxfiles <Max # of Files>
pccardmaxsize <Size in Bytes>
pccardslot <upper|lower>
sysloglogging <enable|disable>
To view a specific number of bytes of data for a device port:
show locallog <Device Port # or Name> [bytes <Bytes To Display>]
1 Kbyte is the default.
To clear the local log for a device port:
set locallog clear <Device Port # or Name>
Note: The locallog commands can only be executed for a device port if local logging is enabled
for the port. The set locallog clear command can only be executed if the user has
permission to clear port buffers (see 11: User Authentication).
Console Port
The console port initially has the same defaults as the device ports. Use the Console Port
page to change the settings, if desired.
To set console port parameters:
1. Click the Devices tab and select Console Port. The following page displays:
SecureLinx SLC User Guide
95
8: Devices
2. Change the following as desired:
Baud
The speed with which the device port exchanges data with
the attached serial device.
From the drop-down list, select the baud rate. Most devices
use 9600 for the administration port, so the console port
defaults to this value.
Data Bits
Number of data bits used to transmit a character. From the
drop-down list, select the number of data bits. The default
is 8 data bits.
Stop Bits
The number of stop bits that indicate that a byte of data has
been transmitted. From the drop-down list, select the
number of stop bits. The default is 1.
Parity
Parity checking is a rudimentary method of detecting
simple, single-bit errors. From the drop-down list, select the
parity. The default is none.
Flow Control
A method of preventing buffer overflow and loss of data.
The available methods include none, xon/xoff (software),
and RTS/CTS (hardware). The default is none.
Timeout
The number of minutes (1-30) after which an idle session
on the console is automatically logged out. Disabled by
default.
Show Lines on
Connecting
If selected, when you connect to the console port with a
terminal emulator, you will see the last lines output to the
console, for example, the SLC boot messages or the last
lines output during a CLI session on the console.
3. Click the Apply button to save the changes.
Console Port Commands
The following CLI commands correspond to the web page entries described above.
SecureLinx SLC User Guide
96
8: Devices
To configure console port settings:
set consoleport <one or more parameters>
Parameters:
baud <300-115200>
databits <7|8>
stopbits <1|2>
parity <none|odd|even>
flowcontrol <none|xon/xoff|rts/cts>
showlines <enable|disable>
timeout <disable|1-30>
To view console port settings:
show consoleport
Host Lists
A host list is a prioritized list of SSH, Telnet, and TCP hosts available for establishing
incoming modem connections or for the connect direct command on the CLI. The
SLC cycles through the list until it successfully connects to one.
To add a host list:
1. Click the Devices tab and select the Host Lists option. The following page
displays:
SecureLinx SLC User Guide
97
8: Devices
2. In the lower section of the page, enter the following:
Note: To clear fields in the lower part of the page, click the Clear Host List button.
Host List Id (view
only)
Displays after a host list is saved.
Host List Name
Enter a name for the host list.
Retry Count
Enter the number of times the SLC should attempt to retry
connecting to the host list.
Authentication
Select to require authentication when the SLC connects to
a host.
3. You have the following options:
To save the host list without adding hosts at this time, click the Add Host List
button.
To add host lists, enter the following:
Host Parameters
Host
Name or IP address of the host.
Protocol
Protocol for connecting to the host (TCP, SSH, or Telnet).
Port
Port on the host to connect to.
SecureLinx SLC User Guide
98
8: Devices
Escape Sequence
The escape character used to get the attention of the SSH
or Telnet client. It is optional, and if not specified, Telnet
and SSH use their default escape character.
For Telnet, the escape character is either a single
character or a two-character sequence consisting of '^'
followed by one character. If the second character is '?', the
DEL character is selected. Otherwise, the second character
is converted to a control character and used as the escape
character.
For SSH, the escape character is a single character.
4. Click the right arrow. The host displays in the Hosts box.
5. Repeat steps 2-4 to add more hosts to the host list.
Note: To clear fields before adding the next host, click the Clear Host Parameters
button.
6. You have the following options:
To remove a host from the host list, select the host in the Hosts box and click the
left arrow.
To give the host a higher precedence, select the host in the Hosts box and click
the up arrow.
To give the host a lower precedence, select the host in the Hosts box and click
the down arrow.
7. Click the Add Host List button. After the process completes, a link back to the
Device Ports – Settings page displays.
To view or update a host list:
1. In the Host Lists table, select the host list and click the View Host List button. The
list of hosts display in the Hosts box.
SecureLinx SLC User Guide
99
8: Devices
2. View, add, or update the following:
Host List Id (view
only)
Displays after a host list is saved.
Host List Name
Enter a name for the host list.
Retry Count
Enter the number of times the SLC should attempt to retry
connecting to the host list.
Authentication
Select to require authentication when the SLC connects to
a host.
Host Parameters
Host
Name or IP address of the host.
Protocol
Protocol for connecting to the host (TCP, SSH, or Telnet).
Port
Port on the host to connect to SLC.
SecureLinx SLC User Guide
100
8: Devices
Escape Sequence
The escape character used to get the attention of the SSH
or Telnet client. It is optional, and if not specified, Telnet
and SSH use their default escape character.
For Telnet, the escape character is either a single
character or a two-character sequence consisting of '^'
followed by one character. If the second character is '?', the
DEL character is selected. Otherwise, the second character
is converted to a control character and used as the escape
character.
For SSH, the escape character is a single character.
3. You have the following options:
To add a host to the host list, click the right arrow. The host displays in the
Hosts box.
To remove a host from the host list, select the host in the Hosts box and click the
left arrow.
To give the host a higher precedence, select the host in the Hosts box and click
the up arrow.
To give the host a lower precedence, select the host in the Hosts box and click
the down arrow.
4. Click the Edit Host List button. After the process completes, a link back to the
Device Ports – Settings page displays.
To delete a host list:
1. Select the host list in the Host Lists table.
2. Click the Delete Host List button. After the process completes, a link back to the
Device Ports – Settings page displays.
Host List Commands
The following CLI commands correspond to the web page entries described above.
To configure a prioritized list of hosts to be used for modem dial-in connections:
set hostlist add|edit <Host List Name> [<parameters>]
Parameters:
name <Host List Name> (edit only)
retrycount <1-10>
Default is 3.
auth <enable|disable>
SecureLinx SLC User Guide
101
8: Devices
To add a new host entry to a list or edit an existing entry:
set hostlist add|edit <Host List Name> entry <Host Number>
[<parameters>]
Parameters:
host <IP Address or Name>
protocol <ssh|telnet|tcp>
port <TCP Port>
escapeseq <1-10 Chars>
To move a host entry to a new position in the host list:
set hostlist edit <Host List Name> move <Host Number>
position <Host Number>
To delete a host list, or a single host entry from a host list:
set hostlist delete <Host List> [entry <Host Number>]
To display the members of a host list:
show hostlist <all|names|Host List Name>
SecureLinx SLC User Guide
102
9: PC Cards
You can use the PC Card page to configure storage (Compact Flash) and modem/ISDN
PC cards. A Compact Flash is useful for saving and restoring configurations (see
Firmware & Configurations on page 168) and for Device Port Logging (see PC Card
Logging on page 90). The SLC supports a variety of Compact Flash-to-PC Card
adapters, as well as modem and Basic Rate Interface (BRI) ISDN cards. (See the
Lantronix web site for a complete list.)
To set up PC Card storage in the SLC:
1. Insert any of the supported PC Cards into either of the PC Card bays on the front
of the SLC. (You can do this before or after powering up the SLC.)
If the card is a compact Flash-to-PC Card adapter, and the first partition on the
Compact Flash is formatted with a file system supported by the SLC (ext2 and
FAT), the card mounts automatically.
2. If the card does not mount automatically, or if you want to update its settings, click
the Devices tab and select the PC Card option. The following page displays.
3. From the PC Card Slots table, select the button (on the right) for the PC Card you
want to configure for storage and click the Configure button. The following page
displays.
SecureLinx SLC User Guide
103
9: PC Cards
4. Enter the following settings for the selected PC Card:
Storage Settings
Mount
Select the checkbox to mount the first partition of the
Compact Flash on the SLC (if not currently mounted).
Once mounted, a Compact Flash is used for device port
logging and saving/restoring configurations.
Unmount
To eject the Compact Flash from the SLC, first unmount
the Compact Flash. Select the checkbox to unmount it.
Warning: If you eject a Compact Flash from the SLC
without unmounting it, subsequent mounts of a PC
Card Compact Flash in either slot may fail, and you
will need to reboot the SLC to restore PC Card
functionality.
Format
Select to unmount the Compact Flash (if it is mounted),
remove all existing partitions, create one partition on the
Compact Flash, format it with the selected file system (ext2
or FAT), and mount it.
Filesystem
Select ext2 or FAT, the file systems the SLC supports.
5. Click the Apply button.
To enter modem settings for a PC Card:
1. Insert any of the supported modem or ISDN cards (see www.lantronix.com/slc) into
either of the PC Card bays on the front of the SLC. (You can do this before or after
powering up the SLC.)
2. Click the Devices tab and select the PC Card option. The PC Card page displays.
3. Select the PC Card you want to configure from the PC Card Slots table and click
the Configure button. The PC Card – Modem/ISDN page displays.
SecureLinx SLC User Guide
104
9: PC Cards
4. Enter or view the following:
State
SecureLinx SLC User Guide
Select to indicate whether to disable the PC Card or set it
for dial-in, dial-out, dial-back, dial-on-demand, or dial-in &
dial-on-demand. Disabled by default.
105
9: PC Cards
Mode
The format in which the data flows back and forth.
With Text selected, the SLC assumes that the modem will
be used for remotely logging into the command line. Text
mode is only for dialing in. This is the default.
PPP establishes an IP-based link over the modem. PPP
connections can be used in dial-out mode (e.g., the SLC
connects to an external network) or dial-in mode (e.g., the
external computer connects to the network that the SLC is
part of) or dial-on-demand. For ISDN cards, only PPP
connections are allowed.
Initialization Script
Commands sent to configure the modem may have up to
100 characters. Consult your modem’s documentation for
recommended initialization options. If you do not specify
an initialization script, the SLC uses a uses a default
initialization string of AT S7=45 SO=0 L1 V1 X4 &D2
&c1 E1 Q0.
Note: We recommend that the modem initialization script
always be preceded with AT and include E1 V1 x4 Q0 so
that the SLC may properly control the modem.
Modem Timeout
Timeout for modem connections. Select Yes for the SLC to
terminate the connection if no traffic is received during the
configured idle time. Enter a value of from 1 to 9999
seconds.
Caller ID Logging
Select to enable the SLC to log caller IDs on incoming
calls.
Note: For the Caller ID AT command, refer to the modem
user guide.
Modem Command
Modem AT command used to initiate caller ID logging by
the modem.
Note: For the AT command, refer to the modem user
guide.
Data Settings
Baud
The speed with which the device port exchanges data with
the attached serial device.
From the drop-down list, select the baud rate. Most devices
use 9600 for the administration port, so this is the default.
Check the equipment settings and documentation for the
proper baud rate.
Data Bits
Number of data bits used to transmit a character. From the
drop-down list, select the number of data bits. The default
is 8 data bits.
Parity
Parity checking is a rudimentary method of detecting
simple, single-bit errors. From the drop-down list, select the
parity. The default is none.
SecureLinx SLC User Guide
106
9: PC Cards
Stop Bits
The number of stop bit(s) used to indicate that a byte of
data has been transmitted. From the drop-down list, select
the number of stop bits. The default is 1.
Flow Control
A method of preventing buffer overflow and loss of data.
The available methods include none, xon/xoff (software),
and RTS/CTS (hardware). The default is none.
ISDN Settings
Note: These fields are disabled if the PC Card inserted is not an ISDN card.
Channel
Select to indicate which B channel on the ISDN card to
use. Valid values are 1 and 2. (The B-channel is the
channel that carries the main data.) Only one 64K channel
can be used at a time.
Phone Number
Phone number associated with the B channel. May have
up to 20 characters. Any format is acceptable.
GSM/GPRS Settings
These settings are only active when a GSM/GPRS PC card modem is in the appropriate
slot.
Notes:
Please consult your wireless carrier's configuration requirements for more
detailed information.
Dial-out GPRS connections may replace the default route and DNS entries.
Static routes may be required to maintain access to subnets that are not directly
attached to the SLC. Click the Static Routes link (above Data Settings) to
configure a static route. (See Routing on page 52.)
Dial-out Mode
Select the type of dial-out connection:
GPRS: (General Packet Radio Service)
GSM: (Global System for Mobile communication)
PIN and Retype
PIN
PIN (personal identification number) for accessing the
GSM/GPRS card.
GPRS Context
Command to specify the protocol data packet (PDP)
context parameter values.
PPP Compression
Select to enable negotiation of data compression over PPP
links. Disabled by default.
GSM Bearer Svc.
Command to select the bearer service, data rate, and
connection element to use when data call originate.
Auto-acquire DNS
Select to enable the SLC to acquire up to three DNS
servers by means of GPRS. Enabled by default.
Negotiated IP
IP address associated with the GPRS connection.
SecureLinx SLC User Guide
107
9: PC Cards
Text Mode
Timeout
Logins
If you selected Text mode, you can enable logins to time
out after the connection is inactive for a specified number
of minutes. The default is No. This setting only applies to
text mode connections. PPP mode connections stay
connected until either side drops the connection. Disabled
by default.
Dial-back Number
Users with dial-back access can dial into the SLC and
enter their login and password. Once the SLC
authenticates them, the modem hangs up and dials them
back.
Select the phone number the modem dials back on--a
fixed number or a number associated with their login. If
you select Fixed Number, enter the number (in the format
2123456789).
Dial-in Host List
From the drop-down list, select the desired host list. The
host list is a prioritized list of SSH, Telnet and TCP
hosts that are available for establishing outgoing
modem connections. The hosts in the list are cycled
through until the modem successfully connects to
one.
To establish and configure host lists, click the Host Lists
link. (See Host Lists on page 97.)
PPP Mode
Negotiate IP
Address
If the SLC and/or the serial device have dynamic IP
addresses (e.g., IP addresses assigned by a DHCP
server), select Yes. This is the default.
If the SLC or the modem have fixed IP addresses, select
No, and enter the Local IP (IP address of the port) and
Remote IP (IP address of the modem).
Authentication
Enables PAP or CHAP authentication for modem logins.
PAP is the default. With PAP, users are authenticated by
means of the Local Users and any of the remote
authentication methods that are enabled. With CHAP, the
CHAP Handshake fields authenticate the user.
CHAP Handshake
The host/username (for UNIX systems) or secret/user
password (for Windows systems) used for CHAP
authentication. May have up to 128 characters.
Same
authentication for
Dial-in & Dial-onDemand (DOD)
Select this option to let incoming connections (dial-in) use
the same authentication settings as outgoing connections
(dial-on-demand). If this option is not selected, then the
dial-on-demand connections take their authentication
settings from the DOD parameter settings. If DOD
Authentication is PAP, then the DOD CHAP Handshake
field is not used.
SecureLinx SLC User Guide
108
9: PC Cards
DOD
Authentication
Enables PAP or CHAP authentication for dial-in & dial-ondemand. PAP is the default. With PAP, users are
authenticated by means of the Local Users and any of the
remote authentication methods that are enabled. With
CHAP, the DOD CHAP Handshake fields authenticate the
user.
DOD CHAP
Handshake
For DOD Authentication, enter the host/username for
UNIX systems) or secret/user password (for Windows
systems) used for CHAP authentication. May have up to
128 characters.
Enable NAT
Select to enable Network Address Translation (NAT) for
dial-in and dial-out PPP connections on a per modem
(Device Port or PC Card) basis. Users dialing into the SLC
access the network connected to Eth1 and/or Eth2.
Note: IP forwarding must be enabled on the Network Settings page for NAT to work. To enable, click the IP
Forwarding link to display the Network Settings page. See
Dial-out
Number
Phone number for dialing out to a remote system or serial
device. May have up to 20 characters. Any format is
acceptable.
Dial-out
Login
User ID for dialing out to a remote system. May have up to
32 characters.
Dial-out Password
and Retype
Password for dialing out to a remote system. May have up
to 64 characters.
Restart Delay
The number of seconds after the timeout and before the
SLC attempts another connection. The default is 30
seconds.
IP Settings
Service
The available connection services for this modem port
(Telnet, SSH, or TCP). Only one can be active at a time.
The default is None.
Telnet Port
Telnet session port number to use if you selected Telnet.
Defaults:
Upper PC Card Slot: 2049
Lower PC Card Slot: 2050
Range: 1025-65535
SSH Port
The SSH session port number to use if you selected SSH.
Defaults:
Upper PC Card Slot: 3049
Lower PC Card Slot: 3050
Range: 1025-65535
TCP Port
The TCP (raw) session port number to use if you selected
TCP.
Defaults:
Upper PC Card Slot: 4049
Lower PC Card Slot: 4050
Range: 1025-65535
SecureLinx SLC User Guide
109
9: PC Cards
Authenticate
If selected, the SLC requires user authentication before
granting access to the port. Authenticate is selected by
default for Telnet Port and SSH Port, but not for
TCP Port.
5. Click the Apply button.
PC Card Commands
These commands for the command line interface correspond to the web page entries
described above.
PC Card Storage Commands
To mount a Compact Flash card in the SLC for use as a storage device:
Note: The Compact Flash card must be formatted with an ext2 or FAT file system before you
mount it.
pccard storage mount <upper|lower>
To view a directory listing of a Compact Flash card:
pccard storage dir <upper|lower>
To unmount a Compact Flash card:
Note: Enter this command before ejecting the card.
pccard storage unmount <upper|lower>
To format a Compact Flash card:
pccard storage format <upper|lower> [filesystem <ext2|fat>]
To rename a file on a Compact Flash card:
pccard storage rename <upper|lower> file <Filename> newfile <New
Filename>
To copy a file on a Compact Flash card:
pccard storage copy <upper|lower> file <Filename> newfile <New
Filename>
Removes a file on a Compact Flash card:
pccard storage delete <upper|lower> file <Current Filename>
PC Card Modem Commands
To configure a currently loaded PC Card modem:
pccard modem <upper|lower> <parameters>
Parameters:
SecureLinx SLC User Guide
110
9: PC Cards
auth <pap|chap>
baud <300-115200> 9600 is the default.
calleridcmd <Modem Command String>
calleridlogging <enable| disable>
chaphost <CHAP Host or User Password>
chapsecret <CHAP Secret or User Password>
databits <7|8>
dialbacknumber <usernumber|Phone Number>
dialinlist <Host List for Dial-in>
dodauth <pap|chap>
dodchaphost <CHAP Host or User Name>
dodchapsecret <CHAP Secret or User Password>
dialoutlogin <User Login>
dialoutnumber <Phone Number>
dialoutpassword <Password>
flowcontrol <none|xon/xoff|rts|cts>
gsmautodns <enable|disable>
gsmbearerservice <GSM Bearer Service>
gsmcompression <enable|disable>
gsmcontext <GPRS Context Id>
gsmdialoutmode <gprs|gsm>
gsmpin <GSM/GPRS PIN Number>
idletimeout <disable|1-9999 seconds>
initscript <Initialization Script>
isdnchannel <1|2>
isdnnumber <Phone Number>
localipaddr <negotiate|IP Address>
modemmode <text|ppp>
modemstate
<disable|dialout|dialin|dialback|dialondemand|
dialin+dialondemand> <dialinhostlist>
modemtimeout <disable|1-9999 sec>
nat <enable|disable>
parity <none|odd|even>
remoteipaddr <negotiate|IP Address>
restartdelay <PPP Restart Delay>
service <none|telnet|ssh|tcp>
sshauth <enable|disable>
sshport <TCP Port>
stopbits <1|2>
SecureLinx SLC User Guide
111
9: PC Cards
tcpauth <enable|disable>
tcpport <TCP Port>
telnetauth <enable|disable>
telnetport <TCP Port>
timeoutlogins <disable|1-30>
SecureLinx SLC User Guide
112
10: Connections
Chapter 8: Devices described how to configure and interact with an SLC device port
connected to an external device. This chapter describes how to use the Connections web
page to connect external devices and outbound network connections (such as Telnet or
SSH) in various configurations.
An SLC device port attached to an external device can be connected to one of the
following endpoints:
Another device port attached to an external device
Another device port with a modem attached
An outgoing Telnet or SSH session
An outgoing TCP or UDP network connection
This enables the user to set up connections such as those described in the next section.
You can establish a connection at various times:
Immediately. These connections are always re-established after reboot.
At a specified date and time. These connections connect if the date and time
have already passed.
After a specified amount of data or a specified sequence of data passes through
the connection. Following reboot, the connection is not reestablished until the
specified data passes through the connection.
SecureLinx SLC User Guide
113
10: Connections
Typical Setup Scenarios for the SLC
Following are typical configurations in which SLC connections can be used, with
references to settings on the Connections and Device Ports web pages.
Terminal Server
In this setup, the SLC acts as a multiplexer of serial data to a single server computer.
Terminal devices are connected to the serial ports of the SLC and configured as a
Device Port to Telnet out type connection on the Connections page. The users of the
terminals can access the server as if they were connected directly to it by local serial
ports or a console.
VT100 Terminals
Server
SLC Console Manager
Serial
Connections
Telnet
Telnet
Sessions
Sessions
(via Network
connection)
Remote Access Server
In this setup, the SLC is connected to one or more modems by its device ports. Configure
the device ports on the Device Ports - Settings web page by selecting the Dial-in option
in the Modem Settings section. Most customers use the modems in PPP mode to
establish an IP connection to the SLC and either Telnet or SSH into the SLC. They could
also select text mode where, using a terminal emulation program, a user could dial into
the SLC and connect to the command line interface.
Modems
SLC Console Manager
Phone
System
Serial
Connections
SecureLinx SLC User Guide
Internal
Network
Network
Connections
114
10: Connections
Reverse Terminal Server
In this scenario, the SLC has one or more device ports connected to one or more serial
ports of a mainframe server. Users can access a terminal session by establishing a
Telnet or SSH session to the SLC. To configure the SLC, select the Enable Telnet In or
Enable SSH In option on the Device Ports – Settings web page.
PC
UNIX Server
SLC Console Manager
Serial
Sessions
PC
Telnet/SSH
Sessions
PC
Multiport Device Server
A PC can use the device ports on the SLC as virtual serial ports, enabling the ports to act
as if they are local ports to the PC. To use the SLC in this setup, the PC requires special
software, for example, Com Port Redirector (available on www.lantronix.com) or similar
software).
Serial
Printer
Windows/Linux PC
SLC Console Manager
Modem
Serial Connections
Raw TCP
Sessions
Serial
Device
SecureLinx SLC User Guide
115
10: Connections
Console Server
For this situation, the SLC is configured so that the user can manage a number of servers
or pieces of network equipment using their console ports. The device ports on the SLC
are connected to the console ports of the equipment that the user would like to manage.
To manage a specific piece of equipment, the user can Telnet or SSH to a specific port or
IP address on the SLC and be connected directly to the console port of the end server or
device. To configure this setup, set the Enable Telnet In or Enable SSH In option on the
Device Ports – Settings web page for the device port in question. The user can
implement an extra remote management capability by adding a modem to one of the
device ports and setting the Dial-in option in the Modem Settings section of the Device
Ports – Settings web page. A user could then dial into the SLC using another modem and
terminal emulation program at a remote location.
Web Server
Serial Terminal
Sessions
SLC Console Manager
Switch
Telnet/SSH
Sessions
PC
PC
PC
Router
Modem
SecureLinx SLC User Guide
116
10: Connections
Connection Configuration
To create a connection:
1. Click the Devices tab and select the Connections opton. The following page
displays:
2. For a device port, enter the following:
Port
The number of the device port you are connecting.
This device port must be connected to an external
serial device and must not have command line
interface logins enabled, be connected to a
modem, or be running a loopback test.
Note: To see the current settings for this device
port, click the Settings link.
SecureLinx SLC User Guide
117
10: Connections
Data Flow
Select the arrow showing the direction
(bidirectional or unidirectional) the data will flow in
relationship to the device port you are connecting.
to
From the drop-down list, select a destination for
the connection: a device port connected to a serial
device, a device port connected to a modem, or an
outbound network connection (Telnet, SSH, TCP
Port, or UDP Port).
Note: To see the current settings for a selected
device port, click the Settings link.
Hostname
The host name or IP Address of the destination.
This entry is required if the to field is set to Telnet
out, SSH out, TCP port, or UDP port.
Port
If the to field is set to Device Port or Modem on
Device Port, enter the number of the device port.
For all other options, this is the TCP/UDP port
number, which is optional for Telnet out and SSH
out, but required for TCP Port and UDP Port.
Notes:
If you select Device Port, it must not have
command line interface logins enabled or be
running a loopback test.
To view the device port's settings, click the
Settings link to the right of the port number.
SSH Out Options
Select one of the following optional flags to use for
the SSH connection.
User: Login ID to use for authenticating on the
remote host.
Version: Version of SSH. Select 1 or 2.
Command: Enter a specific command on the
remote host (for example, reboot).
SecureLinx SLC User Guide
118
10: Connections
Trigger
Select the condition that will trigger a connection.
Options include:
Connect now: Connects immediately, or if you
reboot the SLC, immediately on reboot.
Connect at date/time: Connects at a specified
date and time. Use the drop-down lists to complete
the date and time. Upon rebooting, the SLC
reestablishes the connection if the date/time has
passed.
Auto-connect on characters transferring: Select
the arrow indicating the direction of the data
transfer and either the minimum number of
characters or a specific character sequence that
will trigger the connection.
You can select the direction of the data transfer
only if Data Flow is bidirectional. Upon rebooting,
the SLC does not reestablish the connection until
the specified data has passed through one of the
endpoints of the connection.
3. To save, click the Apply button.
To view, update, or disconnect a current connection:
The bottom of the Connections web page displays current connections.
1. To view details about a connection, hold the mouse over the arrow in the Flow
column.
2. To disconnect (delete) a connection, select the connection in the Select column
and click the Terminate button.
3. To reestablish the connection, create the connection again in the top part of the
page.
4. To view information about Web connections, click the here link in the text above
the table. The Firmware & Configurations - Web Sessions page displays.
Connection Commands
These commands for configuring connections correspond to the web page entries
described above.
SecureLinx SLC User Guide
119
10: Connections
To connect to a device port to monitor and/or interact with it, or to establish an
outbound network connection:
connect direct <endpoint>
Endpoint is one of:
deviceport <Port # or Name>
ssh <IP Address or Name> [port <TCP Port>] [<SSH
flags>]
where <SSH flags> is one or more of:
user <Login Name>
version <1|2>
command <Command to Execute>
tcp <IP Address> [port <TCP Port>]
telnet <IP Address or Name> [port <TCP Port>]
udp <IP Address> [port <UDP Port>]
hostlist <Host List>
To configure initial timeout for outgoing connections:
Note: This is not a TCP timeout.
connect global outgoingtimeout <disable|1-9999 seconds>
To monitor a device port:
connect listen deviceport <Device Port # or Name>
SecureLinx SLC User Guide
120
10: Connections
To connect a device port to another device port or an outbound network
connection (data flows in both directions):
connect bidirection <Port # or Name> <endpoint>
Endpoint is one of:
charcount <# of Chars>
charseq <Char Sequence>
charxfer <toendpoint|fromendpoint>
deviceport <Device Port # or Name>
date <MMDDYYhhmm[ss]>
exclusive <enable|disable>
ssh <IP Address or Name> [port <TCP Port] [<SSH
flags>]
where <SSH flags> is one or more of:
user <Login Name>
version <1|2>
command <Command to Execute>
tcp <IP Address> [port <TCP Port>]
telnet <IP Address or Name> [port <TCP Port>]
trigger <now|datetime|chars>
udp <IP Address> [port <UDP Port>]
Note: If the trigger is datetime (establish connection at a specified date/time), enter the date
parameter. If the trigger is chars (establish connection on receipt of a specified number or
characters or a character sequence), enter the charxfer parameter and either the charcount or
the charseq parameter.
To connect a device port to another device port or an outbound network
connection (data flows in one direction):
connect unidirection <Device Port # or Name> dataflow
<toendpoint⎢fromendpoint> <endpoint>
Endpoint is one of:
charcount <# of Chars>
charseq <Char Sequence>
datetime <MMDDYYhhmm[ss]>
deviceport <Port # or Name>
exclusive <enable|disable>
ssh <IP Address or Name> [port <TCP Port] >]
<SSH flags>]
where <SSH flags> is one or more of:
user <Login Name>
version <1|2>
SecureLinx SLC User Guide
121
10: Connections
command <Command to Execute>
tcp <IP Address> [port <TCP Port>]
telnet <IP Address or Name> [port <TCP Port]
trigger <now|datetime|chars>
udp <IP Address> [port <UDP Port>]
Note: If the trigger is datetime (establish connection at a specified date/time), enter the date
parameter. If the trigger is chars (establish connection on receipt of a specified number or
characters or a character sequence), enter either the charcount or the charseq parameter.
To terminate a bidirectional or unidirectional connection:
connect terminate <Connection ID>
To view connections and their IDs:
Note: The connection IDs are in the left column of the resulting table. The connection ID associated
with a particular connection may change if the connection times out and is restarted.
show connections [email <Email Address>].
You can optionally email the displayed information.
To display details for a single connection:
You can optionally email the displayed information.
show connections connid <Connection ID> [email <Email Address>
To display global connections:
connect global show
SecureLinx SLC User Guide
122
11: User Authentication
Users who attempt to log in to the SLC by means of Telnet, SSH, the console port, or one
of the device ports are granted access by one or more authentication methods.
The User Authentication page provides a submenu of methods (Local Users, NIS, LDAP,
RADIUS, Kerberos, and TACACS+) for authenticating users attempting to log in. Use this
page to assign the order in which the SLC will use the methods. By default, local user
authentication is enabled and is the first method the SLC uses to authenticate users. If
desired, you can disable local user authentication or assign it a lower precedence.
Note: Regardless of whether local user authentication is enabled, the local user
sysadmin account is always available for login.
Authentication can occur using all methods, in the order of precedence, until a successful
authentication is obtained, or using only the first authentication method that responds (in
the event that a server is down).
If you have the same user name defined in multiple authentication methods, the result is
unknown.
Example:
There is an LDAP user "joe" and an NIS user "joe" and the order of
authentication methods is:
1 - Local Users
2 - LDAP
3 - NIS
User "joe" tries to log in. Because there is an LDAP user "joe," the SLC tries to
authenticate him against his LDAP password first. If he fails to log in, then the
SLC may (or may not) try to authenticate him against his NIS "joe" user
password.
Authentication Methods
To enable, disable, and set the precedence of authentication methods:
1. Click the User Authentication tab and select the Authentication Methods option.
The following page displays:
SecureLinx SLC User Guide
123
11: User Authentication
2. To enable a method currently in the Disabled methods list, select the method and
press the left arrow to the left of the list. The methods include:
NIS (Network
Information
System)
A network naming and administration system developed by
Sun Microsystems for smaller networks. Each host client or
server computer in the system has knowledge about the
entire system. A user at any host can access files or
applications on any host in the network with a single user
identification and password.
NIS uses the client/server model and the Remote Procedure
Call (RPC) interface for communication between hosts. NIS
consists of a server, a library of client programs, and some
administrative tools. NIS is often used with the Network File
System (NFS).
LDAP (Lightweight
Directory Access
Protocol)
A set of protocols for accessing information directories,
specifically X.500-based directory services. LDAP runs over
TCP/IP or other connection-oriented transfer services.
RADIUS (Remote
Authentication
Dial-In User
Service)
An authentication and accounting system used by many
Internet Service Providers (ISPs). A client/server protocol, it
enables remote access servers to authenticate dial-in users
and authorize their access to the requested system or
service.
RADIUS allows a company to maintain user profiles in a
central database that all remote servers can share. It
increases security, allowing a company to set up a policy
that can be applied at a single administered network point.
Kerberos
Kerberos is a network authentication protocol that enables
two parties to exchange private information across an
unprotected network.
It works by assigning a unique electronic credential, called a
ticket, to each user who logs on to the network. The ticket is
embedded in messages to identify the sender.
SecureLinx SLC User Guide
124
11: User Authentication
TACACS+
(Terminal Access
Controller Access
Control System)
TACACS+ allows a remote access server to communicate
with an authentication server to determine whether the user
has access to the network. TACACS+ is a completely new
protocol and is not compatible with TACACS or XTACACS.
The SLC supports TACACS+ only.
Local Users
Local accounts authenticate users who attempt to log in via
SSH, Telnet, the Web, or the console port.
3. To disable a method currently in the Enabled methods list, select the method and
click the right arrow between the lists.
4. To set the order in which the SLC will authenticate users, use the up and down
arrows to the left of the Enabled methods list.
5. For Attempt next method on authentication rejection, you have the following
options:
To enable the SLC to use all methods, in order of precedence, until it obtains a
successful authentication, select the check box. This is the default.
To enable the SLC to use only the first authentication method that responds (in
case a server is down or unavailable), clear the check box.
6. Click the Apply button.
Now that you have enabled one or more authentication methods, you must configure
them.
Authentication Commands
The following command for the command line interface corresponds to the web page
entries described above.
To set ordering of authentication methods:
Note: Local Users authentication is always the first method used. Any methods omitted from the
command will be disabled.
set auth <one or more parameters>
Parameters:
authusenextmethod <enable|disable>
kerberos <1-6>
ldap <1-6>
localusers <1-6>
nis <1-6>
radius <1-6>
tacacs+ <1-6>
To view authentication methods and their order of precedence:
show auth
SecureLinx SLC User Guide
125
11: User Authentication
User Rights
The SLC has three default user groups: Administrators, Power Users, and Default Users.
Each has a predefined set of rights; users inherit rights from the user group to which they
belong. These rights are in addition to the current functions that a user can perform at the
CLI:
connect direct/listen
set locallog/password/history/cli
show datetime/deviceport/locallog/portstatus/portcounters/
history/cli/user
The table below shows the mapping of groups and user rights.
Table 11-1. User Group Rights
User Right
Full Administrative
Networking
Services
SecureLinx Network
Date/Time
Local Users
Remote Authentication
SSH Keys
User Menus
Web Access
Reboot/Shutdown
Firmware/Configuration
Diagnostics and Reports
Device Ports
PC Card
Administrators
y
y
y
y
y
y
y
y
y
y
y
y
y
y
y
Power Users
Default Users
y
y
y
y
y
You cannot deny a user rights defined for the group, but you can add or remove all other
rights at any time.
By default, the system assigns new users to the Default Users group, but you can change
their group membership at any time. If you change a user's rights while the user is logged
into the web or CLI, the results do not take effect until the next time the user logs in.
See Local/Remote User Settings on page 129 for information about assigning rights to
users.
SecureLinx SLC User Guide
126
11: User Authentication
Local and Remote Users
The system administrator can configure the SLC to use local accounts and remote
accounts to authenticate users.
1. Click the User Authentication tab and select the Local/Remote Users option.
The following page displays.
The top of the page has entry fields for enabling local and remote users and for setting
password requirements. The bottom of the page displays a table listing and describing all
local and remote users.
To enable local and/or remote users:
1. Enter the following:
Enable Local
Users
Select to enable all local users except sysadmin. The
sysadmin is always available regardless of how you set the
check box. Enabled by default.
Authenticate only
users who are in
the remote users
list
Select the check box to authenticate users listed in the
Remote Users list in the lower part of the page. Disabled by
default.
2. Click the Apply button.
SecureLinx SLC User Guide
127
11: User Authentication
To set password requirements for local users:
Local User Passwords
Complex
Passwords
Select to enable the SLC to enforce rules concerning the
password structure (e.g., alphanumeric requirements,
number of characters, punctuation marks). Disabled by
default.
Complexity rules:
Passwords must be at least eight characters long.
They must contain one upper case letter (A-Z), one lower case
letter (a-z), one digit ( 0-9), and one punctuation character
(()`~!@#$%%^&*-+=\{}[]:;"'<>,.?/_).
Allow Reuse
Select to enable users to continue to reuse old passwords. If
you disable the check box, they cannot use any of the Reuse
History number of passwords. Enabled by default.
Reuse History
The number of passwords the user must use before reusing an
old password. The default is 4.
For example, if you set reuse history to 4, the user may reuse
an old password after using 4 other passwords.
Lifetime (days)
The number of days until the password expires. The default
setting is 90.
Warning Period
(days)
The number of days ahead that the system warns that the
user's password will expire. The default setting is 7.
Max Login
Attempts
The number of times (up to 8) the user can attempt to log in
unsuccessfully before the system locks the user out. The
default setting is 0 (disabled).
Lockout Time
(minutes)
The number of minutes (up to 90) the locked-out user must
wait before trying to log in to the web interface again. The
default setting is 0 (disabled).
3. Click the Apply button.
To add, edit, or delete a user:
You can delete a user listed in the table on this page or open the page for adding or
editing a user.
You have the following options:
To add a user, click the Add/Edit User button. The Local/Remote User Settings
page displays. (See Local/Remote User Settings below)
To edit a user, select the user in the table and click the Add/Edit User button.
The Local/Remote User Settings page displays. (See Local/Remote User
Settings on page129.)
To delete a user, select the user in the table, click the Delete button, and then
click the Apply button.
SecureLinx SLC User Guide
128
11: User Authentication
Local/Remote User Settings
On this page, you can add, edit, or delete a local or remote user.
To add a user:
1. On the Local/Remote Users page (described above), click the Add/Edit User
button. The Local/Remote User Settings page displays.
2. Enter the following information for the user:
Login
User ID of selected user.
Authentication
Select the type of authenticated user:
Local: User listed in the SLC database.
Remote: User not listed in the SLC database.
UID
A unique numeric identifier the system administrator assigns
to each user. Valid UIDs are 101-4294967295.
Note: The UID must be unique. If it is not, SLC automatically
increments it. Starting at 101, the SLC finds the next unused
UID.
Listen Ports
SecureLinx SLC User Guide
The device ports that the user may access to view data using
the connect listen command. Enter the port numbers or
the range of port numbers (for example, 1, 5, 8, 10-15). U
and L denote the PC Card upper and lower slots.
129
11: User Authentication
Data Ports
The device ports with which the user may interact using the
connect direct command. Enter the port numbers or the
range of port numbers.
Clear Port Buffers
The device port buffers the users may clear using the set
locallog clear command. Enter the port numbers or the
range of port numbers.
Enable for
Dial-back
Select to grant a local user dial-back access (see Device
Ports – Settings on page 76). Users with dial-back access
can dial into the SLC and enter their login and password.
Once the SLC authenticates them, the modem hangs up and
dials them back. Disabled by default.
Dial-back Number
The phone number the modem dials back on depends on this
setting for the device port. The user is either dialed back on a
fixed number (specified on the Device Port - Settings page),
or on a number that is associated with the user’s login
(specified here).
Escape Sequence
A single character or a two-character sequence that causes
the SLC to leave direct (interactive) mode. (To leave listen
mode, press any key.)
A suggested value is Esc+A (escape key, then uppercase
"A" performed quickly but not simultaneously). You would
specify this value as \x1bA, which is hexadecimal (\x)
character 27 (1B) followed by an A.
This setting allows the user to terminate the connect
direct command on the command line interface when the
endpoint of the command is deviceport, tcp, or udp.
Break
Sequence
A series of 1-10 characters users can enter on the command
line interface to send a break signal to the external device. A
suggested value is Esc+B (escape key, then uppercase “B”
performed quickly but not simultaneously). You would specify
this value as \x1bB, which is hexadecimal (\x) character 27
(1B) followed by a B.
Custom Menu
If custom menus have been created (see Custom User
Menus on page 163), you can assign a default custom menu
to the user. The custom menu will display at login.
Note: In the Local Users table, if the menu assigned to a
local user no longer exists, it is marked with an asterisk (*).
Display Menu at
Login
If custom menus have been created, select to enable the
menu to display when the user logs into the CLI.
Password/
When a user logs into the SLC, the SLC prompts for a
password (up to 64 characters). The sysadmin establishes
that password here.
Retype Password
Password Expires
SecureLinx SLC User Guide
If not selected, allows the user to keep a password
indefinitely. If selected the user keeps the password for a set
period. (See Local and Remote Users on page 127 for
information on specifying the length of time before the
password expires.)
130
11: User Authentication
Allow Password
Change
Select to allow the user to change password.
Change Password
on Next Login
Indicate whether the user must change the password at the
next login.
Lock Account
Select to locks the account indefinitely.
3. Assign rights to users. Each user is a member of a group that has a predefined
user rights associated with it. You can assign or remove additional rights to the
individual user.
Group
Select the group to which the user will belong:
Default Users: This group has only the most basic rights.
You can specify additional rights for the individual user .
Power Users: This group has the same rights as Default
Users plus Networking, Date/Time, Reboot & Shutdown,
and Diagnostics & Reports. You can specify additional
rights for the individual user.
Administrators: This group has all possible rights.
Full Administrative
Right to perform any function on the SLC.
Networking
Right to enter network and routing settings.
Services
Right to enable and disable system and audit logging, SSH
and Telnet logins, SNMP, and SMTP. Includes NFS and
CIFS.
SecureLinx
Network
Right to view and manage SecureLinx units (e.g., SLPs,
Spiders, SLCs) on the local subnet.
Date/Time
Right to set the date and time.
Local Users
Right to add or delete local users on the system.
Remote
Authentication
Right to assign a remote user to a user group and assign a
set of rights to the user. Includes configuring remote
authentication methods and ordering
SSH Keys
Right to set SSH keys for authenticating users.
User Menus
Right to create or edit a custom user menu for the CLI.
Web Access
Right to access Web-Manager.
Reboot &
Shutdown
Right to shutdown or reboot the SLC.
Firmware &
Configuration
Right to upgrade the firmware on the unit and save or restore
a configuration (all settings).
Diagnostics &
Reports
Right to obtain diagnostic information and reports about the
unit.
Device Ports
Right to enter device port settings. Includes creating
bidirectional and unidirection connections
SecureLinx SLC User Guide
131
11: User Authentication
PC Card
Right to enter modem settings for PC cards. Includes
managing storage PC Cards.
4. Click the Apply button.
5. Click the Back to Local/Remote Users link to return to the Local/Remote User
Settings page.
6. Add another user or click the Back to Local/Remote Users link. The
Local/Remote Users page displays with the new user(s) listed in the table.
Note: The logged-in user's name displays at the top of the web page. Only the tabs and
options for which the user has rights display.
Shortcut
To add a user based on an existing user:
1. Display the existing user on the Local/Remote Users Settings page. The fields in
the top part of the page display the current values for the user.
2. Change the Login to that of the new user. It is best to change the Password too.
3. Click the Apply button.
To edit a local user:
1. On the Local/Remote Users page, select the user and click the Add/Edit User
button. The Local/Remote User Settings page displays.
2. Update values as desired.
3. Click the Apply button.
To delete a local user:
1. On the Local/Remote Users page, select the user and click the Add/Edit User
button. The Local/Remote User Settings page displays.
2. Click the Delete User button.
3. Click the Apply button.
To change the sysadmin password:
1. On the Local/Remote Users page, select sysadmin and click the Add/Edit User
button. The Local/Remote User Settings page displays.
2. Enter the new password in the Password and Retype Password fields.
Note: You can change Escape Sequence and Break Sequence, if desired. You
cannot delete the UID or change the UID, port permissions, or custom menu.
3. Click the Apply button.
Local Users Commands
The following CLI commands correspond to the web page entries described above.
SecureLinx SLC User Guide
132
11: User Authentication
To configure local accounts (including sysadmin) who log in to the SLC by means
of SSH, Telnet, the Web, or the console port:
set localusers add|edit <User Login> <parameters>
Parameters:
allowdialback <enable|disable>
breakseq <1-10 Chars>
changenextlogin <enable|disable>
changepassword <enable|disable>
clearports <Port List>
custommenu <Menu Name>
dataports <Port List>
dialbacknumber <Phone Number>
displaymenu <enable|disable>
escapeseq <1-10 Chars>
group <default|power|admin|>
listenports <Port List>
passwordexpires <enable|disable>
permissions <Permission List>
uid <User Identifier>
To set whether a complex login password is required:
set localusers complexpasswords <enable|disable>
To enable or disable authentication of local users:
set localusers state <enable|disable>
To set a login password for the local user:
set localusers password <User Login>
To delete a local user:
set localusers delete <User Login>
To view settings for all users or a local user:
show localusers [user <User Login>]
To block (lock out) a user's ability to log in:
set localusers lock <User Login>
Note: This capability is not available on the web page.
SecureLinx SLC User Guide
133
11: User Authentication
To allow (unlock) a user's ability to log in:
set localusers unlock <User Login>
Note: This capability is not available on the web page.
Local User Rights Commands
The following CLI commands correspond to the web page entries described above.
To add a local user to a user group or to change the group the user belongs to:
set localusers add|edit <user> group <default|power|admin>
To set a local user's permissions (not defined by the user group):
set localusers add|edit <user> permissions <Permission List>
where
<Permission List> is one or more of nt, sv, dt, lu, ra, sk, um, dp, pc,
rs, rc, dr, wb, sn, ad
To remove a permission, type a minus sign before the two-letter abbreviation for a user
right.
To view the rights of the currently logged-in user:
show user
Remote User Commands
The following CLI commands correspond to the web page entries described above.
To configure whether remote users who are not part of the remote user list will be
authenticated:
set remoteusers listonlyauth <enable|disable>
SecureLinx SLC User Guide
134
11: User Authentication
To configure attributes for users who log in by a remote authentication method:
set remoteusers add|edit <User Login> [<parameters>]
Parameters
breakseq <1-10 Chars>
clearports <Port List>
dataports <Port List>
escapeseq <1-10 Chars>
group <default|power|admin>
listenports <Port List>
permissions <Permissions List>
where
<Permission List> is one or more of nt, sv, dt, lu, ra, sk,
um, dp, pc, rs, rc, dr, wb, sn, ad
To remove a permission, type a minus sign before the two-letter
abbreviation for a user right.
To remove a remote user:
set remoteusers delete <User Login>
To view settings for all remote users:
show remoteusers
To view the rights of the currently logged-in user:
show user
NIS
The system administrator can configure the SLC to use NIS to authenticate users
attempting to log in to the SLC through the Web, SSH, Telnet, or the Console port. If NIS
does not provide port permissions, you can use this page to grant device port access to
users who are authenticated through NIS.
All NIS users are members of a group that has predefined user rights associated with it.
You can assign additional user rights that are not defined by the group.
To configure the SLC to use NIS to authenticate users:
1. Click the User Authentication tab and select the NIS option.
SecureLinx SLC User Guide
135
11: User Authentication
2. Enter the following:
Enable NIS
Displays selected if you enabled this method on the
Authentication Methods page. If you want to set up this
authentication method but not enable it immediately, clear
the checkbox.
Note: You can enable NIS here or on the first User
Authentication page. If you enable NIS here, it automatically
displays at the end of the order of precedence on the User
Authentication page.
NIS Domain
The NIS domain of the SLC must be the same as the NIS
domain of the NIS server.
Broadcast for NIS
Server
If selected, the SLC sends a broadcast datagram to find the
NIS Server on the local network.
NIS Master Server
(required)
The IP address or host name of the master server.
NIS Slave
Servers #1 -5
The IP addresses or host names of up to five slave servers.
SecureLinx SLC User Guide
136
11: User Authentication
Custom Menu
If custom menus have been created (see Custom User
Menus on page 163), you can assign a default custom menu
to NIS users.
Escape Sequence
A single character or a two-character sequence that causes
the SLC to leave direct (interactive) mode. (To leave listen
mode, press any key.)
A suggested value is Esc+A (escape key, then uppercase
"A" performed quickly but not simultaneously). You would
specify this value as \x1bA, which is hexadecimal (\x)
character 27 (1B) followed by an A.
This setting allows the user to terminate the connect
direct command on the command line interface when the
endpoint of the command is deviceport, tcp, or udp.
Break
Sequence
A series of 1-10 characters users can enter on the command
line interface to send a break signal to the external device. A
suggested value is Esc+B (escape key, then uppercase “B”
performed quickly but not simultaneously). You would specify
this value as \x1bB, which is hexadecimal (\x) character 27
(1B) followed by a B.
Data Ports
The ports users are able to monitor and interact with using
the connect direct command. U and L denote the PC
Card upper and lower slots.
Listen Ports
The ports users are able to monitor using the connect
listen command.
Clear Port Buffers
The ports whose port buffer users may clear using the set
locallog clear command.
3. In the User Rights section, select the user group to which NIS users will belong:
Group
Select the group to which the NIS users will belong:
Default Users: This group has only the most basic rights
(described above).
Power Users: This group has the same rights as Default
Users plus Networking, Date/Time, Reboot & Shutdown,
and Diagnostics & Reports.
Administrators: This group has all possible rights.
4. Select or clear the checkboxes for the following rights:
Full Administrative
Right to add, update, and delete all editable fields.
Networking
Right to enter Network settings.
Services
Right to enable and disable system logging, SSH and Telnet
logins, SNMP, and SMTP.
Date/Time
Right to set the date and time.
SecureLinx
Network
Right to view and manage SecureLinx units (e.g., SLPs,
Spiders, SLCs) on the local subnet.
SecureLinx SLC User Guide
137
11: User Authentication
Local Users
Right to add or delete local users on the system.
Remote
Authentication
Right to assign a remote user to a user group and assign a
set of rights to the user.
SSH Keys
Right to set SSH keys for authenticating users.
User Menus
Right to create a custom user menu for the CLI for NIS users.
Reboot &
Shutdown
Right to use the CLI or shut down the SLC and then reboot it.
Firmware &
Configuration
Right to upgrade the firmware on the unit and save or restore
a configuration (all settings). Selecting this option
automatically selects Reboot & Shutdown.
Diagnostics &
Reports
Right to obtain diagnostic information and reports about the
unit.
SLC Network
Right to view and manage SLCs on the local subnet.
Web Access
Right to access Web-Manager.
Device Ports
Right to enter device port settings.
PC Card
Right to enter modem settings for PC cards.
5. Click the Apply button.
Note: You must reboot the unit before your changes will take effect.
NIS Commands
These commands for the command line interface correspond to the web page entries
described above.
SecureLinx SLC User Guide
138
11: User Authentication
To configure the SLC to use NIS to authenticate users who log in via the Web, SSH,
Telnet, or the console port:
set nis <one or more parameters>
Parameters:
breakseq <1-10 Chars>
broadcast <enable|disable>
clearports <Port List>
dataports <Port List>
domain <NIS Domain Name>
escapeseq <1-10 Chars>
listenports <Port List>
master <IP Address or Hostname>
slave1 <IP Address or Hostname>
slave2 <IP Address or Hostname>
slave3 <IP Address or Hostname>
slave4 <IP Address or Hostname>
slave5 <IP Address or Hostname>
state <enable|disable>
To set group and permissions for NIS users:
set nis group <default|power|admin>
To set permissions for NIS users not already defined by the user rights group:
set nis permissions <Permission List>
where
<Permission List> is one or more of nt, sv, dt, lu, ra, sk, um, dp, pc,
rs, rc, dr, wb, sn, ad
To remove a permission, type a minus sign before the two-letter abbreviation for a user
right.
To set a default custom menu for NIS users:
set nis custommenu <Menu Name>
To view NIS settings:
show nis
LDAP
The system administrator can configure the SLC to use LDAP to authenticate users
attempting to log in using the Web, Telnet, SSH, or the console port.
LDAP allows SLC users to authenticate using a wide variety of LDAP servers, such as
OpenLDAP and Microsoft Active Directory. The LDAP implementation supports LDAP
servers that do not allow anonymous queries.
Users who are authenticated through LDAP are granted device port access through the
port permissions on this page.
SecureLinx SLC User Guide
139
11: User Authentication
All LDAP users are members of a group that has predefined user rights associated with
it. You can add additional user rights that are not defined by the group.
To configure the SLC to use LDAP to authenticate users:
1. Click the User Authentication tab and select LDAP. The following page displays.
2. Enter the following:
Enable LDAP
Displays selected if you enabled this method on the first
User Authentication page. If you want to set up this
authentication method but not enable it immediately, clear
the checkbox.
Server
The IP address or host name of the LDAP server.
Port
Number of the TCP port on the LDAP server to which the
SLC talks. The default is 389.
Base
The name of the LDAP search base (e.g., dc=company,
dc=com). May have up to 80 characters.
SecureLinx SLC User Guide
140
11: User Authentication
Bind Name
The name for a non-anonymous bind to an LDAP server.
This item has the same format as LDAP Base. One
example is cn=administrator,cn=Users,dc=domain,dc=com
Bind Password and
Retype Password
Password for a non-anonymous bind. This entry is
optional. Acceptable characters are a-z, A-Z, and 0-9.
The maximum length is 127 characters.
Active Directory
Support
Select to enable. Active Directory is a directory service
from Microsoft that is a part of Windows 2000 and later
versions of Windows. It is LDAP- and Kerberos- compliant.
Disabled by default.
Encrypt Messages
Select to encrypt messages between the SLC and the
LDAP server. Disabled by default.
Custom Menu
If custom menus have been created (see Custom User
Menus on page 163), you can assign a default custom
menu to LDAP users.
Escape Sequence
A single character or a two-character sequence that
causes the SLC to leave direct (interactive) mode. (To
leave listen mode, press any key.)
A suggested value is Esc+A (escape key, then uppercase
"A" performed quickly but not simultaneously). You would
specify this value as \x1bA, which is hexadecimal (\x)
character 27 (1B) followed by an A.
This setting allows the user to terminate the connect
direct command on the command line interface when
the endpoint of the command is deviceport, tcp, or
udp.
Break
Sequence
A series of 1-10 characters users can enter on the
command line interface to send a break signal to the
external device. A suggested value is Esc+B (escape key,
then uppercase “B” performed quickly but not
simultaneously). You would specify this value as \x1bB,
which is hexadecimal (\x) character 27 (1B) followed by a
B.
Data Ports
The ports users are able to monitor and interact with using
the connect direct command. U and L denote the PC
Card upper and lower slots.
Listen Port
The ports users are able to monitor using the connect
listen command.
Clear Port Buffers
The ports whose port buffer users may clear using the set
locallog clear command.
3. In the User Rights section, select the user group to which LDAP users will belong:
SecureLinx SLC User Guide
141
11: User Authentication
Group
Select the group to which the LDAP users will belong:
Default Users: This group has only the most basic rights
(described above).
Power Users: This group has the same rights as Default
Users plus Networking, Date/Time, Reboot & Shutdown,
and Diagnostics & Reports.
Administrators: This group has all possible rights.
4. Select or clear the checkboxes for the following rights:
Full Administrative
Right to add, update, and delete all editable fields.
Networking
Right to enter Network settings.
Services
Right to enable and disable system logging, SSH and Telnet
logins, SNMP, and SMTP.
SecureLinx
Network
Right to view and manage SecureLinx units (e.g., SLPs,
Spiders, SLCs) on the local subnet.
Date/Time
Right to set the date and time.
Local Users
Right to add or delete local users on the system.
Remote
Authentication
Right to assign a remote user to a user group and assign a
set of rights to the user.
SSH Keys
Right to set SSH keys for authenticating users.
User Menus
Right to create a custom user menu for the CLI for LDAP
users.
Reboot &
Shutdown
Right to use the CLI or shut down the SLC and then reboot it.
Firmware &
Configuration
Right to upgrade the firmware on the unit and save or restore
a configuration (all settings). Selecting this option
automatically selects Reboot & Shutdown.
Diagnostics &
Reports
Right to obtain diagnostic information and reports about the
unit.
SLC Network
Right to view and manage SLCs on the local subnet.
Web Access
Right to access Web-Manager.
Device Ports
Right to enter device port settings.
PC Card
Right to enter modem settings for PC cards.
5. Click the Apply button.
Note: You must reboot the unit before your changes will take effect.
LDAP Commands
These commands for the command line interface correspond to the web page entries
described above.
SecureLinx SLC User Guide
142
11: User Authentication
To configure the SLC to use LDAP to authenticate users who log in via the Web,
SSH, Telnet, or the console port:
set ldap <one or more parameters>
Parameters:
adsupport <enable|disable>
Enables or disables active directory.
base <LDAP Base>
bindname <Bind Name>
breakseq <1-10 Chars>
dataports <Ports List>
listenports <Port List>
clearports <Port List>
escapeseq <1-10 Chars>
bindpassword <Bind Password>
encrypt <enable|disable>
port <TCP Port>
Default is 389.
server <IP Address or Hostname>
state <enable|disable>
To set user group and permissions for LDAP users:
group <default|power|admin>
To set permissions for LDAP users not already defined by the user rights group:
permissions <Permission List>
where
<Permission List> is one or more of nt, sv, dt, lu, ra, sk, um, dp, pc,
rs, rc, dr, wb, sn, ad
To remove a permission, type a minus sign before the two-letter abbreviation for a user
right.
To set a default custom menu for LDAP users:
custommenu <Menu Name>
To view LDAP settings:
show ldap
RADIUS
The system administrator can configure the SLC to use RADIUS to authenticate users
attempting to log in using the Web, Telnet, SSH, or the console port.
Users who are authenticated through RADIUS are granted device port access through
the port permissions on this page.
All RADIUS users are members of a group that has predefined user rights associated
with it. You can add additional user rights that are not defined by the group.
SecureLinx SLC User Guide
143
11: User Authentication
To configure the SLC to use RADIUS to authenticate users:
1. Click the User Authentication tab and select RADIUS. The following page
displays.
2. Enter the following:
Enable RADIUS
Displays selected if you enabled this method on
the User Authentication page. If you want to set up
this authentication method but not enable it
immediately, clear the checkbox.
Note: You can enable RADIUS here or on the first
User Authentication page. If you enable RADIUS
here, it automatically displays at the end of the
order of precedence on the User Authentication
page.
SecureLinx SLC User Guide
144
11: User Authentication
RADIUS Server #1
IP address or hostname of the primary RADIUS
server. This RADIUS server may be a proxy for
SecurID.
SecurID is a two-factor authentication method
based on the user's SecurID token and pin
number. The SecurID token displays a string of
digits called a token code that changes once a
minute (some tokens are set to change codes
every 30 seconds).
Server #1 Port
Number of the TCP port on the RADIUS server
used for the RADIUS service. If you do not specify
an optional port, the SLC uses the default RADIUS
port (1812).
Server #1 Secret
Text that serves as a shared secret between a
RADIUS client and the server (SLC). The shared
secret is used to encrypt a password sent between
the client and the server. May have up to 128
characters.
RADIUS Server #2
IP address or host name of the secondary
RADIUS server. This server can be used as a
SecurID proxy.
Server #2 Port
Number of the TCP port on the RADIUS server
used for the RADIUS service. If you do not specify
an optional port, the SLC uses the default RADIUS
port (1812).
Server #2 Secret
Text that serves as a shared secret between a
RADIUS client and the server (SLC). The shared
secret is used to encrypt a password sent between
the client and the server. May have up to 128
characters.
Timeout
The number of seconds (1-30) after which the
connection attempt times out. The default is 30
seconds.
Custom Menu
If custom menus have been created (see Custom
User Menus on page 163), you can assign a
default custom menu to RADIUS users.
Escape Sequence
A single character or a two-character sequence
that causes the SLC to leave direct (interactive)
mode. (To leave listen mode, press any key.)
A suggested value is Esc+A (escape key, then
uppercase "A" performed quickly but not
simultaneously). You would specify this value as
\x1bA, which is hexadecimal (\x) character 27
(1B) followed by an A.
This setting allows the user to terminate the
connect direct command on the command
line interface when the endpoint of the command
is deviceport, tcp, or udp.
SecureLinx SLC User Guide
145
11: User Authentication
Break
Sequence
A series of 1-10 characters users can enter on the
command line interface to send a break signal to
the external device. A suggested value is Esc+B
(escape key, then uppercase “B” performed
quickly but not simultaneously). You would specify
this value as \x1bB, which is hexadecimal (\x)
character 27 (1B) followed by a B.
Data Ports
The ports users are able to monitor and interact
with using the connect direct command. U
and L denote the PC Card upper and lower slots.
Listen Port
The ports users are able to monitor using the
connect listen command.
Clear Port Buffers
The ports whose port buffer users may clear using
the set locallog clear command.
Note: Older RADIUS servers may use 1645 as the default port. Check your
RADIUS server configuration.
3. In the User Rights section, select the user group to which RADIUS users will
belong.
Group
Select the group to which the RADIUS users will belong:
Default Users: This group has only the most basic rights
(described above).
Power Users: This group has the same rights as Default
Users plus Networking, Date/Time, Reboot & Shutdown,
and Diagnostics & Reports.
Administrators: This group has all possible rights.
4. Select or clear the checkboxes for the following rights:
Full Administrative
Right to add, update, and delete all editable fields.
Networking
Right to enter Network settings.
Services
Right to enable and disable system logging, SSH and Telnet
logins, SNMP, and SMTP.
SecureLinx
Network
Right to view and manage SecureLinx units (e.g., SLPs,
Spiders, SLCs) on the local subnet.
Date/Time
Right to set the date and time.
Local Users
Right to add or delete local users on the system.
Remote
Authentication
Right to assign a remote user to a user group and assign a
set of rights to the user.
SSH Keys
Right to set SSH keys for authenticating users.
User Menus
Right to create a custom user menu for the CLI for NIS users.
Reboot &
Shutdown
Right to use the CLI or shut down the SLC and then reboot it.
SecureLinx SLC User Guide
146
11: User Authentication
Firmware &
Configuration
Right to upgrade the firmware on the unit and save or restore
a configuration (all settings). Selecting this option
automatically selects Reboot & Shutdown.
Diagnostics &
Reports
Right to obtain diagnostic information and reports about the
unit.
SLC Network
Right to view and manage SLCs on the local subnet.
Web Access
Right to access Web-Manager.
Device Ports
Right to enter device port settings.
PC Card
Right to enter modem settings for PC cards.
5. Click the Apply button.
Note: You must reboot the unit before your changes will take effect.
RADIUS Commands
These commands for the command line interface correspond to the web page entries
described above.
To configure the SLC to use RADIUS to authenticate users who log in via the Web,
SSH, Telnet, or the console port:
set radius <one or more parameters>
Parameters:
breakseq <1-10 Chars>
clearports <Port List>
dataports <Port List>
escapeseq <1-10 Chars>
listenports <Port List>
state <enable|disable>
To identify the RADIUS server(s), the text secret, and the number of the TCP port
on the RADIUS server:
set radius server <1|2> host <IP Address or Hostname> secret
<Secret> [port <TCP Port>]
The default port is 1812.
To set the number of seconds after which the connection attempt times out:
set radius timeout <disable|1-30>
May be 1-30 seconds.
To set user group and permissions for RADIUS users:
set radius group <default|power|admin>
SecureLinx SLC User Guide
147
11: User Authentication
To set permissions for RADIUS users not already defined by the user rights group:
set radius permissions <Permission List>
where
<Permission List> is one or more of nt, sv, dt, lu, ra, sk, um, dp, pc,
rs, rc, dr, wb, sn, ad
To remove a permission, type a minus sign before the two-letter abbreviation for a user
right.
To set a default custom menu for RADIUS users:
set radius custommenu <Menu Name>
To view RADIUS settings:
show radius
Kerberos
Kerberos is a network authentication protocol that provides strong authentication for
client/server applications by using secret-key cryptography.
The system administrator can configure the SLC to use Kerberos to authenticate users
attempting to log in using the Web, Telnet, SSH, or the console port.
Users who are authenticated through Kerberos are granted device port access through
the port permissions on this page.
All Kerberos users are members of a group that has predefined user rights associated
with it. You can add additional user rights that are not defined by the group.
To configure the SLC to use Kerberos to authenticate users:
1. Click the User Authentication tab and select the Kerberos option. The following
page displays.
SecureLinx SLC User Guide
148
11: User Authentication
2. Enter the following:
Enable Kerberos
Displays selected if you enabled this method on the User
Authentication page. If you want to set up this authentication
method but not enable it immediately, clear the checkbox.
Note: You can enable Kerberos here or on the first User
Authentication page. If you enable Kerberos here, it automatically
displays at the end of the order of precedence on the User
Authentication page.
Realm
Enter the name of the logical network served by a single Kerberos
database and a set of Key Distribution Centers. Usually, realm
names are all uppercase letters to differentiate the realm from the
Internet domain. Realm is similar in concept to an NT domain.
KDC
A key distribution center (KDC) is a server that issues Kerberos
tickets. A ticket is a temporary set of electronic credentials that
verify the identity of a client for a particular service.
Enter the KDC in the fully qualified domain format (FQDN). An
example is SLC.local.
KDC IP Address
SecureLinx SLC User Guide
Enter the IP address of the Key Distribution Center (KDC).
149
11: User Authentication
KDC Port
Port on the KDC listening for requests. Enter an integer with a
maximum value of 65535. The default is 88.
Custom Menu
If custom menus have been created (see Custom User Menus on
page 163), you can assign a default custom menu to RADIUS
users.
Escape Sequence
A single character or a two-character sequence that causes the
SLC to leave direct (interactive) mode. (To leave listen mode,
press any key.)
A suggested value is Esc+A (escape key, then uppercase "A"
performed quickly but not simultaneously). You would specify this
value as \x1bA, which is hexadecimal (\x) character 27 (1B)
followed by an A.
This setting allows the user to terminate the connect direct
command on the command line interface when the endpoint of the
command is deviceport, tcp, or udp.
Break
Sequence
A series of 1-10 characters users can enter on the command line
interface to send a break signal to the external device. A
suggested value is Esc+B (escape key, then uppercase “B”
performed quickly but not simultaneously). You would specify this
value as \x1bB, which is hexadecimal (\x) character 27 (1B)
followed by a B.
Use LDAP
Indicate whether Kerberos should rely on LDAP to look up
user IDs and Group IDs. This setting is disabled by default.
Note: Make sure to configure LDAP if you select this option.
Data Ports
The ports users are able to monitor and interact with using the
connect direct command. U and L denote the PC Card
upper and lower slots.
Listen Port
The ports users are able to monitor using the connect listen
command.
Clear Port Buffers
The ports whose port buffer users may clear using the set
locallog clear command.
3. In the User Rights section, select the user group to which Kerberos users will
belong.
Group
Select the group to which the Kerberos users will belong:
Default Users: This group has only the most basic rights
(described above).
Power Users: This group has the same rights as Default
Users plus Networking, Date/Time, Reboot & Shutdown,
and Diagnostics & Reports.
Administrators: This group has all possible rights.
4. Select or clear the checkboxes for the following rights:
Full Administrative
SecureLinx SLC User Guide
Right to add, update, and delete all editable fields.
150
11: User Authentication
Networking
Right to enter Network settings.
Services
Right to enable and disable system logging, SSH and Telnet
logins, SNMP, and SMTP.
SecureLinx
Network
Right to view and manage SecureLinx units (e.g., SLPs,
Spiders, SLCs) on the local subnet.
Date/Time
Right to set the date and time.
Local Users
Right to add or delete local users on the system.
Remote
Authentication
Right to assign a remote user to a user group and assign a
set of rights to the user.
SSH Keys
Right to set SSH keys for authenticating users.
User Menus
Right to create a custom user menu for the CLI for Kerberos
users.
Reboot &
Shutdown
Right to use the CLI or shut down the SLC and then reboot it.
Firmware &
Configuration
Right to upgrade the firmware on the unit and save or restore
a configuration (all settings). Selecting this option
automatically selects Reboot & Shutdown.
Diagnostics &
Reports
Right to obtain diagnostic information and reports about the
unit.
SLC Network
Right to view and manage SLCs on the local subnet.
Web Access
Right to access Web-Manager.
Device Ports
Right to enter device port settings.
PC Card
Right to enter modem settings for PC cards.
5. Click the Apply button.
Note: You must reboot the unit before your changes will take effect.
Kerberos Commands
These commands for the command line interface correspond to the web page entries
described above.
SecureLinx SLC User Guide
151
11: User Authentication
To configure the SLC to use Kerberos to authenticate users who log in via the
Web, SSH, Telnet, or the console port:
set kerberos <one or more parameters>
Parameters:
breakseq <1-10 Chars>
clearports <Port List>
dataports <Port List>
escapeseq <1-10 Chars>
ipaddr <Key Distribution Center IP Address>
kdc <Key Distribution Center>
listenports <Port List>
port <Key Distribution Center TCP Port>
realm <Kerberos Realm>
state <enable|disable>
useldapforlookup <enable|disable>
To set user group and permissions for Kerberos users:
set kerberos group <default|power|admin>
To set permissions for Kerberos users not already defined by the user rights
group:
set kerberos permissions <Permission List>
where
<Permission List> is one or more of nt, sv, dt, lu, ra, sk, um, dp, pc,
rs, rc, dr, wb, sn, ad
To remove a permission, type a minus sign before the two-letter abbreviation for a user
right.
To set a default custom menu for Kerberos users:
set kerberos custommenu <Menu Name>
To view Kerberos settings:
show kerberos
TACACS+
Similar to RADIUS, the main function of TACACS+ is to perform authentication for remote
access. The SLC supports the TACACS+ protocol (not the older TACACS or XTACACS
protocols).
The system administrator can configure the SLC to use TACACS+ to authenticate users
attempting to log in using the Web, Telnet, SSH, or the console port.
Users who are authenticated through Kerberos are granted device port access through
the port permissions on this page.
All Kerberos users are members of a group that has predefined user rights associated
with it. You can add additional user rights that are not defined by the group.
SecureLinx SLC User Guide
152
11: User Authentication
To configure the SLC to use TACACS+ to authenticate users:
1. Click the TACACS+ tab and select TACACS+. The following page displays.
2. Enter the following:
Enable TACACS+
Displays selected if you enabled this method on the User
Authentication page. If you want to set up this authentication
method but not enable it immediately, clear the checkbox.
You can enable TACACS+ here or on the first User Authentication
page. If you enable TACACS+ here, it automatically displays at
the end of the order of precedence on the User Authentication
page.
TACACS+ Servers
1-3
IP address or host name of up to three TACACS+ servers.
Secret
Shared secret for message encryption between the SLC and the
TACACS+ server. Enter an alphanumeric secret of up to 127
characters.
Encrypt Messages
Select the checkbox to encrypt messages between the SLC and
the TACACS+ server. Selected by default.
Custom Menu
If custom menus have been created (see the User Guide), you
can assign a default custom menu to TACACS+ users.
SecureLinx SLC User Guide
153
11: User Authentication
Escape Sequence
A single character or a two-character sequence that causes the
SLC to leave direct (interactive) mode. (To leave listen mode,
press any key.)
A suggested value is Esc+A (escape key, then uppercase "A"
performed quickly but not simultaneously). You would specify this
value as \x1bA, which is hexadecimal (\x) character 27 (1B)
followed by an A.
This setting allows the user to terminate the connect direct
command on the command line interface when the endpoint of the
command is deviceport, tcp, or udp.
Break
Sequence
A series of 1-10 characters users can enter on the command line
interface to send a break signal to the external device. A
suggested value is Esc+B (escape key, then uppercase “B”
performed quickly but not simultaneously). You would specify this
value as \x1bB, which is hexadecimal (\x) character 27 (1B)
followed by a B.
Data Ports
The ports users are able to monitor and interact with using the
connect direct command. U and L denote the upper and
lower slots of the PC Card.
Listen Port
The ports users are able to monitor using the connect listen
command.
Clear Port Buffers
The ports whose port buffer users may clear using the set
locallog clear command.
3. In the User Rights section, select the user group to which TACACS+ users will
belong.
Group
Select the group to which the TACACS+ users will belong:
Default Users: This group has only the most basic rights
(described above).
Power Users: This group has the same rights as Default
Users plus Networking, Date/Time, Reboot & Shutdown,
and Diagnostics & Reports.
Administrators: This group has all possible rights.
4. Select or clear the checkboxes for the following rights:
Full Administrative
Right to add, update, and delete all editable fields.
Networking
Right to enter Network settings.
Services
Right to enable and disable system logging, SSH and Telnet
logins, SNMP, and SMTP.
SecureLinx
Network
Right to view and manage SecureLinx units (e.g., SLPs,
Spiders, SLCs) on the local subnet.
Date/Time
Right to set the date and time.
Local Users
Right to add or delete local users on the system.
SecureLinx SLC User Guide
154
11: User Authentication
Remote
Authentication
Right to assign a remote user to a user group and assign a
set of rights to the user.
SSH Keys
Right to set SSH keys for authenticating users.
User Menus
Right to create a custom user menu for the CLI for TACACS+
users.
Reboot &
Shutdown
Right to use the CLI or shut down the SLC and then reboot it.
Firmware &
Configuration
Right to upgrade the firmware on the unit and save or restore
a configuration (all settings). Selecting this option
automatically selects Reboot & Shutdown.
Diagnostics &
Reports
Right to obtain diagnostic information and reports about the
unit.
SLC Network
Right to view and manage SLCs on the local subnet.
Web Access
Right to access Web-Manager.
Device Ports
Right to enter device port settings.
PC Card
Right to enter modem settings for PC cards.
5. Click the Apply button.
Note: You must reboot the unit before your changes will take effect.
TACACS+ Commands
These commands for the command line interface correspond to the web page entries
described above.
To configure the SLC to use TACACS+ to authenticate users who log in via the
Web, SSH, Telnet, or the console port:
set tacacs+ <one or more parameters>
Parameters:
breakseq <1-10 Chars>
clearports <Port List>
dataports <Port List>
encrypt <enable|disable>
escapeseq <1-10 Chars>
listenports <Port List>
secret <TACACS+ Secret>
server1 <IP Address or Name>
server2 <IP Address or Name>
server3 <IP Address or Name>
state <enable|disable>
SecureLinx SLC User Guide
155
11: User Authentication
To set user group and permissions for TACACS+ users:
set tacacs+ group <default|power|admin>
To set permissions for TACACS+ users not already defined by the user rights
group:
set tacacs+ permissions <Permission List>
where
<Permission List> is one or more of nt, sv, dt, lu, ra, sk, um, dp, pc,
rs, rc, dr, wb, sn, ad
To remove a permission, type a minus sign before the two-letter abbreviation for a user
right.
To set a default custom menu for TACACS+ users:
set tacacs+ custommenu <Menu Name>
To view TACACS+ settings:
show tacacs+
SSH Keys
The SLC can import and export SSH keys to facilitate shared key authentication for all
incoming and outgoing SSH connections. By using a public/private key pair, a user can
access multiple hosts with a single passphrase, or, if a passphrase is not used, a user
can access multiple hosts without entering a password. In either case, the authentication
is protected against security attacks because both the public key and the private key are
required to authenticate. For both imported and exported SSH keys, the SLC supports
both RSA and DSA keys, and can import and export keys in OpenSSH and SECSH
formats. Imported and exported keys are saved with the SLC configuration, and the
administrator has the option of retaining the SSH keys during a reset to factory defaults.
The SLC can also update the SSH RSA1, RSA and DSA host keys that the SSH server
uses with site-specific host keys or reset them to the default values.
Imported Keys
Imported SSH keys must be associated with an SLC local user. The key can be
generated on host "MyHost" for user "MyUser," and when the key is imported into the
SLC, it must be associated with either "MyUser" (if "MyUser" is an existing SLC local
user) or an alternate SLC local user. The public key file can be imported via SCP or FTP;
once imported, you can view or delete the public key. Any SSH connection into the SLC
from the designated host/user combination uses the SSH key for authentication.
Exported Keys
The SLC can generate SSH keys for SSH connections out of the SLC for any SLC user.
The SLC retains both the private and public key on the SLC, and makes the public key
available for export via SCP, FTP, or copy and paste. The name of the key is used to
generate the name of the public key file that is exported (for example, <keyname>.pub),
and the exported keys are organized by user and key name. Once a key is generated
and exported, you can delete the key or view the public portion. Any SSH connection out
of the SLC for the designated host/user combination uses the SSH key for authentication.
To configure the SLC to use SSH keys to authenticate users:
SecureLinx SLC User Guide
156
11: User Authentication
1. From the main menu, select User Authentication – SSH Keys. The following
page displays.
2. Enter the following:
Imported Keys (SSH In)
Host & User Associated with Key
These entries are required in the following cases:
The imported key file does not contain the host that the user will be making an
SSH connection from, or
SecureLinx SLC User Guide
157
11: User Authentication
The SLC local user login for the connection is different from the user name the
key was generated from or is not included in the imported key file.
If either of these conditions is true, or the imported file is in SECSH format, you must
specify the user and host. The following is an example of a public key file that includes
the user and host:
ssh-rsa AAAAB3NzaC1yc2EAAAABIwAAAEEApUHCX9EWsHt+jmUGXa1YC3us
ABYxIXUhSU1N+NU9HNaUADUFfd8LYz8/gUnUSH4Ksm8GRT7/8/Sn9jCVfGPh
UQ== asallaway@winserver
Host
Host name or IP address from which the SSH connections to the
SLC will be made.
User
The User ID of the user being given secure access to the SLC.
Host & Login for Import
Import via
Select SCP or FTP as the method for importing the SSH keys.
SCP is the default.
Filename
Name of the public key file (for example, mykey.pub). May contain
multiple keys.
Host
IP address of the remote server from which to SCP or FTP the
public key file.
Path
Optional pathname to the public key file.
Login
User ID to use to SCP or FTP the file.
Password/Retype
Password
Password to use to SCP or FTP the file.
Exported Keys (SSH Out)
Export
Enables you to export created public keys. Select one of the
following:
New Key for User: Enables you to create a new key for a user
and export the public key in a file..
All Previously Created Keys: Does not create any keys, but
exports all previously created public keys in one file.
User
User ID of the person given secure access to the remote server.
Key Name
Name of the key. This will generate the public key filename (e.g.,
<keyname>.pub).
Key Type
Select either the RSA or the DSA encryption standard. RSA is the
default.
Number of Bits
Select the number of bits in the key (512 or 1024). The default is
512.
SecureLinx SLC User Guide
158
11: User Authentication
Passphrase/Retype
Passphrase
Optionally, enter a passphrase associated with the key. The
passphrase may have up to 50 characters. The passphrase is an
optional password that can be associated with an SSH key. It is
unique to each user and to each key.
SECSH Format
Indicate whether the keys will be exported in SECSH format (by
default the key is exported in OpenSSH format).
Public Key
Filename
Filename of the public host key.
Host and Login for Export
Export via
Select the method (SCP, FTP, or Cut and Paste) of exporting the
key to the remote server. Cut and Paste, the default, requires no
other parameters for export.
Host
IP address of the remote server to which the SLC will SCP or FTP
the public key file.
Path
Optional path of the file on the host to SCP or FTP the public key
too.
Login
User ID to use to SCP or FTP the public key file.
Password/Retype
Password
Password to use to SCP or FTP the public key file.
To view or delete a key:
1. Select the key from the appropriate table. The View and Delete buttons become
active.
2. To view the key, click the View button. A pop-up page displays the key.
3. To delete the key, click the Delete button.
To view, reset, or import SSH RSA1, RSA, And DSA host keys:
1. On the User Authentication – SSH Keys page, click the SSH Server/Host Keys
link at the top right. The following page displays the current host keys. In the
example below, the current keys are the defaults.
SecureLinx SLC User Guide
159
11: User Authentication
2. View or enter the following:
Reset to Default
Host Key
Select the All Keys checkbox to reset all default
key(s), or select one or more checkboxes to reset
defaults for RSA1, RSA, or DSA keys. All
checkboxes are unselected by default.
Import Host Key
To import a site-specific host key, select the
checkbox. Unselected by default.
Type
From the drop-down list, select the type of host
key to import.
SecureLinx SLC User Guide
160
11: User Authentication
Import via
From the drop-down list, select the method of
importing the host key (SCP or SFTP). The
default is SCP.
Public Key
Filename
Filename of the public host key.
Private Key
Filename
Filename of the private host key.
Host
Host name or IPaddress of the host from which to
import the key.
Path
Path of the directory where the host key will be
stored.
Login
User ID to use to SCP or SFTP the file.
Password & Retype
Password
Password to use to SCP or SFTP the file.
3. Click the Apply button.
4. Repeat steps 2-3 for each key you want to import.
5. To return to the SSH Keys page, click the Back to SSH Keys link.
SSH Commands
These commands for the command line interface correspond to the web page entries
described above.
To import an SSH key:
set sshkey import <ftp|scp> <one or more parameters>
Parameters:
[keyhost <SSH Key IP Address or Name>]
[keyuser <SSH Key User>]
[path <Path to Public Key File>]
file <Public Key File>
host <IP Address or Name>
login <User Login>
SecureLinx SLC User Guide
161
11: User Authentication
To export a key:
set sshkey export <ftp|scp|copypaste> <one or more parameters>
Parameters:
[format <openssh|secsh>]
[host <IP Address or Name>]
[login <User Login>]
[path <Path to Copy Key>]
bits <512|1024>
keyname <SSH Key Name>
keyuser <SSH Key User>
type <rsa|dsa>
To export the public keys of all previously created SSH keys:
set sshkey allexport <ftp|scp|copypaste> [pubfile <Public Key
File>] [host <IP Address or Name>] [login <User Login>] [path
<Path to Copy Keys>]
To delete a key:
set sshkey delete <one or more parameters>
Parameters:
keyhost <SSH Key Host>
keyname <SSH Key Name>
keyuser <SSH Key User>
Note: Specify the key user and key host to delete an imported key;
specify the keyuser and keyname to delete an exported key.
To import an SLC host key or to reset a SLC host key to the default:
set sshkey server import type <rsa1|rsa|dsa> via
<sftp|scp>
pubfile <Public Key File> privfile <Private Key File>
host <IP Address or Name> login <User Login> [path
<Path to Key File>]
To reset defaults for all or selected host keys:
set sshkey server reset [type <all|rsa1|rsa|dsa>]
SecureLinx SLC User Guide
162
11: User Authentication
To display SSH keys that have been imported:
show sshkey import <one or more parameters>
Parameters:
[keyhost <SSH Key IP Address or Name>]
[keyuser <SSH Key User>]
[viewkey <enable|disable>]
To display SSH keys that have been exported:
show sshkey export <one or more parameters>
Parameters:
[keyhost <SSH Key IP Address or Name>]
[keyuser <SSH Key User>]
[viewkey <enable|disable>]
To display host keys (public key only):
show sshkey server [type <all|rsa1|rsa|dsa>]
6. Click the Apply button. New entries display in the Imported SSH Keys table and
Exported SSH Keys table, as applicable.
Custom User Menus
Local and remote users can have a custom user menu as their command line interface
rather than the standard command set. Instead of typing each command, the user enters
the number associated with the command. Each command can also have a nickname
that can display in the menu instead of the command.
From the current menu, a user can display another menu, thus allowing menus to be
nested. The special command showmenu <Menu Name> displays a specified menu.
The special command returnmenu redisplays the parent menu if the current menu was
displayed from a showmenu command.
The user with appropriate rights creates and manages custom user menus from the
command line interface, but can assign a custom user menu to a user from either the
command line or the web interface.
SecureLinx SLC User Guide
163
11: User Authentication
Custom User Menu Commands
When creating a custom user menu, note the following limitations:
Maximum of 20 custom user menus
Maximum of 50 commands per custom user menu (logout is always the last
command)
Maximum of 15 characters for menu names
Maximum of five nested menus can be called.
No syntax checking (Enter each command correctly.)
To assign a custom user menu to a local or remote user:
set localusers add|edit <User Login> menu <Menu Name>
To create a new custom user menu or add a command to an existing custom user
menu:
set menu add <Menu Name> [command <Command Number>]
To change a command or nickname within an existing custom user menu:
set menu edit <Menu Name> command <Command Number>
set menu edit <Menu Name> nickname <Command Number>
To set the optional title for a menu:
set menu edit <Menu Name> title <Menu Title>
To enable or disable the display of command nicknames instead of commands:
set menu edit <Menu Name> shownicknames <enable|disable>
To enable or disable the redisplay of the menu before each prompt:
set menu edit <Menu Name> redisplaymenu <enable|disable>
To delete a custom user menu or one command within a custom user menu:
set menu delete <Menu Name> [command <Command Number>]
To view a list of all menu names or all commands for a specific menu:
show menu <all|Menu Name>
SecureLinx SLC User Guide
164
11: User Authentication
Example
The system administrator creates two custom user menus, with menu1 having a nested
menu (menu2):
[slc]> set menu add menu1
Enter optional menu title (<return> for none): Menu1 Title
Specify nickname for each command? [no] y
Enter each command, up to 50 commands ('logout' is always the last command).
Press <return> when the menu command set is complete.
Command #1: connect direct deviceport 1
Nickname #1: connect Port-1
Command #2: connect direct deviceport 2
Nickname #2: connect Port-2
Command #3: showmenu menu2
Warning: menu 'menu2' does not exist.
Nickname #3: menu2
Command #4:
Command #4: logout
Nickname #4: log off
Custom User Menu settings successfully updated.
[slc]> set menu add menu2
Enter optional menu title (<return> for none): Menu2 Title
Specify nickname for each command? [no]
Enter each command, up to 50 commands ('logout' is always the last command).
Press <return> when the menu command set is complete.
Command #1: connect direct deviceport 3
Command #2: connect direct deviceport 4
Command #3: show datetime
Command #4: returnmenu
Command #5:
Command #5: logout
Custom User Menu settings successfully updated.
[slc]> show menu all
___Custom User Menus___________________________________________________________
menu1
menu2
[slc]> show menu menu1
___Custom User Menus___________________________________________________________
Menu: menu1
Title: Menu1 Title
Show Nicknames: enabled
Redisplay Menu: disabled
Command
1: connect direct deviceport 1
Nickname 1: connect Port-1
Command
2: connect direct deviceport 2
Nickname 2: connect Port-2
Command
3: showmenu menu2
Nickname 3: menu2
Command
4: logout
Nickname 4: log off
[slc]> show menu menu2
_
SecureLinx SLC User Guide
165
11: User Authentication
__Custom User Menus___________________________________________________________
Menu: menu2
Title: Menu2 Title
Show Nicknames: disabled
Redisplay Menu: disabled
Command
1: connect direct deviceport 3
Nickname 1: <none>
Command
2: connect direct deviceport 4
Nickname 2: <none>
Command
3: show datetime
Nickname 3: <none>
Command
4: returnmenu
Nickname 4: <none>
Command
5: logout
Nickname 5: <none>
The system administrator 4 configures local user 'john' to use custom menu 'menu1':
[slc]> set localusers edit john custommenu menu1
Local users settings successfully updated.
[slc]> show localusers user john
___Current Local Users Settings________________________________________________
Login: john
Password: <set> UID: 101
Listen Ports: 1-32
Data Ports: 1-32
Clear Ports: 1-32
Escape Sequence: \x1bA Break Sequence: \x1bB
Custom Menu: menu1
Allow Dialback: disabled
Dialback Number: <none>
User 'john ' logs into the command line interface, initially sees menu1, executes the
command to jump to nested menu menu2, and then returns to menu1:
Welcome to the SecureLinx Console Manager
Model Number: SLC32
For a list of commands, type 'help'.
[Enter 1-4]> help
Menu1 Title
------------------------------------------------------------------------1) connect Port-1
3) menu2
2) connect Port-2
4) log off
[Enter 1-4]> 3
Executing: showmenu menu2
[Enter 1-5]> help
Menu2 Title
----------1) connect direct deviceport 3
2) connect direct deviceport 4
3) show datetime
4) returnmenu
5) logout
[Enter 1-5]> 3
Executing: show datetime
Date/Time: Tue Sep 7 19:13:35 2004
Timezone: UTC
[Enter 1-5]> 4
Executing: returnmenu
[Enter 1-4]> help
SecureLinx SLC User Guide
166
11: User Authentication
Menu1 Title
------------------------------------------------------------------------1) connect Port-1
3) menu2
2) connect Port-2
4) log off
[Enter 1-4]> 4
Executing: logout
Logging out...
SecureLinx SLC User Guide
167
12: Maintenance
The system administrator performs maintenance activities and operates the SLC using
the pages of the Maintenance tab and additional commands on the command line
interface.
Firmware & Configurations
The SLC Firmware & Configurations page allows the system administrator to:
Configure the FTP, SFTP, or TFTP server that will be used to provide firmware
updates and save/restore configurations. (TFTP is only used for firmware
updates.)
Set up the location or method that will be used to save or restore configurations
(default, FTP, SFTP, NFS, CIFS, or PC Card). Update the version of the
firmware running on the SLC.
Save a snapshot of all settings on the SLC (save a configuration).
Restore the configuration, either to a previously saved configuration, or to the
factory defaults.
View and terminate current web sessions.
Import a site-specific SSL certificate
For dual boot SLCs, view the firmware version on each boot bank, select the
bank to boot from, and copy the contents of one boot bank to the other.
Enable an iGoogle gadget that displays the status of ports on multiple SLCs.
To configure settings:
1. Click the Maintenance tab. The Firmware & Configurations page displays.
SecureLinx SLC User Guide
168
12: Maintenance
2. Enter the following:
General
Reboot
Select this option to reboot the SLC immediately.
The default is No.
Note: The front panel LCD displays the
“Rebooting the SLC” message, and the normal
boot sequence occurs.
Shutdown
SecureLinx SLC User Guide
Select this option to shut down the SLC. The
default is No.
169
12: Maintenance
Welcome Banner
The text to display on the command line interface
before the user logs in. Welcome to the SLC is
the default.
Note: To create more lines use the \n character
sequence.
Login Banner
The text to display on the command line interface
after the user logs in. May contain up to 1024
characters. Default is blank.
Note: To create more lines, use the \n character
sequence.
Logout Banner
The text to display on the command line interface
after the user logs out. May contain up to 1024
characters. Default is blank.
Note: To create more lines use, the \n character
sequence.
Web Timeout
Number of minutes (5-120) after which the SLC
web session times out. The default is 5. To avoid
timeouts, select No.
If the session times out, refresh the browser page
and enter your user id and password to open
another web session.
Note: If you close the browser without logging off
the SLC first, you will have to wait for the timeout
time to expire. You can also end a web session
by using the admin web terminate
command at the CLI or by asking your system
administrator to terminate your active web
session.
To view or terminate current web sessions, click
the Web Sessions link. (See Firmware &
Configurations – Web Sessions on page 173.)
To view, import, or reset the SSL Certificate, click
the SSL Certificate link. (See Firmware &
Configurations – SSL Certificate on page 173.)
Enable iGoogle
Gadget Web
Content
Select the check box to enable an SLC iGoogle
gadget. The iGoogle gadget allows an iGoogle
user to view the port status of many SLCs on one
web page. (See iGoogle Gadgets on page 176.)
SLC Firmware
Update Firmware
To update the SLC firmware, select the
checkbox. If you select this option, the SLC
reboots after you apply the update.
To view a log of all prior firmware updates, click
the Firmware Update Log link.
Note: For dual boot SLCs, the non-active boot
bank is updated during the firmware update,
without requiring a reboot. The configuration on
the current boot bank may optionally be copied to
the non-active boot bank during the firmware
update.
SecureLinx SLC User Guide
170
12: Maintenance
Load Firmware via
From the drop-down list, select the method of
loading the firmware. Options are FTP, TFTP,
HTTPS and SFTP (Secure FTP). FTP is the
default.
If you select HTTPS, the Upload File link
becomes active. Select the link to open a popup
window that allows you to browse to a firmware
update file to upload.
Firmware Filename
The name of the firmware update file downloaded
from the Lantronix web site.
Key
A key for validating the firmware file. The key is
provided with the firmware file (32 hex
characters).
Boot Banks
Bank 1
Version of SLC firmware in bank 1.
Note: The word "current" displays next to the
bank the SLC booted from.
Bank 2
Version of SLC firmware in bank 2.
Next Boot Bank
Current setting for bank to boot from at next
reboot.
Switch to Bank
If desired, select the alternate bank to boot from
at next reboot.
Copy configuration
from Bank 1 to
Bank 2 during
firmware update
If checked, will copy the configuration from the
current bank to the bank being updated.
Copy contents of
Bank 1 to Bank 2
If checked, enables you to copy the current boot
bank to the alternate boot bank. This process
takes a few minutes to complete.
FTP/TFTP/SFTP
Server
The IP address or host name of the server used
for obtaining updates and saving or restoring
configurations. May have up to 64 alphanumeric
characters; may include hyphens and
underscores.
Path
The default path on the server for obtaining
firmware update files and getting and putting
configuration save files.
Login
The userid for accessing the FTP server. May be
blank.
Password & Retype
Password
The FTP user password.
SecureLinx SLC User Guide
171
12: Maintenance
Configuration Management
Configuration
Management
From the option list, select one of the following:
No Save/Restore: Does not save or restore a
configuration.
Save Configuration: Saves all settings to file,
which can be backed up to a location that is not
on the SLC.
Restore Factory Defaults: Restores factory
defaults. If you select this option, the SLC reboots
after you apply the update. Select the Save SSH
Keys checkbox to save any imported or exported
SSH keys. Select the Save SSL Certificate
checkbox to save any imported certificate.
Disabled by default.
Restore Saved Configuration: Returns the SLC
settings to a previously saved configuration. If
you select this option, the SLC reboots after you
apply the update.
Configuration Name
to Save To or
Restore From
If you selected to save or restore a configuration,
enter a name for the configuration file (up to 12
characters).
Location for Save,
Restore, or Manage
If you selected to save or restore a configuration,
select one of the following options:
Default – Saved Configurations: If restoring,
select a saved configuration from the drop-down
list.
FTP Server: The FTP server specified in the
FTP/SFTP/TFTP section. If you select this option,
select FTP or SFTP to transfer the configuration
file.
NFS Mounted Directory: Local directory of the
NFS server for mounting files.
CIFS Share – Saved Configurations: If
restoring, select a saved configuration from the
drop-down list.
PC Card: If a PC Card Compact Flash is loaded
into one of the PC Card slots on the front of the
SLC, and properly mounted (see 9: PC Cards),
the configuration can be saved to or restored
from this location.
If you select this option, select the slot (upper or
lower) in which the PC Card Compact Flash is
mounted, and then select a saved configuration
from the drop-down list.
Manage: The Manage option allows you to view
and delete all configurations saved to the
selected location. This feature is available for the
default, CIFS Share, and PC Card locations. (See
next procedure).
SecureLinx SLC User Guide
172
12: Maintenance
Preserve
Configuration after
Restore
Allows the user to keep a subset of the current
configuration after restoring a configuration or
resetting to factory defaults.
Select the checkbox for each part of the current
configuration you want to keep, for example,
Networking, Services, or Device Ports.
3. Click the Apply button.
Note: If you selected an option that forces a reboot (restore configuration, update
firmware, or reset factory defaults), the SLC automatically reboots at the end of
the process.
To manage configuration files:
The Manage option on the Firmware & Configurations page allows you to view
all configurations saved to the selected location and delete any of the
configurations. This feature is available for the default, CIFS Share, and PC Card
locations.
1. On the Firmware and Configurations page, click the Manage link. The following
page displays the name and the time and date the file was saved:
2. To delete files, select one or more files and click the Delete button.
Firmware & Configurations – Web Sessions
The Firmware & Configurations - Web Sessions page enables you to view and terminate
current web sessions.
To view or terminate current web sessions:
1. On the Firmware & Configurations page, click the Web Sessions link. The
following page displays:
SecureLinx SLC User Guide
173
12: Maintenance
2. To terminate a web session, select the checkbox for the session and click the
Terminate button.
3. To return to the Firmware & Configurations page, click the Back to Firmware &
Configurations link.
Firmware & Configurations – SSL Certificate
The SLC Firmware & Configurations – SSL Certificate page enables you to view and
update SSL certificate information. The SSL certificate, consisting of a public/private key
pair used to encrypt HTTP data, is associated with the web server. You can import a sitespecific SSL certificate, if desired.
To view, reset, import, or change an SSL Certificate:
1. On the Firmware & Configurations page, click the SSL Certificate link. The
following page displays the current SSL certificate.
SecureLinx SLC User Guide
174
12: Maintenance
2. If desired, enter the following:
Reset to Default
Certificate
To reset to the default certificate, select the
checkbox to reset to the default certificate.
Unselected by default.
Import SSL
Certificate
To import your own SSL Certificate, select the
checkbox. Unselected by default.
Import via
From the drop-down list, select the method of
importing the certificate (SCP or SFTP). The
default is SCP.
Certificate Filename
Filename of the certificate.
Key Filename
Filename of the private key for the certificate.
Host
Host name or IPaddress of the host from which to
import the file.
Path
Path of the directory where the certificate will be
stored.
Login
User ID to use to SCP or SFTP the file.
Password and
Retype Password
Password to use to SCP or SFTP the file.
SecureLinx SLC User Guide
175
12: Maintenance
3. Click the Apply button.
Note: You must reboot the SLC for the update to take effect.
4. To return to the Back to Firmware & Configurations page, click the link at the
bottom of the page.
iGoogle Gadgets
You can create an iGoogle gadgets that enables you to view the status of the ports of
many SLCs on one web page.
Anyone with a Google email account (gmail.com) can create an iGoogle gadget for
viewing web pages. There are two types of iGoogle gadgets: public gadgets and private
gadgets. When a gadget’s XML code is submitted to Google, it becomes part of the
iGoogle public gadgets, which are listed for import on iGoogle web pages. When a
gadget’s XML code is stored on a private server, the gadget stays private and is usable
only by users who are aware of its location.
To set up an SLC iGoogle gadget:
1. Load the following XML code on a web server that is accessible over the Internet.
This code describes how to retrieve information and how to format the data for
display.
<?xml version="1.0" encoding="UTF-8" ?>
- <Module>
<ModulePrefs title="__UP_model__ Devport Status"
title_url="http://www.lantronix.com"
directory_title="SLC/SLB Status" description="Devport
status and counters" scrolling="true" width="400"
height="360" />
- <UserPref name="model" display_name="Model" datatype="enum"
default_value="slc">
<EnumValue value="SLC" display_value="SLC" />
<EnumValue value="SLB" display_value="SLB" />
</UserPref>
<UserPref name="ip" display_name="IP Address" required="true"
/>
- <UserPref name="rate" display_name="Refresh Rate"
datatype="enum" default_value="10">
<EnumValue value="1" display_value="1 second" />
<EnumValue value="5" display_value="5 seconds" />
<EnumValue value="10" display_value="10 seconds" />
<EnumValue value="30" display_value="30 seconds" />
<EnumValue value="60" display_value="1 minute" />
<EnumValue value="300" display_value="5 minutes" />
<EnumValue value="600" display_value="10 minutes" />
</UserPref>
<Content type="url" href="http://__UP_ip__/devstatus.htm" />
</Module>
2. On the iGoogle web page, click the Add stuff link.
3. On the new page, click the Add feed or gadget link.
4. In the field that displays, type the URL of the gadget location.
5. Return to the gadget viewing page and complete the SLC gadget configuration
fields.
You should see an iGoogle gadget similar to the following:
SecureLinx SLC User Guide
176
12: Maintenance
Administrative Commands
These commands for the command line interface correspond to the web page entries
described above.
To reboot the SLC:
admin reboot
Note: The front panel LCD displays the “Rebooting the SLC” message, and the normal boot
sequence occurs.
To add welcome, login, and logout banners:
admin banner login <Banner Text>
admin banner logout <Banner Text)
admin banner welcome <Banner Text>
Note: To go to the next line, type \n and press Enter.
To display banners:
admin banner show
SecureLinx SLC User Guide
177
12: Maintenance
To prepare the SLC to be powered off:
admin shutdown
Note: When you use this command to shut down the SLC, the LCD front panel displays "Shutting
down the SLC," followed by a pause, and then "Shutdown complete." When "Shutdown complete"
displays, it is safe to power off the SLC. This command is not available on the Web page.
To configure the timeout for web sessions:
admin web timeout <disable|5-120>
Timeouts are measured in minutes.
To terminate a web session:
admin web terminate <web session id>
To view current timeout and all active web sessions:
admin web show
To list current hardware and firmware information:
admin version
To update SLC firmware to a new revision:
Note: The firmware file should be accessible via the settings displayed by admin ftp show.
The SLC automatically reboots after successful update.
admin firmware update <ftp|tftp|sftp> file <Firmware File> key
<Checksum Key>
To copy the boot bank from the currently booted bank to the alternate bank (for
dual-boot SLCs):
admin firmware copybank
To set the boot bank to be used at the next SLC reboot:
admin firmware bootbank <1|2>
Applies to dual-boot SLCs only.
To list the current firmware revision:
admin firmware show [viewlog <enable|disable>]
Lists the current firmware revision, the boot bank status (for dual-boot SLCs), and
optionally displays the log containing details about firmware updates.
To lock or unlock the LCD keypad:
Note: If the keypad is locked, users can scroll through settings but not change them.
admin keypad <lock|unlock>
SecureLinx SLC User Guide
178
12: Maintenance
To change the Restore Factory Defaults password used at the LCD to return the
SLC to the factory settings:
admin keypad password <Password>
Must be 6 digits.
To view keypad settings:
admin keypad show
To set the FTP/TFTP/SFTP server used for firmware updates and configuration
save/restore:
admin ftp server <IP Address or Hostname> [login <User Login>]
[path <Directory>]
To view FTP settings:
admin ftp show
To set the FTP server password and prevent it from being echoed:
admin ftp password
To restore the SLC to factory default settings:
admin config factorydefaults [savesshkeys <enable|disable>]
[savesslcert <enable|disable>][preserveconfig <Config Params to
Preserve>]
<Config Params to Preserve> is a comma-separated list of current configuration
parameters to retain after the config restore or factorydefaults:
nt – Networking
lu - Local Users
sv – Services
dp - Device Ports
dt - Date/Time
pc - PC Card
To restore a saved configuration to the SLC:
admin config restore <Config Name> location
<default|ftp|sftp|nfs|cifs|pccard> [nfsdir <NFS Mounted Dir>]
[pccardslot <upper|lower>] [keepconfig <Config Params to Keep>]
[preserveconfig <Config Params to Prserve>]
<Config Params to Preserve> is a comma-separated list of current configuration
parameters to retain after the config restore or factorydefaults:
nt – Networking
lu - Local Users
sv – Services
dp - Device Ports
dt - Date/Time
pc - PC Card
ra – remote authentication
To save the current SLC configuration to a selected location:
admin config save <Config Name> location
<default|ftp|sftp|nfs|cifs|pccard> [nfsdir <NFS Mounted Dir>]
[pccardslot <upper|lower>]
SecureLinx SLC User Guide
179
12: Maintenance
To list the configurations saved to a location:
admin config show <default|ftp|sftp|nfs|cifs|pccard> [nfsdir <NFS
Mounted Dir>] [pccardslot <upper|lower>]
To run the quick setup script:
admin quicksetup
To import an SSL certificate, or reset the web server certificate to the default:
admin web certificate import via <sftp|scp> certfile <Certificate File>
privfile <Private Key File> host <IP Address or Name>
login <User Login> [path <Path to Files>]
To reset a web certificate:
admin web certificate reset
To show a web certificate:
admin web certificate show
To enable or disable iGoogle Gadget web content:
admin web gadget <enable|disable>
System Logs
The System Logs page allows you to view various system logs. (See 7: Services for more
information about system logs.) You can also clear logs on this page.
To view system logs:
1. Click the Maintenance tab and select the System Logs option. The following
page displays:
SecureLinx SLC User Guide
180
12: Maintenance
2. Enter the following:
Log
Select the type(s) of log you want to view.
Level
Select the alert level you want to view for the
selected log.
Starting at
Select the starting point of the range you want to
view:
Beginning of Log: Beginning of the log.
Date: Specific start date and time of the log.
Ending at
Select the endpoint of the range you want to view:
End of Log: The end of the log.
Date: Specific end date and time of the log.
3. Click the View Log button. The log displays. For example, if you select the type All
and the level Error, the SLC displays a log similar to this:
SecureLinx SLC User Guide
181
12: Maintenance
4. To email the system log to an individual:
a) In the Comment field, enter a comment (if desired).
b) Select to and enter the person’s email address.
c) Press the Email Output button.
5. To email the system log to Lantronix Technical Support:
a) In the Comment field, enter a comment (if desired).
b) Select to: Lantronix Tech Support.
c) Call Lantronix Tech Support and obtain a case number.
Note: For contact information, click the Lantronix Tech Support link.
d) Enter the number in Case Number.
e) Press the Email Output button.
6. A message asks for confirmation. Click OK.
To clear system logs:
1. Return to the System Logs page.
2. Select the logs you want to clear and click the Clear Log button.
SecureLinx SLC User Guide
182
12: Maintenance
System Log Command
The following command for the command line interface corresponds to the web page
entries described above.
To view the system logs containing information and error messages:
show syslog [<parameters>]
Parameters:
[email <Email Address>]
level <error|warning|info|debug>
log <all|netlog|servlog|authlog|devlog|diaglog|genlog>
display <head|tail> [numlines <Number of Lines>]
startingtime <MMDDYYhhmm [ss]
endtime <MMDDYYhhmm [ss]
Note: The level and display parameters cannot be used simultaneously.
To clear one or all of the system logs:
show syslog clear
<all|netlog|servlog|authlog|devlog|diaglog|genlog>
Audit Log
The Audit Log web page displays a log of all actions that have changed the configuration
of the SLC. The audit log is disabled by default. Use the Services web page (7: Services)
to enable the audit log and to configure its maximum size.
Each entry in the log file contains a date/time stamp, user login, and the action performed
by the user. The user may clear the log file and sort the log by date/time, user, and
command. The audit log is saved through SLC reboots.
1. Click the Maintenance tab and select the Audit Log option. The following page
displays:
SecureLinx SLC User Guide
183
12: Maintenance
2. To select a sort option (by User or Command) click the appropriate button:
To sort by user, click the Sort by User button.
To sort by command/action, click the Sort by Command button.
3. To clear the log, click the Clear Log button.
Diagnostics
The Diagnostics web page provides methods for diagnosing problems such as network
connectivity and device port input/output problems. You can use equivalent commands
on the command line interface. An additional diagnostic, loopback, is only available as a
command.
1. Click the Maintenance tab and select the Diagnostics option. The following page
displays:
SecureLinx SLC User Guide
184
12: Maintenance
2. Enter the following:
Select Diagnostics
Select one or more diagnostic methods you want
to run, or select All to run them all.
ARP Table
Address Resolution Protocol (ARP) table used to
view the IP address-to-hardware address
mapping.
Netstat
Displays network connections. If you select the
checkbox, select a protocol or select All for both
protocols to control the output of the Netstat
report.
Host Lookup
If you enter a host name in the corresponding
Hostname field, verifies that the SLC can resolve
the host name into an IP address (if DNS is
enabled).
Ping
If you enter a host name in the corresponding
Hostname field, verifies that the host is up and
running.
SecureLinx SLC User Guide
185
12: Maintenance
Send Packet
This option sends an Ethernet packet out one of
the Ethernet ports, mainly as a network
connectivity test.
Enter the following:
Protocol: Select the type of packet to send.
Hostname: Specify a host name or IPaddress of
the host to send the packet to.
Port: Specify a TCP or UDP port number of the
host to send the packet to.
String: Enter a set of up to 64 characters. The
string is encapsulated in the packet (so you could
use a network sniffer to track the packet and, by
looking at its contents, verify that it was sent).
Count: The count is the number of times the string
is sent.
For UDP, the number of times the string is sent is
equal to the number of packets sent.
For TCP, the number of times the string is sent
may (or may not) be equal to the number of
packets sent, because TCP controls how data is
packetized and sent out.
3. Click the Run Diagnostics button. The Diagnostics report page displays.
4. To view a report, click the link for that report. The links display at the top left of the
page.
SecureLinx SLC User Guide
186
12: Maintenance
5. To email the report(s) to an individual:
a) In the Comment field, enter a comment (if desired).
b) Select to and enter the person’s email address.
c) Press the Email Output button.
6. To email the report(s) to Lantronix Technical Support:
a) In the Comment field, enter a comment (if desired).
b) Select to: Lantronix Tech Support
c) Call Lantronix Tech Support and obtain a case number.
Note: For contact information, click the Lantronix Tech Support link.
d) Enter the number in Case Number.
e) Press the Email Output button.
Diagnostic Commands
The following CLI commands correspond to the web page entries described above.
To display the ARP table of IP address-to-hardware address mapping:
diag arp [email <Email Address>]
You can optionally email the displayed information.
To display a report of network connections:
You can optionally email the displayed information.
diag netstat [protocol <all|tcp|udp>] [email <Email Address>]
To resolve a host name into an IP address:
You can optionally email the displayed information.
diag lookup <Hostname> [email <Email Address>]
To test a device port by transmitting data out the port and verifying that it is
received correctly:
diag loopback <Device Port Number or Name>[<parameters>]
Parameters:
test <internal|external>
xferdatasize <Size In Kbytes to Transfer>
Default is 1 Kbyte.
Note: A special loopback cable comes with the SLC. To test a device port, plug the cable into the
device port and run this command. The command sends the specified Kbytes to the device port
and reports success or failure. The test is performed at 9600 baud. Only an external test requires a
loopback cable.
To display the route that packets take to get to a network host:
diag traceroute <IP Address or Hostname>
SecureLinx SLC User Guide
187
12: Maintenance
To verify that the host is up and running:
diag ping <IP Address or Name> [<parameters>]
Parameters:
count <Number of Times to Ping>
The default is 5.
packetsize <Size in Bytes>
The default is 64.
To display performance statistics for an Ethernet port or a device port (averaged
over the last 5 seconds):
diag perfstat [ethport <1|2>] [deviceport <Device Port # or Name>]
To generate and send Ethernet packets:
diag sendpacket host <IP Address or Name> port <TCP or UDP Port
Number> [string <Packet String>] [protocol <tcp|udp>] [count
<Number of Packets>]
The default is 1.
To display all network traffic, applying optional filters:
Note: This command is not available
diag nettrace <one or more parameters>
Parameters:
ethport <1|2>
host <IP Address or Name>
numpackets <Number of Packets>
protocol <tcp|udp|icmp>
verbose <enable|disable>
To display information on the internal memory, storage and processes of the SLC:
diag internals
Note: This command is available in the CLI but not the web.
SecureLinx SLC User Guide
188
12: Maintenance
Status/Reports
On this page, you can view the status of the SLC ports and power supplies and generate
a selection of reports.
Note: Status and statistics shown on the web interface represent a snapshot in time. To
see the most recent data, you must reload the web page.
1. Click the Maintenance tab and select the Status/Reports option. The following
page displays:
The top half of the page displays the status of each port and the power supplies.
Green indicates that the port connection or power supply is active and functioning
correctly. Red indicates an error or failure.
2. Enter the following:
View Report
View Report
Select as many of the reports as desired, or select
All.
Port Status: Displays the status of each device
port: mode, user, any related connections, and
serial port settings.
Port Counters: Displays statistics related to the
flow of data through each device port.
IP Routes: Displays the routing table.
Connections: Displays all active connections for
the SLC: Telnet, SSH, TCP, UDP, device port, and
modem.
System Configuration – Complete: Displays a
complete snapshot of the SLC settings.
SecureLinx SLC User Guide
189
12: Maintenance
System Configuration – Basic: Displays a
snapshot of the SLC's basic settings (for example,
network, date/time, routing, services, console
port).
System Configuration – Authentication:
Displays a snapshot of authentication settings only
(including a list of all localusers).
System Configuration - Devices: Displays a
snapshot of settings for each device port and
(each PC Card slot) for a
PC Card.
3. Click the Generate Report button. In the upper left, the report page displays a list
of reports generated.
4. To view a report, click the link for that report.
5. To email the report(s) to Lantronix Technical Support:
a) In the Comment field, enter a comment (if desired).
b) Select to: Lantronix Tech Support
SecureLinx SLC User Guide
190
12: Maintenance
c) Call Lantronix Tech Support and obtain a case number.
Note: For contact information, click the Lantronix Tech Support link.
d) Enter the number in Case Number.
e) Press the Email Output button.
6. To email the report(s) to an individual:
a) In the Comment field, enter a comment (if desired).
b) Select to: and enter the person’s email address.
c) Press the Email Output button.
Status Commands
These commands for the command line interface correspond to the web page entries
described above.
To display device port modes and states for one or more ports:
You can optionally email the displayed information.
show portstatus [deviceport <Device Port List or Name>] [email
<Email Address>]
To display a snapshot of configurable parameters:
You can optionally email the displayed information.
show sysconfig [display <basic|auth|devices>] [email <Email
Address]
Displays a report of all configurable parameters or a shorter report with
basic system settings, authentication settings, or device settings.
To generate a report for one or more ports:
You can optionally email the displayed information.
show portcounters [deviceport <Device Port List or Name>] [email
<Email Address>]
To display the overall status of all SLC devices:
You can optionally email the displayed information.
show sysstatus [email <Email Address>]
To display a list of all current connections:
You can optionally email the displayed information.
show connections [email <Email Address>]
To provide details, e.g., endpoint parameters and trigger, for a specific connection:
You can optionally email the displayed information.
show connections connid <Connection ID> [email <Email Address>]
Note: Use the basic show connections command to obtain the Connection ID.
SecureLinx SLC User Guide
191
12: Maintenance
Events
On this page, you can define what action you want to take for events that may occur in
the SLC.
1. Click the Maintenance tab and select the Events option. The following page
displays:
2. Enter the following:
Event Trigger
From the drop-down list, select the type of incident that
triggers an event. Currently, the options are:
Receive Trap
Temperature Over/Under Limit: For Sensorsoft devices.
Humidity Over/Under Limit: For Sensorsoft devices.
Action
From the drop-down list, select the action taken because
of the trigger. For example, the action can be writing an
entry into the syslog with details of the event or sending
the trap(s) to the Ethernet or modem connection.
Ethernet
For actions that require an Ethernet connection (for
example, Forward All Traps to Ethernet), select the
Ethernet port to use.
Modem
Connection on
For actions that require a modem connection (for example,
Forward All Traps to a Modem Connection, select which
device port or PC Card slot with a modem connection to
use.
SecureLinx SLC User Guide
192
12: Maintenance
NMS/Host to
forward trap to
SNMP Community
For actions that forward a trap, enter the IP address of the
computer to forward the trap to. The computer does not
have to be an SNMP NMS; it just has to be capable of
receiving SNMP traps.
Forwarded traps are sent with this SNMP community value
There is no default.
SNMP Trap OID
Enter a unique identifier for an SNMP object. (An SNMP
object is anything that can hold a value and can be read
using an SNMP "get" action.) The OID consists of a string
of numbers separated by periods (for example, 1.1.3.2.1).
Each number is part of a group represented by the number
on its left.
Email Address
Email address to receive email alerts.
3. You have the following options:
To add the defined event, click the Add Event button. The event displays in the
Events table at the bottom of the page.
To edit an event, select the event from the Events table and click the Edit Event
button. The Events page displays the event.
To delete an event, select the event from the Events table and click the Delete
Event button. A message asks for confirmation. Click OK.
4. To save, click the Apply button.
Events Commands
To manage the response to events that occur in the SLC:
admin events add <trigger> <response>
<trigger> is one of:
|receivetrap|templimit|humidlimit|overcurrent|
<response> is one of:
action <syslog>
action <fwdalltrapseth|fwdseltrapeth> ethport <1|2>
nms <SNMP NMS> community <SNMP Community> [oid <SNMP
OID>]
action <fwdalltrapsmodem|fwdseltrapmodem> deviceport
<Device Port # or Name> nms <SNMP NMS> community <SNMP
Community> [oid <SNMP Trap OID>]
action <fwdalltrapsmodem|fwdseltrapmodem> pccardslot
<upper|lower> nms <SNMP NMS> community <SNMP
Community> [oid <SNMP Trap OID>]
action <emailalert> emailaddress <destination email
address>
SecureLinx SLC User Guide
193
12: Maintenance
To update event definitions:
admin events edit <Event ID> <parameters>
Parameters:
community <SNMP Community>
deviceport <Device Port # or Name>
ethport <1|2>
nms <SNMP NMS>
oid <SNMP Trap OID>
pccardslot <upper|lower>
emailaddress <destination email address>
To delete an event:
admin events delete <Event ID>
To view events:
admin events show
SecureLinx SLC User Guide
194
13: Application Examples
Each SLC has multiple serial ports and two network ports. Each serial port can be
connected to the console port of an IT device. Using a network port
(in-band) or a modem (out-of-band) for dial-up connection, an administrator can remotely
access any of the connected IT devices using Telnet or SSH.
Figure 13-1. SLC Console Manager Configuration
This chapter includes three typical scenarios for using the SLC. The scenarios assume
that the SLC is connected to the network and has already been assigned an IP address.
In the examples, we use the command line interface. You can do the same things using
the web page interface except for directly interacting with the SLC (direct command).
SecureLinx SLC User Guide
195
13: Application Examples
Telnet/SSH to a Remote Device
The following figure shows a Sun server connected to port 2 of the SLC.
Figure 13-2. Remote User Connected to a SUN Server via the SLC
Sun Server
Remote User
Internet
Serial Cable to Port 2
SLC Console Manager
In this example, the sysadmin would:
1. Display the current settings for device port 2:
[slc]> show deviceport port 2
___Current Device Port
Settings________________________________________________
Number: 2 Name: Port-2
Modem Settings-------------------Data Settings----------IP Settings--------Modem State: disabled
Baud Rate: 9600
Telnet: disabled
Modem Mode: text
Data Bits: 8
Telnet Port: 2002
Timeout Logins: disabled
Stop Bits: 1
SSH: disabled
Local IP: negotiate
Parity: none
SSH Port: 3002
Remote IP: negotiate
Flow Control: xon/xoff IP: <none>
Authentication: PAP
Logins: disabled
CHAP Host: <none>
Break Sequence: \x1bB
CHAP Secret: <none>
Check DSR: disabled
NAT: disabled
Close DSR: disabled
Dial-out Login: <none>
Dial-out Password: <none>
Dial-out Number: <none>
Dial-back Number: usernumber
Initialization Script: <none>
Logging Settings-------------------------------------------------------------Local Logging: disabled
PC Card Logging: disabled
Email Logging: disabled
Log to: upper slot
Byte Threshold: 100
Max number of files: 10
Email Delay: 60
seconds
Max size of files: 2048
Restart Delay: 60
seconds
Email To: <none>
Email Subject: Port %d Logging
Email String: <none>
NFS File Logging: disabled
Directory to log to: <none>
Max number of files: 10
Max size of files: 2048
SecureLinx SLC User Guide
196
13: Application Examples
2. Change the baud to 57600 and disable flow control:
[slc]> set deviceport port 2 baud 57600 flowcontrol none
Device Port settings successfully updated.
3. Connect to the device port:
[slc]> connect direct deviceport 2
4. View messages from the SUN server console:
Mar 15 09:09:44 tssf280r sendmail[292]:
(8.12.2+Sun): SMTP+queueing@00:15:00
Mar 15 09:09:44 tssf280r sendmail[293]:
(8.12.2+Sun): queueing@00:15:00
Mar 15 14:44:40 tssf280r sendmail[275]:
(8.12.2+Sun): SMTP+queueing@00:15:00
Mar 15 14:44:40 tssf280r sendmail[276]:
(8.12.2+Sun): queueing@00:15:00
[ID 702911 mail.info] starting daemon
[ID 702911 mail.info] starting daemon
[ID 702911 mail.info] starting daemon
[ID 702911 mail.info] starting daemon
5. Reboot the SUN server:
reboot
<shutdown messages from SUN>
6. Use the escape sequence to escape from direct mode back to the command line
interface.
Dial-in (Text Mode) to a Remote Device
Sun UNIX Server
Remote User
Phone
System
Phone Line
Serial Cable to Port 2
Modem
t
Serial Cable
to Port 1
SLC Console Manager
This example shows a modem connected to an SLC device port, and a Sun server
connected to another SLC device port. You can configure the modem for text mode dialin, so a remote user can dial into the modem using a terminal emulation program and
access the Sun server. (HyperTerminal, ™ which comes with the Microsoft ® Windows™
operating system, is an example of a terminal emulation program.)
In this example, the sysadmin would:
1. Configure the device port that the modem is connected to for dial-in:
[slc]> set deviceport port 1 modemmode text
Device Port settings successfully updated.
[slc]> set deviceport port 1 initscript "AT&F&K3&C1&D2%C0A"
Device Port settings successfully updated.
[slc]> set deviceport port 1 auth pap
SecureLinx SLC User Guide
197
13: Application Examples
Device Port settings successfully updated.
[slc]> set deviceport port 1 localsecret "password"
Device Port settings successfully updated.
[slc]> set deviceport port 1 modemstate dialin
Device Port settings successfully updated.
[slc]>
2. Configure the device port that is connected to the console port of the Sun UNIX
server:
[slc]> set deviceport port 2 baud 57600 flowcontrol none
Device Port settings successfully updated.
3. Dial into the SLC via the modem using a terminal emulation program on a remote
PC. A command line prompt displays.
4. Log into the SLC.
CONNECT 57600
Welcome to the SLC
login: sysadmin
Password:
Welcome to the SecureLinx Console Manager
Model Number: SLC48
For a list of commands, type 'help'.
[slc]>
5. Connect to the SUN Unix server using the direct command.
[slc]> connect direct deviceport 2
SunOS 5.7
login: frank
Password:
Last login: Wed Jul 14 16:07:49 from computer
Sun Microsystems Inc.
SunOS 5.7
Generic October 1998
SunOS computer 5.7 Generic_123485-05 sun4m sparc SUNW,SPARCstation-20
$
6. Use the escape sequence to escape from direct mode back to the command line
interface.
SecureLinx SLC User Guide
198
13: Application Examples
Local Serial Connection to Network Device via Telnet
This example shows a terminal device connected to an SLC device port, and a Sun
server connected over the network to the SLC. When a connection is established
between the device port and an outbound Telnet session, users can access the Sun
server as though they were directly connected to it. (See 10: Connections for more
information).
VT100 Terminal
SLC Console Manager
Serial Cable to Port 2
Telnet
Session
Sun UNIX Server
In this example, the sysadmin would:
1. Display the current settings for device port 2:
[slc]> show deviceport port 2
___Current Device Port Settings________________________________________________
Number: 2 Name: Port-2
Modem Settings-------------------Data Settings----------IP Settings--------Modem State: disabled
Baud Rate: 9600
Telnet: disabled
Modem Mode: text
Data Bits: 8
Telnet Port: 2002
Timeout Logins: disabled
Stop Bits: 1
SSH: disabled
Local IP: negotiate
Parity: none
SSH Port: 3002
Remote IP: negotiate
Flow Control: xon/xoff IP: <none>
Authentication: PAP
Logins: disabled
CHAP Host: <none>
Break Sequence: \x1bB
CHAP Secret: <none>
Check DSR: disabled
NAT: disabled
Close DSR: disabled
Dial-out Login: <none>
Dial-out Password: <none>
Dial-out Number: <none>
Dial-back Number: usernumber
Initialization Script: <none>
Logging Settings--------------------------------------------------------------Local Logging: disabled
PC Card Logging: disabled
Email Logging: disabled
Log to: upper slot
Byte Threshold: 100
Max number of files: 10
Email Delay: 60
seconds
Max size of files: 2048
Restart Delay: 60
seconds
Email To: <none>
Email Subject: Port %d Logging
Email String: <none>
NFS File Logging: disabled
Directory to log to: <none>
Max number of files: 10
Max size of files: 2048
SecureLinx SLC User Guide
199
13: Application Examples
2. Change the serial settings to match the serial settings for the vt100 terminal changes baud to 57600 and disables flow control:
[slc]> set deviceport port 2 baud 57600 flowcontrol none
Device Port settings successfully updated.
3. Create a connection between the vt100 terminal connected to device port 2 and an
outbound telnet session to the server. (The IP address of the server is
192.168.1.1):
[slc]> connect bidirection 2 telnet 192.168.1.1
Connection settings successfully updated.
4. At the VT100 terminal, hit <return> a couple of times. The Telnet prompt from the
server displays:
Trying 192.168.1.1...
Connected to 192.168.1.1.
Escape character is '^]'.
Sun OS 8.0
login:
At this point, a user can log in and interact with the Sun server at the VT100 terminal as if
directly connected to the server.
SecureLinx SLC User Guide
200
14: Command Reference
After an introduction to using commands, this chapter lists and describes all of the
commands available on the SLC command line interface accessed through Telnet, SSH,
or a serial connection. The commands are in alphabetical order by category.
Introduction to Commands
Following is some information about command syntax, command line help, and tips for
using commands. For more detailed information about commands, see Command Line
Interface on page 36.
Command Syntax
Commands have the following format:
<action> <category> <parameter(s)>
where
<action> is set, show, connect, admin, diag, pccard, or logout.
<category> is a group of related parameters whose settings you want to configure or
view. Examples are ntp, deviceport, and network.
<parameter(s)> is one or more name-value pairs in one of the following formats:
<parameter name> <aa⏐bb>
User must specify one of the values (aa
or bb) separated by a vertical line ( | ).
The values are in all lowercase and must
be entered exactly as shown. Bold
indicates a default value.
<parameter name> <Value>
User must specify an appropriate value,
for example, an IP address. The
parameter values are in mixed case.
Square brackets [ ] indicate optional
parameters.
SecureLinx SLC User Guide
201
14: Command Reference
Table 14-1. Actions and Category Options
Action
Category
set
network | ipfilter | routing | datetime | ntp | services |
nfs | cifs | menu | hostlist | auth | localusers |
remoteusers | ldap | radius | kerberos | tacacs+ |
consoleport | deviceport | nis | slcnetwork | command |
sshkey | password | history | cli | locallog |
show
network | ipfilter | routing | datetime | ntp | services |
nfs | cifs | menu | hostlist | auth | localusers | nis |
ldap | radius | kerberos | tacacs+ | consoleport |
deviceport | locallog | sysstatus | syslog | auditlog |
portstatus | sysconfig | portcounters | connections |
slcnetwork | sshkey | history | cli | user | remoteusers
connect
direct | listen | bidirection | unidirection | terminate |
global
diag
ping | loopback | traceroute | arp | lookup | netstat |
perfstat | sendpacket | nettrace | internals
pccard
storage | modem
admin
reboot | shutdown | ftp | config | firmware | version |
banner | keypad | quicksetup | web | events |lcd
logout
Terminates CLI session.
Command Line Help
For general Help and to display the commands to which you have rights, type:
help
For general command line Help, type:
help command line
For more information about a specific command, type help followed by the command,
for example:
help set network or help admin firmware
Tips
Type enough characters to identify the action, category, or parameter name
uniquely. For parameter values, type the entire value. For example, you can
shorten:
set network port 1 state static ipaddr 122.3.10.1 mask
255.255.0.0
to
se net po 1 st static ip 122.3.10.1 ma 255.255.0.0
Use the Tab key to automatically complete action, category, or parameter
names. Type a partial name and press Tab either to complete the name if only
one is possible, or to display the possible names if more than one is possible.
Following a space after the preceding name, Tab displays all possible names.
Should you make a mistake while typing, backspace by pressing the Backspace
key and/or the Delete key, depending on how you accessed the interface. Both
keys work if you use VT100 emulation in your terminal access program when
connecting to the console port. Use the left and right arrow keys to move within
a command.
SecureLinx SLC User Guide
202
14: Command Reference
Use the up and down arrows to scroll through previously entered commands. If
desired, select one and edit it. You can scroll through up to 100 previous
commands entered in the session.
To clear an IP address, type 0.0.0.0, or to clear a non-IP address value, type
CLEAR.
When the number of lines displayed by a command exceeds the size of the
window (the default is 25), the command output is halted until the user is ready to
continue. To display the next line, press Enter, and to display the page, press the
space bar. You can override the number of lines (or disable the feature
altogether) with the set cli command.
Administrative Commands
admin banner login
Syntax
admin banner login <Banner Text>
Description
Configures the banner displayed after the user logs in.
Note: To go to the next line, type \n and press Enter.
admin banner logout
Syntax
admin banner logout <Banner Text>
Description
Configures the banner displayed after the user logs out.
Note: To go to the next line, type \n and press Enter.
admin banner show
Syntax
admin banner show
Description
Displays the welcome, login and logout banners.
admin banner welcome
Syntax
admin banner welcome <Banner Text>
Description
Configures the banner displayed before the user logs in.
Note: To go to the next line, type \n and press Enter.
SecureLinx SLC User Guide
203
14: Command Reference
admin config delete
Syntax
admin config delete <Config Name> location <default|cifs|pccard>
[pccardslot <upper|lower>]
Description
Deletes a configuration.
admin config factorydefaults
Syntax
admin config factorydefaults [savesshkeys <enable|disable>] [savesslcert
<enable|disable>] [preserveconfig <Config Params to Preserve>]
<Config Params to Preserve> is a comma-separated list of current configuration
parameters to retain after the config restore or factorydefaults:
nt – Networking
lu - Local Users
sv – Services
dp - Device Ports
dt - Date/Time
pc - PC Card
Description
Restores the SLC to factory default settings.
admin config restore
Syntax
admin config restore <Config Name> location
<default|ftp|sftp|nfs|cifs|pccard> [nfsdir <NFS Mounted Dir>]
[pccardslot <upper|lower>] [preserveconfig <Config Params to Preserve>]
<Config Params to Preserve> is a comma-separated list of current configuration
parameters to retain after the config restore or factorydefaults:
nt – Networking
lu - Local Users
sv – Services
dp - Device Ports
dt - Date/Time
pc - PC Card
Description
Restores a saved configuration to the SLC.
admin config save
Syntax
admin config save <Config Name> location
<default|ftp|sftp|nfs|cifs|pccard> [nfsdir <NFS Mounted Dir>]
[pccardslot <upper|lower>]
Description
Saves the current SLC configuration to a selected location.
SecureLinx SLC User Guide
204
14: Command Reference
admin config show
Syntax
admin config show <default|ftp|sftp|nfs|cifs|pccard> [nfsdir <NFS
Mounted Dir>] [pccardslot <upper|lower>]
Description
Lists the configurations saved to a location.
admin firmware bootbank
Syntax
admin firmware bootbank <1|2>
Description
Sets the boot bank to be used at the next SLC reboot. Applies to dual-boot SLCs only.
admin firmware copybank
Syntax
admin firmware copybank
Description
Copies the boot bank from the currently booted bank to the alternate
bank (for dual-boot SLCs).
admin firmware show
Syntax
admin firmware show [viewlog <enable|disable>]
Description
Lists the current firmware revision, the boot bank status (for dual-boot SLCs), and optionally
displays the log containing details about firmware updates.
admin firmware update
Syntax
admin firmware update <ftp|tftp|sftp|> file <Firmware File> key
<Checksum Key>
Description
Updates SLC firmware to a new revision.
You should be able to access the firmware file using the settings admin ftp show displays.
The SLC automatically reboots after successful update.
admin ftp password
Syntax
admin ftp password
Description
Sets the FTP server password and prevent it from being echoed.
SecureLinx SLC User Guide
205
14: Command Reference
admin ftp server
Syntax
admin ftp server <IP Address or Hostname> [login <User Login>] [path
<Directory>]
Description
Sets the FTP/TFTP/SFTP server used for firmware updates and configuration save/restore.
admin ftp show
Syntax
admin ftp show
Description
Displays FTP settings.
admin keypad
Syntax
admin keypad <lock|unlock>
Description
Locks or unlocks the LCD keypad.
If the keypad is locked, you can scroll through settings but not change them.
admin keypad password
Syntax
admin keypad password <Password>
Must be 6 digits.
Description
Changes the Restore Factory Defaults password used at the LCD to return the SLC to the factory
settings.
admin keypad show
Syntax
admin keypad show
Description
Displays keypad settings.
admin quicksetup
Syntax
admin quicksetup
Description
Runs the quick setup script.
SecureLinx SLC User Guide
206
14: Command Reference
admin reboot
Syntax
admin reboot
Description
Reboots the SLC.
The front panel LCD displays the “Rebooting the SLC” message, and the normal boot sequence
occurs.
admin shutdown
Syntax
admin shutdown
Description
Prepares the SLC to be powered off.
When you use this command to shut down the SLC, the LCD front panel displays the “Shutting
down the SLC” message, followed by a pause, and then “Shutdown complete.” When “Shutdown
complete” displays, it is safe to power off the SLC. This command is not available on the Web
page.
admin version
Syntax
admin version
Description
Displays current hardware and firmware information.
admin web certificate
Syntax
admin web certificate import via <sftp|scp> certfile <Certificate File>
privfile <Private Key File> host <IP Address or Name>
login <User Login> [path <Path to Files>]
Description
Imports an SSL certificate.
admin web certificate reset
Syntax
admin web certificate reset
Description
Resets a web certificate.
admin web certificate show
Syntax
admin web certificate show
SecureLinx SLC User Guide
207
14: Command Reference
Description
Displays a web certificate.
admin web gadget
Syntax
admin web gadget <enable|disable>
Description
Enables or disables iGoogle Gadget web content.
admin web timeout
Syntax
admin web timeout <disable|5-120>
Description
Configures the timeout for web sessions.
admin web terminate
Syntax
admin web terminate <Session ID>
Description
Terminates a web session.
admin web show
Syntax
admin web show
Description
Displays the current sessions and their ID.
Add ‘admin web certificate’ commands
Audit Log Commands
show auditlog
Syntax
show auditlog [command|user|clear]
Description
Displays audit log. By default, shows the audit log sorted by date/time. You can sort it by user or
command, or clear the audit log.
SecureLinx SLC User Guide
208
14: Command Reference
Authentication Commands
set auth
Syntax
set auth <one or more parameters>
Parameters
authusenextmethod <enable|disable>
kerberos <1-6>
ldap <1-6>
localusers <1-6>
nis <1-6>
radius <1-6>
tacacs+ <1-6>
Description
Sets ordering of authentication methods.
Local Users authentication is always the first method used. Any methods omitted from the
command are disabled.
show auth
Syntax
show auth
Description
Displays authentication methods and their order of precedence.
show user
Syntax
show user
Description
Displays attributes of the currently logged in user.
Kerberos Commands
set kerberos
Syntax
set kerberos <one or more parameters>
Parameters
breakseq <1-10 Chars>
clearports <Port List>
custommenu <Menu Name>
dataports <Port List>
SecureLinx SLC User Guide
209
14: Command Reference
escapeseq <1-10 Chars>
group <default|power|admin>
ipaddr <Key Distribution Center IP Address>
kdc <Key Distribution Center>
listenports <Port List>
port <Key Distribution Center TCP Port>
realm <Kerberos Realm>
state <enable|disable>
useldapforlookup <enable|disable>
permissions <Permission List>
Note: See User Permissions Commands on page 216 for information on groups and user rights.
Description
Configures the SLC to use Kerberos to authenticate users who log in via the Web, SSH, Telnet,
or the console port.
show kerberos
Syntax
show kerberos
Description
Displays Kerberos settings.
LDAP Commands
set ldap
Syntax
set ldap <one or more parameters>
Parameters
adsupport <enable|disable>
base <LDAP Base>
bindname <Bind Name>
bindpassword <Bind Password>
breakseq <1-10 Chars>
clearports <Port List>
clearports <Port List>
custommenu <Menu Name>
dataports <Port List>
dataports <Ports List>
encrypt <enable|disable>
escapeseq <1-10 Chars>
group <default|power|admin>
listenports <Port List>
SecureLinx SLC User Guide
210
14: Command Reference
listenports <Port List>
permissions <Permission List>
port <TCP Port>
server <IP Address or Hostname>
state <enable|disable>
Default is 389.
Note: See User Permissions Commands on page 216 for information on groups and user rights.
Description
Configures the SLC to use LDAP to authenticate users who log in via the Web, SSH, Telnet, or
the console port.
show ldap
Description
Displays LDAP settings:
Syntax
show ldap
Local Users Commands
set localusers
Syntax
set localusers add|edit <User Login> <one or more parameters>
Parameters
allowdialback <enable|disable>
breakseq <1-10 Chars>
changenextlogin <enable|disable>
changepassword <enable|disable>
clearports <Port List>
custommenu <Menu Name>
dataports <Port List>
dialbacknumber <Phone Number>
displaymenu <enable|disable>
escapeseq <1-10 Chars>
group <default|power|admin>
listenports <Port List>
passwordexpires <enable|disable>
permissions <Permission List>
Note: See User Permissions Commands on page 216 for information on groups and user rights.
uid <User Identifier>
SecureLinx SLC User Guide
211
14: Command Reference
Description
Configures local accounts (including sysadmin) who log in to the SLC by means of the Web,
SSH, Telnet, or the console port.
set localusers allowreuse
Syntax
set localusers allowreuse <enable|disable>
Description
Sets whether a login password can be reused.
set localusers complexpasswords
Syntax
set localusers complexpasswords <enable|disable>
Description
Sets whether a complex login password is required.
set localusers delete
Syntax
set localusers delete <User Login>
Description
Deletes a local user.
set localusers lifetime
Syntax
set localusers lifetime <Number of Days>
Description
Sets the number of days the login password may be used. The default is 90 days.
set localusers maxloginattempts
Syntax
set localusers maxloginattempts <Number of Logins>
Description
Sets the maximum number of login attempts before the account is locked. Disabled by default.
set localusers password
Syntax
set localusers password <User Login>
Description
Sets a login password for the local user.
SecureLinx SLC User Guide
212
14: Command Reference
set localusers periodlockout
Syntax
set localusers periodlockout <Number of Minutes>
Description
Sets the number of minutes after a lockout before the user can try to log in again. Disabled by
default.
set localusers periodwarning
Syntax
set localusers periodwarning <Number of Days>
Description
Sets the number of days the system warns the user that the password will be expiring. The
default is 7 days.
set localusers reusehistory
Syntax
set localusers reusehistory <Number of Passwords>
Description
Sets the number of passwords the user must use before reusing an old password. The default is 4.
set localusers state
Syntax
set localusers state <enable|disable>
Description
Enables or disables authentication of local users.
show localusers
Syntax
show localusers [user <User Login>]
Description
Displays local users.
NIS Commands
set nis
Syntax
set nis <one or more parameters>
Parameters
breakseq <1-10 Chars>
broadcast <enable|disable>
SecureLinx SLC User Guide
213
14: Command Reference
clearports <Port List>
custommenu <Menu Name>
dataports <Port List>
domain <NIS Domain Name>
escapeseq <1-10 Chars>
group <default|power|admin>
listenports <Port List>
master <IP Address or Hostname>
permissions <Permission List>
Note: See User Permissions Commands on page 216 for information on groups and user rights.
slave1 <IP Address or Hostname>
slave2 <IP Address or Hostname>
slave3 <IP Address or Hostname>
slave4 <IP Address or Hostname>
slave5 <IP Address or Hostname>
state <enable|disable>
Description
Configures the SLC to use NIS to authenticate users who log in via the Web, SSH, Telnet, or the
console port.
show nis
Syntax
show nis
Description
Displays NIS settings.
RADIUS Commands
set radius
Syntax
set radius <one or more parameters>
Parameters:
breakseq <1-10 Chars>
clearports <Port List>
custommenu <Menu Name>
custommenu <Menu Name>
dataports <Port List>
escapeseq <1-10 Chars>
group <default|power|admin>
listenports <Port List>
state <enable|disable>
SecureLinx SLC User Guide
214
14: Command Reference
permissions <Permission List>
Note: See User Permissions Commands on page 216 for information on groups and user rights.
timeout <enable|1-30>
Sets the number of seconds after which the connection attempt times out. It may be 1-30 seconds.
Description
Configures the SLC to use RADIUS to authenticate users who log in via the Web, SSH, Telnet, or
the console port.
set radius server
Syntax
set radius server <1|2> host <IP Address or Hostname> secret <Secret>
[port <TCP Port>]
Description
Identifies the RADIUS server(s), the text secret, and the number of the TCP port on the RADIUS
server.
Note: The default port is 1812.
show radius
Syntax
show radius
Description
Displays RADIUS settings.
TACACS+ Commands
set tacacs+
Syntax
set tacacs+ <one or more parameters>
Parameters
breakseq <1-10 Chars>
clearports <Port List>
custommenu <Menu Name>
dataports <Port List>
encrypt <enable|disable>
escapeseq <1-10 Chars>
group <default|power|admin>
listenports <Port List>
permissions <Permission List>
Note: See User Permissions Commands on page 216 for information on groups and user rights.
secret <TACACS+ Secret>
server1 <IP Address or Name>
SecureLinx SLC User Guide
215
14: Command Reference
server2 <IP Address or Name>
server3 <IP Address or Name>
state <enable|disable>
Description
Configures the SLC to use TACACS+ to authenticate users who log in via the Web, SSH, Telnet,
or the console port.
show tacacs+
Syntax
show tacacs+
Description
Displays TACACS+ settings.
User Permissions Commands
The following commands are available for the CLI only:
To block (lock out) a user's ability to log in:
set localusers lock <User Login>
To allow (unlock) a user's ability to log in:
set localusers unlock <User Login>
set localusers group
Syntax
set localusers add|edit <user> group <default|power|admin>
Description
Adds a local user to a user group or changes the group the user belongs to.
set localusers lock
Syntax
set local users unlock <User Login>
Description
Blocks (locks) a user's ability to login.
set localusers unlock
Syntax
set local users unlock <User Login>
SecureLinx SLC User Guide
216
14: Command Reference
Description
Allows (unlocks) a user's ability to login.
set localusers permissions
Syntax
set localusers add|edit <user> permissions <Permission List>
where
<Permission List> is one or more of nt, sv, dt, lu, ra, sk, um, dp, pc,
rs, rc, dr, wb, sn, ad
To remove a permission, type a minus sign before the two-letter abbreviation for a user
permission.
Description
Sets a local user's permissions (not defined by the user group).
set remoteusers <add|edit>
Syntax
set remoteusers add|edit <User Login> [<parameters>]
Parameters
breakseq <1-10 Chars>listenports <Port List>
clearports <Port List>
dataports <Port List>
escapeseq <1-10 Chars>
group <default|power|admin>
permissions <Permissions List>
where
<Permission List> is one or more of nt, sv, dt, lu, ra, sk, um, dp, pc,
rs, rc, dr, wb, sn, ad
To remove a permission, type a minus sign before the two-letter abbreviation for a user right.
Description
Sets attributes for users who log in by a remote authentication method.
set remoteusers listonlyauth
Syntax
set remoteusers listonlyauth <enable|disable>
Description
Sets whether remote users who are not part of the remote user list will be authenticated.
set remoteusers delete
Syntax
set remoteusers delete <User Login>
Description
Removes a remote user.
SecureLinx SLC User Guide
217
14: Command Reference
show remoteusers
Syntax
show remoteusers
Description
Displays settings for all remote users
set <nis|ldap|radius|kerberos|tacacs+> group
Syntax
set <nis|ldap|radius|kerberos|tacacs> group <default|power|admin>
Description
Sets a permission group for remotely authorized users.
set <nis|ldap|radius|kerberos|tacacs+> permissions
Syntax
set <nis|ldap|radius|kerberos|tacacs> permissions <Permission List>
where
<Permission List> is one or more of nt, sv, dt, lu, ra, sk, um, dp, pc,
rs, rc, dr, wb, sn, ad
Description
Sets permissions not already defined by the assigned permissions group.
show user
Syntax
show user
Description
Displays the rights of the currently logged-in user:
CLI Commands
set cli
Syntax
set cli scscommands <enable|disable>
Description
Allows you to use SCS-compatible commands as shortcuts for executing commands. Enabling
this feature enables it only for the current cli session. It is disabled by default.
Note: Settings are retained between CLI sessions for local users and users listed in the remote
users list.
SecureLinx SLC User Guide
218
14: Command Reference
set cli menu start
Syntax
set cli menu start
Description
Starts the menu if the menu associated with the current user does not display.
set cli terminallines
Syntax
set cli terminallines <disable|Number of lines>
Description
Sets the number of lines in the terminal emulation (screen) for paging through text one screenful
at a time, if the SLC cannot detect the size of the terminal automatically.
Note: Settings are retained between CLI sessions for local users and users listed in the remote
users list.
set localusers lock
Syntax
set localusers lock <User Login>
Description
Block (lock out) a user’s ability to log in.
set localusers unlock
Syntax
set localusers unlock <User Login>
Description
Allow (unlock) a user’s ability to log in.
show user
Syntax
show user
Description
Displays attributes of the currently logged in user.
set history
Syntax
set history clear
Description
Clears the commands that have been entered during the command line interface session.
SecureLinx SLC User Guide
219
14: Command Reference
show history
Syntax
show history
Description
Displays the last 100 commands entered during the session.
Connection Commands
connect bidirection
Syntax
connect bidirection <Port # or Name> <endpoint> <one or more Parameters>
Parameters
Endpoint is one of:
charcount <# of Chars>
charseq <Char Sequence>
charxfer <toendpoint|fromendpoint>
date <MMDDYYhhmm[ss]>
deviceport <Device Port # or Name>
exclusive <enable|disable>
ssh <IP Address or Name> [port <TCP Port>][<SSH flags>]
where <SSH flags> is one or more of:
user <Login Name>
version <1|2>
command <Command to Execute>
tcp <IP Address> [port <TCP Port>]
telnet <IP Address or Name> [port <TCP Port>]
trigger <now|datetime|chars>
If the trigger is datetime (establish connection at a specified date/time), enter the date
parameter. If the trigger is chars (establish connection on receipt of a specified number
or characters or a character sequence), enter the charxfer parameter and either the
charcount or the charseq parameter.
udp <IP Address> [port <UDP Port>]
Description
Connects a device port to another device port or an outbound network connection (data flows in
both directions).
SecureLinx SLC User Guide
220
14: Command Reference
connect direct
Syntax
connect direct <endpoint>
Parameters
Endpoint is one of:
deviceport <Device Port # or Name>
hostlist <Host List>
ssh <IP Address or Name> [port <TCP Port>][<SSH flags>]
where <SSH flags> is one or more of:
user <Login Name>
version <1|2>
command <Command to Execute>
tcp <IP Address> [port <TCP Port>]
telnet <IP Address or Name> [port <TCP Port>]
udp <IP Address> [port <UDP Port>
Description
Connects to a device port to monitor and/or interact with it, or establishes an outbound network
connection.
connect listen deviceport
Syntax
connect listen deviceport <Device Port # or Name>
Description
Monitors a device port.
connect global outgoingtimeout
Syntax
connect global outgoingtimeout <disable|1-9999 seconds>
Description
Sets the amount of time the SLC will wait for a response (sign of life) from an SSH/Telnet server that it is
trying to connect to.
Note: This is not a TCP timeout.
connect global show
Syntax
connect global show
Description
To display global connections.
SecureLinx SLC User Guide
221
14: Command Reference
connect terminate
Syntax
connect terminate <Connection ID>
Description
Terminates a bidirectional or unidirectional connection.
connect unidirection
Syntax
connect unidirection <Device Port # or Name> dataflow
<toendpoint⎢fromendpoint> <endpoint>
Parameters
Endpoint is one of:
charcount <# of Chars>
charseq <Char Sequence>
datetime <MMDDYYhhmm[ss]>
deviceport <Port # or Name>
exclusive <enable|disable>
ssh <IP Address or Name> [port <TCP Port][<SSH flags>]
where <SSH flags> is one or more of:
user <Login Name>
version <1|2>
command <Command to Execute>
tcp <IP Address> [port <TCP Port>]
telnet <IP Address or Name> [port <TCP Port]
trigger <now|datetime|chars>
If the trigger is datetime (establish connection at a specified date/time), enter the date
parameter. If the trigger is chars (establish connection on receipt of a specified number or
characters or a character sequence), enter either the charcount or the charseq parameter.
udp <IP Address> [port <UDP Port>]
Description
Connects a device port to another device port or an outbound network connection (data flows in
one direction).
show connections
Syntax
show connections [email <Email Address>]
Description
Displays connections and their IDs. You can optionally email the displayed information.
The connection IDs are in the left column of the resulting table. The connection ID
associated with a particular connection may change if the connection times out and is
restarted.
SecureLinx SLC User Guide
222
14: Command Reference
show connections connid
Syntax
show connections connid <Connection ID> [email <Email Address>]
Description
Displays details for a single connection. You can optionally email the displayed information.
Console Port Commands
set consoleport
Syntax
set consoleport <one or more parameters>
Parameters
baud <300-115200>
databits <7|8>
flowcontrol <none|xon/xoff|rts/cts>
parity <none|odd|even>
showlines <enable|disable>
stopbits <1|2>
timeout <disable|1-30>
Description
Configures console port settings.
show consoleport
Syntax
show consoleport
Description
Displays console port settings.
Custom User Menu Commands
When creating a custom user menu, note the following limitations:
Maximum of 20 custom user menus.
Maximum of 50 commands per custom user menu (logout is always the last command).
Maximum of 15 characters for menu names.
Maximum of five nested menus can be called.
No syntax checking. (Enter each command correctly.)
SecureLinx SLC User Guide
223
14: Command Reference
set localusers
Syntax
set localusers add|edit <User Login> menu <Menu Name>
Description
Assigns a custom user menu to a local user.
set menu add
Syntax
set menu add <Menu Name> [command <Command Number>]
Description
Creates a new custom user menu or adds a command to an existing custom user menu.
set menu edit
Syntax
set menu edit <Menu Name> <parameter>
Parameters
command <Command Number>
nickname <Command Number>
redisplaymenu <enable|disable>
shownicknames <enable|disable>
title <Menu Title>
Description
Changes a command within an existing custom user menu.
Changes a nickname within an existing custom user menu.
Enables or disables the redisplay of the menu before each prompt.
Enables or disables the display of command nicknames instead of commands.
Sets the optional title for a menu.
set menu delete
Syntax
set menu delete <Menu Name> [command <Command Number>]
Description
Deletes a custom user menu or one command within a custom user menu.
SecureLinx SLC User Guide
224
14: Command Reference
set <nis|ldap|radius|kerberos|tacacs+> custommenu
Syntax
set <nis|ldap|radius|kerberos|tacacs> custommenu <Menu Name>
Description
Sets a default custom menu for remotely authorized users.
show menu
Syntax
show menu <all|Menu Name>
Description
Displays a list of all menu names or all commands for a specific menu:
Date and Time Commands
set datetime
Syntax
set datetime <one date/time parameter>
Parameters
date <MMDDYYhhmm[ss]>
timezone <Time Zone>
Note: If you type an invalid time zone, the system guides you through the process of
selecting a time zone.
Description
Sets the local date, time, and local time zone (one parameter at a time).
show datetime
Syntax
show datetime
Description
Displays the local date, time, and time zone.
set ntp
Syntax
set ntp <one or more ntp parameters>
Parameters
localserver1 <IP Address or Hostname>
localserver2 <IP Address or Hostname>
localserver3 <IP Address or Hostname>
poll <local|public>
publicserver <IP Address or Hostname>
SecureLinx SLC User Guide
225
14: Command Reference
state <enable|disable>
sync <broadcast|poll>
Description
Synchronizes the SLC with a remote time server using NTP.
show ntp
Syntax
show ntp
Description
Displays NTP settings.
Device Commands
set command
Syntax
set command <Device Port # or Name or List> <one or more parameters>
Parameters
slp auth login <User Login>
Establishes the authentication information to log into the SLP attached to the device port.
slp restart
Issues the CLI command the SLP uses to restart itself.
slp outletcontrol state <on|off|cyclepower> [outlet <Outlet #>][tower
<A|B>]
Outlet # is 1-8 for SLP8 and 1-16 for SLP16.
The outletcontrol parameters control individual outlets.
slp outletstate [outlet <Outlet #>]
The outletstate parameter shows the state of all outlets or a single outlet.
slp envmon
Displays the environmental status (e.g., temperature and humidity) of the SLP.
slp infeedstatus
Displays the infeed status and load of the SLP.
slp system
Provides system information for the SLP.
sensorsoft lowtemp <Low Temperature in C.>
Sets the lowest temperature permitted for the port.
sensorsoft hightemp <High Temperature in C.>
Sets the hightest temperature permitted for the port.
sensorsoft lowhumidity <Low Humidity %>
Sets the lowest humidity pemitted for the port.
sensorsoft highhumidity <High Humidity %>
Sets the lowest humidity permitted for the port.
sensorsoft traps <enable|disable>
Enables or disables traps when specified conditions are met.
SecureLinx SLC User Guide
226
14: Command Reference
sensorsoft status
Displays the status of the port.
Description
Sends commands to (or control) a device connected to an SLC device port over the serial port.
Note: Currently the only devices supported for this type of interaction are the SLP and Sensorsoft
devices.
Device Port Commands
set deviceport port
Syntax
set deviceport port <Device Port List or Name> <one or more device port
parameters>
Example: set deviceport port 2-5,6,12,15-16 baud 2400
Parameters
auth <pap|chap>
banner <Banner Text>
baud <300-115200>
breakseq <1-10 Chars>
calleridcmd <Modem Command String>
calleridlogging <enable| disable>
chaphost <CHAP Host or User Name>
chapsecret <CHAP Secret or User Password>
The user defines the secret.
checkdsr <enable|disable>
closedsr <enable|disable>
databits <7|8>
device <none|slp8|slp16>
dialbacknumber <usernumber|Phone Number>
dialinlist <Host List for Dial-in>
dialoutlogin <User Login>
dialoutnumber <Phone Number>
dialoutpassword <Password>
dodauth <pap|chap>
dodchaphost <CHAP Host or User Name>
dodchapsecret <CHAP Secret or User Password>
flowcontrol <none|xon/xoff|rts/cts>
gsmautodns <enable|disable>
gsmbearerservice <GSM Bearer Service>
gsmcompression <enable|disable>
gsmcontext <GPRS Context Id>
SecureLinx SLC User Guide
227
14: Command Reference
gsmdialoutmode <gprs|gsm>
gsmpin <GSM/GPRS PIN Number>
idletimeout <disable|1-9999 seconds>
initscript <Initialization Script>
A script that initializes a modem.
Note: We recommend preceding the initscript with AT and include E1 V1 x4 Q0 so that the SLC
may properly control the modem.
ipaddr <IP Address>
localipaddr <negotiate|IP Address>
logins <enable|disable>
modemmode <text|ppp>
modemstate <disable|dialout|dialin|dialback|dialondemand|
dialin+dialondemand>|dialinhostlist>
name <Port Name>
nat <enable|disable>
modemtimeout <disable|1-9999 seconds>
parity <none|odd|even>
remoteipaddr <negotiate|IP Address>
restartdelay <PPP Restart Delay>
slp infeedstatus
Displays the infeed status and load of the SLP.
showlines <enable|disable>
sshauth <enable|disable>
sshin <enable|disable>
sshport <TCP Port>
stopbits <1|2>
telnetauth <enable|disable>
telnetin <enable|disable>
telnetport <TCP Port>
timeoutlogins <disable or 1-30>
webcolumns <Web SSH/Telnet Cols>
webrows <Web SSH/Telnet Rows>
Description
Configures a single port or a group of ports.
set deviceport global
Syntax
set deviceport global <one or more parameters>
Parameters
sshport <TCP Port>
telnetport <TCP Port>
SecureLinx SLC User Guide
228
14: Command Reference
tcpport <TCP Port>
maxdirect <1-10>
Description
Configures settings for all or a group of device ports.
show deviceport global
Syntax
show deviceport global
Description
Displays global settings for device ports.
show deviceport names
Syntax
show deviceport names
Description
Displays a list of all device port names.
show deviceport port
Syntax
show deviceport port <Device Port List or Name>
Description
Displays the settings for one or more device ports.
show portcounters
Syntax
show portcounters [deviceport <Device Port List or Name>] [email <Email
Address>]
Description
Displays device port statistics and errors for one or more ports. You can optionally email the
displayed information.
show portcounters zerocounters
Syntax
show portcounters zerocounters <Device Port List or Name>
Description
Zeros the port counters for one or more device ports.
show portstatus
Syntax
show portstatus [deviceport <Device Port List or Name>] [email <Email
Address>]
SecureLinx SLC User Guide
229
14: Command Reference
Description
Displays the modes and states of one or more device port(s). You can optionally email the
displayed information.
Diagnostic Commands
diag arp
Syntax
diag arp [email <Email Address>]
Description
Displays the ARP table of IP address-to-hardware address mapping. You can optionally email the
displayed information.
diag internals
Syntax
diag internals
Description
Displays information on the internal memory, storage and processes of the SLC
Note: This command is available in the CLI but not the web.
diag netstat
Syntax
diag netstat [protocol <all|tcp|udp>] [email <Email Address>]
Description
To display a report of network connections. You can optionally email the displayed information.
diag nettrace
Syntax
diag nettrace <one or more parameters>
Parmeters
ethport <1|2>
host <IP Address or Name>
numpackets <Number of Packets>
protocol <tcp|udp|icmp>
verbose <enable|disable>
Description
Displays all network traffic, applying optional filters. This command is not available on the web
page.
SecureLinx SLC User Guide
230
14: Command Reference
diag lookup
Syntax
diag lookup <Hostname> [email <Email Address>]
Description
Resolves a host name into an IP address. You can optionally email the displayed information.
diag loopback
Syntax
diag loopback <Device Port Number or Name>[<parameters>]
Parameters
test <internal|external>
xferdatasize <Size In Kbytes to Transfer>
Default is 1 Kbyte.
Description
Tests a device port by transmitting data out the port and verifying that it is received correctly.
A special loopback cable comes with the SLC. To test a device port, plug the cable into the
device port and run this command. The command sends the specified Kbytes to the device port
and reports success or failure. The test is performed at 9600 baud. Only an external test requires
a loopback cable.
diag traceroute
Syntax
diag traceroute <IP Address or Hostname>
Description
Displays the route that packets take to get to a network host:
Add “diag internals” command
End Device Commands
set command
Syntax
set command <Device Port # or Name or List> <one or more parameters>
Parameters
slp auth login <User Login>
Establishes the authentication information to log into the SLP attached to the device port.
slp envmon
Displays the environmental status (e.g., temperature and humidity) of the SLP.
slp outletcontrol state <on|off|cyclepower> [outlet <Outlet #>]
Outlet # is 1-8 for SLP8 and 1-16 for SLP16. The outletcontrol parameters control individual
outlets.
slp outletstate [outlet <Outlet #>]
Shows the state of all outlets or a single outlet.
SecureLinx SLC User Guide
231
14: Command Reference
slp restart
Issues the CLI command the SLP uses to restart itself.
slp system
Displays system information for the SLP.
Description
Sends commands to (or controls) a device connected to an SLC device port over the serial port.
Note: Currently the only devices supported for this type of interaction are the SLP and
Sensorsoft devices.
Events Commands
admin events add
Syntax
admin events add <trigger> <response>
<trigger> is one of:
|receivetrap|templimit|humidlimit|overcurrent|
<response> is one of:
action <syslog>
action <fwdalltrapseth|fwdseltrapeth> ethport <1|2> nms
<SNMP NMS> community <SNMP Community> [oid <SNMP OID>]
action <fwdalltrapsmodem|fwdseltrapmodem> deviceport <Device
Port # or Name> nms <SNMP NMS> community <SNMP Community>
[oid <SNMP Trap OID>]
action <fwdalltrapsmodem|fwdseltrapmodem> pccardslot
<upper|lower> nms <SNMP NMS> community <SNMP Community> [oid
<SNMP Trap OID>]
action <emailalert> emailaddress <destination email address>
Description
Manages the response to events that occur in the SLC.
admin events delete
Syntax
admin events delete <Event ID>
Description
Deletes an event definition.
SecureLinx SLC User Guide
232
14: Command Reference
admin events edit
Syntax
admin events edit <Event ID> <parameters>
Parameters
community <SNMP Community>
deviceport <Device Port # or Name>
ethport <1|2>
nms <SNMP NMS>
oid <SNMP Trap OID>
pccardslot <upper|lower>
emailaddress <destination email address>
Description
Edits event definitions.
admin events show
Syntax
admin events show
Description
Displays event definitions.
Host List Commands
set hostlist add|edit <Host List Name>
Syntax
set hostlist add|edit <Host List Name> [<parameters>]
Parameters:
name <Host List Name> (edit only)
retrycount <1-10>
Default is 3.
auth <enable|disable>
Description
Configures a prioritized list of hosts to be used for modem dial-in connections.
set hostlist add|edit <Host List Name> entry
Syntax
set hostlist add|edit <Host List Name> entry <Host Number>
[<parameters>]
Parameters:
host <IP Address or Name>
protocol <ssh|telnet|tcp>
SecureLinx SLC User Guide
233
14: Command Reference
port <TCP Port>
escapeseq <1-10 Chars>
Description
Adds a new host entry to a list or edit an existing entry.
set hostlist edit <Host List Name> move
Syntax
set hostlist edit <Host List Name> move <Host Number> position <Host
Number>
Description
Moves a host entry to a new position in the host list.
set hostlist delete
Syntax
set hostlist delete <Host List> [entry <Host Number>]
Description
Deletes a host list, or a single host entry from a host list.
show hostlist
Syntax
show hostlist <all|names|Host List Name>
Description
Displays the members of a host list.
SecureLinx SLC User Guide
234
IP Filter Commands
set ipfilter state
Syntax
set ipfilter state
Description
Enables or disables IP filtering for incoming network traffic.
set ipfilter mapping
Syntax
set ipfilter mapping <parameters>
Parameters
ethernet <1|2> state <disable>
ethernet <1|2> state <enable> ruleset <Ruleset Name>
deviceport <1..48> state <disable>
deviceport <1..48> state <enable> ruleset <Ruleset Name>
pccardslot <upper|lower> state <disable>
pccardslot <upper|lower> state <enable> ruleset <Ruleset Name>
Description
Maps an IP filter to an interface.
set ip filter rules
Syntax
set ipfilter rules <parameters>
Parameters
add <Ruleset Name>
delete <Ruleset Name>
edit <Ruleset Name> <Edit Parameters>
Edit Parameters:
append
insert <Rule Number>
replace <Rule Number>
delete <Rule Number>
Description
Sets IP filter rules.
SecureLinx SLC User Guide
235
14: Command Reference
Logging Commands
set deviceport port
Syntax
set deviceport port <Device Port List or Name> <one or more deviceport
parameters>
Parameters
emaildelay <Email Delay>
emaillogging <disable|bytecnt|charstr>
emailrestart <Restart Delay>
emailsend <email|trap|both>
emailstring <Regex String>
emailsubj <Email Subject>
emailthreshold <Byte Threshold>
emailto <Email Address>
filedir <Logging Directory>
filelogging <enable|disable>
filemaxfiles <Max # of Files>
filemaxsize <Max Size of Files>
locallogging <enable|disable>
name <Device Port Name>
nfsdir <Logging Directory>
nfslogging <enable|disable>
nfsmaxfiles <Max # of Files>
nfsmaxsize <Size in Bytes>
pccardlogging <enable|disable>
pccardmaxfiles <Max # of Files>
pccardmaxsize <Size in Bytes>
pccardslot <upper|lower>
sysloglogging <enable|disable>
Description
Configures logging settings for one or more device ports.
Local logging must be enabled for a device port for the locallog commands to be executed. To
use the set locallog clear command, the user must have permission to clear port buffers
(see 11: User Authentication).
Example
set deviceport port 2-5,6,12,15-16 baud 2400 locallogging enable
SecureLinx SLC User Guide
236
14: Command Reference
show locallog
Syntax
show locallog <Device Port # or Name> [bytes <Bytes To Display>]
Description
Displays a specific number of bytes of data for a device port. 1K is the default.
set locallog clear
Syntax
set locallog clear <Device Port # or Name>
Description
Clears the local log for a device port.
The locallog commands can only be executed for a device port if local logging is enabled for
the port. The set locallog clear command can only be executed if the user has permission
to clear port buffers (see 11: User Authentication).
Network Commands
set network
Syntax
set network <parameters>
Parameters
interval <1-99999 Seconds>
ipforwarding <enable|disable>
probes <Number of Probes>
startprobes <1-99999 Seconds>
Description
Sets TCP Keepalive and IP Forwarding network parameters.
set network dns
Syntax
set network dns <1|2|3> ipaddr <IP Address>
Description
Configures up to three DNS servers.
set network gateway
Syntax
set network gateway <parameters>
Parameters
default <IP Address>
precedence <dhcp|gprs|default>
SecureLinx SLC User Guide
237
14: Command Reference
alternate <IP Address>
pingip <IP Address>
ethport <1 or 2>
pingdelay <1-250 seconds>
failedpings <1-250>
Description
Sets default and alternate gateways. The alternate gateway is used if an IP address usually
accessible through the default gateway fails to return one or more pings.
set network host
Syntax
set network host <Hostname> [domain <Domain Name>]
Description
Sets the SLC host name and domain name.
set network port
Syntax
set network port <1|2> <parameters>
Parameters
mode <auto|10mbit-half|100mbit-half|10mbit-full|100mbit-full>
state <dhcp|bootp|static|disable>
[ipaddr <IP Address> mask <Mask>]
[ipv6addr <IP v6 Address/Prefix>]
Description
Configures Ethernet port 1 or 2.
show network dns
Syntax
show network dns
Description
Displays DNS settings.
show network gateway
Syntax
show network gateway
Description
Displays gateway settings.
show network host
Syntax
show network host
SecureLinx SLC User Guide
238
14: Command Reference
Description
Displays the network host name of the SLC.
show network port
Syntax
show network port <1|2>
Description
Displays Ethernet port settings and counters.
show network all
Syntax
show network all
Description
Displays all network settings.
NFS and SMB/CIFS Commands
set nfs mount
Syntax
set nfs mount <one or more parameters>
Parameters
locdir <Directory>
mount <enable|disable>
remdir <Remote NFS Directory>
rw <enable|disable>
Enables or disables read/write access to remote directory.
Description
Mounts a remote NFS share.
The remdir and locdir parameters are required, but if they have been specified previously,
you do not need to provide them again.
set nfs unmount
Syntax
set nfs unmount <1|2|3>
Description
Unmounts a remote NFS share.
set cifs
Syntax
set cifs <one or more parameters>
SecureLinx SLC User Guide
239
14: Command Reference
Parameters
eth1 <enable|disable>
eth2 <enable|disable>
state <enable|disable>
workgroup <Windows workgroup>
Description
Configures the SMB/CIFS share, which contains the system and device port logs.
Note: The admin config command saves SLC configurations on the SMB/CIFS share.
set cifs password
Syntax
set cifs password
Description
Changes the password for the SMB/CIFS share login (default is cifsuser).
show cifs
Syntax
show cifs
Description
Displays SMB/CIFS settings.
show nfs
Syntax
show nfs
Description
Displays NFS share settings.
PC Card Commands
PC Card Storage Commands
pccard storage copy
Syntax
pccard storage copy <upper|lower> file <Filename> newfile <New Filename>
Description
Copies a file on a Compact Flash card.
SecureLinx SLC User Guide
240
14: Command Reference
pccard storage delete
Syntax
pccard storage delete <upper|lower> file <Current Filename>
Description
Removes a file on a Compact Flash card.
pccard storage dir
Syntax
pccard storage dir <upper|lower>
Description
Views a directory listing of a Compact Flash card.
pccard storage format
Syntax
pccard storage format <upper|lower> [filesystem <ext2|fat>]
Description
Formats a Compact Flash card.
pccard storage mount
Syntax
pccard storage mount <upper|lower>
Description
Mounts a Compact Flash card in the SLC for use as a storage device. The Compact Flash card
must be formatted with an ext2 or FAT file system before you mount it.
pccard storage rename
Syntax
pccard storage rename <upper|lower> file <Filename> newfile <New
Filename>
Description
To rename a file on a Compact Flash card.
pccard storage unmount
Syntax
pccard storage unmount <upper|lower>
Description
Unmounts a Compact Flash card. Enter this command before ejecting the card.
SecureLinx SLC User Guide
241
14: Command Reference
PC Card Modem Commands
pccard modem
Syntax
pccard modem <upper|lower> <parameters>
Parameters
auth <pap|chap>
baud <300-115200>
9600 is the default.
calleridcmd <Modem Command String>
calleridlogging <enable| disable>
chaphost <CHAP Host or User Password>
chapsecret <CHAP Secret or User Password>
databits <7|8>
dialbacknumber <usernumber|Phone Number>
dialinlist <Host List for Dial-in>
dialoutlogin <User Login>
dialoutnumber <Phone Number>
dodauth <pap|chap>
dodchaphost <CHAP Host or User Name>
dodchapsecret <CHAP Secret or User Password>
dialoutpassword <Password>
flowcontrol <none|xon/xoff|rts|cts>
gsmautodns <enable|disable>
gsmbearerservice <GSM Bearer Service>
gsmcompression <enable|disable>
gsmcontext <GPRS Context Id>
gsmdialoutmode <gprs|gsm>
gsmpin <GSM/GPRS PIN Number>
idletimeout <disable|1-9999 seconds>
initscript <Initialization Script>
isdnchannel <1|2>
isdnnumber <Phone Number>
localipaddr <negotiate|IP Address>
modemmode <text|ppp>
modemstate <disable|dialout|dialin|dialback|dialondemand|
dialin+dialondemand> <dialinhostlist>
modemtimeout <disable|1-9999 sec>
parity <none|odd|even>
remoteipaddr <negotiate|IP Address>
restartdelay <PPP Restart Delay>
SecureLinx SLC User Guide
242
14: Command Reference
service <none|telnet|ssh|tcp>
sshauth <enable|disable>
sshport <TCP Port>
stopbits <1|2>
tcpauth <enable|disable>
tcpport <TCP Port>
telnetauth <enable|disable>
telnetport <TCP Port>
timeoutlogins <disable|1-30>
Description
Configures a currently loaded PC Card.
Routing Commands
set routing
Syntax
set routing [parameters]
Parameters
rip <enable|disable>
route <1-64> ipaddr <IP Address> mask <Netmask> gateway <IP Address>
static <enable|disable>
version <1|2|both>
Description
Configures static or dynamic routing.
To delete a static route, set the IP address, mask, and gateway parameters to 0.0.0.0.
show routing
Syntax
show routing [resolveip <enable|disable>] [email <Email Address>]
Description
Sets the routing table to display IP addresses (disable) or the corresponding host names
(enable). You can optionally email the displayed information.
Services Commands
set services
Syntax
set services <one or more services parameters>
Parameters
alarmdelay <1-6000 Seconds>
SecureLinx SLC User Guide
243
14: Command Reference
auditlog <enable|disable>
auditsize <Size in Kbytes>
Limit is 1-500 Kbytes
authlog <off|error|warning|info|debug>
clicommands <enable|disable>
contact <Admin contact info>
devlog <off|error|warning|info|debug>
diaglog <off|error|warning|info|debug>
genlog <off|error|warning|info|debug>
includesyslog <enable|disable>
location <Physical Location>
netlog <off|error|warning|info|debug>
nms <IP Address or Name>
phonehome <enable|disable>
phoneip <IP Address>
portssh <TCP Port>
rocommunity <Read-Only Community Name>
rwcommunity <Read-Write Community Name>
Sets a password for an SNMP manager to access the read-only data the SLC SNMP agent
provides and to modify data where permitted.
servlog <off|error|warning|info|debug>
smtpserver <IP Address or Hostname>
snmp <enable|disable>
ssh <enable|disable>
syslogserver1 <IP Address or Name>
syslogserver2 <IP Address or Name>
telnet <enable|disable>
timeoutssh <disable or 1-30>
timeouttelnet <disable or 1-30>
traps <enable|disable>
trapcommunity <Trap Community>
v1ssh <enable|disable>
v3password <Password for v3 auth>
v3user <User for v3 auth>
v3user <V3 RO User>
v3password <V3 RO User Password>
v3phrase <V3 RO User Passphrase>
v3rwuser <V3 RW User>
v3rwpassword <V3 RW User Password>
v3rwphrase <V3 RW User Passphrase>
v3security <noauth|auth|authencrypt>
SecureLinx SLC User Guide
244
14: Command Reference
v3auth <md5|sha>
v3encrypt <des|aes>
webssh <enable|disable
webtelnet <enable|disable>
Description
Configures services (system logging, SSH and Telnet access, SSH and Telnet timeout, SNMP
agent, email (SMTP) server, and audit log):
show services
Syntax
show services
Description
Displays current services.
SLC Network Commands
set slcnetwork
Syntax
set slcnetwork <one or more parameters>
Parameters
add <IP Address>
delete <IP Address>
search <localsubnet|ipaddrlist|both>
Description
Detects and displays all SLC or user-defined IP addresses on the local network.
show slcnetwork
Syntax
show slcnetwork[ipaddrlist <all|Address Mask>]
Description
Detects and displays all SLCs on the local network.
Without the ipaddrlist parameter, the command searches the SLC network. With the
ipaddrliist parameter, the command displays a sorted list of all IP addresses or displays the
IP addresses that match the mask (for example, 172.19.255.255 would display all IP addresses
that start with 172.19).
SecureLinx SLC User Guide
245
14: Command Reference
SSH Key Commands
set sshkey allexport
Syntax
set sshkey allexport <ftp|scp|copypaste> [pubfile <Public Key File>]
[host <IP Address or Name>] [login <User Login>] [path <Path to Copy
Keys>]
Parameter
Exports the public keys of all previously created SSH keys.
set sshkey delete
Syntax
set sshkey delete <one or more parameters>
Parameters
keyhost <SSH Key Host>
keyname <SSH Key Name>
keyuser <SSH Key User>
Description
Deletes an ssh key.
Specify the keyuser and keyhost to delete an imported key; specify the keyuser and
keyname to delete exported key.
set sshkey export
Syntax
set sshkey export <ftp|scp|copypaste> <one or more parameters>
Parameters
[format <openssh|secsh>]
[host <IP Address or Name>]
[login <User Login>]
[path <Path to Copy Key>]
bits <512|1024>
keyname <SSH Key Name>
keyuser <SSH Key User>
type <rsa|dsa>
Description
Exports an sshkey.
set sshkey import
set sshkey import <ftp|scp> <one or more parameters>
Parameters
[keyhost <SSH Key IP Address or Name>]
SecureLinx SLC User Guide
246
14: Command Reference
[keyuser <SSH Key User>]
[path <Path to Public Key File>]
file <Public Key File>
host <IP Address or Name>
login <User Login>
Description
Imports an SSH key.
set sshkey server import
Syntax
set sshkey server import type <rsa1|rsa|dsa> via <sftp|scp>
pubfile <Public Key File> privfile <Private Key File>
host <IP Address or Name> login <User Login> [path <Path to Key
File>]
Description
Imports an SLC host key.
set sshkey server reset
Syntax
set sshkey server reset [type <all|rsa1|rsa|dsa>]
Description
Resets defaults for all or selected host keys.
show sshkey export
Syntax
show sshkey export <one or more parameters>
Parameters
[keyhost <SSH Key IP Address or Name>]
[keyuser <SSH Key User>]
[viewkey <enable|disable>]
Description
Displays all exported keys or keys for a specific user, IP address, or name.
show sshkey import
Syntax
show sshkey import <one or more parameters>]
Parameters
[keyhost <SSH Key IP Address or Name>]
[keyuser <SSH Key User>]
SecureLinx SLC User Guide
247
14: Command Reference
[viewkey <enable|disable>]
Description
Displays all keys that have been imported or keys for a specific user, IP address, or name.
show sshkey server
Syntax
show sshkey server [type <all|rsa1|rsa|dsa>]
Description
Displays host keys (public key only).
Status Commands
show connections
Syntax
show connections [email <Email Address>]
Description
Displays a list of current connections. Optionally emails the displayed information. The connection
IDs are in the left column of the resulting table. The connection ID associated with a particular
connection may change if the connection times out and is restarted.
show connections connid
Syntax
show connections connid <Connection ID> [email <Email Address>].
Description
Provides details, for example, endpoint parameters and trigger, for a specific connection.
Optionally emails the displayed information.
Note: Use the basic show connections command to obtain the Connection ID.
show portcounters
Syntax
show portcounters [deviceport <Device Port List or Name>] [email <Email
Address>]
Description
Generates a report for one or more ports. Optionally emails the displayed information.
show portstatus
Syntax
show portstatus [deviceport <Device Port List or Name>] [email <Email
Address>]
SecureLinx SLC User Guide
248
14: Command Reference
Description
Displays device port modes and states for one or more ports. Optionally emails the displayed
information.
show sysconfig
Syntax
show sysconfig [display <basic|auth|devices>] [email <Email Address]
Description
Displays a snapshot of all configurable parameters. Optionally emails the displayed information.
show sysstatus
Syntax
show sysstatus [email <Email Address>]
Description
To display the overall status of all SLC devices. Optionally emails the displayed information.
System Log Commands
show syslog
Syntax
show syslog [<parameters>]
Parameters
[email <Email Address>]
level <error|warning|info|debug>
log <all|netlog|servlog|authlog|devlog|diaglog|genlog>
display <head|tail> [numlines <Number of Lines>]
starttime <MMDDYYhhmm[ss]>
endtime <MMDDYYhhmm[ss]>
Description
Displays the system logs containing information and error messages.
Note: the level and display parameters cannot be used simultaneously.
show syslog clear
Syntax
show syslog clear <all|netlog|servlog|authlog|devlog|diaglog|genlog>
Description
Clears one or all of the system logs.
SecureLinx SLC User Guide
249
A: Bootloader
The SLM provides a bootload command interface. This interface is only accessible
through the SLC’s console port.
Accessing the Bootloader
To access the bootloader CLI:
1. Power up the SLC.
2. Type x15 within 10 seconds of power up. The bootloader halts the boot procedure
and displays a Lantronix command prompt.
Bootloader Commands
User Commands
help
Lists and prints the command list and online help.
?
An alias for help.
boot
Boot default (runs bootcmd).
bootcheck
Checks boot bank information.
bootinfo
Displays boot bank information.
bootsel 1|2
Selects boot bank 1 or boot bank 2.
IDE
Accesses the IDE sub-system.
SecureLinx SLC User Guide
250
A: Bootloader
mtest
Performs a simple test of the RAM.
showconf
Displays hardware configuration.
su cust|admin
Switches to another user: from cust (customer) to adm (administrator) and vice versa.
version
Prints the bootloader version.
whoami
Displays information about the current user.
Administrator Commands
In addition to the commands that the user can issue, the administrator can issue the
following commands:
imagecopy
Copies an image of the drive from the lower PCMCIA device to the internal CF card.
passwd
Provides a new password for user admin. The default password for user admin is
admin. User cust does not have a password.
ping
Sends a ping request to the network host.
printeny
Prints bootloader variables.
setenv
Sets environment variables.
showconf
Displays hardware configuration parameters.
SecureLinx SLC User Guide
251
B: Security Considerations
The SLC provides data path security by means of SSH or Web/SSL. Even with the use of
SSH/SSL, however, do not assume you have complete security. Securing the data path
is only one measure needed to ensure security. This appendix briefly discusses some
important security considerations.
Security Practice
Develop and document a Security Practice. The Security Practice should state:
The dos and don’ts of maintaining security. For example, the power of SSH and
SSL is compromised if users leave sessions open or advertise their password.
The assumptions that users can make about the facility and network
infrastructure, for example, how vulnerable the CAT 5 wiring is to tapping.
Factors Affecting Security
External factors affect the security provided by the SLC, for example:
Telnet sends the login exchange as clear text across Ethernet. A person
snooping on a subnet may read your password.
A terminal to the SLC may be secure, but the path from the SLC to the end
device may not be secure.
With the right tools, a person having physical access to open the SLC may be
able to read the encryption keys.
There is no true test for a denial-of-service attack—there is always a legitimate
scenario for a request storm. A denial-of-service filter locks out some highperformance automated/scripted requests. The SLC will attempt to service all
requests and will not filter out potential denial–of-service attacks.
SecureLinx SLC User Guide
252
C: Safety Information
Safety Precautions
Please follow the safety precautions described below when installing and operating the
SLC.
Cover
Do not remove the cover of the chassis. There are no user-serviceable parts
inside. Opening or removing the cover may expose you to dangerous voltage
that could cause fire or electric shock.
Refer all servicing to Lantronix.
Power Plug
When disconnecting the power cable from the socket, pull on the plug, not the
cord.
Always connect the power cord to a properly wired and grounded power source.
Do not use adapter plugs or remove the grounding prong from the cord.
Only use a power cord with a voltage and current rating greater than the voltage
and current rating marked on the unit.
Install the unit near an AC outlet that is easily accessible.
Always connect any equipment used with the product to properly wired and
grounded power sources.
To help protect the product from sudden, transient increases and decreases in
electrical power, use a surge suppressor, line conditioner, or uninterruptible
power supply (UPS).
Do not connect or disconnect this product during an electrical storm.
Input Supply
This unit may have more than one power supply source. Disconnect all power
supply sources before servicing to avoid electric shock.
Check nameplate ratings to assure there is no overloading of supply circuits that
could affect over current protection and supply wiring.
Grounding
Maintain reliable grounding of this product.
Pay particular attention to supply connections when connecting to power strips,
rather than directly to the branch circuit.
Install DC-rated equipment only under the following conditions:
− Connect the equipment to a DC supply source that is electrically isolated from the
AC source and reliably connected to ground, or connect it to a DC (SELV) source.
SecureLinx SLC User Guide
253
C: Safety Information
− Install only in restricted access areas (dedicated equipment rooms, equipment
closets or the like) in accordance with Articles 110-16,
110-17, and 110-18 of the National Electrical Code, ANSI/NFPA 70.
− Route and secure input wiring to terminal block in such a manner that it is
protected from damage and stress. Do not route wiring past sharp edges or
moving parts.
− Incorporate a readily accessible disconnect device, with a 3 mm minimum contact
gap, in the fixed wiring.
− Provide a listed circuit breaker suitable for protection of the branch circuit wiring
and rated 60 VDC minimum.
Fuses
For protection against fire, replace the power-input-module fuse with the same
type and rating.
Rack
If rack mounted units are installed in a closed or multi-unit rack assembly, they may
require further evaluation by Certification Agencies. The following items must be
considered:
Do not install the unit in a rack in such a way that a hazardous stability condition
results because of uneven loading. A drop or fall could cause injury.
The ambient temperature (Tma) inside the rack may be greater than the room
ambient temperature. Make sure to install the SLC in an environment with an
ambient temperature less than the maximum operating temperature of the SLC.
(See Technical Specifications on page 20.)
Install the equipment in a rack in such a way that the amount of airflow required
for safe operation of the equipment is not compromised.
Mount the equipment in the rack so that a hazardous condition is not achieved
due to uneven mechanical loading.
Maintain reliable earthing of rack-mounted equipment. Give particular attention to
supply connections other than direct connections to the branch circuit (e.g. use of
power strips).
Before operating the SLC, make sure the SLC is secured to the rack.
Port Connections
Only connect the network port to an Ethernet network that supports 10BaseT/100Base-T.
Only connect device ports to equipment with serial ports that support EIA-232
(formerly RS-232C).
Only connect the console port to equipment with serial ports that support EIA-232
(formerly RS-232C).
SecureLinx SLC User Guide
254
D: Adapters and Pinouts
The serial device ports of the SLC products match the RJ45 pinouts of the console ports
of many popular devices found in a network environment. The SLC uses conventional
straight-through Category 5 fully pinned network cables for all connections when used
with Lantronix adapters. The cables are available in various lengths.
In most cases, you will need an adapter for your serial devices. Lantronix offers a variety
of RJ45-to-serial connector adapters for many devices. These adapters convert the RJ45
connection on the SLC to a 9-pin or 25-pin serial connector found on other
manufacturers' serial devices or re-route the serial signals for connections to other
devices that use RJ45 serial connectors.
Please check the cabling database on the Lantronix website at http://www.lantronix.com
for suggested cables and adapters for commonly used serial devices.
The console port is wired the same way as the device ports and has the same signal
options.
Note: You can view or change the console port settings using the LCDs and
pushbuttons on the front panel, the Console Port web page, or the command line
interface show console port and set consoleport commands.
The adapters illustrated below are compatible with the Lantronix SLC models.
SecureLinx SLC User Guide
255
C: Adapters and Pinouts
RJ45 Receptacle to DB25M DCE Adapter for the SLC (PN 200.2066A)
Pin 1
1
RJ45
RTS 1
DB25 Male
5
8
DTR 2
6
Tx 3
3
Gnd 4
7
Gnd 5
Rx 6
2
DSR 7
20
CTS 8
4
Use PN 200.2066A adapter with a dumb terminal or with many SUN applications.
SecureLinx SLC User Guide
256
C: Adapters and Pinouts
RJ45 Receptacle to DB25F DCE Adapter for the SLC (PN 200.2067A)
Pin 1
1
RJ45
RTS 1
DB25 Female
5
8
DTR 2
6
Tx 3
3
7
Gnd 5
Rx 6
2
DSR 7
20
CTS 8
4
SecureLinx SLC User Guide
257
C: Adapters and Pinouts
RJ45 Receptacle to DB9M DCE Adapter for the SLC (PN 200.2069A)
Pin 1
1
RJ45
RTS 1
DB9 Male
8
1
DTR 2
6
Tx 3
2
Gnd 4
5
Gnd 5
Rx 6
3
DSR 7
4
CTS 8
7
SecureLinx SLC User Guide
258
C: Adapters and Pinouts
RJ45 Receptacle to DB9F DCE Adapter for the SLC (PN 200.2070A)
Pin 1
1
RJ45
RTS 1 1
DB9 Female
8
1
DTR 22
6
3
Tx 3
2
Gnd 44
5
Gnd 55
Rx 66
3
DSR 77
4
CTS 88
7
Use PN 200.2070A adapter with a PC's serial port.
SecureLinx SLC User Guide
259
C: Adapters and Pinouts
RJ45 to RJ45 Adapter for Netra/Sun/Cisco and SLP (PNs 200.2225 and ADP010104-01)
Note: The cable ends of the ADP010104-01 are an RJ45 socket on one end and a
RJ45 plug on the other instead of RJ45 sockets on both ends.
RTS 1
DTR 2
Tx 3
Gnd 4
Gnd 5
Rx 6
DSR 7
CTS 8
Use this adapter for SLP Remote Power Manager, Netra/SUN/CISCO, and others.
SecureLinx SLC User Guide
260
E: Protocol Glossary
BOOTP (Bootstrap Protocol)
Similar to DHCP, but for smaller networks. Automatically assigns the IP address for a
specific duration of time.
CHAP (Challenge Handshake Authentication Protocol)
A secure protocol for connecting to a system; it is more secure than the PAP.
DHCP (Dynamic Host Configuration Protocol)
Internet protocol for automating the configuration of computers that use TCP/IP.
DNS (Domain Name Servers): A system that allows a network nameserver to translate
text host names into numeric IP addresses.
Kerberos
A network authentication protocol that provides strong authentication for client/server
applications by using secret-key cryptography.
LDAP (Lightweight Directory Access Protocol)
A protocol for accessing directory information.
NAT (Network Address Translation)
An Internet standard that enables a LAN to use one set of IP addresses for internal traffic
and a second set of addresses for external traffic. This enables a company to shield
internal addresses from the public Internet.
NFS (Network File System)
A protocol that allows file sharing across a network. Users can view, store, and update
files on a remote computer. You can use NFS to mount all or a portion of a file system.
Users can access the portion mounted with the same privileges as the user’s access to
each file.
NIS (Network Information System)
System developed by Sun Microsystems for distributing system data such as user and
host names among computers on a network.
SecureLinx SLC User Guide
261
E: Protocol Glossary
NMS (Network Management System)
NMS acts as a central server, requesting and receiving SNMP-type information from any
computer using SNMP.
NTP (Network Time Protocol)
A protocol used to synchronize time on networked computers and equipment.
PAP (Password Authentication Protocol)
A method of user authentication in which the username and password are transmitted
over a network and compared to a table of name-password pairs.
PPP (Point-to-Point Protocol)
A protocol for creating and running IP and other network protocols over a serial link.
RADIUS (Remote Authentication Dial-In User Service)
An authentication and accounting protocol. Enables remote access servers to
communicate with a central server to authenticate dial-in users and their access
permissions. A company stores user profiles in a central database that all remote servers
can share.
SMB/CIFS
(Server Message Block/Common Internet File System): Microsoft’s protocol for allowing
all applications as well as Web browsers to share files across the Internet. CIFS runs on
TCP/IP and uses the SMB protocol in Microsoft Windows for accessing files. With CIFS,
users with different platforms and computers can share files without having to install new
software.
SNMP (Simple Network Management Protocol)
A protocol that system administrators use to monitor networks and connected devices
and to respond to queries from other network hosts.
SMTP (Simple Mail Transfer Protocol)
TCP/IP protocol for sending email between servers.
SSL (Secure Sockets Layer)
A protocol that provides authentication and encryption services between a web server
and a web browser.
SSH (Secure Shell)
A secure transport protocol based on public-key cryptography.
SecureLinx SLC User Guide
262
E: Protocol Glossary
TACACS+ (Terminal Access Controller Access Control System)
A method of authentication used in UNIX networks. It allows a remote access server to
communicate with an authentication server to determine whether the user has access to
the network.
Telnet
A terminal protocol that provides an easy-to-use method of creating terminal connections
to a network host.
SecureLinx SLC User Guide
263
F: Compliance Information
(according to ISO/IEC Guide 22 and EN 45014)
Manufacturer’s Name & Address:
Lantronix Inc., 15353 Barranca Parkway, Irvine, CA 92618 USA
Declares that the following product:
Product Name(s): Models SLC8, SLC16, SLC32, and SLC48 SecureLinx Console
Managers
Conform to the following standards or other normative documents:
Safety: EN60950:1992+A1, A2, A3, A4, A11
Electromagnetic Emissions:
EN55022: 1994 (IEC/CSPIR22: 1993)
FCC Part 15, Subpart B, Class B
IEC 1000-3-2/A14: 2000
IEC 1000-3-3: 1994
Electromagnetic Immunity:
EN55024: 1998 Information Technology Equipment-Immunity Characteristics
IEC61000-4-2: 1995 Electro-Static Discharge Test
IEC61000-4-3: 1996 Radiated Immunity Field Test
IEC61000-4-4: 1995 Electrical Fast Transient Test
IEC61000-4-5: 1995 Power Supply Surge Test
IEC61000-4-6: 1996 Conducted Immunity Test
IEC61000-4-8: 1993 Magnetic Field Test
IEC61000-4-11: 1994 Voltage Dips & Interrupts Test
Supplementary Information:
This Class A digital apparatus complies with Canadian ICES-003 (CSA) and has been
verified as being compliant within the Class A limits of the FCC Radio Frequency Device
Rules (FCC Title 47, Part 15, Subpart B CLASS A), measured to CISPR 22: 1993 limits
and methods of measurement of Radio Disturbance Characteristics of Information
Technology Equipment. The product complies with the requirements of the Low Voltage
Directive 72/23/EEC and the EMC Directive 89/336/EEC.
SecureLinx SLC User Guide
264
E: Compliance Information
Additional Agency Approvals and Certifications:
VCCI
TUV
GS Mark
UL/CUL
C-Tick
CB Scheme
NIST-certified implementation of AES as specified by FIPS 197
This product carries the CE mark since it has been tested and found compliant with the
following standards:
Safety:
Emissions:
Immunity:
EN 60950
EN 55022 Class A
EN 55024
RoHS Notice:
All Lantronix products in the following families are China RoHS-compliant and free of the following hazardous
substances and elements:
•
Lead (Pb)
•
Mercury (Hg)
•
Polybrominated biphenyls (PBB)
•
Cadmium (Cd)
•
Hexavalent Chromium (Cr (VI))
•
Polybrominated diphenyl ethers (PBDE)
•
Product Family Name
UDS1100 and 2100
EDS
MSS100
IntelliBox
XPress DR & XPress-DR+
SecureBox 1101
WiBox
UBox
MatchPort
SLC
XPort
WiPort
SLB
SLP
SCS
SLS
Toxic or hazardous Substances and Elements
Lead
Mercury
Cadmium
Hexavalent
(Pb)
(Hg)
(Cd)
Chromium
(Cr (VI))
0
0
0
0
0
0
0
0
0
0
0
0
0
0
0
0
0
0
0
0
0
0
0
0
0
0
0
0
0
0
0
0
0
0
0
0
0
0
0
0
0
0
0
0
0
0
0
0
0
0
0
0
0
0
0
0
0
0
0
0
0
0
0
0
Polybrominated
biphenyls (PBB)
Polybrominated diphenyl
ethers (PBDE)
0
0
0
0
0
0
0
0
0
0
0
0
0
0
0
0
0
0
0
0
0
0
0
0
0
0
0
0
0
0
0
0
O: toxic or hazardous substance contained in all of the homogeneous materials for this part is below the limit requirement in SJ/T11363-2006.
X: toxic or hazardous substance contained in at least one of the homogeneous materials used for this part is above the limit requirement in SJ/T11363-2006.
Manufacturer’s Contact:
Director of Quality Assurance, Lantronix Inc.
15353 Barranca Parkway, Irvine, CA 92618 USA
Phone: 949-453-3990
Fax: 949-453-3995
SecureLinx SLC User Guide
265
G: Warranty
Lantronix warrants each Lantronix product to be free from defects in material and
workmanship for a period of TWO YEARS after the date of shipment. During this
period, if a customer is unable to resolve a product problem and Lantronix Technical
Support determines the product is defective, a Return Material Authorization (RMA)
will be issued. Following receipt of an RMA number, the customer shall return the
product to Lantronix, freight prepaid. Upon verification of warranty, Lantronix will -- at
its option -- repair or replace the product and return it to the customer freight prepaid.
If the product is not under warranty, the customer may have Lantronix repair the unit
on a fee basis or return it. No services are handled at the customer's site under this
warranty. This warranty is voided if the customer uses the product in an unauthorized
or improper way, or in an environment for which it was not designed.
Lantronix warrants the media containing its software product to be free from defects
and warrants that the software will operate substantially according to Lantronix
specifications for a period of 60 DAYS after the date of shipment. The customer will
ship defective media to Lantronix. Lantronix will ship the replacement media to the
customer.
*
*
*
*
In no event will Lantronix be responsible to the user in contract, in tort (including
negligence), strict liability or otherwise for any special, indirect, incidental or
consequential damage or loss of equipment, plant or power system, cost of capital,
loss of profits or revenues, cost of replacement power, additional expenses in the use
of existing software, hardware, equipment or facilities, or claims against the user by
its employees or customers resulting from the use of the information,
recommendations, descriptions and safety notations supplied by Lantronix. Lantronix
liability is limited (at its election) to:
Refund of buyer's purchase price for such affected products (without interest)
Repair or replacement of such products, provided that the buyer follows the
above procedures.
There are no understandings, agreements, representations or warranties, express or
implied, including warranties of merchantability or fitness for a particular purpose,
other than those specifically set out above or by any existing contract between the
parties. Any such contract states the entire obligation of Lantronix. The contents of
this document shall not become part of or modify any prior or existing agreement,
commitment, or relationship.
For details on the Lantronix warranty replacement policy, please go to our web site at
http://www.lantronix.com/support/warranty/index.html
SecureLinx SLC User Guide
266