1
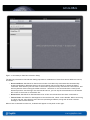
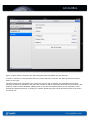
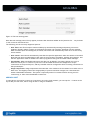
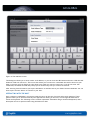
GO-GLOBAL FOR IPAD
USER’S GUIDE
GO-Global for iPad allows GO-Global customers to connect to their GO-Global hosts from the Apple iPad, with an
emphasis of maintaining a high degree of usability for Windows applica&ons accessed remotely through the iPad.
This document describes how to install and use GO-Global for iPad.
SYSTEM REQUIREMENTS
The following are the system requirements for GO-Global for iPad:
• Apple iPad or iPad 2 (both WiFi and 3G models supported). Note that for the beta program, only iPads
registered with GraphOn will be able to run GO-Global for iPad. If you haven’t provided your iPad’s
device ID to GraphOn support, you will not be able to install the client.
• A PC or Mac computer running iTunes 10.x or later is required in order to install the application on the
iPad.
INSTALLING
The following are the instructions for installing GO-Global for iPad:
1. From a PC or Mac that is connected to the iPad over USB, download the following two files: ggclient.ios.ipa, and Beta_Provisioning_Profile.mobileprovision.
2. Launch iTunes.
3. Drag and drop the two files you downloaded into iTunes.
4. Make sure your iPad is connected to the computer, and select it in the DEVICES section on the left-hand
pane in iTunes.
5. Click on the Apps tab across the top.
6. Make sure the Sync Apps checkbox is checked.
7. Make sure the GO-Global checkbox is checked.
8. Click on the Sync button in the lower right-hand corner of iTunes.
9. You should now see the GO-Global icon on your iPad’s home screen. Notice that if your iPad has a large
number of installed applications, the icon might not appear in the current page and you might need to
swipe left or right until you locate the GO-Global icon.
USING GO-GLOBAL FOR IPAD
When you first launch GO-Global for iPad, you will be presented with the host selection dialog, which allows you
to select a host to connect to.
Figure 1: GO-Global for iPad host selection dialog.
The host list presented in the selection dialog represents a combination of hosts from several different sources,
as follows:
• Discovered Hosts: GO-Global for iPad client includes a host discovery mechanism that automatically
locates GO-Global for Windows hosts on the local network (the current subnet) to which the iPad is
connected. Host discovery will not work in cases where your iPad is only connected to a 3G network, and
will only discover hosts running GO-Global version 4.1 and later. In case new hosts have recently been
booted-up and are not showing in the discovered host list, you can tap the refresh button on the bottom
left corner of the screen to refresh the list.
• Recent hosts: GO-Global for iPad maintains a list of the recent hosts that have been connected to.
• Favorite hosts: GO-Global for iPad supports a favorite hosts list, which is user editable. When connecting
to a host, the user may choose to store the host (including its address, along with all other relevant
settings) in the favorite hosts list.
When a host is selected from the list, its details will appear in the panel on the right.
Figure 2: When a host is selected, the right side panel shows a detailed view for that host.
In order to connect to a host you must select it from the host list on the left, and then tap the blue Connect
button on the right.
The detail panel shows information such as the host’s name, URL, IP address, and availability and network
latency information (if available). This panel also includes an Add to Favorites button that stores the host in GOGlobal for iPad’s favorites database. Adding a host to the favorites database allows you to customize certain
parameters regarding that host, including port number, default app that will be launched as soon as the host is
connected, etc.
Figure 3: The host settings pane.
Note that the settings pane will only appear for hosts that have been added to the favorites list -- not for hosts
in the recents or discovered lists.
The following are the currently supported options:
• Auto Zoom: Auto Zoom improve session usability by automatically zooming and panning into active
windows, thereby making it easier to tap buttons and other user-interface elements in those windows.
When a window (such as a dialog box) is closed, the session will automatically zoom out to fit the newly
active window.
• Auto Launch: Auto Launch automatically launches the specified application when the session is launched.
Note that the name provided must be the name of the program’s executable, without the extension, and
that the application must be added to the host’s program list using the GO-Global Cluster Manager.
• Port Number: While GO-Global sessions use the 491 port by default, this setting allows you to use a
different TCP/IP port to connect to your host. The GO-Global host must be configured to accept
connections on the specified port, and any firewalls must be configured to allow incoming connections on
the specified port.
• Image Compression: Image compression decreases the color resolution of the session from 16-bit color to
8-bit color. This slightly reduces the image quality of pictures and other images, but it decreases the
session’s bandwidth utilization. This option is especially useful for remote sessions running over 3G
connectivity, or other lower bandwidth connections.
ADDING A HOST
In cases where you need to connect to a host that’s not on the local network, you can tap the ‘+’ button on the
top to add your own host, either using its URL or using its IP address.
Figure 4: The Add Host screen.
This dialog box allows you to enter either an IP address, or you can click the URL button and enter a URL that GOGlobal for iPad will connect to. This screen also allows you to enter user credentials that will be stored on your
iPad, to prevent you from having to enter those every time you connect to the host. If you do not enter user
credentials, GO-Global for iPad will prompt you for those every time you connect to the host.
After entering host information you tap the Add button to add the host to your iPad’s favorites database. You can
then tap the Connect button to connect to your host.
INTERACTING WITH THE HOST
Once a session is established, you interact with the server by the use of several multi-touch gestures. These
gestures allow you to interact naturally with applications running on the host, even though the iPad lacks a
mouse and keyboard. The following are the common operations achievable using a mouse and keyboard, and a
description of how to perform them using GO-Global for iPad.
Understanding the Host Canvas
When you connect to a host using GO-Global for iPad, the image you see on the screen is essentially a canvas just
like any other canvas on the iPad, meaning that you can pinch in and out to zoom in and out of the image, and
drag your finger across the screen to pan to different areas of the image. This behavior is identical to what you’d
find in Safari, Photos, and many other iPad applications.
Clicking and Double-clicking
In order to click or double click a button or other user interface component from the host, you simply tap or
double-tap on the touchscreen. If the user interface component on the host is too small to hit accurately with
your finger, you can temporarily zoom into it by zooming in and then tapping it.
Right-clicking
In order to achieve a right mouse click, you perform a two-finger tap at the position where you’d like the rightclick to occur. The actual position of the right-click will be at the position of your left finger.
Figure 5: Right clicking by tapping two fingers on the screen.
Dragging
In order to drag the mouse over the application (for dragging windows, selecting text in a document, etc.), you
need to tap and hold at the area of the screen where you you’d like the drag operation to begin, and then begin
dragging your finger across the screen. At this point, an on-screen indicator will appear to indicate that a drag
operation is in progress. Note that you must hold your finger steady for brief moment before you begin dragging
it. If you don’t, GO-Global for iPad will simply pan the host image, and dragging will not occur.
Scrolling
In order to easily scroll through a document, you can drag two fingers vertically. Dragging upwards scrolls up,
while dragging downwards scrolls down. The further you go in each direction, the faster the scrolling will be.
Bringing up the Touch Keyboard
In order to type in an application, you must bring up the iPad’s touch-screen keyboard. This is accomplished in
several different ways. One option is to perform a three-finger tap anywhere on the screen (by simultaneously
putting three fingers anywhere on the screen and immediately releasing them). The keyboard can also be
dismissed in the exact same way.
Another option is to bring up the on-screen toolbar and simply use keyboard button on the toolbar (see the
following section regarding the On-Screen Toolbar).
Bringing up the On-Screen Toolbar
The on-screen toolbar exposes some options while the session is active. In order to expose it, you may press and
hold a single finger anywhere on the screen. This will bring up the toolbar for several seconds, until it will be
automatically hidden.
Figure 6: The on-screen toolbar.
If you’d like to pin the toolbar so it doesn’t automatically hide, you may tap the pushpin icon on the left. Tap it
again to unpin the keyboard so it automatically hides.
The following is a description of the other buttons available in the toolbar:
• Keyboard Toggle Button: Tapping the ‘A’ button toggles the touch-screen keyboard.
• Auto-Zoom Toggle Button: This button (indicated by a rectangle containing vertical and horizontal
arrows), toggles GO-Global for iPad’s auto-zoom feature. Tapping the auto-zoom button again disables this
feature and zooms out to show the entire screen.
• Done Button: The Done button closes the session and flips back to the main host list screen.
GRAPHON CORPORATION
Headquarters: 5400 Soquel Ave., A-2, Santa Cruz, CA, 95062 USA
Phone: 1.800.GRAPHON or 603.225.3525
Fax: 831.475.3017 • Email: [email protected]
European Office: United Kingdom
Phone: +44.1344.206549 • Fax: + 44.1344.206855