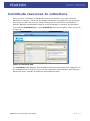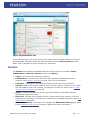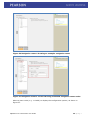
1
EQUELLA ® Contribution User Guide Version 6.2 Document History Document No. 1 Reviewed 8/12/2013 Finalised 10/12/2013 Published 10/12/2013 December 2013 edition. Information in this document may change without notice. EQUELLA ® and its accompanying documentation are furnished under a non-disclosure, evaluation agreement or licence agreement. Copying, storing, transmitting, or otherwise reproducing the software or this document in any form without written permission from Pearson is strictly forbidden. All products, other than EQUELLA®, named in this document are the property of their respective owners. Property of: Pearson Level 1, 11 Elizabeth Street Hobart, Australia, 7000 Copyright © 2013 Pearson Contact [email protected] for matters relating to documentation. EQUELLA 6.2 Contribution User Guide 2|Page Table of Contents Item contribution overview ............................................................................................... 5 EQUELLA Digital Repository ........................................................................................... 6 Contribute resources to collections ................................................................................. 7 Contribution wizards .................................................................................................. 8 Contribution wizard pages........................................................................................... 9 Contribute an example resource ................................................................................ 12 Accessing contributed resources ................................................................................ 22 Resource summary page .......................................................................................... 25 Details ................................................................................................................... 27 Actions ................................................................................................................... 33 Wizard controls reference ............................................................................................... 41 DRM ......................................................................................................................... 41 Navigation builder ...................................................................................................... 42 View content package .............................................................................................. 46 Attachments .............................................................................................................. 48 Upload a file............................................................................................................ 48 Upload zip files ........................................................................................................ 52 Upload QTI packages ............................................................................................... 53 EQUELLA Resource................................................................................................... 57 URL ....................................................................................................................... 59 Web pages .............................................................................................................. 61 Google Books .......................................................................................................... 62 Kaltura ................................................................................................................... 64 YouTube ................................................................................................................. 73 iTunes U ................................................................................................................. 75 Flickr...................................................................................................................... 76 External tool provider (LTI) ....................................................................................... 78 Edit attachments ..................................................................................................... 81 Calendar ................................................................................................................... 82 Check box group ........................................................................................................ 83 Edit box .................................................................................................................... 84 Email selector ............................................................................................................ 84 File manager .............................................................................................................. 86 Synchronise files ..................................................................................................... 88 HTML edit box ............................................................................................................ 89 List box ..................................................................................................................... 92 Radio button group ..................................................................................................... 92 EQUELLA 6.2 Contribution User Guide 3|Page Shuffle box ................................................................................................................ 93 Shuffle group ............................................................................................................. 93 Shuffle list ................................................................................................................. 94 Term selector ............................................................................................................. 94 Auto-complete edit box ............................................................................................ 95 Detailed Pop-up browser........................................................................................... 96 Wide Pop-up browser ............................................................................................... 98 User selector............................................................................................................ 101 Contact Client Support .............................................................................................. 103 EQUELLA 6.2 Contribution User Guide 4|Page Item contribution overview The EQUELLA Digital Repository allows users to search, discover, create, store, manage, view and share resources. An EQUELLA resource is a grouping of metadata (information) and digital content. Resources enter the EQUELLA repository by contribution using a wizard based web form. The process is shown in the flow chart in Figure 1. • Metadata is entered into contribution wizard Metadata Attachments & Links Create Resource • Digital content is attached or linked to contribution wizard • Resource created by completing contribution wizard Figure 1 Create resource process Resources are contributed to the repository using a customised contribution wizard. Each resource is stored in a Collection and each collection belongs to a Category. An example of the relationship between categories, collections, resources and attachments and/or links within the repository is shown in Figure 2. Metadata Resource Attachments (e.g. docs, pdfs etc.) Links (URL, YouTube, HTML pages, Google Books, ITunesU etc.) Collection Metadata Resource Category Attachments (e.g. docs, pdfs etc.) Links (URL, YouTube, HTML pages, Google Books, ITunesU etc.) Metadata Collection Resource Attachments (e.g. docs, pdfs etc.) Links (URL, YouTube, HTML pages, Google Books, ITunesU etc.) Figure 2 Relationships within the EQUELLA Digital Repository EQUELLA 6.2 Contribution User Guide 5|Page Contribution wizards are customised by adding different wizard controls that prompt users to input text, make selections, upload files, add links and various other actions. The purpose of this guide is to demonstrate to users how to contribute resources to EQUELLA using a contribution wizard. Users will also gain a broad overview of the wizard control types that can be used when contributing items. For further information see EQUELLA Collection Definitions Configuration Guide. Please note that this guide has been developed to best reflect the full capabilities of EQUELLA, and as such may differ in appearance to your own installation. Contact the system administrator for access to extra features or to reconfigure your installation. EQUELLA Digital Repository To access EQUELLA 1. Open a browser and enter your EQUELLA URL (e.g. http://equella.myinstitution.edu). 2. Log in to EQUELLA to display the EQUELLA Dashboard page. An example is shown in Figure 3. Figure 3 EQUELLA Dashboard page EQUELLA 6.2 Contribution User Guide 6|Page Contribute resources to collections Every resource contributed to EQUELLA is saved in a collection, and each collection belongs to a category. There may be multiple collections and categories, and privileges may be set so users will see only relevant categories and collections. See EQUELLA Security Manager Configuration Guide for more information on security and privileges. To access the Contribute page, select Contribute from the navigation menu, as shown in Figure 4. Figure 4 Contribute link The Contribute page displays, with available collections listed under their categories. In the example shown in Figure 5, there are two categories (Demonstration and Teaching Resources) with a number of collections associated with each. EQUELLA 6.2 Contribution User Guide 7|Page Figure 5 Collection page When selected, each contribution link opens the associated contribution wizard. Contribution wizards Contribution wizards prompt contributors for details relevant to the resources being contributed to EQUELLA. The amount of information collected is set by the institution, but the more metadata (information) collected for a resource, the more ‘discoverable’ it becomes in the EQUELLA repository. The appearance and sequence of contribution wizard pages can be different for each collection, and can change according to: the type of user; moderation progress; and information previously entered in the contribution process. In addition to collecting information, a contribution wizard may contain controls that allow users to: upload individual or multiple files, including zip files add YouTube™, iTunesU™, Flickr™, Kaltura and Google Book™ links organise uploaded items with a navigation tree import and export IMS, METS, QTI and SCORM packages add URL links create HTML pages EQUELLA 6.2 Contribution User Guide 8|Page select and add taxonomy terms. Contribution wizard pages Contribution wizards can be a single page or multiple pages, depending on their configuration. An example of a contribution wizard is shown in Figure 6. Figure 6 Learning resources contribution wizard Contribution wizard pages are made up of the following elements: Contribution page name—this name also appears on the page links to the right-hand side. Wizard controls—various wizard controls may be displayed. See Wizard controls reference on page 41 for more information. Page control buttons—see Page control buttons on page 11 for more information. —saves the resource to the selected collection. Save and continue – saves the resource as draft if it hasn’t been saved before, or updates the existing record for pre-existing resources. Preview—displays the resource as it will look if saved at this point. Cancel—displays a confirmation dialog box. Click OK to cancel the current contribution. NOTE: The save, preview and cancel functions move if the page is scrolled so they will always appear in the top right-hand corner of the page. An example is shown in Figure 7. EQUELLA 6.2 Contribution User Guide 9|Page Figure 7 Scrolling Save panel Contribution wizard controls can be dynamic, only displaying once a particular option is selected. This helps to collect meaningful data during the contribution process, while only showing the user relevant fields. Using the example contribution wizard shown in Figure 6, once the Classification metadata checkbox is selected, an extra contribution wizard page is enabled. An example is shown in Figure 8. EQUELLA 6.2 Contribution User Guide 10 | P a g e Figure 8 Dynamic wizard control An asterisk after a field label indicates a mandatory field. Page control buttons Links to the page names display on the right-hand side of the contribution wizard, and, depending on the wizard configuration, information can be added to the pages in any order. The page control at the bottom of the contribution wizard may be labelled Next and Previous or the relevant page name, depending on how the collection definition is configured. See EQUELLA Collection Definition Configuration Guide for more information. Click on either page link to display the page. An example is shown in Figure 9. EQUELLA 6.2 Contribution User Guide 11 | P a g e Figure 9 Display another contribution wizard page The page control button at the bottom of the screen now points back. (Note: The asterisk displaying after About on both page links is an indication that information has not yet been entered into a mandatory field on that page.) Contribute an example resource To best illustrate the functionality of a contribution wizard, the process of contributing a resource is outlined below. Keep in mind that contribution wizards are highly configurable and will be tailored to meet the needs of different institutions and so may look different from the example. Example Contribute a resource to the Learning Resources collection titled Introduction to EQUELLA, add a description, a pdf document, a Word document, a URL and a YouTube link, then save the resource. To contribute the example resource to a collection 1. Select the Contribute link from the navigation menu. 2. Select the Learning resources link from the Demonstration category. An example is shown in Figure 10. EQUELLA 6.2 Contribution User Guide 12 | P a g e Figure 10 Select Learning resources collection The Learning resources contribution wizard displays, as shown in Figure 11. Figure 11 Learning resources wizard The first page of a contribution wizard is typically an information collecting page, and can be labelled in a variety of ways, for example Details, About, Basic Information, etc. The first page in this example includes the following controls: EQUELLA 6.2 Contribution User Guide 13 | P a g e Title and description wizard controls The resource’s title and description are typically Edit Box wizard controls that allow the entry of basic text. In the example shown in Figure 12, the Title field has been flagged with a red asterisk, denoting that the control is mandatory. 1. Enter Introduction to EQUELLA in the Title text box. 2. Enter a brief overview of what the resource is about in the Description text box. An outline of the attachments or links could be entered here, to give the ‘discoverer’ an idea of what the resource covers. This description displays on the search results page under the title. 3. Select the Media checkbox. The Attach media section displays, as shown in Figure 12. Figure 12 Attach media section 4. Select the Add a resource link. The Pick resource type page displays, as shown in Figure 13. EQUELLA 6.2 Contribution User Guide 14 | P a g e Figure 13 Pick resource type page 5. Select Upload a file then click displays, as shown in Figure 14. . The Upload files from your computer page Figure 14 Upload files from your computer page 6. Either: Click to open the Choose File to Upload page, navigate to the required file (in this example EQUELLA Technical Requirements.pdf) then click Open. The Upload files from your computer page displays with the selected file listed, as shown in Figure 15. EQUELLA 6.2 Contribution User Guide 15 | P a g e Figure 15 File uploaded using Browse button NOTE: This method allows only single files to be uploaded with each browse session. Click again to add another file. or Select one or more files then drag them into the dotted area to upload. There is no limit to the number of files that can be dropped into the area. An example is shown in Figure 16. Figure 16 Two pdfs selected and dragged into drop area The files are uploaded and a progress bar displays for each. An example is shown in Figure 17. EQUELLA 6.2 Contribution User Guide 16 | P a g e Figure 17 Progress bars display for each file being uploaded Once the upload is complete the progress bar displays green. And example is shown in Figure 18. Figure 18 Completed uploads The selected file can be removed by clicking . Select the Import files from scrapbook link to add scrapbook files to the resource. See EQUELLA My Resources User Guide for more information. Click to return to the Pick resource type page without saving the file selected. 7. Once all required files have been selected, click . The files are now listed on the Learning resources wizard page, as shown in Figure 19. EQUELLA 6.2 Contribution User Guide 17 | P a g e Figure 19 Learning resources wizard page with files listed File options are: Edit—opens a page displaying file metadata and file editing options: Edit file with default editor—opens the default editor for that file type (e.g. Word). Edit file with another editor—lists all editors available for that file type (e.g. Word, Wordpad etc.). An example of the Edit attachment page is shown in Figure 20. Figure 20 Edit attachment page Once a file is edited and saved using an editor (e.g. Word), the and buttons display. Select to implement the changes in the attachment. EQUELLA 6.2 Contribution User Guide 18 | P a g e Replace—opens the Pick resource type page (shown in Figure 13). Another file can be selected, and the option to Replace the current file or Add the new one is offered. Delete—removes file after confirmation. 8. Select the Add a resource link again, and this time select URL then click Add a URL page displays. An example is shown in Figure 21. . The Figure 21 Add a URL dialog 9. Enter the URL (e.g. http://www.equella.com) and click page displays as shown in Figure 22. . The Edit URL details Figure 22 Edit URL details page The Display name can be changed to something more meaningful than the actual web address if required (e.g. EQUELLA website), but the Website address must be prefixed with http://, not just www, or it won’t work. 10. Click to return to the Learning resources wizard page. The EQUELLA website link now displays in the list. 11. Select the Add a resource link again, and this time select YouTube then click . The Add YouTube page displays. Enter an appropriate search term (e.g. equella) in EQUELLA 6.2 Contribution User Guide 19 | P a g e the Search text box then click display, as shown in Figure 23. . Matching search results from YouTube Figure 23 Add YouTube page 12. Select the required YouTube video (e.g. EQUELLA: Getting Started with a Digital Repository) then click Figure 24. . The Edit YouTube details page displays, as shown in Figure 24 Edit YouTube details page The Display name can be changed if required. 13. Click to return to the Learning resources wizard page. The EQUELLA: Getting Started with a Digital Repository link now displays in the list. 14. Select a type of resource in the Resource Type field (e.g. General Knowledge). As this general information is relevant to all classes, in this example, we’re not going to select a particular class. All information has now been entered. An example of the page is shown in Figure 25. EQUELLA 6.2 Contribution User Guide 20 | P a g e Figure 25 Learning resources wizard with information entered Select the Save and continue link to save the data you have entered so far. Select the Preview link to see the resource as it will look when saved. Select the Cancel link to cancel the contribution. 15. Click . The Save dialog displays, as shown in Figure 26. Figure 26 Save dialog Select to save as a draft copy to be submitted at a later date. The draft copy can be accessed from the My resources, Drafts. (See EQUELLA My Resources Guide for more information.) Select to go back to the Learning resources wizard page. EQUELLA 6.2 Contribution User Guide 21 | P a g e Select to save the resource and submit it to the associated workflow. The Resource summary page displays with a confirmation screen at the top, as shown in Figure 27. Figure 27 Resource summary page Now that the resource has been contributed to the selected collection, the contributor can access the resource to track its progress, view information or perform a number of actions. Accessing contributed resources Contributed resources can be accessed through the My resources link on the navigation menu. An example is shown in Figure 28. EQUELLA 6.2 Contribution User Guide 22 | P a g e Figure 28 My resources link The My resources page displays, as shown in Figure 29. Figure 29 My resources page All resources contributed by the logged in user can be found in My resources. Select an option to view resources of a specific status (e.g. Drafts, Moderation queue, Published, Scrapbook, Archive) or select All resources. See EQUELLA My Resources User Guide for more information. An example is shown in Figure 30. EQUELLA 6.2 Contribution User Guide 23 | P a g e Figure 30 My resources—All resources Select the required resource by clicking on the title link. The Resource summary page opens for the selected resource. An example is shown in Figure 31. Figure 31 Resource summary page EQUELLA 6.2 Contribution User Guide 24 | P a g e Resource summary page The resource summary page is used to view, comment on and rate resources. Resource owners and content managers can also manage resources and resource versions. The main panel of the summary displays resource content, viewing options, ratings and comments, while further information and various actions can be accessed using the Details and Actions area links. The right-hand pane provides options for managing and viewing information about the resource. HELP—click on the down arrow to display context-sensitive help and links to other help pages. Add to favourites—click Share with others—click to share an item link with other users, or to notify users when the resource becomes available (Live) if it is currently in moderation. An example of the Share with others page is shown in Figure 32. to add the resource to the favourites list. Figure 32 Share with others page Select the Select more users to notify link to open the Select user(s) search page. Search for and select the required users, then click in Figure 33. EQUELLA 6.2 Contribution User Guide . An example is shown 25 | P a g e Figure 33 Select users page The selected users are added to the notification list, as shown in Figure 34. Figure 34 Notification list Once the resource becomes ‘Live’, the resource is listed in the selected users’ Notifications link. An example is shown in Figure 35. EQUELLA 6.2 Contribution User Guide 26 | P a g e Figure 35 Notifications link Users can also send a link to the resource via email. Enter an email address in the field provided and a message. Select the access duration from the Allow access for dropdown. This is designed for users outside your institution. Details The Details area displays information about the resource and can include: Owner, Collaborators, Collection, Version number, and Status. Owner—The user that created the resource. Collaborators—lists any users that have been added as collaborators for this resource. See Change ownership on page 35 for more information. Collection—selecting this link displays a search result list for that collection. Version—displays the version number of the current resource. Clicking on the (show all) link displays a list of all versions, including the current live version. See To view all versions of a resource on page 28 Status—resource statuses can be Live, Archived, Deleted, Suspended, Review, Moderating, Rejected or Draft. Find uses—use this link to display a list of current uses for this resource. This link displays only if at least one connector is configured in the EQUELLA system. See Find uses function on page29. Moderation History—select this link to display the Moderation history page. Refer to the Moderation history page section on page 32 for more information. EQUELLA 6.2 Contribution User Guide 27 | P a g e Terms of use—select this link to display the Terms of use page with terms and a list of users who have accepted those terms and date of acceptance. Refer to the Terms of use page section on page 30. Moderation Progress—select this link to display the Moderation progress page. Refer to the Moderation progress page section on page 31 for more information. Activations—select this link to display the Activations page with a list of all activations for the selected resource. This link only appears if there are activations set for this resource. See Activations page on page 33. To view all versions of a resource 1. Select the (show all) link to display the Versions of this item page listing all resource versions and their statuses. An example is shown in Figure 36. Figure 36 Resource summary page - show all link The Versions of this item page displays. An example is shown in Figure 37. Figure 37 Versions of this item page When a new resource has been created using the Create a new version action, the previous version is archived. The example in Figure 37 shows a resource with two versions, the original version appears as 1 in the Version column and its status displayed as archived. The current version is version 2, with a status of live. All resources displayed in the versions list can be viewed, regardless of their status. 2. Select the Title of the version to display the resource summary page of the selected version. EQUELLA 6.2 Contribution User Guide 28 | P a g e Find uses function The Find uses function is part of the EQUELLA Push to LMS feature. Select Find uses from the Details section to display all current uses for the selected resource within a specific connector (LMS). NOTE: The Find uses link only displays if at least one external connector has been configured in the EQUELLA system. See the EQUELLA Push to LMS Guide for more detail. EQUELLA supports Moodle and Blackboard connectors (and Local Resources for the Find Uses function), and more than one may be configured. If there are multiple connectors configured, a drop down box displays, and the user selects from the list. If there is only one connector configured, the Add to external system screen displays immediately. NOTE: If the connector Local Resources is configured and selected, the system displays all uses of the current resource and attachments within other resources in the EQUELLA repository. If there is only one connector configured, the Find uses screen is displayed immediately. An example is shown in Figure 38. Figure 38 Find uses page EQUELLA 6.2 Contribution User Guide 29 | P a g e The Courses in which the selected resource is currently used are listed, with the Location and Date added information. Enter course search criteria in the filter box to return only matching results. To sort by Course, Location or Date added, click the column heading. Click again to reverse the order displayed. Tick Show all versions of this resource to display any uses of earlier versions of the resource. Tick Show unavailable courses and resources to display any hidden courses and resources in which the selected resource is used. Select the down arrow (which displays to the right of the Date added column when the cursor points at a course line) to display an expandable pane showing resource details, including Resource version, Date modified, and Name in external system. An example is shown in Figure 39. Figure 39 Find uses resource details Terms of use page Selecting the Terms of use link displays the Terms of use page which lists the terms of use that users must accept before they can view the resource. Additionally, a list of users that have accepted those terms of use is displayed. An example is shown in Figure 40. EQUELLA 6.2 Contribution User Guide 30 | P a g e Figure 40 Terms of use page Moderation progress page Contributed resources that are in the process of moderation will have a link to the Moderation progress page in the Details section of the Resource summary page. An example of the Moderation progress page is shown in Figure 41. This page provides information about where the resource currently sits in the moderation process and has the following elements: Task—lists the name of the current moderation task, Moderators—lists the names of the users required to accept the task Waiting for—total time waiting for moderation since entering that task Moderation progress—a graphical flow chart illustrating the layout of the moderation process. The current task, and any accepted tasks are highlighted. EQUELLA 6.2 Contribution User Guide 31 | P a g e Figure 41 Moderation progress page Moderation history page A resource’s Moderation history page provides details on any submission, status change and moderation events pertaining to this resource. An example of the Moderation history page is shown in Figure 42. Figure 42 Moderation History page It is made up of the following elements: Event (Submitted for moderation, Went live, etc)—provides a descriptive name of the event. User—lists the user involved in this event. Date—shows how much time has passed since this event was performed. EQUELLA 6.2 Contribution User Guide 32 | P a g e Show edits checkbox—switches on and off the display of Edit events in the history. Show all details—switches on and off all events in the history, including Edit and Workflow reset events. Activations page (NOTE: The Activations page is only relevant to Australian users). A resource will have an Activations page when it has been activated against a course. This action is restricted to resources contributed to collections with Copyright Agency Limited (CAL) configured. Once activated, users can view the resource’s Activations page, similar to that in Figure 43. This page is made up of the following elements: Attachment—the name of the resource that is activated against the course. Status—the activation status of the resource. Information— Students—number of students enrolled in the course the resource has been activated against, User—name and username of the user that activated this resource, Course—name and description of the course the resource has been activated against, From—the date and time the resource was made active from, Until—the date and time the resource was made active until. Figure 43 Activations page Actions The Actions area can display the following operations: Add to external system The Add to external system function is part of the EQUELLA Push to LMS feature. Selecting this action allows the user to add all or parts of the resource to external connectors that have been configured in the system. (Note: The Add to external EQUELLA 6.2 Contribution User Guide 33 | P a g e system link only displays if at least one external connector has been configured in the EQUELLA system.) See the EQUELLA Push to LMS Guide for more information. EQUELLA supports Moodle and Blackboard connectors, and more than one may be configured. If there are multiple connectors configured, a drop down box displays, and the user selects from the list. If there is only one connector configured, the Add to external system screen displays immediately. The Add to external system function allows the addition of a resource to multiple locations within the selected connector. To add a resource to an external system 1. Select Add to external system from Actions. 2. Select the external system from the drop down list to which the resource is to be added. If only one external system is set up, the Add to external system screen displays immediately. An example is shown in Figure 44. Figure 44 Add to external system 3. Select the required resources from the Select the resources to add section. EQUELLA 6.2 Contribution User Guide 34 | P a g e 4. Click the Show unavailable courses checkbox to display any courses set as ‘unavailable’ in Blackboard, the Show hidden courses to display any courses set as ‘hidden’ in Moodle, use to expand courses to show their components and/or enter text in the filter text box to show only matching courses, if required. (This filter box only displays if there are more than 10 results in the Select the locations to add to pane.) 5. Select the location/s to which the resource should be added, then click . 6. An action receipt confirming the successful addition of the resource is displayed at the top of the page. An example is shown in Figure 45. 7. Use the breadcrumbs to navigate back to your resource, as shown in Figure 45. Figure 45 Successful addition of resource to Moodle location Archive this version Displays for resources with a status of ‘Live’. Archiving hides the resource from searches, and is intended for resources that are no longer required. This includes old versions of resources that have been archived by the Create a new version action. The resource cannot be discovered but remains accessible via its URL. Change ownership Ownership can be reassigned and other users can be added as collaborators. EQUELLA 6.2 Contribution User Guide 35 | P a g e To reassign ownership 1. Select the Change ownership link to display the Owner and collaborators page. An example is shown in Figure 46. Figure 46 Owner and collaborators page 2. Select the Change link to display the Select a new owner dialog where a new owner can be selected. 3. Click the Add collaborators link to display the Select collaborators dialog. Collaborators are listed with a Remove link alongside. Clone item into a collection Selecting this action makes a copy of the selected resource, with or without attachments, and adds it to the same or a different collection. The original version remains live, unlike the New Version operation where the original version is archived once the new version becomes live. To clone a resource 1. Select the Clone item into a collection link to display the Clone this item page. An example is shown in Figure 47. Figure 47 Clone this item page 2. Select an option from the Select an operation section. There are two options: Clone—copy the entire resource, including all attachments and metadata; or EQUELLA 6.2 Contribution User Guide 36 | P a g e Clone without attachments—copy metadata without attachments. The cloned resource can be assigned to the same collection as the original resource, or to a different collection. The original collection is displayed as the default in the Select a collection section. To assign the cloned resource to a different collection 1. Click the Select a collection arrow to display a drop-down list of available collections. 2. Select a collection. To apply an optional schema transform to the cloned resource 1. Click the Select a schema transform (optional) arrow to display the options. 2. Select an option, or leave at the default (None selected). 3. Click . The contribution wizard for the resource is displayed. 4. Modify the item metadata or attachments, if required. 5. Publish, save, or cancel the resource, as required. Create a new version Selecting this action displays the contribution wizard for the resource, allowing the user to modify metadata or files, and the new version can be published or submitted for moderation. When the new version reaches the ‘live’ status, the current version is automatically archived. Delete this version This action removes the resource from the repository and marks it for purging with the next purge scheduled task. Edit this version Selecting this action displays the contribution wizard for the resource, allowing the user to modify metadata or files. Any changes made are saved to the current version. Export Export a resource to one of the formats listed. Resources can be exported as an IMS package, a SCORM package or a METS record with or without attachments. Mark this for review Selecting this link (which only shows for resources with a status of ‘live’ that are in a collection with an associated workflow) changes the status of the resource to ‘review’ and places it at the beginning of the associated workflow. Modify key resource Resources can be added or deleted as key resources to one or more hierarchy topics. EQUELLA 6.2 Contribution User Guide 37 | P a g e To add or delete a resource to/from a hierarchy topic 1. Click the Modify key resource link from the Actions menu. The Modify key resource page displays, as shown in Figure 48. Figure 48 Modify key resource page 2. Click on the plus sign to expand the hierarchy tree and display any subtopics. 3. Select the checkboxes next to the hierarchy topics or subtopics (including dynamic subtopics) to which the resource is to be added as a key resource. Multiple checkboxes can be selected. An example is shown in Figure 49. NOTE: Hierarchy topics or subtopics where the selected resource already exists as a key resource display as checked when the Modify key resource page opens. Uncheck to remove the resource as a key resource. Figure 49 Hierarchy topic and subtopic selection 4. Click . A confirmation screen displays, as shown in Figure 50. EQUELLA 6.2 Contribution User Guide 38 | P a g e Figure 50 Confirmation of Key resource modification The resources have now been added (or removed) as key resources for the selected hierarchy topics and/or subtopics. See the EQUELLA Hierarchy Configuration Guide for further information. Move item into another collection Selecting this action allows the selected resource to be transferred to a different collection. To move a resource 1. Select the Move item into another collection link to display the Move this item page. An example is shown in Figure 51. Figure 51 Move this item page 2. Click the Select a collection arrow to display a drop-down list of available collections. 3. Select a collection. To apply a preferred schema transform to the moved item 1. Click the Select a schema transform (optional) arrow to display the options. 2. Select an option, or leave at the default (None selected). 3. Click . The contribution wizard for the resource is displayed. EQUELLA 6.2 Contribution User Guide 39 | P a g e 4. Modify the metadata or attachments, if required. 5. Publish, save, or cancel the resource, as required. New contribution of same type Selecting this action displays the original contribution wizard where a new resource can be contributed to the same collection. Redraft this version This action is intended for resources that require redrafting prior to moderation workflow completion. Selecting this operation allows the resource to be edited and re-submitted for moderation or saved as a draft. Redraft is intended for use with resources that have not been made live. Suspend this version Displays for resources of all statuses. This action hides the resource from searches and is intended for temporary removal of resources from the repository, for example the removal of links for sites that are temporarily unavailable. The resource cannot be discovered but remains accessible via its URL. A Resume this version action is available for suspended resources. EQUELLA 6.2 Contribution User Guide 40 | P a g e Wizard controls reference DRM The DRM (Digital Rights Management) control is used to gather information on the digital rights associated with contributed items. A DRM control can display two pages in a contribution wizard: a Details page (name DRM – Ownership and rights in the example) and an Access Control page. Examples are shown in Figure 52 and Figure 53. Figure 52 DRM details page Figure 53 DRM access control page EQUELLA 6.2 Contribution User Guide 41 | P a g e Navigation builder The Navigation builder control adds a page to the contribution wizard that allows users to: organise resource attachments and links into a package with customised navigation; provide content viewers with a ‘split view’ option where attachments can be viewed in two independent panes; rename files; and specify the viewer type for individual attachments. The packaged content can be arranged with a single attachment per menu node or organised with multiple tabs to group related attachments together. For example, a menu node can include images grouped with text, HTML, PDF or video attachments containing information such as transcripts and translations. An example user’s view of multiple images grouped per node and displayed with a ‘split view’ is shown in Figure 54. Figure 54 User’s view of packaged content displayed as a split view An example of the Navigation builder page as part of a contribution wizard is shown in Figure 55. EQUELLA 6.2 Contribution User Guide 42 | P a g e Figure 55 Navigation builder control The Navigation builder configuration options include: Navigation menu pane and —use the up and down arrows to rearrange the sequence of nodes. —click this button to add a menu node at the level below the currently selected node. —click this button to add a menu node at the same level as the currently selected node. —click this button to remove the selected node. —click this button to automatically populate the menu pane with names of the resource’s attachments and links. An example is shown in Figure 56. Navigation nodes can be created one at time (an example of this method is shown in Figure 56), or the initialise button can be selected to bring in all the resource’s attachments and links, which can then be restructured (an example is shown in Figure 57). EQUELLA 6.2 Contribution User Guide 43 | P a g e Figure 56 Navigation control showing an example navigation menu Figure 57 Navigation builder control showing initialised navigation menu nodes Select a menu node (e.g. 1-Cradle) to display the configuration options, as shown in Figure 57. EQUELLA 6.2 Contribution User Guide 44 | P a g e Settings for entire menu section Show ‘split view’ option in menu bar—check this option to allow users to view different tabs side by side, an example is shown in Figure 54. Show attachments not assigned to a navigation node—check this check box if any attachments linked to the resource that aren’t assigned to a node are required to display as part of the package. Settings for selected menu item section Name—enter or edit the selected node name as required. Edit resource details section Single resource—select this option to link only one attachment per menu node: Select an attachment from the Resource drop-down list. Select the type of viewer used to display the attachment from the Viewer dropdown list. Multiple resources—select this option to link more than one attachment per node. The attachments are displayed as tabs within the viewers. An example of the Edit resource details section with the Multiple resources option selected is shown in Figure 58. Figure 58 Edit resource details—Multiple resources option selected Click the attachment name (e.g. Tab 1) to display the attachment dialog. An example is shown in Figure 59. Figure 59 Attachment dialog The following options are provided: Resource—select an attachment from the drop-down list (e.g. 1-Cradle). Name—edit the tab name (e.g. Cradle Mountain). Viewer—select a viewer to display the attachment. Viewer options may include the following, depending upon the system MIME types configuration: EQUELLA 6.2 Contribution User Guide 45 | P a g e Default—a preselected viewer for the file type, for example, an image file viewer, PDF reader etc. File Viewer—the native application for the attached file type. For example, image files are displayed using the basic image viewer, .pdf files in a PDF reader, .doc and .docx files in MS Word™ etc. Large Image Viewer—a sophisticated image viewer that is preferred for images that are larger than the standard browser window. An example is shown in Figure 61. HTML Conversion—converts and displays the file as HTML. Embedded Movie Player—displays the video file in a flash video viewer. Download File—automatically downloads the file. Click the Save button to save changes. Added attachments are displayed by tab name in the Edit resource details list. An example is shown in Figure 58. To add further attachments, click attachment dialog. Click to display the to remove an attachment from the list. View content package To view the resource package, click the Full screen link under the Links to resources panel. An example is shown in Figure 60. EQUELLA 6.2 Contribution User Guide 46 | P a g e Figure 60 Resource Summary—Full screen link The packaged content displays. An example displaying in the Large Image Viewer is shown in Figure 61. Figure 61 Package content—viewed with the Large Image Viewer EQUELLA 6.2 Contribution User Guide 47 | P a g e The Large Image Viewer is used when an image is too large or detailed to be viewed in a single screen. Additional controls available in this viewer allow the user to zoom and rotate the image, or to show a thumbnail of the image. Attachments Depending on the configuration settings of the attachment control, addition of attachments may include the following types: Files (e.g. doc, docx, pdf, xls, zip, ppt etc.) EQUELLA Resources—attachments and links associated with existing EQUELLA resources URL Links Web pages Google Books Kaltura YouTube Videos iTunesU Tracks Flickr photos External tool provider (LTI) An example of an attachment control is shown in Figure 62. Figure 62 Attachment control Upload a file To upload a file 1. Select Upload a file then click displays, as shown in Figure 63. EQUELLA 6.2 Contribution User Guide . The Upload files from your computer page 48 | P a g e Figure 63 Upload files from your computer page 2. Use one of the following methods to select files: Click to open the Choose File to Upload page, navigate to the required file (in this example EQUELLA Technical Requirements.pdf) then click Open. The Upload files from your computer page displays with the selected file listed, as shown in Figure 64. Figure 64 File uploaded using Browse button NOTE: This method allows only single files to be uploaded with each browse session. Click again to add another file. or Select one or more files then drag them into the dotted area to upload. There is no limit to the number of files that can be dropped into the area. An example is shown in Figure 65. EQUELLA 6.2 Contribution User Guide 49 | P a g e Figure 65 Two pdfs selected and dragged into drop area The files are uploaded and a progress bar displays for each. An example is shown in Figure 66. Figure 66 Progress bars display for each file being uploaded Once the upload is complete the progress bar displays green. An example is shown in Figure 67. EQUELLA 6.2 Contribution User Guide 50 | P a g e Figure 67 Completed uploads The selected file can be removed by clicking . Select the Import files from scrapbook link to add scrapbook files to the resource. See EQUELLA My Resources User Guide for more information. Click selected. to return to the Pick resource type page without saving the file 3. Once all required files have been selected, click wizard page, as shown in Figure 68. . The files are now listed on the Figure 68 Learning resources wizard page with files listed File options are: EQUELLA 6.2 Contribution User Guide 51 | P a g e Edit—opens a page displaying file metadata and file editing options: Edit file with default editor—opens the default editor for that file type (e.g. Word). Edit file with another editor—lists all editors available for that file type (e.g. Word, Wordpad etc.). An example of the Edit attachment page is shown in Figure 69. Figure 69 Edit attachment page Once a file is edited and saved using an editor (e.g. Word), the and buttons display. Select to implement the changes in the attachment. Replace—opens the Pick resource type page (shown in Figure 62). Another file can be selected, and the option to Replace the current file or Add the new one is offered. Delete—removes file after confirmation. Upload zip files When one or more zip files are uploaded to EQUELLA, depending on how the system is configured to treat zip files by default, a Zip options dialog may display. An example is shown in Figure 70. EQUELLA 6.2 Contribution User Guide 52 | P a g e Figure 70 Zip file options Select the required option: Unzip the contents and allow me to select the files to attach – selecting this option allows single files from the zip file to be attached to the resource. Attach the zip file only – attaches the zip file itself to the resource. Upload QTI packages When a QTI package (a package conforming to the IMS QTI 2.1 standard) is uploaded during contribution, depending on how the system is configured to treat zip and package files by default, a Package options dialog may display. An example is shown in Figure 71. Figure 71 Package options Select the required option for ‘How would you like to treat this file?’: As a QTI package – stores the package as a QTI package, allowing the quiz to be played using the default EQUELLA quiz player. EQUELLA 6.2 Contribution User Guide 53 | P a g e As a content package – stores the package as an IMS package, ignoring any QTI functionality. As a zip file – selecting this option brings up the Zip options (see Upload zip files on page 52). As a regular file – stores as a file (without zip or package options). Playing QTI packages Once a QTI package has been uploaded to an EQUELLA resource, and the resource has been saved, the package can be played. As long as it has been stored as a QTI package, the default QTI quiz player will be used. When QTI packages are played in EQUELLA, a score accumulates, but is not stored. Each time a user logs in, the quiz will restart. To play a QTI quiz 1. From the results or Resource summary page, click on the required QTI package. The quiz start page displays. An example is shown in Figure 72. Figure 72 Example QTI quiz 2. Click the button to begin the quiz. The question titles display down the left hand side of the page, and a single question’s details show in the right-hand pane. An example is shown in Figure 73. EQUELLA 6.2 Contribution User Guide 54 | P a g e Figure 73 Example quiz Note the following points: Once a question has been answered, a blue bar displays to the left of the question name in the left-hand question list. Unanswered questions have no bar. The question currently being viewed displays a grey bar to the left of the question name, until it is either answered or the user moves to another question. An example is shown in Figure 74. Figure 74 Question status bars Questions can be answered in any order. Once all questions have been answered, click the button (confirmation dialog displays) to view the score acquired (which doesn’t get stored) and any feedback available for that QTI quiz. EQUELLA 6.2 Contribution User Guide 55 | P a g e NOTE: Not all QTI quizzes are configured to display results or feedback once they are submitted. An example is shown in Figure 75. Figure 75 Quiz results page Each question can be selected to view question level feedback, if included as part of the package. An example is shown in Figure 76. Figure 76 Question level feedback To return to the results page, click EQUELLA 6.2 Contribution User Guide . 56 | P a g e EQUELLA Resource Select EQUELLA Resource then click to add an attachment associated to an existing EQUELLA resource. The Select page displays, as shown in Figure 77. Figure 77 Select page Perform a search for the relevant resource, and from the search results either add an entire resource or add attachments only: Add entire resource To add an entire resource 1. Click to add the entire resource (metadata and attachments) as a link in the new contribution. An example is shown in Figure 78. Figure 78 Link entire resource Once the resource is selected, the EQUELLA 6.2 Contribution User Guide button changes to . 57 | P a g e 2. Click to go to the My selections page with the selected resource listed, as shown in Figure 79. Figure 79 My selections page Click to remove a resource. Click to select more resources or attachments. Click to go back to the wizard page without adding the resource. 3. Click 80. to go to the Edit resource details page, as shown in Figure Figure 80 Edit resource details page 4. Click to add the link to the current contribution. Add attachments only To add attachments only 1. Select the relevant resource link to open the Resource summary page. Each attachment has a button, as shown in Figure 81. EQUELLA 6.2 Contribution User Guide 58 | P a g e Figure 81 Selection page for files and links 2. Click for each attachment required, then click . The My selections page displays with the selected attachments, as shown in Figure 82. Figure 82 My selections screen with attachments Click to remove a resource. Click to select more resources or attachments. Click to go back to the wizard page without adding the resource. 3. Click to add the resources to the contribution. URL To add a URL link 1. Select URL then click Figure 83. EQUELLA 6.2 Contribution User Guide to add a URL. The Add a URL page displays, as shown in 59 | P a g e Figure 83 Add a URL page 2. Enter the URL (e.g. http://www.equella.com) and click page displays as shown in Figure 84. . The Edit URL details Figure 84 Edit URL details page The Display name can be changed to something more meaningful than the actual web address if required (e.g. EQUELLA website), but the Website address must be prefixed with http://, not just www, or it won’t work. 3. Click the Open URL in new window to go to the URL website. This is a good way to test that the web address entered is correct. 4. Click to return to the contribution wizard page. The EQUELLA website link now displays as an attachment. EQUELLA 6.2 Contribution User Guide 60 | P a g e Web pages To add a web page link 1. Select Web pages then click displays, as shown in Figure 85. to add a web page. The Create web pages page Figure 85 Create web pages The Add Page link allows the user to open the EQUELLA HTML Editor and create web pages. The Import pages from scrapbook allows the user to select existing web pages from their Scrapbook. Add Page link To add a page link 1. Click the Add Page link to open the Edit Page section, as shown in Figure 86. Figure 86 Create web pages—Edit page 2. Click the Toggle full-screen link to open the Edit page in a full screen. EQUELLA 6.2 Contribution User Guide 61 | P a g e 3. Enter a Title and use the editor to enter the content in the Content section. See EQUELLA HTML Editor Guide for more information. 4. Click to return to the contribution wizard page. The web page link now displays as an attachment. Import pages from the scrapbook link To import pages from the scrapbook link 1. Click the Import pages from scrapbook link to open the Select from scrapbook page. An example is shown in Figure 87. Figure 87 Select from scrapbook page 2. Click the button next to the required web pages, then click The My selections page displays with the selections listed. Click . , then . The selected web pages are now displayed on the contribution wizard page as attachments. Google Books To add a Google Books link 1. Select Google Books then click to add a Google Books link. The Add Google Book page displays, as shown in Figure 88. EQUELLA 6.2 Contribution User Guide 62 | P a g e Figure 88 Add Google Book page 2. Enter search criteria (e.g. overland track) then click results display. An example is shown in Figure 89. . The search Figure 89 Google Book search results 3. Select the required references then click . If multiple selections are made, the contribution wizard page displays with the selected attachments listed. They can be edited or deleted from the list. See Edit attachments on page 81 for more information. If only one Google Book link has been selected, the Edit Google Book details page displays. An example is shown in Figure 90. EQUELLA 6.2 Contribution User Guide 63 | P a g e Figure 90 Edit Google Book details page 4. Click the View on Google Books link to open Google Books and view the resource. 5. Edit the Display name if required, then click displays with the Google Book link listed. . The contribution wizard page Kaltura Select Kaltura then click Figure 91. to display the Add Kaltura media page, as shown in Figure 91 Add Kaltura media page Click to go back to the Pick resource type page. The Add Kaltura media page provides the user with two options, Add existing Kaltura media and Upload new Kaltura media. NOTE: Some institutions may be restricted to one of these options, in which case this step will not display. EQUELLA 6.2 Contribution User Guide 64 | P a g e Add existing Kaltura media Selecting the Add existing Kaltura media option allows the user to search the Kaltura server for a relevant streaming media item then attach the link to the resource being contributed. To add existing Kaltura media 1. Click to display the Add Kaltura media search page, as shown in Figure 92. Figure 92 Add Kaltura media search page NOTE: Kaltura does not allow the use of wildcards. Additionally, a full word match must be made to return results. 2. Enter search criteria (e.g. sample) then click An example is shown in Figure 93. . The search results display. Figure 93 Add Kaltura media search results 3. Select the required items then click . If multiple selections are made, the contribution wizard page displays with the selected attachments listed. They can be EQUELLA 6.2 Contribution User Guide 65 | P a g e edited or deleted from the list. See Edit attachments on page 81 for more information. If only one Kaltura video link has been selected, the Edit Kaltura media page displays. An example is shown in Figure 94. Figure 94 Edit Kaltura media page 4. Click to play the streaming media item, or to display share options. NOTE: The icons may differ depending on the player being used. Additionally, if the file is large, it may still be processing at this point. An example of the share options is shown in Figure 95. Figure 95 Kaltura share options page 5. Edit the Display name if required. This is the name EQUELLA attachment name. The name is not changed in Kaltura. 6. Select the required player from the Select player drop-down. The [Default player] is the player selected as the default for this Kaltura server (see the EQUELLA Administration Overview Guide for further information). 7. Click . The contribution wizard page displays with the Kaltura media link listed. EQUELLA 6.2 Contribution User Guide 66 | P a g e Upload new Kaltura media Selecting the Upload new Kaltura media option allows the user to record a video using a webcam, or upload one or more local video or audio files to the Kaltura server, then attach the link/s to the resource being contributed. To upload an existing video or audio file 1. Click to display the Add Kaltura media search page, as shown in Figure 96. Figure 96 Add Kaltura media - Upload videos page 2. Select either the Video or Audio tabs. 3. Click and select the required video or audio file/s and select Open. Multiple files can be selected. The file/s display on the Upload videos page. An example is shown in Figure 97. Figure 97 Selected video files to be uploaded to Kaltura server 4. Click to add more video files, or to remove a file from the list. Click to start the upload to the Kaltura server. Once the upload is complete, the Status of the file displays as Done. An example is shown in Figure 98. EQUELLA 6.2 Contribution User Guide 67 | P a g e Figure 98 Kaltura upload complete 5. Click to add more video files, or click to open the Add Kaltura media – Title and Tags page. An example is shown in Figure 99. Figure 99 Add Kaltura media - Title and Tags 6. Change the title if required, then add required tags (keywords) in the Tags field, using a comma to separate each entry. 7. Select a Category from the drop-down list, if relevant. Categories can only be configured and browsed from the Kaltura KMC or Kaltura Management Console. 8. Enter a Description, if relevant. NOTE: If multiple files have been uploaded, the Title, Tags, Category and Description fields can be edited for each file by clicking on the required file thumbnail on the left. An example is shown in Figure 100. EQUELLA 6.2 Contribution User Guide 68 | P a g e Figure 100 Multiple file upload with thumbnails 9. Click . The page shown in Figure 101 displays. Figure 101 Kaltura files successfully added 10. Click to return to the start or to complete the process. If multiple files have been uploaded a page listing the files displays, and the user selects the files to be attached to the resource. If multiple files are selected, the contribution wizard page displays with the selected attachments listed. They can be edited or deleted from the list. See Edit attachments on page 81 for more information. If only one Kaltura video has been uploaded, the Edit attachment page displays. An example is shown in Figure 102. EQUELLA 6.2 Contribution User Guide 69 | P a g e Figure 102 Edit Kaltura media page NOTE: The Kaltura conversion process can take some time to complete, depending on the number of files waiting for conversion, file sizes etc. It is safe to save the attachment prior to the completion of the conversion process. 11. Edit the Display name if required. 12. Select the required player from the Select player drop-down. The [Default player] is the player selected as the default for this Kaltura server (see the EQUELLA Administration Overview Guide for further information). 13. Click . The contribution wizard page displays with the Kaltura media link listed. To record and upload a file to Kaltura 1. Click to display the Add Kaltura media search page, as shown in Figure 103. Figure 103 Add Kaltura media – Webcam tab 2. Select the Webcam tab on the left-hand side. An Adobe Flash Player Settings confirmation dialog displays, as shown in Figure 104. EQUELLA 6.2 Contribution User Guide 70 | P a g e Figure 104 Adobe confirmation dialog 3. Click . The Add Kaltura media dialog displays, with a drop-down to select the camera to be used. This defaults if there is only one. An example is shown in Figure 105. Figure 105 Add Kaltura media - Webcam enabled 4. Click to begin recording. 5. Record the video, then click 6. Click recording). . to view the video, or 7. Once happy with the recording, click example is shown in Figure 106. EQUELLA 6.2 Contribution User Guide to rerecord (this will overwrite the prior . The Title and tags page displays. An 71 | P a g e Figure 106 Title and tags 8. Enter a title, then add required tags (keywords) in the Tags field (if relevant), using a comma to separate each entry. 9. Select a Category from the drop-down list, if relevant. Categories can only be configured and browsed from the Kaltura KMC or Kaltura Management Console. 10. Enter a Description, if relevant. 11. Click . The page shown in Figure 107 displays. Figure 107 Kaltura files successfully added 12. Click to return to the start or to complete the process. There may be a delay while the file is being processed by Kaltura. If multiple files have been uploaded a page listing the files displays, and the user selects the files to be attached to the resource. If multiple files are selected, the contribution wizard page displays with the selected attachments listed. They can be edited or deleted from the list. See Edit attachments on page 81 for more information. If only one Kaltura video has been uploaded, the Edit attachment page displays. An example is shown in Figure 108. EQUELLA 6.2 Contribution User Guide 72 | P a g e Figure 108 Edit Kaltura media page NOTE: The Kaltura conversion process can take some time to complete, depending on the number of files waiting for conversion, file sizes etc. It is safe to save the attachment prior to the completion of the conversion process. 13. Edit the Display name if required. 14. Select the required player from the Select player drop-down. The [Default player] is the player selected as the default for this Kaltura server (see the EQUELLA Administration Overview Guide for further information). 15. Click . The contribution wizard page displays with the Kaltura media link listed. YouTube To add a YouTube link 1. Select YouTube then click to add a YouTube link. The Add YouTube page displays, as shown in Figure 109. Figure 109 Add YouTube page EQUELLA 6.2 Contribution User Guide 73 | P a g e 2. Enter search criteria (e.g. equella) then click display. An example is shown in Figure 110. . The search results Figure 110 Add YouTube search results 3. Select the required videos then click . If multiple selections are made, the contribution wizard page displays with the selected attachments listed. They can be edited or deleted from the list. See Edit attachments on page 81 for more information. If only one YouTube link has been selected, the Edit YouTube details page displays. An example is shown in Figure 111. Figure 111 Edit YouTube details page 4. Click the View on YouTube link to open YouTube and view the resource. 5. Edit the Display name if required, then click displays with the YouTube video link listed. EQUELLA 6.2 Contribution User Guide . The contribution wizard page 74 | P a g e iTunes U To add an iTunes U link 1. Select iTunes U then click to add an iTunes U link. The Add iTunes U resource page displays. An example is shown in Figure 112. Figure 112 Add iTunes U resource dialog 2. Click the + to open the tree to locate the relevant resources. Each resource has an button beside it. An example is shown in Figure 113. Figure 113 iTunes U resource list 3. Click to add the selected iTunes U resource to the contribution wizard page. The Edit iTunes U details page displays. An example is shown in Figure 114. EQUELLA 6.2 Contribution User Guide 75 | P a g e Figure 114 iTunes U details page 4. Click on the Listen to this track link to listen to the resource with iTunes. 5. Edit the Display name if required, then click displays with the iTunes U link listed. . The contribution wizard page Flickr To add a Flickr link 1. Select Flickr then click to add a Flickr image link. The Add Flickr image page displays. An example is shown in Figure 115. Figure 115 Add Flickr image dialog Elements of the Add Flickr image page include: Search—enter search criteria (e.g. Tasmania) Over— Text and tags—perform a free text search, matching values in a photo’s title, description or tags. EQUELLA 6.2 Contribution User Guide 76 | P a g e Any tags—search tags for ANY match of search criteria terms (OR combination). All tags—search tags for match of ALL search criteria terms (AND combination). Sort—results can be sorted by Relevance Interestingness—this is a Flickr term translating to ‘level of interest’ Date taken Date posted Check the check box to reverse the order of the results Filter—results can be filtered by Date photo taken Creative Commons licences Flickr Institutions Flickr user’s FlickrId, username or email. An example of the search results page, using the search term ‘Tasmania’, is shown in Figure 116. Figure 116 Flickr results page The results page elements can include: Name Selection check box Description Full image size Date taken License Author Time since added. 2. Select the required Flickr images then click . If multiple selections are made, the contribution wizard page displays with the selected attachments listed. If only one EQUELLA 6.2 Contribution User Guide 77 | P a g e image has been selected, the Edit Flickr details page displays. An example is shown in Figure 117. Figure 117 Edit Flickr details page 3. Click on the View on Flickr link to open the image in Flickr. 4. Edit the Display name if required, then click displays with the Flickr image link listed. . The contribution wizard page External tool provider (LTI) To add an LTI provider link 1. Select External tool provider (LTI) then click to add an LTI provider link. The Add external tool page displays. An example is shown in Figure 118. Figure 118 Add external tool dialog NOTE: EQUELLA has a setting (External Tool Providers (LTI)) which allows administrators to configure Base URL information for LTI Tool Providers that provide one or more tools. If the core information for these providers is pre-configured, the user only needs to select EQUELLA 6.2 Contribution User Guide 78 | P a g e the LTI provider from the list and enter the Launch URL during contribution. The rest of the information will default from the pre-configured record. See the EQUELLA LTI User Guide for further information. 2. From the LTI provider drop-down, select either a pre-defined tool provider if the required tool provider displays in the list, otherwise leave as Automatic, based on URL. 16B NOTE: If a pre-configured LTI provider has been selected, any information added in the Advanced settings fields will override the preset configuration, except Custom parameters, which will add to current custom parameters configured through Settings, rather than overriding them. 3. Enter the LTI tool Launch URL (e.g. https://www.eduapps.org/tool_redirect?id=quizlet). An example is shown in Figure 119. Figure 119 LTI tool example 4. For new LTI provider tools, enter the Consumer key, Shared secret and any Custom parameters, if required. These would be provided to you by the external LTI tool. NOTE: If multiple custom parameters are required, separate each parameter with a comma. 5. For new LTI provider tools, enter the Icon URL. This is the icon that will show on the results page for the LTI tool. Note that if a pre-configured tool has been selected, adding an Icon URL will override any Icon information stored as part of the preconfiguration. 6. For new LTI provider tools, uncheck the Use default privacy options checkbox to enable the Share launcher’s name and Share launcher’s email checkboxes, then select the option/s required: Share launcher’s name – if enabled, the full name of the user launching the tool will be shared with the tool provider Share launcher’s email – if enabled, the email address of the user launching the tool will be shared with the tool provider. An example is shown in Figure 120. EQUELLA 6.2 Contribution User Guide 79 | P a g e Figure 120 LTI Tool privacy options 7. Click . The Edit attachment dialog displays as shown in Figure 121. 28B 5B Figure 121 Edit attachment dialog 28B 8. Edit the Display name, if required. 163B 9. Click 164B . The contribution wizard page displays with the LTI tool link listed. EQUELLA 6.2 Contribution User Guide 80 | P a g e Edit attachments Once all required attachments have been added to the current contribution, they are listed on the contribution wizard page. An example is shown in Figure 122. Figure 122 Attachments list File options are: Edit—opens the relevant page depending on attachment type, displaying file metadata and editing options. Each attachment type edit page has options relevant to that type. For example, the URL Edit page has Display name and Website address. The Display name for all attachment types can be edited. For files, the following edit options are available: Edit file with default editor—opens the default editor for that file type (e.g. Word). Edit file with another editor—lists all editors available for that file type (e.g. Word, Wordpad etc.). See Upload a file on page 48 for more information. Replace—opens the Pick resource type page (shown in Figure 13 on page 15). Another attachment can be selected. When saved, the new attachment replaces the original. Delete—removes attachment after confirmation. EQUELLA 6.2 Contribution User Guide 81 | P a g e Calendar The Calendar control allows the selection of a date or date range, for example to select a publication, creation or modification date, or to control resource use or availability. An example is shown in Figure 123. Figure 123 Calendar Control Click the Date field or to display a date selector, as shown in Figure 124. Figure 124 Date selector Select a date to populate the Date field with the selected date, as shown in Figure 125. Figure 125 Date field populated with selected date The year drop down list ranges from 50 years prior to 10 years from the current year. Calendar controls may be configured to require only the month and year or only the year in addition to the full date. An example of each is shown in Figure 126. EQUELLA 6.2 Contribution User Guide 82 | P a g e Figure 126 Calendar controls, one with month and year and one with only year Calendar controls can also be configured to enter a date range. An example is shown in Figure 127. Figure 127 Calendar control with date range Check box group A Check box group provides a number of options where one or more elements can be selected by checking the boxes provided. An example of two check box groups is shown in Figure 128. Figure 128 Check box groups Check box selections can enable other controls to be displayed, depending on how the contribution wizard is configured. EQUELLA 6.2 Contribution User Guide 83 | P a g e Selected check boxes can be unchecked by clicking on them. Check boxes may also be pre-checked by default. Edit box The Edit box allows the entry of basic text such as names, descriptions, tags, keywords, comments etc. An example of two edit boxes is shown in Figure 129. Figure 129 Edit boxes The Description edit box has inactivated scroll arrows. These arrows become functional if the amount of text entered is larger than the size of the edit box. Email selector The Email selector allows the entry of one or multiple email addresses (depending on its configuration). An example is shown in Figure 130. Figure 130 Email selector To select emails 1. Either type the email address in the edit box then click , or click to open the Search for users page, as shown in Figure 131. EQUELLA 6.2 Contribution User Guide 84 | P a g e Figure 131 Search for users page 2. Enter search criteria then click . The search results display with a radio button (where only a single user can be selected) or check box (where multiple users can be selected) beside each name. An example where only a single user can be selected is shown in Figure 132. Figure 132 Search results page 3. Select the required name/s then click list. An example is shown in Figure 133. . The email address/es display in a Figure 133 Email list EQUELLA 6.2 Contribution User Guide 85 | P a g e Click to remove an email address. File manager The File Manager is used for uploading, downloading and managing contributed files. The File Manager control appears as a button in the contribution wizard, as shown in Figure 134. Figure 134 File Manager control Click to display the File Manager page, as shown in Figure 135. Figure 135 File Manager page To add files to the File Manager, there are two options: Drag-and-drop—locate files or folders in the local computer or network, then drag and drop them into the File Manager, or Upload Files—click the Upload Files computer or network. button to browse for files in the local Figure 136 shows an example of files added to the File Manager. EQUELLA 6.2 Contribution User Guide 86 | P a g e Figure 136 File Manager with uploaded files Select a file to enable the File Manager buttons. (Note: The Extract Archive button is only enabled if the selected file is an archive file.) The File Manager provides the following file management options: Open —opens the currently selected folder or file for viewing or editing. Edit —opens the currently selected file for editing. Files can be edited directly using native tools such as MS Word™. When changes are made the files must be synchronised to update the stored files. See Synchronise files on page 88 for more information. Rename Delete —deletes the currently selected file or folder (a confirmation dialog appears on selection of this option). New Folder Show in Item Summary/Remove from Item Summary —shows or removes the selected files from the resource summary page. The paper clip symbol shows on attachments that will display on the resource summary page. (See Figure 136.) Download Files network. Upload Files Extract Archive .zip) Up Home Item Folder level. Close Uploaded items that have been selected to Show in Item Summary display in a list under the button on the contribution wizard page. An example is shown in Figure 137. —renames the currently selected file or folder. —creates a new folder. —downloads the selected files or folders to the local computer or —uploads files or folders from the local computer or network. —extracts files from an archive (an example archive file type is —returns to a higher level folder. —returns to the top folder level. —displays the current folder. No folder is shown at the top folder —click the button when all necessary files have been uploaded or edited. EQUELLA 6.2 Contribution User Guide 87 | P a g e Figure 137 File Manager displaying currently selected files Synchronise files If a file uploaded using the File Manager has been edited, an ‘Unsynchronised changes detected to X files’ message is displayed with a button. An example is shown in Figure 138. Figure 138 File Manager displaying unsynchronised changes message Click the Synchronise Now button to display a Select Changes to Synchronise dialog, listing the files that have been changed. An example is shown in Figure 139. Figure 139 Select Changes to Synchronise dialog Check the check boxes corresponding to the files to be synchronised, and click the Synchronise Now button to align the files. When a resource is contributed the files selected and marked with are listed as attachments on the resource summary page. An example is shown in Figure 140. EQUELLA 6.2 Contribution User Guide 88 | P a g e Figure 140 Resource with attachments added via File Manager HTML edit box The HTML edit box control provides an inline HTML Editor in the contribution wizard that allows users to create HTML content during contribution which will be saved as part of the resource metadata. An example is shown in Figure 141. Figure 141 HTML Edit Box control The HTML Editor can be displayed automatically, as shown in Figure 141, or ‘on demand’, where the editor defaults to read only and a link is selected to open the editor, as shown in Figure 142. EQUELLA 6.2 Contribution User Guide 89 | P a g e Figure 142 HTML editor (on demand) Select the [Click here to edit] link to enable the HTML Editor. Select the Toggle full-screen link to open editor in a full screen. Create or edit content as needed then select the [Click here to lock] link to store any updated content and disable the Editor. The content is displayed as part of the resource metadata. An example where an image has been added is shown in Figure 143. Figure 143 Resource with HTML content The HTML Editor operations can include: Resizing of the editor pane Bold, Italic Underline Strikethrough EQUELLA 6.2 Contribution User Guide 90 | P a g e Align Left Align Centre Align Right Align Full Styles Paragraph formatting Insert Horizontal Ruler Remove formatting Toggle guidelines/Invisible elements Subscript Superscript Insert custom character Toggle full screen mode EQUELLA Resource Embedder EQUELLA Resource Linker EQUELLA File Uploader Font Family Font Size Cut Copy Paste Unordered List Ordered List Unindent Indent Undo Redo Insert/edit link Unlink Insert/edit Anchor Insert/edit image Clean up messy code Edit HTML source Inserts a new table Table row properties Table cell properties Insert row before Insert row after Delete row Insert column before Insert column after Remove column Split merged table cells Merge table cells Select all Select text colour Select background colour Further information is provided in the EQUELLA HTML Editor User Guide. EQUELLA 6.2 Contribution User Guide 91 | P a g e List box The List Box control provides a drop-down list of selectable options. Some examples are shown in Figure 144. Figure 144 List boxes Click anywhere in the Please select one edit box or on the down arrow to display a drop-down list of options, then select the relevant value. The selection may cause other controls related to the selection to be displayed. Radio button group The Radio button group control displays a group of options where only one can be selected. Two examples are shown in Figure 145. Figure 145 Radio button group control examples EQUELLA 6.2 Contribution User Guide 92 | P a g e Radio button selections can enable other controls to be displayed, depending on how the contribution wizard is configured. Radio buttons may be pre-selected by default. Shuffle box The Shuffle box control allows users to select one or more values by moving them from one pane to another using the arrow buttons. An example is shown in Figure 146. Figure 146 Shuffle box Select a value from the left-hand pane and move it to the right-hand pane by clicking the button, or move all values using the button. Use the and buttons to remove elements from the right-hand pane. Shuffle group The Shuffle Group control allows users to add and delete groups of details in a list (e.g. course and subject details). It can include Edit Box and List Box controls. An example before values have been added is shown in Figure 147. Figure 147 Shuffle Group control Select the Add link to add a value. An example is shown in Figure 148. Figure 148 Shuffle group Enter details page Enter relevant data in Edit Box fields, select options from the List Box drop-down list then click to populate the list box with the information. Values are separated by a forward EQUELLA 6.2 Contribution User Guide 93 | P a g e slash (e.g. Course / Subject /). Multiple groups of information can be added. An example is shown in Figure 149. Figure 149 Shuffle group list box Select the Edit link to edit a value in the list. Select the Delete link to remove a value from the list. Shuffle list The Shuffle list control allows users to add any number of values to a list (for example, a list of multiple authors relating to a single document). An example is shown in Figure 150. Figure 150 Shuffle list control Enter details in the top field, then click is shown in Figure 151. to move it to the list box below. An example Figure 151 Shuffle List control with information entered Select the Edit link to edit a value in the list. Select the Delete link to remove a value from the list. Term selector The Term Selector control allows selection of one or more terms from an associated taxonomy. It can be displayed in the following ways: Auto-complete edit box—partially entered terms are used to search the taxonomy for matching terms. Detailed Pop-up browser—users can search, browse or both (depending on configuration) the taxonomy, view the term details and select suitable terms. EQUELLA 6.2 Contribution User Guide 94 | P a g e Wide Pop-up browser - users can search, browse or both (depending on configuration) the taxonomy, view terms on a wide screen (for very long taxonomy terms) and select suitable terms. Auto-complete edit box When a term selector is configured as an auto-complete edit box, the control is displayed with an edit box that automatically completes the entered term. An example is shown in Figure 152. Figure 152 Term selector with auto-complete edit box To use the auto-complete edit box 4. Start typing a term in the edit box (e.g. lect). A list of matching terms displays as a drop-down list. An example is shown in Figure 153. Figure 153 List of matching terms 5. Select the required term to display the term path in the edit box. An example is shown in Figure 154. Figure 154 Selected term displayed in edit box 6. Click . The selected term displays in a list box under the term selector edit box, as shown in Figure 155. Figure 155 Currently selected terms list Multiple terms may be added. Click to remove a value from the list. EQUELLA 6.2 Contribution User Guide 95 | P a g e Detailed Pop-up browser When a term selector is configured with a Detailed Pop-up browser, a new page opens to select the required terms. An example of a term selector control is shown in Figure 156. Figure 156 Term selector with pop-up browser To use the Detailed Pop-up browser 1. Click the Select terms link to open the browser. An example is shown in Figure 157. Figure 157 Term selector with Detailed Pop-up browser (NOTE: For information on how to use the Search Terms tab, see Search Terms page on page 100.) 2. Click to expand the term tree. Each term has a Select and View link. Click the View link to display the term details in the right hand pane. An example is show in Figure 158. EQUELLA 6.2 Contribution User Guide 96 | P a g e Figure 158 Select term 3. To select a term, either click the Select link from the left hand pane or click from the right hand pane. The term is listed in the Selected terms list at the bottom of the right hand pane, as shown in Figure 159. Figure 159 Selected terms Multiple terms can be selected, depending on how the term selector has been configured. Terms can be removed from the Selected terms list by clicking . 4. Once all required terms have been selected, click . The terms selected now display in the term selector list on the contribution wizard page. An example is shown in Figure 160. EQUELLA 6.2 Contribution User Guide 97 | P a g e Figure 160 Term selector list Click to remove a term from the list or Select terms to add more terms. Wide Pop-up browser When a term selector is configured with a Wide Pop-up browser, a new page opens to select the required terms, the same as the Detailed Pop-up browser. An example of a term selector control is shown in Figure 161. Figure 161 Term selector with Wide Pop-up browser To use the Wide Pop-up browser 1. Click the Select terms link to open the browser. An example is shown in Figure 162. Figure 162 Term selector Wide Pop-up browser (NOTE: For information on how to use the Search Terms tab, see Search Terms page on page 100.) 2. Click to expand the term tree. Each term has a Select link. An example is shown in Figure 163. EQUELLA 6.2 Contribution User Guide 98 | P a g e Figure 163 Wide Pop-up browser with terms displayed 3. To select a term, click the Select link beside the required term. The term is listed in the Selected terms list at the bottom of the page, as shown in Figure 164. Figure 164 Selected terms Multiple terms can be selected, depending on how the term selector has been configured. Terms can be removed from the Selected terms list by clicking . 4. Once all required terms have been selected, click . The terms selected now display in the term selector list on the contribution wizard page. An example is shown in Figure 165. EQUELLA 6.2 Contribution User Guide 99 | P a g e Figure 165 Term selector list Click to remove a term from the list. Search Terms page When using a term selector with either pop-up browser types, the Browse Terms page displays. If a user would prefer to search for a specific term rather than browse, the Search Terms tab can be selected. To use the Search Terms page 5. From the pop-up browser Browse Terms page, select the Search Terms tab. The Search Terms page displays. An example with the Wide Pop-up browser is shown in Figure 166. Figure 166 Pop-up browser Search Terms page 6. Enter a search term (e.g. ex) then click example is shown in Figure 167. EQUELLA 6.2 Contribution User Guide . All matching results display. An 100 | P a g e Figure 167 Term search results 7. Click the Select link next to the required terms, then . User selector The User selector control enables the selection of users and stores the user’s details with the resource. An example is shown in Figure 168. Figure 168 User selector control To select users 1. Select the Select a user link to open the Search for users page, as shown in Figure 169. EQUELLA 6.2 Contribution User Guide 101 | P a g e Figure 169 Search for users page 2. Enter search criteria such as a first name, last name or part of a name (e.g. jo) then click . Any users that match the criteria display in the results list. An example is shown in Figure 170. Figure 170 User search result list 3. Select the required user or users, then click display in a list box. An example is shown in Figure 171. . The selected user or users Figure 171 User selector list EQUELLA 6.2 Contribution User Guide 102 | P a g e Select the Select a user link to add further users to the list. Click to remove a value from the list. Contact Client Support We are always happy to help. If your organisation has a support agreement with EQUELLA then help is available at http://equella.custhelp.com. EQUELLA 6.2 Contribution User Guide 103 | P a g e