1
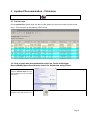
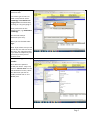
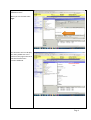
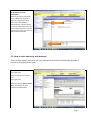
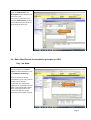
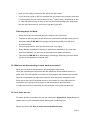
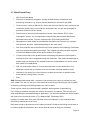
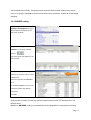
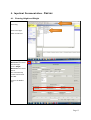
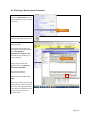
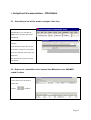
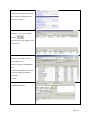
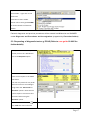
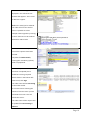
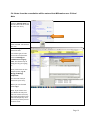
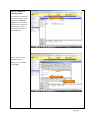
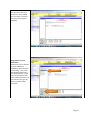
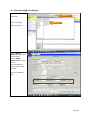
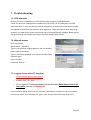
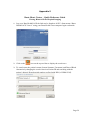
The Barts Heart Centre Millennium User Guide Written by Dr Elpida Charalampaki July 2014 Developed in consultation with Cardiology Team: Dr Andrew Wragg, Dr Christopher Primus, Dr Vikas Kapil, Dr Tania Dexter. Revised version 25/03/15 Page 1 Table of Contents 1. Overview ................................................................................................................. 3 2. How to access Cerner Millennium .......................................................................... 3 3. Inpatient Documentation - Clinicians ...................................................................... 4 4. Inpatient Documentation - Nurses ........................................................................ 13 5. Outpatient Documentation – Clinicians ................................................................ 15 6. Outpatient Documentation – Nurses .................................................................. 223 7. Troubleshooting………………………………………………………………………...244 8. Appendices……………………………………………………………………………...25 • • • • • Appendix 1 – e-CareLogic (e-CL) over N3 Barts User Guide Appendix 2 – Autotext for Cardiology Ward Rounds Appendix 3 – Autotext for Thoracic Ward Rounds Appendix 4 – Autotext for Cardiac Ward Rounds Appendix 5 – Barts Heart Centre Quick Reference Guide for viewing historic Heart Hospital Imaging Page 2 1. Overview Functionality will be primarily based around the use of Cerner Millennium which will be connected and integrated to the following systems. o EPR (clinical documentation) o eTTA (discharge summary and TTAs) o G2 speech (clinical dictation) (refer to o Dendrite Pats (clinical audit) o Sectra PACS (images) (see Appendix 5) o UCLH CDR (images) o e-CareLogic (e-CL) (see Appendix 1) o Circle cvi42 (MRI and cardiac CT reporting) o Echo analysis software (to be confirmed) o WinPath (Pathology) 2. How to access Cerner Millennium o Log into your PC using user-name & password provided from ICT department. o Insert Smartcard into card reader. o A pop – up box will appear, prompting you to enter your password. o Enter password and select enter. Select the relevant access role starting with: BARTS AND THE LONDON NHS TRUST. o Cerner millennium live can now be accessed via Start menu. Page 3 3. Inpatient Documentation - Clinicians Double click on the PowerChart icon 3.1. Patient Lists On the patient list, double click the name of the patient on whom you want to make a new entry. This will open up the patient’s CRS record 3.2. How to make new documentation entries on Cerner millennium How to Modify/Amend and how to search for documents using Filters Click on “Clinical notes” on the left hand side of screen to make new entry. Once clinical notes have been selected. Left click on this icon Page 4 This will bring up the new document box. First select type of note. For ward round/reviews select: Cardiology or Cardiothoracic surgery note. The fastest way of doing so is by just typing 'C'. Then put the title on the Subject space, e.g. IP WR WK 1 Cardiology. You are now ready to document your entry. When you are finished select ‘sign’ Note: If you select save you will be the only one who can access the entry. This might be useful if you want to temporarily save your entry so that you can amend it later. How to modify pre-‐existing entries: Once within the patient's record (see above -‐ steps 1-‐8) Click on “Clinical notes” on the left hand side of screen, select the document you wish to modify and left click on the Modify icon Page 5 Type in under “Insert Addendum Here” When you are finished select ‘sign’ The document will now display the newly added text at the bottom of the page and state in red that the Document Contains Addenda. Page 6 Using Filters to View documents. Documents can be filtered by several different methods to allow for ease of searching. This screen shot displays documents by “performed by” so you can view documents you have created yourself. You can also filter by Type, by Status, by Date and by Encounter 3.3. How to make shortcuts with Autotext This is a CRS capacity with which you can make shortcuts that can automatically generate a full text by only typing a key word. Type the text you want to save as an auto text. Select all the text you typed and then right click Select the option Save as Auto text. You will be asked to provide an abbreviation Page 7 Type the Abbreviation and Description of the autotext and then press save. From now on whenever you type the Abbreviation you will be provided with the option of generating the auto text. 3.4. Basic Ward Round documentation principles on CRS Day 1 on Ward. Make a new entry on CRS as described above via clinical notes, not documentation. Title it “IP WR WK1 Cardiology” To insert the name of the Consultant in your entry click on modify. This is the box underneath the Subject box right next to “associated clinical staff”. This should load another table. Type the name on the search box and click on the binoculars on the right, click ok. Page 8 • Now you are ready to document the WR on the main table. • If you have time prior to WR it is sensible that you prepare the summary and save it. Unfortunately this can only be done on the 1st weekly entry. As practical as this is, note that when saving an entry it can only be viewed through your Smartcard. No one else can access it; ensure you sign during the WR. Following days on Ward. • Ward rounds are documented daily as a sequel of the initial entry. • This can be done by going to documents as noted above and right clicking on the document titled IP WR WK1 Cardiology and selecting modify from the list of provided options. • You will not be able to save the document now, only sign it. • Every Monday regardless of whether a patient was admitted on any other day apart from Monday, you will need to generate a new weekly document. • Title the entry WR WK 2, 3, 4 Cardiology accordingly, depending on which week you are on the patient's in-hospital stay. 3.5. What are we documenting on each ward round entry? What you would have documented in a normal paper ward round. Given the experience the team has had with electronic documentation and an ongoing audit, we have agreed on a minimum of information that needs to be included. However complicated this might sound it does serve a purpose, especially out of hours and in the event of a cardiac arrest. In this context it is very difficult for the arrest team to be going through paper as well as electronic documentation. To make this less time consuming we use shortcuts and in particular auto text. 3.6. Auto texts we use For clarity and for continuation we use the auto-texts in Appendix 2, 3 and 4 that you need to save in your Smartcard before starting with Cardiology firm. Please see above 3.3. How to make shortcuts with Autotext Page 9 3.7. Ward Round Entry: • WR Clinical lead bleep • Summary of presenting complaint: include at least the day of admission and presenting complaint, e.g. 48 year old lady admitted on the 09/12 with SOB • Chronic Issues: refers to PMH & SH. Given that we found that on many occasions we omitted the social history on at least the Initial WR entry you are also prompted to provide a SH below chronic issues. • Results refer to relevant presenting blood results / blood Gases / ECG / other investigation results. You are expected to have at least documented significantly abnormal blood results, Troponin if appropriate, ECG finding and ECHO. • Management to date refers to the treatment the patient has received, for example ACS protocol, diuretics, inhalers depending on the main issue. • Plan from post take ward round refers to the plan made by the Cardiology Consultant who first reviewed the patient post triage. This is again because post take happens on the Acute Medical Ward where documentation is on paper. • Current issues refer to the problems that are keeping the patient in the hospital or issues that have been recognised during this admission. This means that although a patient might not be kept in the hospital because of hypokalaemia it is still an issue that needs to me addressed. • O/E: On examination refers to current observations & current examination. It is absolutely crucial that you make sure a note is made of at least patient's vitals. • Impression can be as per current issues or at least a comment on whether team thinks patient is doing better or worse. • Plan: EDD: Estimated discharge date – make sure you prompt your senior to provide you with such a date. This will turn out to be very helpful for many things including the morning MDT as well as prioritising the discharge letters you have to write. Follow up plan needs to be documented if patient's discharge date is approaching If it is Friday a weekend handover will need to be made for the patient. This will help you when populating the weekend handover application. You will know beforehand which patient will need to be reviewed by whom (FY1, Medical SpR, Cardiology SpR). If patient is unwell make sure there has been some consideration of the escalation plan should they deteriorate out of hours Daily ward round is documented on the same principles. However the feeling is that there is no need to duplicate information such as the post take plan as long as it has been Page 10 documented electronically. On-going issues should be documented daily as they ensure there is on-going consideration of both acute and chronic problems, as well as for discharge planning. 3.8. SNOMED coding Within the patients record Select Problems and Diagnosis from the Menu options displayed on the left of the window. Diagnosis – the higher window Problems – the lower window. Click on type and search the diagnosis you want to add. Click on Search by Name. Set filter to contains returns more coded terms Select the appropriate SNOMED term. To add the SNOMED term to your Favourites folder click Add to Favourites. Click OK. Note that this is where you will also need to electronically record VTE assessment if not already done. Make sure SNOMED coding is populated with all the diagnosis for each patient including Page 11 important information for patient's that are considered high risk. For example if patient is homeless or an IVDU or colonised by bacteria (MRSA positive), has a permanent catheter and so on and so forth. Page 12 4. Inpatient Documentation -‐ Nurses 4.1. Entering Height and Weight Click on Adhoc Recording Select Vital Signs Adult and Record Click in Weight Measured and record actual weight Click in Height Measured and record actual. This automatically creates and records the BMI Click on the Tick to sign Page 13 4.2. Entering a Nursing Care Evaluation Click on “Clinical notes” on the left hand side of screen to make new entry. Once clinical notes have been selected. Left click on this icon This will bring up the new document box. First select type of note. For Nursing Care Evaluation notes, select Cardiology or Cardiothoracic surgery note. The fastest way of doing so is by just typing 'C'. Then put the title on the Subject space, e.g. Ward 4a Nurse Care Evaluation. You are now ready to document your entry. When you are finished select ‘sign’ Note: If you select save you will be the only one who can access the entry. This might be useful if you want to temporarily save your entry so that you can amend it later. Page 14 5. Outpatient Documentation – Clinicians 5.1. Scheduling Lists will be used to navigate clinic lists Within Powerchart Click on Scheduling icon on Tool bar Or Click View in Task bar and select Scheduling To View a Clinic List for Lead Clinician In the Resource field, Click on the binoculars to select the consultant Enter the required Clinic day in the Date field The clinic for the chosen clinician will display 5.2. Reason for consultation to be entered into Millennium as a SNOMED coded Problem Ensure you have selected the correct patient on the patient banner bar. Click on Problem Page 15 Within the patients record Select Problems and Diagnosis from the Menu options displayed on the left of the window. Diagnosis – the higher window Problems – the lower window. Click on type and search the diagnosis you want to add. Click on Search by Name. Set filter to contains to return more coded terms. Select the appropriate SNOMED term. To add the SNOMED term to your Favourites folder click Add to Favourites. Click OK. To view Favourites folders, click on Favourites button. Page 16 Any folder can be set as your Home folder – right click on the folder and select Set as Home Folder. Please refer to User guide CLIN08 for further details on favourite folders. Patient’s diagnoses and previous procedures will be entered into Millennium as SNOMED coded Diagnoses and Procedures and Investigations (supported by Favourites folders) 5.3. Requesting of diagnostic tests e.g. ECHO (Refer to user guide CLIN05 for further details) Once you have located the patients record, Click on the +Add button next to the Requests option. Enter the name or the start of the name of the request in the ‘Find’ search box. The user may search for any order within the entire trust catalogue using either the ‘Starts with’ or ‘Contains’ options. Note that the system requires a minimum of 3 characters when using the ‘Contains’ option. Next to each test there is a icon. Click this icon to find out Page 17 more about a test using the link displayed in the reference text window that appears. This is used for decision support. Click on the Test(s) to be ordered. The order will turn blue and be bold. It is possible to select multiple orders together by clicking on them. Each item to be ordered will be blue and be bold. Click the Done button to proceed once all the requests have been selected. Complete the Order Details, ensuring the mandatory (yellow) fields are populated. Once the request order entry fields have been completed (there should be 0 missing required details shown in the bottom left hand corner) click Sign The order status will be Processing on the Order Profile. Click on the button showing the number of minutes since you last refreshed the screen. This will refresh the screen. The order status of the request will be updated from Processing to Ordered. Page 18 5.4. Notes from the consultation will be entered into Millennium as a Clinical Note Click on “Clinical notes” on the left hand side of screen to make new entry. Once clinical notes have been selected. Left click on this icon This will bring up the new document box. First select type of note. For ward round/reviews select: Cardiology or Cardiothoracic surgery note. The fastest way of doing so is by just typing 'C'. Then put the title on the Subject space, e.g. Dr Wragg Cardiology Outpatient You are now ready to document your entry. When you are finished select ‘sign’ Note: If you select save you will be the only one who can access the entry. This might be useful if you want to temporarily save your entry so that you can amend it later. Page 19 How to modify pre-‐ existing entries: Once within the patient's record (see above -‐ steps 1-‐8) Click on “Clinical notes” on the left hand side of screen, select the document you wish to modify and left click on the Modify icon Type in under “Insert Addendum Here” When you are finished select ‘sign’ Page 20 The document will now display the newly added text and state in red that the Document Contains Addenda. Using Filters to View documents. Documents can be filtered by several different methods to allow for ease of searching. This screen shot displays documents by “performed by” so you can view documents you have created yourself. You can also filter by Type, by Status, by Date and by Encounter Page 21 5.5. Correspondence will be dictated via G2 speech and letters will be transcribed and stored in EPR • All results will be viewable in Millennium supported by EPR hyperlink • All images will be viewable via PACS hyperlink 6. Outpatient Documentation – Nurses Page 22 6.1. Entering Height and Weight Click on Adhoc Recording Select Vital Signs Adult and Record Click in Weight Measured and record actual weight Click in Height Measured and record actual. This automatically creates and records the BMI Click on the Tick to sign Page 23 7. Troubleshooting 7.1. CRS downtime Ensure you have undertaken your CRS training and you have a valid Smartcard. If both you and your colleagues are unable to log into CRS, it is very likely this is a CRS downtime issue. In this case ward round can be typed on a word document and then copied and pasted to CRS when the system is once again live. There are plans to have a back-up system in the near future where past entries can be reviewed but not modified. Blood results can be accessed via Winpath and images via Barts Health PACS viewer. 7.2. Winpath access Go to start menu Select option _WardEnq Type in your personal logging details in the first window; titled LogOn to Windows. Type in the following details in the second window; titled System Logon. Login: hourihm Password: Price12 7.3. Logging issues with ICT helpdesk • [email protected] • 47680 or 020 7377 7680 • Or for urgent ICT problems please call the dedicated Barts Heart Centre ICT hot phone (live now): 07984368192 If you choose to log an issue with ICT via email, remember it is helpful to copy and paste a print-screen of the error message you get on your screen to the email you send to ICT. Page 24 Appendix 1 e-CareLogic Over N3 Barts User Guide Access to e-CareLogic (e-CL) is now available to users with valid login credentials. This is a user guide on how to access e-CL over the N3 network and also includes details for support. Gaining Access to e-CL over N3 1. 2. 3. 4. 5. The N3 connected user enters the URL for e-CareLogic into the Barts desktop through Internet Explorer 8. URL: https://nww.ecarelogic.uclh.nhs.uk. Users must have an e-CL account provided by UCLH, and these credentials should be used to access e-CL over N3. The user must enable pop up blockers in order to launch the site. If unsure how to do this then contact Barts support desk. The user must select yes when presented with the following pop up message – The webpage you are viewing is trying to close this tab. Do you want to close this tab? The session will remain open as long as the browser window is open. When closing the browser window, the session will expire and the user will need to login to access again (see step 1). Compatibility Settings The user must ensure the following compatibility settings are enabled: • Check if ‘Compatibility View’ is enabled (under tools> compatibility view settings). • The above settings only need to be applied once. Functionality Available on e-CL over N3 There are some areas which will be unavailable to users accessing e-CL over N3. Areas unavailable: • PACS Web access • Op Notes drawings • Document scanning • Ops Centre reports • 18 week reports • Certain Links (where these point to URLs internal to UCLH) Desktop Requirements • • • e-CL is, at present, is only warranted for desktop access (and not laptops or tablets) Windows 7 Internet Explorer 8. Attempts to access e-CL over N3 using an alternative browser will result in an error message advising the user to access again using an approved browser. Support Any issues (including password re-sets) with connecting to e-CL Over N3 should be raised as per below: • Support is provided by the CGI Service Desk: o Email: [email protected] o Contact number: 0203 447 9367 o Hours of support:24/7 • Ensure when logging the issue you state that you are accessing e-CL from Barts. • All incidents raised will be assigned a ticket number that will be used in all future correspondence with the user. Any issues relating to other applications used on the Barts desktop should be raised as per below: o Email: TBC o Contact number: TBC o Hours of support:24/7 Page 25 Appendix 2 Autotext to be created for Cardiology ward rounds WR Initial WR Daily WR (Clinical lead) 0965 WR (Clinical lead) 0965 Summary of presenting complaint Current Issues Chronic Issues: Chronic Issues Social History: Results: - Bloods: - ECG: - ECHO: Management to date: (including past medical history & social history) Results: - Bloods: - ECG: - ECHO: O/E: BP: HR: Sat: RR: T: Plan from post take consultant review: Impression Current Issues: Plan: O/E: BP: HR: Sat: RR: T: 1. EDD 2. Follow up 3. Weekend plan Impression: Plan: 1. EDD 2. Follow up 3. Weekend plan ii. Antibiotics Abx Indication: Agent: Duration: Stop Date: Advice from microbiology: Page 26 Appendix 3 Autotext to be created for Thoracic Ward Rounds WR Lead: Date: Time: Operation: Day X post – XXXXXX Significant comorbidities and issues: Patient well / unwell – details Labs: Significant CXR findings: Significant blood results: Pain control: Modality: Epidural PVB PCA Oral Pain Score at rest: /10 Able/Unable to cough effectively Mobilised / Not mobilized Observations: Temperature: HR: SR/AF BP: Saturation: Oxygen requirement: Drains: Apical – X mls, XX suction, airleak intermittent/on cough/on expiration/continuous Basal – X mls, XX suction, airleak intermittent/on cough/on expiration/continuous XX – X mls, XX suction, airleak intermittent/on cough/on expiration/continuous Medications review: VTE prophylaxis Analgesia Nebulisers Laxatives Antibiotics: Drug: Indication: Day: Culture results: Plan: Drains: Leave on suction / Off suction / Drain out / Other Imaging: portable/ward CXR Antibiotics: Bloods: Discharge planning: When? TTAs? Others changes and plans Page 27 Appendix 4 Autotext to be created for Cardiac Ward Rounds WR Lead: Date: Time: Operation: Day X post - XXXXXX Significant comorbidities and issues: Patient well / unwell - details Labs: Significant CXR findings: Significant blood results: Observations: Temperature: HR: Rhythm: Pacing: BP: Saturation: Oxygen requirement: Weight difference: Wounds: Medications review: VTE prophylaxis Aspirin Ranitidine Diuretic ACEi Betablocker Statin Analgesia - Antibiotics: Drug: Indication: Day: Culture results: Plan: ECG Pacing Wires: Antibiotics: Bloods: Discharge planning: When? TTAs? Others changes and plans: Page 28 Appendix 5 Barts Heart Centre – Quick Reference Guide Viewing Historic Heart Hospital Imaging 1. Log on to Bart Health PACS the link can be found on all PC’s Start menus “Barts Health PACS Viewer” using your Barts Health Trust computer login credentials 2. Click on the icon on the top tool bar to display the search area 3. To search enter the patient’s name (format Surname, Forename) and Date of Birth. Alternatively changing the search criteria to Patient ID and searching with the patient’s historic Heart hospital number prefixed with HH (i.e HH0012345). Page 29