1
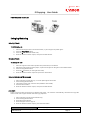
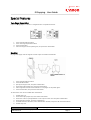
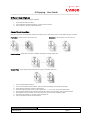
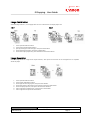
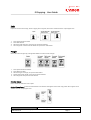
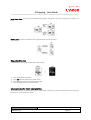
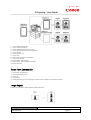
Copying - User Guide
iR
Version 1
July 2005
http://www.canon.co.uk
Canon (UK) Limited
July 2005. Author: Canon Training Department
www.canon.co.uk/
iR Copying - User Guide
iR Copying - User Guide
Contents
Key Contacts ....................................................................................................................................................................4
Introduction .....................................................................................................................................................................5
Basic Features..................................................................................................................................................................7
Original Placement – Platen Glass .............................................................................................................................7
Original Placement – Document Feeder ...................................................................................................................7
Cancelling Copy Job....................................................................................................................................................7
Paper Selection ...........................................................................................................................................................7
Card/Transparencies ..................................................................................................................................................7
Copy Quality ................................................................................................................................................................8
Interrupt ......................................................................................................................................................................8
Sample Set ..................................................................................................................................................................8
Reservation Job...........................................................................................................................................................8
Finisher – Collate/Group/Staple/Hole Punch ...........................................................................................................8
Enlarging/Reducing ................................................................................................................................................ 10
Reducing (Preset) ........................................................................................................................................................ 10
Enlarging (Preset) ........................................................................................................................................................ 10
Reducing/Enlarging in 1% Increments....................................................................................................................... 10
Auto Zoom .................................................................................................................................................................... 10
Fit Image Mode............................................................................................................................................................. 11
Double Sided Copying ............................................................................................................................................. 11
Special Features ............................................................................................................................................................ 13
Two-Page Separation............................................................................................................................................... 13
Booklet ..................................................................................................................................................................... 13
Different Size Originals ............................................................................................................................................ 14
Cover/Sheet Insertion.............................................................................................................................................. 14
Transparency Interleaving ....................................................................................................................................... 15
Job Build................................................................................................................................................................... 15
Image Combination ................................................................................................................................................ 16
Image Separation .................................................................................................................................................... 16
Shift........................................................................................................................................................................... 17
Margin ...................................................................................................................................................................... 17
Frame Erase ............................................................................................................................................................. 17
Negative/Positive .................................................................................................................................................... 18
Storing Forms for Form Composition ..................................................................................................................... 18
To use Form Composition ....................................................................................................................................... 19
Image Repeat .......................................................................................................................................................... 19
PG/Copy Set Numbering......................................................................................................................................... 20
Mirror Image ............................................................................................................................................................ 21
Watermark/Print Date ............................................................................................................................................. 21
Sharpness................................................................................................................................................................. 21
Mode Memory.......................................................................................................................................................... 22
Recall........................................................................................................................................................................ 22
Mail Boxes................................................................................................................................................................ 23
Mailbox Setup ............................................................................................................................................................... 23
Storing Documents ...................................................................................................................................................... 23
To Change Document Name ...................................................................................................................................... 23
Retrieving and Printing Documents ........................................................................................................................... 23
Canon (UK) Limited
06/01/2006. Author: Canon Training Department
www.canon.co.uk
iR Copying - User Guide
Page 3
iR Copying - User Guide
Basic Features
Original Placement – Platen Glass
To be used when copying from books, transparencies, articles that have been cut and pasted together, torn
originals or originals smaller than A5.
Place original on platen glass face down.
Align the corner of the original with the orange arrow at the top left hand corner of the platen glass.
Gently lower the lid.
Original Placement – Document Feeder
Use the document feeder to automatically scan a stack of originals. Do not place originals with torn or curled
edges, large binding holes, or stapled sheets.
1.
2.
Place originals in feeder face up.
Adjust the slide guides to fit the size of the originals.
When the number of pages exceeds the number of pages that can be fed through the document feeder, use Job
Build feature (see Job Build on page 8)
Cancelling Copy Job
Press either the Cancel button on the touch screen or the stop (orange) button on the control panel.
Paper Selection
The default setting is Auto paper select; the machine will automatically select paper depending on the original
size. Paper selection can manually be specified,
1.
2.
Press the Paper Select button.
Select the paper size.
Card/Transparencies
Use the manual feed on the right hand side of the machine, to copy onto light card (check paper weights for
your machine) or transparencies (only Canon transparencies to be used). Transparencies must never be placed
in any of the front loading cassettes.
1.
2.
3.
4.
Open the stack bypass tray on the right hand side of the machine.
Load card/transparencies in the tray and adjust the slide guides to the size of the paper.
The machine will automatically activate the manual feed, select paper size and media type.
Transparencies with paper backing ensure the sealed edge is inserted as the leading edge. The side to be
copied on is placed face up.
Canon (UK) Limited
06/01/2006. Author: Canon Training Department
www.canon.co.uk
iR Copying - User Guide
Page 7
iR Copying - User Guide
Copy Quality
To improve copy quality, select from one of the 4 original type modes. The machine will produce copies
according the type of original i.e. photo.
1.
2.
Press the original type button (default setting is Text).
Select the desired setting (Text, Text/Photo, Printed Image and Photo).
Interrupt
Use the interrupt mode to interrupt the current job to make priority copies
1.
2.
3.
Press Interrupt button.
Place originals, reset the copier, set the desired copy settings and press the Start button.
Once the originals are scanned, remove them from the machine, and wait for the machine to bleep
indicating that the interrupt copy is made. The machine will automatically resume copying.
Sample Set
When making multiple copies, the machine copies only one set to be checked before completing the copying
job. Sample set button will only appear when 2 or more copies are requested, and the document is placed in the
document feeder.
1.
2.
3.
4.
5.
6.
7.
Place originals in document feeder.
Enter the desired number of copies.
Press the Sample Set button.
Set copy settings i.e. 2 sided copying.
Press the Start button. The machine will stop after printing the first set.
If the settings are correct, press the Start Print button, to complete the copy job.
If the settings are incorrect, press the Change Settings button and change copier settings to copy the job
with new settings.
Reservation Job
Up to 5 reservation jobs can be scanned into memory while the machine is copying the first job. The next copy
job will automatically begin when the current job is completed.
1.
2.
3.
4.
Set the first copy job as normal, and press the Start button.
Once all the originals are scanned into memory, press the Done button. The machine is now available for
the next job to be scanned.
Reset the machine (yellow button), and set the next copy job.
Repeat steps 2-3 the set the next job.
Finisher – Collate/Group/Staple/Hole Punch
Copy sets are collated in various ways depending on the machine configuration (optional accessories).
1. Place originals in document feeder.
2. Press the Finisher button.
3. Select the desired option - Collate/Group/Staple.
4. Press the OK button.
5. Enter the desired number copies, and press the Start button.
Canon (UK) Limited
iR Copying - User Guide
06/01/2006. Author: Canon Training Department
www.canon.co.uk
Page 8
iR Copying - User Guide
Note
Your machine may not offer all the following options.
If the collate mode is set
If the Group mode is set
If the Staple, Corner mode is set
If the Staple, Double mode is set
If the Saddle Stitch mode is set
Canon (UK) Limited
06/01/2006. Author: Canon Training Department
www.canon.co.uk
iR Copying - User Guide
Page 9
iR Copying - User Guide
If the hole punch mode is set
Enlarging/Reducing
Reducing (Preset)
To reduce A3→ A4
1.
2.
3.
4.
Place the A3 original in the document feeder, or place original on platen glass.
Press the Copy Ratio button.
Press A3→A4 button (left hand side).
Enter the desired number copies, and press the Start button.
Enlarging (Preset)
To enlarge A4→A3
1.
2.
3.
4.
5.
Place A4 original in the landscape direction (horizontal) in the feeder.
Adjust the slide guides to fit the paper, or place the original on the glass in the A4R direction.
Press the Copy Ratio button.
Select A4→A3 button (on the right hand side)
Enter the desired number copies and press the Start button.
Reducing/Enlarging in 1% Increments
1.
2.
3.
4.
5.
Place originals in feeder face up, or on the platen glass face down.
Press the Copy Ratio button.
Using the numeric pad, enter the ratio (between 25%-400%).
Press the done button.
Enter the desired number copies, and press the Start button.
Auto Zoom
Use to copy from odd size originals to standard size paper. The machine automatically calculates the copy ratio
based on the size of paper and the selected copy paper size.
1.
2.
3.
4.
5.
Place originals in the document feeder only.
Press the Copy Ratio button.
Select Auto Zoom button.
Select the paper size to copy on.
Enter the desired number copies, press the Start button.
Canon (UK) Limited
06/01/2006. Author: Canon Training Department
www.canon.co.uk
iR Copying - User Guide
Page 10
iR Copying - User Guide
Fit Image Mode
Use to copy from edge to edge originals. The image is reduced slightly so that the whole of image is copied
without cropping the edges.
1.
2.
3.
4.
Place originals.
Press the Copy Ratio button.
Select Entire Image button.
Enter the desired number copies, press the Start button.
Double Sided Copying
Use to make 2 sided copies.
1.
2.
3.
4.
Place originals in document feeder (except book, place on platen glass).
Press the Two-sided button.
Select the desired option and press the OK button.
Enter the desired number copies, press the Start button.
Single-sided originals to double-sided copies
Double-sided originals to double-sided copies
Double-sided originals to single-sided copies
Canon (UK) Limited
06/01/2006. Author: Canon Training Department
www.canon.co.uk
iR Copying - User Guide
Page 11
iR Copying - User Guide
Book to double-sided
Canon (UK) Limited
06/01/2006. Author: Canon Training Department
www.canon.co.uk
iR Copying - User Guide
Page 12
iR Copying - User Guide
Special Features
Two-Page Separation
Copies 2 facing pages in a book or a magazine onto 2 separate A4 sheets.
1.
2.
3.
4.
Press Special Features button.
Press Two-Page Separation button.
Press Done button.
Place the original on the platen glass, and press the Start button.
Booklet
Re-paginates page order of originals so that copies are made into booklets.
1.
2.
3.
4.
5.
6.
Press Special Features button.
Press Booklet button.
Specify the original size, and press Next button.
Select the output paper size, and press Next button.
Place originals in the document feeder or scan pages on the platen glass.
Press Done button, and press the start button.
To add a front cover and to saddle stitch the booklet.
1.
2.
3.
4.
5.
6.
Follow steps 1-3.
Select the output paper size, Press Add Cover button.
Select Yes or No to specify whether or not to print on the cover and press Next button.
Select the type of paper, and press Next button.
If Saddle Finisher is attached, select Saddle Stitch booklet, and press OK and Done buttons.
Follow steps 5-6.
Canon (UK) Limited
06/01/2006. Author: Canon Training Department
www.canon.co.uk
iR Copying - User Guide
Page 13
iR Copying - User Guide
Different Size Originals
Copies mixed A4 and A3 size originals together.
1.
2.
3.
Press Special Features button.
Press Different Size Original button, and press Done button.
Place originals, and press the start button.
Cover/Sheet Insertion
Sets the machine to automatically add front and back covers, with sheet inserts using different types of media.
Front Cover – Adds a front cover to each set.
Back Cover – Adds a back cover to each set.
Sheet Insertion – Adds sheet insertions between the pages of single sided sets.
Chapter Page – adds chapter pages between the pages of double sided sets.
1.
2.
3.
4.
5.
6.
7.
8.
Press Special Features button.
Press Cover/Sheet Insertion button, select the desired settings, and press Next button.
Select Printed or Blank, and press Next button.
Select the side the back cover is to be copied onto – 1st or 2nd side, and press Next button.
Specify Sheet/Chapter page numbers, where the sheet is to be inserted, and press Next button.
Select paper source for each cover/sheet insertion, and press OK and Done button.
Set other copy settings i.e. double siding, stapling etc.
Place originals and press the start button.
Canon (UK) Limited
06/01/2006. Author: Canon Training Department
www.canon.co.uk
iR Copying - User Guide
Page 14
iR Copying - User Guide
Transparency Interleaving
The machine automatically interleaves a sheet of paper between each transparency. The interleaf sheets protect
the copies surface of the transparencies.
1.
2.
3.
4.
5.
6.
Press Special Features button.
Select Transparency Interleaving button.
Select the size of the transparencies, and press Next button.
Select the size of interleaf sheet, and press Next button.
Specify Printed or Blank interleaf sheets, press OK and Done buttons.
Place originals, and press the start button.
Job Build
Documents are scanned in multiple batches, when the number of pages exceeds the number of pages that can
be fed through the document feeder, or the originals are a combination of single sided pages, double sided
pages or pages from book. Originals can be scanned using both the document feeder and platen glass. Copies
are output as one document after all batches have been scanned.
1.
2.
3.
4.
5.
6.
7.
Set all copy settings before scanning.
Press Special Features button.
Press Job Build button and press Done button.
Press the start button to start scanning first batch.
Place the next batch and press the start button.
For double-sided original press the 2-sided button. Select the desired setting and press OK button.
After the last original is scanned press Done button to print pages.
Canon (UK) Limited
06/01/2006. Author: Canon Training Department
www.canon.co.uk
iR Copying - User Guide
Page 15
iR Copying - User Guide
Image Combination
Automatically reduces 2, 4 or 8 pages to fit on one or both sides of output paper size.
4 On 1
1.
2.
3.
4.
5.
8 on 1
Press Special Features button.
Press Image Combination button.
Specify the original size and type, and press Next button.
Select the desired setting, and press Next button.
Select the output paper size, press OK button and Done buttons.
Image Separation
Automatically divides an original into equal sections, and copies each section in an enlarged form on separate
sheets of paper.
1.
2.
3.
4.
5.
6.
7.
Press Special Features button.
Press Image Separation button.
Select type of zooming layout, and press Next button.
Select the layout of the page/s to be printed, and press Next button.
Select output paper size, and press OK and Done buttons.
Place originals on platen glass, and press the start button.
Place originals and press the start button.
Canon (UK) Limited
06/01/2006. Author: Canon Training Department
www.canon.co.uk
iR Copying - User Guide
Page 16
iR Copying - User Guide
Shift
Copies and moves the image, when copying from originals, which are smaller than the output paper size.
1.
2.
3.
4.
Press Special Features button.
Press Shift button.
Select the shift direction, and press OK and Done buttons.
Place originals in the document feeder and press the start button.
Margin
Moves the entire original by a designated width to create a wider margin.
1.
2.
3.
4.
5.
Press Special Features button.
Press Margin button.
Select the type of margin, and press Next button.
Specify the margin width, press OK and Done buttons.
Place originals and press the start button.
Frame Erase
Erases shadows and lines from copies.
Original Frame Erase - Erases the dark borders and frames that appear around the copy when the original size is
smaller than the output paper size
Canon (UK) Limited
06/01/2006. Author: Canon Training Department
www.canon.co.uk
iR Copying - User Guide
Page 17
iR Copying - User Guide
Book Frame Erase – Erases lines and shadows that appear around the copy when copying from 2 pages in a
book.
Binding Erase – Erases the shadows from originals which are hole-punched.
Negative/Positive
Inverts the black areas to white and white areas to black.
1.
2.
3.
4.
Press Special Features button.
Press button to display the second screen.
Press Nega/Posi button, and press Done button.
Place originals and press the start button.
Storing Forms for Form Composition
The form composition mode enables you to superimpose a previously scanned image stored in the memory of
the machine, onto another document.
Canon (UK) Limited
06/01/2006. Author: Canon Training Department
www.canon.co.uk
iR Copying - User Guide
Page 18
iR Copying - User Guide
1. Press additional functions
2. Press common settings
3. Press downward arrow to page 3/6
4. Press register form for form composition
5. Press register
6. Choose paper size
7. Press next
8. Select Entire Image or Transparent
9. Press Form Name
10. Enter Name of Document
11. Press Start to Scan background image
12. Press Done X 3
To use Form Composition
1.
2.
3.
4.
5.
Press Form Composition
Select Form from the list
Press Ok
Press Done
Place document you are merging into the document feeder and press the start key
Image Repeat
Images are repeated in vertical and horizontal direction.
Canon (UK) Limited
06/01/2006. Author: Canon Training Department
www.canon.co.uk
iR Copying - User Guide
Page 19
iR Copying - User Guide
1.
2.
3.
4.
5.
6.
Press Special Features button.
Press button to display the second screen.
Press Image Repeat button.
Set the number of repeats - Specify horizontal and vertical directions or set Automatic repeat.
Press OK and Done buttons.
Place original and press the start button.
PG/Copy Set Numbering
1.
2.
3.
4.
5.
6.
7.
8.
Press Page numbering
Choose Numbers and position
Press next
Choose starting number (Add characters if desired)
Press Next
Choose size and colour
Press Ok
Press done X2
Canon (UK) Limited
06/01/2006. Author: Canon Training Department
www.canon.co.uk
- User Guide
Page 20
iR Copying - User Guide
Mirror Image
Image is reversed as a reflection in the mirror.
1.
2.
3.
4.
Press Special Features button.
Press button to display the second screen.
Press Mirror Image button, and press Done button.
Place originals and press the start button.
Watermark/Print Date
Prints a watermark or date of your choice anywhere on the page.
1.
2.
3.
4.
5.
6.
7.
8.
Press Watermark or Print Date
Choose orientation and Position
Press Next
Choose your watermark or create your own
Press next
Choose size and type
Press Ok
Press Done X2
Sharpness
Reproduces text or lines more sharply, and photographs or halftones more softly. Use Low to copy from
photographs, High to copy from text and fine lines.
1.
2.
3.
4.
Press Special Features button.
Press button to display the second screen.
Press Sharpness button.
Adjust by pressing Low or High, and press OK and Done buttons.
5. Place original and press the start button.
Canon (UK) Limited
06/01/2006. Author: Canon Training Department
www.canon.co.uk
iR Copying - User Guide
Page 21
iR Copying - User Guide
Mode Memory
Stores nine copy settings for frequently used copy functions.
1.
2.
3.
4.
5.
Set the copy settings to be stored.
Press Special Features button.
Press Mode Memory, and press Store/Erase button.
Press Store, select location M!-M9, and press Next button.
Select Yes to save copy setting, press OK and Done buttons.
To Store a memory button name
1.
2.
3.
Follow steps 2-3, press Store Name button.
Select the memory button M1-M9, and press Next button.
Enter the name, and press OK and Done buttons.
To recall copy settings
1.
2.
3.
Press Special Features, and press Mode Memory button.
Select the memory button, press OK and Done buttons.
Place originals and press the start button.
Recall
Recalls three previous copy settings from memory.
1. Press Special Features button.
2. Press Recall button.
3. Select from 1 Before, 2 Before or 3 Before button, and press OK and Done button.
Canon (UK) Limited
06/01/2006. Author: Canon Training Department
www.canon.co.uk
iR Copying - User Guide
Page 22
iR Copying - User Guide
Mail Boxes
Frequently copied document originals/masters can be scanned and stored on the machine’s hard disk. The
stored originals/masters can be retrieved and printed as and when required. Mail boxes can also be used for
confidential printing over the network.
Mailbox Setup
1.
2.
3.
4.
5.
6.
7.
8.
9.
Press the star button (Additional Functions) – located just under the ? button.
Press the Mailbox Settings button.
Press Box Set/Store button.
Select the next available mailbox from 00 – 99.
Press Store Name button.
Type the name of the mailbox using the QWERTY keyboard on the display screen.
Press the OK button.
Set the number of days for automatic document deletion. Set to 0 for permanent document storage.
Repeat from step 4 to store a new mailbox.
Storing Documents
1.
2.
3.
4.
5.
6.
7.
8.
Press the Mailbox button to display the mailbox window.
Select the desired mailbox number.
Enter the password if set and press the OK button.
Place document in the Document Feeder or place on the glass.
Press the Scan button.
Press the Document Name* button, and enter the name of the document.
Set Scan settings i.e. double siding, and press the Start button to scan document.
Press the Start (Green) button.
To Change Document Name
* If a document is scanned without a name, the machine automatically generates a number for the document
name (year/month/day the document was scanned).
1.
2.
3.
4.
5.
6.
7.
Select the document to be renamed
Press the Details button.
Press the Change Document Name button.
Press the C key on the numeric key panel to clear the year/month/day
Type the new name for the document
Press OK button/
Press DONE button.
Retrieving and Printing Documents
1.
2.
3.
4.
5.
6.
7.
Press the Mailbox button to display the mailbox window.
Select the desired mailbox number.
Enter the password if set and press the OK button.
Select the document/s to be printed. Press ‘Select All’ button to print all the documents in the mailbox, or
select individual documents in the order of printing, (a box with a number will appear to indicate selection).
Press the Print button.
Press the Change P Settings button. Set print settings i.e. double siding, stapling etc., multiple documents
can be merged into one document. Press the ‘Merge Documents’ button.
Press the Start print button to print.
Canon (UK) Limited
06/01/2006. Author: Canon Training Department
www.canon.co.uk
iR Copying - User Guide
Page 23


![User's Guide [Print Operations]](http://vs1.manualzilla.com/store/data/006865851_1-707f03be75ff1c81e6e96aa922adf3d2-150x150.png)
