1
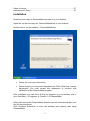
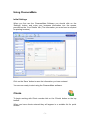
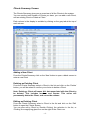
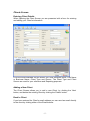
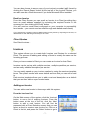
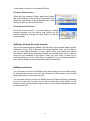
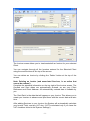
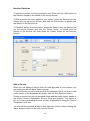
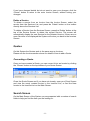
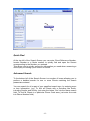
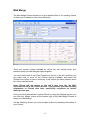
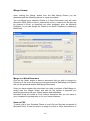
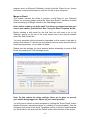
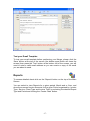
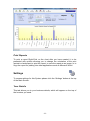
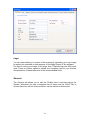
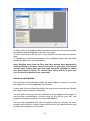
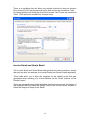
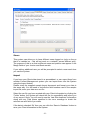
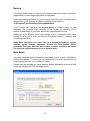
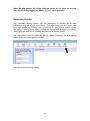
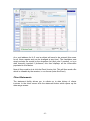
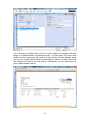
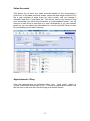
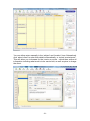
User Guide Installation ........................................................................................................ 2 Using CleanersMate ........................................................................................ 3 Initial Settings ........................................................................................... 3 Clients .............................................................................................................. 3 Clients Summary Screen.............................................................................. 4 Adding a New Client ................................................................................. 4 Deleting an Existing Client ........................................................................ 4 Editing an Existing Client .......................................................................... 4 Clients Screen .............................................................................................. 5 Entering Client Details .............................................................................. 5 Adding a New Client ................................................................................. 5 Email a Client............................................................................................ 5 Saving a Client.......................................................................................... 6 Sending a Letter ....................................................................................... 6 Client Invoices .............................................................................................. 6 Copy an Invoice ........................................................................................ 6 Print an Invoice ......................................................................................... 6 Email an Invoice ....................................................................................... 7 Client Quotes ............................................................................................... 7 Invoices ............................................................................................................ 7 Adding an Invoice ......................................................................................... 7 Editing an Invoice ......................................................................................... 8 Invoice Services ......................................................................................... 10 Add a Service ......................................................................................... 10 Delete a Service ..................................................................................... 11 Quotes ........................................................................................................... 11 Converting a Quote .................................................................................... 11 Search Screen ............................................................................................... 11 Quick Find .................................................................................................. 12 Advanced Search ....................................................................................... 12 Mail Merge ..................................................................................................... 13 Merge Screen............................................................................................. 14 Merge to a Word Document .................................................................... 14 Save as CSV .......................................................................................... 14 Merge to Email........................................................................................ 15 Email Templates ........................................................................................ 16 Test your Email Template ....................................................................... 17 Reports .......................................................................................................... 17 Print Reports .............................................................................................. 18 Settings .......................................................................................................... 18 Your Details................................................................................................ 18 Logo ........................................................................................................... 19 General ...................................................................................................... 19 Invoices and Quotes .................................................................................. 20 Invoice Email and Quote Email .................................................................. 21 Users .......................................................................................................... 22 Import ......................................................................................................... 22 Backup ....................................................................................................... 23 Bulk Email ...................................................................................................... 23 Franchise Version....................................................................................................25 Client Statements............................................................................................25 -1- Sales Accounts...............................................................................................27 Appointments / Diary.......................................................................................27 Installation Download your copy of CleanersMate and save it to your desktop. Open the .zip file and copy the ‘CleanersMateSetup’ to your desktop Double-click to run the installer; ‘CleanersMateSetup’ Follow the on-screen instructions. Please ensure you read and understand the EULA (End User License Agreement’) you must accept this agreement to continue with installation of the CleanersMate program. After installation you can find a link to the program on your desktop, and in your Start Menu Programs CleanPro CleanersMate When first running the CleanersMate software you will automatically start your free 30-day trial period. Click ’Continue Evaluation’ to enter the software and instantly start using CleanersMate. -2- Using CleanersMate Initial Settings When you first use the CleanersMate Software you should click on the ‘Settings’ button, and enter your business information into the spaces provided on the ‘Your Details’ tab. (The Information you enter here is required for printing Invoices) Click on the ‘Save’ button to save the information you have entered. You are now ready to start using the CleanersMate software. Clients To begin working with Client records click on the ‘Clients’ button on the top toolbar. When you have clients entered they will appear in a sortable list for quick access. -3- Clients Summary Screen The Clients Summary gives you an overview of all the Clients in the system. You can see the total number of Clients you have, you can add a new Client, edit an existing Client or Delete a Client. Each column in the display is sortable by clicking on the grey tab at the top of each column. Adding a New Client From the Clients Summary click on the ‘New’ button to open a blank screen to enter a new Client Deleting an Existing Client From the Clients Summary select a Client in the list and click on the ‘Delete’ button, you will be asked to confirm your choice to delete a Client. Note: Deleting a Client will cause ALL data associated with that Client to be deleted. This includes Invoices and Quotes. This action will permanently delete the Client, and cannot be undone. Editing an Existing Client From the Clients Summary select a Client in the list and click on the ‘Edit’ button to open the Clients Screen. You can also edit a Client by ‘Double Clicking’ the selection in the list, or ‘Clicking’ the magnifying glass icon on the right of the Client row. -4- Clients Screen Entering Client Details When Opening the Client Screen you are presented with a form for entering and editing your Client’s information. From the fields available on this screen you must complete either, Last Name or Business Name, Client Type and Source. The Client Type and Client Source are used for your reference and Reporting purposes. Adding a New Client The Client Screen allows you to add a new Client, by clicking the ‘New’ button, and delete the existing Client by clicking the ‘Delete’ button. Email a Client If you have entered the Client’s email address you can send an email directly to the client by clicking either of the Email buttons. -5- Saving a Client Click the ‘Save’ button to save any details entered or changed on the Client Screen. To cancel any changes and close the Client Screen click the ‘Cancel ‘ button. Sending a Letter From the Client Screen you can also send a letter via mail merge to that Client by clicking the ‘Letter’ button. Client Invoices This system allows you to create both Invoices and Quotes for a selected Client. The process of adding and editing a Quote is exactly the same as the Invoicing process. There are two ways of accessing Invoices from the Clients Screen. You can use the buttons on the top toolbar, or you can use the tabs with Invoice summaries at the bottom of the Client Screen. On the top toolbar of the Client Screen clicking the ‘Invoice’ button will take you to the Invoice Screen. If there are no Invoices added yet for the selected Client then you will be taken to a new Invoice screen to enter a new record, If there are existing Invoices, you will be taken to the first one in the list. (You can use the navigator on the top of the Invoice Screen to view all the invoices for a Client) From the lower Invoice Summary tab you can preview a list of Invoices for the Client. To open a selected Invoice from the list you can ‘double-click’ the row, select the row and click the ‘Edit’ button, or click the magnifying glass to the right of the selected row. Copy an Invoice This system allows you to save time by copying an existing Invoice. To copy an existing Invoice, select the Invoice to copy in the Invoice summary list, and click the ‘Copy’ button. This will add a duplicate Invoice to your Invoice summary list. You will need to edit this copied Invoice to alter the contents to your satisfaction. Print an Invoice From the Client Screen you can directly print an Invoice by selecting the required Invoice in the summary list, then clicking the ‘Print’ button. When you have the Invoice preview screen displayed you can print the Invoice by clicking the ‘Printer’ button at the top of the Invoice Preview. -6- You can also choose to save a copy of your invoice in acrobat (.pdf) format by clicking the ‘Export Report’ button at the top left of the Invoice Preview, you can also save as a Word document if you have Microsoft Office installed. Email an Invoice From the Client Screen you can email an Invoice to a Client (providing they have an email address supplied) by selecting the required Invoice in the summary list, then clicking the ‘Email’ button. (You will need an email client configured on your computer to successfully send emails – you cannot send an email through web-based email clients) If you experience problems using the MAPI email service please try exporting the invoice, as detailed above and attaching it manually to an email. Client Quotes See Client Invoices... Invoices This system allows you to create both Invoices and Quotes for a selected Client. The process of adding and editing a Quote is exactly the same as the Invoicing process. Once you have created a Client you can create an Invoice for that Client. Invoices can be set up with multiple services, multiple quantities per service, and an easily editable description per service. You can easily speed up your invoice creation by using the services template items. The system comes with some default services that you can edit or add to. Each service template allows you to add a cost and description as a default that you can then edit on a per-invoice basis. Adding an Invoice You can add a new Invoice in three ways with this system: From the Invoices List On the Main screen of the system, click the ‘Invoices’ button, to see a list of existing Invoices. From the button menu at the top of the list, click the ‘New’ button to add a new Invoice. You will first be presented with a Client Selection screen that you can select a client to create a new Invoice for. Click on a Client in the list, and press the ‘Select’ button to go to -7- a new (blank) Invoice for the selected Client. From the Client Screen When you are viewing a Client, select the Invoice tab at the bottom of the Invoice Screen and then press the ‘Add’ button to be presented with a new (blank) Invoice for the selected Client. From the Invoice Screen From the Invoice screen, if you are viewing or editing existing Invoices, you can add a new Invoice for the selected Client by clicking the ‘New’ button on the top button toolbar. Adding a Source for each invoice The invoice feature has by default a Source entry that must be made for each individual invoice. This is because the reports feature relies on this data to give you the right information. In other words, when you market your clients you need to know what marketing method has worked each time i.e. did the client ring you because of the type of letter you sent them, or was it by a reminder card etc or any other form of marketing? You will then be able to very quickly determine what marketing method works best. Editing an Invoice You can open an Invoice for Editing from the Invoices list on the Main screen by selecting an Invoice in the list and clicking the ‘Edit’ button, or by double clicking the Invoice in the Invoices List. You can also open an Invoice for Editing from the Clients Screen by selecting an Invoice from the Invoices List on the Invoices tab at the bottom of the Clients screen and clicking the ‘Open’ button, or by double clicking the Invoice in the Invoice List. -8- The Invoice screen allows you to view/create/edit an Invoice for your selected Client. You can navigate through all the Invoices entered for the Selected Client using the arrow buttons at the top of the screen. You can delete an Invoice by clicking the ‘Delete’ button at the top of the screen. Note: Deleting an Invoice (and associated Services, is an action that cannot be undone!) Complete the standard information on the top right of the Invoice screen. The Created and Sent dates are automatically entered, as are your Client Reference and Client Address. All automatically entered data is editable by you. The ‘Sent Date’ is the date that will appear on your Invoice. This allows you to create you Invoices in advance and print them with the current date at a later time. After adding Services to your Invoice, the System will automatically calculate your Invoice Total, and any VAT due. (VAT is calculated only if you have the VAT checkbox ticked in the System ‘Settings’) -9- Invoice Services To add services that you have provided to your Client click the ‘Add’ button on the Services toolbar in the middle of the Invoice Screen. To Edit a service you have added to your Invoice, select the Service from the Service List (on the Invoice Screen) and click the ‘Edit’ button, or double click the Service in the Service List. To Delete a service from the Invoice, select the Service from the Service List (on the Invoice Screen) and click the ‘Delete’ button, or double click the Service in the Service List, then press the ‘Delete’ button on the Services Screen. Add a Service When you are adding a Service that you have provided, to your Invoice, you are presented with the blank Service screen. To add a Service you must pick one from the dropdown list (If you wish to add a new service to the dropdown list, please click the ‘Edit Services’ button) Picking a service from the list provided would add the basic service details to the screen: Service, Description, Service Price and Quantity. The system is set up to make generating Invoices as easy as possible by using the Service Templates in this way. You can edit the selected details for that particular Invoice, before clicking the ‘Save’ button to return to the main Invoice Screen. - 10 - If you have changed details but do not want to save your changes, click the ‘Cancel’ button to return to the main Invoice Screen, without saving your changes. Delete a Service To delete a service from an Invoice from the Invoice Screen, select the service from the Services List, and press the ‘Delete’ button on the toolbar directly above the Services List. To delete a Service from the Services Screen, press the ‘Delete’ button at the top of the Service Screen to delete the current Service. The screen will automatically display the next Service for the Selected Invoice. If there are no more Services to be displayed the System will return you back to the Invoices Screen. Quotes On this System the Quotes work in the same way as Invoices. Please see the Invoices section above for details of how to add a Quote. Converting a Quote Once you have created a Quote, you can convert it into an Invoice by clicking the ‘Convert’ button on the top toolbar of your Quote Screen. Close the Quote Screen and if you have not already, open your Client Screen and view the newly created invoice in the Invoices List, or find the New Invoice in the Invoices List on the Main Screen. Search Screen On the Main Screen of the System you are presented with a number of search fields to help you find the Item you are looking for. - 11 - Quick Find At the top left of the Search Screen you can enter Client Reference Number, Invoice Number or a Quote number to quickly find and open the Screen corresponding to the Number you entered. This allows you to quickly access the information you need when answering a client query or looking up an Invoice or Quote. Advanced Search To the bottom left of the Search Screen is a number of boxes allowing you to perform a detailed search for one or more Clients matching the search parameters entered. You can search for all or part of your specified search term, by entering more or less information. (e.g. To find all Clients with a Surname like Smith, including Smythe and Smithy, just enter the letters ‘Sm’ into the Name search field. To find all Clients in a particular Phone Code area, just enter the code into Phone Number field.) - 12 - Mail Merge The Mail Merge Screen allows you to do a detailed filter of you existing Clients to allow you to market to them more efficiently. There are several criteria available by which you can narrow down your results to keep you Mail Merges highly targeted. You must select one of the Client Types from the list on the left, and then you can select one or more of the various options available, and press the ‘Refresh List’ button to view a summary of the criteria you have entered, and a list of the matches found. Note: Clients will not appear in this list if they have the ‘No Mail’ checkbox ticked in their Client Screen. This prevents you from sending information to Clients who have specifically requested no further mailings from you. Once you have selected the required Clients by using the filtering options, you can click the ‘Merge’ button at the bottom right of the Mail Merge Screen to begin your Mail Merge. On the following Screen you have multiple options for sending information to your Clients. - 13 - Merge Screen Upon clicking the ‘Merge’ button from the Mail Merge Screen you are presented with the following options in a pop up window. You can Merge your selected Clients to a Word Document (you will need Microsoft Office 2000 or later to perform this action), create a csv file that can be opened in Excel or imported into other programs such as Microsoft Publisher, or you can Merge the Clients to an email Template for sending a Bulk Email. Merge to a Word Document Click on the ‘folder’ button to select a document that you wish to merge you Clients to (if this is the first time you have performed a Mail Merge the System will use the provided sample Mail Merge Document) Once you have selected the document you wish to perform a Mail Merge to, simply click the ‘Merge’ button and wait for the system to populate you selected document with your Clients names and addresses. Microsoft Word will create a ‘Form Letters’ document that you can save to your computer for printing later or for your future reference. Save as CSV To save a list of your Selected Clients to a csv file (csv files can be opened in Microsoft Excel, or can be used in a merge to a flyer or other documents in a - 14 - program such as Microsoft Publisher), simply click the ‘Export to csv’ button and enter a name and location to save the csv file to your computer. Merge to Email This system includes the ability to perform a bulk Email to your Selected Clients, for accuracy please ensure the ‘Must have Email?’ checkbox is ticked when selecting your Merge criteria on the Mail Merge Screen. Note: before sending any bulk email it is always recommended that you send a test email to yourself first. See ‘Test your Email Template’ below. Before sending a bulk email for the first time you will need to go to the ‘Settings’ section at the top of the main screen and in the pop-up window select the ‘Bulk Email’ tab. You must complete all the information requested on this screen to be able to perform bulk emails. To do this you will need to have an email account with an email hosting provider, or you web site hosts. Please test the settings you have entered before attempting to send a Bulk Email, by pressing the ‘Test Settings’ button. Note: Do Not reduce the delay settings, these are in place to prevent your emails being tagged as ‘Spam’ by your email provider! You will need to select an email template by clicking the ‘Select Email’ button (please follow the instructions below on creating an email template). Use the navigation at the top of the Email Templates screen to find the email template you would like to use and click the ‘Select’ button at the bottom of the screen. - 15 - When you have selected your template the system will estimate how long it will take to perform the Bulk Email, if you have entered the required information in the settings screen you will be able to click the ‘Send’ button, if it is greyed out (as below) you will need to enter the appropriate settings as detailed above. Note: To prevent your emails being tagged as Spam by your email provider, sending is performed in batches, with delays between each batch, to send hundreds of emails will take some time. Adding attachments to your template will increase sending time! Email Templates To perform the Bulk Email you will need to set up one or more Email Templates, by clicking the ‘New Email’ button. You must enter a useful name that will be entered into the Marketing Tab on the Clients Screen, after you perform your bulk email. You can enter the contents of the email, including Subject, Body and email attachment, just like any email client. You can Merge your Client data with the email by placing your cursor in either the Subject or Body and clicking one of the Merge Field buttons on the right of the screen. - 16 - Test your Email Template To test your email template before performing your Merge, please click the ‘Save’ button at the top of the screen (the bottom save button will close the screen) then press the ‘Test’ button at the bottom left of the screen, you will need to enter a valid email address so you can receive a copy of the email you are about to send. Reports To access detailed charts click on the ‘Reports’ button on the top of the Main Screen. You can select to view Reports for a given period, Month and or Year, and show the summed Invoice Amounts for the given Period organised by; Invoice Type, Service, Client Type and Invoice Total, by selecting the desired Report Type and Period and clicking the ‘Create Chart’ button. - 17 - Print Reports To print a report Right-Click on the chart after you have created it, to be presented with options allowing you to change the orientation of the print (portrait or landscape) to print the report, to save the report as an image, or to copy the report for pasting into other applications such as Microsoft Word. Settings To access settings for this System please click the ‘Settings’ button at the top of the Main Screen. Your Details This tab allows you to your business details, which will appear on the top of the Invoices you send. - 18 - Logo You can personalise your version of this system by uploading your own image to replace the standard on that appears on the Main Screen of the software. For best fit resize your image to no larger than 775pixels high and 420 pixels wide. There is a further option to upload your company logo for your invoices and quotations. Please take note of the recommended sizes. General The General tab allows you to edit the ‘Picklist Items’ used throughout the System. Wherever you see a dropdown list of items such as Client Title or Invoice Services, the list of items within it can be edited via this screen. - 19 - To edit an item in a dropdown box, select the relevant list on the left hand side and edit the data that appears in the list on the right. To add a new item to the list click in the ‘Starred’ row and enter the relevant data. To change the order that items appear in the dropdown boxes, alter the order numbers in each list to your satisfaction. Note: Deleting items from the lists, that have already been assigned to existing Clients or Invoices may cause errors in your data. You should change these values when you first start using the software to match your own business needs. To correct these errors will be at your own cost (should it be desired to be corrected). Invoices and Quotes The Invoices and Quotes tabs contain the same options, except you can alter the settings for Invoices separately from Quotes. Invoice and Quote settings that affect the way printed Invoices and Quotes are viewed can be altered in these tabs. You can add a footer to your Invoice/Quote (that will appear at the bottom of every printed Invoice/Quote), common uses for this are for your VAT and Registered Company number, or your website address. You can add a standard note (that will appear below the services on every printed Invoice/Quote), common uses for this are for any standard terms and conditions that apply to your Invoices. - 20 - There is a checkbox that will allow your printed Invoices to show an Amount Due of zero £0.00 if the payment terms for that Invoice are marked as ‘Paid’ Un-ticking this box will show the Amount Due even if the Terms are marked as ‘Paid’. (This options is available for Invoices only) Invoice Email and Quote Email The Invoice Email and Quote Email tabs perform the same functions, except that you can alter the settings for Invoice Emails and Quote Emails separately. These tabs allow you to alter the template for the default email that gets generated when sending your Invoice/Quotes via the ‘Email’ buttons on the Clients Screen. There are standard merge fields available via the buttons across the bottom of the template that will insert the Merge Field at the current cursor location in either the Subject or Body of the Email. - 21 - Users This system can allow you to have different users logged on (only on the pc that it is installed on – this will not work on a network, across different pc’s). The purpose of this is so that a different name and position can appear in the Merge fields of your Invoice and Quote emails. If you add an additional user you will be prompted to select a user each time you use the System. Import If you have your Client data stored in a spreadsheet, or can export them from another Contact Management system you can Import them into this System using the Import feature. Please study the supplied sample Import document and format your data in the same way. You will need to include the field headers used in the sample import file, save your data as a csv file. Select the csv file you have created with your Client information by clicking the ‘Folder’ button, the System will check the file for compatibility and inform you of any errors it finds. You will need to use the ’Last Row Imported’ Information along with any Field Name specified in the error message to check the relevant row and field of your data. If the data is checked ‘Ok’ then you can click the ‘Save to Database’ button to save your Client information to the System. - 22 - Backup It is recommended that you backup your data at least once a week, and it your responsibility to keep those backups in a safe place. If you have backup software on your computer you can inform it to backup the ‘Data’ folder of this System, the default location of this folder is: ‘C:\Program Files\CleanPro\CleanersMate\Data’ If you choose you can click the Backup button to create a copy of your database, this provides extra reliability of the System by allowing you to restore a dated copy of your Data should any data corruption occur. Simply go to the ‘Backup’ tab in the settings, then it is advised to click ‘save backup’ to allow you to save your data to an outside source i.e. memory stick or external hard drive. Note: Data corruption can occur due to a number of reasons; system crashes, power outages, computer viruses etc. This system cannot guarantee that your data will not become corrupt, therefore we advise you perform regular backups of your System data. Bulk Email You must complete all the information requested on this screen to be able to perform bulk emails. To do this you will need to have an email account with an email hosting provider, or you web site hosts. Please test the settings you have entered before attempting to send a Bulk Email, by pressing the ‘Test Settings’ button. - 23 - Note: Do Not reduce the delay settings, these are in place to prevent your emails being tagged as ‘Spam’ by your email provider! Franchise Version The franchise version allows you the franchisor to receive up to date information from all of your franchisees. This information which is easily sent by e mail, allows you to keep track of turnover for each month, exactly where the work is coming from, what services are being sold, average job values, client types etc and this is normally received on a monthly basis. The franchisee needs to enter the section called Franchise, by clicking the button at the top (amongst the others). This opens the following screen: - 24 - An e mail address for H.O. and a subject will need to be entered (this saves for all future reports and can be changed at any time). The franchisee now simply selects the month by the dropdown list (and year if needed), or by a date manually inputted if preferred, this then displays all the information populated in a list below. Now all they need to do is click the Email Invoice List. This will then send a file which is viewable by the receiver, in csv format (looks like Excel). Client Statements The statement facility allows you to collate up to date history of clients invoices. In the client screen click the statement button which opens up the date range screen: - 25 - You can select anything from a day to a year simply be selecting the date range, or if desired select a month and a year – or just a year. Fill in the e mail details and click send (you will need an e mail client to do this (hotmail, gmail etc is not an e mail client as they are web based). When you send it by e mail the recipient will receive it in pdf format. Alternatively you can select print to print a paper based version. - 26 - Sales Accounts This allows you to send your sales accounts details to your accountant in quick time. In the sales accounts screen, select the date range required, fill in the e mail recipient (it stays there for future sends, until you change it manually) and click ‘e mail sales list’. This will be sent in csv format so that your accountant can utilise the information in a spreadsheet format. You will need an e mail client to send this by e mail. Alternatively if you use hotmail, gmail etc, you can export this information to a csv file (just like Excel) to save to your desktop and e mail it that way. Appointments / Diary View the appointments by selecting either ‘day’, ‘work week’, ‘week’ or ‘month’. Work week means Mon to Fri. To create an appointment double click the line next to the time slot, this will bring up a smaller screen. - 27 - You can either enter manually in the ‘subject’ and ‘location’ lines. Alternatively click ‘select client’ to enter their details automatically, or ‘select invoice/quote’. This will allow you to browse for the invoice or quote – which then enters all information including what work is to be carried out, as well as price to charge the client. - 28 - To print off a daily worksheet, simply click the print button, you can then select what view (we would recommend ‘day view’) to show the page to be printed. If you have other staff that want their own appointments (that wont clash with other users), then at the bottom of the screen click ‘show users’. Then click ‘add/edit’ This allows you to add other staff and customise their colour code scheme for easy reference. QuoteMASTER The QuoteMASTER system allows users to carry out in-home quotations with different packages to offer clients – thus increasing job ticket values. It also allows users to offer maintenance plans. All packages and plans are fully editable and customisable. For an in depth tutorial please log on to: www.cleanersmate.co.uk/carpet_cleaning_software_tutorials.htm and scroll to ‘Latest Features Tutorials’. Text Marketer This allows the user to send texts either individually or by bulk – using the filter system in Marketing. A simple sign up with www.textlocal.com is required. Please use this link to see how it works www.cleanersmate.co.uk/cleaners_marketing_software.htm#Text_Marketing - 29 -