1
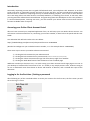
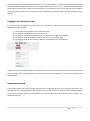
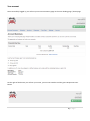
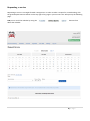
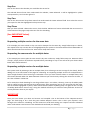
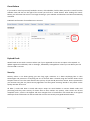
Online Client Account Portal
User Guide v1.1.2
24/06/2015 12:42
Contents
Introduction ........................................................................................................................ 3
Accessing your Online Client Account Portal......................................................................... 3
Logging in for the first time | Setting a password ................................................................. 3
Logging in on subsequent visits ............................................................................................ 4
Forgotten password ............................................................................................................ 4
Your account ....................................................................................................................... 5
-Account Summary ............................................................................................................ 6
-Schedule .......................................................................................................................... 6
-Invoices ............................................................................................................................ 6
-Payments ......................................................................................................................... 6
-Your data ......................................................................................................................... 7
-Settings ............................................................................................................................ 7
-Manage cards ........................................................................................................ 7
-Log out ............................................................................................................................. 7
Requesting a service ......................................................................................................... 8,9
Cancellations ..................................................................................................................... 10
Expired credit / debit cards ................................................................................................ 10
Security ............................................................................................................................. 10
General ............................................................................................................................. 11
2|Page
Introduction
Historically requesting services was via good old fashioned email, text and phone calls. However as we have
grown and strive to continually improve the level of service we offer, we have introduced an Online Client
Account Portal. In addition to improving the way we handle booking requests, it has a host of other benefits
too: From being able to see what services are already booked in, to allowing you to check, in real-time, when
your dog was both collected and returned home. The great thing about the developers we use is the product is
in continual development, meaning over time, you will see both your Online Client Account Portal and the
functions available within it improve.
Accessing your Online Client Account Portal
After we have received your completed application form, we will setup your own Online Client Account. You
will receive a welcome email from us, containing your account number, a direct link to the portal and this User
Guide.
Your individual link will look similar to the one below:
https://2505halodogs.petsoftware.net/clientportal?account=1234567891
(N.B the last 10 digits are your individual account number, i.e. in the example above: 1234567891)
There are 4 ways to access your Online Client Account Portal:
1)
2)
3)
4)
Clicking the link contained in your welcome email
Clicking the link contained in any invoice email (issued on the last day of every month)
Clicking the ‘Client Account Portal Login’ link from the top right of our website
Clicking the ‘Book Now’ button from the banner of our Facebook page
Whichever method you choose to use, it is worth saving your Client Account Portal Login page as an icon on
your desktop or bookmark for future ease of use. It is usually a very simple process to do, however saving as
an icon or bookmark varies from device to device and browser to browser, and is outside the scope of this
document.
Logging in for the first time | Setting a password
After following any of the 4 methods above to access your account for the first time, the first screen you will
see is the ‘Log in’ screen.
3|Page
Before accessing your account for the first time, you will need to setup a password. Click the link in blue text,
‘Create Password’ which will take you to a new page where you can enter in your 10 digit account number or
email address and click the ‘Create Password’ button. An email will be sent to your registered email address
with a link to follow where you can choose and setup a password, doing this will also log you straight into your
account.
Logging in on subsequent visits
If you have saved the login page as a desktop icon or bookmark, you will now have 5 ways to access your
Online Client Account Portal:
1)
2)
3)
4)
5)
Clicking the link contained in your welcome email
Clicking the link contained in any invoice email
Clicking the ‘Client Account Portal Login’ link from the top right of our website
Clicking the ‘Book Now’ button from the banner of our Facebook page
Clicking the desktop icon from your desktop or bookmark from your browser
Simply fill out your account number or email address in the top field, your password in the bottom field and
click the ‘Login’ button. Many browsers will offer to remember these details for you and auto-complete the
fields in future.
Forgotten password
In the unfortunate event that you forget your password, simply click the blue text ‘Forgotten password?’ This
will take you to the next page where you can enter your account number or registered email address followed
by the ‘Reset Password’ button. An email will be sent to your registered account allowing you to choose a new
password and login.
4|Page
Your account
Once successfully logged in, you will see your Account Summary page as the main landing page / home page.
On the right of the banner you will see your name, your account number and the green Request Services
button
5|Page
Just under the banner you will see seven clickable text links in blue font: Account Summary, Schedule, Invoices,
Payments, Your Data, Settings and Log out
Account Summary
Account Summary
The Account Summary is also the default landing page when you login to your account. It shows an overview
of your account. It lists any outstanding invoices, the amount, the due date and the ability to pay each invoice
separately or pay all of the outstanding for multiple outstanding invoices.
Schedule
This is an important page, as it shows all the services you have currently booked in from a calendar view up to
six months in advance. We guarantee that if a service is displayed here, it will be delivered.
Above the calendar is the current month and year you are viewing. Use the blue arrows either side of the date
to scroll back and forth between months.
The default view is of the current month, however if you click on a specific day, you have the option to cancel a
day (more on this later) or you can see in real time when your dog was both collected and returned home. This
function is linked to the team’s mobile devices and incorporates geo-tagging. This means by clicking on the
little green map marker next to each time (pick up & drop off), you can see where the device was when the
button was pressed, which should be right outside your front door.
Invoices
A list of all invoices for the previous twelve months in PDF format. These can be downloaded and printed if
required.
Payments
Lists payments received information, including the payment date, the amount and the relevant invoice
number
6|Page
Your Data
Another important page. This is essentially the most up to date page for contact details, alternative contact
details, and importantly; emergency contact details (if different to what we have already).
It is also the page to detail any house routines you would like us to comply with when collecting or dropping a
dog home including any alarm or medication administration or feeding instructions. To change any data,
simply click ‘edit’ in blue text next to the relevant section titles.
Settings
This is a frequently requested option. On this page you can switch on and off the ability to allow automatic
payments (similar to a direct debit feature) from a stored card in your account when a new invoice becomes
due. Invoices are issued on the last day of every month. If the ‘Allow automatic payment’ box is ticked, a
payment attempt will be made against your registered card for the invoice amount. If successful, you will get
an email confirmation and receipt. If the payment attempt is unsuccessful for any reason, you will receive an
invoice via email as usual.
You will also receive an invoice via email on the last day of the month if the box is left un-ticked. This then
leaves you the option to manually pay invoices with any stored card details or alternative methods such as
bank transfer. After ticking or un-ticking the ‘Allow automatic payment’ box, click the ‘Save’ button for your
preference to be updated.
-Manage Cards
At the bottom of the Settings page is ‘Manage Cards’ Your stored cards can be managed here.
Click the blue text ‘managed here’ to add or delete a card from your account.
Log Out
Once you have finished with your account, click ‘Log out’. This is especially important if you are using a public
or shared computer.
7|Page
Requesting a service
Requesting a service is a straight forward 3-step process. In order to make a request for a new booking, click
the green Request Services button on the top right of any page in your account. This will open up the following
page:
N.B you can scroll the calendar by using the
above the calendar.
buttons from
8|Page
Step One
Click on the date in the calendar you would like the service for.
The selected date will now show underneath the calendar, ‘Dates Selected’. It will be highlighted in yellow
accompanied by a red X to the right of it.
Step Two
Click on the ‘Service Item’ drop down menu from underneath the ‘Dates Selected’ field. Then select the service
you require for the date highlighted in the previous step.
Step Three
Now you have selected a date and a service, click the blue ‘Add Service’ button which adds the item into a list
at the bottom of the page ready to be sent over for scheduling.
[See IMPORTANT below]
Requesting multiple services for the same date
If for example you want to book in day care and a shampoo for the same day, simply follow steps 1-3 above,
then repeat from step 2 as the date is still highlighted by the system in the ‘Dates Selected’ field. Remember to
select the alternative service from the ‘Service Item’ drop down menu.
Requesting the same service for multiple dates
If, for example you want to plan the next month’s day care in advance, simply follow steps 1-3. However whilst
at step 1, simply click on all the dates required before proceeding to step 2. You will see all your chosen dates
listed under ‘Dates Selected’
Requesting multiple services for multiple dates
The system works by selecting a date or multiple dates, then selecting a service to assign for the date/s, before
adding to a list at the bottom of the page for submitting. So requesting multiple services for multiple dates is
quite straight forward. The main thing to remember is once you have selected a date or multiple dates, they
will remain selected under the ‘Dates Selected’ field until you clear them by clicking the red X next to them, or
the ‘clear all dates’ in blue text.
So for example to book boarding for one dog, Follow steps 1-3 as above, choosing ‘First Day of Holiday With
Pick Up 1 Dog’ from the ‘Service Item’ drop down menu. After completing step 3, you must now click the red X,
next to the date highlighted in yellow, under ‘Dates Selected’ before repeating steps 1-3 again for the ‘Last Day
of Holiday With Return Home 1 Dog’. Using this method will allow you to book as many different services for
as many different dates as you require.
IMPORTANT
Once you have chosen your dates and services and compiled a list at the bottom of the ‘Request Services’
page. The final thing to do is click the green ‘Submit Request’ button. This is when your request’s come
through to the office for scheduling. You will receive an email both stating your request has been submitted
and a confirmation email once we have checked and confirmed your booking.
9|Page
Cancellations
If you need to cancel a previously booked in service, click Schedule, click the date you wish to cancel from the
calendar view and over on the right of the screen you will see a ‘cancel’ button. After clicking the ‘cancel’
button you will notice the service is no longer showing in your calendar and therefore has been automatically
cancelled.
N.B email confirmation of cancellations are not sent.
Expired Cards
We will send out via email a notice to advise you if your registered card is soon to expire or has expired. To
update registered card details, click on ‘Settings’, followed by ‘managed here’ where you can delete your old
card and add a new one.
Security
Security online is not about getting just one thing right, moreover it is about employing best in class
technologies and practices in everything we do. All account data is hosted using the Amazon Elastic Cloud
Compute service. This is the same Amazon that you buy all your bits & pieces from online. Data is protected in
your account using the very latest security algorithms and encryption receiving “Grade A” test passes via the
Quality SSL Labs server test.
All debit / credit card data is stored with Stripe. Stripe are world leaders in internet based credit card
processing and they treat security of clients data as their number one priority. Their servers are all PCI
compliant level 1, which is the highest and most stringent form of certification. All stored data is encrypted
and Stripe forces all browsers to interact with their services via securely encrypted HTTPS channels.
10 | P a g e
General
Both booking requests and cancellations can be made online up till 23:59 on the day before the expected
service delivery. However please note weekends and Bank Holidays should be requested by 2pm on the
preceding Friday, (or the last normal working day for Bank Holidays falling on a day other than a Monday) in
order that we can make suitable arrangements for the necessary keys to be issued to the staff on duty over
the weekend or Bank Holiday. We will endeavour to accommodate late requests, but ask for these to be
occasional opposed to routine due to the associated complexities of key assignment.
If you wish to have the same services on the same days on a regular basis, i.e. Day Care 5 days per week or
regular Monday, Wednesday & Fridays for example. We have the ability to set this up as an administrator.
Therefore rather than having to keep login in and requesting the same services on a weekly, or monthly basis,
let us know at [email protected] and we will set the recurring services up in your account. You will still
have the full functionality of all the features available in your account without the need for continually
requesting the same services.
All boarding requests must have two dates. The check-in date, i.e. the first day with collection from home, and
the check-out date i.e. date to return home. If necessary any day’s in-between the check-in and check-out
dates will automatically be added to the booking after submission.
Please be aware this system is not fully automated. Every request and cancellation is still acknowledged by a
human and scheduled in manually. This means any comments left in the notes field will be read and any errors
with a booking should be identified. This is a system to assist us deliver a better service, not to replace us!
11 | P a g e