1
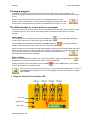
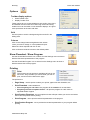
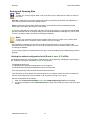
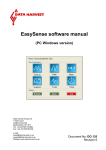
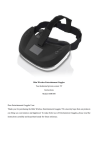
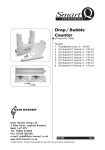
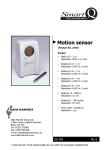
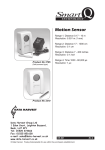
The eLearn & Go software user guide DO174 (2) eLearn & Go software Contents Overview ......................................................................................................................................... 3 The ACEs .................................................................................................................................... 3 System requirements ...................................................................................................................... 4 Installing the eLearn & Go software ................................................................................................ 4 Starting eLearn & Go for the first time............................................................................................. 4 Selecting a user level .................................................................................................................. 4 Connecting an ACE......................................................................................................................... 5 The ACE window............................................................................................................................. 5 The eLearn & Go screen layout ...................................................................................................... 6 Toolbars....................................................................................................................................... 6 The Standard and Control toolbar............................................................................................ 6 Running a control program.............................................................................................................. 6 Creating a program ......................................................................................................................... 7 The different ways to ‘Learn’ and run a program ............................................................................ 7 1. Using the Learn & Go Controller ACE..................................................................................... 7 2. Using the screen Learn & Go on an ACE................................................................................ 8 3. Using the Learn and Go/Stop icons on the control toolbar ..................................................... 8 Switching Outputs on and off....................................................................................................... 8 The Wait command ..................................................................................................................... 9 The flowchart symbols .................................................................................................................... 9 Loop program ................................................................................................................................ 10 To check a control program .......................................................................................................... 10 Pause and single step ............................................................................................................... 10 Transfer to Go ............................................................................................................................... 10 Options .......................................................................................................................................... 11 Toolbar display options.............................................................................................................. 11 Grid ............................................................................................................................................ 11 Colours ...................................................................................................................................... 11 Show Flowchart / Show Program.................................................................................................. 11 Printing .......................................................................................................................................... 11 Saving and Opening files .............................................................................................................. 12 Altering the default configuration for ACE and eLearn & Go files ............................................. 12 Licence conditions, copyright information and disclaimers ........................................................... 13 Data Harvest's policy is to continually improve products and services, so we reserve the right to make changes without notice. It is acknowledged that there may be error or omissions in this publication for which responsibility cannot be assumed. No liability will be accepted for loss or damage resulting from use of information contained in this manual or from uses as described. © Data Harvest Group Ltd. 2007: all rights reserved This manual may be freely copied for use within the purchaser’s establishment. 1 Eden Court, Leighton Buzzard, Bedfordshire LU7 4FY Tel: +44 (0)1525 373666, Fax: +44 (0)1525 851638 e-mail: [email protected], [email protected] Website: www.data-harvest.co.uk © Data Harvest Group Ltd. 2 Document No: DO174 (2) DO174 (2) eLearn & Go software Overview A Learn & Go controller is the first step towards control without a computer. It enables pupils to progress from using a switch in a simple circuit to ‘programming’ a sequence of on-off switch actions to bring a picture to life and movement to models. Learn & Go can be thought of as an intelligent switch box with a memory. It is able to remember, or learn, the order in which switches are pressed, how long each switch is held down, and how long between the presses. Learn & Go can then ‘play back’, from memory, the sequence of switch actions that a pupil has made. The difference between using Learn & Go and using a computer to run a sequence of actions is that Learn & Go needs button presses to teach it what to do, whilst a computer needs commands or instructions typed in. eLearn & Go can be used to ease the progression from Learn & Go to computer control. This software can show a program as it is created in line-by-line commands or as a flowchart, to make the link with a computer control program. Pupils can view their sequence of switch actions as the symbols and instructions used in a computer program. Example 1: Making an eye wink Pupil’s actions on a Learn & Go controller I pressed the LEARN button I pressed the Output 1 button I held it down and counted 1 I let go of the Output 1 button I pressed the LEARN button The Wink program in a flowchart format A text view of the Wink program The ACEs eLearn & Go offers a simple programming language that allows students to control the outputs of on-screen Animated Control Environments (ACEs). When eLearn & Go is installed, the following eLearn & Go ACEs will also be installed: 1 2 3 4 5 6 An on-screen representation of Learn & Go controller Bee model Traffic Light model Washing Machine model Fair ground model Lighthouse model Found in Model Pack 1 Model Pack 1 Model Pack 1 Model Pack 2 Model Pack 2 The eLearn & Go model ACEs will operate as if connected to a Learn & Go controller. The model packs are available to purchase from Data Harvest. Each pack contains 3 brightly coloured flat packed plastic models, which can be assembled in minutes. © Data Harvest Group Ltd. 3 DO174 (2) eLearn & Go software System requirements Computer: Operating System: Minimum Software: Display: IBM PC (or compatible) Windows XP, Windows Vista, Windows 7 (32-bit and 64-bit compatible) Microsoft Internet Explorer 6.0 Windows Installer 3.1* Microsoft .NET Framework 2* Adobe Reader software (V7 or above**) Minimum 800 x 600 with 256 colours Recommended: 1024 x 768 with High Colour - 16-bit *If Microsoft .NET Framework 2, Installer 3.1 is not detected during the installation set up process, they will be automatically installed prior to the eLearn & Go application install. This may extend the installation time significantly. ** To be able to view and print the software manuals you will need Adobe Reader installed. Installing the eLearn & Go software • Log on as ADMINISTRATOR (or with equivalent access rights) on the system. • Close any open programs – you may need to restart your machine for configuration changes to be made. • Insert the eLearn & Go CD ROM into the CD Drive. Windows should detect the CD and automatically start up the eLearn & Go auto run program. If auto run fails to start, use Windows Explorer to navigate the CD ROM contents and double click on the Setup.exe file. • Follow the on-screen instructions to complete the installation of eLearn & Go and its associated files onto the hard disk. • An installer for Adobe Flash Player will automatically start upon finishing the Go installation wizard*. Select INSTALL. • When the installation is complete, eject the CD ROM and store it safely. Restart your system. A Windows installer package (.msi) of the eLearn & Go software is available. The .msi package for 32 bit systems is supplied in the i386 directory and for 64 bit systems in the amd64 directory. (To check your system properties, click on Start, right click on Computer and select Properties). Note: If you have a later version of Adobe Flash Player installed on your computer than that supplied with the eLearn & Go software you may get a failed to register error message e.g. 'Error 1904.Module C:\Program Files\DHG\ eLearn & Go\Flash10_.ocx failed to register’. Select OK, the installation will complete and the eLearn & Go ACEs should still function correctly. See page 12 for information on altering the default locations for the ACEs and eLearn & Go files. Starting eLearn & Go for the first time Start the eLearn & Go software e.g. Start ► Programs ► Data Harvest ► and double click on eLearn & Go Software. Selecting a user level The first time the eLearn & Go program is run a ‘select Program Level’ window will automatically open. eLearn & Go offers 2 user levels, roughly corresponding to student ages of: • 8 - 10 years old - Level 1 • over 10 years old - Level 2 Note: In Level 1 the Pause and Single Step features are hidden, wait times are rounded up to the nearest whole number. Once opened the program level can be altered using the Level icon on the top right of the eLearn & Go window. Click on the Level icon to cycle through the levels. The currently selected level will be saved when eLearn & Go is closed. © Data Harvest Group Ltd. 4 DO174 (2) eLearn & Go software Connecting an ACE The eLearn & Go program will open with the Learn & Go controller ACE connected. Once an ACE window is connected it can be hidden from view by clicking on the Hide ACE icon. To restore the ACE simply click back on the Show ACE icon. Close an ACE window by clicking on the Disconnect ACE icon. To open an ACE click on the Connect ACE icon. A file dialogue box will appear allowing you to choose which ACE to open. The ACE window An ACE can be moved and re-sized like a standard window. Click here and drag to move the ACE window Use to minimise (button on the Windows taskbar) Close Use to maximise (completely fill the screen) or when maximised to restore down to standard size Click and drag any edge to resize the window Some ACEs have a control bar, which will alter according to the features on the ACE. To turn the ACE sounds on or off To show or hide output labels To show or hide the screen Learn & Go For information about the ACE (description and tasks) To reset an ACE back to its original start condition, click on Reset ACE in the control toolbar. ACE control bar Screen Learn & Go Note: The ACEs designed to work with the Go control program can be used with eLearn & Go but may not have keyboard control and may have inputs which cannot be controlled. © Data Harvest Group Ltd. 5 DO174 (2) eLearn & Go software The eLearn & Go screen layout Control toolbar Menu bar Standard toolbar Program is displayed in a flowchart format Program is displayed in a text format Click on a text line and it will highlight the appropriate symbol in the flowchart and visa versa Right click to alter the scale of view or delete your control program Right click in this area to alter the font size of the text Window divider – drag left or right to alter the window size/shape Toolbars The toolbars can be positioned at the top, bottom or left of the window. To move, position the mouse pointer over the dotted line on the left of the toolbar, when it becomes a symbol, click hold down and drag to its new position. The Standard and Control toolbar To begin writing Save your a new control control program program Open an existing program To set the display options To Go or Stop the control program running For the To Start or Stop flowchart print options Learn mode To run through a program step-by-step Temporarily halt the running program To hide/show the flowchart view of the program To Connect (open) or Disconnect (close) an ACE Don't Loop Program – replace loop with a Stop command at end of program. Loop Program - replace Stop with a flow line that loops back to the first command. To hide/show the textual view of the program Running a control program Once your control program has been created it can be run either by clicking on the Go/Stop icon or the Go button on the screen Learn & Go. As it runs the symbols will highlight as they become active. To stop a program running, either click on the Go/Stop icon or the Learn button on the screen Learn & Go. When you stop a control program from running it may stop leaving outputs still on. Click on the Reset ACE icon before you next run your program to set the ACE back to its original start condition. © Data Harvest Group Ltd. 6 DO174 (2) eLearn & Go software Creating a program A computer controlled system needs a sequence of commands, this is called a program. The program should give commands in the correct order to tell the computer exactly what to do and when to do it. While in Learn mode (when the Start Learn icon is highlighted) each time an output or motor is switched On or Off a command will appear in the flowchart and text area with a wait command to record the time between each switch On or Off. The different ways to ‘Learn’ and run a program The screen Learn & Go and the Learn & Go ACE simulate the way the Learn & Go controller is used to create a sequence. The icons on the toolbar operate in the same manner as the Go control program. Learn mode You can start Learn mode either by selecting the Learn icon on the screen Learn & Go or the Learn & Go Controller ACE. or by selecting the Learn button You can stop Learn mode either by selecting the Stop Learn icon button on the screen Learn & Go or the Learn & Go Controller ACE. or by selecting the Go When you stop Learn mode a flow line will automatically loop from the last command back to the first switch output command. This loop will make the program run continuously. To make a program run only once, click on the Don’t Loop Program icon. The loop will be replaced by a Stop command at the end of the program. Start and Stop When you have created your program you can run it by either by clicking on the Go/Stop icon the Go button on the screen Learn & Go or Learn & Go Controller ACE. To stop a program from running either click on Go/Stop Learn & Go or Learn & Go Controller ACE. or icon or the Learn button on the screen When you stop a control program from running it may stop leaving outputs still on. Click on the Reset ACE icon before you next run your program to set the ACE back to its original start condition. 1. Using the Learn & Go Controller ACE Output (1) hot spot Output (2) hot spot GO button LEARN button Status light © Data Harvest Group Ltd. 7 Output (3) hot spot Output (4) hot spot DO174 (2) eLearn & Go software ● If the Learn & Go Ace isn’t already open select Connect ACE then select the Learn & Go ACE file from the eLearn & Go ACEs files folder. ● Click on the LEARN button on the ACE - the status light will stay lit solidly. ● Switch the outputs on or off as required (see below) to create your program. ● Click on the GO button on the ACE to finish the program – the status light will flash. ● Click on the GO button on the ACE to run the program – the status light will stay lit solidly as the program runs. ● Click on the LEARN button on the ACE to stop the program running - the status light will flash. To run the program again, click on the GO button on the ACE. 2. Using the screen Learn & Go on an ACE • Click on the LEARN button solidly. • Switch the outputs on or off as required (see below) to create your program. • Click on the GO button will flash. • Click on the GO button to run your program– the status light will stay lit solidly as the program runs. • Click on the LEARN button to stop the program running - the status light will flash. To run the program again, click on the GO button. - the status light will stay lit to finish the program – the status light Screen Learn & Go 3. Using the Learn and Go/Stop icons on the control toolbar • Click on the Learn icon. • Switch the outputs on or off as required (see below) to create your program. • Click on the Stop Learn icon • Click on Go/Stop to run your program. • Click on Go/Stop again. to stop your program running. Click on Go/Stop to run the program to finish. Switching Outputs on and off The outputs on the eLearn & Go ACEs can be controlled using the left-hand mouse button and keyboard numbers. To switch more than one output on at the same time use the keyboard numbers. 1. Using the mouse on an ACE: - move the mouse pointer to the area of an output, when it’s over the hot spot it will change to the hand symbol. Click in the output’s hot spot to switch it on, keep the mouse button held down and it will stay on, release the button and it will switch off. © Data Harvest Group Ltd. 8 DO174 (2) eLearn & Go software 2. Using the mouse on the screen Learn & Go: - click with the mouse in the output’s hot spot area on the screen Learn & Go to switch it on, keep the mouse button held down and it will stay on, release the button and it will switch off. The Output’s hot spot areas 3. Using keyboard numbers: - Press the number key for an output to switch it on, keep the key held down so it stays on, release the key and it will switch off. Note: If the number keys fail to respond click with the mouse on the ACE (the mouse cursor has to be positioned within the ACE window). If you are using a numeric keypad check that Number Lock is on. 1 2 3 4 The Wait command The Wait command will make the program delay doing anything for an allotted amount of time. It is created: • When the mouse button or number key is held down - so keep the button held down for the length of time you want an output to be on. • Between mouse button clicks or number key presses - so wait the required length of time before you select the next output. • Between the last mouse button click or key press and stopping Learn mode. The flowchart symbols The Start symbol is used at the beginning of a flowchart. When eLearn & Go is opened a Start symbol is automatically placed in the flowchart area. When New is selected the existing program is cleared and replaced by a new Start symbol ready for a new program. The Output symbol is used to switch an output or motor On or Off. A motor output is switched Forward (Fwd) or Reverse (Rev). The Wait (process) symbol is used to make the flowchart delay doing anything for an allotted amount of time e.g. to keep an Output switched on for 2.8 seconds. Wait times are rounded up to the nearest whole number when eLearn & Go is set at Level 1, or to one decimal place at Level 2. The flow line connects the symbols in the correct sequence and direction of flow. The Stop symbol is used to stop a program running © Data Harvest Group Ltd. 9 DO174 (2) eLearn & Go software Loop program When you stop Learn mode a flow line will automatically loop from the last command back to the first switch output command. This loop will make the program run continuously. To make a program run only once, click on the Don’t Loop Program icon. The loop will be replaced by a Stop command at the end of the program. Flow line To check a control program A control program normally runs very quickly. When eLearn & Go is set to Level 2 there are two features which can be useful when evaluating or ‘talking through’ a program. These are: 1. Pause - used to temporarily stop a program running 2. Single Step – to advance one step at a time through the symbols in a program. Pause and single step 1. Click on the Start/Stop icon to start your program running. 2. When it gets to the part you want to check click on the Pause icon the program running. 3. Click on the Single Step icon the program. to immediately suspend to advance one step at a time through the symbols in 4. To return to running a paused program normally, click on the Resume icon. If you wish to single step through the program from the very beginning, click on Single Step rather than the Start/Stop icon – this will automatically start and pause the program on the first symbol. Transfer to Go Transfer to Go (from the File menu) can be used to transfer your program to the Go Control software if it is installed on your computer. Notes: The eLearn & Go program will remain open. Any ACE that was connected in eLearn & Go will not automatically be connected in Go. © Data Harvest Group Ltd. 10 DO174 (2) eLearn & Go software Options Toolbar display options • • Small Toolbar Icons Display Toolbar Text These options let you choose whether to see small or large icons, and whether the icons show text. Removing the text and using smaller icons can be useful on low resolution displays, as it gives more space back to the main edit area. Grid Use this option to switch a background grid on and off in the editing area. Colours Click on the change button alongside the item whose colour you wish to change. A colour palette will open. Select the colour required and click on OK. Click on Reset to reset the colours to the default palate. Show Flowchart / Show Program Use the Show/Hide Flowchart icon or select from the Settings menu to show or hide the flowchart representation of the program. Use the Show/Hide Program icon or select from the Settings menu to show or hide the textual view of the program. Printing Print The full range of print options is available via Print in the File menu. They will allow you choose what you wish to print, and how it will be fitted to the page. The options are: • • Page Setup - use this option to select your printer, paper size and orientation, etc. Print Flowchart - select whether to: • • • Print everything on one sheet - the program will be scaled to fit on one sheet Everything full size to separate sheets – will print the program at 100% scale on separate sheets of paper Print Preview Flowchart - the print options window will open. Make your choice and select OK to view the printout before printing. • • Print Program - use to print the textual representation of the program. Print Preview Program - use to preview the textual representation of your program before printing. © Data Harvest Group Ltd. 11 DO174 (2) eLearn & Go software Saving and Opening files Save To save your control program either click on the Save icon or select Save or Save As from the File menu. Save As: A dialogue box will open to allow the file to be saved using a filename and destination of your choice. Files are saved in the .eGo file format. Save: Providing the file has been saved previously, the information will be automatically saved retaining the name given the first time it was saved. eLearn &Go will default to saving the .eGo file in the currently logged on users My Documents folder (My Documents\eLearn & Go Program files) but the standard windows file dialogue box can be used to save to another location. See below for altering the defaults. Open To open your previously saved control program either click on the Open icon or select Open from the File menu. Locate the correct .eGo file and click on Open. Go will default to showing the .eGo files in My Documents\eLearn & Go Program files but the standard windows file dialogue box can be used to locate files saved in another location. See below for altering the defaults. If your control program was saved with an ACE open, it will automatically be re-loaded along with the program. Altering the default configuration for ACE and eLearn & Go files The default locations for the local data or ACE directory can be altered by changing the AppConfig.txt file, located at C:\Program Files\DHG\ eLearn & Go \Objects. The default locations are: LocalDataDirectory=[MyDocuments]\eLearn & Go Programs LocalAceDirectory=[ProgramFiles]\DHG\eLearn & Go ACE Files Once the AppConfig.txt file has been altered it should be saved. If the ACE files are to be stored onto a shared area on your network (rather than the local machine) then the AppConfig.txt file must be altered on all computers running eLearn & Go. Edit the configuration file as follows: 1. Open the C:\Program Files\DHG\ eLearn & Go\Objects\AppConfig.txt file into Notepad 2. Locate and change the line LocalAceDirectory= to point to the folder you wish to set as the new default. © Data Harvest Group Ltd. 12 DO174 (2) eLearn & Go software Licence conditions, copyright information and disclaimers Definitions The following expressions have the meanings given here: • • • ‘DHG’ means Data Harvest Group Limited, being owner of all intellectual property rights in the Software ‘Documentation’ means the printed documentation supplied with the Software or the .pdf supplied on the CD ROM. ‘Software’ means the programs contained in object-code form on the disc(s) supplied with these conditions: Licence DHG grants to the licensee a non-transferable non-exclusive licence (or sub-licence) as follows: • The licence permits the licensee to make further copies of the title for use within the premises of the licensee subject to the conditions set out below. • Copies made in accordance with this licence may not be loaned, sold or used outside the premises of the licensee other than as stated below. • The content of the title being copies under the terms of this licence may not be amended, changed or altered in anyway. It may not be translated into another language nor will it be versioned for use on any other computer system. • No part of the software may be incorporated into other programs developed or used by the licensee. • The copyright notices contained in the Software must be reproduced and included in all copies of the Software. • Documentation is covered by copyright; refer to the document for copyright details. • Copies made under the terms of this licence may be used outside the premises listed in the attached schedule by: o Teachers/tutors preparing lessons o Students undertaking work with the permission of the teacher/tutor o Students using copies made under the terms of this licence in schools/colleges other than those listed in the attached schedule. • Copies used in accordance with above may not be further copied whilst out of the premises of the licensee. Term This licence remains in effect unless you terminate it: • by destroying the Software and all copies, and the Documentation, or • by failing to comply with the Conditions. Limited Warranty and Disclaimer of Liability • • DHG warrants the disc(s) upon which the Software is supplied to be free from defects in materials and workmanship under normal use for a period of ninety (90) days from the date of purchase, as evidenced by a copy of your receipt The Software is supplied ‘as is’; DHG makes no warranty, whether express or implied, as to the merchant ability of the Software or its fitness for any particular purpose. In no circumstances will DHG be liable for any damage, loss of profits, goodwill or for any indirect or consequential loss arising out of your use of the Software, or inability to use the Software, even if DHG has been advised of the possibility of such loss. General These conditions supersede any prior agreement, oral or written, between the licensee and DHG relating to the software. Disclaimer The eLearn & Go Control Software is supplied ‘as is’; DHG makes no warranty, whether express or implied, as to the ability of the Software or its fitness for any particular purpose. In no circumstances will DHG be liable for any damage, loss of profits, goodwill or for any indirect or consequential loss arising out of your use of the Software, or inability to use the Software, even if DHG has been advised of the possibility of such loss. © Data Harvest Group Ltd. 13 DO174 (2) eLearn & Go software Copyright eLearn & Go Control Software © Data Harvest Group Ltd. 2007 ACEs supplied with the eLearn & Go Control Software © Data Harvest Group Ltd. 2007 All documentation supplied with the eLearn & Go Control Software © Data Harvest Group Ltd. 2007 © Data Harvest Group Ltd. 14