1
DocuShare
User Guide
Publication date: April 2007
This document supports DocuShare Release 6.0/DocuShare CPX Release 6.0
Prepared by:
Xerox Corporation
DocuShare Business Unit
3400 Hillview Avenue
Palo Alto, California 94304
USA
Copyright © 2007 Xerox Corporation. All Rights Reserved. Xerox ® and DocuShare® are
trademarks of Xerox Corporation. All other trademarks are the property of their respective
companies and are hereby acknowledged.
Table of Contents
Chapter 1
Getting started
Welcome . . . . . . . . . . . . . . . . . . . . . . . . . . . . . . . . . . . . . . . . . . . . . . . . . . . . . . . . . 1–2
Accessing DocuShare . . . . . . . . . . . . . . . . . . . . . . . . . . . . . . . . . . . . . . . . . . . . . . . 1–3
Navigating your site . . . . . . . . . . . . . . . . . . . . . . . . . . . . . . . . . . . . . . . . . . . . . . 1–4
Understanding DocuShare objects . . . . . . . . . . . . . . . . . . . . . . . . . . . . . . . . . . . . . 1–5
Object permissions . . . . . . . . . . . . . . . . . . . . . . . . . . . . . . . . . . . . . . . . . . . . . . 1–6
Object properties . . . . . . . . . . . . . . . . . . . . . . . . . . . . . . . . . . . . . . . . . . . . . . . . 1–6
Logging in and out . . . . . . . . . . . . . . . . . . . . . . . . . . . . . . . . . . . . . . . . . . . . . . . . . . 1–7
How to get help . . . . . . . . . . . . . . . . . . . . . . . . . . . . . . . . . . . . . . . . . . . . . . . . . . . . 1–8
DocuShare User Group . . . . . . . . . . . . . . . . . . . . . . . . . . . . . . . . . . . . . . . . . . . 1–8
DocuShare Client applications . . . . . . . . . . . . . . . . . . . . . . . . . . . . . . . . . . . . . . . . . 1–9
Chapter 2
Users and groups
About DocuShare accounts . . . . . . . . . . . . . . . . . . . . . . . . . . . . . . . . . . . . . . . . . . . 2–2
DocuShare user accounts . . . . . . . . . . . . . . . . . . . . . . . . . . . . . . . . . . . . . . . . . . . . 2–3
Creating a user account . . . . . . . . . . . . . . . . . . . . . . . . . . . . . . . . . . . . . . . . . . 2–3
Viewing user account properties . . . . . . . . . . . . . . . . . . . . . . . . . . . . . . . . . . . . 2–4
Changing your user account properties. . . . . . . . . . . . . . . . . . . . . . . . . . . . . . . 2–4
Changing your password . . . . . . . . . . . . . . . . . . . . . . . . . . . . . . . . . . . . . . . . . . 2–5
Changing your username . . . . . . . . . . . . . . . . . . . . . . . . . . . . . . . . . . . . . . . . . 2–5
Changing your domain . . . . . . . . . . . . . . . . . . . . . . . . . . . . . . . . . . . . . . . . . . . 2–6
Viewing your activity history. . . . . . . . . . . . . . . . . . . . . . . . . . . . . . . . . . . . . . . . 2–6
Changing federation settings . . . . . . . . . . . . . . . . . . . . . . . . . . . . . . . . . . . . . . . 2–6
Deleting a user account . . . . . . . . . . . . . . . . . . . . . . . . . . . . . . . . . . . . . . . . . . . 2–8
DocuShare group accounts . . . . . . . . . . . . . . . . . . . . . . . . . . . . . . . . . . . . . . . . . . . 2–9
Creating a group . . . . . . . . . . . . . . . . . . . . . . . . . . . . . . . . . . . . . . . . . . . . . . . . 2–9
Viewing group properties . . . . . . . . . . . . . . . . . . . . . . . . . . . . . . . . . . . . . . . . . 2–10
Changing group properties . . . . . . . . . . . . . . . . . . . . . . . . . . . . . . . . . . . . . . . 2–10
Changing the members of a group . . . . . . . . . . . . . . . . . . . . . . . . . . . . . . . . . 2–11
Changing the owner of a group . . . . . . . . . . . . . . . . . . . . . . . . . . . . . . . . . . . . 2–12
Changing the domain of a group . . . . . . . . . . . . . . . . . . . . . . . . . . . . . . . . . . . 2–12
Sending mail to group members . . . . . . . . . . . . . . . . . . . . . . . . . . . . . . . . . . . 2–13
Viewing the change history . . . . . . . . . . . . . . . . . . . . . . . . . . . . . . . . . . . . . . . 2–14
Deleting a group . . . . . . . . . . . . . . . . . . . . . . . . . . . . . . . . . . . . . . . . . . . . . . . 2–14
Finding and listing DocuShare accounts . . . . . . . . . . . . . . . . . . . . . . . . . . . . . . . . 2–15
Chapter 3
DocuShare collections
About collections . . . . . . . . . . . . . . . . . . . . . . . . . . . . . . . . . . . . . . . . . . . . . . . . . . . 3–2
Adding a collection . . . . . . . . . . . . . . . . . . . . . . . . . . . . . . . . . . . . . . . . . . . . . . . . . . 3–3
Viewing and changing collection properties . . . . . . . . . . . . . . . . . . . . . . . . . . . . . . . 3–4
Viewing the change history . . . . . . . . . . . . . . . . . . . . . . . . . . . . . . . . . . . . . . . . 3–4
User Guide
iii
Table of Contents
Changing the location of a collection . . . . . . . . . . . . . . . . . . . . . . . . . . . . . . . . . . . . 3–5
Deleting a collection . . . . . . . . . . . . . . . . . . . . . . . . . . . . . . . . . . . . . . . . . . . . . . . . . 3–6
Editing multiple objects in a collection . . . . . . . . . . . . . . . . . . . . . . . . . . . . . . . . . . . 3–7
Using Copy, Cut, and Paste to change the location of an object. . . . . . . . . . . . 3–8
Chapter 4
DocuShare documents
About documents . . . . . . . . . . . . . . . . . . . . . . . . . . . . . . . . . . . . . . . . . . . . . . . . . . . 4–2
Adding a document . . . . . . . . . . . . . . . . . . . . . . . . . . . . . . . . . . . . . . . . . . . . . . . . . 4–3
Viewing a document. . . . . . . . . . . . . . . . . . . . . . . . . . . . . . . . . . . . . . . . . . . . . . . . . 4–4
Viewing a document and its properties . . . . . . . . . . . . . . . . . . . . . . . . . . . . . . . 4–4
Viewing an HTML rendition of a document . . . . . . . . . . . . . . . . . . . . . . . . . . . . 4–5
Viewing a PDF rendition of a document . . . . . . . . . . . . . . . . . . . . . . . . . . . . . . 4–5
Finding duplicate documents . . . . . . . . . . . . . . . . . . . . . . . . . . . . . . . . . . . . . . . . . . 4–6
Editing a document . . . . . . . . . . . . . . . . . . . . . . . . . . . . . . . . . . . . . . . . . . . . . . . . . 4–7
Adding a new version of a document . . . . . . . . . . . . . . . . . . . . . . . . . . . . . . . . . . . . 4–9
Managing document versions . . . . . . . . . . . . . . . . . . . . . . . . . . . . . . . . . . . . . . . . 4–10
Viewing document versions . . . . . . . . . . . . . . . . . . . . . . . . . . . . . . . . . . . . . . . 4–10
Changing the preferred version . . . . . . . . . . . . . . . . . . . . . . . . . . . . . . . . . . . . 4–10
Viewing the renditions of a version . . . . . . . . . . . . . . . . . . . . . . . . . . . . . . . . . 4–11
Viewing and changing version properties . . . . . . . . . . . . . . . . . . . . . . . . . . . . 4–11
Locking and unlocking a document . . . . . . . . . . . . . . . . . . . . . . . . . . . . . . . . . . . . 4–12
Exporting a document . . . . . . . . . . . . . . . . . . . . . . . . . . . . . . . . . . . . . . . . . . . . . . 4–13
Adding comments to a document. . . . . . . . . . . . . . . . . . . . . . . . . . . . . . . . . . . . . . 4–14
Viewing and changing document properties . . . . . . . . . . . . . . . . . . . . . . . . . . . . . 4–15
Viewing the change history . . . . . . . . . . . . . . . . . . . . . . . . . . . . . . . . . . . . . . . 4–15
Changing the location of a document. . . . . . . . . . . . . . . . . . . . . . . . . . . . . . . . . . . 4–16
Deleting a document . . . . . . . . . . . . . . . . . . . . . . . . . . . . . . . . . . . . . . . . . . . . . . . 4–17
Chapter 5
Access permissions
About access permissions . . . . . . . . . . . . . . . . . . . . . . . . . . . . . . . . . . . . . . . . . . . . 5–2
Viewing the access permissions of an object. . . . . . . . . . . . . . . . . . . . . . . . . . . . . . 5–3
Changing the access permissions of an object . . . . . . . . . . . . . . . . . . . . . . . . . . . . 5–4
Changing the owner of an object . . . . . . . . . . . . . . . . . . . . . . . . . . . . . . . . . . . . . . . 5–5
Applying permissions to the objects in a container . . . . . . . . . . . . . . . . . . . . . . . . . 5–6
Applying permissions to a document and its versions . . . . . . . . . . . . . . . . . . . . . . . 5–7
Chapter 6
DocuShare calendars
About calendars . . . . . . . . . . . . . . . . . . . . . . . . . . . . . . . . . . . . . . . . . . . . . . . . . . . . 6–2
Adding a calendar . . . . . . . . . . . . . . . . . . . . . . . . . . . . . . . . . . . . . . . . . . . . . . . . . . 6–3
Changing the calendar view. . . . . . . . . . . . . . . . . . . . . . . . . . . . . . . . . . . . . . . . . . . 6–4
Viewing and changing calendar properties . . . . . . . . . . . . . . . . . . . . . . . . . . . . . . . 6–5
Viewing the change history . . . . . . . . . . . . . . . . . . . . . . . . . . . . . . . . . . . . . . . . 6–5
Changing the location of a calendar. . . . . . . . . . . . . . . . . . . . . . . . . . . . . . . . . . . . . 6–6
iv
User Guide
Table of Contents
Deleting a calendar . . . . . . . . . . . . . . . . . . . . . . . . . . . . . . . . . . . . . . . . . . . . . . . . . 6–7
Adding an event to a calendar . . . . . . . . . . . . . . . . . . . . . . . . . . . . . . . . . . . . . . . . . 6–8
Viewing and changing calendar event properties . . . . . . . . . . . . . . . . . . . . . . . . . . 6–9
Viewing the change history . . . . . . . . . . . . . . . . . . . . . . . . . . . . . . . . . . . . . . . . 6–9
Changing the location of a calendar event. . . . . . . . . . . . . . . . . . . . . . . . . . . . . . . 6–10
Deleting a calendar event . . . . . . . . . . . . . . . . . . . . . . . . . . . . . . . . . . . . . . . . . . . 6–11
Chapter 7
DocuShare workspaces
About workspaces . . . . . . . . . . . . . . . . . . . . . . . . . . . . . . . . . . . . . . . . . . . . . . . . . . 7–2
Adding a workspace. . . . . . . . . . . . . . . . . . . . . . . . . . . . . . . . . . . . . . . . . . . . . . . . . 7–3
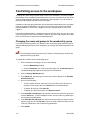
Controlling access to the workspace . . . . . . . . . . . . . . . . . . . . . . . . . . . . . . . . . . . . 7–4
Changing the users and groups in the membership group . . . . . . . . . . . . . . . . 7–4
Re-assigning the membership group. . . . . . . . . . . . . . . . . . . . . . . . . . . . . . . . . 7–5
Changing the workspace’s permissions . . . . . . . . . . . . . . . . . . . . . . . . . . . . . . 7–5
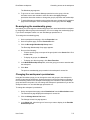
Adding content to the workspace . . . . . . . . . . . . . . . . . . . . . . . . . . . . . . . . . . . . . . . 7–7
Managing shortcuts . . . . . . . . . . . . . . . . . . . . . . . . . . . . . . . . . . . . . . . . . . . . . . . . . 7–8
Using calendars . . . . . . . . . . . . . . . . . . . . . . . . . . . . . . . . . . . . . . . . . . . . . . . . . . . . 7–9
Changing portlet properties . . . . . . . . . . . . . . . . . . . . . . . . . . . . . . . . . . . . . . . . . . 7–10
Viewing and changing workspace properties . . . . . . . . . . . . . . . . . . . . . . . . . . . . . 7–11
Viewing the change history . . . . . . . . . . . . . . . . . . . . . . . . . . . . . . . . . . . . . . . 7–11
Changing the location of a workspace . . . . . . . . . . . . . . . . . . . . . . . . . . . . . . . . . . 7–12
Deleting a workspace. . . . . . . . . . . . . . . . . . . . . . . . . . . . . . . . . . . . . . . . . . . . . . . 7–13
Chapter 8
DocuShare wikis
About wikis . . . . . . . . . . . . . . . . . . . . . . . . . . . . . . . . . . . . . . . . . . . . . . . . . . . . . . . . 8–2
Adding a wiki . . . . . . . . . . . . . . . . . . . . . . . . . . . . . . . . . . . . . . . . . . . . . . . . . . . . . . 8–3
Adding content to a wiki . . . . . . . . . . . . . . . . . . . . . . . . . . . . . . . . . . . . . . . . . . . . . . 8–4
Adding content to the wiki home page. . . . . . . . . . . . . . . . . . . . . . . . . . . . . . . . 8–4
Linking pages to a wiki. . . . . . . . . . . . . . . . . . . . . . . . . . . . . . . . . . . . . . . . . . . . 8–4
Inserting images . . . . . . . . . . . . . . . . . . . . . . . . . . . . . . . . . . . . . . . . . . . . . . . . 8–5
Attaching documents . . . . . . . . . . . . . . . . . . . . . . . . . . . . . . . . . . . . . . . . . . . . . 8–5
Renaming wiki pages . . . . . . . . . . . . . . . . . . . . . . . . . . . . . . . . . . . . . . . . . . . . . . . . 8–6
Printing wiki pages . . . . . . . . . . . . . . . . . . . . . . . . . . . . . . . . . . . . . . . . . . . . . . . . . . 8–7
Viewing and changing wiki properties . . . . . . . . . . . . . . . . . . . . . . . . . . . . . . . . . . . 8–8
Viewing the change history . . . . . . . . . . . . . . . . . . . . . . . . . . . . . . . . . . . . . . . . 8–8
Changing the location of a wiki . . . . . . . . . . . . . . . . . . . . . . . . . . . . . . . . . . . . . . . . 8–9
Deleting a wiki . . . . . . . . . . . . . . . . . . . . . . . . . . . . . . . . . . . . . . . . . . . . . . . . . . . . 8–10
Chapter 9
DocuShare weblogs
About weblogs . . . . . . . . . . . . . . . . . . . . . . . . . . . . . . . . . . . . . . . . . . . . . . . . . . . . . 9–2
Adding a weblog. . . . . . . . . . . . . . . . . . . . . . . . . . . . . . . . . . . . . . . . . . . . . . . . . . . . 9–3
Posting weblog entries . . . . . . . . . . . . . . . . . . . . . . . . . . . . . . . . . . . . . . . . . . . . . . . 9–4
Editing weblog entries . . . . . . . . . . . . . . . . . . . . . . . . . . . . . . . . . . . . . . . . . . . . 9–4
User Guide
v
Table of Contents
Deleting weblog entries . . . . . . . . . . . . . . . . . . . . . . . . . . . . . . . . . . . . . . . . . . . 9–5
Approving entries. . . . . . . . . . . . . . . . . . . . . . . . . . . . . . . . . . . . . . . . . . . . . . . . 9–5
Adding comments to entries. . . . . . . . . . . . . . . . . . . . . . . . . . . . . . . . . . . . . . . . . . . 9–6
Viewing comments. . . . . . . . . . . . . . . . . . . . . . . . . . . . . . . . . . . . . . . . . . . . . . . 9–6
Deleting comments . . . . . . . . . . . . . . . . . . . . . . . . . . . . . . . . . . . . . . . . . . . . . . 9–6
Viewing and changing weblog properties. . . . . . . . . . . . . . . . . . . . . . . . . . . . . . . . . 9–7
Viewing the change history . . . . . . . . . . . . . . . . . . . . . . . . . . . . . . . . . . . . . . . . 9–7
Changing the location of a weblog . . . . . . . . . . . . . . . . . . . . . . . . . . . . . . . . . . . . . . 9–8
Deleting a weblog. . . . . . . . . . . . . . . . . . . . . . . . . . . . . . . . . . . . . . . . . . . . . . . . . . . 9–9
Chapter 10 DocuShare discussions
About discussions . . . . . . . . . . . . . . . . . . . . . . . . . . . . . . . . . . . . . . . . . . . . . . . . . 10–2
Adding a discussion . . . . . . . . . . . . . . . . . . . . . . . . . . . . . . . . . . . . . . . . . . . . . . . . 10–3
Viewing and changing discussion properties . . . . . . . . . . . . . . . . . . . . . . . . . . . . . 10–4
Viewing the change history . . . . . . . . . . . . . . . . . . . . . . . . . . . . . . . . . . . . . . . 10–4
Changing the location of a discussion . . . . . . . . . . . . . . . . . . . . . . . . . . . . . . . . . . 10–5
Deleting a discussion . . . . . . . . . . . . . . . . . . . . . . . . . . . . . . . . . . . . . . . . . . . . . . . 10–6
Adding a topic to a discussion . . . . . . . . . . . . . . . . . . . . . . . . . . . . . . . . . . . . . . . . 10–7
Adding replies . . . . . . . . . . . . . . . . . . . . . . . . . . . . . . . . . . . . . . . . . . . . . . . . . 10–7
Viewing and changing the properties of a topic or reply . . . . . . . . . . . . . . . . . . . . 10–8
Viewing the change history . . . . . . . . . . . . . . . . . . . . . . . . . . . . . . . . . . . . . . . 10–8
Changing the location of a topic. . . . . . . . . . . . . . . . . . . . . . . . . . . . . . . . . . . . . . . 10–9
Deleting a topic or reply . . . . . . . . . . . . . . . . . . . . . . . . . . . . . . . . . . . . . . . . . . . . 10–10
Viewing and deleting expired topics. . . . . . . . . . . . . . . . . . . . . . . . . . . . . . . . . . . 10–11
Chapter 11 DocuShare URLs
About URLs . . . . . . . . . . . . . . . . . . . . . . . . . . . . . . . . . . . . . . . . . . . . . . . . . . . . . . 11–2
Adding a URL. . . . . . . . . . . . . . . . . . . . . . . . . . . . . . . . . . . . . . . . . . . . . . . . . . . . . 11–3
Viewing and changing URL properties. . . . . . . . . . . . . . . . . . . . . . . . . . . . . . . . . . 11–4
Viewing the change history . . . . . . . . . . . . . . . . . . . . . . . . . . . . . . . . . . . . . . . 11–4
Changing the location of a URL . . . . . . . . . . . . . . . . . . . . . . . . . . . . . . . . . . . . . . . 11–5
Deleting a URL. . . . . . . . . . . . . . . . . . . . . . . . . . . . . . . . . . . . . . . . . . . . . . . . . . . . 11–6
Chapter 12 DocuShare notifications
About notifications . . . . . . . . . . . . . . . . . . . . . . . . . . . . . . . . . . . . . . . . . . . . . . . . . 12–2
Adding a notification. . . . . . . . . . . . . . . . . . . . . . . . . . . . . . . . . . . . . . . . . . . . . . . . 12–3
Viewing notifications. . . . . . . . . . . . . . . . . . . . . . . . . . . . . . . . . . . . . . . . . . . . . . . . 12–4
Creating a recipient list for a notification . . . . . . . . . . . . . . . . . . . . . . . . . . . . . . . . 12–5
Viewing and changing notification properties. . . . . . . . . . . . . . . . . . . . . . . . . . . . . 12–6
Deleting a notification. . . . . . . . . . . . . . . . . . . . . . . . . . . . . . . . . . . . . . . . . . . . . . . 12–7
Chapter 13 DocuShare content rules
About content rules . . . . . . . . . . . . . . . . . . . . . . . . . . . . . . . . . . . . . . . . . . . . . . . . 13–2
Creating a content rule. . . . . . . . . . . . . . . . . . . . . . . . . . . . . . . . . . . . . . . . . . . . . . 13–3
vi
User Guide
Table of Contents
Viewing content rules . . . . . . . . . . . . . . . . . . . . . . . . . . . . . . . . . . . . . . . . . . . . . . . 13–4
Deleting a content rule . . . . . . . . . . . . . . . . . . . . . . . . . . . . . . . . . . . . . . . . . . . . . . 13–5
Chapter 14 DocuShare searches
About searches . . . . . . . . . . . . . . . . . . . . . . . . . . . . . . . . . . . . . . . . . . . . . . . . . . . 14–2
Viewing new content on your site. . . . . . . . . . . . . . . . . . . . . . . . . . . . . . . . . . . . . . 14–3
Searching for objects . . . . . . . . . . . . . . . . . . . . . . . . . . . . . . . . . . . . . . . . . . . . . . . 14–4
Search options. . . . . . . . . . . . . . . . . . . . . . . . . . . . . . . . . . . . . . . . . . . . . . . . . 14–5
Running an advanced search . . . . . . . . . . . . . . . . . . . . . . . . . . . . . . . . . . . . . . . . 14–6
Using reserved characters in a search. . . . . . . . . . . . . . . . . . . . . . . . . . . . . . . . . . 14–9
Stop words . . . . . . . . . . . . . . . . . . . . . . . . . . . . . . . . . . . . . . . . . . . . . . . . . . . . . . 14–10
Saving a search query . . . . . . . . . . . . . . . . . . . . . . . . . . . . . . . . . . . . . . . . . . . . . 14–11
Changing saved query properties . . . . . . . . . . . . . . . . . . . . . . . . . . . . . . . . . . . . 14–12
Viewing the change history . . . . . . . . . . . . . . . . . . . . . . . . . . . . . . . . . . . . . . 14–12
Changing the location of a saved query. . . . . . . . . . . . . . . . . . . . . . . . . . . . . . . . 14–13
Deleting a saved query . . . . . . . . . . . . . . . . . . . . . . . . . . . . . . . . . . . . . . . . . . . . 14–14
Chapter 15 My DocuShare
About My DocuShare . . . . . . . . . . . . . . . . . . . . . . . . . . . . . . . . . . . . . . . . . . . . . . . 15–2
Managing favorites. . . . . . . . . . . . . . . . . . . . . . . . . . . . . . . . . . . . . . . . . . . . . . . . . 15–3
Using your personal collection . . . . . . . . . . . . . . . . . . . . . . . . . . . . . . . . . . . . . . . . 15–4
Using your personal calendar . . . . . . . . . . . . . . . . . . . . . . . . . . . . . . . . . . . . . . . . 15–5
Using your personal trashcan . . . . . . . . . . . . . . . . . . . . . . . . . . . . . . . . . . . . . . . . 15–6
Viewing your online meetings . . . . . . . . . . . . . . . . . . . . . . . . . . . . . . . . . . . . . . . . 15–7
Viewing your groups. . . . . . . . . . . . . . . . . . . . . . . . . . . . . . . . . . . . . . . . . . . . . . . . 15–7
Viewing your routing tasks . . . . . . . . . . . . . . . . . . . . . . . . . . . . . . . . . . . . . . . . . . . 15–7
Chapter 16 Online meetings
About online meetings . . . . . . . . . . . . . . . . . . . . . . . . . . . . . . . . . . . . . . . . . . . . . . 16–2
Scheduling an online meeting . . . . . . . . . . . . . . . . . . . . . . . . . . . . . . . . . . . . . . . . 16–3
Launching an online meeting . . . . . . . . . . . . . . . . . . . . . . . . . . . . . . . . . . . . . . . . . 16–5
Joining an online meeting . . . . . . . . . . . . . . . . . . . . . . . . . . . . . . . . . . . . . . . . . . . 16–6
Deleting an online meeting. . . . . . . . . . . . . . . . . . . . . . . . . . . . . . . . . . . . . . . . . . . 16–7
Chapter 17 Routing documents
About routing documents . . . . . . . . . . . . . . . . . . . . . . . . . . . . . . . . . . . . . . . . . . . . 17–2
Routing a document . . . . . . . . . . . . . . . . . . . . . . . . . . . . . . . . . . . . . . . . . . . . . . . . 17–3
Setting up a collection for routing documents . . . . . . . . . . . . . . . . . . . . . . . . . . . . 17–6
Checking the status of routing tasks you assigned . . . . . . . . . . . . . . . . . . . . . . . . 17–7
Viewing progress reports . . . . . . . . . . . . . . . . . . . . . . . . . . . . . . . . . . . . . . . . . 17–9
Publishing a new version of your routed document . . . . . . . . . . . . . . . . . . . . 17–10
Viewing the tasks assigned to you . . . . . . . . . . . . . . . . . . . . . . . . . . . . . . . . . . . . 17–11
Approving or disapproving a document . . . . . . . . . . . . . . . . . . . . . . . . . . . . . 17–11
Reviewing a document . . . . . . . . . . . . . . . . . . . . . . . . . . . . . . . . . . . . . . . . . 17–12
User Guide
vii
Table of Contents
Acknowledging receipt of a document . . . . . . . . . . . . . . . . . . . . . . . . . . . . . . 17–13
Removing a document sent for information . . . . . . . . . . . . . . . . . . . . . . . . . . 17–13
Viewing your deleted tasks . . . . . . . . . . . . . . . . . . . . . . . . . . . . . . . . . . . . . . . . . 17–14
Viewing the routing tasks of a document . . . . . . . . . . . . . . . . . . . . . . . . . . . . . . . 17–15
Chapter 18 Scanning documents
About scanning documents . . . . . . . . . . . . . . . . . . . . . . . . . . . . . . . . . . . . . . . . . . 18–2
Scanning documents using scan cover sheets . . . . . . . . . . . . . . . . . . . . . . . . . . . 18–3
Creating a scan cover sheet . . . . . . . . . . . . . . . . . . . . . . . . . . . . . . . . . . . . . . 18–3
Scanning a document with a scan cover sheet . . . . . . . . . . . . . . . . . . . . . . . . 18–4
Deleting a scan cover sheet . . . . . . . . . . . . . . . . . . . . . . . . . . . . . . . . . . . . . . 18–4
Scanning documents to a temporary scan collection. . . . . . . . . . . . . . . . . . . . . . . 18–5
Saving a scanned document to a collection . . . . . . . . . . . . . . . . . . . . . . . . . . 18–6
Chapter 19 Archiving content
About archiving content . . . . . . . . . . . . . . . . . . . . . . . . . . . . . . . . . . . . . . . . . . . . . 19–2
Archiving content . . . . . . . . . . . . . . . . . . . . . . . . . . . . . . . . . . . . . . . . . . . . . . . . . . 19–3
Archiving content automatically . . . . . . . . . . . . . . . . . . . . . . . . . . . . . . . . . . . . 19–3
Archiving content manually . . . . . . . . . . . . . . . . . . . . . . . . . . . . . . . . . . . . . . . 19–3
Restoring archived content . . . . . . . . . . . . . . . . . . . . . . . . . . . . . . . . . . . . . . . . . . 19–5
Chapter 20 FAQs
Answers to frequently asked questions . . . . . . . . . . . . . . . . . . . . . . . . . . . . . . . . . 20–2
Appendix A
WebDAV folders
Using WebDAV folders. . . . . . . . . . . . . . . . . . . . . . . . . . . . . . . . . . . . . . . . . . . . . . A–2
Document titles in WebDAV folders. . . . . . . . . . . . . . . . . . . . . . . . . . . . . . . . . A–2
Appendix B
DocuShare portal integration
Accessing DocuShare in a portlet . . . . . . . . . . . . . . . . . . . . . . . . . . . . . . . . . . . . . B–2
viii
User Guide
Getting started
•
Welcome . . . . . . . . . . . . . . . . . . . . . . . . . . . . . . . . . . . . . . . . . . . . . . . . . . . . . 1–2
•
Accessing DocuShare . . . . . . . . . . . . . . . . . . . . . . . . . . . . . . . . . . . . . . . . . . . 1–3
•
Understanding DocuShare objects . . . . . . . . . . . . . . . . . . . . . . . . . . . . . . . . . 1–5
•
Logging in and out . . . . . . . . . . . . . . . . . . . . . . . . . . . . . . . . . . . . . . . . . . . . . . 1–7
•
How to get help . . . . . . . . . . . . . . . . . . . . . . . . . . . . . . . . . . . . . . . . . . . . . . . . 1–8
•
DocuShare Client applications . . . . . . . . . . . . . . . . . . . . . . . . . . . . . . . . . . . . . 1–9
User Guide
1–1
Welcome
Getting started
Welcome
The Xerox DocuShare family of products allow you to easily and efficiently manage
electronic content using a web browser. Using DocuShare, you can create, organize, and
share content, collaborate with other users on projects, search for and retrieve content,
and automate work processes.
Based on one core platform, your site can provide the capabilities of one or both products:
DocuShare and DocuShare CPX. Key features in the products enable you to:
•
Create and maintain your own account and personal work area without the
assistance of a web master or site administrator.
•
Add and control access to site content.
•
Maintain multiple versions of a document, track its revision history, and lock a
document to prevent simultaneous editing.
•
Collaborate on content using wikis and weblogs.
•
Scan paper documents to site locations.
•
Route documents for approval or review.
•
Create project-oriented areas for managing the content, people, and tasks.
(DocuShare CPX only)
•
Set up content rules to automate a work process. (DocuShare CPX only)
This guide describes how to use the features in both DocuShare and DocuShare CPX.
Any feature unique to DocuShare CPX is indicated by the following icon and note:
Only for DocuShare CPX
1–2
User Guide
Getting started
Accessing DocuShare
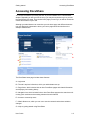
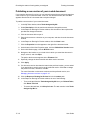
Accessing DocuShare
You access DocuShare by entering the URL of your DocuShare site in a web browser
window. Depending on how your site is set up, you may be required to log in or you see
the DocuShare home page. From the site home page you can log in, as well as access the
content and features on your site.
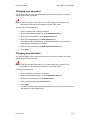
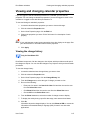
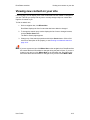
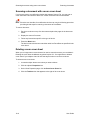
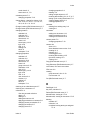
Although your administrator can customize your site home page and different browsers
may not display site elements the same, your home page should look similar to the
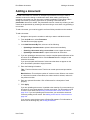
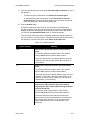
example shown below.
D
A
E
F
G
B
C
The DocuShare home page includes these features:
A—Login area
B—The site’s top-level collections, which your administrator sets up
C—Page footer, which includes links to other DocuShare pages and related information
and displays your browsing history
D—Navigation bar, which includes links to other DocuShare pages and a search area for
running quick searches and accessing advanced search features
E—Access to community areas
F—What’s New menu, which you can use to see the content that has been added or
changed
G—Help on getting started using DocuShare
User Guide
1–3
Accessing DocuShare
Getting started
Navigating your site
DocuShare navigation features make it easy to find what you need.
Navigation bar—Includes links to pages and features that are used frequently:
•
Home—returns to the home page.
•
Content Map—provides a hierarchical display of the objects on your site, based
on your current location. You can click any object in the Content Map to open it.
•
What’s New—lists the new and changed objects on your site.
•
Users & Groups—provides links to listing, finding, and creating user and group
accounts.
•
Help—provides access to user guides, tutorials, and software downloads.
•
Username—displays your user account properties. Your username displays after
you log into DocuShare.
•
Logout—logs you out of DocuShare. The link displays after you log in.
•
My DocuShare—displays your personal home page, which includes your favorites
and a personal collection and calendar. The link displays after you log in.
•
My Tasks—shows the routing tasks assigned to you and the tasks you assigned.
The link displays after you log in.
•
Search area—includes an area for running quick searches as well as a link to the
Advanced Search page.
Page footer—In addition to including some of the same links shown on the navigation bar,
provides links to related information, personal pages, and account information and
displays your browsing history.
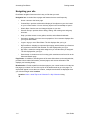
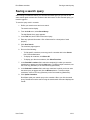
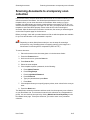
Breadcrumbs—Provide a path from the home page to your current location or list the last
few pages you visited. You can click any link in the breadcrumbs to go to the page. For
objects that appear in more than one location, multiple breadcrumbs are displayed when
you click the triangle under Location.
Location: Home > Initial Top Level Collection D > My Collection Listing
T
1–4
User Guide
Getting started
Understanding DocuShare objects
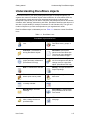
Understanding DocuShare objects
You create content on your site by adding different types of DocuShare objects. You
organize site content in container objects called collections. On a DocuShare CPX site,
you manage the content and resources associated with projects in objects called
workspaces. Objects that you can add to collections and workspaces include: documents,
calendars, wikis, weblogs, discussions, and URLs. DocuShare identifies each object on a
site with a unique handle (for example, Document-37 and Calendar-102). The type and
number of objects on your site are dependent on your organization’s needs.
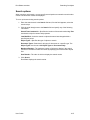
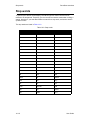
Each DocuShare object is indicated by an icon. Table 1–1 shows the current DocuShare
icons.
Table 1–1: DocuShare icons
DocuShare object and its icon
User—A registered DocuShare
user.
Group—One or more
DocuShare users, groups, or
both.
Collection—A container for
storing DocuShare objects.
Document—A document
stored on the DocuShare site.
The icon can vary, depending
on the document’s file type.
Workspace—A shared area for
project and team collaboration.
(DocuShare CPX only)
Content Rule—A configurable
rule for running an action after a
change occurs to a specified
object. (DocuShare CPX only)
Wiki—A collaborative web site.
Weblog—A simple web site for
frequent postings.
Discussion—An online forum
where topics can be posted.
Topic—A posting to a
discussion.
Calendar—An online monthly
or weekly calendar.
Event—A calendar entry.
Mail Message—An email
message.
Saved Query—Saved search
query terms that can be used
for a search.
Notification—Email notification
after a change occurs to a
specified object.
URL—An Internet address for a
web page.
User Guide
1–5
Understanding DocuShare objects
Getting started
Object permissions
Every object on a site has an owner who can control the type of access that users and
groups have to it by assigning permissions. Initially, the object’s owner is the user who
added the object. However, any user with the appropriate permission can change the
owner. DocuShare allows you to assign these access permissions to users and groups:
•
Reader allows the user or group to read the contents of the object and view its
associated properties and permissions.
•
Writer allows the user or group to edit the object’s properties and add new
objects, including new versions of documents.
•
Manager allows the user or group to delete the object, and change the object’s
permissions and owner.
Your DocuShare administrator has full permissions to all of the objects on your site.
Access permissions provides a complete explanation of how to assign permissions to
objects.
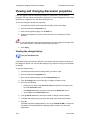
Object properties
In addition to permissions, every object has a set of properties. For example, the
properties for all objects include a title, a description, and an owner. Each object has a
number of specific properties. For example, the sort order property is unique to collections
and documents have a maximum versions property. Your DocuShare administrator also
can create custom properties for use at your site. You can assign property values to
objects, which allows you to categorize objects, provide information about objects to other
users, and facilitate searches.
1–6
User Guide
Getting started
Logging in and out
Logging in and out
Your administrator determines the access policies for your site. Therefore, you may be
able to browse and view content without logging in (as a guest) or you may be required to
log in before you can access any site content.
To log into DocuShare:
1. In a web browser, enter the URL of your DocuShare site.
2. In the Login area, enter your registered username and password in the fields.
Your password is case-sensitive.
3. In the Domain field, select your internal domain name (if applicable).
4. If the Retain login for future checkbox appears, click it if you want to remain
logged into DocuShare after you close and reopen your browser.
Note: The Retain login for future checkbox appears if your administrator configured
your site to allow users to remain logged in after closing their browser. For
DocuShare to save your password, Internet Explorer’s Do not save encrypted
pages to disk option cannot be enabled. You can check the option’s setting by
selecting Internet Options from the Tools menu and then clicking the Advanced
tab.
5. Click Go.
Your username appears on the navigation bar, indicating that you are logged in.
To log out of DocuShare:
1. Do one of the following:
•
Close the browser window.
•
If you selected the retain login for future checkbox, click the Logout link on
the navigation bar.
User Guide
1–7
How to get help
Getting started
How to get help
In addition to this guide, the Help Desk includes other guides and a tutorial. The
Documentation page provides user guides for the features available on your site. The
Training page includes a User Tutorial, which helps you get started using DocuShare by
following a series of step-by-step exercises.
DocuShare User Group
The DocuShare User Group, DoUG, provides access to additional product information,
hints and tips from other user group members, and knowledge base articles. To sign up
with the user group, go to http://docushare.xerox.com/doug.
1–8
User Guide
Getting started
DocuShare Client applications
DocuShare Client applications
The Downloads page on the Help Desk provides several Client applications to extend
DocuShare’s functionality:
DocuShare Windows Client—A Windows-based application that seamlessly integrates
DocuShare's document management features within your Windows desktop environment.
From your Windows desktop you can easily access DocuShare content, drag and drop
documents between DocuShare collections and your local and network drives, and open,
edit, and save DocuShare documents from a variety of applications.
DocuShare Outlook Client—A Windows-based application that enables you to
conveniently manage and share information within Microsoft Outlook. Mapped DocuShare
servers and collections appear as mail folders in your Inbox’s Folder List. Open a folder to
browse the contents of a collection, open documents for editing, and save new versions of
documents. You can easily archive and share mail messages and attachments by
dragging and dropping them to a collection. When you need to find information quickly,
you can perform keyword searches.
PaperPort Link to DocuShare—A program link for the popular Nuance PaperPort
application that is included with many desktop scanners. The link enables you drag and
drop scanned documents from your PaperPort desktop to DocuShare.
User Guide
1–9
DocuShare Client applications
1–10
Getting started
User Guide
Users and groups
•
About DocuShare accounts . . . . . . . . . . . . . . . . . . . . . . . . . . . . . . . . . . . . . . . 2–2
•
DocuShare user accounts . . . . . . . . . . . . . . . . . . . . . . . . . . . . . . . . . . . . . . . . 2–3
•
DocuShare group accounts . . . . . . . . . . . . . . . . . . . . . . . . . . . . . . . . . . . . . . . 2–9
•
Finding and listing DocuShare accounts . . . . . . . . . . . . . . . . . . . . . . . . . . . . 2–15
User Guide
2–1
About DocuShare accounts
Users and groups
About DocuShare accounts
DocuShare provides two types of accounts: individual user accounts and group accounts.
Your administrator determines who can create each type of account on your site. For
example, your site might allow a guest (someone who can view public content) to create a
user account, but require an administrator to create group accounts.
When a user account is created, either by you or an administrator, it is assigned a user
level. The user level controls the level of access to site content and functions. One or
more of the following user levels are provided when creating a user account:
•
Read-Only—Allows the user to view content and manage personal content on My
DocuShare.
•
DocuShare—Allows the user to access all DocuShare content management
functions.
•
CPX—Allows the user to access all DocuShare CPX content and process
management functions. (DocuShare CPX only)
After the user account is created, the user level assigned to the account is indicated by the
superscript letters appearing after the username: read-only, DS, or CPX.
Note: If your site uses the LDAP (Lightweight Directory Access Protocol) feature to
manage user accounts, an administrator creates an account for you. To find out
how your site is configured, see your DocuShare administrator.
2–2
User Guide
Users and groups
DocuShare user accounts
DocuShare user accounts
To add and edit content, you must have a DocuShare user account.
Creating a user account
If your site allows a guest to create accounts, you can create a user account. If account
creation is restricted, an administrator will need to create a user account for you.
To create a user account:
1. On the navigation bar, click Users & Groups.
2. Click the Add User link.
3. On the Add User page, enter the following information:
Username—The name to use to log into DocuShare.
Password and Password Confirm—The password to use to log into DocuShare.
Your administrator can specify that passwords adhere to a set of rules. If
specified, the rules appear on the page.
Passwords are case-sensitive and must be typed as specified when logging in.
Domain—An organization or other entity on your DocuShare site. This field
appears if your site uses the LDAP feature; the menu lists both internal and LDAP
domains.
User Level—The level of access to site content and functions.
Last Name—The last name of the user. Users are listed on the DocuShare site by
their first and last names.
4. Enter any optional information. Click a field name for a description of each
property.
Note: If your administrator created custom properties, they also display on the page. See
your administrator for information about custom properties.
5. Click Apply.
The View Properties page for the user account appears.
If DocuShare was unable to create a new account, a message page appears
describing the problem.
User Guide
2–3
DocuShare user accounts
Users and groups
Viewing user account properties
You can view the properties of any DocuShare user account.
To view a user’s account properties:
1. On the navigation bar, click Users & Groups.
2. On the List page, select Users in the Show field.
3. From the User Level menu, select a single user level or all levels.
4. Do one of the following:
•
To find a specific user account, enter part of the user’s first name, last name,
or username in the Search field. Click the Go button.
•
To display all user accounts, click Show All.
5. From the displayed list, click the name of the user whose properties you want to
view.
The View Properties page appears, displaying the user’s properties. Click a field
name for a description of each property.
Changing your user account properties
You must be logged in as the user whose properties you want to change. You can view,
but not change, another user’s properties.
To change your user account properties:
1. On the navigation bar, click your username.
2. On the View Properties page, click the Edit link.
3. Change the properties you want. Click a field name for a description of each
property.
4. Click Apply.
2–4
User Guide
Users and groups
DocuShare user accounts
Changing your password
You must be logged in as the user whose password you want to change. You cannot
change another user’s password.
Note: If your site uses the LDAP feature, you cannot change your password. Your
administrator must change your password on the LDAP server.
To change your current password:
1. On the navigation bar, click your username.
2. On the View Properties page, click the Change Password link.
3. Enter your current password in the Old Password field.
4. Enter your new password in the New Password field.
Your administrator can specify that your password adhere to a set of rules. If
specified, the rules appear on the page.
5. Enter your new password in the New Password Confirm field.
6. Click Apply.
Changing your username
You must be logged in as the user whose username you want to change. You cannot
change another user’s username.
Note: If your site uses the LDAP feature, you cannot change your username. Your
administrator must change your username on the LDAP server.
To change your username:
1. On the navigation bar, click your username.
2. On the View Properties page, click the Change Username link.
3. Enter your current password in the Password field.
4. Enter a new username in the Username field.
5. Click Apply.
The View Properties page appears displaying your new username. The new name
also appears on the navigation bar.
User Guide
2–5
DocuShare user accounts
Users and groups
Changing your domain
If your site uses the LDAP feature, you can change your domain to an internal domain on
the DocuShare server. You must be logged in as the user whose domain you want to
change; you cannot change another user’s domain.
To change your current domain:
1. On the navigation bar, click your username.
2. On the View Properties page, click the Change Domain link.
3. Select a new domain from the Domain menu.
4. Click Apply.
Viewing your activity history
Only for DocuShare CPX
DocuShare keeps track of all user activity on your site, which provides an audit trail of the
actions of each user. You can view your site activity only. An administrator can view the
activity of all site users.
To view activity history:
1. Click your username on the navigation bar.
2. On the View Properties page, click the Activity History link.
3. From the Activity menu, select the type of activity you want to view.
4. From the Object Type menu, select an object to limit the activity displayed to a
specific object type.
5. From the Show Last menu, select the number of activity events to display.
6. To display the activity during a specific date range, enter start and end dates.
7. Click Go.
Information about the activity displays. You can click Show as XML to convert the
information to Extensible Markup Language (XML) format for use with other
applications.
Changing federation settings
DocuShare federation enables you to search multiple DocuShare sites to easily access
content located on several servers. If your site is a member of a DocuShare federation (a
Federation icon appears at the bottom of a DocuShare page), you must map your user
account information to the other member servers that you want to access.
To map your user account:
1. On the navigation bar, click your username.
2. On the View Properties page, click the Federation Settings link.
The Federation Settings page lists the servers in your federation.
2–6
User Guide
Users and groups
DocuShare user accounts
3. Click the Edit Mapping link that appears to the right of the server to which you
want to map.
The Edit Mapping page appears. If you know your username on the server,
continue with step 4. To search for your username, go to step 5.
Note: If you do not have an account on the server, see the procedure To create a user
account on a federated server below.
4. To enter your account information, click Enter manually and do the following:
a. Enter your username, password, and domain (if applicable).
b. Click Apply.
Your username appears on the Federation Settings page.
5. To select your user account from a list, click Choose from list and do the
following:
a. Find your account by doing one of the following:
•
Enter part of your first name, last name, or username in the Search field
and click the Go button.
•
Click Show All to display all user accounts.
•
Click Show users with my email address to display the accounts with
your email address.
b. Select your account.
c.
Enter the password for the account.
d. Click Apply.
Your username appears on the Federation Settings page.
To create a user account on a federated server:
1. On the Edit Mapping page, click the Create a new user account on this server
link.
The Add User page on the server on which you are creating the account appears.
Note: If the site does not allow guest access, you cannot create an account.
2. Enter your account information and click Apply.
3. Click the browser’s Back button until you return to the Edit Mapping page on the
initial server.
4. Click Choose from list.
5. Display your account and select it.
6. Enter your password.
7. Click Apply.
Your username appears on the Federation Settings page.
User Guide
2–7
DocuShare user accounts
Users and groups
To remove an account mapping:
1. On the navigation bar, click your username.
2. On the View Properties page, click the Federation Settings link.
The Federation Settings page lists the servers in your federation.
3. Click the Edit Mapping link that appears to the right of the server whose mapping
you want to remove.
4. On the Edit Mapping page, click No user mapping.
5. Click Apply.
Your username does not appear next to the server on the Federation Settings
page.
Deleting a user account
Only an administrator can delete an existing user account. Contact your administrator if
you want to delete your user account. If you have several user accounts, your
administrator can combine any number of the accounts into one account.
2–8
User Guide
Users and groups
DocuShare group accounts
DocuShare group accounts
A group consists of any number of DocuShare users, groups, or both. When your site
includes groups, you can more easily manage access to objects by assigning permissions
to the group instead of to each user.
Creating a group
The DocuShare administrator can choose to allow logged-in users to create group
accounts or to have group account creation under administrative control. If after logging
into DocuShare, you do not see the Add Group link on the Users and Groups Registry
page, then an administrator will need to create a group for you.
To create a group:
1. On the navigation bar, click Users & Groups.
2. Click the Add Group link.
3. In the Title field, enter a name for the group. The name can contain spaces and
punctuation marks, and can be identical to another group name.
4. In the Domain field, select a domain name. This field appears if your site uses the
LDAP feature; the menu lists both internal and LDAP domains.
5. Enter any optional information. Click a field name for a description of each
property.
Note: If your administrator created custom properties, they also display on the page. See
your administrator for information about custom properties.
6. Click Apply.
The Pick Members for Group page appears.
7. In the Show field, select the type of account you want to display in the Possible
Users/Groups field.
8. Do one of the following:
•
To find a specific account, enter part of the user’s first name, last name, or
username or the group’s title in the Search field. Click the Go button.
•
To display all accounts, click Show All.
•
To display your favorite accounts, click Show Favorites.
9. In the Possible Users/Groups field, select the accounts to add to the group and
click the Add button. To select multiple accounts, use the CTRL key (Windows) or
the Command key (Macintosh).
10. In the Selected Users/Groups field, select any accounts that you want to remove
from the group and click the Remove button. To select multiple accounts, use the
CTRL key (Windows) or the Command key (Macintosh).
User Guide
2–9
DocuShare group accounts
Users and groups
11. Click Update.
The group members display on the Members page.
12. To give one or more members Manager permission to the group, click the
checkbox next to each member’s name and click Apply. Manager permission
allows the member to change the group’s properties and membership.
Viewing group properties
You can view the properties of any DocuShare group.
To view a group’s properties:
1. On the navigation bar, click Users & Groups.
2. On the List page, select Groups in the Show field.
3. Do one of the following:
•
To find a specific group account, enter part of the group’s title in the Search
field. Click the Go button.
•
To display all group accounts, click Show All.
4. From the displayed list, click the name of the group whose properties you want to
view.
The View Properties page for the group appears. Click a field name for a
description of each property.
Changing group properties
Depending on how the group was set up, either the logged-in owner of the group or a
logged-in group member can change the properties of a group.
To change a group’s properties:
1. On the navigation bar, click Users & Groups.
2. On the List page, select Groups in the Show field.
3. Do one of the following:
•
To find a specific group account, enter part of the group’s title in the Search
field. Click the Go button.
•
To display all group accounts, click Show All.
4. From the displayed list, click the group whose properties you want to change.
The View Properties page for that group appears.
5. Click the Edit link.
6. Change the properties that you want. Click a field name for a description of each
property.
7. Click Apply.
2–10
User Guide
Users and groups
DocuShare group accounts
Changing the members of a group
Depending on how the group was set up, either the logged-in owner of the group or a
logged-in group member can change the members of the group.
To change a group’s members:
1. On the navigation bar, click Users & Groups.
2. On the List page, select Groups in the Show field.
3. Do one of the following:
•
To find a specific group account, enter part of the group’s title in the Search
field. Click the Go button.
•
To display all group accounts, click Show All.
4. From the displayed list, click the group whose members you want to change.
The View Properties page for that group appears.
5. Click the Members link.
The Members page shows the current group members.
6. To change group members, click the Change Membership button.
7. In the Show field, select the type of account you want to display in the Possible
Users/Groups field.
8. Do one of the following:
•
To find a specific account, enter part of the user’s first name, last name, or
username or the group’s title in the Search field. Click the Go button.
•
To display all accounts, click Show All.
•
To display your favorite accounts, click Show Favorites.
9. In the Possible Users/Groups field, select the accounts to add to the group and
click the Add button. To select multiple accounts, use the CTRL key (Windows) or
the Command key (Macintosh).
10. In the Selected Users/Groups field, select any accounts that you want to remove
from the group and click the Remove button. To select multiple accounts, use the
CTRL key (Windows) or the Command key (Macintosh).
11. Click Update.
The group members display on the Members page.
User Guide
2–11
DocuShare group accounts
Users and groups
Changing the owner of a group
Only the logged-in owner of the group can change its owner. After changing the group’s
owner to another user, you will no longer be able to change the group’s members and
properties, unless you have Manager permission to the group.
To change the owner of a group:
1. On the navigation bar, click Users & Groups.
2. On the List page, select Groups in the Show field.
3. Do one of the following:
•
To find a specific group account, enter part of the group’s title in the Search
field. Click the Go button.
•
To display all group accounts, click Show All.
4. From the displayed list, click the group whose owner you want to change.
The View Properties page for that group appears.
5. Click the Edit link.
6. Click Change Owner.
The Change Owner page appears.
7. Do one of the following:
•
To find a specific user account, enter part of the user’s first name, last name,
or username in the Search field. Click the Go button.
•
To display all user accounts, click Show All.
•
To display your favorite accounts, click Show Favorites.
8. Select a name from the New Owner field.
9. In the Add Owner to Group field, click Yes to add the new owner to the group.
10. Click Update Owner.
Changing the domain of a group
If your site uses the LDAP feature, you can change a group’s domain to an internal
domain on the DocuShare server. You must be the logged-in owner of the group to
change its domain.
Note: Changing the group’s domain does not change a group member’s domain, if one is
used.
To change a group’s domain:
1. On the navigation bar, click Users & Groups.
2. On the List page, select Groups in the Show field.
2–12
User Guide
Users and groups
DocuShare group accounts
3. Do one of the following:
•
To find a specific group account, enter any part of the group’s title in the
Search field. Click the Go button.
•
To display all group accounts, click Show All.
4. From the displayed list, click the group whose domain you want to change.
The View Properties page for that group appears.
5. Click the Change Domain link.
6. Select a new domain from the Domain menu.
7. Click Apply.
Sending mail to group members
To easily communicate with a DocuShare group, you can send an email message to the
group’s members. The message is sent to each member whose user properties include an
email address. To send email, your web browser must be correctly configured with a mail
client, such as Microsoft Outlook or Netscape Communicator.
To send email to the members of a group:
1. On the navigation bar, click Users & Groups.
2. On the List page, select Groups in the Show field.
3. Do one of the following:
•
To find a specific group account, enter part of the group’s title in the Search
field. Click the Go button.
•
To display all group accounts, click Show All.
4. From the displayed list, click the group that you want to send an email message
to.
The View Properties page for that group appears.
5. Click the Email link.
6. To write your message, click the here link.
Your browser launches an untitled message window with each group member’s
email address entered in the To field.
7. Compose your message and click Send to email the message to the members of
the group.
User Guide
2–13
DocuShare group accounts
Users and groups
Viewing the change history
Only for DocuShare CPX
DocuShare keeps track of all the changes to site objects, which provides an audit trail of
the changes to objects.
To view the change history:
1. Locate the group whose change history you want to view.
2. Click the group’s Properties icon.
3. On the View Properties page, click the Change History link.
4. From the Change menu, select the type of change you want to view.
5. Do one of the following:
•
Enter part of a name in the Search for User field and then choose the user
from the Select User menu.
•
Click Show All and then choose the user from the Select User menu.
•
Choose All from the Select User menu.
6. From the Show Last menu, select the number of change events to display.
7. To display the activity during a specific date range, enter start and end dates.
8. Click Go.
Information about the change displays. You can click Show as XML to convert the
information to Extensible Markup Language (XML) format for use with other
applications.
Deleting a group
You can delete a group if you are the logged-in owner of the group.
To delete a group:
1. On the navigation bar, click Users & Groups.
2. On the List page, select Groups in the Show field.
3. Do one of the following:
•
To find a specific group account, enter any part of the group’s title in the
Search field. Click the Go button.
•
To display all group accounts, click Show All.
4. From the displayed list, click the group that you want to delete.
The View Properties page for that group appears.
5. At the bottom of the page, click the Delete button.
The Confirm Delete page appears.
6. Click Delete to remove the group from your site.
2–14
User Guide
Users and groups
Finding and listing DocuShare accounts
Finding and listing DocuShare accounts
From the List page, you can quickly search the users and groups registry to determine
whether or not a user or group has an account on the DocuShare site. You also can list all
of the user and group accounts registered on the site.
To search for a user or group:
1. On the navigation bar, click Users & Groups.
2. On the List page, select the type of account you want to find in the Show field.
3. From the User Level menu, select a single user level or all levels.
4. In the Search field, enter a complete name or part of a name.
5. Click Go.
The search results display, listing the users, groups, or both who match the search
text.
To list the accounts on your site:
1. On the List page, select the type of account you want to list in the Show field.
2. Click Show All.
The list of all registered accounts displays.
Only for DocuShare CPX
When displaying the list of accounts, the List page enables you to see which users are
logged into DocuShare. The user icon next to the user’s name indicates whether or not
the user is logged in; the icon is grayed when the user is not logged in.
User Guide
2–15
Finding and listing DocuShare accounts
2–16
Users and groups
User Guide
DocuShare collections
•
About collections . . . . . . . . . . . . . . . . . . . . . . . . . . . . . . . . . . . . . . . . . . . . . . . 3–2
•
Adding a collection . . . . . . . . . . . . . . . . . . . . . . . . . . . . . . . . . . . . . . . . . . . . . . 3–3
•
Viewing and changing collection properties . . . . . . . . . . . . . . . . . . . . . . . . . . . 3–4
•
Changing the location of a collection . . . . . . . . . . . . . . . . . . . . . . . . . . . . . . . . 3–5
•
Deleting a collection . . . . . . . . . . . . . . . . . . . . . . . . . . . . . . . . . . . . . . . . . . . . . 3–6
•
Editing multiple objects in a collection . . . . . . . . . . . . . . . . . . . . . . . . . . . . . . . 3–7
User Guide
3–1
About collections
DocuShare collections
About collections
Your DocuShare site consists of any number of repositories, called collections, in which
you store documents and other objects. The administrator determines which initial set of
collections appears on the DocuShare home page. As a registered user, you can add
collections to your site.
3–2
User Guide
DocuShare collections
Adding a collection
Adding a collection
You can add a collection to another collection or to a workspace (DocuShare CPX only) if
you are logged in and have Writer permission to the container.
To add a collection:
1. Navigate to and open the container to which you want to add a collection.
2. From the Add menu, select Collection.
The Add Collection page appears.
3. In the Title field, enter a name for the collection. The name should be short, but
descriptive, and can contain spaces and punctuation marks.
4. Enter any optional information. Click a field name for a description of each
property.
Note: If your administrator created custom properties, they also display on the page. See
your administrator for information about custom properties.
5. Click Apply.
The collection is added to the container.
To change the collection’s permissions, see Access permissions.
User Guide
3–3
Viewing and changing collection properties
DocuShare collections
Viewing and changing collection properties
If you are logged in and have Reader permission to a collection, you can view its
properties. You can change a collection’s properties if you are the logged-in owner of the
collection or a logged-in user with Writer permission to it.
To view and change a collection’s properties:
1. Locate the collection whose properties you want to view and change.
2. Click the collection’s Properties icon.
3. On the View Properties page, click the Edit link.
4. Change the properties you want. Click a field name for a description of each
property.
Note: If your administrator created custom properties, they also display on the page. See
your administrator for information about custom properties.
5. Click Apply.
Viewing the change history
Only for DocuShare CPX
DocuShare keeps track of all the changes to site objects, which provides an audit trail of
the changes to objects. You can view the changes to any object to which you have Reader
permission.
To view the change history:
1. Locate the collection whose change history you want to view.
2. Click the collection’s Properties icon.
3. On the View Properties page, click the Change History link.
4. From the Change menu, select the type of change you want to view.
5. Do one of the following:
•
Enter part of a name in the Search for User field and then choose the user
from the Select User menu.
•
Click Show All and then choose the user from the Select User menu.
•
Choose All from the Select User menu.
6. From the Show Last menu, select the number of change events to display.
7. To display the activity during a specific date range, enter start and end dates.
8. Click Go.
Information about the change displays. You can click Show as XML to convert the
information to Extensible Markup Language (XML) format for use with other
applications.
3–4
User Guide
DocuShare collections
Changing the location of a collection
Changing the location of a collection
You can move a collection to another container or have the collection appear in several
containers on your site. Although a collection can appear in several containers, there is
only one copy of it, which saves space on your DocuShare site.
To change a collection’s location, you must be logged in and have Writer permission to
both the collection and the new container.
Note: You can also use the Copy, Cut, and Paste commands from the Edit Selected
menu to change the location of a collection. See Editing multiple objects in a
collection on page 3–7.
To change a collection’s location:
1. Locate the collection whose location you want to change.
2. Do one of the following:
•
Click the checkbox that appears next to the collection’s title. From the Edit
Selected menu, select Change Location. On the Confirm Change Location
page, click Confirm.
•
Click the Properties icon that appears to the right of the collection’s title. On
the Properties page for the collection, click the Locations link.
The Change Location page appears.
3. In the Sort By field, select Title to display the possible containers in alphabetical
order or select Handle to display the possible containers in numerical order.
4. Do one of the following:
•
To find specific containers, enter any part of a container title in the Search
field. Click the Go button.
•
To display all containers, click Show All.
•
To display your favorite containers, click Show Favorites.
5. In the Possible Locations field, select the container(s) in which you want the
collection to appear and click the Add button. To select multiple containers, use
the CTRL key (Windows) or the Command key (Macintosh).
6. In the Selected Locations field, select any containers in which you do not want
the collection to appear and click the Remove button. To select multiple
containers, use the CTRL key (Windows) or the Command key (Macintosh).
Note: Make sure at least one container appears in the Selected Locations field.
Otherwise, the collection will become orphaned, which means it will not appear in
any container.
7. Click Update Locations.
User Guide
3–5
Deleting a collection
DocuShare collections
Deleting a collection
You can delete a collection if you are the logged-in owner of the collection or have
Manager permission to it. If the collection contains other objects, you can choose to delete
the collection only or the collection and its contents. To delete the collection and its
contents, you must be the owner of the objects in the collection or have Manager
permission to them.
After deleting a collection, it goes to your personal trashcan on My DocuShare. You can
restore an object from your personal trashcan as long as your administrator has not
expunged the object from the site-wide trashcan. See My DocuShare for more
information.
Note: If you delete a collection, but not its contents, and the objects are not located in
another collection, they become orphaned. You are unable to access orphaned
objects from a collection. Your administrator can relocate orphaned objects in a
collection so you can access them again.
To delete a collection:
1. Locate the collection that you want to delete.
2. Do one of the following:
•
Click the checkbox that appears next to the collection’s title. From the Edit
Selected menu, select Delete.
•
From the collection’s More Actions menu, select Delete.
The Confirm Delete page appears.
Note: If a minus sign appears in the checkbox that precedes the collection, then you do
not have Manager permission to the object and cannot delete it.
3. From the For collections, delete menu, do one of the following:
•
Select Collection and Contents to delete the collection and all of the objects
in it.
•
Select Collection Only to delete the collection, but not its contents.
4. Click Delete to remove the collection from your site.
3–6
User Guide
DocuShare collections
Editing multiple objects in a collection
Editing multiple objects in a collection
When viewing an open collection, you can use the Edit Selected menu to perform a
variety of tasks on one or more objects. The menu includes these commands:
•
Add to Favorites—Add the object to Favorites on My DocuShare.
•
Archive and Restore—Move the object to and retrieve the object from an Archive
Server (commands appear if your site uses an Archive Server). See Archiving
content for more information.
•
Change Location—Add the object to another location.
•
Change Owner—Change the owner of the object.
•
Copy—Copy a reference of the object to the clipboard. The clipboard can contain
a maximum of 100 objects.
•
Copy Shortcuts—Copy a reference of the object to the clipboard so it can be
pasted to a shortcuts portlet on a workspace. (DocuShare CPX only)
•
Cut—Cut the object to the clipboard. The clipboard can contain a maximum of
100 objects.
•
Paste—Paste the object from the clipboard.
•
Delete—Remove the object from your site.
•
Rename—Change the title of the object.
•
Route—Send the document to users for approval, review, or information. See
Routing documents for more information.
To edit multiple collection objects:
1. Navigate to and open the collection.
2. Do one of the following:
•
To edit some of the objects, click the checkbox next to the objects you want.
•
To edit all of the objects, click the checkbox to the left of the Type column
heading.
3. From the Edit Selected menu, select the command you want.
A confirm window appears.
4. Click Confirm to continue. Depending on which command you selected,
additional pages may appear.
Note: When using the Change Location command, if an object appears in more than
one collection, only the current collection is listed in the Selected Locations field.
User Guide
3–7
Editing multiple objects in a collection
DocuShare collections
Using Copy, Cut, and Paste to change the location of an
object
To copy or cut objects:
1. Locate the object that you want to copy or cut.
2. Click the checkbox next to the object.
3. From the Edit Selected menu, select either Copy or Cut.
A confirm window appears.
4. Choose whether or not to remove any objects from the clipboard before the copy
or cut.
5. Click Confirm.
Note: When using the Cut command, the object is grayed until you Paste it to another
container.
6. Open the container in which you want to paste the object.
7. From the Edit Selected menu, select Paste.
A confirm window appears.
8. Choose whether or not to remove any objects from the clipboard after the paste.
9. Click Confirm.
The object appears in the container.
3–8
User Guide
DocuShare documents
•
About documents . . . . . . . . . . . . . . . . . . . . . . . . . . . . . . . . . . . . . . . . . . . . . . . 4–2
•
Adding a document . . . . . . . . . . . . . . . . . . . . . . . . . . . . . . . . . . . . . . . . . . . . . 4–3
•
Viewing a document. . . . . . . . . . . . . . . . . . . . . . . . . . . . . . . . . . . . . . . . . . . . . 4–4
•
Finding duplicate documents . . . . . . . . . . . . . . . . . . . . . . . . . . . . . . . . . . . . . . 4–6
•
Editing a document . . . . . . . . . . . . . . . . . . . . . . . . . . . . . . . . . . . . . . . . . . . . . 4–7
•
Adding a new version of a document . . . . . . . . . . . . . . . . . . . . . . . . . . . . . . . . 4–9
•
Managing document versions . . . . . . . . . . . . . . . . . . . . . . . . . . . . . . . . . . . . 4–10
•
Locking and unlocking a document . . . . . . . . . . . . . . . . . . . . . . . . . . . . . . . . 4–12
•
Exporting a document . . . . . . . . . . . . . . . . . . . . . . . . . . . . . . . . . . . . . . . . . . 4–13
•
Adding comments to a document. . . . . . . . . . . . . . . . . . . . . . . . . . . . . . . . . . 4–14
•
Viewing and changing document properties . . . . . . . . . . . . . . . . . . . . . . . . . 4–15
•
Changing the location of a document. . . . . . . . . . . . . . . . . . . . . . . . . . . . . . . 4–16
•
Deleting a document . . . . . . . . . . . . . . . . . . . . . . . . . . . . . . . . . . . . . . . . . . . 4–17
User Guide
4–1
About documents
DocuShare documents
About documents
Using DocuShare, you can store, access, and manage documents created in a variety of
popular formats. You add documents to DocuShare by uploading documents from your
computer or a network drive or by scanning paper documents. With the documents stored
on DocuShare, users connected to the network can use their browser to search for, view,
edit, and download a document.
For document management, DocuShare supports version control and document locking.
By default, DocuShare saves four versions of a document; you can change the number of
versions DocuShare saves on a per-document basis. In addition, you can change a
document’s preferred version, which is the version that opens when users view, edit, and
route the document. By default, a document’s preferred version is its latest version.
4–2
User Guide
DocuShare documents
Adding a document
Adding a document
You add a document to a collection or workspace (DocuShare CPX only) to make it
available to others for viewing or collaborative work. When adding a document by
uploading a document now, the document is added immediately to DocuShare. When
adding a document by scanning a document or uploading a document later, a
placeholder document is added. The placeholder does not contain any content; you add
content to the placeholder by scanning a document using a cover sheet or by uploading a
new version.
To add a document, you must be logged in and have Writer permission to the container.
To add a document:
1. Navigate to and open the container to which you want to add the document.
2. From the Add menu, select Document.
The Add Document page appears.
3. In the Add Document By field, select one of the following:
•
Uploading a document now to upload a document immediately.
•
Scanning a document using a cover sheet to scan a paper document.
•
Uploading a document later to upload a document at a later time.
4. If you are uploading a document now, enter the complete path and filename of the
document in the Filename field or click the Browse button to navigate to and
select the document.
If you enter the path and filename of a document that does not appear on the
drive, DocuShare uploads an empty document.
5. Enter the following information:
Title—The title of the document. The title can contain spaces and punctuation
marks.
Max Versions—The maximum number of versions to save. When a new version
of a document is saved to DocuShare, the oldest version is deleted, unless it is
the preferred version.
6. Enter any optional information. Click a field name for a description of each
property.
7. Click Apply.
If you are uploading a document, it is added to the container. If you are scanning a
document, a cover sheet appears. Print the cover sheet. For information on how
to use the cover sheet, see Scanning a document with a scan cover sheet on
page 18–4. If you are uploading a document later, you can add the document
content by adding a new version. See Adding a new version of a document on
page 4–9.
If you chose to route the document, a Routing Slip appears. For information on
how to use the Routing Slip, see Routing documents.
User Guide
4–3
Viewing a document
DocuShare documents
Viewing a document
When opening a document to view it, you choose to either open or save (download) the
document. The download copies the document and keeps the original document on
DocuShare.
Your browser controls how a document is displayed. By design, browsers are able to
handle several types of documents and files, such as HTML, GIF, and JPEG. However, for
some documents, such as Microsoft Word and Excel, your browser launches a helper
application (viewer) to run or display the document either outside or within the browser
window. To play multimedia files, the browser uses a plug-in, which opens the file within
the browser window.
Your browser is preconfigured to use specific helper applications and plug-ins. Generally,
if you try to open a document or file that your browser does not recognize, it displays a
window that guides you in finding the application to use for that type of file.
Unless access to a document is restricted, you can view any document on your site.
To view a document:
1. Locate the document that you want to view.
2. Click the document’s title.
A window appears allowing you to open or download the document.
3. To return to the container page after opening the document, do one of the
following:
•
If the document opened in a separate window, select Exit from the File menu.
•
If the document opened within the browser window, click the browser’s Back
button.
Note: If you click the X in the top-right corner of the browser or select Close from the File
menu, your browser closes and you lose your connection to the DocuShare site.
Viewing a document and its properties
For PDF documents, a variety of image documents (gif, jpeg, png, tiff), and other
document formats, you can view the document content while viewing and editing the
document’s properties.
Note: To view Microsoft Word and PowerPoint documents, you should use Internet
Explorer. Also, make sure your Folder Options are configured to open each
document type within the same browser window.
To view a document and its properties:
1. Locate the document that you want to view.
2. From the document’s More Actions menu, select View Document & Properties.
Both the document and its properties display in a separate window.
4–4
User Guide
DocuShare documents
Viewing a document
3. Change any of the properties and click Update.
4. Click Close to close the window.
Viewing an HTML rendition of a document
DocuShare provides an HTML conversion feature that lets you view supported document
types in HTML format. This feature eliminates the need to configure your browser to
display certain document types.
Note: The HTML conversion feature cannot convert documents that contain encrypted
information.
To view an HTML rendition of a document:
1. Locate the document that you want to view.
2. From the document’s More Actions menu, select View in HTML.
DocuShare converts the document to HTML and displays the document.
3. Click the browser’s Back button to return to the container page.
Viewing a PDF rendition of a document
Only for DocuShare CPX
DocuShare provides a PDF conversion feature that lets you view supported document
types in PDF format. This feature eliminates the need to configure your browser to display
certain document types.
Note: The PDF conversion feature cannot convert documents that contain encrypted
information. You must have Adobe® Reader® installed on your computer.
To view a PDF rendition of a document:
1. Locate the document that you want to view.
2. From the document’s More Actions menu, select View in PDF.
DocuShare converts the document to PDF and displays the document.
User Guide
4–5
Finding duplicate documents
DocuShare documents
Finding duplicate documents
Only for DocuShare CPX
DocuShare provides a finder feature that enables you to find documents with identical
content, regardless of their format.
To find duplicate documents:
1. Locate the document that you want to check for duplicates.
2. From the document’s More Actions menu, select Find Duplicates.
Any documents with the same content display.
4–6
User Guide
DocuShare documents
Editing a document
Editing a document
DocuShare supports the complete development cycle of a document, allowing users to
collaborate on a project. Document check out and locking ensures that only one user at a
time edits a document. Version control maintains a user-specified number of document
versions.
To edit a document and create a new version, you must be either the logged-in owner of
the document or a logged-in user with Writer permission to it. In addition, the document’s
Add Versions property must be set to Allowed (default setting).
Note: If DocuShare Windows Client is installed on your computer and you enabled the
Handle checkout from web browser property in the DocuShare Client Properties
window, the DocuShare Client Checkin Wizard displays after you edit and save the
document. When using this feature, make sure DocuShare’s URL in the browser is
the same as the server’s address in Windows Client. To check the server’s
address, right-click the server name and select Properties.
To edit a document:
1. Locate the document that you want to edit.
2. Click the document’s Check Out icon.
A window appears allowing you to open or download the document.
3. Edit the document.
4. Do one of the following:
•
If the document opened in the browser, click the Back button. Click Yes to
save your edits.
•
If the document opened in its native editor, select Save As from the File
menu.
5. In the Save As window, save the document to a location on your local drive.
Do not change the name of the document.
6. On the container page, click the document’s Upload a New Version icon.
The Add Version page appears.
7. Click the Browse button.
8. Navigate to the location on your local drive in which you saved the edited
document, select it, and click Open.
The path to the document appears in the Filename field.
9. In the Title field, you can change the document title. By default, the new version is
assigned the original document title.
10. Optionally, enter any comments in the Version Comments field.
11. If you locked the document, choose whether or not you want to unlock the
document after adding the new version in the Unlock Document field.
User Guide
4–7
Editing a document
DocuShare documents
12. When a document version other than the latest is the preferred version, you can
click Yes in the Make This The Preferred Version field to set this version as the
preferred one. Otherwise, click No to not change the preferred version.
13. Click Apply.
4–8
User Guide
DocuShare documents
Adding a new version of a document
Adding a new version of a document
You can add a new version of a document by uploading a document from a folder on your
local drive or a network drive. To add a new version, you must either be the logged-in
owner of the document or have Writer permission to it.
To add a new version of a document:
1. Locate the document that you want to update with a new version.
2. Click the document’s Upload a New Version icon.
The Add Version page appears.
3. Click the Browse button.
4. Navigate to the location that contains the document you want to add as a new
version, select it, and click Open.
The path to the document appears in the Filename field.
5. In the Title field, you can change the document title. By default, the new version is
assigned the original document title.
6. Optionally, enter any comments in the Version Comments field.
7. If the previous version of the document was locked, the Unlock Document field
appears. Click No if you do not want to unlock the document after adding the new
version.
8. When a document version other than the latest is the preferred version, you can
click Yes in the Make This The Preferred Version field to set this version as the
preferred one. Otherwise, click No to not change the preferred version.
9. Click Apply.
User Guide
4–9
Managing document versions
DocuShare documents
Managing document versions
DocuShare’s version control feature enables you to maintain a record of a document's
history. For each version DocuShare saves, you can view the content, the date and time
the version was added, the user who added the version, and any user-provided comment.
You can also view and edit each version’s properties and permissions, and route individual
versions.
By default, DocuShare saves four versions of a document. You can change the default
setting by changing the document's Max Versions property. See Viewing and changing
document properties on page 4–15.
Viewing document versions
To view a document’s version history:
1. Locate the document whose version history you want to view.
2. Click the document’s Properties icon.
The View Properties page appears.
3. Click the Version History link.
The page displays all saved versions of the document.
4. To view a specific version of the document, click its type or version number.
5. To return to the Version History page, do one of the following:
•
If the document opened in a separate window, select Exit from the File menu.
•
If the document opened within the browser window, click the browser’s Back
button.
Changing the preferred version
By default, a document’s preferred version is the latest version. When there is more than
one version of a document, you can change the document’s preferred version. This is the
version of the document that opens when users view, edit, and route the document.
However, users can route a specific document version from the document’s Version
History page.
DocuShare always saves the preferred version, regardless of the number of Max
Versions specified.
To change a document’s preferred version:
1. Display a document’s Version History page.
2. Click Change Preferred Version.
Radio buttons display next to each version and the Use Latest Version option
appears.
4–10
User Guide
DocuShare documents
Managing document versions
3. Do one of the following:
•
To select one of the existing versions as the preferred version, click the radio
button next to the version you want.
•
To always have the latest version of the document be the preferred version,
click the radio button next to Use Latest Version.
4. Click Apply.
Viewing the renditions of a version
Each version of a document can consist of a number of renditions. A rendition is the
version’s display format, such as Microsoft Word, Adobe PDF, or HTML, and can be
comprised of content files. For example, an HTML rendition of a particular document
version would consist of the HTML file and several image files if the rendition contained
graphics.
To view a version’s renditions:
1. Display a document’s Version History page.
2. To view the version renditions, click Show Renditions.
The version renditions display and, if a rendition contains content files, those files
display.
3. You can click a rendition or a content file to view it.
4. Click Hide Renditions to not view the renditions.
Viewing and changing version properties
If you are logged in and have Reader permission to a version, you can view its properties.
You can change a version’s properties if you are the logged-in owner of the version or a
logged-in user with Writer permission to the version.
To view and change a version’s properties:
1. Display a document’s Version History page.
2. Click the document version’s Properties icon.
The View Properties page appears.
3. Click the Edit link.
4. Change the properties you want. Click a field name for a description of each
property.
5. Click Apply.
To change a version’s permissions, see Access permissions.
User Guide
4–11
Locking and unlocking a document
DocuShare documents
Locking and unlocking a document
You can lock a document when you want to keep other users from editing it. To lock a
document, you must be the logged-in owner of the document or a logged-in user with
Writer permission to it.
To allow users to edit a locked document, you need to unlock the document. To unlock a
document, you must be the logged-in owner of the document or a logged-in user with
Writer permission to it. A document is locked if a Lock icon appears to the left of the
document’s title.
To lock a document:
1. Locate the document that you want to lock.
2. From the document’s More Actions menu, select Lock.
A Lock icon appears to the left of the document title. Users can view the
document, but they cannot edit it.
To unlock a locked document:
1. Locate the document that you want to unlock.
2. From the document’s More Actions menu, select Unlock.
A Lock icon no longer appears to the left of the document’s title. Users can now
edit the document.
4–12
User Guide
DocuShare documents
Exporting a document
Exporting a document
Only for DocuShare CPX
Your administrator can set up locations on external servers to which you can export
documents. You can export a single document or several documents at a time.
To export a document:
1. Locate the document that you want to export.
2. Click the checkbox that appears next to the document’s title.
3. From the Edit Selected menu, select Export Document.
The Confirm Export Document page appears.
4. In the Location field, select the external location for the document.
5. Click the Confirm button.
User Guide
4–13
Adding comments to a document
DocuShare documents
Adding comments to a document
You can post comments on a document to maintain an informal commentary on it. For
instance, when co-authoring a document, you can add helpful comments for the other
document authors.
Any logged-in user with Reader permission to a document can post comments on it.
To post a comment on a document:
1. Locate the document on which you want to post a comment.
2. Click the document’s Comments icon.
3. If the are current comments on the document, click the Add a comment link.
The Add Comments page appears.
4. In the Title field, enter a name for the comment.
5. In the Description field, enter the comment text.
6. Click Apply.
You can view the comments on a document by clicking its Comments icon. To
edit a comment, click the comment’s Edit icon.
4–14
User Guide
DocuShare documents
Viewing and changing document properties
Viewing and changing document properties
If you are logged in and have Reader permission to a document, you can view its
properties. You can change a document’s properties if you are the logged-in owner of the
document or a logged-in user with Writer permission to the it.
To view and change a document’s properties:
1. Locate the document whose properties you want to view and change.
2. Click the document’s Properties icon.
3. On the View Properties page, click the Edit link.
4. Change the properties you want. Click a field name for a description of each
property.
Note: If your administrator created custom properties, they also display on the page. See
your administrator for information about custom properties.
5. Click Apply.
Viewing the change history
Only for DocuShare CPX
DocuShare keeps track of all the changes to site objects, which provides an audit trail of
the changes to objects. You can view the changes to any object to which you have Reader
permission.
To view the change history:
1. Locate the document whose change history you want to view.
2. Click the document’s Properties icon.
3. On the View Properties page, click the Change History link.
4. From the Change menu, select the type of change you want to view.
5. Do one of the following:
•
Enter part of a name in the Search for User field and then choose the user
from the Select User menu.
•
Click Show All and then choose the user from the Select User menu.
•
Choose All from the Select User menu.
6. From the Show Last menu, select the number of change events to display.
7. To display the activity during a specific date range, enter start and end dates.
8. Click Go.
Information about the change displays. You can click Show as XML to convert the
information to Extensible Markup Language (XML) format for use with other
applications.
User Guide
4–15
Changing the location of a document
DocuShare documents
Changing the location of a document
You can move a document to another container or have the document appear in several
containers on your site. Moving a document eliminates the need to delete the document
and then upload it again. Although a document can appear in several containers, there is
only one copy of it, which saves space on your DocuShare site.
To change a document’s location, you must be logged in and have Reader permission to
the document and Writer permission to the new container.
Note: You can also use the Copy, Cut, and Paste commands from the Edit Selected
menu to change the location of a document. See Editing multiple objects in a
collection on page 3–7.
To change a document’s location:
1. Locate the document that you want to move.
2. Do one of the following:
•
Click the checkbox that appears next to the document’s title. From the Edit
Selected menu, select Change Location. On the Confirm Change Location
page, click Confirm.
•
Click the Properties icon that appears to the right of the document’s title. On
the View Properties page, click the Locations link.
The Change Location page appears.
3. In the Sort By field, select Title to display the possible containers in alphabetical
order or select Handle to display the possible containers in numerical order.
4. Do one of the following:
•
To find specific containers, enter any part of a container title in the Search
field and click Go.
•
To display all containers, click Show All.
•
To display your favorite containers, click Show Favorites.
5. In the Possible Locations field, select the container(s) in which you want the
document to appear and click the Add button. To select multiple containers, use
the CTRL key (Windows) or the Command key (Macintosh).
6. In the Selected Locations field, select any containers in which you do not want
the document to appear and click the Remove button. To select multiple
containers, use the CTRL key (Windows) or the Command key (Macintosh).
Note: Make sure at least one container appears in the Selected Locations field.
Otherwise, the document will become orphaned, which means it will not appear in
any container.
7. Click Update Locations.
4–16
User Guide
DocuShare documents
Deleting a document
Deleting a document
You can delete a document if you are the logged-in owner of the document or a logged-in
user with Manager permission to it.
After deleting a document, it goes to your personal trashcan on My DocuShare. You can
restore an object from your personal trashcan as long as your administrator has not
expunged the object from the site-wide trashcan. See My DocuShare for more
information.
To delete a document:
1. Locate the document that you want to delete.
2. Do one of the following:
•
Click the checkbox that appears next to the document’s title. From the Edit
Selected menu, select Delete.
•
From the document’s More Actions menu, select Delete.
The Confirm Delete page appears.
Note: If a minus sign appears in the checkbox that precedes the document, then you do
not have Manager permission to the object and cannot delete it.
3. Click Delete to remove the document from your site.
User Guide
4–17
Deleting a document
4–18
DocuShare documents
User Guide
Access permissions
•
About access permissions . . . . . . . . . . . . . . . . . . . . . . . . . . . . . . . . . . . . . . . . 5–2
•
Viewing the access permissions of an object. . . . . . . . . . . . . . . . . . . . . . . . . . 5–3
•
Changing the access permissions of an object . . . . . . . . . . . . . . . . . . . . . . . . 5–4
•
Changing the owner of an object . . . . . . . . . . . . . . . . . . . . . . . . . . . . . . . . . . . 5–5
•
Applying permissions to the objects in a container . . . . . . . . . . . . . . . . . . . . . 5–6
•
Applying permissions to a document and its versions . . . . . . . . . . . . . . . . . . . 5–7
User Guide
5–1
About access permissions
Access permissions
About access permissions
Every DocuShare object has a set of associated permissions called its access list.
Permissions are the access rights that a defined set of users and groups has to view,
delete, or change a DocuShare object. The object's owner or any user with Manager
permission to the object can assign and change the permissions.
As the owner of the DocuShare objects that you add to your site, you can control the type
of access users and groups have to those objects. When you add an object to a container,
you set the object’s initial permissions. At any time you can change the users and groups
who have access to the object and the type of access each user or group has.
DocuShare provides the following access permissions that you can assign to users and
groups:
•
Reader allows the user or group to read the contents of the object and view its
associated properties and permissions.
•
Writer allows the user or group to edit the object’s properties and add new
objects, including new versions of documents.
•
Manager allows the user or group to delete the object, and change the object’s
access permissions and owner.
In addition, you can control who can see an object in a search results list.
By default, colored key icons appear next to objects indicating who in addition to the
owner can access the objects. (DocuShare CPX only)
Table 5–1: Access permission icons
Access permission icon and its description
Green key—Indicates that the object can be accessed by all users, all groups,
and the site administrator.
Yellow key—Indicates that the object can be accessed by all groups and the
site administrator.
Red key—Indicates that the object can be accessed by the site administrator
only.
5–2
User Guide
Access permissions
Viewing the access permissions of an object
Viewing the access permissions of an object
If you have Reader permission to an object, you can view the its access permissions.
To view an object’s access permissions:
1. Locate the object whose permissions you want to view.
2. Do one of the following:
•
From the object’s More Actions menu, select Permissions.
•
If visible, click the key icon that appears to the right of the object’s title.
(DocuShare CPX only)
The Permissions page displays the users and groups in the access list and the
permissions each account is assigned.
User Guide
5–3
Changing the access permissions of an object
Access permissions
Changing the access permissions of an object
You can change an object’s access permissions if you are the logged-in owner of the
object or a logged-in user with Manager permission to the object.
To change an object’s access permissions:
1. Locate the object whose permissions you want to change.
2. Do one of the following:
•
From the object’s More Actions menu, select Permissions.
•
If visible, click the key icon that appears to the right of the object’s title.
(DocuShare CPX only)
The Permissions page for the object appears.
3. For Search Available To, do one of the following:
•
Click Anyone to allow guests and users to view the object in a search results
list.
•
Click Access List Only to allow only those accounts in the object’s access list
that have at least Reader permission to see the object in a search results list.
4. If you want to change the list of users and groups who have access to the object,
click the Change Access List button.
The Change Access List page appears.
5. In the Show field, select the type of account you want to display in the Possible
Users/Groups field.
6. Do one of the following:
•
To find a specific account, enter part of the user’s first name, last name, or
username or the group’s title in the Search field. Click the Go button.
•
To display all accounts, click Show All.
•
To display your favorite accounts, click Show Favorites.
7. In the Possible Users/Groups field, select the accounts to add to the access list
and click the Add button. To select multiple accounts, use the CTRL key
(Windows) or the Command key (Macintosh).
8. In the Selected Users/Groups field, select any accounts that you want to remove
from the access list and click the Remove button. To select multiple accounts, use
the CTRL key (Windows) or the Command key (Macintosh).
9. Click Update Access List.
The Permissions page appears, displaying the new access list.
10. Check the permission boxes you want for each user and group displayed in the
access list.
11. Click Apply.
5–4
User Guide
Access permissions
Changing the owner of an object
Changing the owner of an object
The default owner of an object is the user who initially created the object. You can change
an object’s owner if you are the logged-in owner of the object or a logged-in user with
Manager permission to the object.
Note: When you change the owner of a container, only that object’s owner is changed;
the owners of the container’s objects are not changed.
To change the owner of an object:
1. Locate the object whose owner you want to change.
2. Do one of the following:
•
Click the checkbox that appears to the left of the object’s title. From the Edit
Selected menu, select Change Owner. On the confirmation page, click
Confirm.
•
From the object’s More Actions menu, select Permissions. On the
Permissions page, click the Change Owner button.
•
If visible, click the key icon that appears to the right of the object’s title. On the
Permissions page, click the Change Owner button. (DocuShare CPX only)
The Change Owner page appears.
3. Do one of the following:
•
To find a specific user account, enter part of the user’s first name, last name,
or username in the Search field. Click the Go button.
•
To display all user accounts, click Show All.
•
To display your favorite user accounts, click Show Favorites.
4. Select a username from the New Owner field.
5. Click Update Owner.
The Permissions page for the object appears, displaying the name of the new
owner at the top of the access list. The new owner has Reader, Writer, and
Manager permissions.
The name of the previous owner remains in the access list.
User Guide
5–5
Applying permissions to the objects in a container
Access permissions
Applying permissions to the objects in a
container
When you change the access permissions of a container that includes objects, you can
choose how to apply the container’s permissions to its contents. You can choose to apply
all of the permissions or only the changed permissions to either the container or the
container and its contents.
You can change a container’s access permissions if you are the logged-in owner of the
container or a logged-in user with Manager permission to it.
To apply a container’s access permission to the objects in it:
1. Locate the container whose permissions you want to change.
2. Do one of the following:
•
From the container’s More Actions menu, select Permissions.
•
If visible, click the key icon that appears to the right of the container’s title.
(DocuShare CPX only)
The Permissions page for the container appears.
3. Make the changes you want to the access list.
4. For Options, select one of the following:
•
Apply all permissions to—Assigns all of the access permissions.
•
Apply only changes to—Assigns only the changed access permissions.
5. Select one of the following:
•
This container only—Applies the permissions to the container only. The
permissions of the container’s objects are not changed.
•
This container and its objects, including same objects that appear in
other containers—Applies the permissions to the container and the objects
in it. The permissions of the same objects that appear in other containers also
are changed.
•
This container and its objects, excluding same objects that appear in
other containers—Applies the permissions to the container and the objects
in it. The permissions of the same objects that appear in other containers are
not changed.
6. Click Apply.
Note: When applying the permissions to a container and its objects, the change occurs in
the background. You can check the status of the background job on the information
bar at the top of the Permissions page. For details on the job and to delete the job
from the queue, click the Job ID number displayed on the information bar. In
addition, you can access your background jobs from My DocuShare.
5–6
User Guide
Access permissions
Applying permissions to a document and its versions
Applying permissions to a document and its
versions
Since each version of a document has its own access list, when you change a document’s
access permissions you can choose how you want to apply the changes to the
document’s versions. You can change a document’s access permissions if you are the
logged-in owner of the document or a logged-in user with Manager permission to it.
To apply a document’s access permission to its versions:
1. Locate the document whose permissions you want to change.
2. Do one of the following:
•
From the document’s More Actions menu, select Permissions.
•
If visible, click the key icon that appears to the right of the document’s title.
(DocuShare CPX only)
The Permissions page for the document appears.
3. Make the changes you want to the access list.
4. For Apply all permissions to, select one of the following:
•
This document and its versions—Assigns the changed permissions to the
document and all of its versions.
•
This document only—Assigns the changed permissions to the document
only. The document and its versions will have different access permissions.
5. Click Apply.
User Guide
5–7
Applying permissions to a document and its versions
5–8
Access permissions
User Guide
DocuShare calendars
•
About calendars . . . . . . . . . . . . . . . . . . . . . . . . . . . . . . . . . . . . . . . . . . . . . . . . 6–2
•
Adding a calendar . . . . . . . . . . . . . . . . . . . . . . . . . . . . . . . . . . . . . . . . . . . . . . 6–3
•
Changing the calendar view. . . . . . . . . . . . . . . . . . . . . . . . . . . . . . . . . . . . . . . 6–4
•
Viewing and changing calendar properties . . . . . . . . . . . . . . . . . . . . . . . . . . . 6–5
•
Changing the location of a calendar. . . . . . . . . . . . . . . . . . . . . . . . . . . . . . . . . 6–6
•
Deleting a calendar . . . . . . . . . . . . . . . . . . . . . . . . . . . . . . . . . . . . . . . . . . . . . 6–7
•
Adding an event to a calendar . . . . . . . . . . . . . . . . . . . . . . . . . . . . . . . . . . . . . 6–8
•
Viewing and changing calendar event properties . . . . . . . . . . . . . . . . . . . . . . 6–9
•
Changing the location of a calendar event. . . . . . . . . . . . . . . . . . . . . . . . . . . 6–10
•
Deleting a calendar event . . . . . . . . . . . . . . . . . . . . . . . . . . . . . . . . . . . . . . . .6–11
User Guide
6–1
About calendars
DocuShare calendars
About calendars
You can add a calendar to your site to keep track of your appointments, meetings, and
other activities. If you and a group of co-workers are responsible for a project, you can
share a calendar to manage the tasks and schedules.
The entries you add to a calendar are called events. An event can occur all day or during
a specified time period. In addition, an event can occur once or repeatedly, such as a
weekly staff meeting or a class.
You can display a calendar in any of the following views:
•
Month view—Displays an entire month with the current day highlighted. From the
current month, you can click a link for the previous month and the next month. You
can also display calendars for previous and following years.
The start time and title of each calendar event is shown on the date to which it
was added.
•
Week view—Displays an entire week with the current day highlighted. From the
current week, you can click a link for the previous week and the next week. You
can also display calendars for previous and following years.
The duration, title, and owner of each event is shown on the date to which it was
added.
•
Day view—Displays the current day. From the current day, you can click a link for
the previous day and the next day. You can also display a day from another month
or year.
The day view shows the duration, title, and owner of each event added to the
date.
6–2
User Guide
DocuShare calendars
Adding a calendar
Adding a calendar
You can add a calendar to a collection or workspace (DocuShare CPX only) if you are
logged in and have Writer permission to the container.
To add a calendar:
1. Navigate to and open the container to which you want to add a calendar.
2. From the Add menu, select Calendar.
The Add Calendar page appears.
3. In the Title field, enter a name for the calendar. The name should be short, but
descriptive, and can contain spaces and punctuation marks.
4. Enter any optional information. Click a field name for a description of each
property.
Note: If your administrator created custom properties, they also display on the page. See
your administrator for information about custom properties.
5. Click Apply.
The calendar is added to the container.
To change the calendar’s permissions, see Access permissions.
User Guide
6–3
Changing the calendar view
DocuShare calendars
Changing the calendar view
When viewing a calendar, you can change among the three views.
To change the calendar view:
1. Locate the calendar.
2. From the View menu, select either Month View, Week View, or Day View.
6–4
User Guide
DocuShare calendars
Viewing and changing calendar properties
Viewing and changing calendar properties
If you are logged in and have Reader permission to a calendar, you can view its
properties. You can change a calendar’s properties if you are the logged-in owner of the
calendar or a logged-in user with Writer permission to it.
To view and change a calendar’s properties:
1. Locate the calendar whose properties you want to view and change.
2. Click the calendar’s Properties icon.
3. On the View Properties page, click the Edit link.
4. Change the properties you want. Click a field name for a description of each
property.
Note: If your administrator created custom properties, they also display on the page. See
your administrator for information about custom properties.
5. Click Apply.
Viewing the change history
Only for DocuShare CPX
DocuShare keeps track of all the changes to site objects, which provides an audit trail of
the changes to objects. You can view the changes to any object to which you have Reader
permission.
To view the change history:
1. Locate the calendar whose change history you want to view.
2. Click the calendar’s Properties icon.
3. On the View Properties page, click the Change History link.
4. From the Change menu, select the type of change you want to view.
5. Do one of the following:
•
Enter part of a name in the Search for User field and then choose the user
from the Select User menu.
•
Click Show All and then choose the user from the Select User menu.
•
Choose All from the Select User menu.
6. From the Show Last menu, select the number of change events to display.
7. To display the activity during a specific date range, enter start and end dates.
8. Click Go.
Information about the change displays. You can click Show as XML to convert the
information to Extensible Markup Language (XML) format for use with other
applications.
User Guide
6–5
Changing the location of a calendar
DocuShare calendars
Changing the location of a calendar
You can move a calendar to another container or have the calendar appear in several
containers on your site. Although a calendar can appear in several containers, there is
only one copy of it, which saves space on your DocuShare site.
To change a calendar’s location, you must be logged in and have Writer permission to
both the calendar and the new container.
Note: You can also use the Copy, Cut, and Paste commands from the Edit Selected
menu to change the location of a calendar. See Editing multiple objects in a
collection on page 3–7.
To change a calendar’s location:
1. Locate the calendar whose location you want to change.
2. Do one of the following:
•
Click the checkbox that appears next to the calendar’s title. From the Edit
Selected menu, select Change Location. On the Confirm Change Location
page, click Confirm.
•
Click the Properties icon that appears to the right of the calendar’s title. On
the View Properties page for the calendar, click the Locations link.
The Change Location page appears.
3. In the Sort By field, select Title to display the possible containers in alphabetical
order or select Handle to display the possible containers in numerical order.
4. Do one of the following:
•
To find specific containers, enter any part of a container title in the Search
field. Click the Go button.
•
To display all containers, click Show All.
•
To display your favorite containers, click Show Favorites.
5. In the Possible Locations field, select the container(s) in which you want the
calendar to appear and click the Add button. To select multiple containers, use
the CTRL key (Windows) or the Command key (Macintosh).
6. In the Selected Locations field, select any containers in which you do not want
the calendar to appear and click the Remove button. To select multiple
containers, use the CTRL key (Windows) or the Command key (Macintosh).
Note: Make sure at least one container appears in the Selected Locations field.
Otherwise, the calendar will become orphaned, which means it will not appear in
any container.
7. Click Update Locations.
6–6
User Guide
DocuShare calendars
Deleting a calendar
Deleting a calendar
You can delete a calendar if you are the logged-in owner of the calendar or a logged-in
user with Manager permission to it. When you delete a calendar, all of the events in it are
also deleted.
After deleting a calendar, it goes to your personal trashcan on My DocuShare. You can
restore an object from your personal trashcan as long as your administrator has not
expunged the object from the site-wide trashcan. See My DocuShare for more
information.
To delete a calendar:
1. Locate the calendar that you want to delete.
2. Do one of the following:
•
Click the checkbox that appears next to the calendar’s title. From the Edit
Selected menu, select Delete.
•
From the calendar’s More Actions menu, select Delete.
The Confirm Delete page appears.
Note: If a minus sign appears in the checkbox that precedes the calendar, then you do
not have Manager permission to the object and cannot delete it.
3. Click Delete to remove the calendar from your site.
User Guide
6–7
Adding an event to a calendar
DocuShare calendars
Adding an event to a calendar
You can add an event to a calendar if you are logged in and have Writer permission to the
calendar. You can set the event so that it occurs on a regular basis, such as every Monday
or every two weeks.
To add a calendar event:
1. Open the calendar to which you want to add an event.
2. Do one of the following:
•
Click the Add Event icon corresponding to the date on which you want to add
the event.
•
From the Add menu, select Event.
Note: If your administrator created a custom event, it appears in the Add menu.
3. In the Title field, enter a name for the event.
4. If the event is to occur on a regular basis, select the Repeat frequency and
number of occurrences.
5. Enter any optional information. Click a field name for a description of each
property.
Note: If your administrator created custom properties, they also display on the page. See
your administrator for information about custom properties.
6. Click Apply.
The event is added to the calendar.
7. You can click the event name to open it.
To change the event’s permissions, see Access permissions.
6–8
User Guide
DocuShare calendars
Viewing and changing calendar event properties
Viewing and changing calendar event
properties
You can view and change the properties of a calendar event such as the title or time. If the
event is recurring, the change is made to each event in the series. To change the
properties, you must be the logged-in owner of the event or a logged-in user with Writer
permission to the event.
To view and change a calendar event’s properties:
1. Navigate to and open the calendar that contains the event you want to view and
change.
2. Click the title of the event.
3. On the View Properties page, click the Edit link.
4. Change the properties you want. Click a field name for a description of each
property.
5. Click Apply.
Viewing the change history
Only for DocuShare CPX
DocuShare keeps track of all the changes to site objects, which provides an audit trail of
the changes to objects. You can view the changes to any object to which you have Reader
permission.
To view the change history:
1. Locate the calendar event whose change history you want to view.
2. Click the event’s Properties icon.
3. On the View Properties page, click the Change History link.
4. From the Change menu, select the type of change you want to view.
5. Do one of the following:
•
Enter part of a name in the Search for User field and then choose the user
from the Select User menu.
•
Click Show All and then choose the user from the Select User menu.
•
Choose All from the Select User menu.
6. From the Show Last menu, select the number of change events to display.
7. To display the activity during a specific date range, enter start and end dates.
8. Click Go.
Information about the change displays. You can click Show as XML to convert the
information to Extensible Markup Language (XML) format for use with other
applications.
User Guide
6–9
Changing the location of a calendar event
DocuShare calendars
Changing the location of a calendar event
You can move an event to another calendar or have it appear in several calenders. To
move an event, you must be logged in and have Writer permission to both the event and
the new calendar.
Although an event can appear in several calendars, there is only one copy of it, which
saves space on your DocuShare site.
To change the location of a calendar event:
1. Navigate to and open the calendar that contains the event you want to move.
2. Click the title of the event.
The View Properties page appears.
3. Click the Locations link.
The Locations page appears, showing the event’s current location(s).
4. In the Sort By field, select Title to display the possible locations in alphabetical
order or select Handle to display the possible locations in numerical order.
5. Do one of the following:
•
To find specific calendars, enter any part of a calendar title in the Search field.
Click the Go button.
•
To display all calendars, click Show All.
•
To display your favorite calendars, click Show Favorites.
6. In the Possible Locations field, select the calendar(s) in which you want the
event to appear and click the Add button. To select multiple calendars, use the
CTRL key (Windows) or the Command key (Macintosh).
7. In the Selected Locations field, select any calendars in which you do not want
the event to appear and click the Remove button. To select multiple calendars,
use the CTRL key (Windows) or the Command key (Macintosh).
Note: Make sure at least one calendar appears in the Selected Locations field.
Otherwise, the event will become orphaned, which means it will not appear in any
calendar.
8. Click Update Locations.
6–10
User Guide
DocuShare calendars
Deleting a calendar event
Deleting a calendar event
You can delete a calendar event if you are the logged-in owner of the event or a logged-in
user with Manager permission to it. However, if the event is one of a recurring series, you
need only Writer permission to the event to delete it.
To delete a calendar event:
1. Navigate to and open the calendar that contains the event you want to delete.
2. Click the title of the event.
The View Properties page appears.
3. Click the event’s Delete icon.
4. On the Confirm Delete page, do one of the following:
•
If the event is a single occurrence, click the Delete button.
•
If the event occurs more than once, click the Delete All Events in This
Series button to delete all occurrences of the event from the calendar; click
the Delete Just This Event button to delete the event from the date you
selected.
User Guide
6–11
Deleting a calendar event
6–12
DocuShare calendars
User Guide
DocuShare workspaces
•
About workspaces . . . . . . . . . . . . . . . . . . . . . . . . . . . . . . . . . . . . . . . . . . . . . . 7–2
•
Adding a workspace. . . . . . . . . . . . . . . . . . . . . . . . . . . . . . . . . . . . . . . . . . . . . 7–3
•
Controlling access to the workspace . . . . . . . . . . . . . . . . . . . . . . . . . . . . . . . . 7–4
•
Adding content to the workspace . . . . . . . . . . . . . . . . . . . . . . . . . . . . . . . . . . . 7–7
•
Managing shortcuts . . . . . . . . . . . . . . . . . . . . . . . . . . . . . . . . . . . . . . . . . . . . . 7–8
•
Using calendars . . . . . . . . . . . . . . . . . . . . . . . . . . . . . . . . . . . . . . . . . . . . . . . . 7–9
•
Changing portlet properties . . . . . . . . . . . . . . . . . . . . . . . . . . . . . . . . . . . . . . 7–10
•
Viewing and changing workspace properties . . . . . . . . . . . . . . . . . . . . . . . . . .7–11
•
Changing the location of a workspace . . . . . . . . . . . . . . . . . . . . . . . . . . . . . . 7–12
•
Deleting a workspace. . . . . . . . . . . . . . . . . . . . . . . . . . . . . . . . . . . . . . . . . . . 7–13
User Guide
7–1
About workspaces
DocuShare workspaces
About workspaces
Only for DocuShare CPX
A workspace provides a shared area for project and team collaboration. From a single
page within DocuShare you and other workspace members can gather and manage
shared content, access collaboration tools to facilitate your work, and communicate with
each other.
A workspace consists of four distinct areas called portlets; each portlet has a different use.
•
Content portlet—The area in which you add and manage shared content.
•
Shortcuts portlet—Displays frequently used objects.
•
Calendars portlet—Shows a combination of the calendars in the content portlet.
•
Membership portlet—Lists the users who are members of the workspace
membership group.
You can close a portlet and reopen it by clicking the small triangle next to the portlet title.
7–2
User Guide
DocuShare workspaces
Adding a workspace
Adding a workspace
You can add a workspace to another workspace to which you have Writer permission, or
you add a workspace to My DocuShare. To guide you in creating a workspace, DocuShare
provides templates and a wizard.
When adding a workspace, a membership group is created automatically and initially
includes you as its member. You can add members to the group after the workspace is
added. The members are listed in the membership portlet on the workspace home page.
Note: If you are a Site Administrator or a Content Administrator, an [add] link appears on
the home page. This allows you to add a workspace to your site home page.
To add a workspace:
1. To add a workspace to another workspace, do one of the following and then go to
step 3:
•
On the DocuShare home page, click more under Workspaces. Search for the
workspace to which you want to add a workspace. Open the workspace and
select Workspace from the Add menu.
•
Go to My DocuShare. In the workspaces portlet, search for the workspace to
which you want to add a workspace. Open the workspace and select
Workspace from the Add menu.
•
Navigate to and open the workspace to which you want to add a workspace.
In the content portlet, select Workspace from the Add menu.
2. To add a workspace to My DocuShare, do one of the following:
•
On the DocuShare home page, click more under Workspaces. Then click
Add a Workspace.
•
Go to My DocuShare. In the workspaces portlet, click Add a Workspace.
3. On the Add a New Workspace page, select one of the following templates:
•
Document Storage—includes four workspace collections in the content
portlet.
•
Team Project—includes one workspace collection, a calendar, and a
collection for online meeting URLs in the content portlet.
4. Click Next.
5. In the Title field, enter a name for the workspace.
6. Enter any optional information. Click a field name for a description of each
property.
7. Click Done.
The workspace home page appears.
User Guide
7–3
Controlling access to the workspace
DocuShare workspaces
Controlling access to the workspace
To change the users and groups that have access to the workspace, you simply change
the members of the workspace membership group. Any user or group that you add to the
group is assigned Reader and Writer permissions to the workspace. You can choose to
give the group Manager permission to the workspace.
In addition to listing the group members, the membership portlet enables you to see which
users are logged into DocuShare. The user icon next to the user’s name in the portlet
indicates whether or not the user is logged in; the icon is grayed when the user is not
logged in.
Like other DocuShare objects, a workspace has an access list, which you can use to give
users and groups access to the workspace. However, any users and groups that you add
to the access list are not listed in the membership portlet.
Changing the users and groups in the membership group
If you are the workspace owner or a member of the membership group (and the group is
assigned Manager permission to the workspace), you change the users and groups in the
group.
Note: The membership portlet lists users only. Therefore, individual group members are
listed and not the group titles.
To change the members of the membership group:
1. On the workspace home page, do one of the following:
•
Click the Membership heading.
•
Click the Properties icon. On the Properties page, click the Membership link.
The Membership page appears showing the current members.
2. Click the Change Membership link.
3. In the Show field, select the type of account you want to display in the Possible
Users/Groups field.
4. Do one of the following:
•
To find a specific account, enter part of the user’s first name, last name, or
username or the group’s title in the Search field. Click the Go button.
•
To display all accounts, click Show All.
•
To display your favorite accounts, click Show Favorites.
5. In the Possible Users/Groups field, select the accounts to add to the group and
click the Add button. To select multiple accounts, use the CTRL key (Windows) or
the Command key (Macintosh).
6. In the Selected Users/Groups field, select any accounts that you want to remove
from the group and click the Remove button. To select multiple accounts, use the
CTRL key (Windows) or the Command key (Macintosh).
7. Click Update.
7–4
User Guide
DocuShare workspaces
Controlling access to the workspace
The Members page appears.
8. To give one or more members Manager permission to the group, click the
checkbox next to each member’s name and then click Apply. Manager
permission allows the member to change the group’s properties and membership.
9. To assign Manager permission to the membership group, display the Permissions
page for the workspace. Click the Manager box for the group and click Apply.
Re-assigning the membership group
As needed, you can change the membership group that is associated with the workspace
by assigning a different group to the workspace. You can re-assign the membership group
if you are the workspace owner or a user with Manager permission to it.
To re-assign the membership group:
1. On the workspace home page, click the Properties icon.
2. On the Properties page, click the Permissions link.
3. Click the Re-assign Membership Group button.
The Re-assign Membership Group page appears.
4. Do one of the following:
•
To find a specific group, enter part of the group’s title in the Search field. Click
the Go button.
•
To display all groups, click Show All.
•
To display your favorite groups, click Show Favorites.
5. In the New Membership Group field, select the group you want to associate with
the workspace.
6. Click Save.
The previous membership group remains in the workspace’s access list.
Changing the workspace’s permissions
Using the Permissions page you can change the users and groups in the workspace’s
access list and assign permissions. Users and groups in the access list do not appear in
the membership portlet on the workspace home page; the members of the membership
group are listed in the portlet. You can change the workspace’s permissions if you are the
workspace owner or a user with Manager permission to it.
To change the workspace’s permissions:
1. On the workspace home page, select Permissions from the More Actions menu.
The Permissions page displays the workspace’s access list.
2. Click the Change Access List button.
The Change Access List page appears.
3. In the Show field, select the type of account you want to display in the Possible
Users/Groups field.
User Guide
7–5
Controlling access to the workspace
DocuShare workspaces
4. Do one of the following:
•
To find a specific account, enter part of the user’s first name, last name, or
username or the group’s title in the Search field. Click the Go button.
•
To display all accounts, click Show All.
•
To display your favorite accounts, click Show Favorites.
5. In the Possible Users/Groups field, select the accounts to add to the access list
and click the Add button. To select multiple accounts, use the CTRL key
(Windows) or the Command key (Macintosh).
6. In the Selected Users/Groups field, select any accounts that you want to remove
from the access list and click the Remove button. To select multiple accounts, use
the CTRL key (Windows) or the Command key (Macintosh).
7. Click Update Access List.
The Permissions page appears.
8. For Search Available To, do one of the following:
•
Click Anyone to allow guests and users to view the workspace in a search
results list.
•
Click Access List Only to allow only those accounts in the workspace’s
access list that have at least Reader permission to see the object in a search
results list.
9. For Options, select one of the following:
•
Apply all permissions to—Assigns all of the permissions.
•
Apply only changes to—Assigns only the changed permissions.
10. Select one of the following:
•
This container only—Applies the permissions to the container only. The
permissions of the container’s objects are not changed.
•
This container and its objects, including objects that appear in multiple
locations—Applies the permissions to the container and the objects in it. The
permissions of the same objects that appear in other containers also are
changed.
•
This container and its objects, excluding objects that appear in multiple
locations—Applies the permissions to the container and the objects in it. The
permissions of the same objects that appear in other containers are not
changed.
11. Click Apply.
7–6
User Guide
DocuShare workspaces
Adding content to the workspace
Adding content to the workspace
You can add any type of object, including another workspace, to a workspace. To add
content, you must be logged in and have Writer permission to the workspace.
To add content to the workspace:
1. In the content portlet, select the type of object that you want to add from the Add
menu.
2. On the Add page, enter the required information and click Apply.
The object appears in the content portlet.
To use workspace view features:
1. From the Show menu, select the type of object you want to display.
2. Click a View icon to switch between the icon and list views.
User Guide
7–7
Managing shortcuts
DocuShare workspaces
Managing shortcuts
To conveniently access frequently used objects from a workspace, you can add shortcuts
to them. Any object you add as a shortcut is a link to the original object, not a copy. If the
original object is deleted, it will no longer appear as a shortcut.
To add a shortcut to a workspace:
1. Locate the object that you want to add as a shortcut.
2. Click the checkbox that appears next to the object’s title.
3. From the Edit Selected menu, select Copy Shortcuts.
4. On the Confirm Copy Shortcuts page, click Confirm.
5. Navigate to and open the workspace to which you want to add the shortcut.
6. In the shortcuts portlet, click the Paste Shortcuts icon.
7. On the Confirm Paste Shortcut page, click Confirm.
The object you added appears in the shortcuts portlets. You can use the Show
menu to display one type of object, such as documents. The View icons let you
switch between the icon and list views.
To remove a shortcut from a workspace:
1. Navigate to and open the workspace that contains the shortcut that you want to
remove.
2. In the shortcuts portlet, click the List View icon to display the shortcuts in a list.
3. Click the Remove Shortcut icon that appears next to the object you want to
remove.
4. On the Confirm Remove Shortcut page, click Confirm.
The object no longer appears in shortcuts. However, the object still appears in its
original location(s).
7–8
User Guide
DocuShare workspaces
Using calendars
Using calendars
The calendars portlet shows all of the calendars from the content portlet. This allows you
and other workspace members to quickly access individual calendars as well as to view
the events from all calendars.
To use the calendars portlet:
1. From the Show menu, select the calendar that you want to view or select All
Calendars to view all calendars.
2. Using the View icons, you can switch between daily and weekly calendar views.
User Guide
7–9
Changing portlet properties
DocuShare workspaces
Changing portlet properties
Each portlet has default display properties that you can change. For example, you can set
the default view to list view to display objects in a collection-style listing.
To change the properties of a portlet:
1. Click the portlet’s Edit button.
2. Depending on which portlet properties you are changing, do one or all of the
following:
a. In the Page Size field, enter the number of objects to show on each page.
b. In the Sort Order field, enter the order in which to display objects.
c.
In the View Type field, enter the type of view used to display objects.
Click a field name for a description of each property.
3. Click Apply.
7–10
User Guide
DocuShare workspaces
Viewing and changing workspace properties
Viewing and changing workspace properties
You can change a workspace’s properties if you are the logged-in owner of the workspace
or a logged-in user with Writer permission to it.
To view and change a workspace’s properties:
1. Locate the workspace whose properties you want to view and change.
2. Click the workspace’s Properties icon.
3. On the View Properties page, click the Edit link.
4. Change the properties you want. Click a field name for a description of each
property.
Note: If your administrator created custom properties, they also display on the page. See
your administrator for information about custom properties.
5. Click Apply.
Viewing the change history
DocuShare keeps track of all the changes to site objects, which provides an audit trail of
the changes to objects. You can view the changes to any object to which you have Reader
permission.
To view the change history:
1. Locate the workspace whose change history you want to view.
2. Click the workspace’s Properties icon.
3. On the View Properties page, click the Change History link.
4. From the Change menu, select the type of change you want to view.
5. Do one of the following:
•
Enter part of a name in the Search for User field and then choose the user
from the Select User menu.
•
Click Show All and then choose the user from the Select User menu.
•
Choose All from the Select User menu.
6. From the Show Last menu, select the number of change events to display.
7. To display the activity during a specific date range, enter start and end dates.
8. Click Go.
Information about the change displays. You can click Show as XML to convert the
information to Extensible Markup Language (XML) format for use with other
applications.
User Guide
7–11
Changing the location of a workspace
DocuShare workspaces
Changing the location of a workspace
You can move a workspace to another workspace or have it appear in several workspaces
on your site. Although a workspace can appear in several workspaces, there is only one
copy of it, which saves space on your DocuShare site.
To change a workspace’s location, you must be logged in and have Writer permission to
both the current and new workspace.
Note: You can also use the Copy, Cut, and Paste commands from the Edit Selected
menu to change the location of a workspace.
To change a workspace’s location:
1. Locate the workspace whose location you want to change.
2. Do one of the following:
•
In the content portlet, click the Properties icon that appears next to the
workspace’s title. On the Properties page, click the Locations link.
•
Click the Content heading. Click the checkbox that appears next to the
workspace’s title. From the Edit Selected menu, select Change Location.
On the Confirm Change Location page, click Confirm.
The Locations page appears.
3. Click the Add Locations button.
4. In the Sort By field, select Title to display the possible locations in alphabetical
order or select Handle to display the possible locations in numerical order.
5. Do one of the following:
•
To find specific workspaces, enter any part of a workspace title in the Search
field. Click the Go button.
•
To display all workspaces, click Show All.
•
To display your favorite workspaces, click Show Favorites.
6. In the Possible Locations field, select the workspace(s) in which you want the
workspace to appear and click the Add button. To select multiple workspaces, use
the CTRL key (Windows) or the Command key (Macintosh).
7. In the Selected Locations field, select any workspaces in which you do not want
the workspace to appear and click the Remove button. To select multiple
workspaces, use the CTRL key (Windows) or the Command key (Macintosh).
Note: Make sure at least one workspace appears in the Selected Locations field.
Otherwise, the workspace will become orphaned, which means it will not appear in
any workspace.
8. Click Update Locations.
The Properties page for the workspace appears displaying the workspace title(s)
in which the workspace now appears.
7–12
User Guide
DocuShare workspaces
Deleting a workspace
Deleting a workspace
You can delete a workspace if you are the logged-in owner of the workspace or have
Manager permission to it. When you delete a workspace, you can choose to delete the
workspace only or the workspace and its contents. To delete the workspace and its
contents, you must be the owner of the objects in the workspace or have Manager
permission to them.
After deleting a workspace, it goes to your personal trashcan on My DocuShare. You can
restore an object from your personal trashcan as long as your administrator has not
expunged the object from the site-wide trashcan. See My DocuShare for more
information.
To delete a workspace:
1. Do one of the following:
•
Search for the workspace that you want to delete. On the Search Results
page, click Delete from the workspace’s More Actions menu.
•
Go to My DocuShare. In the workspaces portlet, open the workspace that you
want to delete. Click the Properties icon and then click Delete.
The Confirm Delete page appears.
Note: If a minus sign appears in the checkbox that precedes the workspace, then you do
not have Manager permission to the object and cannot delete it.
2. From the For workspaces, delete menu, do one of the following:
•
Select Workspace and Contents to delete the workspace and all of the
objects in it.
•
Select Workspace Only to delete the workspace, but not its contents.
3. In the Membership group field, choose whether or not to delete the workspace
membership group.
4. Click Delete to remove the workspace from your site.
User Guide
7–13
Deleting a workspace
7–14
DocuShare workspaces
User Guide
DocuShare wikis
•
About wikis . . . . . . . . . . . . . . . . . . . . . . . . . . . . . . . . . . . . . . . . . . . . . . . . . . . . 8–2
•
Adding a wiki . . . . . . . . . . . . . . . . . . . . . . . . . . . . . . . . . . . . . . . . . . . . . . . . . . 8–3
•
Adding content to a wiki . . . . . . . . . . . . . . . . . . . . . . . . . . . . . . . . . . . . . . . . . . 8–4
•
Renaming wiki pages . . . . . . . . . . . . . . . . . . . . . . . . . . . . . . . . . . . . . . . . . . . . 8–6
•
Printing wiki pages . . . . . . . . . . . . . . . . . . . . . . . . . . . . . . . . . . . . . . . . . . . . . . 8–7
•
Viewing and changing wiki properties . . . . . . . . . . . . . . . . . . . . . . . . . . . . . . . 8–8
•
Changing the location of a wiki . . . . . . . . . . . . . . . . . . . . . . . . . . . . . . . . . . . . 8–9
•
Deleting a wiki . . . . . . . . . . . . . . . . . . . . . . . . . . . . . . . . . . . . . . . . . . . . . . . . 8–10
User Guide
8–1
About wikis
DocuShare wikis
About wikis
A wiki allows you and other users to quickly and easily publish content on the web. Using
a web browser and either the built-in WYSIWYG (What You See Is What You Get) editor
or simple wiki syntax, you can add and link web pages and edit content instantly. Wikis are
well-suited for any type of project that requires collaborative writing.
8–2
User Guide
DocuShare wikis
Adding a wiki
Adding a wiki
To get started, you first add a wiki to a collection or workspace (DocuShare CPX only) and
then add content to it. You can add a wiki if you are logged in and have Writer permission
to the container.
To add a wiki:
1. Navigate to and open the container to which you want to add a wiki.
2. From the Add menu, select Wiki.
The Add Wiki page appears.
3. In the Title field, enter a name for the wiki. The name can contain spaces and
punctuation marks.
4. Enter any optional information. Click a field name for a description of each
property.
Note: If your administrator created custom properties, they also display on the page. See
your administrator for information about custom properties.
5. Click Apply.
The wiki is added to the container.
To change the wiki’s permissions, see Access permissions.
User Guide
8–3
Adding content to a wiki
DocuShare wikis
Adding content to a wiki
You add content to the wiki by editing the wiki home page, creating and linking additional
wiki pages, inserting images, and attaching documents. You can add content to the wiki if
you are logged in and have Writer permission to it.
Each wiki page includes a WYSIWYG editor for easy formatting of content. Alternatively,
you can use the wiki syntax provided in a sidebar on a wiki page. However, when editing a
wiki page, you should use the same method you used to create the page.
Adding content to the wiki home page
After adding the wiki, your first step is to add content to the home page.
To add content to the home page:
1. Locate and open the wiki to which you want to add content.
The Add WikiPage appears and the page is titled HomePage.
2. In the Description field, enter the page content using one of the following
methods:
•
Use the WYSIWYG editor. The editor appears when the wysiwyg checkbox
is selected.
•
Deselect the wysiwyg checkbox. Use the wiki syntax displayed in the
sidebar.
3. Click Apply.
The wiki home page appears with your content.
Linking pages to a wiki
You can add any number of web pages to the wiki. You first add the link to the page and
then enter content on the page.
To link a page to the wiki:
1. Open a wiki page and click Edit This Page.
2. On the Edit Wiki page, enter the new page name between double square
brackets.
Example: [[New Wiki Page]]
3. Click Apply.
The page appears showing the page name you entered followed by a question
mark.
4. Click the page name.
The Add WikiPage appears.
5. In the Description field, enter the page content using either the WYSIWYG editor
or wiki syntax.
6. Click Apply.
The pages are linked.
8–4
User Guide
DocuShare wikis
Adding content to a wiki
Note: To list the pages linked to a wiki page, view the wiki page and click Backlinks. The
linked pages are listed on the Search Results page.
Inserting images
On a wiki page you can insert an image that is located on an external URL or on the same
DocuShare server.
To insert an image on a wiki page using the WYSIWYG editor:
1. Do one of the following:
•
To insert an image located on an external URL, select the text to link to the
image and click the Insert/Edit Link button on the WYSIWYG bar. Enter the
complete URL to the image and click Insert.
•
To insert an image located on the same DocuShare server, enter
{image:Document-#}.
2. Click Apply.
To insert an image on a wiki page using wiki syntax:
1. Do one of the following:
•
To insert an image located on an external URL, enter {image:url}.
•
To insert an image located on the same DocuShare server, enter
{image:Document-#}.
2. Click Apply.
Attaching documents
On a wiki page you can add a link to a document that you upload to DocuShare.
To attach a document to a wiki page:
1. Open a wiki page and click Attach.
The Add Document page appears.
2. Enter the complete path and filename of the document in the Filename field or
click the Browse button to navigate to and select the document.
3. In the Title field, enter a document name.
4. Click Apply.
5. On the wiki page, click Edit This Page.
6. On the Edit Wiki page, enter the document name that you used in step 3 between
double square brackets.
Example: For more information, see our [[brochure]].
7. Click Apply.
User Guide
8–5
Renaming wiki pages
DocuShare wikis
Renaming wiki pages
If you are a logged-in user with Writer permission to the wiki can change the name of a
wiki page.
To rename a wiki page:
1. Locate and open the wiki page that you want to rename.
2. Click Rename This Page.
3. In the Title field, enter a new name; then click Rename.
4. On the confirmation page, click OK.
Note: You cannot rename the wiki home page.
8–6
User Guide
DocuShare wikis
Printing wiki pages
Printing wiki pages
You can print some or all of your wiki pages to review the content on the pages or to have
a printed copy of the wiki.
To print wiki pages:
1. Locate and open the homepage of the wiki that you want to print.
2. Click Printable View.
The view shows the top two levels of the wiki, with the homepage as the top level,
or level one.
3. To view other wiki pages, do any of the following:
•
To remove one level of pages from the view, click Subtract One Level.
•
To add one level of pages to the view, click Add One Level.
•
To display all levels of pages, click Show All Levels. When viewing all levels,
you can click Show Two Levels to view the top two levels of the wiki.
4. Use the Print command from the File menu to print the wiki view.
User Guide
8–7
Viewing and changing wiki properties
DocuShare wikis
Viewing and changing wiki properties
If you are logged in and have Reader permission to a wiki, you can view its properties.You
can change a wiki’s properties if you are the logged-in owner of the object or a logged-in
user with Writer permission to it.
To view and change a wiki’s properties:
1. Locate the wiki whose properties you want to view and change.
2. Click the wiki’s Properties icon.
3. On the View Properties page, click the Edit link.
4. Change the properties you want. Click a field name for a description of each
property.
Note: If your administrator created custom properties, they also display on the page. See
your administrator for information about custom properties.
5. Click Apply.
Viewing the change history
Only for DocuShare CPX
DocuShare keeps track of all the changes to site objects, which provides an audit trail of
the changes to objects. You can view the changes to any object to which you have Reader
permission.
To view the change history:
1. Locate the wiki whose change history you want to view.
2. Click the wiki’s Properties icon.
3. On the View Properties page, click the Change History link.
4. From the Change menu, select the type of change you want to view.
5. Do one of the following:
•
Enter part of a name in the Search for User field and then choose the user
from the Select User menu.
•
Click Show All and then choose the user from the Select User menu.
•
Choose All from the Select User menu.
6. From the Show Last menu, select the number of change events to display.
7. To display the activity during a specific date range, enter start and end dates.
8. Click Go.
Information about the change displays. You can click Show as XML to convert the
information to Extensible Markup Language (XML) format for use with other
applications.
8–8
User Guide
DocuShare wikis
Changing the location of a wiki
Changing the location of a wiki
You can move a wiki to another container or have the wiki appear in several containers on
your site. Although a wiki can appear in several containers, there is only one copy of it,
which saves space on your DocuShare site.
To change a wiki’s location, you must be logged in and have Writer permission to both the
wiki and the new location.
To change a wiki’s location:
1. Locate the wiki that you want to move.
2. Do one of the following:
•
Click the checkbox that appears next to the wiki’s title. From the Edit
Selected menu, select Change Location. On the Confirm Change Location
page, click Confirm.
•
Click the wiki’s Properties icon. On the Properties page for the wiki, click the
Locations tab.
The Change Location page appears.
3. In the Sort By field, select Title to display the possible containers in alphabetical
order or select Handle to display the possible containers in numerical order.
4. Do one of the following:
•
To find specific containers, enter any part of a container title in the Search
field and click Go.
•
To display all containers, click Show All.
•
To display your favorite containers, click Show Favorites.
5. In the Possible Locations field, select the container(s) in which you want the
object to appear and click the Add button. To select multiple containers, use the
CTRL key (Windows) or the Command key (Macintosh).
6. In the Selected Locations field, select any containers in which you do not want
the object to appear and click the Remove button. To select multiple containers,
use the CTRL key (Windows) or the Command key (Macintosh).
Note: Make sure at least one container appears in the Selected Locations field.
Otherwise, the object will become orphaned, which means it will not appear in any
container.
7. Click Update Locations.
The Locations page appears displaying the container title(s) in which the object
now appears.
User Guide
8–9
Deleting a wiki
DocuShare wikis
Deleting a wiki
You can delete a wiki, which deletes all of its pages, or delete an individual wiki page if you
are the logged-in owner of the wiki or have Manager permission to it.
After deleting a wiki, it goes to your personal trashcan on My DocuShare. You can restore
an object from your personal trashcan as long as your administrator has not expunged the
object from the site-wide trashcan. See My DocuShare for more information.
To delete a wiki or a wiki page:
1. Locate the wiki or the wiki page that you want to delete.
2. From the More menu. select Delete.
The Confirm Delete page appears.
Note: If a minus sign appears in the checkbox that precedes the wiki or wiki page, then
you do not have Manager permission to the object and cannot delete it.
3. Click Delete to remove the wiki or wiki page from your site.
8–10
User Guide
DocuShare weblogs
•
About weblogs . . . . . . . . . . . . . . . . . . . . . . . . . . . . . . . . . . . . . . . . . . . . . . . . . 9–2
•
Adding a weblog. . . . . . . . . . . . . . . . . . . . . . . . . . . . . . . . . . . . . . . . . . . . . . . . 9–3
•
Posting weblog entries . . . . . . . . . . . . . . . . . . . . . . . . . . . . . . . . . . . . . . . . . . . 9–4
•
Adding comments to entries. . . . . . . . . . . . . . . . . . . . . . . . . . . . . . . . . . . . . . . 9–6
•
Viewing and changing weblog properties. . . . . . . . . . . . . . . . . . . . . . . . . . . . . 9–7
•
Changing the location of a weblog . . . . . . . . . . . . . . . . . . . . . . . . . . . . . . . . . . 9–8
•
Deleting a weblog. . . . . . . . . . . . . . . . . . . . . . . . . . . . . . . . . . . . . . . . . . . . . . . 9–9
User Guide
9–1
About weblogs
DocuShare weblogs
About weblogs
A weblog is a simple web site on which you post entries about a specific topic on a regular
basis. Entries are displayed in reverse chronological order and include the name of the
user who posted the entry.
When adding a weblog, you can choose to have it moderated. A moderated weblog
requires a user with Manager permission to the weblog to approve its entries before they
are posted for all users to read.
9–2
User Guide
DocuShare weblogs
Adding a weblog
Adding a weblog
You can add a weblog to a collection or workspace (DocuShare CPX only) if you are
logged in and have Writer permission to the container. By default, when you add a weblog,
you are the only user with Writer permission to the object (Initial Permissions is set to
Same as container except write restricted to owner). If you want other users and
groups to add entries to the weblog, either change the Initial Permissions setting when
adding the object or change the object’s permissions after adding it.
To add a weblog:
1. Navigate to and open the container to which you want to add a weblog.
2. From the Add menu, select Weblog.
The Add Weblog page appears.
3. In the Title field, enter a name for the weblog. The name should be short, but
descriptive, and can contain spaces and punctuation marks.
4. Change any of the default property values and enter any optional information.
Click a field name for a description of each property.
Note: If your administrator created custom properties, they also display on the page. See
your administrator for information about custom properties.
5. Click Apply.
The weblog is added to the container.
To change the weblog’s permissions, see Access permissions.
User Guide
9–3
Posting weblog entries
DocuShare weblogs
Posting weblog entries
To add content to a weblog, you post entries to it. By default, entries appear in
chronological order, with the most recent entries displayed first. If you are logged in and
have Writer permission to a weblog, you can post entries to it.
To post an entry:
1. Locate and open the weblog to which you want to post an entry.
2. Click the Add Entry link.
The Add Weblog Entry page appears.
3. In the Title field, enter a name for the entry. The name should be short, but
descriptive, and can contain spaces and punctuation marks.
4. In the Description field, enter the body of the entry.
5. Enter any optional information. Click a field name for a description of each
property.
Note: If your administrator created custom properties, they also display on the page. See
your administrator for information about custom properties.
6. Click Apply.
The entry appears in the weblog and includes the date the entry was posted and
your username. If the weblog is moderated, Approval Pending precedes your
username. Users cannot read the entry until a user with Manager permission to
the weblog approves it.
Editing weblog entries
If you are logged in and have Writer permission to a weblog, you can edit the entries in it.
To edit an entry:
1. Locate and open the weblog that contains the entry you want to edit.
2. Click the Edit icon next to the entry.
3. Make the changes you want.
4. Click Apply.
9–4
User Guide
DocuShare weblogs
Posting weblog entries
Deleting weblog entries
You can delete a weblog entry if you are the logged-in owner of the object or a logged-in
user with Manager permission to it.
To delete a weblog entry:
1. Locate and open the weblog that contains the entry you want to delete.
2. Click the weblog entry title.
3. From the weblog entry’s More actions menu, select Delete.
The Confirm Delete page appears.
Note: If a minus sign appears in the checkbox that precedes the weblog entry, then you
do not have Manager permission to the object and cannot delete it.
4. Click Delete to remove the object from your site.
Approving entries
If you are a user with Manager permission to a weblog that is moderated, you must
approve an entry before it is posted for all users to read.
To approve an entry:
1. Do one of the following:
•
Locate and open the weblog that contains the entry you need to approve.
Click the checkmark next to the entry.
•
On the navigation bar, click My Tasks. From the Show menu, select Tasks
Assigned to Me. Click the weblog entry title.
•
On the navigation bar, click My DocuShare. The tasks assigned to you
display under Tasks. Click the weblog entry title.
A For Your Approval window appears.
2. Click the title of the entry to review the text.
3. Click the Approved button.
User Guide
9–5
Adding comments to entries
DocuShare weblogs
Adding comments to entries
If you are logged in and have Reader permission to a weblog, you can add a comment to
a weblog entry.
To add a comment:
1. Locate and open the weblog entry to which you want to add a comment.
2. Click the Add a Comment link.
3. In the Title field, enter a comment title.
4. In the Description field, enter the comment text.
5. Click Apply.
Viewing comments
If you are logged in and have Reader permission to a weblog, you can view the comments
on entries.
To view comments:
1. Locate and open the weblog.
The weblog entries display. A Comments link appears for an entry that includes
comments.
2. Click a Comments link.
The comments display in reverse chronological order and include the name of the
user who posted the comment.
Deleting comments
If you are the user who added the comment or the user who added the entry, you can
delete the comment.
To delete a comment:
1. Locate and open the weblog entry that includes the comment you want to delete.
2. Click the comment title.
3. From the More Actions menu, select Delete.
The Confirm Delete page appears.
4. Click Delete to remove the object from your site.
If you do not want to delete the object, click Cancel.
9–6
User Guide
DocuShare weblogs
Viewing and changing weblog properties
Viewing and changing weblog properties
If you are logged in and have Reader permission to a weblog, you can view its properties.
You can change a weblog’s properties if you are the logged-in owner of the object or a
logged-in user with Writer permission to it.
To view and change a weblog’s properties:
1. Locate the weblog whose properties you want to view and change.
2. Click the weblog’s Properties icon.
3. On the View Properties page, click the Edit link.
4. Change the properties you want. Click a field name for a description of each
property.
5. Click Apply.
Viewing the change history
Only for DocuShare CPX
DocuShare keeps track of all the changes to site objects, which provides an audit trail of
the changes to objects. You can view the changes to any object to which you have Reader
permission.
To view the change history:
1. Locate the weblog whose change history you want to view.
2. Click the weblog’s Properties icon.
3. On the View Properties page, click the Change History link.
4. From the Change menu, select the type of change you want to view.
5. Do one of the following:
•
Enter part of a name in the Search for User field and then choose the user
from the Select User menu.
•
Click Show All and then choose the user from the Select User menu.
•
Choose All from the Select User menu.
6. From the Show Last menu, select the number of change events to display.
7. To display the activity during a specific date range, enter start and end dates.
8. Click Go.
Information about the change displays. You can click Show as XML to convert the
information to Extensible Markup Language (XML) format for use with other
applications.
User Guide
9–7
Changing the location of a weblog
DocuShare weblogs
Changing the location of a weblog
You can move a weblog to another container or have the weblog appear in several
containers on your site. Although a weblog can appear in several containers, there is only
one copy of it, which saves space on your DocuShare site.
To change a weblog’s location, you must be logged in and have Writer permission to both
the weblog and the new container.
To change a weblog’s location:
1. Locate the weblog that you want to move.
2. Do one of the following:
•
Click the checkbox that appears next to the weblog’s title. From the Edit
Selected menu, select Change Location. On the Confirm Change Location
page, click Confirm.
•
Click the weblog’s Properties icon. On the View Properties page, click the
Locations tab.
The Change Location page appears.
3. In the Sort By field, select Title to display the possible containers in alphabetical
order or select Handle to display the possible containers in numerical order.
4. Do one of the following:
•
To find specific containers, enter any part of a container title in the Search
field and click Go.
•
To display all containers, click Show All.
•
To display your favorite containers, click Show Favorites.
5. In the Possible Locations field, select the container(s) in which you want the
object to appear and click the Add button. To select multiple containers, use the
CTRL key (Windows) or the Command key (Macintosh).
6. In the Selected Locations field, select any containers in which you do not want
the object to appear and click the Remove button. To select multiple containers,
use the CTRL key (Windows) or the Command key (Macintosh).
Note: Make sure at least one container appears in the Selected Locations field.
Otherwise, the object will become orphaned, which means it will not appear in any
container.
7. Click Update Locations.
The Locations page appears displaying the container title(s) in which the object
now appears.
9–8
User Guide
DocuShare weblogs
Deleting a weblog
Deleting a weblog
You can delete a weblog, which deletes all of its entries, or delete an individual entry if you
are the logged-in owner of the weblog or a logged-in user with Manager permission to it.
After deleting a weblog, it goes to your personal trashcan on My DocuShare. You can
restore an object from your personal trashcan as long as your administrator has not
expunged the object from the site-wide trashcan. See My DocuShare for more
information.
To delete a weblog or an entry:
1. Locate the weblog or entry that you want to delete.
2. From the More menu. select Delete.
The Confirm Delete page appears.
Note: If a minus sign appears in the checkbox that precedes the weblog or entry, then
you do not have Manager permission to the object and cannot delete it.
3. Click Delete to remove the weblog or entry from your site.
User Guide
9–9
Deleting a weblog
9–10
DocuShare weblogs
User Guide
DocuShare discussions
•
About discussions . . . . . . . . . . . . . . . . . . . . . . . . . . . . . . . . . . . . . . . . . . . . . 10–2
•
Adding a discussion . . . . . . . . . . . . . . . . . . . . . . . . . . . . . . . . . . . . . . . . . . . . 10–3
•
Viewing and changing discussion properties . . . . . . . . . . . . . . . . . . . . . . . . . 10–4
•
Changing the location of a discussion . . . . . . . . . . . . . . . . . . . . . . . . . . . . . . 10–5
•
Deleting a discussion . . . . . . . . . . . . . . . . . . . . . . . . . . . . . . . . . . . . . . . . . . . 10–6
•
Adding a topic to a discussion . . . . . . . . . . . . . . . . . . . . . . . . . . . . . . . . . . . . 10–7
•
Viewing and changing the properties of a topic or reply . . . . . . . . . . . . . . . . 10–8
•
Changing the location of a topic. . . . . . . . . . . . . . . . . . . . . . . . . . . . . . . . . . . 10–9
•
Deleting a topic or reply . . . . . . . . . . . . . . . . . . . . . . . . . . . . . . . . . . . . . . . . 10–10
•
Viewing and deleting expired topics. . . . . . . . . . . . . . . . . . . . . . . . . . . . . . . .10–11
User Guide
10–1
About discussions
DocuShare discussions
About discussions
To facilitate an online exchange of ideas, DocuShare supports threaded discussions. You
can add a container, called a discussion, in which users add topics for other users to read
and reply to. As users reply to a topic, their responses are sequentially linked, or threaded,
to the original topic. Users can read or reply to any of the topics or replies in a thread.
10–2
User Guide
DocuShare discussions
Adding a discussion
Adding a discussion
You can add a discussion to a collection or workspace (DocuShare CPX only) if you are
logged in and have Writer permission to the container.
To add a discussion:
1. Navigate to and open the container to which you want to add a discussion.
2. From the Add menu, select Discussion.
The Add Discussion page appears.
3. In the Title field, enter a name for the discussion. The name should be short, but
descriptive, and can contain spaces and punctuation marks.
4. In the Topics Expire In field, select the length of time to retain topics and their
message threads in the discussion after they are added.
When a topic becomes older than the duration you select, it no longer appears in
the discussion. You can view and delete expired topics on the discussion’s View
Expired page.
5. Enter any optional information. Click a field name for a description of each
property.
Note: If your administrator created custom properties, they also display on the page. See
your administrator for information about custom properties.
6. Click Apply.
The discussion is added to the container.
To change the discussion’s permissions, see Access permissions.
User Guide
10–3
Viewing and changing discussion properties
DocuShare discussions
Viewing and changing discussion properties
If you are logged in and have Reader permission to a discussion, you can view its
properties. You can change a discussion’s properties if you are the logged-in owner of the
discussion or a logged-in user with Writer permission to it.
To view and change a discussion’s properties:
1. Locate the discussion whose properties you want to view and change.
2. Click the discussion’s Properties icon.
3. On the View Properties page, click the Edit link.
4. Change the properties you want. Click a field name for a description of each
property.
Note: If your administrator created custom properties, they also display on the page. See
your administrator for information about custom properties.
5. Click Apply.
Viewing the change history
Only for DocuShare CPX
DocuShare keeps track of all the changes to site objects, which provides an audit trail of
the changes to objects. You can view the changes to any object to which you have Reader
permission.
To view the change history:
1. Locate the discussion whose change history you want to view.
2. Click the discussion’s Properties icon.
3. On the View Properties page, click the Change History link.
4. From the Change menu, select the type of change you want to view.
5. Do one of the following:
•
Enter part of a name in the Search for User field and then choose the user
from the Select User menu.
•
Click Show All and then choose the user from the Select User menu.
•
Choose All from the Select User menu.
6. From the Show Last menu, select the number of change events to display.
7. To display the activity during a specific date range, enter start and end dates.
8. Click Go.
Information about the change displays. You can click Show as XML to convert the
information to Extensible Markup Language (XML) format for use with other
applications.
10–4
User Guide
DocuShare discussions
Changing the location of a discussion
Changing the location of a discussion
You can move a discussion to another container or have the discussion appear in several
containers on your site. Although a discussion can appear in several containers, there is
only one copy of it, which saves space on your DocuShare site.
To change a discussion’s location, you must be logged in and have Writer permission to
both the discussion and the new container.
Note: You can also use the Copy, Cut, and Paste commands from the Edit Selected
menu to change the location of a discussion. See Editing multiple objects in a
collection on page 3–7.
To change a discussion’s location:
1. Locate the discussion whose location you want to change.
2. Do one of the following:
•
Click the checkbox that appears to the left of the discussion’s title. From the
Edit Selected menu, select Change Location. On the Confirm Change
Location page, click Confirm.
•
Click the Properties icon that appears to the right of the discussion’s title.
Click the Locations link.
The Change Location page appears.
3. In the Sort By field, select Title to display the possible containers in alphabetical
order or select Handle to display the possible containers in numerical order.
4. Do one of the following:
•
To find specific containers, enter any part of a container title in the Search
field. Click the Go button.
•
To display all containers, click Show All.
•
To display your favorite containers, click Show Favorites.
5. In the Possible Locations field, select the container(s) in which you want the
discussion to appear and click the Add button. To select multiple containers, use
the CTRL key (Windows) or the Command key (Macintosh).
6. In the Selected Locations field, select any containers in which you do not want
the discussion to appear and click the Remove button. To select multiple
containers, use the CTRL key (Windows) or the Command key (Macintosh).
Note: Make sure at least one container appears in the Selected Locations field.
Otherwise, the discussion will become orphaned, which means it will not appear in
any container.
7. Click Update Locations.
User Guide
10–5
Deleting a discussion
DocuShare discussions
Deleting a discussion
You can delete a discussion on your DocuShare site if you are the logged-in owner of the
discussion or have Manager permission to it. When you delete a discussion, all of its
current and expired topics are also deleted.
After deleting a discussion, it goes to your personal trashcan on My DocuShare. You can
restore an object from your personal trashcan as long as your administrator has not
expunged the object from the site-wide trashcan. See My DocuShare for more
information.
To delete a discussion:
1. Locate the discussion that you want to delete.
2. Do one of the following:
•
Click the checkbox that appears next to the discussion’s title. From the Edit
Selected menu, select Delete.
•
From the discussion’s More Actions menu, select Delete.
The Confirm Delete page appears.
Note: If a minus sign appears in the checkbox that precedes the discussion, then you do
not have Manager permission to the object and cannot delete it.
3. Click Delete to remove the discussion from your site.
10–6
User Guide
DocuShare discussions
Adding a topic to a discussion
Adding a topic to a discussion
A topic is the first message added to a discussion and initiates the online conversation.
Users can reply to the topic as well as to individual replies. By default, replies are
indented, which provides a hierarchical display of the discussion.
You can add a topic to a discussion if you are logged in and have Writer permission to the
discussion.
To add a topic:
1. Open the discussion to which you want to add a topic.
2. Click the Add Topic button.
Note: If your administrator created a custom topic, it appears in the Add menu.
3. In the Title field, enter a name for the topic.
4. In the Description field, enter the body of the topic.
5. Click Submit.
The topic is added to the discussion.
To change the topic’s permissions, see Access permissions.
Adding replies
If you are logged in and have Writer permission to the topic or reply, you can add a reply.
To add a reply:
1. Navigate to and open the discussion.
2. Locate the topic or reply to which you want to reply.
3. Click the Reply button.
4. Enter a title and description.
5. If you want to include the previous message and the name of the user who added
it, click Quote Post.
6. Click Submit.
User Guide
10–7
Viewing and changing the properties of a topic or reply
DocuShare discussions
Viewing and changing the properties of a
topic or reply
If you are logged in and have Reader permission to a topic or reply, you can view its
properties. You can change the properties of a topic or reply if you are logged into
DocuShare and have Writer permission to the object.
To view and change the properties of a topic or reply:
1. Navigate to and open the discussion that contains the topic or reply you want to
change.
2. Click the Properties icon that appears to the right of the object.
3. On the View Properties page, click the Edit link.
4. Change the properties you want. Click a field name for a description of each
property.
5. Click Apply.
Viewing the change history
Only for DocuShare CPX
DocuShare keeps track of all the changes to site objects, which provides an audit trail of
the changes to objects. You can view the changes to any object to which you have Reader
permission.
To view the change history:
1. Locate the topic or reply whose change history you want to view.
2. Click the object’s Properties icon.
3. On the View Properties page, click the Change History link.
4. From the Change menu, select the type of change you want to view.
5. Do one of the following:
•
Enter part of a name in the Search for User field and then choose the user
from the Select User menu.
•
Click Show All and then choose the user from the Select User menu.
•
Choose All from the Select User menu.
6. From the Show Last menu, select the number of change events to display.
7. To display the activity during a specific date range, enter start and end dates.
8. Click Go.
Information about the change displays. You can click Show as XML to convert the
information to Extensible Markup Language (XML) format for use with other
applications.
10–8
User Guide
DocuShare discussions
Changing the location of a topic
Changing the location of a topic
You can move a topic and its message thread to another discussion or have it appear in
several discussions. To move a topic, you must be logged in and have Writer permission
to both the topic and the new discussion.
Although a topic can appear in several discussions, there is only one copy of it, which
saves space on your DocuShare site.
To change the location of a topic:
1. Navigate to and open the discussion that contains the topic you want to move.
2. Click the Properties icon that appears to the right of the topic’s title.
The View Properties page appears.
3. Click the Locations link.
The Locations page appears, showing the topic’s current location(s).
4. In the Sort By field, select Title to display the possible locations in alphabetical
order or select Handle to display the possible locations in numerical order.
5. Do one of the following:
•
To find specific discussions, enter any part of a discussion title in the Search
field. Click the Go button.
•
To display all discussions, click Show All.
•
To display your favorite discussions, click Show Favorites.
6. In the Possible Locations field, select the discussion(s) in which you want the
topic to appear and click the Add button. To select multiple discussions, use the
CTRL key (Windows) or the Command key (Macintosh).
7. In the Selected Locations field, select any discussions in which you do not want
the topic to appear and click the Remove button. To select multiple discussions,
use the CTRL key (Windows) or the Command key (Macintosh).
Note: Make sure at least one discussion appears in the Selected Locations field.
Otherwise, the topic will become orphaned, which means it will not appear in any
discussion.
8. Click Update Locations.
User Guide
10–9
Deleting a topic or reply
DocuShare discussions
Deleting a topic or reply
You can delete a topic or reply if you are the logged-in owner of the object or have
Manager permission to it. When you delete a topic or reply, any message threads also are
deleted.
To delete a topic or reply:
1. Navigate to and open the discussion that contains the topic or reply that you want
to delete.
2. Do one of the following:
•
From the object’s More Actions menu, select Delete.
•
Select the checkbox that appears next to the object’s title. From the Edit
Selected menu, select Delete.
The Confirm Delete page appears.
Note: If a minus sign appears in the checkbox that precedes the topic or reply, then you
do not have Manager permission to the object and cannot delete it.
3. On the Confirm Delete page, click the Delete button.
10–10
User Guide
DocuShare discussions
Viewing and deleting expired topics
Viewing and deleting expired topics
If you set an expiration for the topics added to a discussion, you can view and delete the
expired topics. To delete expired topics, you must be logged in and have Manager
permission to the topics.
To view and delete expired topics:
1. Locate the discussion whose expired topics you want to view.
2. Click the Properties icon that appears to the right of the discussion’s title.
The View Properties page appears.
3. Click the View Expired link.
The page displays all of the expired topics that no longer appear on the
discussion.
4. Do one of the following:
•
Select the individual topics that you want to delete.
•
Click Select All to select all of the topics.
5. Click Delete Selected.
User Guide
10–11
Viewing and deleting expired topics
10–12
DocuShare discussions
User Guide
DocuShare URLs
•
About URLs . . . . . . . . . . . . . . . . . . . . . . . . . . . . . . . . . . . . . . . . . . . . . . . . . . .11–2
•
Adding a URL. . . . . . . . . . . . . . . . . . . . . . . . . . . . . . . . . . . . . . . . . . . . . . . . . .11–3
•
Viewing and changing URL properties. . . . . . . . . . . . . . . . . . . . . . . . . . . . . . .11–4
•
Changing the location of a URL . . . . . . . . . . . . . . . . . . . . . . . . . . . . . . . . . . . .11–5
•
Deleting a URL. . . . . . . . . . . . . . . . . . . . . . . . . . . . . . . . . . . . . . . . . . . . . . . . .11–6
User Guide
11–1
About URLs
DocuShare URLs
About URLs
A DocuShare URL is a link to a web page. Adding a URL to your site enables you to easily
share useful and interesting web pages with other DocuShare users and guests.
11–2
User Guide
DocuShare URLs
Adding a URL
Adding a URL
You can add a URL to a collection or workspace (DocuShare CPX only) if you are logged
in and have Writer permission to the container.
To add a URL:
1. Navigate to and open the container to which you want to add a URL.
2. From the Add menu, select URL.
The Add URL page appears.
3. In the URL field, enter the Internet address of the web page (for example, http://
docushare.xerox.com).
While viewing the web page in a browser, you can copy the URL from the
Address or Location field and paste it into the URL field.
4. In the Title field, enter a name for the URL. The name should be short, but
descriptive, and can contain spaces and punctuation marks.
5. Enter any optional information. Click a field name for a description of each
property.
6. Click Apply.
The URL is added to the container.
To change the URL’s permissions, see Access permissions.
User Guide
11–3
Viewing and changing URL properties
DocuShare URLs
Viewing and changing URL properties
If you are logged in and have Reader permission to a URL, you can view its properties.
You can change a URL’s properties if you are the logged-in owner of the URL or a loggedin user with Writer permission to it.
To view and change a URL’s properties:
1. Locate the URL whose properties you want to view and change.
2. Click the URL’s Properties icon.
3. On the View Properties page, click the Edit link.
4. Change the properties you want. Click a field name for a description of each
property.
Note: If your administrator created custom properties, they also display on the page. See
your administrator for information about custom properties.
5. Click Apply.
Viewing the change history
Only for DocuShare CPX
DocuShare keeps track of all the changes to site objects, which provides an audit trail of
the changes to objects. You can view the changes to any object to which you have Reader
permission.
To view the change history:
1. Locate the URL whose change history you want to view.
2. Click the URL’s Properties icon.
3. On the View Properties page, click the Change History link.
4. From the Change menu, select the type of change you want to view.
5. Do one of the following:
•
Enter part of a name in the Search for User field and then choose the user
from the Select User menu.
•
Click Show All and then choose the user from the Select User menu.
•
Choose All from the Select User menu.
6. From the Show Last menu, select the number of change events to display.
7. To display the activity during a specific date range, enter start and end dates.
8. Click Go.
Information about the change displays. You can click Show as XML to convert the
information to Extensible Markup Language (XML) format for use with other
applications.
11–4
User Guide
DocuShare URLs
Changing the location of a URL
Changing the location of a URL
You can move a URL to another container or have the URL appear in several containers
on your site. Although a URL can appear in several containers, there is only one copy of it,
which saves space on your DocuShare site.
To change a URL’s location, you must be logged in and have Writer permission to both the
URL and the new container.
Note: You can also use the Copy, Cut, and Paste commands from the Edit Selected
menu to change the location of a URL. See Editing multiple objects in a collection
on page 3–7.
To change a URL’s location:
1. Locate the URL whose location you want to change.
2. Do one of the following:
•
Click the checkbox that appears to the left of the URL’s title. From the Edit
Selected menu, select Change Location. On the Confirm Change Location
page, click Confirm.
•
Click the Properties icon that appears to the right of the URL’s title. Click the
Locations link.
The Change Location page appears.
3. In the Sort By field, select Title to display the possible containers in alphabetical
order or select Handle to display the possible containers in numerical order.
4. Do one of the following:
•
To find specific containers, enter any part of a container title in the Search
field. Click the Go button.
•
To display all containers, click Show All.
•
To display your favorite containers, click Show Favorites.
5. In the Possible Locations field, select the container(s) in which you want the
URL to appear and click the Add button. To select multiple containers, use the
CTRL key (Windows) or the Command key (Macintosh).
6. In the Selected Locations field, select any containers in which you do not want
the URL to appear and click the Remove button. To select multiple containers,
use the CTRL key (Windows) or the Command key (Macintosh).
Note: Make sure at least one container appears in the Selected Locations field.
Otherwise, the URL will become orphaned, which means it will not appear in any
container.
7. Click Update Locations.
User Guide
11–5
Deleting a URL
DocuShare URLs
Deleting a URL
You can delete a URL if you are the logged-in owner of the URL or a logged-in user with
Manager permission to it.
After deleting a URL, it goes to your personal trashcan on My DocuShare. You can restore
an object from your personal trashcan as long as your administrator has not expunged the
object from the site-wide trashcan. See My DocuShare for more information.
To delete a URL:
1. Locate the URL that you want to delete.
2. Do one of the following:
•
Click the checkbox that appears next to the URL’s title. From the Edit
Selected menu, select Delete.
•
From the URL’s More Actions menu, select Delete.
The Confirm Delete page appears.
Note: If a minus sign appears in the checkbox that precedes the URL, then you do not
have Manager permission to the object and cannot delete it.
3. Click Delete to remove the URL from your site.
11–6
User Guide
DocuShare notifications
•
About notifications . . . . . . . . . . . . . . . . . . . . . . . . . . . . . . . . . . . . . . . . . . . . . 12–2
•
Adding a notification. . . . . . . . . . . . . . . . . . . . . . . . . . . . . . . . . . . . . . . . . . . . 12–3
•
Viewing notifications. . . . . . . . . . . . . . . . . . . . . . . . . . . . . . . . . . . . . . . . . . . . 12–4
•
Creating a recipient list for a notification . . . . . . . . . . . . . . . . . . . . . . . . . . . . 12–5
•
Viewing and changing notification properties. . . . . . . . . . . . . . . . . . . . . . . . . 12–6
•
Deleting a notification. . . . . . . . . . . . . . . . . . . . . . . . . . . . . . . . . . . . . . . . . . . 12–7
User Guide
12–1
About notifications
DocuShare notifications
About notifications
A notification allows you to receive an email message when a change occurs to an object.
You can add a notification for any object on your site. For example, you can add a
notification for a document to have DocuShare email you when a new version of the
document is uploaded. You might want to add a notification for a collection to know when
new content is added to the collection.
To use notifications, your administrator must enable and set up the feature. In addition,
your user account properties must include an email address.
You can add a notification for any of the following changes to an object:
Any change—Any change to the object.
Something added—A new object is added to a container.
New document version added—A new version of a document is uploaded.
Something deleted—The object is deleted.
Properties edited—The properties of the object are changed.
Permissions edited—The permissions of the object are changed.
Change in ownership—The owner of the object is changed.
Location edited—The location of the object is changed.
Document locked or checked out—The document is locked or checked out.
Document unlocked—The document is unlocked after being locked, but a new version of
it was not uploaded.
Note: DocuShare offers feeds to site collections and other types of containers. If you are
using a browser with built-in feed support or you have a feed reader installed on
your computer, you can add a feed to a DocuShare container. This enables you to
view updated content in the container, provided you have the necessary
permissions, without having to go to the DocuShare site in your browser.
12–2
User Guide
DocuShare notifications
Adding a notification
Adding a notification
You can add a notification for an object if you are logged in and have Reader permission
to the object. You can quickly add a simple notification to have DocuShare email you when
new content is added to an object, or you can choose advanced options to customize the
notification.
To add a notification:
1. Locate the object for which you want to add a notification.
2. Do one of the following:
•
Click the object’s Notifications icon.
•
Click the object’s Properties icon. Then click the Notifications link.
3. On the Notifications page, click Create a New Notification.
4. In the Period field, select one of the following time periods:
•
Immediate provides notification immediately after the event occurs.
•
Daily provides notification in a daily summary report.
•
Weekly provides notification in a weekly summary report.
5. To select advanced options, click Show Advanced Options and choose from the
following:
Events of Interest—The event or events of which you want to be notified. To
select multiple events, use the CTRL key (Windows) or the Command key
(Macintosh).
Include Recipient Activity—Specifies whether or not to also notify the user
whose action caused the notification. Select Yes to notify the user; otherwise,
select No.
External Recipients—The email addresses for recipients who are not registered
users on the DocuShare site. Separate email addresses with a comma. This field
is optional.
Sender—The username that appears in the email message From field: Admin or
Owner.
Notification Applies To—If the object is a collection, specifies how to apply the
notification to the collection and the objects in it.
Initial Permissions—Specifies the permissions for the notification.
6. Click Apply.
The notification does not appear as an object in a container. Notifications appear
on the object’s Notifications page.
Note: If you are receiving too many email messages from notifications, you can choose to
not receive messages for one or more types of events for all of your notifications.
Click your username on the navigation bar and use the Suppress Notification
Messages menu on the Edit page to turn off the events you want.
User Guide
12–3
Viewing notifications
DocuShare notifications
Viewing notifications
You must be logged into DocuShare and have Reader permission to the object to view its
notifications.
To view an object’s notifications:
1. Locate the object whose notifications you want to view.
2. Do one of the following:
•
Click the object’s Notifications icon.
•
Click the object’s Properties icon. Then click the Notifications link.
The object’s current notifications display.
12–4
User Guide
DocuShare notifications
Creating a recipient list for a notification
Creating a recipient list for a notification
You can create a recipient list for a notification to have DocuShare notify others when a
change occurs to an object. For example, you may want co-workers to know when a new
version of a document is uploaded or when an object is moved to another location.
You must be the logged-in owner of a notification or a logged-in user with Writer
permission to the notification to create a recipient list.
To create a recipient list for a notification:
1. Locate the object that has the notification for which you want to create a recipient
list.
2. Do one of the following:
•
Click the object’s Notifications icon.
•
Click the object’s Properties icon. Then click the Notifications link.
The object’s current notifications display.
3. Click the Properties icon that appears to the right of the notification you want to
change.
The View Properties page appears.
4. Click the Recipients link.
5. Click Change Recipients.
6. In the Show field, select the type of account you want to display in the Possible
Users/Groups field.
7. Do one of the following:
•
To find a specific account, enter part of the user’s first name, last name, or
username or the group’s title in the Search field. Click the Go button.
•
To display all accounts, click Show All.
•
To display your favorite accounts, click Show Favorites.
8. In the Possible Users/Groups field, select the accounts to add to the recipient list
and click the Add button. To select multiple accounts, use the CTRL key
(Windows) or the Command key (Macintosh).
9. In the Selected Users/Groups field, select any accounts that you want to remove
from the recipient list and click the Remove button. To select multiple accounts,
use the CTRL key (Windows) or the Command key (Macintosh).
10. Click Update.
User Guide
12–5
Viewing and changing notification properties
DocuShare notifications
Viewing and changing notification properties
To view an object’s notification properties, you must be logged-in and have Reader
permission to the object. You must be the logged-in owner of a notification or a logged-in
user with Writer permission to the notification to change the notification’s properties.
To view and change an object’s notification properties:
1. Locate the object whose notification properties you want to view and change.
2. Do one of the following:
•
Click the object’s Notifications icon.
•
Click the object’s Properties icon. Then click the Notifications link.
The object’s current notifications display.
3. Click the Properties icon that appears to the right of the notification you want to
change.
The View Properties page appears.
4. Click the Edit link.
5. Change the properties you want. Click a field name for a description of each
property.
Note: The Enabled property allows you to turn off a notification without deleting it. When
you want to use the notification again, you can enable it.
6. Click Apply.
12–6
User Guide
DocuShare notifications
Deleting a notification
Deleting a notification
You can delete a notification if you are the logged-in owner of a notification or a logged-in
user with Manager permission to the notification.
After deleting a notification, it goes to your personal trashcan on My DocuShare. You can
restore an object from your personal trashcan as long as your administrator has not
expunged the object from the site-wide trashcan. See My DocuShare for more
information.
To delete a notification:
1. Locate the object whose notification you want to delete.
2. Do one of the following:
•
Click the object’s Notifications icon.
•
Click the object’s Properties icon. Then click the Notifications link.
The object’s current notifications display.
3. Click the Properties icon that appears to the right of the notification you want to
delete.
The View Properties page appears.
4. Click the Delete icon.
The Confirm Delete page appears.
5. Click Delete.
User Guide
12–7
Deleting a notification
12–8
DocuShare notifications
User Guide
DocuShare content rules
•
About content rules . . . . . . . . . . . . . . . . . . . . . . . . . . . . . . . . . . . . . . . . . . . . 13–2
•
Creating a content rule. . . . . . . . . . . . . . . . . . . . . . . . . . . . . . . . . . . . . . . . . . 13–3
•
Viewing content rules . . . . . . . . . . . . . . . . . . . . . . . . . . . . . . . . . . . . . . . . . . . 13–4
•
Deleting a content rule . . . . . . . . . . . . . . . . . . . . . . . . . . . . . . . . . . . . . . . . . . 13–5
User Guide
13–1
About content rules
DocuShare content rules
About content rules
Only for DocuShare CPX
A content rule allows you to have an action run automatically when a specific event
occurs. For example, you can create a content rule for a collection to route any document
added to the collection. Or, you can create a content rule for a document to receive an
email message when a new version of the document authored by a specific user is added.
You can add a content rule for any object on your site.
You can have an action run when any of the following events occur:
•
Any change—Any change to an object.
•
Document locked or checked out—The document is locked or is being edited.
•
Document unlocked—The document is unlocked.
•
Location edited—The location of an object is changed.
•
New document version added—A document is updated with a newer version.
•
Owner changed—The owner of an object is changed.
•
Permissions changed—The permissions of an object are changed.
•
Properties edited—The properties of an object are changed.
•
Routing—A change occurred to the status of a routing task.
•
Something added—A new object is added to a container.
13–2
User Guide
DocuShare content rules
Creating a content rule
Creating a content rule
DocuShare provides a wizard to guide you in creating a content rule. Using the wizard,
you provide a brief description of the content rule, select the event that triggers the action,
select the action to run, and enter settings specific to the selected action.
You can create a content rule for an object if you are logged in and have Manager
permission to the object.
Note: Avoid creating a content rule that repeats itself as it will be disabled after a certain
number of repetitions. For example, if you create a content rule that changes a
property (action to run) when either any change or a property change occurs (event
trigger), the rule will continue to repeat until it is disabled. It is a good idea to refine
the event by specifying additional options on the Content Property Conditions
page.
To create a content rule:
1. Locate the object for which you want to create a content rule.
2. Do one of the following:
•
Click the object’s Content Rules icon.
•
Click the object’s Properties icon. Then click the Content Rules link.
3. On the Content Rules page, click Create a New Content Rule.
The Create a New Content Rule wizard appears. The following steps describe the
required fields. For information about any of the optional fields in the wizard, click
the appropriate field name.
4. On the Description page, enter a Title for the content rule and click Next.
5. On the Event Triggers page, select the event that will cause the action to occur
and click Next.
6. On the Content Property Conditions page, refine the event trigger by specifying
property conditions. Then click Next.
7. On the Action Performed page, select the action to run when the event occurs and
click Next.
The Action Settings page appears. The options on the page vary depending on
the action you selected in the previous step.
8. Enter the appropriate information and click Next.
9. On the Completion Settings page, you can choose to set a property value on the
object when the content rule completes. In addition, you can append the property
value to any existing property values. Then click Done.
The View Properties page for the content rule appears and provides a summary of
the content rule.
User Guide
13–3
Viewing content rules
DocuShare content rules
Viewing content rules
You must be logged into DocuShare and have Reader permission to the object to view its
content rules.
To view an object’s content rules:
1. Locate the object whose content rules you want to view.
2. Do one of the following:
•
From the object’s More Actions menu, select Content Rules.
•
Click the object’s Content Rules icon.
The Content Rules page lists the object’s current content rules.
3. To view the settings of a content rule, do one of the following:
•
Click the Properties icon that appears to the right of the content rule.
•
Click the title of the content rule.
The settings are read-only; you cannot change any of the settings.
Note: If a content rule is disabled, it is because it has run too many times due to the rule
repeating itself. If you want a disabled content rule to run again, you must recreate
it.
13–4
User Guide
DocuShare content rules
Deleting a content rule
Deleting a content rule
You can delete a content rule if you are the logged-in owner of a content rule or a loggedin user with Manager permission to the content rule.
After deleting a content rule, it goes to your personal trashcan on My DocuShare. You can
restore an object from your personal trashcan as long as your administrator has not
expunged the object from the site-wide trashcan. See My DocuShare for more
information.
To delete a content rule:
1. Locate the object whose content rule you want to delete.
2. Do one of the following:
•
From the object’s More Actions menu, select Content Rules.
•
Click the object’s Content Rules icon.
The Content Rules page lists the object’s current content rules.
3. Do one of the following:
•
Click the Properties icon that appears to the right of the content rule.
•
Click the title of the content rule.
4. Click the Delete icon in the upper-right corner of the window.
The Confirm Delete page appears.
5. Click Delete.
User Guide
13–5
Deleting a content rule
13–6
DocuShare content rules
User Guide
DocuShare searches
•
About searches . . . . . . . . . . . . . . . . . . . . . . . . . . . . . . . . . . . . . . . . . . . . . . . 14–2
•
Viewing new content on your site. . . . . . . . . . . . . . . . . . . . . . . . . . . . . . . . . . 14–3
•
Searching for objects . . . . . . . . . . . . . . . . . . . . . . . . . . . . . . . . . . . . . . . . . . . 14–4
•
Running an advanced search . . . . . . . . . . . . . . . . . . . . . . . . . . . . . . . . . . . . 14–6
•
Using reserved characters in a search. . . . . . . . . . . . . . . . . . . . . . . . . . . . . . 14–9
•
Stop words . . . . . . . . . . . . . . . . . . . . . . . . . . . . . . . . . . . . . . . . . . . . . . . . . . 14–10
•
Saving a search query . . . . . . . . . . . . . . . . . . . . . . . . . . . . . . . . . . . . . . . . . .14–11
•
Changing saved query properties . . . . . . . . . . . . . . . . . . . . . . . . . . . . . . . . 14–12
•
Changing the location of a saved query. . . . . . . . . . . . . . . . . . . . . . . . . . . . 14–13
•
Deleting a saved query . . . . . . . . . . . . . . . . . . . . . . . . . . . . . . . . . . . . . . . . 14–14
User Guide
14–1
About searches
DocuShare searches
About searches
DocuShare search features enable you to quickly find objects on your site. You can
perform simple word searches by having DocuShare find the objects that contain the text
you specify. You also can combine several search terms to find specific objects, such as
all documents authored by one user that contain the word DocuShare in their titles. When
searching for objects, you can choose the scope of a search.
When an object is added to a container, DocuShare indexes and stores in a database the
object’s properties (also called metadata) and, if the object is a document, its content. A
search checks the database to find the objects that match your search terms. In addition,
DocuShare uses a process called stemming to find objects that contain variations of the
word you specify. For example, a search for the word mouse will find the word mice.
14–2
User Guide
DocuShare searches
Viewing new content on your site
Viewing new content on your site
From any page, you can display a list of the content that has been added or changed on
your site. This lets you quickly find any new or recently changed object or content that
might be of interest to you.
To find out what’s new:
1. On the navigation bar, click What’s New.
DocuShare displays the list of content that has been added or changed.
2. To change the search query used to display the list of new or changed content,
click the Refine Search link.
The Refine Search page appears.
3. Change any of the search properties and click the Search button. Click a field
name for a description of the property, or see Running an advanced search on
page 14–6.
Note: If you are a guest and you click What’s New on the navigation bar, DocuShare lists
the content that has been added or changed during the past 24 hours. If you are a
logged-in user and you click What’s New on the navigation bar, DocuShare lists
the content that has been added or changed since you last clicked What’s New.
User Guide
14–3
Searching for objects
DocuShare searches
Searching for objects
The navigation bar provides a search area that lets you quickly search for objects and
content. You do not need to be logged into DocuShare to run a search.
To run a quick search:
1. On the navigation bar, enter one or more words in the Search field. Separate
each word with a space.
Note: If you want DocuShare to search for an exact phrase or a phrase that includes a
logical operator such as And or Or, enclose the phrase in quotation marks (for
example, “war and peace”).
If you want the search results to exclude objects that contain a word, precede that
word with a minus sign (-). For example, if you want to find content on green
vegetables but not broccoli, enter green vegetables -broccoli.
If you want the search results to include objects that contain a word, precede that
word with a plus sign (+). For example, if you want to find content on green
vegetables that definitely includes broccoli, enter green vegetables +broccoli.
2. Depending on the page from which you are running the search and whether or not
your site is part of a federation, select a search scope from the In menu.
3. Click Search.
DocuShare displays the search results. For documents, DocuShare either
provides a snippet of the document content with the search term highlighted or
displays the document’s abstract if the search term is not found in the content.
You can click the Show/Hide Details button to control this display.
If you searched all federated sites, DocuShare displays the search results from
the site on which you ran the search. To display the results from the other sites in
the federation, click each site name under Select a Federation Site.
14–4
User Guide
DocuShare searches
Searching for objects
Search options
When running a quick search, you can specify several options to narrow the search and to
control how the search results are displayed.
To run a quick search using search options:
1. Enter the search words in the Search field and, if the In field appears, select the
search scope.
2. Click the small triangle next to the Search field and specify any of the following
information:
Search Text Contained In—Specifies the location of the search words. Any Text
searches the object’s content and properties.
Last Modified—Limits the search to objects that were last changed within a
specific time period.
Object Types—Specifies the type of objects to search.
Document Types—Searches for all types of documents or a specific type. The
Object Types must be set to All Object Types or Documents Only.
Maximum Results—The maximum number of objects to display in the search
results list. DocuShare orders the results by displaying the most relevant objects
first.
Sort Results—The order in which to display the search results.
3. Click Search.
DocuShare displays the search results.
User Guide
14–5
Running an advanced search
DocuShare searches
Running an advanced search
Using the Advanced Search page, you can further narrow a search by combining search
terms, specifying ranges, and searching for specific objects and documents.
To run an advanced search:
1. On the navigation bar, click the Advanced link.
2. Under Search Text Contained In, enter the search term. Create a search term by
selecting an operator, entering the search word or words (separate each word
with a space), and then selecting where the search words should occur. If you
want DocuShare to search for an exact phrase or a phrase that includes a logical
operator, enclose the phrase in quotation marks (for example, “war and peace”).
You can click + add search term to create another search term using a logical
operator. See Table 14–1 for a description of each logical operator.
Note: For information on how to use wildcard and nonalphanumeric characters in a
search term, see Using reserved characters in a search on page 14–9.
3. Depending on the page from which you are running the search and whether or not
your site is part of a federation, select a search scope from the Search Within
menu.
4. In the Maximum Results field, select the maximum number of objects to display
in the search results list. DocuShare orders the results by displaying the most
relevant objects first.
5. In the Sort Results field, select the order in which to display the search results.
6. Under Limit Search to Date Range, enter the date range to use when searching
for objects. Create a date range by selecting options from the menus and entering
a date.
You can click + add date range to create a second date range.
7. Under Find Results with Numeric Range, enter the numeric range to use when
searching for objects whose properties have numeric values.
You can click + add numeric range to create a second numeric range.
Note: This field appears if an object has a numeric property that is searchable.
8. Under Object Types to Search, do one of the following:
14–6
•
To search all of the objects on the site, click Search all object types.
•
To search specific objects only, click Limit search to selected object types
and select the objects to search from the list.
User Guide
DocuShare searches
Running an advanced search
9. If you are searching for documents, under Document Types to Search, do one of
the following:
•
To search all types of documents, click Search all document types.
•
To search specific types of documents, click Limit search to selected
document types and select the types of documents to search from the list.
Each document type is specified by its MIME type.
10. Click the Search button.
DocuShare displays the search results. For documents, DocuShare either
provides a snippet of the document content with the search term highlighted or
displays the document’s abstract if the search term is not found in the content.
You can click the Show/Hide Details button to control this display.
If you searched all federated sites, DocuShare displays the search results from
the site on which you ran the search. To display the results from the other sites in
the federation, click each site name under Select a Federation Site.
Table 14–1: Logical operators
Logical operator
And
Meaning
Searches for objects that contain all of the search
terms.
For example: Search for objects where “Title contains
Training And Summary contains Basic Product.”
The search would return only objects that have the word
“Training” in the Title, and the phrase “Basic Product” in
the Summary.
Or
Searches for objects that contain one of the search
terms.
For example: Search for objects where “Title contains
Advanced Or Summary contains Administrator.”
The search would return objects that have either the word
“Advanced” in the Title or the word “Administrator” in the
Summary, or both the word “Advanced” in the Title and
“Administrator” in the Summary.
Accrue
Searches for objects that contain at least one of the
search terms, and relevance ranks the results by
displaying the objects that contain the largest number
of search terms first.
For example: Search objects where “Title contains
Advanced Accrue Summary contains Administrator.”
The search would first return objects that have both
Advanced in the Title and Administrator in the Summary,
then objects that contain just one of the search terms
(either Advanced in the Title or Administrator in the
Summary).
User Guide
14–7
Running an advanced search
DocuShare searches
Table 14–1: Logical operators
Logical operator
And Not
Meaning
Searches for objects that contain one search term and
not the other.
For example: Search objects where “Title contains
Technology And Not Title contains Marketing.”
The search would return only those objects where
Technology was in the Title, but not return objects if
Marketing was also in the Title.
14–8
User Guide
DocuShare searches
Using reserved characters in a search
Using reserved characters in a search
You can use these wildcard characters when building a search:
Question mark (?)—Specifies any single alphanumeric character.
For example: ?an returns ban, can, dan, fan, etc.
Asterisk (*)—Specifies any number of alphanumeric characters.
For example: corp* returns corporal, corporate, corporation, corpulent, etc.
Note: To find objects that include a wildcard character, use the equals operator, precede
the character with two backslashes (\\), and select the specific property name. For
example, to search for a document named *ReadFirst enter: equals \\*ReadFirst
In Title.
To find objects that include non alphanumeric characters, such as at signs (@) and equal
signs (=), or nonalphanumeric and wildcard characters, select the specific property name,
use the equals operator, and enclose the search text within single quotation marks.
Example:
To search for [email protected], enter:
equals ‘[email protected]’ In (User) Email Address
Example:
To search for jbrown@* enter:
equals ‘jbrown@*’ In (User) Email Address
Note: Three nonalphanumeric characters, the ampersand (&), dash (-), and underscore
(_), are considered alphanumeric characters and do not require any special
treatment. For example, to search for my_document.doc, enter
my_document.doc.
User Guide
14–9
Stop words
DocuShare searches
Stop words
To speed up the search results display, DocuShare ignores certain common words,
referred to as stop words. Therefore, you do not need to enter the words when running a
search. However, if you want DocuShare to search for a stop word, enclose the word in
quotation marks.
The stop words are listed in Table 14–2.
Table 14–2: Stop words
a
had
that
also
has
the
an
have
there
and
how
to
any
I
too
am
I'm
want
are
if
was
as
in
were
at
is
what
be
it
when
but
its
where
can
it's
whether
did
like
which
do
not
who
does
of
whose
find
on
why
for
or
will
from
should
with
get
so
would
got
than
<or>
14–10
User Guide
DocuShare searches
Saving a search query
Saving a search query
After running an advanced search, you can save the search query so you can run the
same search again at a later time or share it with other users. To save a search query, you
must be logged in.
To save the query used in a search:
1. Define your search terms and run a search.
The search results display.
2. From the Add menu, select Saved Query.
The Add Saved Query page appears.
3. In the Title field, enter a title for the saved query.
4. Enter any optional information. Click a field name for a description of each
property.
5. Click Save Search.
The Locations page appears.
6. Do one of the following:
•
To find specific containers, enter any part of a container title in the Search
field. Click the Go button.
•
To display all containers, click Show All.
•
To display your favorite containers, click Show Favorites.
7. In the Possible Locations field, select the container(s) in which you want the
saved query to appear and click the Add button. To select multiple containers, use
the CTRL key (Windows) or the Command key (Macintosh).
8. In the Selected Locations field, select any containers in which you do not want
the saved query to appear and click the Remove button. To select multiple
containers, use the CTRL key (Windows) or the Command key (Macintosh).
9. Click Update Locations.
DocuShare adds your search query to the container. When you click the saved
query, DocuShare runs the search using the saved search terms and displays the
results.
User Guide
14–11
Changing saved query properties
DocuShare searches
Changing saved query properties
You can change the properties and search terms of a saved query if you are the logged-in
owner of the query, or you are logged in and have Writer permission to it.
To change a saved query’s properties:
1. Locate the saved query whose properties you want to change.
2. Click the Properties icon that appears to the right of the saved query’s title.
3. On the View Properties page, click the Edit link.
4. Change the properties you want.
5. Click Apply.
6. Click the Edit Query link.
7. Change the search terms you want.
8. Click Apply.
DocuShare saves the changes to the saved query.
Viewing the change history
Only for DocuShare CPX
DocuShare keeps track of all the changes to site objects, which provides an audit trail of
the changes to objects. You can view the changes to any object to which you have Reader
permission.
To view the change history:
1. Locate the saved query whose change history you want to view.
2. Click the saved query’s Properties icon.
3. On the View Properties page, click the Change History link.
4. From the Change menu, select the type of change you want to view.
5. Do one of the following:
•
Enter part of a name in the Search for User field and then choose the user
from the Select User menu.
•
Click Show All and then choose the user from the Select User menu.
•
Choose All from the Select User menu.
6. From the Show Last menu, select the number of change events to display.
7. To display the activity during a specific date range, enter start and end dates.
8. Click Go.
Information about the change displays. You can click Show as XML to convert the
information to Extensible Markup Language (XML) format for use with other
applications.
14–12
User Guide
DocuShare searches
Changing the location of a saved query
Changing the location of a saved query
You can move a saved query to another container or have the saved query appear in
several containers on your site. Although a saved query can appear in several containers,
there is only one copy of it, which saves space on your DocuShare site.
To change a saved query’s location, you must be logged in and have Writer permission to
both the saved query and the new container.
Note: You can also use the Copy, Cut, and Paste commands to change the location of a
saved query. See Editing multiple objects in a collection on page 3–7.
To change a saved query’s location:
1. Locate the saved query whose location you want to change.
2. Do one of the following:
•
Click the checkbox that appears to the left of the saved query’s title. From the
Edit Selected menu, select Change Location. On the Confirm Change
Location page, click Confirm.
•
Click the Properties icon that appears to the right of the saved query’s title.
Click the Locations link.
3. In the Sort By field, select Title to display the possible containers in alphabetical
order or select Handle to display the possible containers in numerical order.
4. Do one of the following:
•
To find specific containers, enter any part of a container title in the Search
field. Click the Go button.
•
To display all containers, click Show All.
•
To display your favorite containers, click Show Favorites.
5. In the Possible Locations field, select the container(s) in which you want the
saved query to appear and click the Add button. To select multiple containers, use
the CTRL key (Windows) or the Command key (Macintosh).
6. In the Selected Locations field, select any containers in which you do not want
the saved query to appear and click the Remove button. To select multiple
containers, use the CTRL key (Windows) or the Command key (Macintosh).
Note: Make sure at least one container appears in the Selected Locations field.
Otherwise, the saved query will become orphaned, which means it will not appear
in any container.
7. Click Update Locations.
User Guide
14–13
Deleting a saved query
DocuShare searches
Deleting a saved query
You can delete a saved query if you are the logged-in owner of the query or a logged-in
user with Manager permission to it.
After deleting a saved query, it goes to your personal trashcan on My DocuShare. You can
restore an object from your personal trashcan as long as your administrator has not
expunged the object from the site-wide trashcan. See My DocuShare for more
information.
To delete a saved query:
1. Locate the saved query that you want to delete.
2. Do one of the following:
•
Click the checkbox that appears next to the saved query’s title. From the Edit
Selected menu, select Delete.
•
Click the Properties icon that appears to the right of the saved query’s title.
On the View Properties page for the saved query, click the Delete button.
The Confirm Delete page appears.
3. Click Delete to remove the saved query from your site.
14–14
User Guide
My DocuShare
•
About My DocuShare . . . . . . . . . . . . . . . . . . . . . . . . . . . . . . . . . . . . . . . . . . . 15–2
•
Managing favorites. . . . . . . . . . . . . . . . . . . . . . . . . . . . . . . . . . . . . . . . . . . . . 15–3
•
Using your personal collection . . . . . . . . . . . . . . . . . . . . . . . . . . . . . . . . . . . . 15–4
•
Using your personal calendar . . . . . . . . . . . . . . . . . . . . . . . . . . . . . . . . . . . . 15–5
•
Using your personal trashcan . . . . . . . . . . . . . . . . . . . . . . . . . . . . . . . . . . . . 15–6
•
Viewing your online meetings . . . . . . . . . . . . . . . . . . . . . . . . . . . . . . . . . . . . 15–7
•
Viewing your groups. . . . . . . . . . . . . . . . . . . . . . . . . . . . . . . . . . . . . . . . . . . . 15–7
•
Viewing your routing tasks . . . . . . . . . . . . . . . . . . . . . . . . . . . . . . . . . . . . . . . 15–7
User Guide
15–1
About My DocuShare
My DocuShare
About My DocuShare
My DocuShare provides a single location from which you can conveniently manage
personal content as well as access the content on your site. A link to My DocuShare
appears on the site home page, on the navigation bar, and under My Links on the page
footer.
My DocuShare consists of areas called portlets; each portlet has a different use. You can
close a portlet and reopen it by clicking the small triangle next to the portlet title.
•
Personal Collection—A collection for private content.
•
Workspaces—The workspaces you have access to and own. (DocuShare CPX
only)
•
Site Home—The top level collections on your site.
•
Favorite Calendars—A combination of the calendars in your Favorites.
•
Personal Trashcan—Your deleted objects.
•
Favorites—Links to your frequently used objects.
•
Online Meetings—The online meetings you scheduled. (DocuShare CPX only)
•
My Groups—The groups of which you are a member.
•
Tasks—The routing tasks assigned to you.
In addition, you can access your background jobs from My DocuShare. When you change
the permissions of a container and its objects, the change occurs in the background. If you
have any background jobs, a link appears under the navigation bar; you can click the link
to check the status of and delete background jobs.
15–2
User Guide
My DocuShare
Managing favorites
Managing favorites
To conveniently access frequently used objects from a single location, you can add them
to your favorites. Any object you add as a favorite is a link to the original object, not a copy.
If the original object is deleted, it will no longer appear in your favorites.
To add an object to your favorites:
1. Locate the object that you want to add to favorites.
2. Do one of the following:
•
Click the object’s Add to Favorites icon.
•
Click the checkbox that appears next to the object’s title. From the Edit
Selected menu, select Add to Favorites.
3. On the Confirm Add to Favorites page, click Confirm.
4. Go to My DocuShare.
The object you added appears under Favorites. The View menu lets you display
one type of favorite object, such as favorite documents. You can click the
Favorites heading to display your favorites in a collection listing. In this view you
can use standard collection features.
To remove an object from your favorites:
1. Go to My DocuShare.
2. Click the Favorites heading.
3. From the Edit Selected menu, select Remove Favorite.
4. On the Confirm Remove from Favorites page, click Confirm.
The object no longer appears in favorites. However, the object still appears in its
original location(s).
User Guide
15–3
Using your personal collection
My DocuShare
Using your personal collection
Your personal collection on My DocuShare is a private repository for your objects. By
default, only you and a group of administrators called Content Administrators have full
access to the collection.
To add an object to your personal collection:
1. Go to My DocuShare.
2. Click the Personal Collection heading.
3. From the Add menu, select the type of object you want to add.
4. On the Add page, enter the required information and click Apply.
5. Go to My DocuShare.
The object you added appears under Personal Collection. The View menu lets
you display one type of object, such as documents.
Note: You also can add an object to your personal collection using an object’s Locations
page. Display and select you personal collection in the Possible Locations field
and then click the Add and Update Locations buttons.
To view your personal collection in full page:
1. Go to My DocuShare.
2. Click the Personal Collection heading.
The objects display in a collection listing. In this view you can use standard
collection features such as adding new objects and changing the collection’s
properties.
Note: You can delete your personal collection and, optionally, its contents. However, the
next time you access My DocuShare your personal collection appears.
15–4
User Guide
My DocuShare
Using your personal calendar
Using your personal calendar
Your personal calendar is a combination of all your favorite calendars. This allows you to
merge the events from separate calendars into a master calendar. For example, you can
add individual vacation calendars to your favorites to create a single vacation calendar for
a group.
To create a personal calendar:
1. Locate the calendar that you want to add to favorites.
2. Do one of the following:
•
Click the calendar’s Add to Favorites icon.
•
Click the checkbox that appears next to the calendar’s title. From the Edit
Selected menu, select Add to Favorites.
3. On the Confirm Add to Favorites page, click Confirm.
4. Repeat steps 1 through 3 to add additional calendars to favorites.
5. Go to My DocuShare.
The single, personal calendar appears under Favorite Calendars.
6. Using the View menu, you can switch between daily and weekly views of the
calendar.
User Guide
15–5
Using your personal trashcan
My DocuShare
Using your personal trashcan
Your personal trashcan holds both the objects you delete as well as the objects you own
that other users delete. You can use your personal trashcan to restore a deleted object.
Only your administrator can expunge deleted objects.
To restore a deleted object:
1. Go to My DocuShare.
2. Under Personal Trashcan, select the object that you want to restore.
3. Click the Go button next to Restore.
The object is restored to the location from which it was deleted.
Note: If the location is a collection or workspace (DocuShare CPX only) and it was
deleted, then the object is restored to your personal collection. If the location is a
non-collection type of container (such as a calendar or a discussion) and it was
deleted, then the object becomes an orphaned object; your administrator can
relocate an orphaned object.
15–6
User Guide
My DocuShare
Viewing your online meetings
Viewing your online meetings
Only for DocuShare CPX
The meetings you schedule display under the Online Meetings heading. You can click a
meeting name to join the online meeting. See Online meetings for information on using the
online meetings feature.
Viewing your groups
All of the groups of which you are a member display under the Groups heading. You can
click a group name to display its Properties page.
Viewing your routing tasks
All of the routing tasks assigned to you are listed under the Tasks heading. This provides
you with a quick view of the tasks to which you need to respond. You can click a task to
open its window.
In addition, clicking the Tasks heading displays the My Tasks window. You can view both
the tasks assigned to you and the tasks you assigned, and your routing task history in this
window. For more information on document routing, see Routing documents.
User Guide
15–7
Viewing your routing tasks
15–8
My DocuShare
User Guide
Online meetings
•
About online meetings . . . . . . . . . . . . . . . . . . . . . . . . . . . . . . . . . . . . . . . . . . 16–2
•
Scheduling an online meeting . . . . . . . . . . . . . . . . . . . . . . . . . . . . . . . . . . . . 16–3
•
Launching an online meeting . . . . . . . . . . . . . . . . . . . . . . . . . . . . . . . . . . . . . 16–5
•
Joining an online meeting . . . . . . . . . . . . . . . . . . . . . . . . . . . . . . . . . . . . . . . 16–6
•
Deleting an online meeting. . . . . . . . . . . . . . . . . . . . . . . . . . . . . . . . . . . . . . . 16–7
User Guide
16–1
About online meetings
Online meetings
About online meetings
Only for DocuShare CPX
DocuShare is integrated with WebEx™ Meeting Center, which allows you to schedule and
attend online meetings with other DocuShare users. Using a Web browser you can easily
and cost-effectively communicate with co-workers regardless of their geographic location.
Note: To use online meetings, your administrator must configure the server to allow
Javascript. Your user account properties must have Enable Javascript set to Yes.
16–2
User Guide
Online meetings
Scheduling an online meeting
Scheduling an online meeting
You schedule an online meeting by specifying the meeting information and selecting the
attendees. When you are finished, an email message is sent to each attendee with the
information needed to join the meeting.
An online meeting is associated with a collection or a workspace as two URLs are added
to the container after the meeting is created: one URL is for the meeting host and the
second URL is for the meeting attendees.
To schedule an online meeting:
1. Locate and open a site collection or workspace.
2. Click the Meet Online icon in the upper-right corner of the window.
3. If the WebEx Login Page appears, enter your WebEx login information and click
the Login button.
The WebEx Login Page appears if you have not logged into the WebEx meeting
site during your current DocuShare session.
4. On the Properties page, enter the following information:
Meeting Name—The name of the meeting.
Meeting Passcode—The passcode required to join the meeting.
Start Date—The date of the meeting. Immediately schedules the meeting right
away.
Start Time—The meeting start time.
Duration—The length, in minutes, of the meeting.
Time Zone—The time zone in which the meeting is to occur.
Invitation Text (optional)—The meeting invitation message.
5. Click Next to go the Attendees page.
6. In the Your Email field, enter the email address from which the meeting invitation
will be sent.
7. In the Show field, select the type of account you want to display in the Possible
Users/Groups field.
8. Do one of the following:
•
To find a specific account, enter part of the user’s first name, last name, or
username or the group’s title in the Search field. Click the Go button.
•
To display all accounts, click Show All.
•
To display your favorite accounts, click Show Favorites.
9. In the Possible Users/Groups field, select the accounts to add to the list of
recipients and click the Add button. To select multiple accounts, use the CTRL
key (Windows) or the Command key (Macintosh).
10. In the Selected Users/Groups field, select any accounts that you want to remove
from the list of recipients and click the Remove button.
User Guide
16–3
Scheduling an online meeting
Online meetings
11. To invite external attendees, do the following:
a. In the Email field, enter the email address of the person you want to invite.
b. Click the Add button.
c.
Repeat steps a and b for each person.
d. To remove a person from the Selected Users field, select the person’s email
address and click Remove.
12. Click Create.
The Summary page appears and displays the meeting creation status.
13. Click OK.
Two meeting URLs are added to the container. The meeting URLs for a
workspace are located in a meetings collection in the content portlet.
16–4
User Guide
Online meetings
Launching an online meeting
Launching an online meeting
All of the online meetings you scheduled display on My DocuShare. This lets you
conveniently access your meetings from one location.
To launch a scheduled meeting:
1. Go to My DocuShare.
2. If Log in to display meetings appears under Online Meetings, click the link to log
into WebEx.
The meetings you scheduled display under Online Meetings.
3. Click the meeting that you want to launch.
The WebEx Meeting Manager window opens.
Note: You also can launch an online meeting by clicking the meeting Host URL that is
located in the container from which you scheduled the meeting.
User Guide
16–5
Joining an online meeting
Online meetings
Joining an online meeting
Each attendee receives an email message with a link to the online meeting, the meeting
passcode, and any additional information the host provides.
To join a meeting as an attendee:
1. Open the email message that contains the meeting invitation.
2. Do one of the following:
•
Click the WebEx Join URL link.
•
Click the collection link. In the open collection, click the meeting name.
Note: You also can join an online meeting by opening the container that contains the Join
URL for the meeting and clicking the meeting name.
16–6
User Guide
Online meetings
Deleting an online meeting
Deleting an online meeting
You can delete the online meeting from the WebEx server (which also deletes the meeting
URLs from DocuShare) and you can delete the online meeting URLs from your
DocuShare site. To delete an online meeting, you must be the logged-in owner of the
meeting or a logged-in user with Manager access to it.
To delete an online meeting from the WebEx server:
1. Go to My DocuShare.
2. Under Online Meetings, click the Delete icon next to the meeting that you want to
delete.
3. Click Delete to remove the meeting from the WebEx server and the meeting
URLs from DocuShare.
To delete the online meeting URLs from DocuShare:
1. Locate the online meeting that you want to delete.
2. Do one of the following:
•
Click the checkbox that appears next to the meeting’s title. From the Edit
Selected menu, select Delete.
•
From the meeting’s More Actions menu, select Delete.
The Confirm Delete page appears.
Note: If a minus sign appears in the checkbox that precedes the meeting, then you do not
have Manager access to the object and cannot delete it.
3. Click Delete to remove the meeting URLs from DocuShare. The meeting is not
removed from the WebEx server.
User Guide
16–7
Deleting an online meeting
16–8
Online meetings
User Guide
Routing documents
•
About routing documents . . . . . . . . . . . . . . . . . . . . . . . . . . . . . . . . . . . . . . . . 17–2
•
Routing a document . . . . . . . . . . . . . . . . . . . . . . . . . . . . . . . . . . . . . . . . . . . . 17–3
•
Setting up a collection for routing documents . . . . . . . . . . . . . . . . . . . . . . . . 17–6
•
Checking the status of routing tasks you assigned . . . . . . . . . . . . . . . . . . . . 17–7
•
Viewing the tasks assigned to you . . . . . . . . . . . . . . . . . . . . . . . . . . . . . . . . .17–11
•
Viewing your deleted tasks . . . . . . . . . . . . . . . . . . . . . . . . . . . . . . . . . . . . . 17–14
•
Viewing the routing tasks of a document . . . . . . . . . . . . . . . . . . . . . . . . . . . 17–15
User Guide
17–1
About routing documents
Routing documents
About routing documents
During a document’s development cycle, you often need to solicit feedback from others,
receive approval of the document’s content, or simply share the information in the
document. DocuShare enables you to automate the routing of documents to users and
request a specific action after the users receive the documents.
On a form called a Routing Slip, you indicate the users to whom the document should be
sent, the type of action you want the users to take, and a message describing the
document task. You then submit the Routing Slip; DocuShare notifies the specified users
of the document task. While a task is in progress, you can monitor its status.
17–2
User Guide
Routing documents
Routing a document
Routing a document
You can route an existing document on your site or you can choose to route a document
when adding it to DocuShare. In addition, you can route an individual document version.
On the Routing Slip that accompanies the document, you can request users to approve
the document, review the document and provide changes, or acknowledge receipt of the
document, or you can provide the document for information only.
When creating a routing task, you can define a single routing step or several sequential
steps. A single routing step consists of one type of action, such as sending a document to
users for approval. A multi-step routing task enables you to automate a document
process. For example, you can create a routing task to send a document to a group of
users for their review and comment before sending the revised document for approval.
To route a document:
1. Do one of the following:
•
To route a single document, locate the document or document version that
you want to route and click its Route icon. A Route icon does not appear if
the document is locked.
•
To route several documents, locate the documents and click the checkbox
next to each document. From the Edit Selected menu, select Route. On the
Confirmation page, click Confirm.
•
To route a document after adding it to DocuShare, select Document from
the Add menu. Enter the required information and click Publish and then
route the document before clicking Apply.
•
To route a document before it appears in DocuShare, select Document
from the Add menu. Enter the required information and click Route the
document and publish it later before clicking Apply.
A Routing Slip appears.
2. If you want to include another document, click the Add button. Locate the
document and click its Route command; then confirm adding the document to the
Routing Slip.
3. If you want to use a saved Routing Slip, do one of the following and then go to
step 19:
•
Select one of your saved Routing Slips and click Load.
•
Click View all Saved Routing Slips to display your saved Routing Slips and
the public Routing Slips saved by all site users. Select a Routing Slip.
4. Under Routing Action, choose one of the following:
•
Approve or Disapprove—Requires users to approve or not approve the
document.
•
Review and Make Changes—Allows users to provide comments and a
revised version of the document. Click Share Changes with Recipients if
you want each recipient to see the previous recipient’s changes.
•
Acknowledge Receipt—Provides the document to users for information and
requires the users to confirm receiving the document.
•
Information—Provides the document to users for information only.
User Guide
17–3
Routing a document
Routing documents
5. Depending on the routing action you selected, choose one of the following
Routing Orders:
•
In Order—Routes the document to users in the order in which they are listed
in the Selected Users/Groups field. If a user does not approve the
document, it is not routed to subsequent users.
•
At the Same Time-Single Reply—Routes the document to all users
simultaneously and only one user’s reply is needed to complete the routing
task.
•
At the Same Time-All Reply—Routes the document to all users
simultaneously and all users must reply to complete the routing task.
•
At the Same Time-Majority Reply—Routes the document to all users
simultaneously and more than half of the users must reply to complete the
routing task.
6. Under Routing Message, do the following:
•
In the Subject field, enter a brief topic that appears in the notification or email
that the user receives.
•
In the Comments field, enter a message.
7. Click Next to go to the Add Recipients page.
8. In the Show field, select the type of account you want to display in the Possible
Users/Groups field.
9. Do one of the following:
•
To find a specific account, enter part of the user’s first name, last name, or
username or the group’s title in the Search field. Click the Go button.
•
To display all accounts, click Show All.
•
To display your favorite accounts, click Show Favorites.
10. In the Possible Users/Groups field, select the accounts to add to the list of
recipients and click the Add button. To select multiple accounts, use the CTRL
key (Windows) or the Command key (Macintosh).
11. In the Selected Users/Groups field, select any accounts that you want to remove
from the list of recipients and click the Remove button.
12. To show the members in a group, select the group in the Selected Users/Groups
field and click Show Group Members. The group members replace the group title
and the routing task is sent to each user and not to the group.
13. To reorder the recipients in the Selected Users/Groups field, select an account
and do one of the following:
•
To move the recipient before another recipient, click Move Up.
•
To move the recipient after another recipient, click Move Down.
14. Click Next to go to the Choose Escalation and Notification page (the page does
not appear if you are routing the document for information).
15. Select If Not Complete and do the following:
•
17–4
To specify a completion date, select By and enter a date or select Within and
specify a time period.
User Guide
Routing documents
•
Routing a document
To specify an escalation action if the routing task is not complete by the
specified date, choose an action from the Then Escalate menu.
16. Under Notify Me, choose any of the following:
•
Of Escalation—Notifies you of the escalation action.
•
Of Task Progress—Notifies you of the routing status after each user action.
•
When Task Is Complete—Notifies you when each routing step is complete.
To check for notifications, click the My Tasks link on the navigation bar and select
Tasks Assigned to Me.
17. Click Done and review the routing information for the task on the Routing Step
Review page.
18. To save the Routing Slip, click Save Routing Slip. Enter a name for the Routing
Slip and keep Save as private selected if you do not want to share the Routing
Slip with other users. Then click OK.
19. Do one of the following:
•
Click Submit to start the routing task.
•
Click Back to change any of the routing information.
•
Click Add Step to add another step to the routing task.
Note: If you chose Route the document and publish it later in step 1, you must publish
the document for it appear in DocuShare. For information on how to publish the
document, see Checking the status of routing tasks you assigned on page 17–7.
User Guide
17–5
Setting up a collection for routing documents
Routing documents
Setting up a collection for routing documents
You can have any document added to a collection automatically routed by associating one
of your saved, private Routing Slips with the collection.
To use a Routing Slip with a collection:
1. Locate the collection you want to use for routing documents.
2. Click the Properties icon that appears to the right of the collection’s title.
3. Click the Edit link.
4. In the Route Before Publishing field, select Yes to route the document before it
is added to the collection.
5. In the Use Routing Slip field, select the Routing Slip that you want to use.
6. Click Apply.
17–6
User Guide
Routing documents
Checking the status of routing tasks you assigned
Checking the status of routing tasks you
assigned
You can check the status of completed and pending routing tasks that you assigned to
other users. Once a task is complete, you can choose to delete it, keep a record of it, or
publish the document to add it to DocuShare.
To check the status of a routing task:
1. Do one of the following:
•
On the navigation bar, click My Tasks.
•
On the navigation bar, click My DocuShare. Then click Tasks.
The My Tasks window appears.
2. From the Show menu, select Tasks Assigned by Me.
The page lists the routing tasks, under Description, the date the task began, and
the status. Table 17–1 describes the status information.
Table 17–1: Task status
Status
Description
Approved
The single-step task or one step of a multi-step task is
complete and the recipient(s) approved the document(s).
Disapproved
The single-step task or one step of a multi-step task is
complete and the recipient(s) did not approve the
document(s).
Reviewed
The single-step task or one step of a multi-step task is
complete and the recipient(s) reviewed the document(s).
Acknowledged
The single-step task or one step of a multi-step task is
complete and the recipient(s) acknowledged receiving the
document(s).
Delivered
The single-step task or one step of a multi-step task is
complete and the recipient(s) received the document(s) for
their information.
All Steps Completed
The multi-step task is complete.
Started
The task is pending. It is currently being routed to all
recipients at the same time for approval, review, or
acknowledgement.
Username
The task is pending. It is currently being routed to all
recipients in order; the user whose name is displayed has
received the document, but has not taken any action.
Step #
The task is pending and is on a specific step of a multistep task.
User Guide
17–7
Checking the status of routing tasks you assigned
Routing documents
Table 17–1: Task status
Status
Description
Step #: Username
The task is pending and is on a specific step of a multistep task. It is currently being routed to all recipients in
order; the user whose name is displayed has received the
document, but has not taken any action.
Overdue
For a single-step task or one step of a multi-step task that
is overdue, the word Overdue appears after the task’s
description.
Terminated
The task is stopped because it cannot continue. This can
occur when Cancel Task is set for Then Escalate or when
a document or user is deleted from your site.
3. To view more information about the task, click the task’s description.
A Report on Routing window appears, which shows the status of each user
assigned the task.
4. Do one of the following:
•
To view an individual recipient’s comments, click the user’s name.
•
To view all recipient comments, click Show all User Comments. If you want,
you can save the comments to a text file.
Close the window after viewing the comments.
5. To view the user’s changes to the document, click the document’s title.
6. Close the document after viewing the changes. Then close the Response to
Routing window.
7. If the task is complete, do one of the following:
•
To move a task from the Tasks Assigned by Me list to your Deleted Tasks,
click Delete This Job.
•
To complete the task later, click Keep for Later. The task remains in the
Tasks Assigned by Me list.
•
To publish a document that has not been added to DocuShare (the word
Unpublished appears after the document’s title), click the Properties icon that
appears to the right of the document’s title. At the bottom of the View
Properties page, click the Publish This Version button.
If the document was routed for approval and it was not approved, you can
reroute the unpublished document by clicking the Route icon that appears to
the right of the document’s title.
17–8
User Guide
Routing documents
Checking the status of routing tasks you assigned
Viewing progress reports
If you chose to be notified of a task’s progress, completion, or overdue status on the
Routing Slip, you can view the notifications in the Routing Tasks window.
To view a task’s progress report:
1. Do one of the following:
•
On the navigation bar, click My Tasks.
•
On the navigation bar, click My DocuShare. Then click Tasks.
The My Tasks window appears.
2. From the Show menu, select Tasks Assigned to Me.
The page lists the routing tasks, under Description, the date the task was
assigned, and the type of report. Table 17–2 describes the report types.
Table 17–2: Report type
Type
Description
Response
The recipient responded to the task.
Completion
The task is complete.
Overdue
The task is in progress past the completion date.
Termination
The task is stopped because it cannot continue. This can
occur when a document or user is deleted from your site.
3. To view a task’s progress report, click its Description.
A Response to Routing window appears, which includes the routed document and
shows the user’s comments.
4. To view the user’s changes to the document, click the document’s title.
You can save the user’s revised document as a new version of your routed
document. See the next section, Publishing a new version of your routed
document on page 17–10.
5. Close the document after viewing the changes.
6. In the Response to Routing window, do one of the following:
•
To schedule a new due date for an overdue task, enter a new date in the Due
Date field and click the Acknowledged button.
•
To confirm reviewing the report, click the Acknowledged button.
•
To review the report at a later time, click the Acknowledge Later button.
User Guide
17–9
Checking the status of routing tasks you assigned
Routing documents
Publishing a new version of your routed document
If you routed a document for review, you can save a document that a recipient changed as
a new version of your routed document. In the For Your Review window, the word New
appears after the title of a document that a recipient changed.
To publish a new version of your routed document:
1. In the My Tasks window, select Tasks Assigned by Me.
2. Under Description, click the task that includes the changed document.
3. In the Report on Routing for Review window, click the name of the recipient who
provided the changed document.
4. Click the document title to open it.
5. Save the document to a location on your computer, and then close the document
window.
6. In the Report on Routing for Review window, click the Close button.
7. Click the Properties icon that appears to the right of the document’s title.
8. At the bottom of the View Properties page, click the Publish New Version button.
9. On the Add Version page, click the Browse button.
10. Navigate to the location on your local drive in which you saved the document in
step 5, select it, and click Open.
The path to the document appears in the Filename field.
11. Optionally, change the document title and add a version comment.
12. Click Apply.
13. If a document version other than the latest is the preferred version, you are asked
if you would like to set this version as the preferred version. Click Yes to change
the preferred version; otherwise, click No.
For more information on document versions and the preferred version, see
Managing document versions on page 4–10.
14. Click the Report on Routing for Review link in the Location path.
15. In the Report on Routing for Review window, do one of the following:
17–10
•
To move the task from the Tasks Assigned by Me list to your Deleted Tasks,
click Delete This Job
•
To remove the task later, click Keep for Later. The task remains in the Tasks
Assigned by Me list.
User Guide
Routing documents
Viewing the tasks assigned to you
Viewing the tasks assigned to you
The tasks assigned to you display in the My Tasks window or on My DocuShare. If you
chose to receive an email message when a new task is assigned to you, the message
includes a URL to the task.
Note: To receive an email message when a new task is assigned to you, your user
account property Routing Task Notification must be set to Email and your email
address must appear in the Email Address field.
To view the tasks assigned to you:
1. Do one of the following:
•
On the navigation bar, click My Tasks. From the Show menu, select Tasks
Assigned to Me. Any task marked Request is a task assigned to you.
•
On the navigation bar, click My DocuShare. The tasks assigned to you
display under Tasks.
2. Click a task to view it.
A window appears displaying your task. The following sections describe how to
respond to routing tasks.
Approving or disapproving a document
1. In the For Your Approval window, click the document’s title.
The document opens in its native editor or a window appears allowing you to
download the document.
Note: If the document version sent to you is not the latest version, a Latest published
version link is included. You can click the link to view the latest version of the
document.
2. Review the document.
3. When your review is complete, close the document.
4. You can repeat steps 1 through 3 for each routed document.
5. In the Comments field, enter an optional message.
6. Click Save as private if you do not want other recipients to view your comments.
User Guide
17–11
Viewing the tasks assigned to you
Routing documents
7. Do one of the following:
•
To complete the task and approve the document, click the Approved button.
The task is removed from the Tasks Assigned to Me list.
•
To complete the task but not approve the document, click the Disapproved
button. The task is removed from the Tasks Assigned to Me list.
•
To not complete the task at this time, click the Respond Later button. The
task remains in the Tasks Assigned to Me list.
Reviewing a document
1. In the For Your Review window, click the document’s title.
The document opens in its native editor or a window appears allowing you to
download the document.
Note: If the document version sent to you is not the latest version, a Latest published
version link is included. You can click the link to view the latest version of the
document.
2. Review the document and make any changes you want.
3. Close the document and, if you made changes, save it to a location on your
computer.
4. If you changed the document, do the following:
a. Click the Properties icon that appears to the right of the document’s title.
b. At the bottom of the View Properties page, click the Add Draft Version
button.
c.
On the Add Version page, click the Browse button.
d. Navigate to and select the document you changed, and then click Open.
e. Optionally, change the document title and add a version comment.
f.
On the Add Version page, click Apply.
g. If a document version other than the latest is the preferred version, you are
asked if you would like to set this version as the preferred version. Click Yes
to change the preferred version; otherwise, click No.
h. On the View Properties page, click the For Your Review link in the Location
path.
5. You can repeat steps 1 through 4 for each routed document.
6. In the Comments field, enter an optional message.
7. Click Save as private if you do not want other recipients to view your comments.
8. Do one of the following:
17–12
•
To complete the task and remove it from the Tasks Assigned to Me list, click
the Reviewed button.
•
To not complete the task at this time, click the Review Later button. The task
remains in the Tasks Assigned to Me list.
User Guide
Routing documents
Viewing the tasks assigned to you
Acknowledging receipt of a document
1. In the For Your Acknowledgement window, click the document’s title.
The document opens in its native editor or a window appears allowing you to
download the document.
Note: If the document version sent to you is not the latest version, a Latest published
version link is included. You can click the link to view the latest version of the
document.
2. When you are finished viewing the document, close it.
3. You can repeat steps 1 and 2 for each routed document.
4. Do one of the following:
•
To complete the task and remove it from the Tasks Assigned to Me list, click
the Acknowledged button.
•
To not complete the task at this time, click the Acknowledge Later button.
The task remains in the Tasks Assigned to Me list.
Removing a document sent for information
1. In the For Your Information window, click the document’s title.
The document opens in its native editor or a window appears allowing you to
download the document.
Note: If the document version sent to you is not the latest version, a Latest published
version link is included. You can click the link to view the latest version of the
document.
2. When you are finished viewing the document, close it.
3. You can repeat steps 1 and 2 for each routed document.
4. Do one of the following:
•
To complete the task and remove it from the Tasks Assigned to Me list, click
the Remove button.
•
To not complete the task at this time, click the Remove Later button. The task
remains in the Tasks Assigned to Me list.
User Guide
17–13
Viewing your deleted tasks
Routing documents
Viewing your deleted tasks
After you delete a completed task that you assigned by clicking the Delete This Job
button, DocuShare saves the task. This provides you with a record of the completed
routing tasks you assigned.
In addition, you can view the deleted routing tasks of a specific document. See Viewing
the routing tasks of a document on page 17–15.
To view all of your deleted tasks:
1. Do one of the following:
•
On the navigation bar, click My Tasks.
•
On the navigation bar, click My DocuShare. Then click Tasks.
The My Tasks window appears.
2. From the Show menu, select Deleted Tasks.
Your deleted routing tasks display.
17–14
User Guide
Routing documents
Viewing the routing tasks of a document
Viewing the routing tasks of a document
The routing task owner and each recipient can view the routing status of a document or
any of its versions on the Routing page for the document. The page displays both tasks in
progress and deleted tasks.
To view a document’s routing tasks:
1. Do one of the following:
•
Locate the document whose tasks you want to view.
•
Open a routing report or request window that contains the document whose
tasks you want to view.
2. Click the Properties icon that appears to the right of the document’s title.
The View Properties page appears.
3. Click the Routing link.
The tasks and their status display.
User Guide
17–15
Viewing the routing tasks of a document
17–16
Routing documents
User Guide
Scanning documents
•
About scanning documents . . . . . . . . . . . . . . . . . . . . . . . . . . . . . . . . . . . . . . 18–2
•
Scanning documents using scan cover sheets . . . . . . . . . . . . . . . . . . . . . . . 18–3
•
Scanning documents to a temporary scan collection. . . . . . . . . . . . . . . . . . . 18–5
User Guide
18–1
About scanning documents
Scanning documents
About scanning documents
You can add documents to your DocuShare site by scanning them. DocuShare provides
two methods for scanning documents:
•
You can use a scan cover sheet to scan documents to specific locations and as
new document versions. At a multifunction device, you scan a cover sheet with a
document to convert it to PDF format and add the digital document to DocuShare
as specified in the cover sheet.
•
You can scan documents to a temporary scan collection that your administrator
sets up on your site. Using a Xerox WorkCentre with the Scan to File feature, you
scan a document to convert it to TIFF format and add the digital document to the
temporary scan collection. You then save the scanned document to a permanent
collection on your site.
Your administrator determines which method you can use for scanning documents.
Therefore, check with your administrator to find out how your site is set up.
18–2
User Guide
Scanning documents
Scanning documents using scan cover sheets
Scanning documents using scan cover sheets
You can scan documents to specific locations and as new document versions using scan
cover sheets. You can create scan cover sheets for these types of objects:
•
documents—to scan a document as a new document version
•
collections—to scan a document to a collection (DocuShare CPX only)
•
workspaces—to scan a document to the content portlet of a workspace
(DocuShare CPX only)
•
user—to scan a document to your personal collection
When you create a scan cover sheet, information about the scan location and the cover
sheet owner is stored in a DataGlyph on the cover sheet. You place the cover sheet on
top of a document and scan both to add the resulting PDF document to DocuShare.
In addition, you can choose to create a cover sheet for a document when using the Add
Document page to upload a document. For more information, see Adding a document on
page 4–3.
Creating a scan cover sheet
You can create a scan cover sheet if your are logged in and have Writer permission to the
object.
To create a scan cover sheet:
1. Do one of the following:
•
To create a cover sheet for a document, collection, or workspace, locate the
object. Then click the object’s Properties icon.
•
To create a cover sheet for your personal collection, click your username on
the navigation bar.
2. On the View Properties page, click the Scan Cover Sheet link.
3. Click the Create Scan Cover Sheet link.
The cover sheet is created and opens in a separate window.
4. Print the cover sheet. Then close it.
The Scan Cover Sheet page lists the cover sheet and provides the date and time
at which it was created.
User Guide
18–3
Scanning documents using scan cover sheets
Scanning documents
Scanning a document with a scan cover sheet
If you have access to a multifunction device that supports Scan to File, you can scan a
cover sheet with a document to add a PDF version of the document to DocuShare.
Note: Since the user interface for multifunction devices can vary, the following procedure
provides general steps for scanning a document to DocuShare.
To scan a document:
1. Put the cover sheet on top of a document and place the pages in the document
feeder.
2. Display the scan to file screen.
3. Follow any instructions specific to the type of device.
4. Press the Start button.
The device scans the document and then adds it to DocuShare as specified in the
cover sheet.
Deleting a scan cover sheet
When you no longer want a cover sheet to be used to scan a document, you can delete it.
Deleting the cover sheet invalidates any printed copies of it. You might want to delete a
cover sheet if you misplace it and do not want anyone else to use the cover sheet.
To delete a scan cover sheet:
1. Locate the object whose cover sheet you want to delete
2. Click the object’s Properties icon.
3. On the View Properties page, click the Scan Cover Sheet link.
4. Click the Trashcan icon that appears to the right of the cover sheet.
18–4
User Guide
Scanning documents
Scanning documents to a temporary scan collection
Scanning documents to a temporary scan
collection
If you have access to a Xerox WorkCentre with the Scan to File feature enabled, you can
scan documents to DocuShare. Your WorkCentre administrator must set up a scan
template before you can scan documents to DocuShare. When setting up a scan
template, the administrator can choose to save each document page to a TIFF file or to
save all of the document pages to a single TIFF file. Also, you may be able to use a scan
template to enter DocuShare property values at the device, before scanning the
document. After the document is scanned to a collection, the values you entered appear
on the View Properties page for the document.
Before you begin, check with your administrator to find out which templates are available
for your use and whether or not a password is required.
Note: Depending on which WorkCentre model you use, the steps for scanning a
document can vary. DocuShare does not support scanning color images on a
WorkCentre Pro 40 using JPEG compression (JPEG-in-TIFF).
To scan a document:
1. Place a document on the document glass or in the document feeder.
2. Press the Features button.
3. On the touch screen, press the Scan tab.
4. Press Scan to File.
5. Select the scan template.
6. If the template requires a password, do the following:
a. Press Added Features.
b. Press Filing Setups.
c.
Press Login Name/Password.
d. Press Password.
e. Type your password and press Save.
f.
Press Save.
7. If the template allows you to specify property values, enter values for the ones you
want.
8. Press the Start button.
The WorkCentre scans the document and then sends it to the temporary scan collection
on your DocuShare site. The document is stored in this collection for a designated time
period. You can check the time period by clicking WorkCentre Scan Repository on the
DocuShare home page. To keep the document, you need to save it to a permanent
collection.
User Guide
18–5
Scanning documents to a temporary scan collection
Scanning documents
Saving a scanned document to a collection
To save a scanned document to a collection, you must be logged in and have Writer
permission to the collection.
To save a scanned document to a collection:
1. Go to the DocuShare home page.
2. Click WorkCentre Scan Repository.
3. If the Passcode field appears, enter the password you entered at the WorkCentre
to scan the document and then click Enter Passcode.
4. Locate your scanned document.
5. Click Save.
If you do not want to save the document to a collection, click Delete to remove the
document from the temporary scan repository.
6. If you want to rotate the document, select the number of degrees from the Rotate
Image menu and click Go.
7. From the Document Type menu, select the type of document to save the
scanned document as.
The menu contains types in addition to Document if your administrator created
custom documents on your site.
8. If your administrator specified a default collection in which to save scanned
documents, its title appears in the Destination field. Do one of the following:
•
If you want to use the default collection, go to step 13.
•
If you want to change the collection, click Select. The Select Destination page
appears.
9. In the Sort By field, select Title to display the collections in alphabetical order or
select Handle to display the collections in numerical order.
10. Do one of the following:
•
To find specific collections, enter any part of a collection title in the Search
field. Click the Go button.
•
To display all collections, click Show All.
•
To display your favorite collections, click Show Favorites.
•
To display your personal collection, click Show Personal Collection.
11. In the Possible Locations field, select the collection to which you want to save
the document.
12. Click Apply.
13. In the Title field, enter a title for the document.
14. Enter any additional information. Click a field name for a description of each
property.
18–6
User Guide
Scanning documents
Scanning documents to a temporary scan collection
15. Click Save.
The document is saved to the collection you specified.
Note: Your administrator may have given you access to a collection named Temporary
Scan Repository. Alternatively, you can open this collection to move or delete your
scanned document.
User Guide
18–7
Scanning documents to a temporary scan collection
18–8
Scanning documents
User Guide
Archiving content
•
About archiving content . . . . . . . . . . . . . . . . . . . . . . . . . . . . . . . . . . . . . . . . . 19–2
•
Archiving content . . . . . . . . . . . . . . . . . . . . . . . . . . . . . . . . . . . . . . . . . . . . . . 19–3
•
Restoring archived content . . . . . . . . . . . . . . . . . . . . . . . . . . . . . . . . . . . . . . 19–5
User Guide
19–1
About archiving content
Archiving content
About archiving content
The DocuShare Archive Server enables your organization to conveniently increase
document storage capacity while providing a safe location for archived content. If your site
includes an Archive Server, you can move content from your site to a secondary server.
When you need to retrieve your archived content, you can search for the object and, if
needed, restore it.
Check with your DocuShare administrator to find out if your site uses an Archive Server.
19–2
User Guide
Archiving content
Archiving content
Archiving content
You can archive documents, Interact pages, and email messages with attachments. When
you archive a document, all of its versions also are archived. To quickly archive the
contents of a collection, you can select the collection and archive it. However, only the
documents, Interact pages, and email messages in the collection and its subcollections
are archived; the collection is not archived and remains on the DocuShare server.
There are two ways to archive content: Specify a date on which to have objects archived
automatically, or select the objects you want to archive and use the Archive command.
After an object is archived, it retains its properties, access list, and previous location on the
DocuShare server.
You can archive an object if you are the logged-in owner of the object or a logged-in user
with Manager permission to it.
Archiving content automatically
By default, DocuShare uses the object's Expiration Date property to archive content
automatically. Your DocuShare administrator can specify a different date property to use
for archiving, so check with your administrator to find out which property you should use.
To archive content automatically:
1. Locate the object (document, Interact page, email message) that you want to
archive.
2. Click the object’s Properties icon.
3. Click the Edit link.
4. In the appropriate date field, enter the date on which you want the object archived.
5. Click Apply.
DocuShare archives the object on the date you specified.
Archiving content manually
To archive content manually:
1. Do one of the following:
•
Navigate to and open the collection that contains the objects you want to
archive.
•
Run a search to find the objects you want to archive.
•
Navigate to (but do not open) the collection that contains the objects you want
to archive.
2. Do one of the following:
•
To archive objects in an open collection or from a search, click the checkbox
that appears next to the title of each object.
•
To archive the contents of a collection, click the checkbox that appears next to
the title of the collection.
3. From the Edit Selected menu, select Archive.
User Guide
19–3
Archiving content
Archiving content
The Confirm Move to Archive page appears.
Note: If a minus sign appears in the checkbox that precedes an object, then you do not
have Manager permission to the object and cannot archive it.
4. Click the Confirm button to move the objects to the Archive Server.
19–4
User Guide
Archiving content
Restoring archived content
Restoring archived content
You can restore any object that you moved to the Archive Server to its previous location
on DocuShare. If the DocuShare collection in which the object was located was deleted,
you can add the object to another collection after restoring it. An object is restored with its
associated properties and access list. However, if a user who previously appeared in the
object’s access list was deleted from the DocuShare site, the user will not appear in the
restored object’s access list. Also, if you are restoring an object that was owned by
another user whose DocuShare account was deleted, you will become the new owner.
You can restore an object if you are the logged-in owner of the object or a logged-in user
with Manager permission to it.
To restore an archived object:
1. On the navigation bar, click the Advanced link.
The Advanced Search page displays.
2. Specify the search terms and options you want.
3. Depending on the page from which you are running the search, select a search
scope from the Search Within menu.
Note: The search scope you select is used on the Archive Server. When an object is
archived, it retains its original location path. If you know any part of the object’s
location path, you can narrow the search scope to speed the search.
4. In the Server to Search field, select Archive Server.
5. Click Search.
The Search Results page displays. The words Appeared In followed by the
collection name display under each object whose collection exists on DocuShare.
If Appeared In and the collection name do not display, then the object’s collection
was deleted. You can restore the object as an orphan and then add it to another
collection.
6. Select the objects to restore.
7. From the Edit Selected menu, select Restore.
8. On the Confirm Restore From Archive page, click Confirm.
The Archive Restore Results page displays.
9. If the object is an orphan, do the following:
a. Click the checkbox that precedes it.
b. From the Edit Selected menu, select Change Location.
c.
On the Confirm Change Location page, click Confirm.
d. Use the Change Location page to relocate the orphaned object.
The Archive Restore Results page displays and lists the new collection in which
the object appears under the object’s title.
User Guide
19–5
Restoring archived content
19–6
Archiving content
User Guide
FAQs
•
Answers to frequently asked questions . . . . . . . . . . . . . . . . . . . . . . . . . . . . . 20–2
User Guide
20–1
Answers to frequently asked questions
FAQs
Answers to frequently asked questions
This section provides answers to some frequently asked questions about DocuShare.
Table 20–1: FAQs
Problem
Solution
Why am I unable to create an account
on DocuShare?
Your administrator may have restricted
account creation to either registered users or
an administrator. Check with your DocuShare
administrator.
Why am I unable to log into
DocuShare?
Make sure you are using a browser that
supports logging into a system. Check with
your DocuShare administrator to find out
which browsers support logging. Also, make
sure your browser is set to accept cookies.
This problem can also occur when your
browser is not set to refresh the page with
every visit to it. In this case, you are actually
logged in, but are seeing an out-of-date page.
I forgot my DocuShare username.
What should I do?
On the navigation bar, click the Users &
Groups link. On the List page click Show All
to display all the users on your site. Locate
and then click your name. The Username
field on the Properties page displays your
username.
I forgot my DocuShare password.
What should I do?
Do not create another user account. Contact
your DocuShare administrator, who can set
another password for you.
Why does a newly added object not
display when I search for it?
After adding an object to your site, wait a few
seconds before searching for it as DocuShare
needs to finish indexing the object and its
properties.
Why does DocuShare find objects
that contain a property value I did not
specify?
When a property is assigned several commaseparated values, DocuShare treats the
comma like a space. Therefore, DocuShare
will find objects that contain adjacent property
values.
For example, if a document’s Author property
value is Susan George, Taylor Jones,
DocuShare will find the document if you
search for Author or Any Part contains Susan
George, Taylor Jones, or George Taylor.
20–2
User Guide
FAQs
Answers to frequently asked questions
Table 20–1: FAQs
Problem
Solution
Why does Netscape Navigator hang
when I try to upload a document to
DocuShare?
Check to see if the document is open in its
associated application (for example, Word or
PowerPoint). If it is, close the document and
try the upload again. (This is a suspected bug
in the Netscape-Windows interaction.)
Why am I unable to see a document I
uploaded to DocuShare? I did not
have any problems during the upload.
Check your browser's proxy settings. You
should not be using a proxy server to access
your DocuShare server.
I uploaded a document to DocuShare
and received an error saying it had an
invalid index or was unable to open
the collection. What should I do?
If you return to the collection to which the
document was added, you should find that it
was correctly uploaded. If so, the problem was
with the search indexing step that occurs after
your document has been uploaded. The
document is stored but not indexed. Report
the problem to your administrator.
When I click the title of a document in
DocuShare, I get the message
“Unknown File Type - You have
started to download a file of type
application/....” What should I do?
Make sure your browser is configured to use a
helper application to view this type of
document.
I am using Internet Explorer. When I
click a PDF document in DocuShare, I
just get a blank page. Why does the
file not open?
This is a known interaction problem between
Internet Explorer and Acrobat (PDF) files.
Contact your administrator for help.
Why does the page not display
properly after I add HTML tags to the
object's properties?
DocuShare allows you to add HTML tags to
text-based properties such as an object's
Description or Summary. You should limit use
of HTML to simple formatting commands like
font changes and lists. Including header
commands like <HTML>, <HEAD>, or
<BODY> will most likely interfere with
DocuShare's own HTML commands, leaving a
page that is either blank or very poorly
formatted. You should also avoid using any
tags in Title and Summary properties that
affects the vertical layout, such as IMG and list
directives, because those two properties are
displayed in contexts that assume simple
strings.
What should I do if I cannot find an
object or a document?
DocuShare provides a variety of search
features to help you quickly find objects. See
DocuShare searches for information on how
to run a search.
User Guide
20–3
Answers to frequently asked questions
FAQs
Table 20–1: FAQs
Problem
Solution
I am logged into DocuShare and
when I try to access an object, I
receive a message that states “Not
Authorized.” What should I do?
Contact the object’s owner, who can give you
access.
I accidentally deleted a collection
without deleting the objects it
contained. Now I cannot find those
objects. What should I do?
When you delete a collection, but not its
contents, and the objects are not located in
another collection, they become orphaned.
You are unable to access orphaned objects
from a collection. However, the objects are still
stored on your site. Your administrator can
relocate orphaned objects in a collection so
you can access them again. Or, you can
access an orphaned object if you know its
unique address (for example, http://
sales.acme.com/docushare/dsweb/Get/
Document-128).
After moving a collection to a new
location, why am I unable to find it in
either the new or the old location?
You accidentally orphaned the collection,
which means you cannot access it from
another collection. The collection is still stored
in DocuShare. Your administrator can recover
the orphaned collection by relocating it in a
collection. Or, you can access the collection if
you know its unique address (for example,
http://sales.acme.com/docushare/dsweb/Get/
Collection-12).
I deleted an object from a collection.
Why can I still see it when I navigate
to the collection page?
If you used the browser’s Back button,
Favorites, or Bookmarks to navigate, you may
have accessed a cached version of the
collection page. Click the browser’s Refresh or
Reload button to display the latest version of
the page.
I logged into DocuShare, navigated
the site, and then used my browser’s
Back button a few times. Why am I
now logged in as a Guest?
You have accessed a cached version of the
page. Click the browser’s Refresh or Reload
button to display the latest version of the
page. You should see your username on the
navigation bar.
I use Netscape Navigator to access
DocuShare. After rotating a scanned
image, why does it not appear
rotated?
You need to change the browser’s cache
setting. Open the Preferences window, and
click Advanced then Cache. Under Compare
the page in the cache to the page on the
network, select Everytime I view the page.
20–4
User Guide
FAQs
Answers to frequently asked questions
Table 20–1: FAQs
Problem
Solution
Why can changing the permissions of
a collection and its objects take longer
than expected?
The time it takes to change the permissions of
a collection and its objects is dependent on
the number of collection objects, which
includes all nested collections and their
contents. When changing the collection’s
permissions, DocuShare must examine each
object’s access list and either merge the
changes or replace the access list. That is
why DocuShare processes the permissions
change in the background, which allows you
to complete other tasks.
As an alternative, your administrator can use
a command line utility to change the
permissions of a collection that contains a
large number of objects.
User Guide
20–5
Answers to frequently asked questions
20–6
FAQs
User Guide
WebDAV folders
•
Using WebDAV folders. . . . . . . . . . . . . . . . . . . . . . . . . . . . . . . . . . . . . . . . . . . A–2
User Guide
A–1
Using WebDAV folders
Using WebDAV folders
DocuShare supports the WebDAV (Web Distributed Authoring and Versioning) protocol,
which enables you to access DocuShare collections and documents through a WebDAVcompliant folder. You do not need client software installed on your computer. If you are a
Windows 2000 or XP user, simply go to My Network Places to add a DocuShare server
as a network place. If you are using a Macintosh with OS X, select Connect to Server to
add the URL for a DocuShare server.
Note: In both Windows and OS X, you must append the DocuShare server's URL with /
webdav. When you are prompted to log in, use your DocuShare username and
password.
Document titles in WebDAV folders
Your DocuShare administrator controls how document titles are displayed in collections.
For example, a title might have a file extension appended to it. If you have any questions
about how document titles are displayed, see your administrator.
A–2
User Guide
DocuShare portal integration
•
Accessing DocuShare in a portlet . . . . . . . . . . . . . . . . . . . . . . . . . . . . . . . . . . B–2
User Guide
B–1
Accessing DocuShare in a portlet
Accessing DocuShare in a portlet
If you use a desktop portal application, you can access DocuShare in a portlet. Before you
can use this feature, your DocuShare administrator and a portal administrator must set up
your site to support the feature.
To access DocuShare in a portlet:
1. Set up your browser to accept cookies from your DocuShare server. Refer to your
browser documentation for details.
2. Launch your desktop portal application.
DocuShare appears in a portlet.
3. To change the view in the portlet, click the Edit button located in the upper-right
corner of the portlet.
4. From the Show menu, select the collection or workspace (DocuShare CPX only)
that you want to view.
5. In the Portlet Height (px) field, enter a number to change the height of the portlet.
The height is measured in pixels.
6. Click Submit.
The collection or workspace appears in the portlet. You can navigate the container
to view the content to which you have access.
B–2
User Guide
Index
A
archiving content to 19–3 to 19–4
restoring content from 19–5
abstract (document), showing and hiding in
search results 14–4, 14–7
archiving content
about 19–3
automatically 19–3
manually 19–3 to 19–4
access list 5–2
access permissions 1–6, 5–2
See also initial permissions, setting for
objects
and DocuShare administrator 1–6
applying to container 5–6
applying to document versions 5–7
changes processed in the background
5–6
changing 5–4
changing for workspace 7–5 to 7–6
viewing 5–3
accounts, See group account, user account
asterisk, using in searches 14–9
B
background jobs 5–6, 15–2
blog, See weblog
booleans, See logical operators
breadcrumbs, for navigation 1–4
browsing history, viewing 1–3, 1–4
Accrue operator, using in searches 14–7
activity history, viewing 2–6
Add to Favorites (Edit Selected menu) 3–7
adding comments to a document 4–14
adding objects
calendars 6–3
collections 3–3
content rules 13–3
discussions 10–3
documents 4–3
events to calendars 6–8
group accounts 2–9 to 2–10
notifications 12–3
topics to discussions 10–7
URLs 11–3
user accounts 2–3
weblogs 9–3
wikis 8–3
workspaces 7–3
C
calendar
See also personal calendar
about 6–2
adding events 6–8
adding to container 6–3
applying permissions to contents 5–6
changing access permissions 5–4
changing its location 6–6
changing its view 6–4
changing owner 5–5
changing properties 6–5
deleting 6–7
viewing change history 6–5
viewing properties 6–5
calendar event
viewing change history 6–9
And Not operator, using in searches 14–8
calendar event, See event
And operator, using in searches 14–7
calendar view
Archive (Edit Selected menu) 3–7
Archive Server 19–2
User Guide
changing 6–4, 7–9
day view 6–2, 7–9
Index–1
Index
changing properties 3–4
deleting 3–6
editing multiple objects in 3–7
restoring after deleting 3–6, 4–17, 6–7
setting up for routing documents 17–6
viewing change history 3–4
viewing properties 3–4
month view 6–2
week view 6–2, 7–9
calendars portlet 7–2
changing properties 7–10
change history, viewing for objects 2–14,
3–4, 4–15, 6–5, 6–9, 7–11, 8–8, 9–7,
10–4, 10–8, 11–4, 14–12
comment
Change Location (Edit Selected menu) 3–7
deleting from weblog entry 9–6
viewing 9–6
Change Owner (Edit Selected menu) 3–7
changing location
calendar 6–6
collection 3–5
discussion 10–5
document 4–16
event 6–10
saved query 14–13
topic 10–9
URL 11–5
weblog 9–8
wiki 8–9
workspace 7–12
comments
adding to a document 4–14
adding to weblog entry 9–6
viewing for documents 4–14
content portlet 7–2
changing properties 7–10
content rule
about 13–2
about disabled content rules 13–4
creating 13–3
deleting 13–5
event triggers 13–2
restoring after deleting 13–5
tips when creating 13–3
viewing 13–4
changing properties
calendar 6–5
collection 3–4
discussion 10–4
document 4–15
event 6–9
group account 2–10
notification 12–6
reply 10–8
saved query 14–12
topic 10–8
URL 11–4
user account 2–4
version 4–11
weblog 9–7
wiki 8–8
workspace 7–11
checking in an edited document 4–7
checking out a document 4–7
collection 3–2
See also personal collection
about 1–5
adding 3–3
adding document to 4–3
applying permissions to contents 5–6
changing access permissions 5–4
changing its location 3–5
changing owner 5–5
Index–2
Copy (Edit Selected menu) 3–7
Copy Shortcuts (Edit Selected menu) 3–7
cover sheet, See scan cover sheet
CPX user 2–2
creating
group account 2–9 to 2–10
user account 2–3
Cut (Edit Selected menu) 3–7
D
DataGlyph 18–3
day view, calendar 6–2
Delete (Edit Selected menu) 3–7
deleted tasks, viewing all 17–14
deleted tasks, viewing for document 17–15
deleting
calendar 6–7
collection 3–6
completed routing tasks you assigned
17–8
User Guide
Index
scanning using scan cover sheets 18–
3
unlocking 4–12
viewing 4–4
viewing change history 4–15
viewing comments 4–14
viewing content and properties 4–4
viewing deleted routing tasks 17–15
viewing duplicates 4–6
viewing in HTML format 4–5
viewing in PDF format 4–5
viewing its version history 4–10
viewing properties 4–15
viewing routing tasks in progress 17–
15
content rule 13–5
discussion 10–6
document 4–17
event 6–11
expired topics 10–11
group account 2–14
notification 12–7
online meeting 16–7
reply 10–10
saved query 14–14
topic 10–10
URL 11–6
weblog 9–9
wiki 8–10
workspace 7–13
discussion
about 10–2
adding to a container 10–3
adding topics 10–7
applying permissions to contents 5–6
changing access permissions 5–4
changing its location 10–5
changing owner 5–5
changing properties 10–4
deleting 10–6
restoring after deleting 10–6
setting expiration date for topics 10–3
viewing change history 10–4
viewing properties 10–4
document
about 4–2
adding comments to 4–14
adding new version of existing 4–9
adding to collection 4–3
applying permissions to versions 5–7
archiving 19–3 to 19–4
changing access permissions 5–4
changing its location 4–16
changing owner 5–5
changing properties 4–15
checking in new version 4–7
checking out 4–7
deleting 4–17
downloading 4–4
editing 4–7
exporting 4–13
locking 4–12
restoring from Archive Server 19–5
routing to users 17–3 to 17–5
saving scanned document to a
collection 18–6
scanning at a WorkCentre 18–5
User Guide
DocuShare 1–2
accessing 1–3
and WebDAV folders A–2
FAQs 20–2 to 20–5
icons 1–5
logging in 1–7
logging out 1–7
navigating 1–4
DocuShare Archive Server 19–2
DocuShare Client applications
DocuShare Outlook Client 1–9
DocuShare Windows Client 1–9
PaperPort Link to DocuShare 1–9
DocuShare federated server 2–6
DocuShare federation 2–6
DocuShare objects, See objects
DocuShare Outlook Client 1–9
DocuShare user 2–2
DocuShare User Group 1–8
DocuShare Windows Client 1–9
domain
changing for group 2–12
changing for user 2–6
downloading a document 4–4
E
Edit Selected menu 3–7
editing a document 4–7
email message
limiting number received for
notifications 12–3
Index–3
Index
receiving for a notification 12–3
receiving when routing task is assigned
17–11
sending to a group 2–13
viewing list of groups of which you are
a member 15–7
viewing properties 2–10
guest
event
See also recurring event
adding to calendar 6–8
changing access permissions 5–4
changing its location 6–10
changing owner 5–5
changing properties 6–9
deleting 6–11
viewing properties 6–9
viewing what’s new on DocuShare 14–
3
guest user 2–2
H
history
activity, viewing 2–6
browsing, viewing 1–3, 1–4
change, viewing 2–14, 3–4, 4–15, 6–5,
6–9, 7–11, 8–8, 9–7, 10–4, 10–8,
11–4, 14–12
document version, viewing 4–10
expired topic
deleting 10–11
viewing 10–11
exporting a document 4–13
home page 1–3
F
features 1–3
FAQs 20–2 to 20–5
HTML format, viewing a document in 4–5
favorites
adding objects to 15–3
removing objects from 15–3
viewing 15–3
I
icons
federated server
mapping to 2–6 to 2–7
removing mapping 2–8
searching 14–4, 14–6 to 14–7
feed, using to view updated content on
DocuShare 12–2
for access permissions 5–2
for objects 1–5
J
frequently asked questions, See FAQs
JSR 168 portlet, accessing DocuShare in
B–2
G
K
group
key icons 5–2
viewing change history 2–14
group account
changing domain 2–12
changing group members 2–11
changing group owner 2–12
changing properties 2–10
creating 2–9 to 2–10
deleting 2–14
searching for 2–15
sending email to members 2–13
viewing list of 2–15
Index–4
L
LDAP (Lightweight Directory Access
Protocol)
and user accounts 2–2
changing group domain 2–12
changing user domain 2–6
changing user password 2–5
changing username 2–5
User Guide
Index
locking a document 4–12
navigation bar 1–4
logged-in user, and appearance of user
icon 2–15, 7–4
non alphanumeric characters, using in
searches 14–9
logging in 1–7
notification
about 12–2
adding 12–3
changing properties 12–6
creating a recipient list for 12–5
deleting 12–7
events of interest 12–2
requirements for using 12–2
restoring after deleting 12–7
time periods 12–3
turning off and on 12–6
turning off selected event notifications
12–3
viewing 12–4
viewing properties 12–6
logging out 1–7
logical operators
types 14–7
using in searches 14–6 to 14–7
M
Manager access permission 1–6, 5–2
mapping a user account to a federated
server 2–6 to 2–7
members
changing for group 2–11
sending email to group 2–13
membership group 7–3
changing group assigned to workspace
7–5
changing group members 7–4 to 7–5
membership portlet 7–2
changing properties 7–10
minus sign, using in searches 14–4
month view, calendar 6–2
My DocuShare
about 15–2
launching an online meeting 16–5
viewing favorites 15–3
viewing groups of which you are a
member 15–7
viewing personal calendar 15–5
viewing personal collection 15–4
viewing personal trashcan 15–6
viewing routing tasks 15–7
My Tasks
using to check tasks you assigned 17–
7
using to view progress reports 17–9,
17–14
using to view tasks assigned to you
17–11
N
navigating DocuShare 1–4
User Guide
O
object properties 1–6
objects
See also calendar, collection,
discussion, document, event,
group account, saved query, topic,
URL, user account, Weblog, wiki,
workspace
about 1–5
changing access permissions 5–4
changing owner 5–5
editing multiple in collection 3–7
icons 1–5
searching for 14–4 to 14–7
online meeting
about 16–2
adding attendees 16–3 to 16–4
deleting 16–7
joining 16–6
launching 16–5
scheduling 16–3 to 16–4
viewing ones you scheduled 15–7
Or operator, using in searches 14–7
orphan object 4–16, 8–9, 9–8
adding to collection after restoring from
Archive Server 19–5
owner
changing for group 2–12
changing for object 5–5
Index–5
Index
P
deleting series of 6–11
page footer 1–4
removing user account mapping from a
federated server 2–8
PaperPort Link to DocuShare 1–9
Rename (Edit Selected menu) 3–7
password, changing 2–5
rendition
Paste (Edit Selected menu) 3–7
PDF file, creating by scanning 18–3
PDF format, viewing a document in 4–5
permissions, See access permissions
personal calendar 15–5
creating 15–5
personal collection 15–4
adding objects to 15–4
personal trashcan, using 15–6
placeholder document 4–3
plus sign, using in searches 14–4
portal application, and DocuShare B–2
portlet, accessing DocuShare in B–2
preferred version
and maximum versions 4–3
changing 4–10
defined 4–10
progress reports, viewing 17–9
properties
viewing and editing with document
content 4–4
properties, and objects 1–6
Q
viewing for versions 4–11
viewing HTML 4–5
viewing PDF 4–5
reply
adding to topic 10–7
changing properties 10–8
deleting 10–10
viewing change history 10–8
viewing properties 10–8
reserved characters, using in searches 14–
9
Restore (Edit Selected menu) 3–7
restoring archived content 19–5
restoring deleted objects 3–6, 4–17, 6–7,
7–13, 8–10, 9–9, 10–6, 11–6, 12–7,
13–5, 14–14
retain login for future 1–7
Route (Edit Selected menu) 3–7
routed document
acknowledging receipt of 17–13
approving 17–11
disapproving 17–11
publishing new version of 17–10
removing after sent for information 17–
13
reviewing 17–12
routing a document
question mark, using in searches 14–9
quotation marks, using in searches 14–4,
14–6
R
Reader access permission 1–6, 5–2
Read-Only user 2–2
recipient list
changing for document routing 17–4
creating for notification 12–5
recurring event
adding to calendar 6–8
Index–6
about 17–2
automatically after adding to collection
17–6
including additional documents 17–3
routing order 17–4
to users 17–3 to 17–5
types of routing tasks 17–3
using a saved Routing Slip 17–3
Routing Slip 17–2
re-using 17–3
saving 17–5
routing tasks
checking status of your tasks 17–7 to
17–8
deleting completed 17–8
User Guide
Index
viewing all deleted 17–14
viewing for document 17–15
viewing tasks assigned to you 15–7,
17–11
using plus signs 14–4
using wildcards 14–9
searching for objects 14–4 to 14–7
combining search terms 14–6 to 14–7
finding user and group accounts 2–15
on federated servers 14–4, 14–6 to 14–
7
running a word search 14–4
using search options 14–5
RSS feed, See feed 12–2
S
saved query
adding to container 14–11
changing access permissions 5–4
changing its location 14–13
changing owner 5–5
changing properties 14–12
restoring after deleting 14–14
viewing change history 14–12
saved Routing Slip, using 17–3
saving
a Routing Slip 17–5
scanned document to a collection 18–6
search query 14–11
scan cover sheet
creating 18–3
deleting 18–4
using 4–3, 18–4
shortcuts
adding to workspace 7–8
removing from workspace 7–8
shortcuts portlet 7–2
changing properties 7–10
snippet (document), showing and hiding in
search results 14–4, 14–7
stemming 14–2
stop words 14–10
T
tasks, See routing tasks
temporary scan collection
checking how long scanned
documents are stored 18–5
moving scanned document from 18–6
scan template 18–5
scanned document
checking length of time in temporary
collection 18–5
receiving URL after saving 18–6
saving to a collection 18–6
TIFF file, creating by scanning 18–5
topic
adding to discussion 10–7
changing access permissions 5–4
changing its location 10–9
changing owner 5–5
changing properties 10–8
deleting 10–10
deleting expired 10–11
replying to 10–7
viewing change history 10–8
viewing expired 10–11
viewing properties 10–8
scanning documents
about 18–2
at a WorkCentre 18–5
using scan cover sheets 4–3, 18–3
Search Available to, defined 5–4
search words, separator 14–4
searches 14–2
See also saved query
how to specify exact phrase 14–4, 14–
6
running 14–4 to 14–7
saving 14–11
stop words 14–10
using minus signs 14–4
using non alphanumeric characters
14–9
User Guide
U
unlocking a document 4–12
uploading a document 4–3
URL
about 11–2
Index–7
Index
adding to container 11–3
changing access permissions 5–4
changing its location 11–5
changing owner 5–5
changing properties 11–4
deleting 11–6
restoring after deleting 11–6
viewing change history 11–4
viewing properties 11–4
document version history 4–10
duplicate documents 4–6
expired topics 10–11
new content 14–3
progress reports for routing tasks 17–9
version renditions 4–11
your activity history 2–6
viewing properties
calendar 6–5
collection 3–4
discussion 10–4
document 4–15
event 6–9
group account 2–10
notification 12–6
reply 10–8
topic 10–8
URL 11–4
user account 2–4
weblog 9–7
wiki 8–8
workspace 7–11
user account
and user levels 2–2
changing domain 2–6
changing password 2–5
changing properties 2–4
changing username 2–5
creating 2–3
mapping to federated server 2–6 to 2–7
removing user account mapped to
federated server 2–8
searching for 2–15
viewing activity history 2–6
viewing list of 2–15
viewing properties 2–4
user icon, and indication of logged-in status
2–15, 7–4
W
user levels 2–2
WebDAV folder, using with DocuShare A–2
username, changing 2–5
WebEx™ Meeting Center 16–2
weblog
V
about 9–2
adding to container 9–3
changing its location 9–8
changing properties 9–7
deleting 9–9
moderated 9–2
posting entries 9–4
restoring after deleting 9–9
viewing change history 9–7
viewing properties 9–7
version comments, adding 4–7, 4–9
version history, viewing 4–10
version, document
adding edited document 4–7
adding new document 4–9
changing preferred version 4–10
changing properties 4–11
publishing routed document 17–10
specifying maximum to save 4–3
viewing 4–10
viewing properties 4–11
viewing renditions 4–11
weblog entry
adding comment to 9–6
adding to weblog 9–4
approving 9–5
deleting 9–5
editing 9–4
viewing
a document 4–4
a document in HTML format 4–5
a document in PDF format 4–5
access permissions 5–3
document comments 4–14
document content and properties 4–4
Index–8
week view, calendar 6–2
What’s New
using 14–3
wiki
about 8–2
User Guide
Index
adding 8–3
adding content 8–4
attaching documents 8–5
changing its location 8–9
changing page name 8–6
changing properties 8–8
deleting 8–10
inserting images 8–5
linking pages 8–4
printing wiki pages 8–7
restoring after deleting 8–10
viewing change history 8–8
viewing linked pages 8–5
viewing properties 8–8
wildcards, using in searches 14–9
WorkCentre, and scanning documents 18–
5
workflow, See routing a document
workspace
about 1–5, 7–2
adding 7–3
adding content 7–7
adding shortcuts 7–8
changing access permissions 7–5 to
7–6
changing its location 7–12
changing membership group members
7–4 to 7–5
changing portlet properties 7–10
changing properties 7–11
controlling access to 7–4
deleting 7–13
re-assigning membership group 7–5
removing shortcuts 7–8
restoring after deleting 7–13
viewing calendars 7–9
viewing change history 7–11
viewing properties 7–11
Writer access permission 1–6, 5–2
WYSIWYG editor, and wikis 8–4
User Guide
Index–9