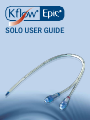
1
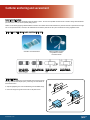
SOLO USER GUIDE A Step by Step Guide to Catheter Insertion See inside for fold-out illustrated poster Connecting to and disconnecting from the haemostatic valves Traditional catheter design New Kflow Epic SOLO design Unlike traditional short term catheters the Kflow Epic SOLO has a haemostatic valve incorporated into the catheter design therefore maintaining a safe closed system at all times, without the need for traditional thumb clamps or end caps, which are a cause of patient discomfort and opportunistic to harbouring dirt and bacteria. No clamps - for improved patient comfort and maintaining durability of extension lines. Haemostatic valves - also complete haemostatic insertion and rapid secure On/Off. Decrease incidence of infection secondary to multiple hub manipulations. Haemostatic valves hold lumen lock solution with minimal reflux of blood into catheter lumens which will decrease incidence of thrombotic occlusion. fig 1 The valve connector should be decontaminated with either alcohol or an alcoholic solution of chlorhexidine gluconate before and after it has been used to access the system with sterile devices. Connecting To access the haemostatic valve connector, swab the silicone seal in accordance with facility protocol (fig 1). To connect a male luer slip to the haemostatic valve connector, grasp the valve connector and position the luer syringe so that the luer syringe will be pushed straight into the valve using a twisting motion, as shown (fig 2). Do not attempt to insert the luer syringe at an angle. fig 2 fig 2 fig 3 fig 3 To connect a male luer lock to the haemostatic valve connector, grasp the valve connector and position the luer so that the luer will be pushed straight into the valve using a twisting motion, as shown (fig 3). Disconnecting 1. To disconnect from the haemostatic valve, grasp the valve and twist the syringe or blood tubing set connector anti-clockwise until loose, then pull away from the valve connector. Flush the valve connector after each use, in accordance with facility protocol. 2. The valve closes and seals once the connector is removed from the valve connector therefore capping is optional. 3. The valve connector should be decontaminated with either alcohol or an alcoholic solution of chlorhexidine gluconate before and after it has been used to access the system with sterile devices. www.kimal.co.uk Catheter anchoring and securement Anchoring the SOLO catheter The Kflow Epic SOLO catheter designed to improve patient comfort. The soft biocompatible catheter features a hubless design which eliminates pressure points, no more need for painful pulling sutures. Fixation can be done by applying a UNIFIX adhesive sutureless securement device which facilitates easy catheter removal or replacement for longer use. No more painful sutures, however, if the traditional suture method is prefered use the 2 piece moveable suture wing supplied in the kit. Fixation using the UNIFIX adhesive suture securement fixation device Sutureless securement device Fixation using Sutures 1. Take the (white) flexible part of the moveable suture wing and spread the wings until the internal split opens, positioning onto the catheter at the desired location. Kflow Epic SOLO anchored using UNIFIX sutureless securement device 1 2. Snap the rigid (blue) part of the moveable wing over the flexible wings. 3. Suture the wings through the suture holes to the patients skin. 2 3 www.kimal.co.uk Handwashing Observe proper hand-hygiene procedures either by washing hands with conventional antiseptic containing soap and water or with water- less alcohol-based gels or foams. Good hand hygiene before catheter insertion or maintenance is important for reducing CVC-related infections. Before and after palpating catheter insertion sites, as well as before and after inserting, replacing, accessing, repairing, or dressing an intravascular catheter accessing or dressing central vascular catheters, hands must be decontaminated either by washing with an antimicrobial liquid soap and water or by using an alcohol handrub. Palpation of the insertion site should not be performed after the application of antiseptic, unless aseptic technique is maintained. Following hand antisepsis, clean gloves and a ‘no-touch’ technique (ANTT) or sterile gloves should be used when changing the insertion site dressing. Use of gloves does not obviate the need for hand hygiene. Refer to your facility hand washing protocol for more details. www.kimal.co.uk Site care - Exit cleaning, maintenance and dressing Catheter care The care and maintenance of the catheter requires trained, skilled personnel who follow the hospital/facility protocol. The protocol should include a directive that the catheter is not used for any other treatment or purpose other than the treatment or therapy prescribed. The catheter exit site should be checked daily or according to hospital policy. If signs of infection are present notify the physician immediately. An aseptic technique must be used for catheter site care and for accessing the system. Site Care – cleaning & maintenance Preferably, an alcoholic chlorhexidine gluconate solution should be used for cleaning the catheter site during dressing changes and allowed to air dry. Please refer to your facilities protocol and procedures regarding site care and maintance of catheters. Healthcare personnel should ensure that catheter-site care is compatible with catheter materials (tubing, hubs, injection ports, luer connectors and extensions) and carefully check compatibility with the manufacturer’s recommendations. Information Source NICE Guidelines. Site Care - dressing Preferably, a sterile, transparent, semipermeable polyurethane dressing should be used to cover the catheter site. If a patient has profuse perspiration or if the insertion site is bleeding or oozing, a sterile gauze dressing is preferable to a transparent, semi- permeable dressing. Gauze dressings should be changed when they become damp, loosened or soiled and the need for a gauze dressing should be assessed daily; a gauze dressing should be replaced by a transparent dressing as soon as possible. Please refer to your facilities protocol and procedures regarding site care and maintance of catheters. Catheter removal t Remove any dressing and suture material. t Ask the patient to take a breath and fully exhale. t Remove the catheter with a steady pull, while the patient is holding their breath, and apply firm pressure to the puncture site for at least 5 minutes to stop the bleeding. t Cover puncture site with a sterile dressing. t Please note excessive force should not be needed to remove the catheter. If it does not come out, try rotating it whilst pulling gently. If this still fails, cover it with a sterile dressing and ask an experienced person for advice. Catheter disposal t A used catheter should be disposed as per hospital protocol or in sanitary container to prevent possible contamination and cross infection. www.kimal.co.uk Now Featuring NEW MULTI-TUBE™ TECHNOLOGY When choosing a lifeline for your patients, make sure it’s... An Evolutionary New Range of Access Catheters From Kimal UK Unit 401, Pointon Way, Stonebridge Cross Business Park, Droitwich Spa, Worcestershire WR9 0LW Tel: +44 (0)845 437 9542 Fax: +44 (0)845 437 9544 www.kimal.co.uk Kimal Deutschland GmbH Benediktusstrasse 88 40549 Düsseldorf Tel: +49(0)211-58588125 Fax: +49(0)211-58588126 www.kimal.com Kimal International Healthcare FZE SAIF - Zone PO Box 8532, Sharjah United Arab Emirates Tel: +00 971 67451597 Fax: +00 971 67451597 [email protected] ©2012 Kimal plc. All rights reserved. No part of this document may be reproduced in any form or by any means without permission in writing from Kimal plc. Specification: Kimal plc reserves the right to change the specification of its products at any time. Registered address: Kimal plc, Arundel Road, Uxbridge, UB8 2SA. L-132A-0006-A1 www.kimal.co.uk SOLO A new solution to old problems NEWMULTI-TUBE™ TECHNOLOGY The of 2 Round lumens facilitate laminar flow. t fusion Holding the venous stylet pass it gently through the venous (blue) lumen being careful not to Excellent rates of 400mls/min at venous pressures kink orflow damage the stylet then lock the venous stylet in place. Flush the venous lumen contain- less than ing the230mmHg. stylet again. Soft tip featuring intelligent grooves which protect the side holes from sucking against the vessel wall. Innovative new design means improved patient comfort - no need for traditional hub. Incorporation of haemostatic valves ensures a safe closed system negating the need for traditional thumb clamps. Catheter fixation achieved without suturing. The soft biocompatible polyurethane material can be shaped to fit any approach. Reduced stocking - 2 fr sizes, one length fits all patients. www.kimal.co.uk m en c onfigu r on ati Lu Easy order codes. ACCESSORIES CODE DESCRIPTION BOX QTY KFE-COV Kflow Epic connector valve pack contain x2 valves this part is to be connected to a functioning valve but can be changed every dialysis session if required. 5 KFE -REV Kflow Epic repair valve pack contains 1 valve this part is to be connected to a defective valve 5 Unifix Adhesive sutureless securement device for catheter fixation and anchoring 50 KFCVCS CVC insertion pack standard suitable for temporary catheter insertion 24 KFCVCP CVC insertion pack premier suitable for temporary catheter insertion. 16 KFCVC1 CVC insertion pack suitable for tunnelled catheter insertion. 7 KFAVF1 Arterial Venous Fistula on / off pack 40 KFCHD1 Dialysis catheter on / off pack 30 Contact your local rep for details or email: [email protected] www.kimal.co.uk Catheter Insertion Step by Step Guide SOLO USER GUIDE 1. Prepare the patient. Using Aseptic technique check kit contents. 2. Carefully insert the stylet into the venous lumen and luer lock into position. ¿J ¿J ¿J ¿J 3. Insert 4. Insert the guidewire into the valved side port on the introducer needle. the 18g introducer needle into the target vein. 5. Using the thumb feeder carefully advance the guidewire into the target vein if any resistance is encountered remove needle and guidewire together. Never pull guidewire back through the needle as shearing may occur. 6. Carefully UHPRYHQHHGOH guidewire dispenser and syringe leaving guidewire in target vein. 15. 7. Using Now Featuring NEW Chest X-Ray WR&RQ¿UP tip placement prior to catheter use. #11. blade make small incision at the H[LWVLWHWR facilitate easy insertion of vessel dilators and catheter. MULTI-TUBE™ TECHNOLOGY 8. Advance 14. 1st of 2 size matched vessel dilators over the guidewire into target vein. Apply sterile dressing to H[LWVLWH 13. Anchor catheter XVLQJWKH8QL¿[ adhesive sutureless securement device or moveable 2 SLHFHER[FODPS suture wing. 12. &KHFNÀRZV aspirate and ÀXVKERWK lumens to FRQ¿UP DGHTXDWHÀRZV and patency. 11. Remove stylet and guidewire together from the venous lumen of the catheter. 10. Carefully advance catheter over the guidewire into target vein to length required. 7KLVGRFXPHQWLVLQWHQGHGDVDJXLGHIRUIXOOFDWKHWHULQVHUWLRQGHWDLOVSOHDVHUHIHUWRWKH.ÀRZ(SLF62/2GLUHFWLRQVIRUXVH7KH.ÀRZ(SLF62/2FDWKHWHUPXVWEHLQVHUWHGE\DTXDOL¿HGFRPSHWHQWFOLQLFLDQXVLQJVWULFWDVHSWLFWHFKQLTXH 9. Remove dilator being careful not to dislodge the guidewire. Repeat steps 8&9 using 2nd size matched dilator.