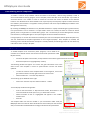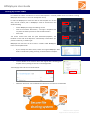
1
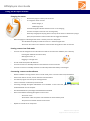
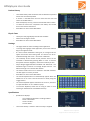
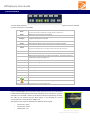
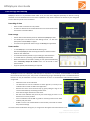
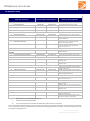
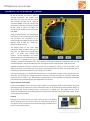
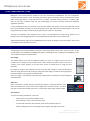
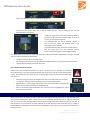
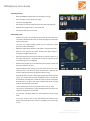
BPMphysio User Guide © 2014 270 Vision Limited. All rights reserved. WARNING: This document is protected by copyright law and international treaties. Any unauthorized use of this document will be pursued to the full extent of the law. Do not copy, modify, reproduce or distribute without permission from 270 Vision Limited. BPMphysio User Guide Index Contents .................................................................................................................................................3 Using the BPMpro sensors ......................................................................................................................4 Charging the sensor ................................................................................................................4 Putting a sensor into Find mode .............................................................................................4 Connecting a sensor to the software .......................................................................................4 Assigning a sensor to a particular side of the body ..................................................................5 Remote control of a test .........................................................................................................5 Averaging of tests ...................................................................................................................5 Attaching the sensor to the body ............................................................................................5 Sensor connection status ........................................................................................................................6 BPMphysio software ...............................................................................................................................7 BPMphysio test screen ............................................................................................................................9 Control buttons .................................................................................................................................... 10 Patient Incidence Points (PIPs) .............................................................................................. 10 Print & Plot........................................................................................................................................... 11 Data storage and backup ....................................................................................................................... 12 Sensor calibration ................................................................................................................ 12 BPMphysio tests ................................................................................................................................... 13 Free-Form Module ................................................................................................................................ 14 Example of Free-Form Module - Shoulder .............................................................................................. 15 Team Fitness Monitor (TFM) Extended Features .................................................................................... 16 Manager licences ................................................................................................................. 16 User licences ........................................................................................................................ 17 Data sharing across computers .............................................................................................................. 19 Setting up Dropbox .............................................................................................................. 19 Setting up a data folder ........................................................................................................ 20 Sharing data folders ............................................................................................................. 20 Additional information ......................................................................................................................... 21 BPMphysio User Guide v1.5 Page 2 of 21 Copyright 2014 270 Vision Limited. All rights reserved. BPMphysio User Guide Contents BPMphysio premium kit: - Tablet with keyboard dock 2 BPMpro sensors 2 small (44cm) straps 1 medium (59cm) strap 2 belt loops BPMphysio software Preloaded system user guide Tablet user guide Ruggedised carry case Accessories compartment - Sensor mains charger & spare plugs USB sensor charger lead Tablet UK charger The user account name and password for the Premium tablet is bpmpro BPMphysio standard kit: - 7" tablet preloaded with BPMphysio software 1 BPMpro sensor 1 extra small (30cm) strap, which can be joined to 1 small (44cm) strap 1 sensor belt loop Sensor mains charger Quick Start Guide System Requirements: BPMphysio works on any Windows-based tablet or PC, but has been designed specifically for devices running Windows 7 or 8 to benefit from its touch-screen capabilities. Warranty All BPMpro products come with a 12 month warranty as standard. For the warranty to apply, the product must be registered on the BPMpro website: www.bpmpro.co.uk/contact-us/product-registration/ User Support If you have any problems using BPMphysio, please contact us: Email: [email protected] Tel: +44 (0)1264 861375 BPMphysio User Guide v1.5 Page 3 of 21 Copyright 2014 270 Vision Limited. All rights reserved. BPMphysio User Guide Using the BPMpro sensors Charging the sensor Remove the plug from the top of the sensor To charge the sensor use the: - Mains charger, or - USB charger lead A slow-flashing LED indicates that the sensor is now charging A sensor will require around 1 hour to charge fully Once fully charged put the plug back in the top of the sensor as without the plug in place, the push button remote control will not trigger the software When charging from discharged the sensor is initially sent into a sleep state - The LED will flash rapidly to show the sensor is in the discharged state - The sensor will remain in this state for a few minutes during which it will not connect Putting a sensor into Find mode A sensor must be charged and in Find mode to be able to connect to the software, this is done by: - Pressing the middle of the sensor twice, - Shaking the sensor, or - Plugging in a charger lead In Find mode the top blue LED will flash A sensor will return to Standby mode if unconnected for around 5 minutes A sensor can remain in Standby mode for around 8 days before the battery is discharged Connecting a sensor to the software With the software running and the sensor in Find mode, press or click one of the Connect buttons If the sensor fails to connect, click on the other Connect button Connection progress is shown by the moving blue bar Sensor connection could take up to 20 seconds A warning message will appear if Bluetooth is not enabled - if this is the case, quit the application and enable Bluetooth on the computer Preinstalled tablets are preconfigured with Bluetooth enabled Once connected the following will appear on the screen: - The sensor name - The blue bar under the sphere now indicates the sensor battery level - The sphere icon follows rotation of the sensor Repeat for second sensor if required BPMphysio User Guide v1.5 Page 4 of 21 Copyright 2014 270 Vision Limited. All rights reserved. BPMphysio User Guide Assigning a sensor to a particular side of the body BPMphysio is able to support two sensors, allowing measurements of left and right. The left hand sensor becomes the default sensor for all tests: When two sensors are connected, the one on the left will be associated with the left-hand side of the body and the right-hand sensor will be associated with the right-hand side of the body The active sensor will be highlighted as the appropriate test is selected If the sensors are placed on the wrong sides of the body, simply press or click on the swap over icon located between the sensors to swap them over Remote control of a test BPMphysio can use the sensors to Start and Save without the need to return to the PC: If the test IS NOT running, one long press starts the test If the test IS running, one long press stops the test and results saved to the table When a sensor is used to stop the test, the result is automatically averaged In addition the measurements recorded by BPMphysio, the tester and/or patient can mark up to two points (PIPs) during certain tests to flag any issues arising such as pain or discomfort. For more information please see Patient Incidence Points (PIPs). If the remote control function is not working, please ensure that the plug is correctly inserted in the sensor. Averaging of tests The outcome of each test can be displayed individually by pressing 'Single' at the end of the test. Otherwise the outcomes of an unlimited number of tests will be averaged if the test is started remotely using the sensor or by pressing 'Average' at the end of the cycle. The averaged data is then displayed in the table and on the avatar. PIPs are not averaged as they deemed to be absolute, the last recorded PIPs, therefore, are those shown on the avatar. Note: the test area must be exited back to the Main Menu or a new patient selected for a test session to be saved Attaching the sensor to the body For each test follow the instructions of the test method carefully noting orientation and position The strap is inserted through the belt loop with the Velcro side against the body and the smooth neoprene side with the BPMpro label uppermost Tighten and secure using the Velcro To remove the belt loop, gently lift the tag on the reverse of the belt loop and slide off the sensor Tag on belt loop BPMphysio User Guide v1.5 Page 5 of 21 Copyright 2014 270 Vision Limited. All rights reserved. BPMphysio User Guide Sensor connection status Sensor is in Find mode, but not connected Sensor connected, but not being used for current test Sensor requires calibration Sensor connected and providing data for current test Sensor modes Sensor Indication Flat None Standby None A single, slow-flashing LED ______ Charging A single, fast-flashing LED Find Two flashing LEDs Connected None The sensor is connected to the software The sensor has not been selected This sensor is not currently collecting measurement data The blue bar indicates the battery level The sensor is connected to the software The sensor has been selected This sensor is collecting measurement data for the current test The blue bar indicates the battery level Sensor connected and providing data for current test There is a sensor registered to the software The sensor is not connected The sensor is in Find mode The sensor battery is flat The sensor cannot be connected until charged After around 5 minutes of inactivity the sensor enters Standby mode A sensor will hold its charge for around 7 days in Standby mode To charge the sensor use the: Mains charger, or USB charger lead The slow-flashing LED indicates that the sensor is now charging and in Find mode If the battery is flat when the charger is connected: The LED near the charge socket may flash rapidly The sensor will not go into Find mode immediately After around 3 minutes the LED will flash more slowly The sensor is now in Find mode A sensor can be used for tests while charging A sensor will require around 1 hour to charge fully A sensor is put into Find mode by: Pressing the middle of the sensor twice, Shaking the sensor, or Plugging in a charger lead (this will result in only one flashing LED) A sensor remains in Find mode until: Connected to the software, or It is left unconnected for around 5 minutes When the sensor is moved the sphere above the battery level indicator will also move on the screen A fully-charged sensor provides around 8 hours of continuous use BPMphysio User Guide v1.5 Page 6 of 21 Copyright 2014 270 Vision Limited. All rights reserved. BPMphysio User Guide BPMphysio software Starting the software When the software is preinstalled: Select the BPMphysio icon When the software is not preinstalled: Locate the BPMphysio installer file as directed when purchased and run Follow the screen prompts and run the BPMphysio application if it does not auto-start The first time the software is used, the licence key must be entered A licence key is obtained by going to www.bpmpro.co.uk/contact-us/product-registration/ to register the BPMpro sensor(s) and entering a valid software voucher code The simplest way to enter the licence key is to paste it from the clipboard if supplied electronically The software will now load and display the Welcome screen followed by the Main Menu screen Main Menu The following options are available: 'Patient details' to select the patient for the session 'Patient history' to select a comparison with today’s test results 'Physio tests' displays the 20 tests available The ghosted buttons represent unlicenced modules 'Settings' displays the internal settings for the application including the sensor pressure sensitivity 'Specifications' displays the installed configuration, licence details and sensor information Press 'Exit' the close the application Patient Details Select a patient from the list or enter the first letter of their surname in the search box To create a new patient press New When saved the new patient is active for the session N.B. If no patient is selected, test results cannot be saved Edit existing patient records by changing the data as required Press Discard to undo changes Selected patient is shown in the lower left corner of the screen 'Delete' removes the patient from the list To retrieve a deleted patient, type 'deleted' or 'undo' in the search box and select the patient record To restore the patient record, press Save Press Menu to return to the Main Menu BPMphysio User Guide v1.5 Page 7 of 21 Copyright 2014 270 Vision Limited. All rights reserved. BPMphysio User Guide Patient History The Patient History table shows the tests undertaken at previous sessions for the selected patient A session is recorded when the user leaves the test area and returns to the Main Menu Each test displays current, previous and selected session results To select the session for comparison with today’s test results, click on the row for that session Press Menu to return to the Main Menu Physio Tests The Physio Tests page displays the 20 tests available Select a test to begin a session Press Menu to return to the Main Menu Settings This page shows the internal settings of the application To change the language of the application, click on the relevant flag on the right hand side If a sensor needs recalibration during use, an orange circle will appear around the sensor being used. The sensors can be recalibrated through this screen - see 'Sensor calibration' The sensitivity of the remote control pressure sensor can be increased or decreased by pressing 'More' or 'Less'. To remove the squeeze function altogether, reduce the sensitivity to zero. 'Physio Range' toggles between 'Standard' and 'Advanced'. The Standard range is based on an average 40-year-old man. The Advanced range is for use with elite athletes. The licence holder name can be entered in the field indicated. This will appear on screen printouts. Press Menu to return to the Main Menu The virtual keyboard does not automatically appear when the software is run on a PC. It can be turned on or off by using the 'Toggle' button. The virtual keyboard appears whenever the cursor is placed on an input field when run on a tablet or laptop To move the keyboard, either click on 'Drag to move' or click and drag on the dark blue area between the keys Specifications Specifications displays - The installed configuration including modules Sensor information Version number Licence details The licence edit key is used if a new licence key is supplied BPMphysio User Guide v1.5 Page 8 of 21 Copyright 2014 270 Vision Limited. All rights reserved. BPMphysio User Guide BPMphysio test screen 1. 2. 3. 4. 5. 6. 7. 8. Title and test name Results table with: Current Session - Displays measurements taken in the current session - Measured values are written to the table by pressing 'Single' or 'Average' (see Averaging of Tests) Previous Session - Displays the results stored from the most recent patient session - Note: the test area must be exited back to the Main Menu or a new patient selected for a test session to be saved - At the start of a therapy session this will be the data set saved from the patient's last therapy session Selected Session - The comparison session can be selected from the Patient History screen or by selecting a date from the graph using the Plot function (see Print & Plot) The Resistance field is editable to record the method of resistance used - note: AROM only Moving avatar This is a graphical representation of the patient moving: - The dotted outline area represents the typical range of movement for the test - The moving green line represents the current limb position - Green lines display the results of the current test - White lines display the results from the previous test - Red lines display the results from the selected test - Orange lines indicate test parameters where set - The diamonds record the Patient Incidence Points (PIPs) (see below) The sensor icon shows the sensor position and alignment Numerical display showing: Current displacement and current maximum displacement If the standard maximum range for the movement is exceeded, a warning 'Out' will appear and the test must be restarted. This is to protect the patient from hyperextension and from the test being performed incorrectly. Comment field Initially this field holds a description of how the sensor is to be positioned on the patient Can be edited to enter comments about the session (up to 70 characters) Selected comparative data Patient information shortcut - click here to return to the Patient Details screen Control buttons (see below) BPMphysio User Guide v1.5 Page 9 of 21 Copyright 2014 270 Vision Limited. All rights reserved. BPMphysio User Guide Control buttons The table below explains the purpose of each button. The buttons are ghosted if no patient has been selected or where the function is unavailable. Start* Starts the measurement of the test Note: The pressing of Start is confirmed by an audible click when using the sensor Single Average* Displays the current test result in the table Press Average after every test in a test cycle and the results for that cycle will be averaged and displayed in the table Mark* Records a point of interest e.g. the patient experiences discomfort (PIP) Alt test Swaps between different ways of performing a test where available Cancel Stops the current test and discards the measurements Note: If you are averaging a test cycle, pressing Cancel clears the results from the test cycle Print Takes the user to the printable screen Plot Takes the user to the plot screen Power Switches the test from position to power measurement. The resistance field can be edited at any time by clicking on it. AROM Sets the Active Range of Movement mode PROM Sets the Passive Range of Movement mode Left Sets the left limb test mode Right Sets the right limb test mode Back Moves to previous test Next Moves to the next test Menu Returns to the Select Test Menu Sensor swap button Sensor icon shows the sensor position and alignment * These functions can also be triggered by pressing a connected BPMpro sensor Patient Incidence Points (PIPs) Using a second BPMpro sensor the tester and/or patient can mark up to two Patient Incidence Points (PIPs) during certain tests to flag any issues arising such as pain or discomfort. If a third PIP is raised, the first PIP is erased and replaced by the third, etc.. PIPs can be marked using the Mark button or by squeezing the second connected sensor, confirmed by an audible click. PIPs appear on the avatar as diamonds, the different colours signify: Current test - green Previous test - white Selected test - red BPMphysio User Guide v1.5 Page 10 of 21 Copyright 2014 270 Vision Limited. All rights reserved. BPMphysio User Guide Print & Plot Printer settings To print from BPMphysio, the PC must already have the following: Printer driver installed Printer connected and switched on Printer set to required page orientation i.e. landscape BPMphysio will automatically print to the default printer using the current printer settings. The screen will print out as it appears on the screen e.g. plot or avatar and it is important to ensure that the page orientation of the printer is set up appropriately. To print from a test screen: Press 'Print' The printable screen appears The editable comment field at the bottom of the screen is to record details of the test (up to 70 characters) on the printout To save this information, press Enter To return to the test screen, press Cancel The lower field is the licence holder name and is entered via the Settings screen Press Print to send the on-screen image to the printer Press Print a second time to return to the test screen To plot historical results data on a test screen: Press 'Plot' The avatar is replaced with a graph showing the historical data for the maximum range of AROM (red) and PROM (white) for the current test The user can switch between Left and Right limbs The dates on the x axis are the sessions during which the test has been performed To select data from a different session date, click on the date required To return to the screen showing the avatar, press Plot To print from a plot screen: Press 'Print' The printable screen appears To return to the plot screen, press Cancel Press Print to send the on screen image to the printer BPMphysio User Guide v1.5 Page 11 of 21 Copyright 2014 270 Vision Limited. All rights reserved. BPMphysio User Guide Data storage and backup BPMphysio works on any Windows-based tablet or PC, but has been designed specifically for devices running Windows 7 or 8 to benefit from its touch-screen capabilities. Only sensors linked to the licence key are configured to work with the specific issue of software. Recording of data Data is saved as sessions for each patient A session is deemed to be finished when the user leaves the test area and returns to the Main Menu Data storage Session data is automatically saved to: Documents\BPMphysio data This folder path can be found on the Settings screen - to alter this path please contact BPMpro support This data is encrypted and usable only by the BPMphysio application Data transfer To use BPMphysio on another Windows device go to: Documents\BPMphysio data and copy the folder to the Documents folder on the new device This will automatically transfer all your settings to the new device To review data on a patient(s), open the BPMphysio data folder Within this folder are the folders relating to each patient identified by their universally unique ID number which can be found in their patient details Copy the specific patient folder(s) as required Sensor calibration All BPMpro sensors are individually calibrated prior to shipment. It is, however, recommended to recalibrate the sensors at least once a year. They can be re-calibrated by going to the Settings screen. The Calibrate Sensor function can only be used when a sensor is connected. If no sensor is connected the Calibrate Sensor buttons are ghosted. Select the sensor to be calibrated The date when it was last calibrated is shown against it, but only if the calibration was carried out within the application Remove the sensor from the belt loop by gently lifting the tag on the reverse of the belt loop and sliding off the sensor Press Start to begin calibration of the sensor Roll the sensor between the palms of your hands trying to move it in all directions as much as possible Once a calibration level of 80% or greater is reached, put the sensor down carefully and press Save If 80% or more is not reached within a few minutes press Undo to restore the previous settings If a sensor needs recalibration during use, an orange circle will appear around the sensor in use. BPMphysio User Guide v1.5 Page 12 of 21 Copyright 2014 270 Vision Limited. All rights reserved. BPMphysio User Guide BPMphysio tests Limb to be measured Typical range of measurement* Sensor position/alignment Head/Neck Flexion 85⁰ Extension 75⁰ Sensor upright on the left side of the head. Left/Right Lateral Bend Left 45⁰ Right 45⁰ Sensor upright on the left side of the head. Rotation Left/Right Left 90⁰ Right 90⁰ Sensor upright on the left side of the head. Elevation 170⁰ Extension 60⁰ 1. Flexion/Extension 2. 3. Shoulder Arm hanging by side, palm in, sensor vertical on outside of upper arm. Arm hanging by side, palm in, sensor vertical on outside of upper arm. Arm by side, elbow bent so lower arm horizontal, palm inwards, sensor on outside of arm with charge socket pointing to elbow. 4. Elevation/Extension 5. Neutral Abduction *** 185⁰ 6. Side External Rotation Internal 90⁰ External 110⁰ 7. Side Abduction Rotation External 105⁰ Internal 70⁰ Flexion/Extension Flexion 145⁰ Extension 5⁰ Supination 80⁰ Pronation 75⁰ Forearm horizontal, thumb up, sensor on palm pointing to wrist. Elbow 8. Subject on back, arm out to side, elbow bent lower arm pointing up, palm pointing to feet, sensor on top of wrist.** ** Arm by side, palm to body, sensor vertical on outside of forearm. Forearm 9. Supination/Pronation Rotation Wrist 10. Flexion/Extension Flexion 80⁰ Extension 80⁰ Forearm horizontal, palm down, sensor on palm pointing to wrist. 11. Radial/Ulnar Deviation Radial 25⁰ Ulnar 35⁰ Forearm horizontal, palm down, sensor on palm pointing to wrist. Hip 12. Flexion 13. Abduction/Adduction 14. Abduction in Flexion*** Subject on back, legs straight, sensor on outside of thigh, pointing to hip. 120⁰ Adduction 30⁰ Subject on back, legs straight, sensor on outside of upper leg, pointing to hip. Subject on back, upper leg vertical, sensor on outside of thigh, pointing to hip. Flexion 135⁰ Extension 5⁰ Sensor on outside of lower leg, pointing to knee, heel moves towards hip.** Dorsi 25⁰ Plantar 50⁰ Abduction 40⁰ 90⁰ Knee 15. Flexion/Extension Ankle 16. Dorsi/Plantar Flexion 17. Internal/External Rotation Internal 30⁰ External 30⁰ 18. Inversion/Eversion Inversion 30⁰ Eversion 15⁰ Subject on back, toes up, sensor on sole of foot pointing to ankle. Subject on back, toes up, sensor on sole of foot pointing to ankle. Subject on back, toes up, sensor on sole of foot pointing to ankle. Hip 19. Extension 20. Internal/External Rotation 25⁰ Internal 45⁰ External 45⁰ Subject on front, leg straight, sensor on outside of upper leg, pointing to hip. Subject on front, lower leg bent vertical, sensor on outside of lower leg, pointing to knee. * Figures based on an average 40-year-old man ** Alternative test method(s) available *** Test can be performed on both limbs simultaneously if two sensors are connected Note: If the standard maximum range for the movement is exceeded, a warning 'Out' will appear and the test must be restarted. This is to protect the patient from hyperextension and from the test being performed incorrectly. The standard range limits can be turned off in the Settings screen. BPMphysio User Guide v1.5 Page 13 of 21 Copyright 2014 270 Vision Limited. All rights reserved. BPMphysio User Guide Free-Form Module The BPMphysio Free-Form Module has been developed to visualise the complete movement envelope of key joints: neck, shoulder, hip, wrist and ankle. The 'other' category gives the user complete freedom to plot anything of interest. Any existing BPMphysio kit, Standard or Premium version, can be upgraded to include the Free-Form Module through the issuing of a new licence key upon purchase of the module. Free-Form test screen 1. Title and test name 2. Results table with current and selected sessions showing the maximum displacement angles for up, down, forward, back and rotation, or for the selected rotation circle (see 4). The comparison session can be selected from the Patient History screen or by selecting a session from the previous comparative data information box (marked 6). Note: the test area must be exited back to the Main Menu or a new patient selected for a test session to be saved 3. Polar plot graphical representation of the patient moving indicated by the solid blue area. The dotted black circles indicate 30⁰ increments in angle and the straight dotted white lines indicate increments of 15⁰. The polar plot of the selected session appears as a solid red line. 4. Selected rotation circle: The details of any specific data point on the polar plot can be selected by pressing or clicking the small dotted circle at the point of interest. The appearance of the selected circle will change upon selection to become white and the data for this point will appear in the Current column in the results table. If a comparative session has been selected, the data for the corresponding point will appear in the Selected column. To deselect the rotation circle, press anywhere in the goldcoloured area outside the plot area. 5. Comment field can be edited to enter comments about the session (up to 300 characters). Initially this field holds a description of how the sensor is to be positioned on the patient and the starting point for the test. 6. Previous comparative data information showing all the previous sessions during which this patient has performed the test. A data set for comparison can be selected by pressing or clicking on the relevant date in the box. Where data is for both upper or lower limbs, an R or L will appear next to the session date to indicate the side to which it relates. 7. Patient information - click here to return to the Patient Details screen 8. Control buttons, including patient orientation. Using the arrow buttons, the orientation of the patient can be switched between vertical and horizontal. BPMphysio User Guide v1.5 Page 14 of 21 Copyright 2014 270 Vision Limited. All rights reserved. BPMphysio User Guide Example of Free-Form Module - Shoulder By way of example, let’s take an athlete’s shoulder assessment. The athlete starts with their arm to the side and then moves their shoulder through the full range of movement (ROM). As they do, the plot will follow their movement and build the profile of their range of motion. The bigger the area of the plot shaded in blue, the greater their ROM. The dotted circles on the outer edge indicate the angle of rotation of the arm at that point. The details of any specific data point - up, down, back, forward and rotation - can be displayed in the results table by clicking on any of the dotted circles. This selection is indicated by the colour of the circle changing to white (highlighted by the red box in this example). To deselect the rotation circle, press anywhere in the gold-coloured area outside the plot area and the data displayed in the results table will return to being the maximum displacement angles for the test. Selected comparative data from a previous session can be overlaid by clicking on any of the dates in the bottom LHS of the screen where all previous tests are listed for that particular joint. This comparative data is shown by the red trace that appears on the example shown above. Free-Form technology is so new that little data exists yet on just what the shoulder or hip should look like as a polar plot. To see change in the ROM, for example recovery post-injury, the plot from a previous assessment can be overlaid, as shown in red. Alternatively, a damaged joint can be compared to its opposite unimpaired joint through the system flipping the plot image before it is overlaid. Patient Incidence Points (PIPs) Using a second BPMpro sensor the tester and/or patient can mark Patient Incidence Points (PIPs) during the test to flag any issues arising such as pain or discomfort. PIPs can be marked using either the Mark button or by squeezing the second connected sensor, confirmed by an audible click. PIPs appear on the plot as diamonds. The different-coloured PIPs signify Current (green) and Selected (red). An unlimited number of PIPs can be marked and recorded. Printing Pressing 'Print' initiates a print out of the current screen to the default printer. Although the screen inverts to save ink, it will otherwise print out as it appears and it is important to ensure that the page orientation of the printer is set up appropriately. BPMphysio User Guide v1.5 Page 15 of 21 Copyright 2014 270 Vision Limited. All rights reserved. © 2014 270 Vision Limited Using the arrow buttons, the orientation of the athlete can be varied between vertical and horizontal. The orientation of the screen changes accordingly so that from the athlete's point of view, up is always up, forward is always forward. BPMphysio User Guide Team Fitness Monitor (TFM) BPMphysio Team Fitness Monitor (TFM) has all of the functionality of BPMphysio, but also incorporates extended features to allow a coach to manage and monitor groups of athletes as they undertake their regular ROM and strength testing. Using TFM, the coach can define a detailed testing routine for an athlete, right down to the level of specific limbs and test methodology and receive real-time performance feedback regardless of location. A much-simplified athlete user interface means that the athlete logs directly into an automated test routine that runs them swiftly through their personalised test routine with audible alerts indicating when a test is not being performed correctly, thereby eliminating the need for a physio to be present. This data is immediately made available to the coach via an automated secure file sharing system such as Dropbox, with alerts highlighting where the predetermined test parameters have not been met. TFM extended features apply only to the BPMphysio tests and do not apply to any of the modules. The licences are modified via the Specifications screen. Manager licences The Manager licence enables additional features in the Patient Details screen and in each test screen. All the normal features and capabilities for BPMphysio apply to a Manager licence, including all the BPMphysio tests. These additional features are listed below. User images The Patient Details screen has the additional ability to load up an image for each User that is created. This is to simply the user interface when a User accesses the system. When a new user is created, a grey square appears on the LHS of the screen to indicate that no image has been uploaded. By copying an image to the clipboard, the text in the grey box changes to invite the Manager to paste the image into the box. By clicking on the grey box the image is pasted into the image field in the Patient Details screen against the selected User. Note: The image is automatically scaled to fit the image window, so ideally it should be cropped to size beforehand. PIN access When a new User is created, they are automatically assigned a unique ID reference. Their PIN to access their User account is the last four digits of this reference number. This PIN is required to confirm the identity of the User. In the example shown right, the PIN is 9656. Test selection To set up the testing schedule for a new User: Select a User from the Patient Details screen Go to the Physio Tests screen and select a test For tests with alternative test methods, select the test method required With the Manager licence, the 'Manage' button appears top right of the screen BPMphysio User Guide v1.5 Page 16 of 21 Copyright 2014 270 Vision Limited. All rights reserved. BPMphysio User Guide Click on the 'Manage' button and the following appears: To select the test for the User, click on 'No' to enable the test. This will change to 'Yes' and the following options will appear: Maximum range limits can be set by entering values in the boxes under the avatar marked 'Max'. If no limits are set, no alarm will be triggered The required limits are set by entering a figure in each of the max boxes and pressing enter or by selecting the other max box. Press Enter after entering data in the second max box Left and right limbs can have different settings within a test by selecting the Left and Right buttons. An audible alarm can be set to sound if these limits are either not reached or exceeded. By clicking to activate one, the other is automatically deactivated. To leave the menu, click on 'Manage' again Run through each test in turn by using the Next and Back buttons, selecting parameters as required The tests and parameters are saved upon entry Non-compliance with parameters Should a User fail to meet the conditions set up for a particular test, for example, not achieving the required range, a warning triangle appears by their name in the User list on the Patient Details screen. By selecting the User from the list, a large triangle appears on the left hand side under their picture. Click on the large triangle to go straight to the test screen where the issue occurred To cancel the warning, click on the triangle next to the 'Manage' button Repeat if there is still a triangle next to their name as this means there is another test where the parameters have been exceeded/not met Sessions where the target parameters have not been met are highlighted in red on the Patient Details Screen User licences When a User logs in by clicking on their image and entering their PIN, they can only run the tests that have been previously selected for them. These tests have an automated starting sequence to make sure that the User is in the correct test starting position and runs them through the preset number of cycles for that test. If they exceed or do not reach the set limits (depending on how the alarm limits have been set), a warning is notified back to the Manager. Once the tests are completed, the User logs out by pressing 'Exit' and returns to the Login screen. BPMphysio User Guide v1.5 Page 17 of 21 Copyright 2014 270 Vision Limited. All rights reserved. BPMphysio User Guide Accessing the tests Start the BPMphysio application (if not already running) From the Login screen, select your image Enter your four-digit PIN If the PIN is incorrect the PIN input box will shake and disappear Reselect your image and to re-enter your PIN You will be taken to your first test Undertaking a test Position the sensor as indicated on the avatar by the orange oval. The arrow indicates the direction in which the plug in the top of the sensor should face. The lines are orange (target), green (current maximum), white (previous) and red (selected) Adopt the required test position as directed in the Comment field Start the test sequence by either touching the Start button or pressing the middle of the sensor Move your limb to the start point shown by the dotted orange line on the avatar and wait for a long low tone to start to indicate you are in the starting zone (+/-5 degrees) Maintain this position for 3 seconds after which a beep sounds and the test movement can start Cycle through the test, passing in and out of the start zone to your maximum limit. Each time you enter the start zone a low 'tick' will sound to indicate the test is being performed correctly. Keep going until you hear a short high-pitched beep after around 3 cycles. This means that you have completed the test. The test will automatically end after the number of cycles has been completed. If the full test is run again, the results recorded will be the average of all the complete test cycles done. To see performance versus your previous tests, click on 'Plot' The avatar is replaced with a graph showing historical data for the maximum range for the current test Use the Left and Right buttons to switch between left and right limbs To end the session, click on the User details box located at the bottom left hand side of the screen to navigate back to the Login screen BPMphysio User Guide v1.5 Page 18 of 21 Copyright 2014 270 Vision Limited. All rights reserved. BPMphysio User Guide Data sharing across computers To enable a coach to set up athletes and for their data to be fed back, a data sharing capability is used. A secure web-based file-sharing program, such as Dropbox, allows data files to be shared with any number of associated devices. This enables a coach to review the real-time test results of athletes across different locations. The athlete data can be formatted to suit any third party record system, subject to a data conversion fee. Athletes’ personal data is encrypted to military standards and access requires BPMphysio software and a Management Licence key. By installing the BPMphysio software on any Windows-based PC or laptop and following the guidance below, live synchronisation can be achieved. If unique folder names are created, the data can either be shared globally across an organisation or shared within groups. This is an ideal way to use the Management and User licence features, enabling Managers to set up test regimes for Users in different locations. If using Dropbox, an account will need to be created by the user via the Dropbox website (www.dropbox.com). The user downloads the Dropbox application to their target PC/Laptop. Once Dropbox is installed, the following process should be followed. If Dropbox is already installed, the following process will not delete any information that is already in Dropbox. Setting up Dropbox To enable Dropbox to be accessed by other programs, it first needs to be moved from its default location into the Documents folder (sometimes called My Documents). Locate the Dropbox control folder, usually located on the bottom right hand side of the screen Select the Dropbox icon (highlighted by red box) The following window will appear. This screen also gives information such as the status of the users Dropbox in terms of synchronisation and the last folders updated. To alter the location of the dropbox folder on the target PC, click on the gear wheel located in the top right hand corner of the screen. Select 'Preferences...' from the drop down list This will bring up the Window shown right: Click on the 'Account' tab, then select the 'Move...' button. This will display the file browsing folder: Look for the 'Documents' or 'My Documents' folder, found either in the main drive folder of the PC (such as C:/) or listed under 'This PC' Select the folder so that it is highlighted and appears in the 'Folder:' selection area Press OK The Dropbox folder will now be located in your 'Documents' folder ready for BPMphysio data to be shared. Note: All the devices across which you want to share data, must have Wi-Fi enabled and be running for the data to be synchronized. BPMphysio User Guide v1.5 Page 19 of 21 Copyright 2014 270 Vision Limited. All rights reserved. BPMphysio User Guide Setting up a data folder First follow the above instructions to ensure that Dropbox is correctly loaded onto the machine running BPMphysio with sensors, if it has not already been set up. In order for BPMphysio to store the data so that Dropbox can use the data, the file location path in BPMphysio must be altered from the standard setting. Launch BPMphysio and go the 'Settings' screen Click on the location 'Documents\ ' and type in 'Dropbox' and any other sub folder you wish to have the data stored in Press enter The screen should now show the path Documents\dropbox\. The backslash on the end of the filepath is automatically created when you press the enter key, as shown right. BPMphysio will now store all of its data in a folder called 'BPMphysio Data' in the Dropbox folder. If you already have data stored, locate the original BPMphysio Data folder in the directory listing and copy it into the folder in Dropbox Sharing data folders To share folders on the machine where the original data is located, go to Dropbox.com by clicking on the link in the settings folder. The web page looks like the one shown below: Select the 'Share Link' icon and follow the instructions on how to share the folder BPMphysio User Guide v1.5 Page 20 of 21 Copyright 2014 270 Vision Limited. All rights reserved. BPMphysio User Guide Additional information Biomaster® test results on the BPMpro sensor array (Certificate #: 1021642.225/7681) Samples of the BPMpro sensors were submitted containing Biomaster® 542 All testing is carried out independently at Industrial Microbiological Services Ltd. To determine anti-microbial efficacy all samples are tested to ISO 22196:2011 along with a lab control sample Submitted samples are challenged against cultures of S. aureus (MRSA) & E.coli Samples are inoculated using a known amount of the above cultures and incubated for 24 hours at 37°C according to ISO 22196:2011 TVC (Total Viable Count) of bacteria are then recorded and the percentage of reduction is calculated The table below shows the results recorded by Industrial Microbiological Services Limited for the BPMpro sensors Bacteria 0hrs - CFU of bacteria at 0 hours of testing, Bacteria 24hrs - CFU of bacteria at 24 hours of testing, % reduction - % level of reduction in bacteria, CFU - colony forming units Disposal of BPMpro sensors (WEEE Directive 2002/96/EC) At the end of its serviceable life the BPMpro sensor should not be treated as household waste. The sensor should be returned to the supplier for suitable disposal or handed over to a suitable recycling facility for electrical and electronic equipment. EC Declaration of Conformity Product: Manufacturer: Company number: Registered office: BPMphysio 270 Vision Limited 7505941 Suite 47, Basepoint Business Centre, Winnall Valley Road, Winchester, SO23 0LD, UK As the manufacturer of BPMphysio, we, 270 Vision Limited, declare that the product and its component subassemblies comply with the applicable EU directives and appropriate standards: Applicable EU Directives: Directive 1999/5/EC on Radio and Telecommunications Terminals Appropriate Standards: ETSI EN 300 328 V1.1.1:2006 Wide Band Data Transmission Equipment Signed: Name: Position: Date: Martin Gossling Director 1st June 2013 BPMphysio User Guide v1.5 Page 21 of 21 Copyright 2014 270 Vision Limited. All rights reserved.