1
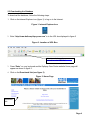
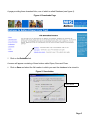
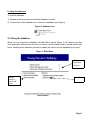
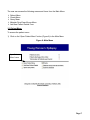
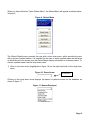
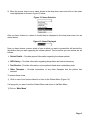
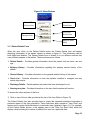
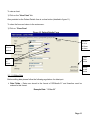
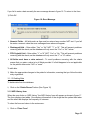
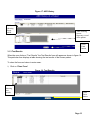
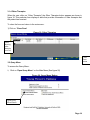
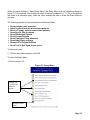
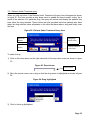
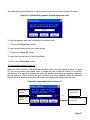
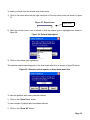
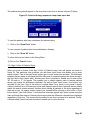
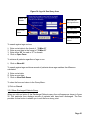
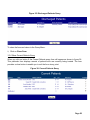
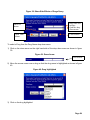
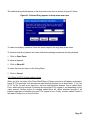
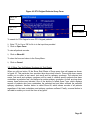
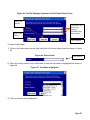
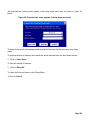
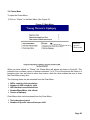
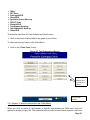
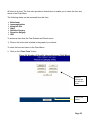
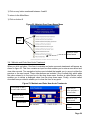
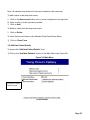
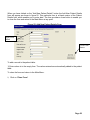
User Guide For The Epilepsy Database Page 1 Contents 1.0 Introduction…………………………………………………………………….Page 3 1.1 Aim of the database…………………………………………………..Page 3 1.2How to use this manual………………………………………………Page 3 2.0 Getting Started…………………………………………………………………Page 3-6 2.1 Where Now?……………………………………………………………Page 3 2.2 Software Requirements………………………………………………Page 3 2.3 Downloading the Database …………………………………………Page 4-6 2.4Loading the Database………………………………………………...Page 6 3.0 Using the database……………………………………………………………Page 6-36 3.1 Patient Menu…………………………………………………………….Page 7-14 3.1.1 Patient Details Form…………………………………………...Page 10-13 3.1.2 AED History Form………………………………….…………..Page 12-13 3.1.3 Test Results…………………………………………………….Page 13 3.1.4 Other Therapies………………………………….….….……...Page 14 3.2 Query Menu……………………………………………….……………..Page 14-28 3.2.1 Show Patients Under Treatment Query…………..….………Page 16-17 3.2.2 Associated Patients (1)………………………………………...Page 17-19 3.2.3 Associated Patients (2)………………………………………...Page 19-20 3.2.4 Age Vs Sex of Patients Query…………………………………Page 20-21 3.2.5 Discharged Patients Query…………………………………….Page 21-22 3.2.6 Current Patients Query…………………………………………Page 22 3.2.7 Transition Clinic Attendees……………………….……………Page 23 3.2.8 Side Effects of Drugs..………………………………………….Page 23-25 3.2.9 DTH Original Patients…………………………….….…………Page 25-26 3.2.10 Test Vs Epilepsy Syndrome Vs Test Result Query………...Page 26-28 3.3 Chart Menu………………………………………………….…………….Page 29-33 3.3.1 Test Ordered and Result menu………………………………..Page 30-31 3.3.2 Number of Specific Interventions per Child menu…………Page 31-32 3.4 Maintain Drop Down Boxes Menu………………………….…………Page 33-35 3.4.1 Maintain and Enter Acute Treatments…………………………Page 34-35 3.5 Add New Patient Details Form…………………………………………Page 35-36 Page 2 1.0 Introduction This user guide has been compiled to assist database users in operating the database and gaining an understanding of the database functionality. 1.1 Aim of the database The aim of the database developed is to provide staff at the Bolton Epilepsy Care Centre with a means of storing patient information, which can later be retrieved when needed. Moreover, the database aims to assist the Epilepsy care staff to effectively organise and manage patient information. The user guide contains the following sections: Getting Started – Provides a description on how the database can be obtained and opened Using the database – Provides a step by step guide on how to use the different features of the database 2.0 Getting Started 2.1 Where Now? If you are a user who has not previously downloaded the database then refer to the “Software Requirements” section below. If you are a user who has downloaded the database but has never used it before then refer to the “First Steps” section. Users, who wish to view to another section of the user guide, please refer to the contents page at the beginning of this document. 2.2 Software Requirements In order to use the Epilepsy Care database you need the following software to be installed on your computer: Microsoft Office 2000 version – This contains Microsoft Access, which the Epilepsy Care database runs on Windows 2000, ME, XP or Vista – Microsoft Office 2000 can run on these operating systems. Page 3 2.3 Downloading the Database To download the database, follow the following steps: 1. Click on the Internet Explorer icon (figure 1) to log on to the Internet. Figure 1: Internet Explorer Icon 2. Enter “http://www.boltonepilepsycare.com” in to the URL box displayed in figure 2 Figure 2: Location of URL Box http://www.boltonepilepsycare.com entered in to the URL box 3. Press “Enter” on your keyboard and the Epilepsy Care Centre website Home page will appear as shown in figure 3. 4. Click on the Downloads link (see figure 3) Figure 3: Home Page Downloads link Page 4 A page providing three download links, one of which is called Database (see figure 4). Figure 4: Downloads Page 5. Click on the Database link. A screen will appear consisting of three buttons called Open, Save and Close. 6. Click on Save and select the file location in which you want the database to be stored in. Figure 5: Save button Save button Page 5 Loading the database To load the database: 1) Browse to the file location in which the database is stored 2) Double click on the database icon to access to database (see figure 6) Figure 6: Database Icon 3.0 Using the database When you first access the database, the Main Menu screen (figure 3) will appear providing clinic population statistics and a choice of buttons, which enable users to access menus and forms. Another button has been provided to enable the user to exit the database at any point. Figure 7: Main Menu Clinic population statistics Buttons linked to menus and forms Exit Button Page 6 The user can access the following menus and forms from the Main Menu: Patient Menu Charts Menu Query Menu Maintain Drop Down Boxes Menu Add New Patient Details Form 3.1 Patient Menu To access the patient menu 1) Click on the “Open Patient Menu” button (Figure 8) in the Main Menu Figure 8: Main Menu Open Patient Menu button Page 7 When you have clicked on “Open Patient Menu”, the Patient Menu will appear as shown below in figure 9. Figure 9: Patient Menu The Patient Details menu provides the user with a drop down menu, which provides the user with a choice of patient names. It is essential for the user to select a patient name as the forms in which the user can access from the Patient Menu display information of a chosen patient. To choose a patient name from the drop down menu: 1) Click on the down arrow (highlighted in figure 10) on the right hand side of the drop down menu. Figure 10: Down Arrow Down arrow Clicking on the drop down arrow displays the names of patients stored on the database as shown in figure 11. Figure 11: Names Displayed Page 8 2) Move the mouse cursor over a name shown in the drop down menu and click on the name once highlighted as shown in figure 12 below. Figure 12: Name Selection After you have clicked on a name it should then be displayed in the drop down menu box as shown below. Figure 13: Name Displayed Now you have chosen a name, select a form in which you want to access that will provide the information that you want regarding the chosen patient. The forms that you can access are as follows: Patient Details – Provides general information regarding the chosen patient AED History – Provides information regarding drugs taken and seizure frequency Test Results – Provides information on how patients fared when undertaking tests Other Therapies – Provides information of any other therapies that the patient has received To access these forms: 1) Click on one of four buttons linked to a form on the Patient Menu (Figure 14). If at any point you want to exit the Patient Menu and return to the Main Menu 1) Click on “Main Menu” Page 9 Figure 14: Menu Buttons View AED History form View Other Therapies form View Patient Details form View Test Results form Return to Main Menu 3.1.1 Patient Details Form When the user clicks on the Patient Details button the Patient Details form will appear displaying information of the patient chosen as shown in figure 15. This information can be both edited and deleted. The Patient Details form is divided in to six different sections that cover different aspects of the patient. These sections are as follows Patient Details – Provides general information about the patient such as name, sex and age. Epilepsy History – Provides information regarding the epilepsy seizure history of the patient General History – Provides information on the general medical history of the patient Check List – Provides information on how the patients condition is managed and any advice they receive Discharge Details – Details whether the patient has been discharged or not Nursing care plan – Provides information on the care that the patient will receive To access the other sections of the form: 1) Click on one of the six tabs provided at the top of the form (Refer to Figure 15) The Patient Details form also provides links to charts that represent statistical information a particular aspect of the clinic population. These links have been named as “View Chart” and appear next to certain fields that relate to a particular chart (detailed in figure 11). For example, on the Patient Details section, a link appears next to the “Date First Seen” field, which will display a chart showing the number of patients first seen on a particular date. Page 10 To view a chart: 1) Click on the “View Chart” link Also provided on the Patient Details form is a close button (detailed in figure 11). To close the form and return to the main menu: 1) Click on “Close Form” Figure 15: Patient Details Form Six tabs to view different sections Details of chosen patient Close Form button Links to charts Delete record button 3.1.1.1 Editing Data Before editing data please follow the following regulations for data input: Date Fields – Dates are stored in the format of DD-Month-YY and therefore must be entered in this format. Example Date: “12-Mar-06” Page 11 If you fail to enter a date correctly the error message shown in figure 16. To return to the form: 1) Click OK Figure 16: Error Message Numeric Fields – All fields such as Age must be entered as a number NOT text. If you fail the enter a numeric value the error message shown above will appear. Discharged field – Enter either “Yes” or “No” NOT “Y” or “N.” This will prevent problems occurring with the charts, as the database will only count the “Yes” or “No” values. DTH Orginial field – Enter either “Y” or “N” NOT “Yes” or “No.” This will prevent problems occurring with the charts, as the database will only count the “Y” or “N” values. All fields must have a value entered – To avoid problems occurring with the charts ensure that you enter a value in to all fields provided. If a field happens to be not applicable for the patient either enter “N/A” or “none.” To edit data: 1) Make the appropriate changes to the patient’s information, ensuring that you follow the data entry regulations. 3.1.1.2 Deleting Data To delete data from the database: 1) Click on the “Delete Record” button (See Figure 15) 3.1.2 AED History form When the user clicks on “AED History” the AED History form will appear as shown in figure 17. The form displays two tables. One displays information of the drugs that the patient has taken and the other that displays the frequency of seizures. To close the form and return to the main menu: 1) Click on “Close Form” Page 12 Figure 17: AED History Table showing drugs taken Table showing seizure frequency record of the patient Close Form button 3.1.3 Test Results When the user clicks on “Test Results” the Test Results form will appear as shown in figure 18. This particular form displays a table showing the test results of the chosen patient. To close the form and return to main menu: 1) Click on “Close Form” Figure 18: Test Results Table showing test results Close Form button Page 13 3.1.4 Other Therapies When the user clicks on “Other Therapies” the Other Therapies button appears as shown in figure 18. This particular form displays a table that provides information of other therapies that the patient has received. To close the form and return to the main menu: 1) Click on “Close Form” Figure 19: Other Therapies Table showing other therapies received Close Form button 3.2 Query Menu To access the Query Menu: 1) Click on “Open Query Menu” on the Main Menu (See figure 20) Figure 20: Query Menu Button Open Query Menu button Page 14 When you have clicked on “Open Query Menu” the Query Menu form will appear as shown in figure 21. This particular form contains a menu of buttons numbered 1 to 11. Ten of the buttons are linked to a particular query, while the other enables the user to close the Query Menu at any time. The following queries can be accessed from the Query Menu Show patients under treatment Select a referral and show associated patients Select a Therapy and show associated patients Show Age Vs Sex of patients Show Discharged Patients Show Current Patients Show Transition Clinic Attendees Show Side Effects of Drugs Show all DTH Original Patients Show Test Vs Epil Synd Vs test result To access a query: 1) Click on any button between 1 and 10 To close the Query Menu: 1) Click on button 11 Figure 21: Query Menu Buttons 1 to 10, which are linked to queries Return to Main Menu Page 15 3.2.1 Patients Under Treatment query When you click on button 1 the Patients Under Treatment will query form will appear as shown in figure 22. The form provides a drop down menu to enable the user to select a drug. As a result of the selection of a particular drug, the query will retrieve and display the patients that have taken the drug selected. Three buttons are also provided that show patients who have taken the drug selected, show all patients in the clinic that have taken a drug and finally close the form. Figure 22: Patients Under Treatment Query form Show All Button Drug drop down menu Open Form button Cancel button to close form To select a drug: 1) Click on the down arrow on the right hand side of the drop down menu as shown in figure 23. Figure 23: Down Arrow Down arrow 2) Move the mouse cursor over a drug so that the drug name is highlighted as shown in figure 24. Figure 24: Drug highlighted 3) Click on the drug highlighted Page 16 The selected drug should appear in the drop down menu box as shown in figure 25 below. Figure 25: Selected Drug appears in drop down menu box To view the patients who have undertaken the selected drug: 1) Click on the “Open Form” button To view records patients who have taken a drug: 1) Click on the “Show All” button To close the form and return to the Query Menu: 1) Click on the “Close form” button 3.2.2 Associated Patients Query (1) When you click on button 2 the Associated Patients query form will appear as shown in figure 26. The form provides a drop down menu to enable the user to select a referral. As a result of the selection of a particular referral, the query will retrieve and display the patients under the referral selected. Three buttons are also provided that show patients under the selected referral, show all patients in the clinic that have been referred and finally close the form. Figure 26: Associated Patients Query (1) Show All Button Open Form button Referral drop down menu Cancel button to close form Page 17 To select a referral from the referral drop down menu: 1) Click on the down arrow on the right hand side of the drop down menu as shown in figure 27. Figure 27: Down Arrow Down arrow 2) Move the mouse cursor over a referral so that the referral type is highlighted as shown in figure 28. Figure 28: Referral highlighted 3) Click on the referral type highlighted The selected referral should appear in the drop down menu box as shown in figure 29 below. Figure 29: Selected referral appears in drop down menu box To view the patients who under particular referral: 1) Click on the “Open Form” button To view records of patients who have been referred: 1) Click on the “Show All” button Page 18 To close the form and return to the Query Menu: 1) Click on the “Close form” button 3.2.3 Associated Patients Query (2) When you click on button 3 the Associated Patients query form will appear as shown in figure 30. The form provides a drop down menu to enable the user to select a therapy. As a result of the selection of a particular therapy, the query will retrieve and display the patients who have undertaken the therapy selected. Three buttons are also provided that show patient who have undertaken a selected therapy, show all patients in the clinic that have undertaken a therapy and finally close the form. Figure 30: Form to select a Therapy Show All Button Therapy drop down menu Open Form button Cancel button to close form To select a therapy from the therapy drop down menu: 1) Click on the down arrow on the right hand side of the drop down menu as shown in figure 31. Figure 31: Down Arrow Down arrow 2) Move the mouse cursor over a therapy so that the therapy type is highlighted as shown in figure 32. Figure 32: Therapy highlighted 3) Click on the therapy type highlighted Page 19 The selected drug should appear in the drop down menu box as shown in figure 33 below. Figure 33: Selected therapy appears in drop down menu box To view the patients who have undertaken the selected drug: 1) Click on the “Open Form” button To view records of patients who have undertaken a therapy: 1) Click on the “Show All” button To close the form and return to the Query Menu: 1) Click on the “Cancel” button 3.2.4 Age Vs Sex of Patients Query When you click on button 4 the Age Vs Sex of Patients query form will appear as shown in figure 34. This particular form provides you with three input boxes that enable you to enter search criteria. Two of the input boxes require you to enter a start and end date. The difference between the two dates is calculated and this difference is searched against the values stored in the Age field in the Patient table. Another input box is provided to enable you to enter either “M” for male or “F” for female. This enables you to search against male or female patients whose age match the difference calculated. As well as three input boxes, four buttons are included on the form. One of the buttons is called Open Form, which is only used if search criteria is entered in to all three input boxes and displays records that of patients whose details match the search criteria entered. Another button shows all patients in the clinic regardless of their age or sex. No search criteria needs to be entered before clicking on this button. A third button called “View both Sexes” is included that searches against age values stored using the start and finish date entered. Patients whose age match the difference calculated are displayed regardless of their sex. This means that the patient’s sex does not have to be entered. Finally, a button called Cancel has been included to enable you to close the form Page 20 Figure 34: Age Vs Sex Query form Show All button Open Form button Start and End date input boxes Sex input box Cancel Button View Both Sexes button To search against age and sex: 1) 2) 3) 4) Enter a start date in the format of “12-Mar-01” Enter an end date in the format of “12-Mar-01” Enter either “M” for male or “F” for female Click on Open Form To retrieve all patients regardless of age or sex: 1) Click on Show All To search against age and show records of patients whose age matches the difference calculated: 1) Enter a start date 2) Enter an end date 3) Click on View Both Sexes To close the form and return to the Query Menu: 1) Click on Cancel 3.2.5 Show Discharged Patients Query When you click on button 5 the Discharged Patients query form will appear as shown in figure 35. This particular form displays records of patients who have been discharged. The form provides a close button to enable you to exit the form at any point. Page 21 Figure 35: Discharged Patients Query To close the form and return to the Query Menu: 1) Click on Close Form 3.2.6 Show Current Patients Query When you click on button 6 the Current Patients query form will appear as shown in figure 36. This particular form displays records of patients who are currently being treated. The form provides a close button to enable you to exit the form at any point. Figure 36: Current Patients Query Page 22 To close the form and return to the Query Menu: 1) Click on Close Form 3.2.7 Transition Clinic Attendees Query When you click on button 7 the Transition Clinic Attendees query form will appear as shown in figure 37. This particular form displays records of patients who are attendees of the transition clinic. The form provides a close button to enable you to exit the form at any point. Figure 37: Transition Clinic Attendees Query To close the form and return to the Query Menu: 1) Click on Close Form 3.2.8 Show Side Effects of Drugs Query When you click on button 8 the Show Side Effects of Drugs query form will appear as shown in figure 38. This particular form provides two drop down menus. These drop down menus enable you to select a drug and an epilepsy syndrome. The selected drug and epilepsy syndrome will be used to retrieve specific patients that have taken a particular drug and experienced a certain epilepsy syndrome. As well as drop down menus, three buttons are included. One of the buttons is called Open Form, which displays records of patients who have taken the drug and suffer the select epilepsy syndrome. Another button is called Show All, which shows records of all patients regardless of the drugs taken and epilepsy syndrome suffered. Finally, a cancel button is included to enable you to exit the form at any point. Page 23 Figure 38: Show Side Effects of Drugs Query Drug name and epilepsy syndrome drop down menus Show All button Open Form button Cancel button To select a Drug from the Drug Name drop down menu: 1) Click on the down arrow on the right hand side of the drop down menu as shown in figure 39. Figure 39: Down Arrow Down arrow 2) Move the mouse cursor over a drug so that the drug name is highlighted as shown in figure 40. Figure 40: Drug highlighted 3) Click on the drug highlighted Page 24 The selected drug should appear in the drop down menu box as shown in figure 41 below. Figure 41: Selected Drug appears in drop down menu box To select an epilepsy syndrome follow the same steps for the drug drop down menu. To retrieve records of patients who have suffered the epilepsy syndrome and drug entered: 1) Click on Open Form To show all patients: 1) Click on Show All To close the form and return to the Query Menu: 1) Click on Cancel 3.2.9 Show all DTH Original patients Query When you click on button 9 the Show Side Effects of Drugs query form will appear as shown in figure 42. This particular form provides an input box that requires you to enter either “Y” for Yes or “N” for No. As well as an input box, the form includes three buttons. One is called Open Form, which retrieves records of patients who are either DTH original or not depending on the value entered. Another button is included called Show All, which retrieves records of all patients regardless of whether they are DTH original or not. Finally, a button called Cancel is included to enable you to close the form. Page 25 Figure 42: DTH Original Patients Query Form Show All button Open Form button Input box Cancel Button To search for DTH Original or non–DTH Original patients: 1) Enter “Y” for Yes or “N” for No in to the input box provided 2) Click on Open Form To view all patients records: 1) Click on Show All To close the form and return to the Query Menu: 1) Click on Cancel 3.2.10 Show Test Vs Epilepsy Syndrome Vs Test Result When you click on button 10 the Show Side Effects of Drugs query form will appear as shown in figure 43. This particular form provides three drop down menus. These drop down menus enable you to select a test name, test result and an epilepsy syndrome. The selected test name, test result and epilepsy syndrome will be used to retrieve specific patients that have undertaken a particular test, and suffered a certain epilepsy syndrome. As well as drop down menus, three buttons are included. One of the buttons is called Open Form, which displays records of patients who have undertaken the selected test and have suffered the selected epilepsy syndrome. Another button is called Show All, which shows records of all patients regardless of the tests undertaken and epilepsy syndrome suffered. Finally, a cancel button is included to enable you to exit the form at any point. Page 26 Figure 43: Test Vs Epilepsy Syndrome Vs Test Result Query Form Show All button Test Name, Test Result and Epilepsy Syndrome drop down menus Open Form button Cancel Button To select a test name: 1) Click on the down arrow on the right hand side of the drop down menu as shown in figure 44. Figure 44: Down Arrow Down arrow 2) Move the mouse cursor over a test name so that the test name is highlighted as shown in figure 45. Figure 45: Test Name highlighted 3) Click on the test name highlighted Page 27 The selected test name should appear in the drop down menu box as shown in figure 46 below. Figure 46: Selected test name appears in drop down menu box To select a test result and epilepsy syndrome follow the steps for the test name drop down menu. To retrieve records of patients who match the values selected from the drop down menus: 1) Click on Open Form To view all records of patients: 1) Click on Show All To close the form and return to the Query Menu: 1) Click on Cancel Page 28 3.3 Charts Menu To open the Charts Menu: 1) Click on “Charts” on the Main Menu (See Figure 47) Figure 47: Main Menu Button to open the charts menu When you have clicked on “Charts”, the Charts Menu will appear as shown in figure 48. This particular form contains a menu of buttons numbered 1 to 8. Five of the buttons are linked to a particular chart, two are linked to other chart menus, while the other enables the user to close the Chart Menu at any time. The following charts can be accessed from the Chart Menu: AED’s used for clinic population Number of AED’s tried per child AED that has been allocated first Number/Major/Minor side effects Causes of epilepsy Chart Menus that can be accessed from the Chart Menu: Test ordered and result Number of Specific Interventions per child Page 29 To access a particular chart: Click on buttons 1, 2, 3, 4 and 7 To access one of the extra chart menus Click on buttons 5 and 6 To close the chart menu and return to the Main Menu: Click on button 11 Figure 48: Chart Menu Buttons linked to charts Buttons linked to extra menu Button to return to Main Menu 3.3.1 Test Ordered and Result (Menu) When you click on button 5, the Test Ordered and Result menu form will appear as shown in Figure 49. This particular form provides a total of eleven buttons, which are all linked to a chart. The form also provides a close button to enable you to close the form and return to the Chart Menu. The following charts can be accessed from this form: AED Levels Blood Metabolic work-up Blood Sugar/Calcium Cardiology Assessment Chromosomes CT Brain Scan ECG MR Brain Scan Page 30 Other PET Scan Prolonged EEG Sleep EEG Specialist Centre Work-up SPECT Scan Straight EEG Toxoplasma Serology Urine Metabolic Work-up Video EEG To access a chart from the Test Ordered and Result menu: Click on the button that is linked to the graph of your choice To close the form and return to the Chart Menu: Click on the “Close Form” button Figure 49: Test Ordered and Result Menu of buttons that are linked to charts Close Form button 3.3.2 Number of Specific Interventions per Child (Menu) When you click on button 6, the Number of Specific Interventions per Child menu form will appear as shown in Figure 50. This particular form provides a total of seven buttons, which are Page 31 all linked to a chart. The form also provides a close button to enable you to close the form and return to the Chart Menu. The following charts can be accessed from this form: Behavioual Immunoglobulins Ketoginic Diet Other Palliative Surgery Resective Surgery VNS To access a chart from the Test Ordered and Result menu: 1) Click on the button that is linked to the graph of your choice To close the form and return to the Chart Menu: 1) Click on the “Close Form” button Figure 50: Number of Specific Interventions per Child (Menu) Menu of buttons that are linked to charts Close Form button Page 32 3.4 Maintain Drop Down Boxes Menu To access the Maintain Drop Down Boxes Menu: 1) Click on the “Main Drop Down Boxes Menu” button on the Main Menu (see Figure 51). Figure 51: Main Menu Maintain Drop Down Boxes Menu Button When you have clicked on “Maintain Drop Down Boxes Menu” the Maintain Drop Down Boxes Menu form will appear as shown in figure 52. This particular form provides a menu of buttons that direct you to a form that provides the functionality to change what options are included in the drop down menus contained in this database. Each button is numbered from 1 to 9. Buttons 1 to 8 are linked to a form that maintains and edits a drop down menu, while button 9 enables you to return to the Main Menu at any point. The following forms can be accessed from the Maintain Drop Down Boxes Menu: Maintain and Enter New Acute Treatments Maintain and Enter New Drug Names Maintain and Enter New Epilepsy Syndromes Maintain and Enter New Referrals Maintain and Enter New School Types Maintain and Enter New Seizure Types Maintain and Enter New Tests Maintain and Enter New Therapies To enter a form to maintain and edit a particular drop down menu: Page 33 1) Click on any button numbered between 1 and 8 To return to the Main Menu: 1) Click on button 9 Figure 52: Maintain Drop Down Boxes Menu Buttons 1 to 8 Return to Main Menu button 3.4.1 Maintain and Enter New Acute Treatments When you click on button 1 the form to maintain and enter new acute treatments will appear as shown in figure 53. This form contains an input box that enables you to enter a new record and view other records. Two navigation buttons are included that enable you to move to either the previous or the next record. Three other buttons are included. One is called Add, which adds the value entered in to the input box to the drop down menu. Another is called Delete, which enables you to delete a displayed value from the drop down menu. Finally, a button called close has been provided to enable you to close the form at any point. Figure 53: Maintain and Enter New Acute Treatments Add button to add a record value entered Button to show previous record Delete button Input box to view and enter a record value Button to view next record Close Form button Page 34 Note: All maintain drop down box forms are formatted in the same way. To add a value to the drop down menu: 1) Click on the Next record button until no value is displayed in the input box 2) Enter a value in to the input box provided 3) Click on Add To delete a value from the drop down menu: 1) Click on Delete To close the form and return to the Maintain Drop Down Boxes Menu: 1) Click on Close Form 3.5 Add New Patient Details To access the “Add New Patient Details” form: 1) Click on the “Add New Patients” button on the Main Menu (see Figure 54) Figure 54: Main Menu Add New Patient Details button Page 35 When you have clicked on the “Add New Patient Details” button the Add New Patient Details form will appear as shown in figure 55. This particular form is a blank version of the Patient Details form, which enables you to enter data. The form provides a close button to enable you to close the form and return to the Main Menu at any point. Figure 55: Add New Patient Details Form Input fields blank Close Form button To add a record to the patient table: 1) Enter values in to the empty form. The values entered are automatically added to the patient table. To close the form and return to the Main Menu: 1) Click on “Close Form” Page 36