1
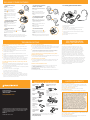
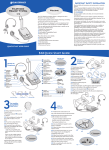
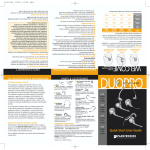
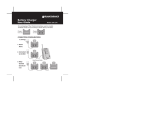
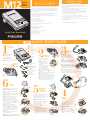
Universal
Headset
Amplifier
IMPORTANT SAFETY
INSTRUCTIONS
WELCOME
to the M12 Universal Headset Amplifier from Plantronics
®
The M12 Universal Headset Amplifier connects your single or multi-line
telephone to a Plantronics headset. The M12 Amplifier provides precise
levels of listening and talking comfort, superior protection, and excellent
audio performance.
Note: The M12 Amplifier is not designed to work on telephones that
have the dial pad in the handset or on cordless telephones.
This side of the user guide provides the following steps to quickly set up
and use your amplifier:
1. Identify the components
When using your telephone equipment, basic safety precautions
should always be followed to reduce the risk of fire, electric shock, and
injuries to persons.
1. This product can get its power from the telephone line. Please note
that a spark can occur if the cord is damaged.
2. Do not allow anything to rest on the telephone cord. Do not locate
this product where persons walking on it could damage the cord.
3. Unplug this product before cleaning. Do not use aerosol or liquid
cleaners. Use a damp cloth for cleaning.
4. Do not locate or use this product in wet environments.
5. Do not install this product during a lightning storm. Do not damage
or take apart this product.
6. Use all normal precautions that would apply to telephones or other
electrical appliances.
2. Install the batteries
3. Attach to telephone and headset
SAVE THESE INSTRUCTIONS
4. Check the default settings
5. Set telephone/amplifier compatibility slide switch
6. Make a test call
The other side has more details:
Quick Start User Guide
■
Examine other features
■
Troubleshooting
■
Technical Support Center Information
■
FCC Information
■
Parts and Accessories
■
Warranty and Service
M12 QUICK START GUIDE
1
5
Identify the
Components
1
2
3
4
TOP VIEW
6
7
Battery Door
Telephone/Amplifier
Compatibility Slide
Switch
Compatibility Slide
Switch Cover
Speak Volume Control
8
10
BACK VIEW
11
12
Telephone Jack
Handset Jack
13
AC Power
Supply Jack
14
15
16
10
Listen Volume
Control
Headset/
Handset
Selector Button
Mute Button
Screwdriver
6
Headset
Jack
2
Install the
Batteries
3
2.1
3.2 Plug your telephone’s handset
cord into the M12 Amplifier handset
jack 11 .
2.1 Slide both batteries
into the side of the M12
Amplifier as shown in the
illustration.
2.2
An outline of the battery ‘+’
and ‘–’ orientation is also
shown on the panel that
separates the two batteries
(top positive, bottom negative).
2.2 Use the battery door
both batteries.
1
3.1
3.1 Unplug your telephone’s handset
cord from the telephone base.
The M12 Amplifier requires
power to work with most
phones.
AC Power Supply
(Optional)
Amplifier to Quick
Disconnect (QD) Coil
Cable (Long Cord)
(included)
Amplifier to
Telephone Coil Cable
(Short Cord)
(included)
Two AA Batteries
(included)
Attach
Telephone
Headset
3.3 Plug one end of the short cord 15
into the telephone jack 10 and the
other end into the telephone handset
jack on the telephone base.
3.4 Connect the telephone plug end
of the the long cord 14 into the front
of the M12 Amplifier and attach the
Quick Disconnect (QD) module end to
any Plantronics H-Series professional
headset.
2.3
to push down on
2.3 Then slide the door into a locked position.
(The door does not snap in.)
3.2
3.3
15
The QD allows you to disconnect the
headset from the amplifier when you
are not using the telephone, or need to move away from your
telephone without removing your headset.
2.4 When the batteries are low, you will hear
three “beeps“ through the headset or you
will notice that the sound quality is not good.
3.4
2.5 An optional AC power supply can be
purchased and plugged into the AC power
supply jack. (See Parts and Accessories.)
14
Make a
Test Call
6.1
6.2
6.1 Ensure you have a dial tone by having
the telephone handset set off hook and
resting on the desk.
6.2 Use your telephone keypad to call a
friend or colleague.
6.3 Adjust the listen volume using the listen
volume control 5 . (1 is the quietest and 9 is
the loudest)
6.6 Snap in the compatibility slide
switch cover 3 by positioning the two
alignment guides into their slots and then
pushing in and down until it snaps shut.
Set Telephone/
Amplifier
Compatibility
Slide Switch
4
5.2
5.1 Put on headset and have amplifier
in the default settings (Step 4).
6.4 If your friend cannot hear you, or you
hear a buzz or hum, try changing the
compatibility slide switch (Step 5.4).
6.5 If necessary, adjust the speak volume
control by using the plastic screwdriver to
turn the speak volume control 4 until the
person on the other end can hear your voice
at an appropriate level.
5
5.1
5.2 Lift the telephone’s handset off the
cradle and place it on your desk.
6.3
5.3 If you hear a clear dial tone, you
can proceed to Step 6.
5.4 If you don’t hear a dial tone, adjust
the compatibility slide switch 2
following this process:
6.4
6.5
1 Slide out the flat, plastic
screwdriver 10 from the bottom of
the amplifier.
Experimenting with various switch
settings will not harm the amplifier or
your telephone.
6.7 After completing the call, return the
handset to its cradle.
6.6
4.1
Always start with these settings to use
your headset.
5.41
4.1 Headset /handset selector button 6
is depressed (colored indicator showing).
4.2 Mute button 7 is released (colored
indicator not showing).
2 Use the screwdriver to slide the
compatibility slide switch 2 until
you hear a clear dial tone.
The raised bumps on the access door will
allow you to push in and slide it open at
another time.
6.8 To receive a call, remove the handset from its
cradle, depress the headset button 6 and begin
talking through your headset.
Check the
Default
Settings
4.3 Listen volume control
5
is set to 4.
4.3
4.4 The speak volume control 4 has been
pre-set. You can adjust it in Step 6.5.
5.42
4.5 Compatibility slide switch
position 5.
2
in
4.5
4.4
4.2
EXAMINE OTHER FEATURES
1 To receive calls with your
headset
1.1 Put on your headset.
1.2 When your telephone rings,
push the headset / handset
button 6 (colored indicator is
showing).
1.3 Remove the handset from the
cradle and place it on your desk.
Your working system should look like this:
4 To switch from your telephone
handset to your headset
1.1
4.1 Alert your caller that there will
be a short delay, mount and adjust
your headset.
4.2 Push the headset/handset
button (colored indicator showing).
1.2
4.3 Resume talking through your
headset.
1.4 Begin talking to your calling
party.
1.5 To end a call, hang up the
handset.
5 To switch from your headset
to your telephone handset
1.3
5.1 Alert your caller that there will
be a short delay then release the
headset / handset button (colored
indicator not showing).
2 To make and receive calls with
your telephone handset
2.1 Release the headset / handset
button (colored indicator not
showing).
5.2 Remove your headset and pick
up your handset.
It provides the following benefits:
5.3 Resume talking through your
telephone handset.
2.2 Use the telephone handset as
normal.
Amplifier Features
2.2
3 To test the necessity of
batteries
If your compatibility slide switch 2 was set to 1
or 2, batteries may not be required.
SoundGuard® Plus™ technology quickly reduces the level
of harsh noises, such as fax tones
■
Call Clarity™ improves incoming and outgoing sound
■
Switch easily with one button selection between headset
and handset
■
Incoming and outgoing volume control
■
Mute control
6 To use the mute function.
6.1 Depress the Mute Button 7
(colored indicator showing). You will
be able to hear them but they can’t
hear you.
3.1 Remove the batteries.
3.2 Follow the instructions to make a call, Steps 6.1 to 6.3.
6.2 Release the mute button (colored indicator
not showing) to deactivate the mute function.
3.3 If you do not get a dial tone, your telephone model requires
batteries or maybe installed incorrectly (check set up steps).
FCC REGISTRATION
AND INFORMATION
TROUBLESHOOTING
I do not hear a dial tone when I try to make or receive a
telephone call.
■
If you are using batteries, confirm that they are good and placed
in the battery compartment correctly.
■
If you are using an AC power supply, confirm that it is plugged in
and the power outlet is turned on.
■
Confirm that the headset/handset selector button is depressed
(colored indicator showing).
I do not hear the caller clearly.
FCC Requirements–Part 68
■
If you are using batteries, confirm that they are good.
■
If your telephone has adjustable volume, set the volume on your phone to
mid or below mid-range. Use the listen volume control on your amplifier
to adjust the headset volume to a comfortable level.
■
Confirm that the compatibility slider switch is in the correct setting for
your telephone (see Step 5). You may want to try moving the switch
through all of the positions until you hear a clear dial tone.
■
Confirm that you have lifted the telephone handset out of the
cradle.
I get a low pitched hum in my headset speaker and/or my callers
complain they can hear hum.
■
Confirm that the telephone handset cable and the short cord to the
telephone are connected to the correct jacks (see Step 3).
■
■
Confirm that the compatibility slider switch is in the correct setting
for your telephone (see Step 5). You may want to try moving the
switch through all of the positions until you hear a clear dial tone.
My callers say that they can’t hear me at all or they can’t hear
me very well.
■
■
Make sure the headset microphone is positioned in front of or near
your mouth. If you are using a noise-canceling headset, the position
of the microphone is very important.
■
You may need to adjust the outgoing volume. See Adjusting Headset
Speak Volume Step 6.5.
■
If you have a voice tube, it may be clogged.
Try rinsing it with luke warm water only.
Try moving the telephone/amplifier compatibility slider switch through all
of the positions until the hum disappears.
I hear three ‘beeps’ in the headset.
■
If you are using batteries to power the M12 Amplifier, three ‘beeps’ tell
you that the batteries are low and need to be replaced. See “Install
Batteries” Step 2.
Plantronics Technical Assistance Center
This equipment complies with Part 68 of the FCC rules.
On the baseline underside is a label that contains, among
other information, the FCC registration number and ringer
equivalence number (REN) for this equipment. If requested,
this information must be provided to the telephone company.
The telephone company may make changes in its facilities,
equipment, operation or procedures that could affect the
operation of the equipment. If this happens, the telephone
company should provide you advance notice in order for you
to make the necessary modifications to maintain uninterrupted
services.
If you experience problems with your headset, please refer to the
warranty section for information on warranty and repair service.
If the problem is causing harm to the telephone network, the
telephone company may request that you remove the equipment
until the problem is resolved. In extreme cases, the telephone
company may be forced to disconnect your service before
notifying you of the problem.
The Plantronics Technical Assistance Center (TAC) is ready to assist you!
Dial (800) 544-4660 x5538 Sunday 5 p.m. through Friday, 5 p.m.
Pacific Standard Time or visit the Support section of our website at
www.plantronics.com.
For accessibility information also call the Technical Assistance Center (TAC).
Shake it and wait until it is completely dry.
Then put it back on the silver stem of your headset.
■
Confirm that the compatibility slider switch is correct for your telephone (see Set the Telephone/Amplifier Compatibility Slider Switch
Step 5). You may want to try moving the switch through all of the
positions until your caller hears you clearly.
PARTS AND ACCESSORIES
AC Power Supply
Amplifier Security Device
26503-01
40696-01
Attaches amplifier to desk
345 Encinal Street
Santa Cruz, California 95060
Telephone/Amplifier
Compatibility Slide Switch Door
26609-02
(800) 544-4660
www.plantronics.com
Plantronics Custom
Cradle Mate
40715-01
Battery Door
26609-02
Holds handset “off-hook” and
a flashing “BUSY” light indicates
when headset is in use
Amplifier to Telephone
Coil Cable
40974-01
Male to male
modular plugs
Amplifier to
QD Coil Cable
26716-01
QD to male
modular plug
© 2002-2003 Plantronics Inc. All rights reserved. Plantronics, the logo design,
Plantronics and logo design combined, and Quick Disconnect are trademarks
or registered trademarks of Plantronics Inc. All other trademarks are the
property of the respective owners.
Patents
US 5,259,780
Printed in USA. 63719-01 (2-03)
Cradle Mate only
40714-01
Easy-to-use device that
mechanically lifts the handset
“off-hook”
Velcro® Amplifier
Attachment Kit
17521-01
For information on accessories and spare parts, call Plantronics at
(800) 544-4660 x5538, or visit the Plantronics web site at
www.plantronics.com
LIMITED WARRANTY
What does this warranty cover?
This warranty covers any defects in workmanship or materials in this
product purchased in the U.S. or Canada. For warranty information in
other countries, contact your local distributor.
How long does the coverage last?
This warranty runs for two years from the date of purchase.
What will Plantronics do?
If the product is found defective, we will exchange it at no charge.
What does this warranty not cover?
Damage caused by, OR PERFORMANCE PROBLEMS RESULTING
FROM, USING THIS PRODUCT WITH AN UNAPPROVED NONPLANTRONICS headset AND/OR CONNECTOR CABLE, accident,
abuse, misuse, or an act of God (such as a flood) are not
covered. IMPLIED WARRANTIES, INCLUDING THOSE OF
MERCHANTABILITY, FITNESS FOR A PARTICULAR PURPOSE
AND NON-INFRINGEMENT SHALL (A) HAVE NO DURATION
GREATER THAN 2 YRS FROM THE DATE OF PURCHASE, (B)
TERMINATE AUTOMATICALLY AT THE END OF THAT PERIOD,
AND (C) TO THE EXTENT PERMITTED BY LAW, BE EXCLUDED.
Consequential and incidental damages, INCLUDING WITHOUT
LIMITATION, LOSS OF PROPERTY AND THOSE ARISING FROM
BREACH OF ANY EXPRESS OR IMPLIED WARRANTY, ARE NOT
THE RESPONSIBILITY OF PLANTRONICS, AND TO THE EXTENT
PERMITTED BY LAW, are excluded. Some states do not allow
the exclusion or limitation of incidental or consequential
damages, so the above exclusion may not apply to you.
How do you get service?
To obtain service in the U.S. contact Plantronics at 800.544.4660 x5538
and in Canada call (800) 540-8363.
How does state law apply?
This warranty gives you specific legal rights, and you may also have
other rights which vary from state to state.