1
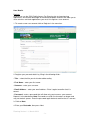
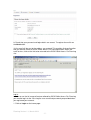
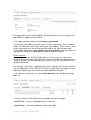
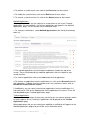
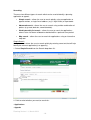
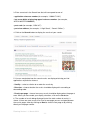
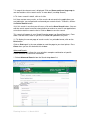
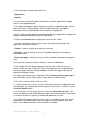
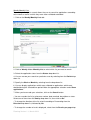
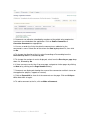
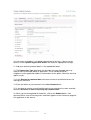
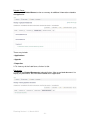
A Guide to Using Public Access for Planning
The Public Access for Planning website is designed to provide customers with an
easy to use system where they are able to search for and track planning applications
and appeals.
Users can;
•
Create a user account, which allows them to:
o Examine and edit their user profile
o Save common searches
o Track cases of interest and be notified of new and updated cases
o Comment on a variety of different types of planning application during
their consultation period.
•
Search for information
•
Examine search results
This short guide explains how to use the different functions on the website.
Planning Version 1.1, March 2013
-1-
Contents
User Details
3
Register
3
Log In
5
Forgotten Password
6
Logout
6
My Profile
6
Searching
10
Simple Search
10
Advanced Search
12
Weekly/Monthly Lists Search
14
Map Search
15
Application Details
18
Details
18
Comments
18
Related Cases
21
Documents
21
Map
22
Tracking Applications
23
Planning Version 1.1, March 2013
-2-
User Details
Register
Anyone can use the IDOX Public Access For Planning site to view planning
applications, but to take advantage of the advanced profile features that allow you to
save searches and track applications you must first register a user account.
1. To create a new user account click on Register in the menu bar.
2. Register your personal details by filling in the following fields:
• Title – select the title you wish to be addressed by.
• First Name – enter your first name.
• Surname – enter your surname.
• Email Address – enter your email address. Enter it again to confirm that it is
correct.
• Password – enter a password that will allow only you to access your account.
Repeat it in the box below. Note Passwords must be five characters or longer and
may not contain spaces. Enter the password again below to confirm that it is correct.
3. Click on Next.
4. Enter your Postcode, then press Next.
Planning Version 1.1, March 2013
-3-
5. Select your address from the drop down list, then click on Next.
6. If your address is not listed, select My address is not on the list and click on
Next.
7. Enter your address details in the appropriate fields, then click on Next.
8. Click to read the Terms and Conditions and Privacy Policy that apply to the use
of this site. When you have done so, tick the check box to indicate that you agree to
them.
Planning Version 1.1, March 2013
-4-
9. Check that your personal and login details are correct. To register them click on
the Next button.
10. An email will be sent to the address you entered. This provides final confirmation
that you want to create an IDOX Public Access For Planning account. When the
email arrives, click on the link to be returned to the IDOX Public Access For Planning
site.
Log In
In order to use the full range of features offered by IDOX Public Access For Planning
you need to log in to the site using the user name and password you provided when
you registered your account.
1. Click on Login on the home page.
Planning Version 1.1, March 2013
-5-
2. Enter your user name and password, then click on the Login button.
Forgotten Password
1. If you forget your password, click on the Forgotten password? link.
2. Enter your email address and then enter a new password twice. Press the Save
button.
3. A confirmation email will be sent to your email address. When it arrives, click on
the confirmation link. You will now be able to log in with your new password.
Logout
When you are finished using IDOX Public Access For Planning, remember to log out
by clicking on the Logout button in the menu bar.
My Profile
Once your account has been created you can access your My Profile area. This area
allows you to configure your personal details as well as manage your searches and
applications.
• Profile Details – your full personal details
• Saved Searches – a list of searches which you have saved
• Notified Applications – notifications that applications that you are tracking, or are
the subject of saved searches, have been modified
• Tracked Applications – a list of applications that you have elected to track.
* Profile Details
The Profile Details page can be accessed at any time to allow you to update any of
your account details.
1. To access your profile page select Profile Details from the My Profile drop down
list in the menu bar.
Planning Version 1.1, March 2013
-6-
This page allows you to view the details you registered with. You can change any of
those details or update your password.
2. To update your password click on Change my password.
3. Enter your email address and then enter a new password twice. Press the Save
button. A confirmation email will be sent to your email address. When it arrives, click
on the confirmation link. You will now be able to log in with your new password.
4. To change your details click on Update my personal details. Alter your details as
appropriate, clicking on the Next button to page through the sections.
Saved Searches
The primary activity on the IDOX Public Access For Planning site is to perform
searches for planning information. Searches that will be performed frequently can be
saved so that they may be repeated easily as often as you like (see the Searching
guidance document).
Any changes to the status of applications previously found by your search criteria or
any new applications which match the criteria of a saved search will trigger an email
notification. Notifications are listed in the Notified Applications page.
1. To view your saved searches, select Saved Searches from the My Profile drop
down list.
2. You can sort the list by clicking on the appropriate column headings:
• Search Title – sort the list alphabetically by search title
• Search Type – sort the list alphabetically by search type
Planning Version 1.1, March 2013
-7-
3. To perform a saved search now, click on the Run button for that search.
4. To modify the search criteria, click on the Edit button for that search.
5. To remove a search from the list, click on the Delete button for that search.
Notified Applications
When applications that are the subject of a saved search or are in your Tracked
Applications list are modified, a list of those applications will appear in the Notified
Applications page. You will also be sent a notification email.
1. To view your notifications, select Notified Applications from the My Profile drop
down list.
2. The tracked applications that have been modified are listed at the top of the
screen. These are followed by the modified applications that are subject to your
saved searches.
3. To view an application, click on the View button for that application.
4. To remove an application from the notifications list, click on the Discard button for
that application. To delete all of the notified results for a particular search, click on
Discard all results from this search.
5. Additionally, you can select saved search applications from the notifications list
and track these. Click on the Track button for the applications of interest. These will
now be added to your Tracked Applications page.
Tracked Applications
After locating an application of interest by searching, you can choose to keep a watch
on what happens to it by Tracking it. Applications are displayed on the Tracked
Applications page.
When applications that you are tracking are modified, a notification will appear on the
Notified Applications page and you will be sent a notification email.
Planning Version 1.1, March 2013
-8-
1. To view these applications, select Tracked Applications from the My Profile drop
down list.
2. You can sort the list by clicking on the appropriate column headings:
• Case Number – sort the list alphanumerically by case number
• Address – sort the list alphanumerically by the address that is the subject of the
application
• Type – sort the list alphabetically by the application type
• Status – sort the list alphabetically by the status of the application.
3. To view a tracked application, click on the View button for that application.
4. To remove an application from the tracked applications list, click on the Stop
Tracking button for that application.
Planning Version 1.1, March 2013
-9-
Searching
There are four different types of search which can be used to identify a planning
application or appeal;
•
Simple search – allows the user to search quickly using an application or
appeal number, a single line of address (e.g. 1 High Street) or a postcode.
•
Advanced search – allows the user to search using a wider combination of
options (e.g. ward, decision, committee date).
•
Weekly/monthly list search – allows the user to search for applications
whose status has been validated or decided within a particular time period.
•
Map search – allows the user to search for applications using an interactive
map tool.
Simple Search
A simple search allows the user to search quickly by entering some text that will help
identify the relevant application(s) or appeal(s).
1. Select Simple Search from the Search drop down list.
2. Click to select whether you want to search for:
• Applications
• Appeals
Planning Version 1.1, March 2013
- 10 -
3. Enter some text in the Search box that will correspond to one of:
• application reference number (for example, “12/00317/1HH”)
• last seven digits of planning appeal reference number (for example,
“APP/X1925/D/12/1234567”)
• post code (for example, “SG6 3JF”)
• part of an address (for example, “1 High Street”, “Council Offices”).
4. Click on the Search button to display the results of your search.
5. You can manipulate how the search results are displayed to help you find
applications of particular interest:
• Sort By – select a criterion to re-order the results by
• Direction – choose whether the results should be displayed in ascending or
descending order
• Results per page – choose how many results should be displayed on the page at
once. When you have made your display selections, click on the Go button.
6. The number of results being displayed (out of the total number of results) is
shown. If there are more results than fit on to one page you can navigate between
the results pages either by clicking on Next to view the next page or by clicking
directly on the page number.
Planning Version 1.1, March 2013
- 11 -
7. A map of the relevant area is displayed. Click on Show results on large map to
see the locations of the search results in more detail (see Map Search).
8. To view a search in detail, click on its title.
9. If there are too many results, or if the results do not contain the applications you
are looking for, you can go back and amend your search criteria. To do this, click on
the Refine Search button.
10. If this search is one that you will reuse, click on the Save Search button. You can
edit the search name here and select whether to receive an email if new applications
arrive that match the search criteria. Click on Save to save the search.
This search will appear in your Saved Searches page (see Saved Searches). From
there it can be run as often as you like, or edited and updated at any time.
11. To display the current page of search results in a printable format, click on the
Print button.
Click on Print again in the new window to send the page to your local printer. Press
Close when you are finished with this window.
Advanced Search
An advanced search allows the user to build a complex combination of specific
criteria on which to search for information.
1. Select Advanced Search from the Search drop down list.
Planning Version 1.1, March 2013
- 12 -
2. Click to display a search page specific to:
• Applications
• Appeals
3. If you know a reference number that identifies a specific application or appeal
enter it in the appropriate box.
4. The Application/Appeals details allow you to specify an application type, status or
decision as well as location details, which include ward, parish and address
information. Enter any combination of these details as appropriate.
5. Enter a Date range to define the period during which the application or appeal was
lodged, validated or decided by court or inspectorate.
6. Click on the Search button to display the results of your search.
7. You can manipulate how the search results are displayed to help you find
applications of particular interest:
• Sort By – select a criterion to re-order the results by
• Direction – choose whether the results should be displayed in ascending or
descending order
• Results per page – choose how many results should be displayed on the page at
once.
Once you have made your display selections, click on the Go button.
8. The number of results being displayed (out of the total number of results) is
shown. If there are more results than fit on to one page you can navigate between
the results pages either by clicking on Next to view the next page or by clicking
directly on the page number.
9. A map of the relevant area is displayed. Click on Show results on large map to
see the locations of the search results in more detail (see Map Search).
10. To view a search in detail, click on its title.
11. If there are too many results, or if the results do not contain the applications you
are looking for, you can go back and amend your search criteria. To do this, click on
the Refine Search button.
12. If this search is one that you will reuse, click on the Save Search button. This
search will appear in your Saved Searches page (see Saved Searches). From there
it can be run as often as you like, or edited and updated at any time.
13. To display the current page of search results in a printable format, click on the
Print button. Click Print again in the new window to send the page to your local
printer. Press Close when you are finished with this window.
Planning Version 1.1, March 2013
- 13 -
Weekly/Monthly Lists
The weekly/monthly lists search allows the user to search for applications according
to the week or month in which they were either validated or decided.
1. Click on the Weekly/Monthly Lists tab.
2. Click on Weekly List or Monthly List to select which list you want to search.
3. Select the application status from the Status drop down list.
4. You can narrow your search to a particular area by selecting from the Parish drop
down list.
5. Specify the Week or Month by selecting from the drop down list.
6. You can display applications which were validated or applications which were
decided during the selected time period. Make the appropriate selection under Show
applications.
7. When you have made your selections, click on the Search button.
• You can re-order the list by reference number, date received, description or status.
Select one of these from the Sort by drop down list, then click on Go.
• To change the direction of the list select Ascending or Descending from the
Direction drop down list, followed by Go.
• To change the number of results displayed, select from the Results per page drop
Planning Version 1.1, March 2013
- 14 -
down list, followed by Go.
• If there are more results than fit on one page, navigate to further pages by clicking
on Next or by clicking on the Page Number directly.
8. To add this search to your Saved Searches page, click on the Save Search
button.
9. You can print off this list by clicking on the Print button.
10. The application locations are displayed on a Map on the right. You can display a
larger map by clicking on Show results on large map.
11. If there are too many results you may want to add more information to the
Search. Click on the Refine Search button.
Map Search
The map search allows the user to identify locations where there has been a
planning application using an interactive map.
Note This feature is only recommended for broadband users.
1. If the interactive map is not displayed, click on the Map Search tab.
2. Select the time period during which applications have been actioned. The location
of a planning application is displayed as a red polygon – as shown in the image
above.
Planning Version 1.1, March 2013
- 15 -
3. The interactive map contains a number of tools to help you zoom in and locate the
desired addresses:
Initial map view button – zooms the map out to show the widest possible view
Zoom in button – zooms in to a point on the map
Zoom out button – zooms the map out
Pan mode button – the user can pan the displayed map in any direction by
dragging the map view
Zoom to rectangle button – zooms to the displayed map view to a rectangle
area drawn by the user
Previous view button – returns the displayed map to the previous view
Next view button – when the Previous View tool has been used; this returns
the displayed map to the view that followed the one that is currently displayed
Select mode button – allows the user to select a case on the map and display
the case information closest to that point. If there is more than one case, a
search results list allows the user to select the case of interest
Zoom slider – an alternative method for zooming in and out of the map view
Pan arrows – pan the displayed map up, down, left and right
4. Users can identify a case by hovering over one of the properties outlined in red
(showing that there has been a planning application at this site). The reference
number for the application will be shown.
5. The applications shown on the map are listed by reference number to the right. To
open one of these, click on the application reference number.
6. Alternatively you can display the applications on the map as a search results list.
To do this, click on Show Results as a List.
Planning Version 1.1, March 2013
- 16 -
• You can print off this list by clicking on the Print button.
• The application locations are displayed on a Map on the right. You can return to the
original map by clicking on Show results on large map.
7. You can add a map search to your Saved Searches list in one of two formats:
• Save Map Extents Search – click on this to save the search, incorporating all of
the applications shown on the map
• Save Proximity Search – select a proximity distance, then click on this to save the
search, incorporating all of the applications within the selected distance.
Planning Version 1.1, March 2013
- 17 -
Application Details
Once you have selected an application from your search results the application
details will be displayed.
The application details are displayed at the top of the page, with further tabs below
containing all of the relevant information about the application.
Details
1. Click on the Details tab to display the full details relating to the application.
2. The Application Details are split up into four tabbed sections. Click on the
appropriate tab to display those details:
• Summary – displays the basic information pertaining to the application. The
summary also identifies the number of the cases and properties that have been
added to this application. Click on one of these to view
them.
• Further Information – displays additional information about the application that
was not included in the summary.
• Important Dates – displays the dates on which important events in the lifespan of
the application occur from initial submission through to the decision.
Comments
1. Click on the Comments tab to display comments that have been made about this
application.
Planning Version 1.1, March 2013
- 18 -
2. Comments can either be submitted by members of the public or by people who
have been consulted about the application. Click on Public Comments or
Consultee Comments as appropriate.
3. You can re-order the list by the date the comment was added or by the
commentor’s name. Select one of these from the Sort by drop down list, then click
on Go.
4. To change the direction of the list select Ascending or Descending from the
Direction drop down list, followed by Go.
5. To change the number of results displayed, select from the Results per page drop
down list, followed by Go.
6. If there are more results than fit on one page, navigate to further pages by clicking
on Next or by clicking on the Page Number directly.
7. Comments are displayed showing the name of the commentor and their stance on
the application (objects, supports or neutral).
8. Click on Expand All to view all of the comments on the page. Click on Collapse
All to hide them all again.
9. To add a comment to the list, click on Make a Comment.
Planning Version 1.1, March 2013
- 19 -
10. Your name and address are added automatically to the form. If these are not
correct, click on update my personal details and make the appropriate changes.
11. Add your remaining contact details in the appropriate boxes.
12. The Commentor Type drop down list describes the type of people who may
need to make a comment about an application. These include councillors,
neighbours to the application address and members of the public. Select the one that
applies to you.
13. In the Reason for comment box select one or more of the offered reasons for
making your comment.
14. Enter the details of your comment in the Your Comment box.
15. If you want to receive an email confirming that your comment has been received,
check the Send me an email confirming my comments box.
16. When you have completed all the details, click on the Submit button. Your
comment will be sent to Planning and a record will appear on the Comments page for
this application in due course.
Planning Version 1.1, March 2013
- 20 -
Related Cases
1. Click on the Related Cases to view a summary of additional information related to
the application.
These may include:
• Applications
• Appeals
• Properties.
2. To view any of the listed items, click on its title.
Documents
1. Click on the Related Documents tab and click on ‘View associated documents’ to
display any documents that have been added to this application.
Planning Version 1.1, March 2013
- 21 -
Map
1. Click on the Map tab to display the area of the application on a map.
2. The interactive map contains a number of tools to help you view the application
area:
• Initial map view – click this to zoom the map out to show the widest possible view.
• Zoom in – select this tool then click a point on the map that you want to zoom in to.
Alternatively you can drag the Zoom Slider up.
• Zoom out – select this tool then click on the map to zoom out. Alternatively you can
drag the Zoom Slider down.
• Pan mode – to move around the map, select this then click on the map. Keeping
the mouse button depressed, drag the cursor in the direction that you want to pan.
Alternatively you can click on the Pan Direction arrows on the map.
• Zoom to rectangle – to zoom in on a selected area, select this tool then click and
drag the cursor to draw an area on the map.
• Previous view – to return to the previous view, click on this tool.
• Next view – when you have used the Previous view tool, click on this button to go
to the view that followed the one that is currently displayed.
Planning Version 1.1, March 2013
- 22 -
Tracking Applications
Any application or appeal can be Tracked so that you can keep up to date with its
progress without having to search for it again.
1. Once you have performed a search, view the details of one of the resulting
applications.
2. If you want to add this to your Tracked Applications page (see Tracked
Applications), click on the Track button.
3. To return to this application at a later date, select Tracked Applications under My
Profile.
4. To stop tracking an application, return to the application details and click the Stop
tracking this application button at the top of the page. Alternatively click the Stop
Tracking button next to the application in the Tracked Applications page.
Planning Version 1.1, March 2013
- 23 -