1
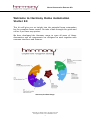
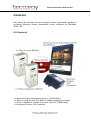
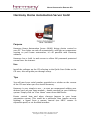
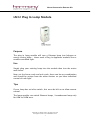
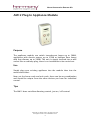
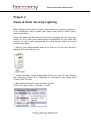
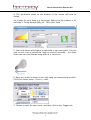
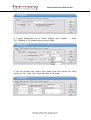
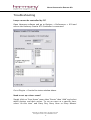
Harmony Home Automation Starter Kit
User Guide
Copyright (c) iDomus Ltd 2004. All rights reserved.
Home Automation Starter Kit
Welcome to Harmony Home Automation
Starter Kit
This kit will give you an insight into the potential home automation
has for complete home control. Do take a look through this guide and
call us if you have any queries.
We have developed the Harmony range to span all areas of Home
Automation and all components are designed to work together with
common interfaces and features.
Harmony Product Range
Copyright (c) iDomus 2005. All rights reserved.
For Support contact [email protected]
2
Home Automation Starter Kit
Contents
Our starter kit contains our most popular Home Automation products,
including Harmony Home Automation Server software for Windows
2000 / XP.
Kit Contents
1
1
1
1
x
x
x
x
Harmony Home Automation Server – Gold Edition
Plug in Lamp module (for 60W to 300W incandescent lamps)
Plug in Appliance module (for up to 230V AC 500W loads)
Harmony Granite X10 Controller
Copyright (c) iDomus 2005. All rights reserved.
For Support contact [email protected]
3
Home Automation Starter Kit
Harmony Granite X10 Controller
The X10 system that these modules use works on Powerline
technology, therefore there is no need to connect your appliances /
lamps with data cables. All the commands to turn lights and other
devices on, off and dim are sent over regular household mains wiring.
Purpose
The purpose of the Harmony Granite X10 Controller is to interface
between your PC and Harmony software and your X10 devices.
Use
The Harmony Granite X10 Controller connects between a mains socket
and your PC’s serial port. The unit must be connected before you start
Harmony software and must remain connected for computer control.
Installation
1.
2.
3.
4.
Connect to your PC’s serial port using supplied cable.
Install Harmony Granite plug-in from www.iDomus.co.uk.
Restart Harmony Home Automation Server.
Go to Plug-in > Granite on Harmony menu.
Copyright (c) iDomus 2005. All rights reserved.
For Support contact [email protected]
4
Home Automation Starter Kit
5. Plug-in window below shows current status and you can set the
COM port here.
6. Finally, change all devices (in Properties pane) to show Granite as
Controller.
Tips
If your computer is any lacking a serial port, don’t worry - USB
adapters are available separately.
Copyright (c) iDomus 2005. All rights reserved.
For Support contact [email protected]
5
Home Automation Starter Kit
Harmony Home Automation Server Gold
Purpose
Harmony Home Automation Server (HHAS) brings device control to
your PC. Turn lights on and off automatically, add light or temperature
sensing to your home automation, it’s all possible with Harmony
software.
Harmony has a built in web server to allow full password protected
control over the internet.
Use
Install the software on the CD referring to the Quick Start Guide on the
CD case, this will guide you through setup.
Tips
You will need your serial number provided on a sticker on the reverse
of the CD case when you first install Harmony.
Harmony is very simple to use – to start we recommend adding your
devices (such as your lamp module – details overleaf) to your Harmony
system. Simply click on “Your Home” menu then Add Device.
Events control how and when changes happen in your home
automation system. This could be a particular time (maybe security
lighting), a signal from a remote control (see KR22 remote in
expansion pack) or via the Web interface.
Copyright (c) iDomus 2005. All rights reserved.
For Support contact [email protected]
6
Home Automation Starter Kit
LM12 Plug In Lamp Module
Purpose
The plug in lamp module will turn a filament lamp (not halogen or
energy saving bulbs – these need a Plug in Appliance module) into a
remote controlled light.
Use
Simply plug your existing lamp into the module then into the mains
wall socket.
Now, set the house code and unit code, these can be any combination
and should be unique from the other devices so you have individual
control of each light.
Tips
If your lamp has an inline switch, this must be left on to allow remote
control.
The lamp module can switch filament lamps / incandescent lamp only
for 60W to 300W max.
Copyright (c) iDomus 2005. All rights reserved.
For Support contact [email protected]
7
Home Automation Starter Kit
AM12 Plug In Appliance Module
Purpose
The appliance module can switch incandescent lamps up to 500W,
appliances with electric motors up to 250W or halogen floor lamps
with foot dimmer up to 500W. The unit is simply inserted into a wall
socket like an ordinary plug, there is no installation to be carried out.
Use
Simply plug your existing appliance into the module then into the
mains wall socket.
Now, set the house code and unit code, these can be any combination
and should be unique from the other devices you have for individual
control.
Tips
The AM12 does not allow dimming control, just on / off control.
Copyright (c) iDomus 2005. All rights reserved.
For Support contact [email protected]
8
Home Automation Starter Kit
Project 1
Simple Device Control from your computer
With the parts supplied in the kit you can control 2 lamps from your
computer, one with each of the Plug in Modules included.
1. Install the software as detailed on the information pack on the
inside of the DVD cover.
2. Now plug a lamp into the front sockets of the Plug
in Modules and then into a mains wall socket. Turn
the address dials on the first lamp unit to “A1” and the
second to be “A2”.
TIP: Please ensure that the bulbs you use are normal
“Tungsten” bulbs and not low energy type.
3. Plug in your Harmony Granite X10 Controller into a
mains socket and plug the serial cable supplied into
both the Granite X10 Controller and a spare serial port
on your computer.
3. Run Harmony and ensure that the system initialises the Computer
Interface correctly – see bottom line of Harmony Control Panel.
Tip: You look in log file to see that the system correctly initialises the
unit by clicking View –> View Log.
4. Click the “Devices” tab and select the “Properties” button to bring up
the pane which allows devices to be edited or created.
5. In this device panel, create 2 devices called “Lamp1” and “Lamp2”
and set the device type to be “Lamp Dimmer – Plug in” or “Appliance
Module – Plug in” as appropriate.
6. You should now be able to turn the lights on and off by clicking on
images of the lamps that are displayed once you press the “icon” tab to
show the pictures of the devices. You can also dim and brighten the
unit by dragging the slider underneath each device.
TIP: If the lights do not switch, ensure that any switches built into the
lamps are in the “On” position.
Copyright (c) iDomus 2005. All rights reserved.
For Support contact [email protected]
9
Home Automation Starter Kit
Project 2
Dawn & Dusk Security Lighting
Many become interested in Home Automation for security purposes –
as an intelligent way to make your home look lived in when you’re
away from home.
Using the dawn and dusk feature built into Harmony you can turn your
lights on at a dusk time determined automatically by the date and
season, so that it will compensate for dark winter nights and long
summer evenings.
1. Plug in your lamp module and set to code A1 on the unit. Attach a
lamp to this unit and turn on.
2. Install Harmony Home Automation Server on your PC and connect
the Harmony Granite X10 Controller as detailed in the Quick Start
Guide in the CD case.
3. Now add the lamp to your Harmony system.
Click Your Home menu -> Devices -> Add.
Copyright (c) iDomus 2005. All rights reserved.
For Support contact [email protected]
10
Home Automation Starter Kit
4. The preference panel at the bottom of the screen will now be
shown.
Set a name for your lamp (e.g. My Lamp). Make sure the address is A1
and type is “Lamp Module (plug in)”. Then click “Save”.
5. Your new device will show as a light bulb in the main panel. You can
click on this icon to switch the lamp on and off manually – the slider
under the icon can dim the lamp when it is turned on.
6. Now, let’s make an event to turn this lamp on automatically at dusk.
Click Your Home menu -> Event -> Add.
7. Choose a name for your event, and then click on the Trigger tab.
Copyright (c) iDomus 2005. All rights reserved.
For Support contact [email protected]
11
Home Automation Starter Kit
8. Trigger should be set to “Other trigger” then System - > Dusk
Tip : Predusk is 30 minutes prior to dusk time.
9. On the Actions tab, select your Lamp from the device list, then
action on “On”. Now click “Save” and you’re finished!
Copyright (c) iDomus 2005. All rights reserved.
For Support contact [email protected]
12
Home Automation Starter Kit
Troubleshooting
Lamps cannot be controlled by PC?
Open Harmony software and go to Options -> Preferences -> X10 and
ensure the Harmony Granite X10 Controller is connected.
Go to Plugins > Granite for status window above.
Need to set up a timer event?
Simply click on “Your Home” menu then “Events” then “Add” and select
which devices and their action. To set an event at a specific time,
select “At this time” and Every Day, Every Hour or Every Minute.
Copyright (c) iDomus 2005. All rights reserved.
For Support contact [email protected]
13
Home Automation Starter Kit
X10 not controlling all devices? Some not responding?
X10 is a powerline technology (the signals are passed over your
existing mains power cables to each module) so you don't need
additional wiring. However, occasionally these signals fail to get
through correctly.
The number one reason for signal loss is interference, this is due to a
"noisy" appliance putting interference on to the mains power supply
which weakens or stops X10 signals.
Common interference generators are TVs, Fridges, Microwaves, PCs
and Power adapters (like those for mobile phone). We suggest turning
as much as you can off in your home, then gradually turn appliances
on one by one, testing the X10 signals as you go. When you identify
the problematic device we can recommend filters (plug in or
DIN) if needed.
It also might be worth moving your Harmony Granite X10 Controller or
TM13 to see if the signal gets through better from another socket.
Devices turning on or off at random?
Firstly, check your Harmony log – go to View > View Log and see
whether the signals were sent from an event you have forgotten about.
If this is not the case, you should try changing the house and unit code
as your neighbours may use X10.
Can’t access the web server?
Firstly try the web server from the same machine that runs Harmony, if
this works but external access is not working, you must check your
internet router / firewall settings. Harmony runs on port 80 as default
(you can change this to any port 80 – 100) therefore this port must be
allowed through any internet security you have. This is often referred
to as “port forwarding” or “virtual servers” in your routers
documentation.
Copyright (c) iDomus 2005. All rights reserved.
For Support contact [email protected]
14
Home Automation Starter Kit
Support
We understand that you may have some queries regarding this kit.
If you have any questions please do let us know.
[email protected]
0845 644 3330
Contacts
iDomus Limited
Unit 23
Wornal Business Park
Worminghall
Bucks
HP19 9PH
Web
Email
www.iDomus.co.uk
[email protected]
iDomus Limited
UK Company number 4116740
Copyright (c) iDomus 2005. All rights reserved.
For Support contact [email protected]
15