1
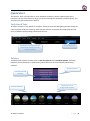
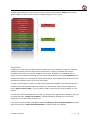
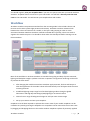
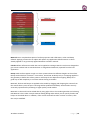
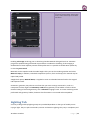
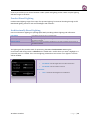
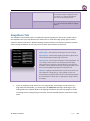
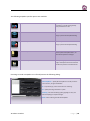
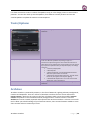
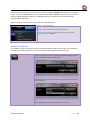
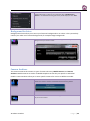
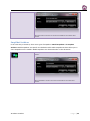
3D Photo Visualiser User Guide Contents Introduction ............................................................................................................................................ 2 Quick Start............................................................................................................................................... 3 Task-based Tabs .................................................................................................................................. 3 Palettes ............................................................................................................................................... 3 Toolbars .............................................................................................................................................. 4 Materials ............................................................................................................................................. 4 SnapShots............................................................................................................................................ 5 Workflow................................................................................................................................................. 6 Model-Type ............................................................................................................................................. 7 Interface Controls ................................................................................................................................... 7 Camera Controls ................................................................................................................................. 7 Rendering Controls ............................................................................................................................. 8 Creating SnapShots ............................................................................................................................. 9 Digital Assets Library ........................................................................................................................... 9 Materials Tab ...................................................................................................................................... 9 Lighting Tab ........................................................................................................................................... 11 Product Based Lighting ..................................................................................................................... 12 Architecturally Based Lighting .......................................................................................................... 12 Editing Lighting and Base Shadowing ............................................................................................... 13 Backgrounds Tab ................................................................................................................................... 14 Product Based Backgrounds ............................................................................................................. 15 Architectural Based Backgrounds ..................................................................................................... 16 Cameras Tab.......................................................................................................................................... 16 SnapShots Tab ....................................................................................................................................... 17 Advanced SnapShots Usage .............................................................................................................. 19 Tools/Options........................................................................................................................................ 20 Archives ................................................................................................................................................. 20 Material Archives .............................................................................................................................. 21 Background Archives......................................................................................................................... 22 Camera Archives ............................................................................................................................... 22 SnapShot Archives............................................................................................................................. 23 Frequently Asked Questions: ................................................................................................................ 24 3D Photo Visualiser Page |1 Introduction 3D Photo Visualiser is a tool for generating photorealistic images from CAD data quickly and easily. 3D Photo Visualiser is aimed at the design review process allowing you to profile combinations of materials and lighting before moving onto final quality imagery. Ease and speed of setup of a full scene (SnapShot) is fundamental to 3D Photo Visualiser, allowing multiple SnapShots to be previewed and generated, ready for off-line software rendering. 3D Photo Visualiser uses a combination of high quality hardware OpenGL rendering for setup and review, along with powerful, scalable CPU based rendering for high quality ray traced and global illumination imagery. 3D Photo Visualiser comes fully loaded with predefined materials, lighting, environments and backgrounds, so you can get started straight away, creating great images. Toolbar access to all functions + file handling Task-based tabs Render Window Dialog changes based on the current tab View controls Render controls Create SnapShot dependent on dependent on controls dependent on Link to content controls dependent on Drag and drop from here to the render window 3D Photo Visualiser Page |2 Quick Start The sections, later in this document, cover 3D Photo Visualiser in detail, explaining the entire interface. The aim of this section is to get you up and running with 3D Photo Visualiser quickly. You are advised to also read the later sections. Task-based Tabs 3D Photo Visualiser is task-based; for example: setting up materials and lighting and the setting the camera position ready for rendering. Each of these tasks has a separate tab. Clicking the tabs will result in different options being presented to the user. Selecting a non-highlighted tab will result in it being set as the current active tab Current Active Tab Palettes Task-based tabs contain 2 palette types: a directory palette and a thumbnail palette. Switching between various directories in the directory palette will result in the thumbnail palette being updated. Directory Palette Currently selected directory Thumbnail Palette 3D Photo Visualiser Thumbnails can be dragged and dropped Page |3 Toolbars Drag View Orbit View Walk View View Fit Track View Pan View Create a Model Camera Edit Background Edit Lighting Interrupt Render Progressive Render Export Last Render Portrait / Landscap e Take a SnapShot Sub-Image Render Render SnapShots Render Current View to File Digital Content Shop Print SnapShots Show SnapShots in Windows Explorer Add All Materials to Archive Add SnapShot to Archive Add Current Background to Archive Add Current Camera View to Archive Materials When your model is loaded into 3D Photo Visualiser it will contain the colour and texture information that was applied in the PlansXpress. 3D Photo Visualiser allows you to extend this material information to give more realistic looking materials. The Materials tab contains 3 categories: Materials, Finishes and Bumps. Materials contain full material definitions, including: colour, finish and bump components. Applying a material will completely override the material applied in the PlansXpress. Finishes contain reflectance and transparency properties such as mirror 3D Photo Visualiser Page |4 or glass. Applying finishes is important if you want realistic looking renders. Bumps make surfaces appear rough or to have a pattern based on different heights on the surface. Materials Finishes Bumps SnapShots SnapShots are used to store all data needed to replay your scene. SnapShots contain the materials, background, lighting, cameras and model size information. Creating a SnapShot will store the information as it was at the time the SnapShot was created. SnapShots are a powerful tool for saving the various stages of the design process. Create a SnapShot by pressing the SnapShot icon. A thumbnail will appear in the SnapShots tab thumbnail palette. This SnapShot now contains all of the information required to replay your scene at this point. To apply your SnapShot at a later time simply drag and drop the SnapShot. The render window will update to show your SnapShot materials, camera, etc. Alternatively, right-click the SnapShot and select “Apply to Current View”, if you only wish to apply a particular part of the SnapShot, e.g. the camera. You can also render the SnapShot direct to file, e.g. JPEG, PNG etc. Right-click the SnapShot you wish to render and select “Render this SnapShot”. A dialog will appear allowing you to set the file properties, such as the render resolution etc. If you have created a number of SnapShots hold the CTRL Key to select multiple SnapShots and then right-click and select “Render Selected SnapShots” to batch render your selection. 3D Photo Visualiser Page |5 You should regularly save your SnapShot data if you wish it to persist next time you launch 3D Photo Visualiser. SnapShot data is saved next to your CAD model. You will find a directory with the same name as the CAD model. This will contain your SnapShot data and renders. Workflow 3D Photo Visualiser interprets 3D CAD data from the incoming model. This includes colours and textures and in some systems light position and intensity. 3D Photo Visualiser maintains links between the colours and textures in a model, or the layers and grouping in order to retain association between 3D Photo Visualiser materials and CAD data. Typically, colours are used to segment the model into parts. This should be done within the PlansXpress before moving into 3D Photo Visualiser. Most of the workflow in 3D Photo Visualiser is controlled using drag and drop of preset materials, lighting and backplate images. Updates are shown in OpenGL or Progressive rendering can be used to preview the final render. After bringing the model into 3D Photo Visualiser apply materials, finishes and bumps to alter the appearance of the model. These will automatically cover all objects with the same incoming material. Predefined lighting setups range from fast basic lighting studios through to global illumination and High Dynamic Range (HDR) lighting for increased realism. Choose from a range of background images or add your own custom image Set up your camera and save your SnapShot. SnapShots store all data required to replicate the current state of your model. SnapShots can be created at any time by pressing the SnapShot icon. SnapShots can be restored to the current scene by dragging and dropping them onto the render window. SnapShots replace all previously applied 3D Photo Visualiser Page |6 data with data stored in the SnapShot. SnapShots allow different material finishes and lighting to be evaluated on the CAD model. SnapShot data is stored next to the model, on disk, in a folder with the same name as the model. The final stage is to render out high quality images from SnapShots. SnapShots can be rendered out to standard image file formats at any time, either individually or as a group. Model-Type 3D Photo Visualiser considers 2 types of CAD model: Product and Architectural. 3D Photo Visualiser can be launched in Product or Architectural mode to reflect the difference in model types. The 2 modes present different content, such as Lighting and Materials, to the user. Model Type On launching 3D Photo Visualiser the Model Style dialog is displayed. The appropriate style for the model should be chosen. Interface Controls Camera Controls Mouse Camera Controls are found on the Main Toolbar. Orbit LMB (Left Mouse Button) rotates the camera around the centre of interest. Drag LMB moves the camera left/right or up/down without changing the direction. Pan LMB moves the camera direction to look at different parts of the scene from a fixed viewpoint. 3D Photo Visualiser Page |7 Walk LMB moves the camera view parallel to the baseplane. Useful for navigating architectural spaces. Track LMB moves the camera view to zoom in and out from a fixed view point. View Fit – Single Click Operation Resets the camera position so that the entire model is in view and the camera is looking at the centre. In most modes, the mouse wheel will perform a Track in In Walk mode, pressing the CTRL key modifies the camera control to be Pan In Walk mode, pressing the ALT key modifies the camera control to be Drag Walking using the cursor/arrow keys Use the cursor/arrow keys to Walk around in the model Pressing the CTRL key and using arrow keys switches to Pan mode Pressing the ALT key and using arrow keys switches to Drag mode Other Keyboard Shortcuts SpaceBar – fits the camera to model extents Shift + SpaceBar – Moves the camera to centre of the model +/- keys increase the speed of walking and panning Collision Detection Walk mode uses collision detection, in Architectural mode. Hold SHIFT key to disable collision detection whilst walking through objects, walls etc. Rendering Controls The main update mode of 3D Photo Visualiser is an OpenGL based mode. Photorealistic rendering modes are accessed from the Main Toolbar. Progressive Render – Single Click Operation 3D Photo Visualiser Render the scene incrementally in several passes getting more accurate with each pass. Page |8 Interrupt Render Interrupt the currently active render. This control is only available if a render is in progress. Sub-image render – persistent button. Click this to render only a section of the render window. Drag a rubberband area on the render window and that will be rendered. You can drag multiple windows to preview different areas. Click the button again to exit sub-image render mode. Creating SnapShots Create SnapShot – single click Create a SnapShot of the current scene (camera, materials, lighting and background) for rendering later. Digital Assets Library Launch Aspects Shop Launches www.my-aspects.com;a rendering resource shop. Materials Tab There are 3 types of content available for defining surface appearance: materials, finishes and bumps. 3D Photo Visualiser Page |9 Materials Finishes Bumps Materials are a complete description of surface properties with reflectance, colour and bump defined. Applying a material to an object will replace any application-defined texture or colour already applied or any previously applied 3D Photo Visualiser material. Finishes define reflectance models that can be applied to existing materials. Finishes are designed to give a more realistic look to standard colour or image-based materials, imported from the host application. Bumps make surfaces appear rough or to have a pattern based on different heights on the surface. Bumps are divided into 3 sections: From Colour, 2D and 3D. 2D bumps rely on a mapping applied to the geometry to define the surface pattern. 3D bumps do not depend on mapping. Bumps are a good way to add complexity to a surface without having to model it. Materials, finishes and bumps are applied to the model by dragging and dropping the content from the content library onto the part. The image will be updated immediately. Some finishes are only accurately represented by rendering in higher quality render modes. Materials on the model can be edited directly using right-click in the rendering window and selecting Edit Material. This invokes a simple material editing dialog within which you can specify finishes and bumps as described above. In addition, if the current material has either a colour or texture, then this may be modified. 3D Photo Visualiser P a g e | 10 Edit Material Right-Click a part and select Edit Material to lunch the material dialog. Texture paths, colours, finishes and bumps can be edited and refined. Enabling sub-image rendering prior to launching the Edit Material dialog will result in automatic progressive updates being performed as parameters are edited in the dialog. If sub-imaging is disabled then a faster OpenGL preview will be performed. It is possible to disable Auto-Update by un-checking Auto Proof. Materials can be copied around the model. Right-click a part in the rendering window and select Material->Copy. In addition, individual components (colour, finish and bump) of a material may be copied and pasted. A Right-click option, Material Reset, is supplied to reset an individual material back to the original CAD imported state. Sometimes, geometry may obscure a surface that you want to assign a material to, such as a transparent surface. Right-click Geometry->Hide allows geometry to be hidden in order to allow material editing of obscured geometry, with a Show All bringing it back. To screen rendering can be performed with geometry hidden, however this information is not stored within SnapShots. Lighting Tab A variety of drag and drop lighting setups are provided dependent on the type of model you are trying to light. They are split into Product, Interior and Exterior Lighting. They vary in complexity and 3D Photo Visualiser P a g e | 11 accuracy to enable you to choose between render speed and lighting realism. More complex lighting will take longer to calculate. Product Based Lighting Product Based lighting ranges from super fast preview lighting, for material checking through to full HDR based lighting solutions with area floodlights and reflectors. Architecturally Based Lighting Interior and exterior lighting use photographic HDR’s providing realistic lighting and reflectance. Fast Lighting Fast lighting studios for use in preview mode Interior Lighting Weather based lighting schemes designed for use when rendering interior views of architectural models Weather based lighting schemes designed for use when rendering exterior views of architectural models Exterior Lighting The lighting tab also provides tools for positioning the sun and environment. Rotating the environment will change what is reflected in the model and is useful where you want a highlight in a particular point on a model. If the current lighting scheme does not contain a sun light the controls will be disabled. Daylight Sun Altitude - Set the height of the sun above the horizon. Fast Lighting Sunwhich Azimuth - Set thefor rotation of thematerial sun Fast lighting schemes can be used previewing finishes or setting up cameras Environment Simple 3 point studio lighting with HDR reflections Studio Lighting Twist - Rotate background reflections Photographersstudio setups usingthe HDR3D(high dynamicand range) lighting Interior Lighting 360 degree HDR images of real interiors providing natural lighting and reflections Exterior Lighting 360 degree HDR images of real exteriors providing natural lighting and reflections Preview Lighting 3D Photo Visualiser P a g e | 12 Editing Lighting and Base Shadowing Various aspects of the lighting can be edited. The balance of lighting between ambient, artificial and studio lighting can be adjusted. In addition, the base plane shadow, usually used in Product mode, can be edited. Edit Lights (Main Toolbar) Single Click Brings up the Edit Lighting dialog Lighting Use artificial lighting – Checkbox controls whether application defined artificial lights will be included in the rendered image Artificial intensity scale – Increase or decrease the effect of all the application defined lights. This is particularly useful when using a combination of application lights and a lighting scheme from the exterior or interior content. Ambient intensity scale – Increase or decrease the level of ambient lighting in the image. Reflected Environment 3D Photo Visualiser Reflect Background – Lighting scheme reflections are ignored. Instead, the current background is reflected File name – By default reflections will match the HDR Image used in the lighting scheme. It is possible to override the image that is reflected Intensity Scale – the reflection intensity can be edited to alter the power of the reflection P a g e | 13 Drop Scenery Effects Sky shadow – Checkbox controls whether a drop-shadow is displayed under the model. o Shadow Quality – change the sample quality of the drop shadow. o Contrast – change the brightness of the drop shadow. Lights Shadow - Checkbox controls whether a shadow is cast from sun light or spot lights (if defined in the light studio) o Brightness – Change the intensity of the shadows Reflection – Checkbox controls whether the model is reflected in the baseplane. o Brightness – Make the reflection appear brighter or darker o Blur – Make the reflection more or less distinct Backgrounds Tab Backgrounds serve to quickly and easily provide context to your model in terms of scale and intended usage. You can change the visible background from the background tab. A number of predefined background effects are supplied and you can supply your own image if required. Backgrounds are grouped based on the type of model they are applicable to. Abstract backgrounds can be used with any model size. 2D and abstract backgrounds are fixed in screen space. 3D backgrounds provide a full spherical photographic image so as you navigate the view the portion of background visible will change. The Edit Background icon on the main toolbar allows you to substitute your own photograph or image as a background. Edit background 3D Photo Visualiser Single click to bring up the edit background dialog. Only available if you have a 2D background currently applied. P a g e | 14 Edit Background Dialog Change colours when current background is graduated. Edit Background Dialog The dialog allows you to supply your own image as a background. Apply a background image from the pre-defined list first. Type a path to a valid image file (formats supported BMP, JPEG, PNG, TGA, uncompressed TIF) or click Edit to browse to a image file. Product Based Backgrounds Abstract Backgrounds Plain and graduated colour backgrounds and abstract photographic backgrounds 2D Backgrounds – Small Object Photographic and rendered backgrounds suitable for models up to around 25cm in size 2D Backgrounds – Medium Object Photographic backgrounds suitable for models approximately 25 - 150cm in size 2D Backgrounds – Large object Photographic backgrounds suitable for models approximately 150-500cm in size 3D Backgrounds 360 degree spherical photographic panoramas Custom Backgrounds Custom backgrounds allowing users to set custom colours and images 3D Photo Visualiser P a g e | 15 Architectural Based Backgrounds Plain and graduated colour backgrounds and abstract photographic backgrounds Generated Backgrounds 2D Backgrounds – Urban Photographic and rendered backgrounds suitable for situating buildings in an urban environment 2D Backgrounds – Rural Photographic backgrounds suitable for situating models in a rural environment 3D Backgrounds 360 degree spherical panoramas representing different weather effects and skies Custom Backgrounds Custom backgrounds allowing users to set custom colours and images Cameras Tab In order to create an interesting composition for your image you need to define the edges of your image. In order to do this you have to know what aspect ratio (width to height) the final image will be. The camera tab provides tools for image setting aspect ratio and view angle that correspond to real world camera lenses. You can also change the up vector if for example you have a phone model you want to render on its side; you can do this by changing the up-vector. 3D Photo Visualiser Portrait/landscape Defines whether the longest side of the current aspect ratio is horizontal or vertical. Lenses Predefined view angles corresponding to real camera lenses, listed by focal length. Lower numbers give a wider angle of view. Higher numbers a smaller angle of view. P a g e | 16 Aspect Ratios Pre-defined ratios of width to height. Correspond to common image aspect ratios found in film, TV , common photographic print sizes and standard paper sizes. Up Vectors Sets the view up vector to align to one of the x, y or z axis in either the positive or negative direction. SnapShots Tab The SnapShots tab provides tools to set different aspects of quality for the current render and for the SnapShots that you have defined. This allows users to trade off image quality against render speed for different operations. When evaluating material finishes you should increase the material quality setting to Medium so that you get an accurate representation of the finish. Rendering Settings Render Quality - Set the level of anti-aliasing for current rendering Lighting Quality - Set the quality of lighting calculations. Higher values increase shadow detail and take longer to calculate. Material Quality - Set the level of sampling for rendering materials. The ‘Low’ setting is fastest and does not include glossy effects. Higher settings will start to show glossy / blurring effects for some materials and finishes. Not all materials and finishes contain glossy effects, so the effect of increasing Material Quality will not always be seen. Model Size – Lighting is optimised based on the size of the model. The size is defined as a model type, e.g. room, building. The size is set automatically on loading the model, based on the model bounding box, but can be altered if a smaller part of a large model is being rendered, for example. If you are viewing a small section of a very large model, for example a small section of a large mechanical assembly, you should alter the model size manually. Reducing the size setting adds more shadow detail to the lighting calculations, but will take longer to render. Increasing the size setting will give smoother and less detailed shadows, with faster render times. 3D Photo Visualiser P a g e | 17 The following SnapShot specific options are available: Export Last Render Exports a previous screen render to file. This relies on a render having already been performed to screen. Render Current View To File Render the current view to file. Brings up the render SnapShots Dialog. Render SnapShots Render SnapShots to file. Brings up the render SnapShots Dialog. Show in Explorer Launches Windows Explorer, showing the directory with all SnapShot data in, to allow direct inspection of images. Print All SnapShots Allows printing of photorealistic SnapShot images. A SnapShot must first have been rendered to print the associated render. Choosing to render a SnapShot or to file will present the following dialog: Active SnapShots - Specify which SnapShots to render, from the current session, using the checkboxes File - Output file type, name and location for rendering. Size - Specify the image resolution in pixels. Rendering - Set the Anti-aliasing quality, lighting accuracy and material sampling for exported images. Render Start rendering the selected SnapShots 3D Photo Visualiser P a g e | 18 Advanced SnapShots Usage SnapShots store all data required to replay your scene. You can update a previously created SnapShot with components of the current setup, or use individual components of a SnapShot to apply to the current setup. Right-clicking a SnapShot presents the following menu: Apply to Current View – Allows 1 or all components of a SnapShot to be applied to the scene. Only the selected components, e.g. materials, or all, will be updated. Update from Current View - Allows 1 or all components of the selected SnapShot to be updated. This is usual, for instance, if all materials are correct, but you decide to change the lighting used in the SnapShot. Render this SnapShot – Launches the Render SnapShots dialog Attach Last Render – If a render has been performed to screen it is possible to associate that render with the selected SnapShot Show Photorealistic Image - Displays the SnapShots associated photorealistic render in the render window. A photorealistic render is associated automatically when the SnapShot is rendered, or it is possible to associate a render using Attach Last Render Show Real-Time Image – Displays the SnapShots associated real time render in the render window. Rename – It is possible to change the name of a SnapShot Delete – Remove the SnapShot from the list Print Photorealistic image – If a render is associated with a SnapShot then it is possible to print it. 3D Photo Visualiser - Double-click (LMB) on a SnapShot to display the Photorealistic Image, if one is associated - Drag and drop a SnapShot to apply the entire SnapShot to the current view P a g e | 19 It is often convenient to take a number of SnapShots early on in the design process to save Camera positions. You can then work up actual SnapShots, from different camera positions and use the saved SnapShots to update the Camera in new SnapShots. Tools/Options The Options dialog exposes various controls related to your installation. Display/Quality Profile Folder Sets the render style for interactive rendering. OpenGL graphics cards have different capabilities depending on age and manufacturer. Representing some of the advanced material and other effects can be challenging for some hardware. Use this setting if you experience problems with your OpenGL display. The settings range from 1. Lowest quality OpenGL 2. Basic OpenGL 3. Advanced OpenGL, using Programmable Shading for advanced representation of materials 4. Adds Screen Space Ambient Occlusion. This will reduce frame rate, but applies more depth to lighting 5. Add Materials displacement. For some cards this will significantly reduce performance The path specified is used to store SnapShot data relating to your installation. Archives 3D Photo Visualiser is powered by Content, in the form of Materials, Lighting schemes, Backgrounds, Cameras and SnapShots. There are 2 forms of 3D Photo Visualiser Content: Preset and Custom. Preset Content is built into the system in the form of palettes which cannot be modified. Custom Content are palettes of user selected materials, backgrounds etc. Custom Content is stored in Archives and can be created, imported and exported from 3D Photo Visualiser. Archives are a useful tool to allow you to build catalogs of your favourite content, share content between models or even share content within a community of users. 3D Photo Visualiser P a g e | 20 In the directory palette are 2 tabs: Preset and Custom. Clicking ‘Custom’ will present a list of Archive names. The list is tab dependant, so if the current active tab is “Materials” then all custom material archives will be displayed. Likewise, if the Backgrounds tab is active then Custom Background Archives will be displayed. Right-clicking any custom Archive will present the following menu: Delete – remove the Archive Rename – Allows you to alter the name of the archive Export Custom Archive – It is possible to export an Archive to disk. Archives are stored as LWZ files. Material Archives It is possible to create a material archive containing materials used in your model. This can be done by adding all model materials to an archive or by selecting individual materials to add. Add All Materials – This option copies all materials present in your model to a material archive of your choice. The following dialog will be displayed and you will be prompted to choose a material archive. Click ‘New Archive’ to create a new material archive or select an archive from the drop down list. Select ‘Add’ to copy all model materials to your chosen archive. 3D Photo Visualiser P a g e | 21 Add Material to Archive– It is possible to add an individual material to an archive. Right-click an object in your model and select “Add Material to Archive”. The Add Material dialog (see above) will be displayed. Click “Add”. Background Archives Background Archives allow you to store your favourite backgrounds in an archive. This is particularly useful if you make use of custom backgrounds; for example image backgrounds. Add Current Background to Archive – This will copy the currently active background to your chosen archive. Camera Archives The Custom Cameras tab contains 2 types of camera directory: Model Cameras and Camera Archives. Model Cameras are similar to Model SnapShots in that they are specific to individual models. Camera Archives allow you to store specific cameras for use across different models. Create Model Camera – The current camera view is copied and stored with the model. The camera is stored in the Model Cameras directory palette. Add Current Camera to Archive – This will copy the current active camera view to your chosen archive. 3D Photo Visualiser P a g e | 22 Once the camera is stored in an archive it is possible to use it within other models. SnapShot Archives In the same way as Cameras, there are 2 types of SnapShots: Model SnapShots and SnapShot Archives. Model SnapShots are specific to individual models whilst SnapShot Archives allow you to share SnapShots across models. Model SnapShots are discussed earlier in this document. Add SnapShot to Archive – This will copy the current SnapShot to your chosen archive. Once a SnapShot is stored in an archive it is possible to use it with other models. 3D Photo Visualiser P a g e | 23 Frequently Asked Questions: What is a SnapShot? SnapShots are used to store all data needed to replay your scene. SnapShots contain the materials, background, lighting and camera information that were active at the time of creating the SnapShot. How do I edit the colour of a material? Right-click an object and select “Edit Material”. A material dialog will appear which can be used to set a new colour. How do I change the texture applied to geometry? If the geometry already has a textured material applied then right-click the object and select “Edit Material”. A material dialog will appear which can be used to set a new colour. If there is no texture currently applied to the object then drag on “Texture” from “basic materials” and then do the above. How do I set my own custom background? Apply the appropriate background from the Custom Backgrounds palette. For instance, drag on “Custom Image” to apply your own 2D Image. You will be presented with a dialog set the path to your image. How do I apply materials to geometry that is inside or occluded by other geometry? Right-click the object in the way and select “Geometry/hide”. The occluding geometry will be removed so you can apply materials to the object. You can add the geometry back in by right clicking anywhere in the render window and choosing “geometry/show all” Why can’t I walk through geometry? When in Architectural mode, collision detection is automatically enabled. Hold the “Shift” key whilst you walk to temporarily disable collision detection. How do I change the camera zoom? Click Lenses in the right-hand palette of the Camera tab. Drag a new camera lens onto the scene to alter the zoom. Why does the background change when add a new lighting scheme? Lighting schemes contain a background to match the lighting. If you do not wish to update the background hold the “Ctrl” key while you drag and drop the lighting scheme. Select the “Apply lighting and Keep Background” Option. I use a low specification graphics card so the real-time render is slow. Can I make it faster? Select “Tools -> Options” and decrease the Display Quality to lower the level of real-time. Likewise, increase the Display Quality if you use a high-end graphics card. The “Render Setting/Model Size” says I’m rendering a “Site”, but in fact the model is very small. Check that you have set appropriate Model Units in the PlansXpress. Why, when I drop a material onto an object is the same material applied to a lot of other objects? Objects that share the same name will share the same material. Consider splitting your model into separate layers if you do not wish to share materials. Why are there grey bands around the render window? The right-hand palette of the Camera tab allows you to alter the Aspect Ratio of your render. The grey bands are used to fill the parts of the render window that will not be rendered. 3D Photo Visualiser When a model is loaded, the model size is automatically set based on the bounding box of the model. If you are rendering a small object within a larger model then you should manually alter the Model Size. P a g e | 24 How do I get more accurate lighting? Increase the Lighting Quality in the SnapShots tab. NB: Consider setting a smaller Model Size, if you are rendering a small object within a large scene. Why is there no dialog with lots of material parameters to edit? This is intentional. Materials are pre-defined for ease of use. Where are my SnapShot renders saved? Before pressing “File -> Save”, all SnapShot data is added to your Profile Folder (see Tools -> Options) After saving your SnapShot data a directory will exist, on disk, next to your CAD model. This will contain your SnapShot data and renders. The directory will have the same name as the CAD model. How do I change the orientation of my model. Select a different Up vector in the “Up Vectors” section of the Camera tab. Why can’t I share materials between models? This feature will be available in the next version. Why don’t I see the full effect of brushed metal/satin and polished materials and finishes? For speed of rendering the default render mode will not represent any blurred reflection effects. Change the “SnapShots/Render settings/Material quality” to a setting other than low to see these effects. How do I reset a material back to the original CAD material? Right-click the object on which you want to reset the material and select Material->Reset. How do I reflect the background? By default, the lighting scheme is reflected, not the background. If you wish to reflect the background launch the “Edit Lighting” dialog and select the “Reflect Background” checkbox. Why are the sun positioning sliders disabled? Not all lighting schemes contain a sun light. If the scheme does not contain a sun light the sliders are disabled. The application hangs after I select Product or Architectural. Why? Is the graphics card being used AMD / ATI? If so, update the graphics drivers and then try again. If the problem continues lower the display quality via the options file, on disk (see below) When I start the application I select Product or Architectural, but I don’t see a render; it is just black. It is possible that the graphics card isn’t capable of running the level of OpenGL required. Go into Tools->Options and lower the display quality. I need to lower the display quality, but I can’t open Tools->Options A settings file is saved on disk in the users profile area. This is usually c:\user\MyUsername\MyApplication\Settings\options.lwx. Open options.lwx in a text editor to edit the values manually. For instance, to lower the display quality. How can I undo my changes to a material without resetting all materials in the model? Right-click the object and select Material->Reset 3D Photo Visualiser P a g e | 25 Why don’t the reflections match my background? By default, reflections match the lighting scheme. To reflect the background open the “Edit Lighting” dialog (light-bulb icon) and check “Reflect Background” How do I disable sub-imaging? Click the sub-image icon once to enable it, click it again to disable it. When rendering a SnapShot I applied a specific resolution, but it was not used. The final resolution is calculated using your current aspect ratio. It is not currently possible to unlock the aspect ratio. Can I render a selection of SnapShots? Hold down the CTRL key to select multiple SnapShots and then right-click select Render Selected SnapShots. Why is the “Print All SnapShots” icon disabled? You can only print a SnapShot if the SnapShot has been rendered. Selecting “Print All SnapShots” will print all photorealistic renders associated with SnapShots. How do I print a single SnapShot? Right-click a SnapShot and select Print Photorealistic image. Why does “Show in Explorer” open in the Profile area Temp directory? All SnapShot data is maintained temporarily until you press “Save”. If you close the application without saving your SnapShot data all renders, SnapShots etc will be lost. On saving, your data it is copied next to your model. Why, when I drag on a material do multiple parts of my model change? Materials are shared by name. Altering <MyMaterial#1> will result in all objects with <MyMaterial#1> being updated. To create a unique material you should uniquely name a material in the PlansXpress. I’ve used the “Hide Geometry” option but when I render using SnapShots the geometry is not hidden. The aim of “Hide Geometry” to be able to apply materials to objects that may be hidden, by others. Therefore geometry is only hidden when rendering to screen. To hide geometry in SnapShot renders you should remove / hide the object in PlansXpress. Why would I want to use SnapShots rather than just rendering to screen? Used correctly SnapShots become very useful. For instance, to render a car in 5 different colours simply take five SnapShots and then “Render Selected SnapShots”. Or, to render a building in different lighting conditions simply take a number of SnapShots using different lighting schemes and then “Render Selected SnapShots”. How do I set my own custom background? Apply the appropriate background from the Custom Backgrounds palette. For instance, drag on “Custom Image” to apply your own 2D Image. You will be presented with a dialog set the path to your image. Do the transparent finishes include refraction? There are 2 types of transparent finishes in the materials tab: Glass Finishes and Transparent Finishes. Transparent Finishes are non-refractive, but Glass Finishes do set a refraction value. However, it is not currently possible to edit the level of refraction. What are Materials? Materials are a full definition of how an object will look. Materials define the finish, transparency and bump. They will completely override the PlansXpress material. What are Finishes? A finish sets only the reflective and transparency of a material. Finishes can be applied onto of your current PlansXpress material. For instance, if you set a texture in the application you can apply a finish to make that texture look shinny, 3D Photo Visualiser P a g e | 26 dull, etc. What are Bumps? Bumps make surfaces appear rough or to have a pattern based on different heights on the surface. For example, applying a “From Colour” bump to a brick texture will result in the brick texture having more depth. What are “From Colour” bumps? The underlying material colour is inspected and is used to determine how the bump should look. For instance, if the texture is of a tiled wall then the main tile can be made to standout more than the grouting. Why do some finishes and bumps range from 1 to 8? Some finishes and bumps have varying levels for each type. The numbers range from low to high for whatever the effect is. E.g. “From Colour 1” bump is less bumpy than “From Colour 8” bump. Likewise “Mirror Reflect 1” finish is less reflective than “Mirror Reflect 8”. How do I use a texture downloaded from Aspects? See How do I apply a custom texture?. How do I use a RPC downloaded from Aspects? 3D Photo Visualiser does not support RPCs. Only content downloaded from the 3D Photo Visualiser area of the Aspects website is supported. How do I use a LWA downloaded from Aspects? 3D Photo Visualiser does not support LWA. Only content downloaded from the 3D Photo Visualiser area of the Aspects website is supported. How do I apply a custom lighting HDRI? It is not currently possible to do this. Only the background and reflected environment can be altered. Can I set the environment map that will be reflected? Yes, open the “Edit Lighting” dialog and set the filename to your custom “Reflected Environment”. Why are my environment reflections so bright? You can lower the intensity of the reflections, if need be, in the “Edit Lighting” Dialog. Why don’t I see any artificial lights in my render? Check that you have now disabled artificial lighting in the “Edit Lighting” dialog? Can I turn off or disable the drop shadow / sky shadow effect? Yes, you can do this in the “Edit Lighting” dialog. Check / Uncheck “Sky Shadow”. Can I disable the sun shadow? Yes, you can do this in the “Edit Lighting” dialog. Check / Uncheck “Lights Shadow”. What is “Profile Folder” as shown in Tools->Options. Your profile area contains the data files needed to run 3D Photo Visualiser. Can I print my real time render, or what I currently see on screen? Yes, right-click the render area and select Print Screen. Are SnapShots just for rendering to file? No. SnapShots are a way of saving the state of your model at a particular point in time. You can drag and drop a SnapShot to apply all materials, camera, lighting etc at that point in time. Or you can right-click a SnapShot and select “Apply To Current View” to apply particular bits of a SnapShot, e.g. the materials or lighting only. Your model will be updated on screen. 3D Photo Visualiser P a g e | 27 Can I update a SnapShot once I have created it? E.g. I’ve found a better lighting setup but already have my materials setup. 3D Photo Visualiser Yes, right click any SnapShot and select “Update From Current View” to update a particular part of the SnapShot. P a g e | 28