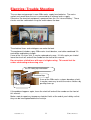
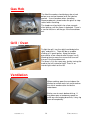
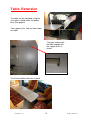
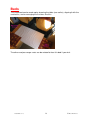
1
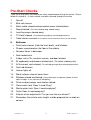
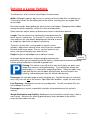
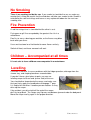
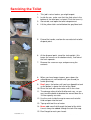
Mooveo P6
Quick User Guide
•
•
•
•
•
Loading up
Driving off
Arriving on Site
Cooking and Heating
Night Time
Height: 2.75m, Width: 2.3m, Length: 5.99m, (plus bike rack if fitted),
Max Weight 3,500kg
In Case of Difficulty Operating the Motorhome:-
In the event of a breakdown, call Roadside Recovery:-
24/05/2010 ver 1.3
1
© MotorHolme Ltd
Pre-Start Checks
There are a lot of items that need to be safely stowed before driving the vehicle. Please
follow this checklist – it starts outside, and works forward through the vehicle.
1.
Gas off.
2.
Bike rack secure.
3.
Mains cable stowed and connection cover latched down.
4.
Step retracted. (Or free-standing step stowed away)
5.
Levelling ramps stowed away.
6.
TV Aerial stowed. (To avoid being caught by overhanging branches)
7.
Table latches secured. (So the table isn’t thrown towards the driver if you stop abruptly)
8.
Bathroom
• Toilet valve closed, (slide the lever back), and lid down.
• Shower rose placed on the floor of the cubicle.
• No loose items in bathroom.
• Door locked shut.
9.
Fridge: set to 12v, contents secure, and door latched
10.
All cupboards and drawers latched shut. (To retain crockery etc).
11.
All three roof vents closed. (To avoid being caught by overhanging branches).
12.
Gas hob lid down.
13.
Interior lights off.
14.
Work surfaces clear of loose items.
15.
Windows closed and locked. (If they blow open at motorway speed, or brush
against hedges, it may rip them off completely).
16.
Driver and passenger seat rotation locked.
17.
Clean-water tank: Does it need filling?
18.
Waste-water tank: Does it need emptying?
19.
Toilet: Does it need emptying?
20.
Exterior mirror adjustment: Can you see the rear wheels?
21.
Remember the vehicle extra length, and be prepared to run wide on
corners.
24/05/2010 ver 1.3
2
© MotorHolme Ltd
The Mooveo Fiat Cab
Seat rotation release
is towards the front
of the inboard side of
the seat
Bonnet
Release
Diesel
Filler
Seat height
adjusters, front
and back
Cab
Air-conditioning
Switch
5 or 6 speed
Gearbox
Lock
yourself in
at night
Instead of a spare wheel, this vehicle carries a foam
tyre repair kit and an electric pump plugs into the
cigarette lighter socket to re-inflate the tyre in the
event of a puncture.
Tool
Kit
24/05/2010 ver 1.3
3
© MotorHolme Ltd
Driving a Large Vehicle
The dimensions of this vehicle are printed on the front cover.
Width: Although it appears big, the van is actually not much wider than an ordinary car.
The exterior mirrors are the widest part of the vehicle, and they give you a good “feel”
for the width.
Be careful though, about getting too close to trees and hedges. Strong branches hidden
among the leaves frequently scratch the sides of motorhomes.
Some countries require drivers to fold external mirrors inward when parked.
Length: The rear wheels are significantly further back from the
driver than in a normal car. As a result it is very easy to turn too
soon and have the rear wheels bumping over the kerb, or worse,
to scrape the side of the van against something.
The trick is to turn later, running wider on corners and at
junctions. Adjust each external mirror so that you can see both
the kerb and the rear wheel. Then as you turn, glance in the
mirror, and you will quickly learn when to turn.
Height: Arches or low bridges are an obvious hazard.
Wheel
and kerb
Also watch out for low roofs, and overhanging tree branches,
particularly when you are squeezing into the side of a narrow road to avoid an oncoming
vehicle and your attention is focused at ground level.
Parking: The vehicle is too tall to fit in most multi-storey car parks, and
longer than most on-street parking bays. If you effectively occupy two
parking bays, it is safer to buy two parking tickets. Some car parks have
high-level barriers that are open during the day, but are closed in the
evening, and could prevent your tall vehicle from leaving.
Reversing: Ask your passenger to walk and guide you. Explain that you can see them
only if they can see you in the mirrors. Open both front windows, so you can hear them.
Fuel Economy: Motorhomes are not very aerodynamic. You will use about 20% less
fuel at 60mph than at 70.
Passengers must remain seated with seat belts fastened whenever the vehicle is
moving.
Weight Distribution and Stability. Motorhomes are tall vehicles and will sway a little in
cross-winds. Minimise this effect by placing heavy items low down in the vehicle –
never put them above the cab.
24/05/2010 ver 1.3
4
© MotorHolme Ltd
No Smoking
There is no smoking inside the van. If you smoke just outside the van, or under any
awning that is fitted, be careful that the wind does not take your smoke inside. Smoke is
retained by the soft furnishings and leaves a very unpleasant odour for the next nonsmoking user.
Fire Prevention
A red fire extinguisher is stored behind the driver’s seat.
Frying pan or grill fires are probably the greatest fire risk in a
motorhome.
Don’t try to carry a burning pan outside, as the flames may blow
back onto your arms.
Use a wet tea towel or a fire blanket to cover flames entirely.
Switch off heat, and leave covered until cool.
Children – Accompanied at all times
It is not safe to leave children unaccompanied in a motorhome.
Levelling.
If the van is not level, it causes problems with the fridge operation, drainage from the
shower tray, and sleeping becomes uncomfortable.
If you don’t have a level place to park, you can use
levelling ramps to lift one end (or one side) of the van.
You should drive forward onto the ramps, and make sure
that you firmly apply the handbrake and engage 1st gear.
It is helpful for the driver if another person watches as they
drive up the ramps.
If by accident, you drive right off the end of the ramps,
don’t try to go back. The ramps may flip over and become jammed under the bodywork.
Move the ramps and try again in the proper direction.
24/05/2010 ver 1.3
5
© MotorHolme Ltd
Storage
There is additional storage space
under seats in the dining area, and
a huge area under the double bed.
A hatch at the rear of the van give access to the under-bed area from outside
Rear Storage
Access Door
24/05/2010 ver 1.3
6
© MotorHolme Ltd
Water System
The van has storage tanks for clean water, and waste “grey” water.
Grey water is exclusively what has gone down the drains of the sinks
or shower. The toilet is a completely separate system.
Clean water is not suitable for drinking without boiling. A separate
bottle of drinking water should be carried for that purpose.
The clean water tank is filled through a filler on the left side of the
vehicle, using the hose supplied.
Water is electrically pumped from the tank to the taps, shower, and
toilet flush. The pump creates a small positive pressure in the system
and then switches off.
When any tap is opened, the pressure falls and the pump runs again until the pressure
is restored – when the tap is turned off.
If the pump can be heard running for no reason, this may be a sign of a leak in the
system or a fault in the pump – or a tap left dripping. Water tank levels are indicated on
the electrical control panel – see page 9.
Waste Water
The waste water outlet is below the water filler on the left side.
View looking forwards from
the back.
Empty the wastewater
tank over a designated
motorhome waste
emptying point.
Turn the red handle to
drain the water, and close
it again when empty.
Waste Water Outlet
Waste Water Tap
Do not neglect the emptying of the wastewater tank or dirty water will rise up into
the shower tray.
Do not put fat or solid material down the sink drain. They can block the drain or
accumulate in the tank and cause bad smells.
24/05/2010 ver 1.3
7
© MotorHolme Ltd
Toilet
Turn on the water pump to enable the electric flush.
The whole toilet bowl can swivel to make a little more
elbow room.
Make sure the red “Cassette Removed” light is not lit.
The outlet from the toilet bowl is normally closed with a
black sealing “blade”. Move it out of the way by sliding the
lever at the base towards the front.
After use, flush the toilet using the central button, and close
the blade by pushing the lever backwards. (Otherwise if
you hit a sleeping policeman too fast, the toilet contents
could be ejected.)
Open
A red warning light shows when the toilet tank is nearly full. This indicates that a
capacity of 2 litres is left, allowing approximately 5 more uses, but it is better to empty
the toilet earlier.
Cassette
Removed
Cassette
Full
Flush
Cassette
¾ Full
Flush water
low.
24/05/2010 ver 1.3
8
© MotorHolme Ltd
Servicing the Toilet
1. This job is not as bad as you might expect.
2. Inside the van, make sure that the slide valve in the
bottom of the toilet pan is closed. (Push the lever in).
3. Go outside, and open the toilet compartment.
4. Lift the yellow latch and withdraw the grey/blue tank.
5. Extend the handle, and tow the cassette to the toilet
disposal point.
6. At the disposal point, stand the tank upright, (this
keeps the runners on the bottom clean), and swivel
the neck upwards.
7. Remove the screw-on cap, and pour away the
contents.
8. When you have begun to pour, press down the
yellow/green air vent button with your thumb (to
avoid splashing).
9. Don’t press the button until you have tipped the tank
so the button is above the level of the liquid.
10. Rinse the tank with clean water until it runs clear.
11. The dosage ratios of toilet fluid brands vary, so you
must read the bottle to deduce the correct dose for a
19 litre capacity cassette.
12. Use the scale inside the cap to measure the toilet
fluid and pour into the tank.
13. Top up with two litres of water.
14. Never add more fluid through the bowl of the toilet.
It must always be added through the tank filler cap.
24/05/2010 ver 1.3
15. Don’t forget to wash your hands.
9
© MotorHolme Ltd
Electrics
The van has a 16amp 230v mains input connection on the right
side. This is connected using the long orange cable from the
storage compartment.
First connect the larger of the two plugs to the van as shown.
Then connect the other end of the cable to the socket provided
by the campsite. This avoids handling a live connector.
There may also be a switch on the campsite socket outlet that
must be turned on. If you try and use more than 16amps (about
3.5kW) either the campsite outlet or your motorhome will shut
down and need resetting (see Troubleshooting, page 10). In
Europe the campsite’s limit may be as low as 7 amps.
There is an electrical control panel over the entrance door.
Once the van is connected to the mains, the yellow “Mains On”
indicator will glow, the mains sockets inside the van will become active, the fridge will
change over to use mains electricity, and the van’s batteries will begin to charge up.
Water levels:
Up = Clean water
Down = Dirty water
Battery Condition:
Up = Leisure Battery
Down= Starter Battery
Mains On
Indicator
12v
Leisure
Battery
Water
Pump
Besides the normal starting battery for the engine, the van has an additional ‘leisure
battery’ which feeds all the appliances in the living area (interior lights, water pump, 12v
electrical outlet, fridge, cooker ignition, toilet flush, and water-level gauges) - but only
when the mains is not connected.
The control panel has switches to turn on the water pump, turn on the leisure battery,
and to check the status of the batteries and water tanks. If no water level lights are
illuminated, the tank is almost empty.
If the red light beside the battery symbol flashes, the leisure battery is very low and
needs recharging. If this happens late at night, do not disturb your neighbours by
starting the engine for battery charging purposes. If you cannot connect to a mains 230v
supply, it is better to turn off all electrical appliances until the morning.
24/05/2010 ver 1.3
10
© MotorHolme Ltd
Electrics: Trouble Shooting
The van does not generate its own 230v mains supply from batteries. The mains
sockets only work when the van is connected to an external mains supply.
Otherwise, the electrical equipment is powered from the 12v ‘Leisure Battery’. These
circuits must be switched on using the switch above the door.
The electrical fuses and switchgear are under the bed.
The equipment includes a grey 230v mains circuit breaker, and a blue combined 12v
control box and battery charger.
If one of the 12v fuses fails, it may be replaced only once. If it fails again you should
leave the circuit off, and call the number on the front of this manual.
Do not replace a failed fuse with one of a higher rating. This would risk the
cables overheating and causing a fire
RCCD safety trip test button
Overload trips
Main switch
If one of the 230v mains systems develops a fault,
it may be necessary to reset the mains switches by
pushing them up.
If the problem happens again, leave the circuit off and call the number on the front of
this manual.
Make a note to report any temporary electrical faults at the end of your holiday so that
they can be investigated before the next trip.
24/05/2010 ver 1.3
11
© MotorHolme Ltd
Gas
The cylinders are accessed from outside the van.
The gas must be turned off when driving, and it is illegal to use gas devices in petrol
filling stations, indoor car parks, and ferries – due to the ignition hazard when fuel
vapour is present.
If you shake a cylinder you can feel and hear whether it is empty. Cylinders can be
exchanged at campsites, and some petrol stations. Calor use a 21mm outlet for butane.
Some other suppliers use a 22mm outlet that will not fit the same regulator.
Blue Butane cylinders are switched on and off using a black
lever on the cylinder. Press the same lever inwards to release
the hose connection and change the cylinder.
Simply press the hose fitting onto the new cylinder, and open
the valve. If it won’t open, you must wriggle the valve further
down onto the cylinder. Always secure the cylinders with their
waist straps.
Red Propane cylinders are preferred for all year round
camping because Butane suffers from reduced gas flow in
cold weather. Unscrew the knob anti-clockwise to turn on the
gas. To change a cylinder, use the spanner provided.
ON
OFF
Release
The connection has a left hand thread, so as in the picture
shown, you should turn the spanner clockwise to release.
Gas is fed into a pressure regulator on the bulkhead beside
the gas cylinder. Any valve there is normally left on.
Finally, there are distribution valves inside the under-sink
drawer. These give separate control over which
appliances receive gas:• Cooking hob
• Oven/Grill
• Fridge
The valves are normally left “ON”, and are turned through 90 degrees to turn off.
If you smell gas
•
Turn off the valve on the gas
cylinder.
•
Extinguish all naked flames.
•
Do not switch on any electrical
devices - including torches.
24/05/2010 ver 1.3
12
•
Open doors and windows
•
Exit the vehicle.
© MotorHolme Ltd
Fridge
Adjust
Temperature
Mode Selector:
Gas,
12v (alternator) or,
Mains voltage 230v
On/Off
The right hand knob adjusts the temperature.
The left knob connects the fridge to one of three sources of power: - gas, 12v enginedriven alternator, or 230v mains voltage.
The fridge prefers to work on 230v mains. (It takes longer to cool down on gas or 12v).
When the engine is running, the fridge must be run on 12v rather than gas, but when
the engine stops, the fridge will not work from the leisure battery (That would quickly
flatten it).
The gas system must be turned off at the bottle while you are travelling, in case it added
to a fire in the event of an accident. It is also forbidden to use gas appliances in petrol
filling stations, ferries, and indoor car parks or anywhere that petrol vapour might
accumulate.
When you select gas you should be able to hear a few clicks as sparking ignites the
burner, and the gas-warning symbol should then glow steadily. If it flashes, it hasn’t lit
properly.
The fridge door shelf has
a slider to prevent items
from moving around when
the van is in motion.
The door has a latch on the top to prevent it swinging open when travelling. It also has
a secondary position which holds the door slightly open, to prevent mould build-up in
the fridge if it is left unused for long periods.
24/05/2010 ver 1.3
13
© MotorHolme Ltd
Gas Hob
The lid of the cooker should always be raised
before use and not lowered until the hob has
cooled. It must be down when travelling.
Some people put a towel under the glass to stop
rattles when travelling.
The knobs must be held in for a few seconds
after lighting, until the flame is detected. There is
a sensor that turns off the gas if the flame blows
out.
Grill / Oven
To light the grill, turn the right hand knob to the
right, and push in. There will be an audible
clicking as it spark-ignites. Keep the button
pressed for a few seconds after the gas has lit,
allowing time to warm the sensor that turns off
the gas if the flame blows out.
The oven is lit in the same way, but by turning the
knob to the left instead of right. There is an
interior light switch on the left.
Ventilation
When cooking, open the vent above the
kitchen to remove moist air and to reduce
the risk of condensation inside the
motorhome.
But be sure to vents before driving. If
they blow open at motorway speed, or
catch on overhanging branches, it may rip
them off completely.
24/05/2010 ver 1.3
14
© MotorHolme Ltd
Heating
A dial above the door controls room temperature and water heating. The boiler can
heat 10 litres of water in about 20minutes, or 80 minutes if room heating is in use.
Without
water
heating
With
60 deg
water
heating
A setting of 4
= 23ºC
For showering, use 60°C water, and once you start the water running, take your shower
quickly before the hot water runs out.
The boiler is located under the main bed. In cold weather (below 3°C) the automatic
drain valve beside the boiler may open automatically to protect the system from frost
damage. The blue button will pop out.
Drain
tap
You can deliberately drain the boiler by
turning off the pump, opening sink and
shower taps, and turn the blue drain tap
through 180°. The blue button will pop out.
To reset the valve, push the blue button back in.
Blue
button
24/05/2010 ver 1.3
The main water tank under the forward facing
seat can be emptied by removing the large
red cap, and reaching into the tank to pull out
the bath-plug.
15
© MotorHolme Ltd
Table: Extension
The table can be extended using the
extra piece stored under the double
bed. (See page 6).
Two support arms slide out from under
the table.
The pegs underneath
the table engage with
the support arms as
shown
The finished table extension in place
24/05/2010 ver 1.3
16
© MotorHolme Ltd
Table: Remove or Replace
Underneath the table are two latches with
red triggers, which must be pulled away
from the wall.
When you replace the table, don’t forget to
re-engage the both of the two latches
shown above. This is important because
they prevent the table from tipping up if you
lean on one corner.
Also without these latches, if you stop
abruptly, the table will be flung towards the
driver.
The table can be
lowered to make bed
support.
The leg is bent by
pressing a button on
the side of the
“knee”
A white secondary support leg prevents the bed
tipping. It is added by clicking it into the socket
as shown. Some people leave it in this position
permanently.
24/05/2010 ver 1.3
17
© MotorHolme Ltd
Beds
The single bed can be made up by lowering the table (see earlier), aligning it with the
seat bases, and re-arranging the cushions like this:-
The driver and passenger seats can be rotated to face this bed if you wish.
24/05/2010 ver 1.3
18
© MotorHolme Ltd
Windows
The windows are closed using lever latches that incorporate a locking ventilation
position, which holds the window securely a few millimetres ajar.
Windows must be fully closed when driving. If they blow open at motorway speed, or
brush against hedges, it may rip them off completely
Blinds
The windows all have blinds for privacy at night,
and to reduce the heat from the sun during the
day.
Pull down and push away to latch them.
The windows are also equipped with fly-screens.
The cab windows have quilted screens, which
are attached to the inside of the glass with rubber
suckers.
The screens have a silvered surface on the
outside, which helps reflect the heat of the sun in
the daytime.
To remove the blinds, fold back to reveal each sucker and use
your fingers to lift the lips off the glass.
If you simply pull directly on the blinds, they may be damaged.
24/05/2010 ver 1.3
19
© MotorHolme Ltd
Ventilation
The main roof light has a wind-up mechanism
as shown. The first few turns are very easy
while the mechanism unlocks. Then it
becomes heavier as it begins to open.
When closing, wind the handle down a couple
of extra turns to lock it, and then push up
against the “glass” with your hand, to make
sure it is secure.
The roof-lights have blinds and fly-screens,
which slide across.
The smaller roof light has slide lock which must be
released before trying to open it with the rotary
knob. (See below),
This roof light has fly screens and back-out
blinds which are released by squeezing the
two buttons together. (see below)
It is a good idea to open the roof vents in the
bathroom and kitchen area when cooking or
taking a shower. This might go against your
instincts - especially when it is cold outside but it lets the water vapour escape, and that
will minimise condensation inside the van –
not just on the windows, but also inside the
cupboards.
Be sure to close windows and roof-lights before driving.
If they blow open at motorway speed, or catch on overhanging branches, it may
rip them off completely.
24/05/2010 ver 1.3
20
© MotorHolme Ltd
TV Aerial: Status type
Before you begin, look around for other TV aerials, and note which way they are
pointing, and whether the bars on the aerials are horizontal or vertical.
The aerial is adjusted from inside the wardrobe.
Unscrew the big white finned nut (red arrow) to allow the aerial to be raised and then
turned to face the same way as other aerials nearby. A red dot on the shaft is aligned
with the front of the aerial.
If nearby aerials have vertical bars, turn the handle anti-clockwise (green arrow) to
rotate the aerial into the vertical position. This handle is rather fragile, but can usually be
clicked back into place if it comes off in your hand.
If you have moved since last using the TV it will probably need re-tuning to the local
transmitter. (See TV manufacturer’s instructions).
You must lower the aerial before travelling, and point it towards the rear; otherwise tree
branches may damage it.
24/05/2010 ver 1.3
21
© MotorHolme Ltd
Index
Battery, 10
Beds, 18
Blinds, 19
Cab, 3
Children, 5
Cooker, 14
Driving, 4
Electrics, 10
Electrics: Trouble Shooting, 11
Fire Prevention, 5
Fridge, 13
Fuses, 11
Gas, 12
Grill, 14
Heating, 15
Hob, 14
Levelling., 5
Oven, 14
Parking, 4
Pre-Start Checks, 2
Puncture, 3
Reversing, 4
spare wheel, 3
Storage, 6
Table: Extension, 16
Table: Remove or Replace, 17
Toilet, 8
TV Aerial, 21
Ventilation, 14
Ventilation - main, 20
Waste Water, 7
Water Level, 10
Water System, 7
Windows, 19
This Guide was produced by Teal Technical Consulting Ltd
www.tealweb.com
24/05/2010 ver 1.3
22
© MotorHolme Ltd