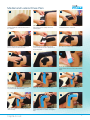
1
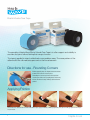
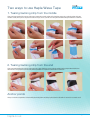
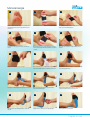
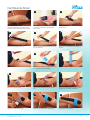
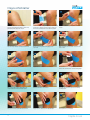
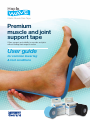
Elastic Muscle Care Tape
Premium
muscle and joint
support tape
Offers support and stability to muscles and joints
without limiting their range of motion
User guide
for common lower leg
& foot conditions
Elastic Muscle Care Tape
The principle of Hapla Wave Elastic Muscle Care Tape is to offer support and stability to
muscles and joints without limiting their range of motion.
The tape is applied in strips to effectively cover problem areas. The wave pattern of the
adhesive lifts the skin reducing pressure on the tissue beneath.
Directions for use - Rounding Corners
Before applying tape it is important to remember
to round the corners of each piece.
Rounding the corners prevents the tape from
catching on clothes and peeling back which may
reduce the time the tape will stay adhered to the
patient.
Applying Friction
To activate the adhesive on the underside of the tape, apply friction by rubbing vigorously using the backing paper from the tape
or your hand.
1
hapla.co.uk
Two ways to use Hapla Wave Tape
1. Tearing backing strip from the middle
After you have rounded the corners of the tape, remove the central section of the backing paper using a ripping action with your
thumbs. Usually these pieces are placed across the injury site as you will see in our guide. Avoid touching the adhesive at all times.
2. Tearing backing strip from the end
After you have rounded the corners of the tape, using your thumbs to create a ripping action tear the paper about two inches
from one end. This prepares your anchor point. Remember it is important not to touch the adhesive.
Anchor points
Always ensure that, regardless of the technique, anchor points are always placed on the skin with 0% stretch, i.e. no stretch at all.
hapla.co.uk
2
Turf Toe
1
Patients will be experiencing pain under the ball
of their first metatarsal joint.
4
Avoid placing the tape on the nail. The ends of the
tape should just meet. The tape should not wrap
around the toe fully as this may cause a tourniquet.
7
With 25% stretch apply the tape from the heel to
the first metatarsal head.
10
With 50% stretch continue to apply the tape to
the apex of the toe.
13
Using your hand or a piece of the backing paper
from the tape apply friction.
3
2
Use a one inch wide piece of tape long enough
to wrap around the big toe.
5
Cut another piece of tape one inch wide and
long enough to reach from the back of the heel
to the tip of the hallux.
8
Using your other hand secure the tape onto the
skin.
11
When you reach the apex of the toe cut off any
excess and apply with zero stretch.
14
Apply friction to all areas of the applied tape.
3
Place this tape with zero stretch around the
big toe.
6
With the foot in the flexed position (dorsiflexed)
apply an anchor point behind the heel.
9
At this point you can remove the backing paper if
required from the remaining length of tape.
12
Ensure the toe is being pulled in a downwards or
plantarflexed direction by the tape.
15
Ensure patient is comfortable.
hapla.co.uk
Hallux Valgus
1
Patients will be experiencing discomfort around
the site of a bunion.
4
With zero stretch apply the tape around the
posterior aspect of the heel to just proximal to the
side of the bunion.
7
Ensure no tape is on the nail.
10
Cut another one inch wide piece of tape long
enough to wrap from the hallux around to the
lateral malleolus.
13
Place at the ankle point with zero stretch just
distal to the lateral malleolus.
hapla.co.uk
2
Cut a one inch wide piece of tape long enough
to reach from the lateral malleolus around the
heel to the hallux.
5
Then apply 75% stretch to the tape up and
around the hallux as shown.
8
Apply friction to all areas of the applied tape.
11
Remove the end of the tape and place an
anchor point on the plantar aspect of the hallux.
14
Apply friction to all areas of the applied tape.
3
Apply an anchor point on the heel with zero
stretch directly below the lateral malleolus.
6
Apply friction.
9
Repeat this process with a second piece of tape
half overlapping the first piece.
12
Applying 75% stretch with the toe slightly
plantarflexed take the tape around the dorsal aspect
of the foot and wrap it around to the lateral malleolus.
15
Ensure patient is comfortable.
4
Metatarsalgia
1
Patient will be experiencing discomfort around
the metatarsal head area of the plantar aspect
of the foot.
4
This tape should go up to but not over the toe
sulcus.
7
Apply friction to both pieces of tape.
10
Using a 50% stretch apply the tape up to the heel.
13
Place an anchor point again with no stretch at
the calf.
5
2
Cut a length of tape the same width as the foot.
5
Repeat the process - cut another piece of tape
to the same length. Remember always round the
corners.
8
Cut a full width piece of tape long enough to go
from the metatarsal joints to halfway up the calf.
11
Once you reach the heel remove the stretch
from the remaining tape.
14
Apply friction to all areas of the applied tape.
3
Using a central tear and 75% stretch place the
tape over the metatarsal joints.
6
Place the second piece of tape halfway down
the first.
9
Place an anchor point roughly one inch proximal
to the metatarsal heads.
12
Apply the remaining tape with zero stretch up
over the achilles tendon and up the calf.
15
Ensure patient is comfortable.
hapla.co.uk
Plantar Fasciitis
1
Patient will be experiencing pain either on the
central or medial portion of the heel. Ensure the
foot is in a dorsiflexed position.
4
Place an anchor point at the metatarsal heads
applying zero stretch.
7
Apply the tape down to the heel.
10
Place an anchor point with zero stretch on the
achilles tendon and apply friction to all areas of
the applied tape.
13
Apply another six inch length of tape at a slightly
more oblique angle to the first across the site of
the pain.
hapla.co.uk
2
Cut a full width piece of tape long enough to go
from the metatarsal heads up to the mid calf.
5
Remove the first part of the remaining backing
paper.
8
At the heel reduce the stretch down to 25%.
11
Cut a six inch length of tape, tear and remove the
central part of the backing paper.
14
Apply friction to all areas of the applied tape and
ensure patient is comfortable.
3
Tear and remove the backing paper from one
end of the tape.
6
Apply 50% stretch to the tape.
9
Apply tape to the Achilles.
12
Apply a 50% stretch across the site of pain.
Make sure you apply each end (anchor points)
with zero stretch.
15
Alternatively, if they are able, you could put your
patient into this position to ensure dorsiflexion of
the foot.
6
Dorsal Foot Pain
1
The patient will be experiencing pain on the top
of their foot. Place the foot in a relaxed position
for treatment.
4
Anchor the ends on the sides of the foot with
zero stretch.
7
Apply friction to all areas of the applied tape.
10
Once anchored apply a 50% stretch.
13
The tape should be pulling the foot upwards
(dorsiflexing).
7
2
Cut a four inch length of tape, tear and remove
the central portion of the backing paper.
5
Repeat this 75% stretch for a second time with
another four inch piece of tape.
8
Cut a twelve inch piece of tape, tear and remove
the end piece of backing paper.
11
Take tape to about three inches above the ankle.
14
Apply friction to all areas of the applied tape.
3
Apply 75% stretch over the point of pain.
6
Place the second piece of tape halfway over
the first.
9
Apply and anchor just proximal to the toes with
zero stretch.
12
Secure the tape to the skin, anchoring with zero
stretch.
15
Ensure patient is comfortable.
hapla.co.uk
Swollen Foot
1
Patient may be experiencing swelling around
either malleolus.
4
Ensure the backing paper on each thin strip is
torn and separated from the anchor point at the
top.
7
One at a time remove the backing paper from
the strips and apply them down the top of the
foot with zero stretch.
10
Each separate strip should be applied.
13
Take your time when applying as lifting and
moving the strips will reduce the effectiveness of
the adhesive.
hapla.co.uk
2
Cut a four inch long piece of tape, then cut five
equal strips up the length of the tape leaving a
two inch anchor point at the top.
5
Gently remove the backing paper from the
anchor point at the top, do NOT remove the
paper from the strip lengths at this point.
8
Make sure you do this one strip at a time.
11
Extend these strips to any points on the foot
beyond where the swelling ends.
14
Once you have laid all the strips down apply
friction to all areas of the applied tape.
3
Tear across the top of the backing paper just
across the top of the strips.
6
Apply the anchor point near the malleolus with
zero stretch.
9
Take the second length and repeat.
12
You may wish to extend the strips under the foot.
15
Ensure patient is comfortable.
8
Heel Pain
1
Patient may be experiencing pain directly under
the heel on the plantar aspect (centrally).
4
Apply an anchor point at each end with zero
stretch.
7
Apply a 50% stretch.
10
Apply friction to all areas of the applied tape.
13
Again bring the tape around the back of the heel.
9
2
Cut an eight inch long piece of tape, tear and
remove the central backing paper.
5
Try to avoid touching the adhesive as this will
lessen the effectiveness of the adhesive.
8
Take the tape around the lateral aspect and
wrap it around the posterior aspect of the heel.
11
Cut another six inch piece of tape and apply an
anchor to the lateral malleolus.
14
Apply an anchor with zero stretch at the lateral
malleolus. Apply friction to all areas of the
applied tape.
3
Apply with a 50% stretch around the posterior
aspect of the heel extending forwards along the
1st and 5th metatarsal shafts.
6
Cut a six inch long piece of tape, tear and
remove the backing paper from one end and
apply to the medial side.
9
Remove the remaining backing paper and place
the end as an anchor with zero stretch.
12
Apply 50% stretch taking the tape medially.
15
Ensure patient is comfortable.
hapla.co.uk
Achilles
1
If they are able, place the patient in the position
shown. Alternatively dorsiflex the ankle whilst
they are sitting.
4
Place an anchor proximal to the metatarsal
heads on the base of the foot.
7
Place the tape down at the posterior of the leg.
10
Ensure all tape is in contact with the skin.
13
Remove remaining backing paper, leaving each
end as an anchor point.
hapla.co.uk
2
Take a ten inch piece of tape, round the corners,
and tear the backing paper as shown.
5
Put a 50% stretch on the tape.
8
Anchor with zero stretch.
11
Apply friction to all areas of the applied tape.
14
Position gently with zero stretch. Apply friction to
all areas of the applied tape.
3
Carefully remove the backing paper without
touching the adhesive.
6
Extend the tape with 50% stretch up to the
tendo-muscular junction, removing the backing
paper as you proceed.
9
Remove the remaining backing paper at the
anchor point without touching the adhesive.
12
With a four inch long piece of tape tear and
remove the central portion and with 50% stretch,
apply across the site of pain in the Achilles.
15
Ensure patient is comfortable.
10
Peroneal Strain
1
Patient will be experiencing pain along the lateral
border of the foot and possibly at the fibula
and/or behind the lateral malleolus.
4
Bring the tape under the plantar aspect of the
foot with zero stretch.
7
Take a four inch length of tape, tear and remove
the central backing paper.
10
Apply a zero stretch anchor at each side.
13
Apply a zero stretch to the anchor points at both
ends.
11
2
Take a ten inch length of tape, round the corners,
tear and remove the backing paper from one
end.
5
With a 50% stretch apply tape behind the lateral
malleolus and up to the head of the fibula.
8
Apply a 50% stretch.
11
Take another four inch length and tear and
remove the central portion of the backing paper.
14
Apply friction to all areas of the applied tape.
3
Apply an anchor point on the medial aspect of
the heel.
6
Ensure you apply an anchor tape with zero
stretch.
9
Apply to the posterior aspect of the heel.
12
Apply with a 50% stretch over the site of pain.
This can be anywhere up the side of the leg.
15
Ensure patient is comfortable.
hapla.co.uk
Calf Muscle Strain
1
Patient may be experiencing discomfort on the
medial and lateral heads of the gastrocnemius.
Place the foot in a dorsiflexed position as shown.
4
With 75% stretch apply up the calf.
7
Apply friction.
10
Place across the site of pain.
13
Apply a zero stretch anchor point.
hapla.co.uk
2
Take an eight inch length of tape, round the
corners, tear and remove the backing paper
from one end.
5
Remove the backing paper ensuring you do not
touch the adhesive.
8
Take a four inch length of tape, tear and remove
the central part of the backing paper.
11
Lay down zero stretch anchor points at each
end.
14
Apply friction to all areas of the applied tape.
3
Apply an anchor point two inches up from the
Achilles tendon.
6
Apply a zero stretch anchor point at the top of
the calf.
9
Apply 75% stretch.
12
Remove the remaining backing paper carefully
ensuring you do not touch the adhesive.
15
Ensure patient is comfortable.
12
Osgood Schlatter
1
Pain will be felt at the tibial tuberosity in
adolescents between the ages of 13 and 16,
particularly if they play a lot of sport.
4
Place the tape without touching the adhesive.
7
Lay down each point gently.
10
With a 75% stretch apply diagonally in the
opposite direction across the site of pain.
13
Place anchor ends down with zero stretch.
13
2
3
Patient should be sitting with leg hanging in a relaxed Apply 75% stretch diagonally across the site
position (90°). Take a four inch length of tape and
of pain.
remove the central portion of the backing paper.
5
Remove anchor point backing paper from
each side.
8
Apply friction to ensure it is well adhered.
11
Ensure adhesive is not touched.
14
Apply friction to all areas of the applied tape.
6
Make sure there is zero stretch on each of the
anchor ends.
9
Take another four inch length of tape, tear and
remove the central portion of the backing paper.
12
Carefully remove anchor points of remaining
backing paper.
15
Ensure patient is comfortable.
hapla.co.uk
Jumper’s Knee
1
Patient will be experiencing pain in the patella
tendon. The patient should ideally be standing for
treatment.
4
With an eight inch length of tape remove the
central portion of backing paper leaving two
small pieces of backing paper at each end.
7
Using the ball of your hand secure the tape either
side of the knee.
10
With a twelve inch length of tape cover the
anchor points of the previous tape using zero
stretch.
13
Apply friction to all areas of the applied tape.
hapla.co.uk
2
Take a four inch length of tape, remove the central
portion of the backing paper and apply with a
75% stretch across the patella tendon.
5
Place the centre of the tape with zero stretch
over the top of but slightly below your first piece
of tape.
8
Remove the backing paper from the anchor
points and apply with zero stretch.
11
The tape should cover both anchor points and
comfortably go around the knee at 30° of flexion
with zero stretch.
14
The blue tape above may be repeated twice
more, overlapping the first piece for extra support.
3
The knee should be in about 30° of flexion. Lay
down the tape, anchor with zero stretch and
apply friction.
6
While pulling the tape up each side of the knee
ask the patient to lunge forward.
9
Apply friction to all areas of the applied tape.
12
Ensure the tape is not too tight so it does not
create a tourniquet effect.
15
Ensure patient is comfortable and can move
knee freely.
14
Full Knee Support
1
Patient will usually experience pain in and around
the knee joint. This can be nonspecific.
Place knee in 90° of flexion.
4
Remove backing paper from the ends and apply
with zero stretch.
7
Remove backing paper from the top of the uncut
tape and place an anchor roughly six inches
above the knee.
10
With 50% stretch place the first strip of tape
around one side of the patella.
13
Repeat on the opposite side of the patella.
15
2
Take a four inch length of tape, round the
corners, tear and remove the central portion of
the backing paper.
5
Cut an eight inch length of tape and cut a slit up
the centre leaving four inches of the length uncut.
8
Remove the top section of backing paper and
with zero stretch apply the unslit section of the
tape down to just above the knee.
11
Bring the tape centrally below the patella.
14
Lay the second strip flat on top of the first and
apply friction to all areas of the applied tape.
3
With 75% stretch apply across the patella tendon.
6
Tear the backing paper at the top of each strip
so that each half of the tape falls freely (leaving
the paper on the tape at this stage).
9
Take one of the strips of tape and remove half of
the backing paper. As you apply it, do not touch
the adhesive.
12
Take the tape down with zero stretch along
the tibia.
15
Ensure patient is comfortable.
hapla.co.uk
Medial and Lateral Knee Pain
1
Patient may be experiencing discomfort on the
medial or lateral side of the knee. Place knee in
90° of flexion
4
Remove remaining backing paper and apply
anchors at each end with zero stretch.
7
Apply anchor points as before with zero stretch.
10
Place an anchor point roughly one third of the
way down the shin with zero stretch.
13
Apply a 50% stretch from the patella up the first
third of the thigh.
hapla.co.uk
2
Take a four inch piece of tape, round the corners,
tear and remove the central portion of the
backing paper.
5
Repeat this process with another four inch
section of tape removing the central portion of
the backing paper.
8
Apply friction to all areas of the applied tape.
11
Apply up to the patella using a 50% stretch.
14
Apply an anchor point at the end with zero
stretch. Apply friction to all areas of the applied
tape.
3
Apply using 75% stretch across the point of pain
following the direction of the femur.
6
Place tape at an oblique angle to the first piece.
9
Cut an eight inch piece of tape, round the
corners, tear and remove one end of the backing
paper.
12
Gently manoeuvre the tape so it follows the
shape of the leg.
15
Ensure patient is comfortable.
16
Swollen Knee
1
Patient’s knee may be swollen on either side
above or below the knee. Place knee in a slight
flexion but in a relaxed position.
4
Each strip must be torn free from the main body
of the tape. Do NOT remove the paper from the
strip lengths at this point.
7
Place the anchor point with zero stretch on the
thigh roughly two inches above the knee.
10
Follow the same procedure with the second strip
separating the application by a few millimetres.
13
The fifth and final strip should be applied
underneath the patella.
17
2
With an eight inch length of tape cut five slits from
one end up to two inches from the other end of
the tape.
5
Make sure you do not touch the adhesive.
8
Remove the backing paper from the first strip
of tape.
11
Repeat with the third strip ensuring you don’t
touch the adhesive.
14
Apply friction to all areas of the applied tape.
3
Tear and separate the backing paper of the five
strips from the main body of tape.
6
Remove the anchor point backing paper from
the top body of the tape.
9
With zero stretch place the strip diagonally
across the knee.
12
The fourth strip should now be at the base of
the knee.
15
Cut another piece of tape eight inches long and
cut five slits two inches from one end and tear
backing paper as before.
hapla.co.uk
16
Remove backing paper from anchor and place
with zero stretch on the thigh on the opposite
side of the knee roughly two inches up.
19
A criss-cross pattern should start to appear.
22
Apply the third strip.
25
Apply the fifth and final strip underneath the
patella.
28
Apply friction to all of the applied tape.
hapla.co.uk
17
Separate each strip as before and apply with
zero stretch.
20
You may space the strips of tape as you wish
depending on positioning of oedema.
23
Apply the fourth strip.
26
Remove backing paper from final strip.
29
A criss-cross pattern of tape is the final desired
effect.
18
The tape should be applied as before with each
strip placed in the opposite direction to the first.
21
Apply friction to each strip of the tape as you
apply it.
24
Apply friction to each strip.
27
Apply friction to all strips of the tape.
30
Ensure patient is comfortable.
18
Premium muscle and joint support tape
Available in Blue or Black 5cm x 5m Rolls
www.hapla.co.uk
Hapla is a trademark of Cuxson Gerrard & Co. Ltd.
Cuxson Gerrard & Company Ltd, 125 Broadwell Road, Oldbury, West Midlands B69 4BF, UK.
Tel: 0121 544 7117 Fax: 0121 544 8616 www.cuxsongerrard.com