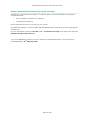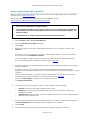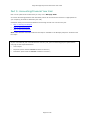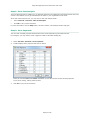
1
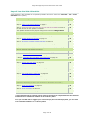
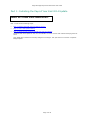
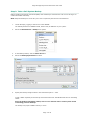
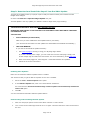
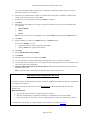
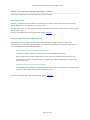
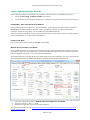
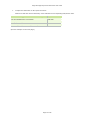
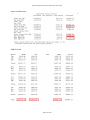
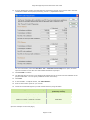
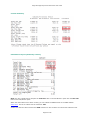
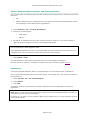
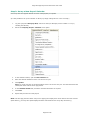
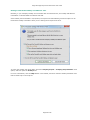
Sage Micropay Payroll Year End 2014 User Guide Sage Micropay Payroll Year End 2014 User Guide This guide covers the Payroll Year End 2014 process. You can read it onscreen or print it out. For additional PYE advice, select the Year End – Tax – Year End Process Help menu option. Important note for Windows XP users Microsoft no longer provide technical support or security updates for Windows XP and they recommend you upgrade your system. To protect your security and data, this is the last version of Sage Micropay that will work with Windows XP. What should I do? You can still install and use this version of Sage Micropay as normal. Microsoft recommend you upgrade to Windows 7 or Windows 8 as soon as possible. You won’t be able to use future versions of Sage Micropay, unless you upgrade your system. To check your current version of Windows: 1. 2. 3. Press the Windows key Type Winver Click Enter. +R For assistance with moving your Sage software from Windows XP, please click here. Page 2 of 35 Sage Micropay Payroll Year End 2014 User Guide News Feeds Use the News Feeds feature to stay up to date with the latest information about Micropay. To enable News Feeds: 1. Click the News Feeds button on your Micropay tool bar. 2. The News Feeds page opens. Click the Configure Feed button. 3. The Feed Configuration window opens. Select the Enabled checkbox. 4. Click OK to save your settings. (You can also subscribe to Micropay news feeds through your Internet browser.) Video Demos The Sage website provides a set of video demos that go through the steps involved in the Payroll Year End 2014 process. 1. Visit https://my.sage.co.uk/ireland/support/payroll/payroll-year-end-video-tutorials.aspx 2. Log in using your My Sage login details. Note: If you don't already have a login, you can create one from the main page. Simply click Create a Sage login and follow the instructions. For more information, please click here. Page 3 of 35 Sage Micropay Payroll Year End 2014 User Guide Payroll Year End 2014 Checklist (This checklist is also available as a separate printable document. Select the Year End – Tax – View Checklist menu option.) Part 1: Installing the Payroll Year End 2014 Update Done? Step 1: Register with ROS (Revenue Online Service) on page 6 Step 2: Take a Full System Backup on page 7 Step 3: Download and Install the Payroll Year End 2014 Update on page 9 Do this as soon as the update is available. The update contains all the payroll changes announced in Budget 2015. Part 2: Completing 2014 Processing Step 1: Process the final pay period(s) of 2014 on page 12 Step 2: Update Employee Records on page 13 Step 3: Check the Company Details Window on page 14 Step 4: Compare Control Summary and P30/CC124 on page 14 Step 5: Generate Earnings, Tax & PRSI report for each employee on page 17 Part 3: Payroll Year End Procedures Step 1: Ensure that pensions are set up correctly on page 19 * Step 2: Generate the P35 to ROS File on page 20 * Step 3: Generate P60s and Other Year End Certs on page 23 Part 4: Start of Tax Year 2015 Step 1: Create Tax Year 2015 on page 25 Step 2: Open Tax Year 2015 on page 25 Step 3: Set up a New Payroll Calendar on page 26 Step 4: Period 1 of 2015 on page 27 Step 5: Tax Credit Import (P2C File) on page 29 Step 6: Enabling CSO Reporting on page 31 Step 7: Construction Workers Pensions on page 31 Part 5: Accounting/Financial Year End (Optional, depending on when your Financial or Deduction Year ends.) Step 1: Clear Cost Analysis on page 33 Step 2: Clear Payments on page 33 Step 3: Clear Deductions on page 34 * Steps marked with an asterisk can be deferred, but must be completed before the Revenue Commissioners’ submission deadline of 15th February 2015. Or if you use ROS both to submit your return and pay the associated payment, you can avail of an extended deadline: 23rd February 2015. Page 4 of 35 Sage Micropay Payroll Year End 2014 User Guide Part 1: Installing the Payroll Year End 2014 Update CARRY OUT THESE STEPS IMMEDIATELY Part 1 involves the following steps: Step 1: Register with ROS (Revenue Online Service) Step 2: Take a Full System Backup Step 3: Download and Install the Payroll Year End 2014 Update Install the PYE 2014 update as soon as it is available. You don’t need to wait until the final pay period of 2014. This update also contains all necessary Budget 2015 changes. This year there’s no need for a separate Budget Update. Page 5 of 35 Sage Micropay Payroll Year End 2014 User Guide Step 1: Register with ROS (Revenue Online Service) If you have not already done so, register with the Revenue Online Service (ROS) immediately at: http://www.ros.ie You won’t be able to carry out the submit P35 to ROS step unless you are registered. Note: It can take a few weeks to register, so allow plenty of time for this. The ROS technical helpdesk phone number is 1890 201 106. From outside the Republic of Ireland, call +353 1 702 3021. Alternatively, you can email [email protected] For more information, select the Year End - Tax – Year End Process Help menu option, and then open the ‘P35 to ROS submission’ help topic. Page 6 of 35 Sage Micropay Payroll Year End 2014 User Guide Step 2: Take a Full System Backup Before installing the Payroll Year End Update, take a backup to minimise the risk of ever having to recreate information manually. Note: Keep the backup for six full tax years. This is required by the Revenue Commissioners. 1. Launch Micropay, logging in with the user name ADMIN. The default password for ADMIN is PASS, but this may be different on your system. 2. Select the Miscellaneous - Backup menu option. 3. In the Backup window, click the Select All button. 4. Select the Backup System Files checkbox. 5. Specify the backup storage location in the ‘Enter backup drive...’ field. Create a folder especially for the backup. Name this folder FULL SYS BACKUP PYE 2014 or something similar. Store the backup somewhere reliable, such as on a network drive or memory stick. Avoid overwriting previous backups. The backup may require 50MB of memory or more. Page 7 of 35 Sage Micropay Payroll Year End 2014 User Guide 6. Click Backup to proceed. 7. The backup is created at the specified location. Click OK. The backup process is now complete. Note: Backup files open only within Micropay. You can’t open a backup from the folder in which it is saved. Page 8 of 35 Sage Micropay Payroll Year End 2014 User Guide Step 3: Download and Install the Payroll Year End 2014 Update The PYE 2014 Update makes your payroll system ready for PYE 2014 tasks, and includes relevant Budget 2015 changes. So there’s no need for a separate Budget Update this year. The PYE Update is the only update your software needs to begin 2015 pay processing. THE PYE 2014 UPDATE IS AVAILABLE AS A DOWNLOAD ONLY. DOWNLOAD AND INSTALL IT AS SOON AS IT IS AVAILABLE. DON’T WAIT UNTIL THE FINAL PAY PERIOD OF 2014. YOU CAN USE: AUTO-UPDATES (recommended) Make sure you have enabled the Auto-Update feature (see below). (You can also set this feature so that updates are downloaded and installed automatically.) THE SAGE WEBSITE If you want to download the update manually: 1. Visit www.mysage.ie and log in using your My Sage login details. If you don't already have a login, you can create one from the main page. Simply click Create a Sage login and follow the instructions. For more information, please click here. 2. When successfully logged in, select Support > Download software and updates. 3. Follow the on-screen instructions. Enabling Auto-Updates Make sure the Automatic Software Updates feature is enabled. This will ensure that you get the PYE 2014 update as soon as it’s available. 1. Select the Tools – Internet Options menu option. 2. In the Software Updates tab, select one of the Automatic checkboxes. We recommend the Check and download Sage software updates and automatically install them when I exit option. 3. Click OK. You have activated the Automatic Software Updates feature. Downloading and Installing the PYE Update 1. Make sure the payroll system has the status ‘Start of Period’ or ‘End of Period’. 2. Your current version of Micropay should be v15.0 or higher. Check the title bar to make sure that this is the case. Page 9 of 35 Sage Micropay Payroll Year End 2014 User Guide You may need administrator rights on your computer to install the update. If you are unsure about this, contact your IT person. 3. When the Auto Updates feature notifies you that the PYE 2014 Update is available to download and install, close all Sage products and click Yes. 4. Accept the licence agreement by selecting I Accept… checkbox. 5. Click Next. 6. Select the type of installation you require, paying close attention to the onscreen information about these options: This Computer Client Server Note: If you run a client-server installation, carry out the Server update before any Client updates. 8. Click Next. 9. Specify whether you want to use Typical settings or Custom settings. If you choose Custom, you can: change the locations of the program and data folders specify a Start menu group for the software 10. Click Next. 11. Select Add shortcuts to my desktop. 12. Click Install. 13. When the update process is complete, click Finish. 14. You are prompted to install the latest Adobe Acrobat Reader (if it is not already installed). 15. Log into each of your payrolls in turn. Your payroll data will automatically be converted so that it works in the new version of the application. 16. Micropay 2014 should now be on Version v16.3. Check the top left-hand corner of the program window to confirm this. Note: You’ll also have a new shortcut for Micropay 2015, which is version 17.0. Important note for Windows XP users Microsoft no longer provide technical support or security updates for Windows XP and they recommend you upgrade your system. To protect your security and data, this is the last version of Sage Micropay that will work with Windows XP. What should I do? You can still use this version of Sage Micropay as normal. Microsoft recommend you upgrade to Windows 7 or Windows 8 as soon as possible. You won’t be able to use future versions of Sage Micropay, unless you upgrade your system. For assistance with moving your Sage software from Windows XP, please click here. Page 10 of 35 Sage Micropay Payroll Year End 2014 User Guide Part 2: Completing 2014 Processing Finish processing payroll in the 2014 tax year, and carry out a number of related tasks: Step 1: Process the final pay period(s) of 2014 Step 2: Update Employee Records Step 3: Check the Company Details Window Step 4: Compare Control Summary and P30/CC124 Step 5: Generate the Earnings, Tax & PRSI report for each employee Page 11 of 35 Sage Micropay Payroll Year End 2014 User Guide Step 1: Process the final pay period(s) of 2014 Process the remaining pay period(s) of 2014 in the normal way. Extra Pay Periods Normally, the last pay period is Week 52, Fortnight 26, etc. But in some years there is an extra pay period, depending on the date of your first pay period. This year there is an extra pay period for Weekly and Fortnightly payrolls if the company's first pay date was January 1, 2014. For more information about extra pay periods, please click here. Automatic Recalculation of PRD amounts If an employee who is subject to the Pension-Related Deduction (PRD) has been in continuous employment in the 2014 tax year, the system automatically recalculates the employee’s PRD values. (You can disable the recalculation if necessary.) If the employee took unpaid leave during 2014… Unpaid leave does not affect the employee’s continuous employment status. So an employee due a PRD recalculation may not reach 52 insurable weeks during the year. In this case you have to manually mark the employee for a PRD recalculation in the final pay period of the year. Refunds Arising from the PRD Recalculation If the employee is entitled to a refund arising from any of these recalculations, it is added to the employee’s final payslip along with an explanatory note. For more information about PRD recalculations, please click here. Page 12 of 35 Sage Micropay Payroll Year End 2014 User Guide Step 2: Update Employee Records Ensure that information is complete for all employees who worked for the company during 2014. 1. Select the Processing - Employee Details menu option. 2. Check the tabs in each employee details record, making sure all relevant information has been entered. PPS Number, Date of Birth and Home Address Every employee record should have a valid PPS Number. In the absence of a PPS number, the Date of Birth and Home Address must be specified. This is to enable the system to match any ‘duplicate’ employee records correctly when you are creating the P35 ROS submission. Also, the P35 ROS submission will be rejected by the Revenue Commissioners unless all employees have either a PPS Number or a Date of Birth and Address. Finish Period/Date Every leaver should have a Finish Period and a Finish Date. Medical Insurance BIK for Tax Relief In circumstances where you're paying medical insurance premiums on behalf of an employee (or where the employee pays their own premiums), you are required to document the portions of these premiums that are eligible for tax relief on your P35 year-end submission. The medical insurance provider will give you these amounts for each employee. You must then input the amounts into the employee details record before creating the P35 to ROS submission file. 1. 2. 3. Pay/YTD > BIK Year To Date > Medical Insurance Eligible For Tax Relief. Enter the amount > Save > Cancel. Repeat the steps above for each relevant employee. For further information, refer to www.revenue.ie/en/tax/it/leaflets/changes-medical-insurance-reliefinfo-for-employers.pdf Page 13 of 35 Sage Micropay Payroll Year End 2014 User Guide Step 3: Check the Company Details Window 1. Select the Company/Payroll – Company Details menu option. 2. Ensure that the company details, such as the Tax Registration Number and the Contact Details, are up to date and correct. Make any necessary changes. (Contact details must be included on ROS returns. Make sure that phone and fax numbers don’t contain spaces or dashes, and that there are no special characters in the company address. These can cause problems for ROS.) Step 4: Compare Control Summary and P30/CC124 Now you need to compare totals in the Control Summary and P30/CC124 reports. 1. Select the Reports - Payroll Reports menu option. 2. The Payroll Reports window opens. Select Control Summary in the Payroll tab. 3. Click Print. The Control Summary prints out. 4. Now you are ready to print out (and optionally save) the P30/CC124. Select the P30/CC124 radio button. 5. Click Print. 6. Specify whether you want to include quarterly subtotals by clicking Yes or No. The P30/CC124 prints out. Page 14 of 35 Sage Micropay Payroll Year End 2014 User Guide 7. Compare the information on the reports as follows: Make sure that each Control Summary value matches the corresponding P30/CC124 value. Control Summary (Cumulative Control Totals) P30/CC124 Value Tax This Employment (C/Forward) PAYE Year USC (C/Forward) USC Year PRSI E’e (C/Fwd) + PRSI E’r (C/Forward) PRSI Year (See the example on the next page.) Page 15 of 35 Sage Micropay Payroll Year End 2014 User Guide Control Summary P30/CC124 Page 16 of 35 Sage Micropay Payroll Year End 2014 User Guide Step 5: Generate the Earnings, Tax & PRSI report for each employee 1. Select the Reports - Payroll Reports menu option. 2. Open the Employee tab. 3. Use the Selection fields to specify the relevant employees, if necessary. The default setting is ‘All Employees’. 4. Select Earnings Tax & PRSI. We recommend that you print this report in Landscape format using the Courier New Regular Size 8 font. 5. a) Click Setup. b) Select Landscape. c) Click Font. d) Specify the font settings. e) Click OK. Click Print. The reports are printed out for each employee. Alternatively, you can save the report in PDF or Excel format. 6. Confirm that each Earnings, Tax & PRSI (ETP) report is complete and correct. Bear in mind that there may be valid reasons why an entry is missing, such as an employee being on holiday. If the ETP report is incomplete or incorrect, resolve any outstanding issues before you print P60s or create your P35. If you need more information about this, contact your support provider. 7. Keep the Earnings, Tax & PRSI reports in your records. Page 17 of 35 Sage Micropay Payroll Year End 2014 User Guide Part 3: Payroll Year End Procedures This part of the PYE process deals with printing 2014 statutory reports for the Revenue Commissioners. The following steps must be carried out for each of your payrolls in Micropay 2014: Step 1: Ensure that pensions are set up correctly Step 2: Generate the P35 to ROS File * Step 3: Generate P60s and Other Year End Certs * * The steps marked with an asterisk can be deferred for now, but must be completed before the Revenue Commissioners’ submission deadline of 15th February 2015. Or if you use ROS both to submit your return and pay the associated payment, you can avail of an extended deadline: 23rd February 2015. Page 18 of 35 Sage Micropay Payroll Year End 2014 User Guide Step 1: Ensure that pensions are set up correctly The P35 file (to be returned on or before 15th February 2015*) must include details of any pension contributions made: by the company on behalf of its employees by employees themselves Ensure that pensions are set up correctly in your system. Any deduction relating to a pension, PRSA, RAC and CWPS scheme must be set up with an appropriate ‘Pension Link’. For more information, select the Year End - Tax – Year End Process Help menu option. Then open the Pensions at Payroll Year End topic. * If you use ROS both to submit your return and pay the associated payment, you can avail of an extended deadline: 23rd February 2015. Page 19 of 35 Sage Micropay Payroll Year End 2014 User Guide Step 2: Generate the P35 to ROS File Now you need to generate a P35 file for the Revenue Online Service (ROS) and submit it on the ROS website, which is: http://www.ros.ie The full set of official Revenue Commissioners P35 documentation is here: http://www.revenue.ie/en/business/paye/p35/faq-p35.html You must be registered as a ROS customer. The submission deadline is 15th February 2015. (If you use ROS both to submit your return and pay the associated payment, you can avail of an extended deadline: 23rd February 2015.) The P35 Disk is no longer accepted by the Revenue Commissioners. 1. Select Year End - Tax - Tax Year End Reports. 2. Select the P35 Returns via ROS radio button. 3. Click Create. 4. Read the message onscreen about Tax Registered Companies. If you are happy to proceed, click Continue. If you have more than one payroll with the same Tax Registration Number, you should consolidate these payrolls into a consolidation company. In the consolidation company, generate a single P35 file that covers all the consolidated payrolls. For more information about consolidation companies, please click here. 5. If the system detects any ‘duplicate’ employee records, the Merge Duplicate Employees window opens, listing the duplicates. A duplicate employee record is usually one with the same PPS Number and Gender as another employee record. The listed duplicates will be merged automatically on the P35 and reported as a single employee. However, records displayed in red cannot be merged automatically. You may need to merge these manually before you generate the P35. For more information, please click here. Select the I acknowledge… checkbox if you are happy to proceed. Click Merge and Continue. 6. The P35 Return Type screen appears. There are three P35 Return options available: Original: If you have not already submitted a P35 for 2014. Amended: If you have already submitted a P35 for 2014, but some employee details have subsequently changed. Supplementary: When you want to submit an addition to a P35 return, having omitted employee data from the original P35 return. 7. By default, all employees are included in the P35. However, if you want to exclude certain employees, click Select Employees. Then manually select the employees to be excluded. 8. Click Proceed. 9. The system checks your data. If any errors are listed, resolve these before you continue. Page 20 of 35 Sage Micropay Payroll Year End 2014 User Guide 10. A screen displays the pension amounts that were processed in payroll. If you need to add in amounts contributed outside normal payroll processing, use the +/-Adjustments column. For more information, select the Year End - Tax – Year End Process Help menu option, and then open the ‘Pensions at Year End’ and ‘P35 to ROS submission’ help topics. 11. Click Proceed to continue. 12. The ROS P35 Save As screen is now displayed. By default, the file is saved in the P35 subfolder in the payroll’s ROS folder. You can specify a different location if necessary. 13. Click Save. 14. In the P35 ROS – Complete window, click View Monitor. 15. Print out the monitor report for your records. 16. Check the overall totals against your last Control Summary using this table: Control Summary (Cumulative Control Totals) P35 Monitor Report (Summary section) Gross This Employment (C/Fwd) Total Pay Tax This Employment (C/Fwd) Total Tax PRSI E’e (C/Fwd) + PRSI E’r (C/Fwd) Total PRSI USC This Employment (C/Fwd) Total USC (See the example on the next page.) Page 21 of 35 Sage Micropay Payroll Year End 2014 User Guide Control Summary P35 Monitor Report (Summary section) Note: It’s also a good idea to compare the Total LPT value in the P35 Monitor report with the LPT Year total on the P30/CC124 report. When the values above have been verified, you can submit the ROS P35 file on the ROS website: www.ros.ie. The file to submit has the extension .P35. Another file with the same name and a .MON extension is also created. You should not submit this file. Page 22 of 35 Sage Micropay Payroll Year End 2014 User Guide Step 3: Generate P60s and Other Year End Certificates You must generate the following reports for each employee still employed by the company at the end of the 2014: P60 PRD 60 (Required for any employees who are subject to the Pension-Related Deduction (PRD), which applies to certain public sector organisations.) 1. Select Year End - Tax - Tax Year End Reports. 2. Select one of these options: 3. o a P60 option o PRD 60 By default, all employees will have their reports printed out. However, if you want to specify a particular range of employees instead, use the Sort & Filter fields. You can print P60s in either English or Irish. If the application detects any errors in your payroll data, they will be listed onscreen when you try to create the P60s. You must correct all errors before you can create the P60s. 4. Click Preview or Print. The relevant P60s or PRD Certs are generated. One copy is generated per employee. Micropay also has an option to e-mail P60s to employees. For more information, please click here. PRD35 Report The Pension-Related Deduction (PRD) is a gross deduction for certain public sector organisations. You must generate a PRD35 report for the whole payroll, if any employees in the payroll are subject to the Pension Levy. 1. Select Year End - Tax - Tax Year End Reports. 2. Select PRD 35. 3. Click Print. The PRD 35 certificate is generated for this payroll. Submit this to the Accounting Office of the parent Department. Note: When you print a P60 for an employee who’s subject to the Pension-Related Deduction, Micropay will automatically generate the associated PRD 60. However if for any reason you need to obtain a blank copy of a PRD 60 form, you must contact the Revenue Commissioners directly. Page 23 of 35 Sage Micropay Payroll Year End 2014 User Guide Part 4: Start of Tax Year 2015 Part 4 of the Payroll Year End process involves getting ready for 2015 pay processing. Carry out all these steps before processing the first pay period of 2015: Step 1: Create Tax Year 2015 Step 2: Open Tax Year 2015 Step 3: Set up a New Payroll Calendar Step 4: Period 1 of 2015 Step 5: Tax Credit Import (P2C File) Step 6: Enabling CSO Reporting Step 7: Construction Workers Pensions Changes to payroll legislation announced in Budget 2015 As part of the Government's Budget 2015 announced on 14th October 2014, the following legislation changes come into enforcement from January 1st 2015: Universal Social Charge (USC) All income for USC purposes of €12,012 or less will be exempt from USC. The USC rates and thresholds for employees earning over €12,012 have also been amended. These changes apply to payments made to employees on or after January 1st 2015. For more information, open the help system by selecting the Help – Help Topics menu option. Then search for ‘Universal Social Charge (USC)’ in the Search pane. PAYE Income Tax An increase of €1000 in the standard rate band of income tax occurs. As a result of this, the emergency tax standard rate cut-off changes from €32,800 to €33,800. Also, the higher rate of tax changes from 41% to 40%. The Payroll year end 2014 update contains all Budget 2015 changes. When the Payroll year end 2014 update is installed, these changes are updated automatically in Micropay 2015. Page 24 of 35 Sage Micropay Payroll Year End 2014 User Guide Step 1: Create Tax Year 2015 CARRY OUT THIS STEP IN ALL YOUR PAYROLLS 1. Log into the payroll in Micropay 2014. This is Version 16.3. 2. Select the Year End - Tax - Set up 2015 Tax Year menu option. 3. Follow the onscreen instructions. All payroll data is copied into Micropay 2015, and is stored separately from 2014 data. Employee cumulative tax year values for 2014 are cleared. Leavers from 2014 are not transferred into the new year. Tax Year 2015 is now ready for payroll processing. You can now log into Micropay 2015. This is Version 17.0. You don’t need to close down Micropay 2014 first. You can have Micropay 2014 and Micropay 2015 open at the same time. Step 2: Open Tax Year 2015 1. To open Micropay 2015, double-click the Micropay 2015 shortcut icon on your desktop. 2. Log into the payroll in the normal way. You are now logged into the 2015 tax year. Budget 2015 changes have already been applied to your payroll software as part of the PYE 2014 Update. This year there’s no need for a separate Budget Update. After logging into Micropay 2015, you should see ‘Budget 2015-compliant’ in the process map’s title bar. The payroll’s status is currently blank. You have not yet set Period 1 of 2015. Page 25 of 35 Sage Micropay Payroll Year End 2014 User Guide Step 3: Set up a New Payroll Calendar Now set up the 2015 payroll calendar for each of the payrolls you operate. (It’s also possible to set up the calendar ‘on the fly’ by simply setting Period 1 in the next step.) 1. Log into a payroll in Micropay 2015, and ensure that your Micropay version number is 17.0 (by checking the title bar). 2. Select the Company/Payroll - Calendar menu option. 3. In the Calendar window, open the New Calendar tab. 4. Enter the calendar details for Period 1 of the new tax year. 5. Click Update. Note: You must enter the correct PAY DATE for Period 1 of the new tax year. This date determines the subsequent dates of all of 2015’s pay periods. 6. In the Calendar Details tab, amend the calendar information as required. 7. Click Save. 8. Repeat this procedure for each payroll. Note: The first pay period of 2015 may involve paying the employee for work done at the end of 2014. (Alternatively, you may have paid employees before Christmas for the early days of January.) Page 26 of 35 Sage Micropay Payroll Year End 2014 User Guide Step 4: Period 1 of 2015 Set Period 1 of 2015 in the normal way. No need for a Budget 2015 software update There is no need for a separate Budget Update to your payroll software this year. All the changes necessary to get your payrolls ready for pay processing in 2015 are contained in the PYE Update, which you installed at the start of the PYE process. After logging into Micropay 2015, you should see ‘Budget 2015-compliant’ in the process map’s title bar. Page 27 of 35 Sage Micropay Payroll Year End 2014 User Guide Rolling Forward the Holiday and Absence Year Normally, if your Company Holiday Year coincides with the Financial Year, the holiday and absence information is rolled forward at Financial Year End. If the Holiday Year finish date is 31/12/2014, the system will automatically provide an option to roll forward the holiday information when you are setting the first period of 2015. To check the Holiday Year finish date, select the Company/Payroll – Company/Payroll Details menu option, and then open the Holidays tab. For more information, click the Help button in the toolbar, and then read the ‘Holiday Cleardown and Roll Forward’ topic in the help file. Page 28 of 35 Sage Micropay Payroll Year End 2014 User Guide Step 5: Tax Credit Import (P2C File) If you are a ROS (Revenue Online Service) customer, a Tax Credit File (P2C file) will be available for you at the ROS web site - https://www.ros.ie/login.jsp. This contains the 2015 tax credits and cut-off points, USC rates and LPT information (where relevant) for your employees. The P2C file may not be available at the beginning of Tax Year 2015. You can process pay using the 2014 information until the 2015 file is available. To transfer the tax credit information into Micropay, Sage strongly recommends that you follow these instructions: 1. Select the Miscellaneous - Tax Credit Import - Import Tax Credits menu option. 2. The Locate Tax Credit Import File window opens. Here you specify the location of the P2C file you have received from the Revenue Commissioners. The default location is the application folder, but you can browse to a different location if necessary. Make sure that the P2C file’s name is based on the company’s Tax Registration Number. Also check that the P2C file’s tax year matches that of the payroll. 3. Make sure that the payroll’s pay frequency matches that of the P2C file. 4. Click Next to proceed. 5. The Select Tax Credit Record window displays. This window lists all the tax credit records in the P2C file. Records with apparent discrepancies are displayed in red. Other records are displayed in black, and are selected by default. Possible types of discrepancy include: Records for employees who have left your payroll. Records for employees who have not yet been added to your payroll. The employee’s Previous Employment Gross Pay in Micropay exceeds the corresponding value in the Tax Credit Import file. The employee’s Previous Employment Tax Paid value in Micropay exceeds the corresponding value in the Tax Credit Import file. You can import records that have discrepancies, but doing so risks introducing errors to your payroll system. Investigate the cause of each discrepancy, and consult with Revenue to clarify any relevant issues. 6. When you have selected all the records you want to import, click Import Now. 7. The Import Progress window displays a summary of the import process. You can generate a more detailed report on the import process by clicking the Print Tax Credit Import Reports button. (You can also print this report, or save it as a PDF, by selecting the Miscellaneous – Tax Credit Import – Print Tax Credit Import Report menu option.) You can specify which sections of the report you want to print, and whether you want to generate a detailed or a summary report. Page 29 of 35 Sage Micropay Payroll Year End 2014 User Guide 8. Click Done to close the window. 9. Spot-check a few Employee Details records to confirm that the tax credit information has been updated correctly. Manual Tax Credit Import You can also update each employee’s tax credit information manually. (However, Sage strongly recommends that you follow the method detailed above.) 1. Open each employee’s Tax/PRSI/USC tab. 2. Enter the yearly Tax Credit and Standard Rate Cut-Off values. 3. Ensure that the correct Tax/USC Status is specified for the employee. The Tax Status is specified by the Revenue Commissioners. 4. Enter the employee’s USC threshold values. 5. Local Property Tax (LPT) information can be added in the employee’s Deductions tab. 6. Click Save when you have updated the employee’s information. Page 30 of 35 Sage Micropay Payroll Year End 2014 User Guide Step 6: Enabling CSO Reporting If your company has been selected by the Central Statistics Office (CSO) for surveying purposes, you need to enable the CSO Reporting feature. Note: If you haven’t been selected by the CSO, you can skip this step. 1. Select the Company/Payroll – Company Details menu option. 2. Open the CSO tab. 3. Select the Use CSO Reporting Feature checkbox. 4. Enter the company’s CBR number. This is provided by the CSO. 5. Click OK. 6. Make sure that payments and employee data are properly set up for CSO reporting. Do not begin processing payroll data in 2015 until you’re sure of this. For more information on CSO, please click here. Step 7: Construction Workers Pensions If you are running a Construction Workers Pension Scheme (CWPS), you should now clear the scheme’s 2014 balances and history, and set up a CWPS calendar for the 2015 tax year. The 2015 CWPS scheme starts on Monday, December 29, 2014. 1. Select the Year End - New Construction Pension Year menu option. 2. Confirm that you want to clear the balances and history by clicking Yes. 3. To set up a calendar, select the Company/Payroll - Construction Workers Pension menu option. 4. Open the Calendar tab. 5. Review the default calendar details. If you are satisfied that these meet your requirements, click OK. Alternatively, to set up your own calendar details, click Create New Calendar. Follow the onscreen instructions, and then click OK. For more information on CWPS, please click here. Page 31 of 35 Sage Micropay Payroll Year End 2014 User Guide Part 5: Accounting/Financial Year End Part 5 is an optional set of tasks that you carry out in Micropay 2015. It involves Accounting/Financial Year End tasks, which can be carried out whenever is appropriate for your company (financial or deduction year end). Cleardown tasks prevent financial balances from being carried over into the new year. Step 1: Clearing Cost Analysis Step 2: Clearing Payments Step 3: Clearing Deductions Note: More detailed information about these steps is available in the Micropay help file’s ‘Financial Year End’ topic. If your new financial year coincides with the new tax year, print the following payroll reports before carrying out the steps listed above: Cost Analysis Payments (Ensure that the Leavers checkbox is selected.) Deductions (Ensure that the Leavers checkbox is selected.) Page 32 of 35 Sage Micropay Payroll Year End 2014 User Guide Step 1: Clear Cost Analysis The Cost Analysis feature enables you to associate payments and deductions with departments and cost centres. This enables you to get a breakdown of where in your organisation costs occur. At the end of the Financial Year, you may wish to clear Cost Analysis totals. Select Year End - Financial - Clear Cost Analysis. Click OK to carry out the cleardown. For more information, click the Help button, and then read the ‘Cost Analysis Details’ help topic. Step 2: Clear Payments You can clear selected payment balances that were accumulated during the Financial Year. For example, you may want to reset a payment used to calculate holiday pay. 1. Select Year End - Financial - Clear Payments. 2. A table displays all the payments that can be cleared. Select the relevant Hours and Values checkboxes to clear the amounts for the selected payments. If you select nothing, nothing will be cleared. 3. Click OK to carry out the cleardown. Page 33 of 35 Sage Micropay Payroll Year End 2014 User Guide Step 3: Clear Deductions You can clear selected deduction balances that were accumulated in the Financial Year. For example, you can reset the balance of a subscription deduction. You can also clear employee pension deduction balances for the Financial Year to date the entire span of time that pension contributions have been made 1. Select Year End - Financial - Clear Deductions. 2. Select each deduction amount to be cleared. Each deduction has four amounts: Std.Amt: amount deducted in each period Fin Yr Bal: deduction total accumulated since the last clearance All: a running total of the deduction since the deduction was first introduced (you may wish to retain this value for pension purposes, for example) Tax Yr Bal: tax year balance Take particular care when considering clearing the balance on an employee loan repayment. 3. You can also clear the employee pension history by selecting the checkboxes in the Pensions - Employee File section. If you select nothing, nothing will be cleared. 4. Click OK to carry out the cleardown. Page 34 of 35 Sage Micropay Payroll Year End 2014 User Guide PYE 2014 Complete THIS COMPLETES THE 2014 PAYROLL YEAR END PROCESS. (This year there’s no need for a step involving installing a Budget Update.) For further information about PYE, visit our web site: http://www.mysage.ie Page 35 of 35