1
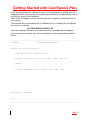
CoolSpools Plus User’s Guide Version V5R1M0 June 2005 ariadne software ltd. cheltenham, england Table of Contents Introduction ................................................................................................................ 3 Upgrade Notes ........................................................................................................... 4 License Keys .......................................................................................................... 4 Warning/Disclaimer................................................................................................. 5 Minimum OS/400 Release Level ............................................................................ 5 Product Library ....................................................................................................... 5 Licensed Program Id............................................................................................... 5 Installation .................................................................................................................. 6 Method 1: Installing CoolSpools Plus using FTP .................................................... 6 Method 2: Installing CoolSpools Plus using the IFS ............................................... 9 Maintenance............................................................................................................. 12 Method 1: Installing a PTF using FTP................................................................... 13 Method 2: Installing a PTF using the IFS .............................................................. 14 Getting Started with CoolSpools Plus....................................................................... 17 Introduction CoolSpools Plus brings together ariadne’s four powerful and highly cost-effective modules in a single licensed program. CoolSpools Plus consists of the following: CoolSpools, which provides the functionality to convert AS/400 and iSeries spooled files to a variety of formats, including PDF, Excel, text and HTML. CoolSpools Plus includes Version 5 of CoolSpools. Slipstream, which does similar things for AS/400 and iSeries database files and queries, allowing these to be saved in Excel, text, HTML and delimited ASCII formats (CSV, TSV etc.). CoolSpools Plus includes Version 4 of Slipstream. Communiqué, which adds email options to CoolSpools and Slipstream, as well as providing the ability to send emails separately from those products, using a simple command interface or an API. CoolSpools Plus currently includes Version 1 of Communiqué. CoolTools, which works with CoolSpools and Communiqué to allow you to convert, process and manage multiple spooled files quickly and simply, either using an online “work with” interface, by running commands in batch, or by setting up an entirely automated spooled file management environment. CoolSpools Plus includes Version 2 of CoolTools. Each of these modules has its own User Guide, which you should refer to for details of how to use the features associated with that particular module. In addition, CoolSpools has a Programmer’s Guide, which explains how to use advanced features such as the APIs and exit programs. Page: 3 Upgrade Notes CoolSpools Plus V5 is a separate licensed program from each of the modules it comprises and installs into a separate product library (COOLSPV5R1). Thus, if you have already licensed one of the component modules from ariadne (CoolSpools, Slipstream, Communiqué or CoolTools), you can continue to run that separate module live in production while testing CoolSpools Plus. To switch over from using the individual module to the full CoolSpools Plus package, you simply need to change your library lists or refer to the command names in library COOLSPV5R1 rather than in the product library of the individual module (CVTSPLVxR1, STMEXPVxR1, CMNQUEVxR1, SPLTLSVxR1, where x is the version number). License Keys You are entitled to upgrade to CoolSpools Plus free of charge if: the machine on which you wish to run CoolSpools Plus V5 has a valid license for any version of all 4 of the component modules (CoolSpools, Slipstream, Communiqué and CoolTools) and you are either in your first 12 months’ maintenance period after purchase or have paid your latest annual maintenance invoice in respect of all 4 modules. If you wish to upgrade, you can simply download the software from www.ariadnesoftware.co.uk and install it according to the instructions contained in the “Installation” section of this User Guide. E-mail [email protected] and ask for your key for CoolSpools Plus. Please quote your system serial number(s) and processor group code(s) in your e-mail. These are shown at the top of the WRKLICINF screen. If you have one or more of the component modules, but not all 4, please contact [email protected] for a quotation. Without a license key, CoolSpools Plus will allow you a 30-day grace period and will then no longer run. This will not affect any of the individual modules you licensed separately. If you have not paid your annual maintenance invoice, and if you need longer than 30-days to test CoolSpools Plus, we will, on request, send you a temporary license key to extend the trial period. If you require additional temporary license keys to assist with testing CoolSpools Plus, or if you run into any problems during your testing, please do not hesitate to contact us at [email protected]. Page: 4 Warning/Disclaimer We recommend strongly that all production applications are re-tested thoroughly using the new version in your development environment before you switch over to running the new version in your production environment. All versions are packaged as separate licensed programs and install into different libraries. This means that all versions of CoolSpools can coexist and run alongside one another on the same machine. You can switch an application from using one version to using another simply by changing the library list of the job to include the appropriate version library or by specifying a different library name when you run the command. Hence it is quite a simple matter to test your applications using the new version while continuing to run the older version in production. Please note that while ariadne makes every effort to ensure that CoolSpools functions in the same way with the same parameters from one version to the next, it is not possible to guarantee this. This is why you should re-test your applications against a new version before going live with it as it is possible that in some cases different parameter settings will be necessary to obtain the same results as before. ariadne software accepts no responsibility for any damage, expense or loss of income incurred as a result of unforeseen and unwanted effects resulting from installing new versions of its software or applying PTFs. Minimum OS/400 Release Level The minimum OS/400 release level required to run CoolSpools Plus V5 is OS/400 V5R2M0. If you are running V4R5M0 or an earlier version of OS400, you will not be able to install CoolSpools Plus. Product Library The product library for CoolSpools V5 is now COOLSPV5R1. You may need to change library lists in job descriptions and other system objects in order to pick up the new version of the code rather than the old. This change of library name has the advantage that it allows you to run both V5 and the earlier versions on the same machine. You are therefore able to test V5 before swapping your production applications over to the new version, as we strongly advise you to do. Licensed Program Id The licensed program identifier for CoolSpools Plus V5 is 5COOLSP and the version code is V5R1M0. The product library for CoolSpools Plus V5 is COOLSPV5R1. Page: 5 Installation If you downloaded CoolSpools Plus from the Internet, or received the product via e-mail, you will have received a zip file called COOLSPV5R1.ZIP. This zip files contain everything you need to get started with CoolSpools Plus. This section describes two possible procedures for installing CoolSpools Plus on your iSeries. Please select one of the two methods described below and follow the steps carefully and in the order indicated. Method 1 is the simplest, but requires the use of FTP to your iSeries. If FTP is unavailable to you, for whatever reason, you may use Method 2 instead. Steps to be carried out on the PC are shown in green, steps to be carried out on the iSeries in blue. Method 1: Installing CoolSpools Plus using FTP This method uses FTP (File Transfer Protocol) to transfer the CoolSpools Plus product files from your PC to your iSeries. It is assumed that you have stored the COOLSPV5R1.ZIP file which you downloaded from the Internet or received via email on your PC and that you have enabled an FTP link between your PC and your iSeries. Step 1 On your PC, create an install directory for CoolSpools Plus, either within Windows Explorer, or from the DOS prompt, e.g.: md c:\coolsp Save or copy the zip file that you downloaded or received into this directory. Step 2 On your PC, unzip the contents of the zip file into the directory you just created using pkunzip, WinZip, Norton UnZip etc. Step 3 On your iSeries, decide which library you wish to use for the install procedure and create a save file in that library, e.g. crtsavf lib_name/coolsp where lib_name is the name of the library you chose to use. Step 4 On your PC, start an FTP session to your iSeries. You may use FTP packages such as CuteFTP or simply go to the DOS prompt and type: ftp AS400_name where AS400_name is the name of your iSeries. You will be prompted to enter your user id and password. Please ensure that you sign on with a user id that has adequate authority. We recommend that you sign on as the Security Officer QSECOFR. Issue the following FTP commands within the FTP session: Page: 6 quote site na 0 This command instructs FTP to use the traditional iSeries library/file naming convention rather than the IFS naming convention. binary This command instructs FTP not to carry out any conversion on the data to be sent to the iSeries. cd lib_name where lib_name is the name of the library in which you created the save file in Step 3. This command makes lib_name your current library on the iSeries. lcd dir_name where dir_name is the name of the directory on your PC in which you unzipped the install files earlier. This command makes dir_name your current directory on the PC. put COOLSPV5R1.SAV coolsp This command transmits the contents of the file COOLSPV5R1.SAV, which was earlier unzipped from COOLSPV5R1.ZIP, and stores them in the save file called coolsp which you created earlier on your iSeries. Step 5 On your iSeries, ensure that the previous step worked by displaying the contents of save file coolsp: dspsavf lib_name/coolsp If you see the message (No records in save file) then something has gone wrong during the preceding steps. Try following them again. If you still cannot get this procedure to work, contact us at [email protected]. Step 6 On your iSeries, if you already have any of our software products installed, first please ensure that you do not have any of our product libraries in your library list, in particular the system portion of your library, otherwise problems can occur during installation of CoolSpools Plus. Use the DSPLIBL command to display and check your library list (note: EDTLIBL does not show the system portion of the library list). If any of the libraries listed below is present, remove it from your library list with RMVLIBLE (if in the user portion) or CHGSYSLIBL (if in the system portion): CVTSPLVxR1, STMEXPVxR1, SPLTLSVxR1, CMNQUEVxR1 Where x is any number. Note that you may need to add any libraries you removed in this way back into your library list after you have installed CoolSpools Plus in order to continue working normally. Now issue the following command to restore the CoolSpools Plus licensed program to your system: rstlicpgm licpgm(5COOLSP) dev(*savf) Page: 7 option(*base) rstobj(*all) lng(*primary) output(*none) rls(*first) replacerls(*only) savf(lib_name/coolsp) where lib_name is the name of the library in which you created the save file in Step 3. Step 7 If you have downloaded CoolSpools Plus from the Internet, you can use the product without a license key for up to 30 days. At the end of that period CoolSpools Plus will notify you that it can no longer be used without a license key. To obtain a license key contact ariadne at [email protected]. Only if you have been issued with a license key, proceed as follows. Issue the following command to add a license key to enable you to use the CoolSpools Plus licensed program: addlickey where: and: lickeyinp(*prompt) prdid(5COOLSP) licterm(V5R1) feature(5001) serial(*local) prcgrp(Ppp) lickey(XXXXXX YYYYYY ZZZZZZ) usglmt(*nomax) expdate(exp_date) vnddta(*none) XXXXXX YYYYYY ZZZZZZ is the license key you received by e-mail from us exp_date is the expiry date mentioned in the e-mail Ppp is the processor group mentioned in the e-mail CoolSpools Plus is now ready for you to use! If you have any trouble at any point in this procedure, please contact us by e-mail at [email protected]. Now refer to the “Getting started” section for instructions on how to run CoolSpools Plus. Page: 8 Method 2: Installing CoolSpools Plus using the IFS This method uses a Client Access network drive assigned to the IFS of your iSeries to transfer the CoolSpools Plus product files from your PC to your iSeries. It is assumed that you have stored the COOLSPV5R1.ZIP file (which you downloaded from the Internet or received via e-mail) on your PC. This method is most useful where FTP to your iSeries is unavailable, for whatever reason. Step 1 On your PC, create an install directory for CoolSpools Plus, either within Windows Explorer, or from the DOS prompt, e.g.: md c:\PC_dir where PC_dir is the name of the directory you wish to use for this installation. Save or move the zip file that you downloaded or received into this directory. Step 2 On your PC, unzip the contents of the zip file into the directory you just created using pkunzip, WinZip, Norton UnZip etc. Step 3 On your PC, ensure that you have a network drive assigned to a directory in the root file system of your iSeries’s IFS. This can be done in Windows Explorer by selecting Tools, Map Network Drive. Create a directory in the IFS to receive the CoolSpools Plus files. This can be done in Windows Explorer by selecting File, New, Folder, or at the DOS prompt as follows: md i:\IFS_dir where I: is the network drive assigned to your iSeries and IFS_dir is the name of the directory you wish to use for this installation. Step 4 Copy the contents of your PC’s install directory created in Step 1 above to the IFS directory created in Step 3 above using Windows Explorer, or from the DOS prompt as follows: copy c:\PC_dir\*.* I:\IFS_dir where PC_dir is the name of the directory on your PC, I: is the network drive assigned to your iSeries and IFS_dir is the name of the directory you wish to use for this installation. Step 5 On your iSeries, decide which library you wish to use for the install procedure and create a save file in that library, e.g. crtsavf lib_name/coolsp where lib_name is the name of the library you chose to use. Step 6 On your iSeries, copy the contents of the COOLSPV5R1.SAV file from the IFS directory to the save file just created, by issuing the following command: Page: 9 cpyfrmstmf fromstmf(„/IFS_dir/COOLSPV5R1.SAV‟) tombr(„/qsys.lib/lib_name.lib/coolsp.file‟) mbropt(*replace) cvtdta(*none) endlinfmt(*fixed) tabexpn(*no) where IFS_dir is the name of the IFS directory into which you copied the install files in Step 4 above, and lib_name is the name of the library in which you created the save file in Step 5 above. Step 7 On your iSeries, ensure that the previous step worked by displaying the contents of save file coolsp: dspsavf lib_name/coolsp where lib_name is the name of the library in which you created the save file in Step 5. If you see the message (No records in save file) then something has gone wrong during the preceding steps. Try following them again. If you still cannot get this procedure to work, contact us at [email protected]. Step 8 On your iSeries, if you already have any of our software products installed, first please ensure that you do not have any of our product libraries in your library list, in particular the system portion of your library, otherwise problems can occur during installation of CoolSpools Plus. Use the DSPLIBL command to display and check your library list (note: EDTLIBL does not show the system portion of the library list). If any of the libraries listed below is present, remove it from your library list with RMVLIBLE (if in the user portion) or CHGSYSLIBL (if in the system portion): CVTSPLVxR1, STMEXPVxR1, SPLTLSVxR1, CMNQUEVxR1 Where x is any number. Note that you may need to add any libraries you removed in this way back into your library list after you have installed CoolSpools Plus in order to continue working normally. Now issue the following command to restore the CoolSpools Plus licensed program to your system: rstlicpgm licpgm(5COOLSP) dev(*savf) option(*base) rstobj(*all) lng(*primary) output(*none) rls(*first) replacerls(*only) Page: 10 savf(lib_name/coolsp) where lib_name is the name of the library in which you created the save file in Step 5. Step 9 If you have downloaded CoolSpools Plus from the Internet, you can use the product without a license key for up to 30 days. At the end of that period CoolSpools Plus will notify you that it can no longer be used without a license key. To obtain a license key contact ariadne at [email protected]. If you have been issued with a license key, proceed as follows. On your iSeries, issue the following command to add a license key to enable you to use the CoolSpools Plus licensed program: addlickey where: and: lickeyinp(*prompt) prdid(5COOLSP) licterm(V5R1) feature(5001) serial(*local) prcgrp(Ppp) lickey(XXXXXX YYYYYY ZZZZZZ) usglmt(*nomax) expdate(exp_date) vnddta(*none) XXXXXX YYYYYY ZZZZZZ is the license key you received by e-mail from us exp_date is the expiry date mentioned in the e-mail Ppp is the processor group mentioned in the e-mail CoolSpools Plus is now ready for you to use! If you have any trouble at any point in this procedure, please contact us by e-mail at [email protected]. Now refer to the “Getting started” section for instructions on how to run CoolSpools Plus. Page: 11 Maintenance Periodically we will release Program Temporary Fixes (PTFs) in order to add new features or to resolve any problems found with CoolSpools Plus. PTFs are supplied in the form of an iSeries save file stored within a zip file, and can be downloaded from the CoolSpools Plus Download section of the ariadne web site at http://www.ariadnesoftware.co.uk/PlusDown.htm. Please note the following points before applying PTFs. 1. If you have taken a copy of any of the commands supplied with CoolSpools Plus into one of your own libraries or a system library such as QGPL or QUSRSYS, applying a PTF will render that copy of the command invalid. You should delete and recreate any copied commands after applying PTFs. 2. We recommend that, as a precaution, you take a save of the CoolSpools Plus licensed program before applying the PTF. Create a save file with CRTSAVF, e.g.: CRTSAVF your_lib/your_savf then save CoolSpools Plus with: SAVLICPGM LICPGM(5COOLSP) DEV(*SAVF) SAVF(your_lib/your_savf) DTACPR(*YES) In the unlikely event that the PTF has unwanted side-effects, contact [email protected] and, if necessary, our support team can advise you on how to restore CoolSpools Plus from the save file. 3. When applying PTFs with APYPTF, specify *TEMP on the APY (Extent of change) parameter so that the PTF is only temporarily applied initially. While PTFs are temporarily applied, they may be removed with RMVPTF. In the unlikely event that the PTF has unwanted side-effects, contact [email protected] and, if necessary, our support team can advise you on how to remove the PTF with RMVPTF. The procedure for loading and applying a PTF for CoolSpools Plus is as follows. First download the PTF you require from the Internet. The PTF will be held in a file called Q5CPnnnn.zip, where nnnn is the PTF id. This section describes two possible procedures for copying the iSeries save file held in this zip file to your iSeries. Please select one of the two methods described below and follow the steps carefully and in the order indicated. Method 1 is appropriate where FTP is available. Method 2 can be used as an alternative where FTP is unavailable, for whatever reason. Steps to be carried out on the PC are shown in green, steps to be carried out on the iSeries in blue. Page: 12 Method 1: Installing a PTF using FTP This method uses FTP (File Transfer Protocol) to transfer the PTF file from your PC to your iSeries. It is assumed that you have stored the zip file which you downloaded from the Internet on your PC and that you have enabled an FTP link between your PC and your iSeries. Step 1 On your PC, create a directory for the PTF installation, either within Windows Explorer, or from the DOS prompt, or re-use the directory you used to install originally, e.g.: md c:\coolsp Save or copy the zip file that you downloaded or received into this directory. Step 2 On your PC, unzip the contents of the zip file into the directory you just created using pkunzip, WinZip, Norton UnZip etc. Step 3 On your iSeries, first sign off then sign back on again to ensure that you do to have any CoolSpools Plus objects in your QTEMP library. Then decide which library you wish to use for the PTF install procedure and create a save file in that library. The name of this save file should be Q5CPnnnn, where nnnn is the PTF id, e.g. crtsavf lib_name/Q5CP0001 where lib_name is the name of the library you chose to use. Step 4 On your PC, start an FTP session to your iSeries. You may use FTP packages such as CuteFTP or simply go to the DOS prompt and type: ftp AS400_name where AS400_name is the name of your iSeries. You will be prompted to enter your user id and password. Please ensure that you sign on with a user id that has adequate authority. We recommend that you sign on as the Security Officer QSECOFR. Issue the following FTP commands within the FTP session: binary This command instructs FTP not to carry out any conversion on the data to be sent to the iSeries. cd lib_name where lib_name is the name of the library in which you created the save file in Step 3. This command makes lib_name your current library on the iSeries. lcd dir_name where dir_name is the name of the directory on your PC in which you unzipped the install files earlier. This command makes dir_name your current directory on the PC. Page: 13 put Q5CPnnnn.sav Q5CPnnnn This command transmits the contents of the file Q5CP0001.sav, which was earlier unzipped from Q5CP0001.zip, and stores them in the save file called Q5CPnnnn which you created earlier on your iSeries. Step 5 On your iSeries, ensure that the previous step worked by displaying the contents of save file Q5CPnnnn: dspsavf lib_name/Q5CPnnnn If you see the message (No records in save file) then something has gone wrong during the preceding steps. Try following them again. If you still cannot get this procedure to work, contact us at [email protected]. Step 6 On your iSeries, issue the following command to load the PTF on to your system: lodptf licpgm(5COOLSP) dev(*savf) select(5CPnnnn) savf(lib_name/Q5CPnnnn) where lib_name is the name of the library in which you created the save file in Step 3 and nnnn is the PTF id. Step 7 On your iSeries, issue the following command to apply the PTF to your system: apyptf where: licpgm(5COOLSP) select(5CPnnnn) apy(*temp) nnnn is the PTF If you have any trouble at any point in this procedure, please contact us by e-mail at [email protected]. Method 2: Installing a PTF using the IFS This method uses a Client Access network drive assigned to the IFS of your iSeries to transfer the PTF from your PC to your iSeries. It is assumed that you have stored the PTF zip file (which you downloaded from the Internet or received via e-mail) on your PC. Step 1 On your PC, create an install directory for the PTF, either within Windows Explorer, or from the DOS prompt, or use the directory you created for the original installation, e.g.: md c:\PC_dir where PC_dir is the name of the directory you wish to use for this installation. Save or move the zip file that you downloaded or received into this directory. Page: 14 Step 2 On your PC, unzip the contents of the zip file into the directory you just created using pkunzip, WinZip, Norton UnZip etc. Step 3 On your PC, ensure that you have a network drive assigned to a directory in the root file system of your iSeries’s IFS. This can be done in Windows Explorer by selecting Tools, Map Network Drive. Create a directory in the IFS to receive the PTF. This can be done in Windows Explorer by selecting File, New, Folder, or at the DOS prompt as follows: md i:\IFS_dir where I: is the network drive assigned to your iSeries and IFS_dir is the name of the directory you wish to use for this installation. Step 4 Copy the contents of your PC’s PTF directory created in Step 1 above to the IFS directory created in Step 3 above using Windows Explorer, or from the DOS prompt as follows: copy c:\PC_dir\*.* I:\IFS_dir where PC_dir is the name of the directory on your PC, I: is the network drive assigned to your iSeries and IFS_dir is the name of the directory you wish to use for this installation. Step 5 On your iSeries, first sign off then sign back on again to ensure that you do to have any CoolSpools Plus objects in your QTEMP library. Then decide which library you wish to use for the install procedure and create a save file in that library. The save file should be called Q5CPnnnn, where nnnn is the PTF id, e.g. crtsavf lib_name/Q5CPnnnn where lib_name is the name of the library you chose to use and nnnn is the PTF id. Step 6 On your iSeries, copy the contents of the Q5CPnnnn.sav file (where nnnn is the PTF id) from the IFS directory to the save file just created, by issuing the following command: cpyfrmstmf fromstmf(„/IFS_dir/Q5CPnnnn.sav‟) tombr(„/qsys.lib/lib_name.lib/Q5CPnnnn.file‟) mbropt(*replace) cvtdta(*none) endlinfmt(*fixed) tabexpn(*no) where IFS_dir is the name of the IFS directory into which you copied the PTF files in Step 4 above, and lib_name is the name of the library in which you created the save file in Step 5 above. Page: 15 Step 7 On your iSeries, ensure that the previous step worked by displaying the contents of save file Q5CPnnnn: dspsavf lib_name/Q5CPnnnn If you see the message (No records in save file) then something has gone wrong during the preceding steps. Try following them again. If you still cannot get this procedure to work, contact us at [email protected]. Step 8 On your iSeries, issue the following command to load the PTF on to your system: lodptf licpgm(5COOLSP) dev(*savf) select(5CPnnnn) savf(lib_name/Q5CPnnnn) where lib_name is the name of the library in which you created the save file in Step 3 and nnnn is the PTF id. Step 9 On your iSeries, issue the following command to apply the PTF to your system: apyptf where: licpgm(5COOLSP) select(5CPnnnn) apy(*temp) nnnn is the PTF If you have any trouble at any point in this procedure, please contact us by e-mail at [email protected]. Page: 16 Getting Started with CoolSpools Plus If you are upgrading from a previous version of CoolSpools Plus, please read the “Upgrade Notes” section of this document before switching live applications over to running this version of the software. Refer to the “Installation” section for instructions for installing CoolSpools Plus on your system. The simplest way to get started with CoolSpools Plus is to display the CoolSpools Plus menu by entering: GO COOLSPV5R1/COOLPLUS The menu displays the various conversions that are available with CoolSpools. When you select an option, you will be transferred to the corresponding module menu. ----------------------------------------------------------------------------------- COOLPLUS CoolSpools Plus Menu Select one of the following: 1. Manage and convert spooled files 2. Convert spooled files to PDF, Excel, HTML, RTF etc. 3. Email 4. Convert database files to Excel, CSV, HTML, text Selection or command ===> ----------------------------------------------------------------------------------- Page: 17 1. Manage and convert spooled files Transfers you to the CoolTools menu, which lets you work with spooled files online, process and convert spooled files in batch mode, or configure your environment to enable spooled files to be converted automatically. 2. Convert spooled files to PDF, Excel, HTML, RTF etc. Transfers you to the CoolSpools menu, which provides options for converting individual spooled files to these formats. You may find it more convenient to use option 1 from the CoolTools menu (“1. Work with spooled files”), which lets you select the spooled file to be converted from a list and provides options for converting spooled files to various formats. 3. Email Transfers you to the Communiqué menu, which provides options for sending emails. If you wish to email a spooled file as an attachment, you might find it more convenient to use option 1 from the CoolTools menu (“1. Work with spooled files”), which lets you select the spooled file to be converted from a list and provides options for emailing spooled files in various formats. 4. Convert database files to Excel, CSV, HTML, text Transfers you to the Slipstream menu, which provides options for converting database files to these formats and running queries and saving them in these formats. Refer to the User Guide for the corresponding module for further details of the functions provided by these sub-menus. Page: 18