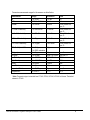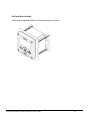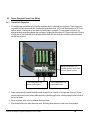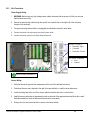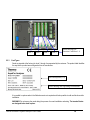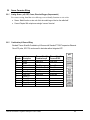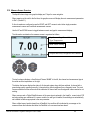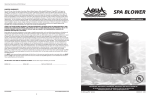
1
Thermo Scientific AquaPro™ Multi-Input Process Analyzer User Guide ©2012 Thermo Fisher Scientific Inc. All rights reserved. All trademarks are the property of Thermo Fisher Scientific Inc. and its subsidiaries. ROSS and the COIL tradedress are trademarks of Thermo Fisher Scientific Inc. US Patent 6,793,787. Teflon is a registered trademark of DuPont. RDO ® is a registered trademark of In-Situ Inc., Fort Collins, CO USA. CANopen is a registered trademark of the CAN in Automation User’s Group. DeviceNet is a trademark of Open DeviceNet Vendor Association, Inc. Modbus is a registered trademark of Modbus Organization, Inc. Preface This instruction manual describes the use of the Thermo Scientific AquaPro Analyzer Platform and is written to cover as many applications as possible. Please do not hesitate to contact Thermo Fisher Scientific or an authorized representative with questions or concerns. The information presented in this instruction manual is subject to change without notice as improvements are made, and does not represent any commitment whatsoever on the part of Thermo Fisher Scientific. Thermo Fisher Scientific cannot accept any responsibility for damage or malfunction of the product due to improper use. Contact Information To contact Thermo Scientific Technical Support: Within the United States call 1.800.225.1480 or fax 978-232-6015. Outside the United States call 978.232.6000 or fax 978.232.6031. Email to [email protected] In Europe, the Middle East and Africa, contact your local authorized dealer. Visit us on the web at www.thermoscientific.com/water Visit our online library at www.thermoscientific.com/waterlibrary Thermo Scientific AquaPro Analyzer User Guide 1 Safety Information The Thermo Scientific AquaPro Analyzer shall be installed and operated only by a skilled, trained or authorized person should carry out installation, setup and operation of the sensor system. Do not power the analyzer without a sensor cable being connected as specified in the Sensor Parameter Wiring Section of the Manual. Failure to do so may result in permanent damage to the system or its components. Protection against electric shock will be achieved only by following the corresponding installation instructions. Thermo Scientific AquaPro Analyzer User Guide 2 TABLE OF CONTENTS 1. INTRODUCTION.................................................................................................................................................... 5 1.1 1.2 1.3 1.4 2. GENERAL INFORMATION .......................................................................................................................................................5 INTENDED USE ......................................................................................................................................................................5 SAFETY INSTRUCTIONS .........................................................................................................................................................6 REMOVAL FROM SERVICE / CORRECT DISPOSAL OF THE AQUAPRO ANALYZER ...................................................................6 PRODUCT DESCRIPTION ................................................................................................................................... 7 2.1 SYSTEM OVERVIEW...............................................................................................................................................................7 2.2 AQUAPRO ANALYZER PLATFORM SENSOR COMPATIBILITY .................................................................................................8 2.3 AQUAPRO ANALYZER IN-LINE SENSOR CONFIGURATION TABLE ........................................................................................10 2.4 AQUAPRO MONITOR INSTALLATION ...................................................................................................................................11 2.4.1 Mounting........................................................................................................................................................................11 2.5 POWER, RELAY AND CURRENT LOOP WIRING.....................................................................................................................18 2.5.1 Conduit Hole Preparation .............................................................................................................................................18 2.5.2 Wire Termination...........................................................................................................................................................19 2.5.3 Card Types.....................................................................................................................................................................20 2.6 SENSOR PARAMETER WIRING .............................................................................................................................................21 2.6.1 Analog Sensor - pH, ORP, Ozone, Dissolved Oxygen (Amperometric).........................................................................21 2.6.2 Combination pH Sensor Wiring.....................................................................................................................................21 2.6.3 Differential pH Sensor Wiring.......................................................................................................................................22 2.6.4 Differential ORP Sensor Wiring ....................................................................................................................................22 2.6.5 AnalogPlus Ozone Sensor Wiring..................................................................................................................................23 2.6.6 AnalogPlus Dissolved Oxygen Sensor Wiring ...............................................................................................................23 2.6.7 Analog Sensor- Two-electrode Conductivity/Resistivity and Toroidal Conductivity.....................................................24 2.6.8 AnalogPlus Toroidal Conductivity Sensor Wiring.........................................................................................................24 2.6.9 AnalogPlus Two Electrode Contacting Conductivity Sensor Wiring.............................................................................25 2.6.10 DataStick Sensor Wiring...........................................................................................................................................25 2.6.11 DO Scaling Card Connections for RDO Pro Probe Only.........................................................................................26 2.7 RELAY WIRING ...................................................................................................................................................................26 2.7.1 Relay Card.....................................................................................................................................................................26 2.8 HOST COMMUNICATIONS WIRING .......................................................................................................................................27 2.8.1 Host Digital Communications Cards: ...........................................................................................................................27 2.9 FIELD REPLACEMENT /ADDITION OF SENSOR SCALING AND SPECIAL FUNCTION CARDS ....................................................29 2.10 MEASURE SCREEN OVERVIEW ............................................................................................................................................31 3. SOFTWARE MENUS AND NAVIGATION ...................................................................................................... 33 4. CALIBRATION MENUS...................................................................................................................................... 38 4.1 4.1.1 4.1.2 4.2 4.2.1 4.3 4.3.1 4.4 4.5 4.5.1 4.6 4.6.1 4.7 PH CALIBRATION ................................................................................................................................................................40 1 Point pH Calibration ..................................................................................................................................................40 2 Point pH Calibration ..................................................................................................................................................40 ORP (REDOX) CALIBRATION ..............................................................................................................................................40 1 Point ORP Calibration ...............................................................................................................................................40 CONTACTING CONDUCTIVITY .............................................................................................................................................41 1 Point Contacting Conductivity Calibration ................................................................................................................41 TOROIDAL CONDUCTIVITY ..................................................................................................................................................41 ANALOGPLUS DO OR DATASTICK DO CALIBRATION .........................................................................................................41 1 Point DO Calibration .................................................................................................................................................42 RDO PRO ............................................................................................................................................................................42 1 Point RDO Calibration...............................................................................................................................................43 DATASTICKS .......................................................................................................................................................................43 Thermo Scientific AquaPro Analyzer User Guide 3 5. DIAGNOSTICS MENUS ...................................................................................................................................... 44 5.1 5.2 5.3 5.4 5.5 SYSTEM INFORMATION........................................................................................................................................................44 CALIBRATION LOG ..............................................................................................................................................................45 EVENT LOG .........................................................................................................................................................................45 ANALOG OUTPUT STATUS ...................................................................................................................................................45 RELAY STATUS ...................................................................................................................................................................45 6. SETUP MENU........................................................................................................................................................ 46 7. PID FUNCTIONS .................................................................................................................................................. 48 8. RELAYS ................................................................................................................................................................. 50 9. HOST COMMUNICATIONS............................................................................................................................... 51 10. TROUBLESHOOTING / SERVICE.................................................................................................................... 52 11. CERTIFICATE OF CONFORMITY .................................................................................................................. 53 12. TERMS AND CONDITIONS ............................................................................................................................... 54 13. ORDERING INFORMATION:............................................................................................................................ 56 14. SPECIFICATIONS................................................................................................................................................ 57 14.1 14.2 14.3 14.4 14.5 14.6 14.7 14.8 14.9 14.10 PARAMETER MEASUREMENT RANGES FOR THE SENSORS .....................................................................................................57 FUNCTIONS AND FEATURES.................................................................................................................................................58 MOUNTING OPTIONS ...........................................................................................................................................................58 INTERFACE ..........................................................................................................................................................................58 ENVIRONMENTAL CONDITIONS ...........................................................................................................................................59 INTERCHANGEABLE MODULES ............................................................................................................................................59 4 TO 20 MILLIAMP CURRENT LOOPS ...................................................................................................................................59 RELAYS ...............................................................................................................................................................................60 DIGITAL PROTOCOL OPTIONS TO HOST ...............................................................................................................................60 POWER SUPPLY ...................................................................................................................................................................60 Thermo Scientific AquaPro Analyzer User Guide 4 1. INTRODUCTION 1.1 General Information Thank you for purchasing the Thermo Scientific AquaPro Analyzer. The product is designed for continuous use in industrial process applications and complies with safety regulations currently in force. Improper use could lead to hazards for the user or a third-party, and/or adverse effects to the plant or other equipment. Thermo Fisher Scientific does not accept any liability for damage that may arise if information in this manual is not followed. Therefore, the operating instructions and specifications must be read and understood by all persons involved in installation and operation of this equipment. This manual identifies safety instructions and additional information by means of the following symbols: This symbol draws attention to safety instructions and warnings of potential danger, which if neglected, could result in injury to persons and/or damage to property. This symbol identifies additional information and instructions, which if neglected, could lead to inefficient operation and possible loss of production. It is recommended that this manual be made accessible to everyone who may need it as a reference. Please contact Thermo Fisher Scientific or an authorized representative with any questions. 1.2 Intended Use The Thermo Scientific Analyzer is designed to monitor and control up to four in-line measurement points with all DataStick, AnalogPlus and RDO process. Any other use, or use not mentioned here, that is incompatible with the technical specifications is deemed inappropriate. The operator is solely responsible for any damage arising from such use. Other prerequisites for appropriate use include: Observing the instructions, notes and requirements set out in this or updated instruction manuals. Observing all local safety regulations. Observing all warnings and cautions in the documentation regarding all products used in this measurement system, including the sensor, mounting hardware, AquaPro electronics and cabling. Observing the prescribed environmental and operational conditions. Observing chemical compatibility with all wetted materials. Thermo Scientific AquaPro Analyzer User Guide 5 1.3 Safety Instructions The AquaPro analyzer should be installed and operated only by personnel familiar with the sensors and qualified for such work. A defective AquaPro should be returned to Thermo Fisher Scientific for repair or replacement. Contact Thermo Fisher Scientific to obtain a Return Material Authorization (RMA) number. No unauthorized modifications to the AquaPro are allowed. The manufacturer/supplier accepts no responsibility for damage caused by unauthorized modifications. The risk is borne entirely by the user. 1.4 Removal from Service / Correct Disposal of the AquaPro Analyzer Removal from Service Disconnect the cable wiring from the analyzer terminal block. Remove the AquaPro from the mounting hardware. Correct Disposal of Unit When the AquaPro is taken out of service, observe the local environmental regulations for correct disposal. Thermo Scientific AquaPro Analyzer User Guide 6 2. PRODUCT DESCRIPTION 2.1 System Overview The AquaPro is an on-line liquid analytical measurement platform that supports up to four sensors in an outdoor rated enclosure. The enclosure can be mounted in a ½ DIN panel, U-bolted to a pipe or mounted on a wall. Six conduit mounting holes are available for wiring. The large color graphics display makes it easy to view measurements over a wide range of environmental conditions. There is a USB data port that is accessible from the front panel to transfer data, auto-configure the system setup or to upgrade the operating software with new features. AquaPro Configuration Options offer flexibility to meet your needs today and tomorrow, including: Sensors: Up to 4 analog or digital sensor measurements that currently include options for pH, ORP, DO, conductivity, turbidity, ozone, suspended solids, free chlorine and others. All sensors include provisions to measure temperature. Calculated Measurements: When two sensors that measure the same parameter are installed, math functions can be configured on a “fifth channel”. Current Outputs: There are two current outputs provided with each sensor input. Up to eight outputs are supported. Outputs can be configured for 0 to 20 mA and 4 to 20 mA in both linear and log formats. Outputs can also be setup for PID control for two pH or two conductivity channels. *Relays: Up to six 5 Amp Form C relays are supported. Three relays are standard with every AquaPro configuration. Three additional relays can be added to the system when required. All relays are programmable and can be driven by any sensor or temperature input in the system for alarm or control functions. The relays can additionally be programmed as wash timers or set as error indicators. *Host Communications: The analyzer can be optionally configured to operate remotely through Modbus, DeviceNet, Ethernet IP, Ethernet TCP/IP, and others. Data and Event Logging: Internal data storage will support up to 30 days of data from four sensors when configured for standard sample rates. Data can easily be removed via front USB port and dropped into a spreadsheet. Interface: Color Graphics display with seven button navigation. Enclosure: For outdoor or indoor use with panel, pipe and wall mount capability. The AquaPro uses a ½ DIN panel standard and has up to 6 conduit fittings for routing cable. * Note: A maximum of three sensors may be used when 6 relays or host communications features are installed. Thermo Scientific AquaPro Analyzer User Guide 7 2.2 AquaPro Analyzer Platform Sensor Compatibility The AquaPro Analyzer supports the following measurements intended for in-line and on-line analytical process applications. Parameter AnalogPlus Sensor Chlorine (Free – Amperometric ppm) Digital DataStick √ Conductivity (Two Electrode) √ √ Conductivity (Toroidal) √ √ Dissolved Oxygen (Amperometric ppm) √ √ Dissolved Oxygen (Optical ppm) √ Dissolved Oxygen (Amperometric ppb) √ Free Chlorine √ ORP/Redox √ √ Ozone (ppm) √ √ pH √ √ Suspended Solids √ Turbidity (Low Range 0 to 200 NTU) √ Turbidity (High Range 0 to 4000 NTU) √ As additional capabilities become available on the AquaPro webpage and in the WAI online library, software updates can saved to a USB stick. It is an easy uploaded through the USB port on the AquaPro front door panel–without removing the mounted AquaPro from the wall! Simply unscrew the Data/USB cover with a coin to access the port. Thermo Scientific AquaPro Analyzer User Guide 8 Parameter measurement ranges for the sensors are listed below Measurement pH ORP Toroidal Range 0 to 14 pH -2000 to +2000mV 0 to 2 S/cm Resolution 0.01 pH 1mV 1uS/cm 1.0 2-cell Conductivity 0 to 2000 uS/cm 0.1 uS/cm 0.1 2-cell Conductivity 0 to 500 uS/cm 0.01 uS/cm 0.05 2-cell Conductivity 0 to 20 ppm 0.01 uS/cm 0.01 2-cell Conductivity 0 to 10 ppm 0.001uS/cm RDO Pro® Optical DO 0 to 20.0 ppm; 0 to 200% saturation 0 to 20 ppm 0 to 20 ppm 0 to 100 NTU 0 to 4000 NTU 0 to 5 ppm 0 to 5 ppm 0 to 20,000 ppm -5 to 200°C 0.1ppm Units pH mV uS/cm, Mohm*cm, ppm, % uS/cm, Mohm*cm, ppm, % uS/cm, Mohm*cm, ppm, % uS/cm, Mohm*cm, ppm, % uS/cm, Mohm*cm, ppm, % ppm 0.1ppm 1ppb; 0.001 ppm 0.001 NTU 0.1 NTU 0.1ppm 0.1ppm 1 ppm 0.1°C ppm, % ppb, ppm, % NTU NTU ppm ppm ppm, % °C/°F DO (ppm) DO (ppb) Low Turbidity High Turbidity Ozone Free Chlorine Suspended Solids Temperature** **Note: Temperature type is selectable from PT1000, PT100, NTC300, NTC30K, or Manual. The default element is PT1000. Thermo Scientific AquaPro Analyzer User Guide 9 2.3 AquaPro Analyzer In-line Sensor Configuration Table Model Number Base AP AquaPro enclosure with color graphics display, data logging functions and simple menu navigation for up to 4 sensors and 1 derived measurement. The enclosure is rated for outdoor use. Mounting options include ½ DIN Panel Mount, Wall Mount and Pipe Mount. There are two isolated current outputs per channel parameter. Three relays standard. Three additional relays optional. Front panel USB port for data transfer, auto configuration and software feature upgrades. SD Card port available for long term data storage. Channel 1 1 pH (Combination or Differential) 2 ORP (Combination or Differential) 3 Contacting Conductivity (Cell Constants: 1.0, 0.1, 0.05, and 0.01). 4 Toroidal Conductivity 5 Dissolved Oxygen (PPM) 6 Ozone 7 RDO pro Dissolved Oxygen 8 DataStick™ Digital Sensors: pH; ORP; Contacting Conductivity; Toroidal Conductivity; Low Turbidity; Dissolved Oxygen PPM; Dissolved Oxygen PPB; High Turbidity; Ozone; Free Chlorine; Suspended Solids. Channel 2 X Not Installed 1 pH (Combination or Differential) 2 ORP (Combination or Differential) 3 Contacting Conductivity (Cell Constants: 1.0, 0.1, 0.05, and 0.01). 4 Toroidal Conductivity 5 Dissolved Oxygen (PPM) 6 Ozone 7 RDO pro Dissolved Oxygen 8 DataStick™ Digital Sensors: pH; ORP; Contacting Conductivity; Toroidal Conductivity; Low Turbidity; Dissolved Oxygen PPM; Dissolved Oxygen PPB; High Turbidity; Ozone; Free Chlorine; Suspended Solids. Channel 3 X Not Installed 1 pH (Combination or Differential) 2 ORP (Combination or Differential) 3 Contacting Conductivity (Cell Constants: 1.0, 0.1, 0.05, and 0.01). 4 Toroidal Conductivity 5 Dissolved Oxygen (PPM) 6 Ozone 7 RDO pro Dissolved Oxygen 8 DataStick™ Digital Sensors: pH; ORP; Contacting Conductivity; Toroidal Conductivity; Low Turbidity; Dissolved Oxygen PPM; Dissolved Oxygen PPB; High Turbidity; Ozone; Free Chlorine; Suspended Solids. Channel 4 X Not Installed 1 pH (Combination or Differential) 2 ORP (Combination or Differential) 3 Contacting Conductivity (Cell Constants: 1.0, 0.1, 0.05, and 0.01). 4 Toroidal Conductivity 5 Dissolved Oxygen (PPM) 6 Ozone 7 RDO pro Dissolved Oxygen 8 DataStick™ Digital Sensors: pH; ORP; Contacting Conductivity; Toroidal Conductivity; Low Turbidity; Dissolved Oxygen PPM; Dissolved Oxygen PPB; High Turbidity; Ozone; Free Chlorine; Suspended Solids. A Host Communications with MODBUS (RS-232) B Host Communications MODBUS RTU (RS-485) C Host communications Ethernet IP, TCP/IP, Modbus TCP, HTTP, PC3 D Host Communications DeviceNet E Host Communications CanOPEN G Three Additional Relays for process control Power and Standard Functions J 24 VDC with 3 relays K 90 to 240 VAC with 3 relays AP In-Line Part Number NOTE: 1. Derived Measurement functions are available when two conductivity or two pH measurements are configured. 2. Host communication and relay option cards in Channel 4 slot only. Thermo Scientific AquaPro Analyzer User Guide 10 2.4 2.4.1 AquaPro Monitor Installation Mounting The AquaPro Analyzer can be mounted on a wall with a standard mounting plate and four screws. The surface wall mounting kit is supplied with the standard analyzer. A ½ DIN panel mount kit or a pipe mount kit can be ordered separately. Mounting instructions must be followed to maintain environmental seal integrity. Wall Mount The AquaPro Analyzer comes with a mounting plate and four screws. To mount the enclosure on a wall: 1. Fasten the plate to the back of the analyzer. The screws are spaced 6 inches apart horizontally and 4.63 inches apart vertically. 2. Place the analyzer where it is to be mounted on the wall and mark the corner holes for drilling. Install anchors in the wall and screw the plate down with four # 10 screws. Thermo Scientific AquaPro Analyzer User Guide 11 3. The mounting holes are designed so that when loosening the screws, the mounting plate can slide up for easy removal. 4. The enclosure extends 5.0 inches from the wall. Pipe Mount Kit (Cat. No. AP0PIPKT) The pipe mount accessory kit is ordered separately and provides the hardware needed to mount the AquaPro on a vertical or horizontal pipe. The hardware will accommodate pipe diameters between 1 inch and 2 inches. The AP0PIPKT consists of: One Pipe/Panel Mounting Plate Four #8 Screws and four small washers to fasten the mounting plate to the AquaPro. Four 5/16 inch nuts, four washers and four lock washers to fasten two U-Bolts to the mounting plate. Two U-Bolts for pipe mounting 1.5 inch 2 inch diameter pipe. Two U-Bolts for pipe mounting 1 diameter pipe. Thermo Scientific AquaPro Analyzer User Guide 12 1. Assemble the mounting plate (item 2) with the AquaPro (item 1) using four #8 screws (item 3) and four washers (item 4). Position the bracket as shown in the exploded view figure when mounting to a horizontal pipe run. When mounting to a vertical pipe run, rotate the mounting bracket 90 degrees before mounting it to the monitor. 2. Place the mounting plate and AquaPro assembly on the pipe. The pipe should rest in the V-notches on the mounting plate. 3. The mounting kit includes four U-bolts. Use the larger U-bolts when mounting to a 2” or 1-1/2” pipe. Use the smaller U-bolts when mounting to a 1” pipe. 4. Secure the mounting plate/AquaPro assembly to the pipe with the appropriate sized U-bolts (item 5). Use two 5/16” nuts (item 6), two small washers (item 7) and two large washers (item 8) for each U-bolt to secure the AquaPro to the pipe. Only finger-tighten the nuts at this point, do not wrench-tighten them. 5. Rotate the monitor to the desired position and wrench-tighten the nuts that secure the U-bolts. Clearances for the pipe mount assembly are show: Thermo Scientific AquaPro Analyzer User Guide 13 Horizontal Pipe Mounting: Install the mounting plate on the AquaPro in the horizontal position for horizontal pipe mounting. Vertical Pipe Mounting: Install the mounting plate on the AquaPro in the vertical position for pipe mounting. vertical Panel Mount Kit (Cat. No. AP0PANKT) The panel mount accessory kit is ordered separately and provides the hardware needed to mount the AquaPro in a ½ DIN panel cutout. The Panel Mount Kist (AP0PANKT) consists of: One Pipe/Panel Mounting Plate One face gasket Four ¼ inch jack screws Four ¼ inch nuts and washers (one set per jack screw) Two jack screw clamp bars Four #8 Screws and four small washers to fasten the mounting plate to the AquaPro. Thermo Scientific AquaPro Analyzer User Guide 14 1. Cut an opening in the panel – 5.2 inches on the horizontal and 5.4 inches on the vertical. 2. Insert the 1/4” jackscrews (item 4) into the mounting bracket (item 3). 3. Slide the 1/4” washers (item 6) and loosely thread the 1/4” nuts (item 5) approximately halfway onto the jackscrews. 4. Assemble the clamp bars (item 7) to the ends of the jackscrews. Align the threaded holes on the clamp bars with the jackscrews and thread the jackscrews into the clamp pads until they are hand tight. 5. Slide the gasket (item 2) onto the monitor housing (item 1). 6. Assemble the AquaPro into the panel opening from the front side of the panel. 7. Attach the mounting plate (item 3) to the back of the monitor housing and secure the two parts with four #8 screws (item 8) and four washers (item 9). 8. Push jackscrews (item 4) until the clamp pads (item 7) are tight against the back surface of the panel. 9. Tighten the 1/4” nuts (item 5) against the mounting bracket (item 3) to secure the clamp pads to the back of the panel. Thermo Scientific AquaPro Analyzer User Guide 15 Clearances for the pipe mount assembly are shown below: Panel Cutout: Front View: Thermo Scientific AquaPro Analyzer User Guide Side View: Top View: 16 Final Panel Mount Assembly: Jack Screws are tightened against the nuts and mounting plate as shown. Thermo Scientific AquaPro Analyzer User Guide 17 2.5 2.5.1 Power, Relay and Current Loop Wiring Conduit Hole Preparation 1. Six conduit plugs are installed in the AquaPro enclosure when it is shipped from the factory. These plugs are oring sealed and can be removed with a medium flat blade screw driver, a 5/16 inch Allen wrench or a 15/16 inch spanner wrench. Interior nuts are not needed to install plugs or cord grips. To route cables into the box, the appropriate plugs should be replaced with cord grips or conduit that are sized to fit 13.5pg conduit holes. There is a metal plate on the inside wall which will make a direct Earth Ground connection to metal conduit when metal conduit nuts are used. Earth Ground Plate for conduit ground connection and six ground screws Four conduit holes for sensors and outputs. Two conduit holes for Power and Relays 2. Power cables and relay cables should be routed through the two conduits on the right side of the box. Sensor communications and current output cables should be routed through the four conduit openings on the left side of the box as shown. 3. Dress the sensor wires so the lay between the wiring labels. 4. Stow excess cable in the space below the cards. Bunching cables above the cards is not recommended. Thermo Scientific AquaPro Analyzer User Guide 18 2.5.2 Wire Termination Power Supply Wiring: 1. WARNING: Before wiring any high voltage/current cables, make sure that the power is off at the source and that the cables are not live. 2. Pass the power and relay cable through the conduit. Use conduit holes on the right side of the unit (when facing the unit as shown). 3. The power and relay terminal blocks are pluggable and should be removed to insert wires. 4. Connect the power line and neutral onto the AC power block. 5. Connect the power ground to the Earth Ground Terminal. Relays A, B and C Normally Open Common Normally Closed AC Power Terminals Line Neutral Sensor and Current Output Wiring: Earth Ground Terminals (6) Sensor Wiring: 1. Verify that the sensor type and the measurement at the top of the card label are correct. 2. Press down the wire chart, attached to the right of the terminal block, to read the wiring instructions. 3. Locate the wiring label at the end of the sensor cable that matches wire color to wire function. 4. Install the sensor cable wires by depressing the tabs on the side of the appropriate terminal block with a small flat blade screwdriver. Insert the bare wire and remove the screw driver. 5. Gently pull on the wire to be sure that it is secure in the terminal block. Thermo Scientific AquaPro Analyzer User Guide 19 Slot 1 2.5.3 Slot 2 Slot 3 Slot 4 Sensor and Special Function Card Slots 1- 4 Card Types Cards are inserted at the factory into slots 1 through 4 as requested by the customer. The product label identifies the way that the product was configured at time of manufacture. Slot Descriptions (1-4) Power Ratings and Operating Environment It is possible to replace cards in the field when service is required and it also possible to add card functions after installation. WARNING! Do not remove the cards during the process of normal installation and wiring. The terminal blocks are designed to be wired in place. Thermo Scientific AquaPro Analyzer User Guide 20 2.6 2.6.1 Sensor Parameter Wiring Analog Sensor - pH, ORP, Ozone, Dissolved Oxygen (Amperometric) For correct wiring, bend the wire cable tag over to identify function or wire color. Sensor: Match function or wire color list to wire cable tags or label on the cable itself. Current Outputs: Both outputs use a single “common” terminal. 2.6.2 Combination pH Sensor Wiring Standard Thermo Scientific Combination pH Sensors with Standard PT1000 Temperature Elements. Orion ATC probe, 2001 TM, can be used for electrodes without integrated ATC. Pin Number 12 11 10 9 8 7 6 5 4 3 2 1 Label Description Active Shield Process Ground Reference Temp Comp Temp Low Power (+) Power (-) mA Out 1 Output Common mA Out 2 Thermo Scientific Combination pH Clear Wire Thermo Scientific Process ROSS Clear Wire Blue Wire Shield Wire (Black) Green Wire Black Wire Red Wire White Wire Red Wire White Wire Thermo Scientific AquaPro Analyzer User Guide 21 2.6.3 Differential pH Sensor Wiring Standard Thermo Scientific Differential pH Sensors, sensors use an NTC300 temperature element that must be set up in software, sensors use a PT1000 temperature element. Sensors: AnalogPlus SP and FP Sensors 2.6.4 Pin Number Label Description 12 11 10 9 8 7 6 5 4 3 2 1 Active Shield Process Ground Reference FP and SP Sensors with “-8” Temp. Element Red Shield Black Green Temp Comp Yellow Temp Low Power (+) Power (-) White mA Out 1 Output Common mA Out 2 FP and SP Sensors with “-9” Temp. Element Red Shield Black Green Yellow Blue White Differential ORP Sensor Wiring Standard Thermo Scientific Differential ORP Sensors, sensors use an NTC300 temperature element that must be set up in software, sensors use a PT1000 temperature element. Sensors: AnalogPlus SR and FR Sensors Pin Number Label Description 12 11 10 9 8 7 6 5 4 3 2 1 Active Shield Process Ground Reference FR and SP Sensors with “-8” Temp. Element Red Shield Black Green Temp Comp Yellow Temp Low Power (+) Power (-) White mA Out 1 Output Common mA Out 2 Thermo Scientific AquaPro Analyzer User Guide SR and FR Sensors with “-9” Temp. Element Red Shield Black Green Yellow Blue White 22 2.6.5 AnalogPlus Ozone Sensor Wiring Standard Thermo Scientific Ozone Sensors are setup with PT1000 temperature elements. Sensors: AnalogPlus SZ31 Ozone sensor family Pin Number 12 11 10 9 8 7 6 5 4 3 2 1 2.6.6 Label Description Sense Shield Drive Temp Comp Temp Black Power (+) Power (-) mA Out 1 Output Common mA Out 2 SZ31 Ozone Sensors Red Shield Green Yellow Black Blue White AnalogPlus Dissolved Oxygen Sensor Wiring Standard Thermo Scientific Dissolved Oxygen Sensors are setup with PT1000 temperature elements. Sensors: AnalogPlus SD31 Dissolved Oxygen sensor family Pin Number 12 11 10 9 8 7 6 5 4 3 2 1 Label Description Sense Shield SD31 Dissolved Oxygen Sensors Red Shield Drive Temp Comp Temp Black Power (+) Power (-) mA Out 1 Output Common mA Out 2 Green Yellow Black Blue White Thermo Scientific AquaPro Analyzer User Guide 23 2.6.7 Analog Sensor- Two-electrode Conductivity/Resistivity and Toroidal Conductivity. For correct wiring, bend over wire cable tag to identify function or wire color. Sensor: Match function or wire color to wire cable tags. Current Outputs: Both outputs use a single “common” terminal. 2.6.8 AnalogPlus Toroidal Conductivity Sensor Wiring Standard Thermo Scientific Toroidal Conductivity sensors are setup with PT1000 temperature elements. Sensors: AnalogPlus ST Toroidal Conductivity sensor family. Pin Number 11 10 9 8 7 6 5 4 3 2 1 Label Description Drive 1 Drive 2 Toroidal Conductivity White Blue Sense Temp Low Shield Temp Comp Green Yellow Shield Red mA Out 1 Output Common mA Out 2 Thermo Scientific AquaPro Analyzer User Guide 24 2.6.9 AnalogPlus Two Electrode Contacting Conductivity Sensor Wiring Standard Thermo Scientific Two Electrode Conductivity sensors are setup with PT1000 temperature elements. Sensors: AnalogPlus SC, KC, BC, Two Electrode sensor families. Pin Number 11 10 9 8 7 6 5 4 3 2 1 Label Description Drive Two Electrode Contacting Conductivity Red Sense Black Shield Shield Temp Comp Blue Temp Low White mA Out 1 Output Common mA Out 2 2.6.10 DataStick Sensor Wiring DataStick Digital Sensor Systems: pH, ORP, contacting conductivity, toroidal conductivity, dissolved oxygen (ppm), trace dissolved oxygen (ppb), free chlorine, ozone, low range turbidity, high range turbidity, suspended solids. Any of these digital sensors can be connected to the same AquaPro card. Pin Number 8 7 6 5 4 3 2 1 Label Description +24 VDC Ground Comms (+) Comms (-) Shield mA Out 1 Output Common mA Out 2 DataStick Red Black White Blue Shield Thermo Scientific AquaPro Analyzer User Guide 25 2.6.11 DO Scaling Card Connections for RDO Pro Probe Only (Table populated from RDO label dwg) Pin Number 8 7 6 5 4 3 2 1 Label Description +24 VDC Ground Comms (+) Comms (-) Shield mA Out 1 Output Common mA Out 2 DataStick Red Black Blue Green Shield * Note: The Comms (+) and Comms (-) are different than the DataStick connection 2.7 2.7.1 Relay Wiring Relay Card Remove the terminal block from the desired relay and wire to the common contact (COM) and to either the normally open contact or the normally closed contact. Plug the terminal block into the card. Relay F Relays D, E and F NO = Normally Open Contact COM = Common Contact NC = Normally Closed Contact Relay E Relay D Thermo Scientific AquaPro Analyzer User Guide 26 2.8 2.8.1 Host Communications Wiring Host Digital Communications Cards: When installed, the Host Comms card provides a means for a remote computer to take control of the measurement system – to report data directly or to remotely diagnose setup or calibrate the system. Please refer to the appropriate Host Comms manual for programming, routing and operation. The AquaPro currently supports one of the following communications protocols as described in the sales order configuration guide on page 8. A Host Communications with MODBUS 232 B Host Communications MODBUS RTU (RS-485) C Host communications Ethernet IP, TCP/IP, Modbus TCP. D Host Communications DeviceNet E Host Communications CANopen After connections are made, communication is established through the Host Computer. There is nothing to set up in the AquaPro menu system. The specific communication protocol being used is described on the AquaPro product label on the outside of the case. Wiring for Modbus RTU (RS-485) The AquaPro does not provide external power to the communications cable. The ground connection between the AquaPro and the host computer should be made first. MODBUS RTU Shield Comms A (-) Comms B (+) Ground 7 6 5 4 3 2 1 Thermo Scientific AquaPro Analyzer User Guide 27 Wiring for Modbus 232 (RS-232) The AquaPro does not provide external power to the communications cable. The ground connection between the AquaPro and the host computer should be made first. MODBUS 232 Shield RX TX Ground 7 6 5 4 3 2 1 Wiring for DeviceNET or CANopen The AquaPro does not provide external power to the communications cable. The ground connection between the AquaPro and the host computer should be made first. The wiring is the same for DeviceNET and CANopen protocols. DeviceNET Ground CAN_L Shield Ground 7 6 5 4 3 2 1 CANopen Ground CAN_L Shield Ground 7 6 5 4 3 2 1 Wiring for EtherNet An RJ45 jack is provided on the Host Comms card when the Ethernet protocol is configured. The AquaPro supports several Ethernet protocols including Ethernet/IP, TCP/IP, Modbus TCP, HTTP, PC3. Thermo Scientific AquaPro Analyzer User Guide 28 2.9 Field Replacement /Addition of Sensor Scaling and Special Function Cards When servicing the AquaPro in the field, cards can be removed or inserted. When doing so, it is recommended that power should be off to the AquaPro. Cards should never be removed just to connect wires to the terminal blocks. Terminal block wiring should be done with the cards installed. To remove an existing card or blank from a slot, depress the card tab located in the interior wall of the base enclosure with a small flat blade screwdriver and pull up on the wiring tab on the top of the card. The card will slide out easily. When all four cards and card blanks are removed from the AquaPro, the backplane and card guides are visible. To install any Card: 1. Install sensor scaling cards from left to right without leaving any gaps. The first card goes in Slot 1 (far left); second scaling card goes in Slot 2, and so on. 2. Relay and communications cards are always inserted into Slot 4. 3. Orient the card so that the locking tab for the card is lined up with the interior wall of the AquaPro. 4. Line up the edges of the card so that they slide into the Slot card guide. If there is an empty card slot in the AquaPro unit, the cards in a higher number slot would not be read, nor be viewable, on the main display. Thermo Scientific AquaPro Analyzer User Guide 29 The following image shows the AquaPro system with three scaling cards installed (from left to right). The fourth card slot has a card blank installed and is available for field upgrade to a fourth sensor, a Host comms card or a relay expansion card. Thermo Scientific AquaPro Analyzer User Guide 30 2.10 Measure Screen Overview The AquaPro has a large color graphics display and 7 keys for menu navigation. When powering up the unit for the first time, the graphics screen will display the main measurement parameters in Slot 1 (Channel 1). If other channels are configured, press the RIGHT and LEFT arrows to select other single parameter measurement screens and combined measurement screens. Use the UP and DOWN arrows to toggle between numeric and graphic measurement displays. The information contained on the measure screen is organized as follows: Top Banner: Tag, Channel/Sensor Type/Temperature Main sensor reading Outputs and Relays assigned to this channel The top line banner displays a User Entered Channel “NAME” to the left, the channel and measurement type in the center and the temperature on the right. The bottom line banner displays the status of all channels system along with time and date. A channel with a green background is operating normally. A channel with a yellow background has a diagnostic issue. The most common would be that the sensor should be calibrated. A channel with a red background is disconnected or not working. When a sensor card or Digital DataStick sensor of the same type is replaced in the AquaPro, current output, PID and relay settings are maintained. If a sensor module of a new type is installed, these settings are automatically set to default conditions appropriate to the new parameter. When a digital sensor head is absent from a DataStick, the condition will be indicated by a message on the measure screen that indicates that either the DataStick or the sensors head are absent. Thermo Scientific AquaPro Analyzer User Guide 31 SINGLE CHANNEL VIEW THREE CHANNEL VIEW Thermo Scientific AquaPro Analyzer User Guide TWO CHANNEL VIEW FOUR CHANNEL VIEW 32 3. SOFTWARE MENUS AND NAVIGATION Menus are accessed by pressing the MENU key (highlighted in Gray). Select the appropriate Up, Down, Left and Right Arrows to highlight to your selection. Press ENTER to select the highlighted selection and access the available menus and tasks. Use the UP/DOWN arrow keys to scroll through the list of Menu options. Use the ENTER key to select an option. Use the ESC key to move up in the structure and back into the MEASURE screens Main Menu Calibration Diagnostics Setup Service Calibration Diagnostics Setup Service Channel 1 Channel 2 Channel 3 Channel 4 System Information Calibration Log Warning List Event Log Analog Output Status Relay Status Channel 1 Channel 2 Channel 3 Channel 4 Channel 5 (Math) Relays Data Logging Language System Rest Time/Date Password Service Hold Analog Output Ch 1 Analog Output Ch 2 Analog Output Ch 3 Analog Output Ch 4 Test Relays USB Flash Drive Thermo Scientific AquaPro Analyzer User Guide 33 The Main Menu has four selections: Calibration, Diagnostics, Setup and Service. Select Calibration: For all sensor and temperature calibration functions in the system. A list of the installed Channels with their measurement parameter and an optional name, such as process or location, if added by the user. Select Diagnostics: To display System Information, Calibration Log, Warning List, Event Log, Analog Output Status and Relay Status. Select Setup: To setup the sensor cards installed in the analyzer listed by Channel 1 through 4 and the Channel 5 Math Channel, only if either 2 pH or 2 contacting conductivity probes require calculated functions. Also the Relays, Data Logging, Language, System Reset, Time/Date, Passwords settings are configured here. Default value for Enable passwords is No. Select Service: To program a Service Hold to stop all operations or select by channel to stop current output and relays states, view Analog Output for analog sensor channels to test and calibrate current outputs, test relays operation. USB operations require the user to have a USB stick for data transfers. Select USB to perform functions such as uploading logged data, copying configuration setups in one monitor to other monitors electronically, and loading new features into the AquaPro software. Scroll to the desired Menu Tree using the UP and DOWN arrows and press ENTER. The Diagnostics Menu is helpful for checking that systems are operating properly. System Information: The system information gives a list of the Front Panel Slots and what is in each slot number. The type of card is listed here – either DC scaling, AC scaling, DataStick, NONE, AC or DC power source. For each card with a probe, the probe description is listed as well. Calibration Log: The calibration log can be viewed per channel for the measurement for the active channel. The log lists the most recent calibration. The user may scroll back to see the history. All calibrations have a time and date stamp for audit trail needs. Warning List: The warning list is a list by channel of the colored status for the channel. The list shows the detail of the causes of the warning color. Event Log: The event log is a listing of the events that have occurred on each channel, sorted by date and time. Examples are On Hold, DataStick Found or Not Found, Temperature Broken, Default Calibration, Power Up, etc Thermo Scientific AquaPro Analyzer User Guide 34 Analog Output Status: The analog outputs are assigned to an Analog Output by the user. Output 1 and Output 2 are displayed for each active channel. The user can assign the output of the Sensor, Temperature or PID. These milliamp (mA) ranges of the default values of 4-20mA or 0-20 mA are selectable in Setup. The scaling of Output 1 is 4.00 mA and Output 2 is 20.00 mA. This is the default value but it may be changed to either 0 to 20 mA or PID Controller to meet the testing requirements. Relay Status: Each relay in the system is listed and status is noted as Active or Inactive. Relays are identified by a capital letter starting with Relay A, Relay B, etc. Three relays are provided with the AquaPro Analyzer but additional relays can be added to the Channel 4 if required. The Setup menu allows the user to customize the AquaPro for their needs. Channel 1 (or 2, 3 or 4): User selects the channel of interest, presses Enter to moves into the Channel 1 Setup. The channel’s Analog Output 1 pH assignment election channel options include sensor, temperature and PID options. PID Controller setup is also in this menu. The PID Controller list of options includes Algorithms (ISA or Velocity), Full Scale, Zero Scale, Set Point, Proportional Gain offset, Integral Gain. Derivative Gain, Manual Reset (%), Manual Mode. Manual mode of the PID controller shows full scale with %, pH reading and temperature which the user can edit with scale and gains. Calibration Setup: Set the Calibration Interval and Buffer Set (pH) or other standardization methods corresponding to the test being performed. Measurement Settings: Select the Measurement Units and the Sensor type, Show mV (yes or no), Display Resolution (X.XX), Sensor Filter (10 sec), Temperature parameters of Elements (PT1000, etc), Units (°C) and Filter (seconds). Channel Name Hold/Transfer Solution Compensation (Off/On) Channel Active (Yes, No) The 3 other channels may be set up the same way with a few differences due to the parameter being measured. Thermo Scientific AquaPro Analyzer User Guide 35 An additional Channel, called the Calculated Function or Math Channel, can be used when two channels are measuring samples using the same sensor type. For example, if two channels are using Contacting Conductivity then math calculation can be performed on the readings. Both channels need to be on to use the Calculated Function. Currently this function only applies to pH and Conductivity measurements. The Calculated Function Channel is not visible unless at two channels with the same measurement being performed are active and running. Setup Menu: for the Calculated Function options is listed below. Sensor Units: Automatically populated if only one pair of measurements is viable. If more than one pair is active, the units need to be selected. Display Resolution: Displays the resolution, based on the measurement channel data. Set Channel X: Assign a channel as Channel X Set Channel Y: Assign a channel as Channel Y Set Formula: Select formula from table. See table below for options. X-Y X+Y X/Y*100% (X+Y)/2 X*Y (X-Y)/X*100% X/(X+Y)*100% Channel Name: Assign name if applicable, such as Ch5-Math Channel Active: Yes or No, Should be Yes to view and use the channel. Channel can be turned off with No. Thermo Scientific AquaPro Analyzer User Guide 36 A navigation map for each of the four main branches of the menu tree is displayed below. The main menu choices are shown as follows for an AquaPro configured with four sensors. When only 1 sensor card is installed, the listings in the menu will only indicate choices for 1 channel. Every effort is made to organize the lists with most frequently used functions first. Main Menu Calibration Diagnostics Setup Service Calibration Diagnostics Setup Service Channel 1 Channel 2 Channel 3 Channel 4 System Information Calibration Log Event Log Analog Output Status Relay Status Channel 1 Channel 2 Channel 3 Channel 4 Calculated Function Relays Data Logging Language System Rest Time/Date Setup Password Service Hold Analog Output Ch 1 Analog Output Ch 2 Analog Output Ch 3 Analog Output Ch 4 Test Relays USB Configuration Thermo Scientific AquaPro Analyzer User Guide 37 4. CALIBRATION MENUS Calibration methods supported in the AquaPro are automatically determined depending on the sensor card installed. The software makes the calibration process very easy for the user to calibrate and get back online quickly. The calibration process goes through a sequence of steps to configure the calibration. The step sequence is the same. Option lists are used where user must give information, such as selection to calibrate the sensor or temperature or the number of cal points, 2 or 1. Sequence: Step 1: Output/Relay State during calibration (Hold, Transfer, Active) Step 2: Select the sensor or temperature as main parameter(Sensor or Temperature) Step 3: Select the type of calibration (Based on sensor type) Step 4: Select the number of points to calibrate (Based on sensor type) Step 5: Put the sensor in desired calibration solution and allow it to stabilized Step 6: Set the desired value for manual/sample calibration. This step is skipped for buffer, air and zero calibration. Step 7: Initiate calibration and wait for completion. Step 8: Messages on calibration result along with slope and offset information where appropriate. When selected, Outputs and Relays will remain in a Hold or Transfer condition during the calibration and for a period of time after calibration that is set in for each channel setup in the SETUP menu. Thermo Scientific AquaPro Analyzer User Guide 38 Calibration methods currently employed: Calibration Type Function Sensors Supported 1-Point Sample Set measured reading to desired reading. Changes offset. Best done at high end of range. All 2-Point Sample Sets measured reading to desired reading for two points separated by more than 2 pH units. Changes span and offset. pH 1-Point Buffer Automatically sets measured pH reading to closest pH buffer standard point. Buffer standard set is selected in the configuration menu. Changes offset. 2-Point Buffer Automatically sets measured readings to closest buffer standard. Two points need to be separated by more than 2 pH units. Buffer standard set is selected in the configuration menu. Changes span and offset. pH Zero Set measured reading to zero. Measured reading must be close to zero. Conductivity, Turbidity, Dissolved Oxygen, RDO, Ozone, Suspended Solids Air Adjust measured reading to calculated reading of oxygen in air with pressure and salinity configuration settings as well as temperature reading. Assumes sensor is placed in air. Dissolved Oxygen,RDO Temperature 1Point Set measured reading to desired reading. Changes offset. Best done at high end of range. All Calibration steps are listed below by measurement. Thermo Scientific AquaPro Analyzer User Guide 39 4.1 pH Calibration 1. From the main measurement screen, press Menu key and select Calibration line. 2. Select the pH channel you wish to calibrate. Note: DataStick pH calibrations are performed using the DataStick card. 4.1.1 1 Point pH Calibration 1. Select a point for calibration that is near or at the point you are measuring. The point can be a sample value or a buffer point. 2. Under the calibration screen, select the channel to be calibrated and press enter to start calibration. The measurement will be adjusted to the new calibration point. 4.1.2 2 Point pH Calibration 1. Select 2 points that represent the measurement range using either US buffers (4.01, 7.00, 10.01) set or DIN19267 buffers (1.09, 4.65, 6.79, 9.23, 12.75). Be sure to use fresh buffers for the greatest accuracy. 2. Perform the calibration following the screen prompts for the buffer order of measurement. 3. Slope and offset value will be displayed and saved in the calibration log. 4. Default temperature compensation is at 20°C if there is no live temperature measurement during calibration. 5. A calibration timer may be set to automatically remind the user to recalibrate at the specified time interval. Default is 30 days. 4.2 ORP (Redox) Calibration 1. From the main measurement screen, press Menu key and select Calibration line. 2. The AnalogPlus ORP uses the same card as the AnalogPlus pH uses. Note: DataStick ORP calibrations are performed using the DataStick card. 3. Select a standard for the ORP calibration. Do not use Orion ORP standard for the calibration as it will damage the probe. Select either 200 mV (order number ORPSOL200) or 600 Mv (order number OPPSOL600), whichever is closer to your expected measurement point, or perform a sample calibration. 4.2.1 1 Point ORP Calibration 1. Select a point for calibration that is near or at the point you are measuring. The point can be a mV standard or a sample value. 2. Under the calibration screen, select the channel to be calibrated and press enter to start calibration. The measurement will be adjusted to the new calibration point. Thermo Scientific AquaPro Analyzer User Guide 40 4.3 Contacting Conductivity Contacting Conductivity probes are all calibrated using Manual/Sample, Zero Calibration or Cell Constant entry, for all cell constant values. Manual/Sample Calibration uses a standard solution of known concentration or a sample solution for the calibration solution. Zero Calibration is an air calibration to create a zero conductivity point. Cell Constant calibration shows the current cell constant and allows the user to edit the cell constant to another value. 4.3.1 1 Point Contacting Conductivity Calibration 1. Select a point for calibration that is near or at the point you are measuring. The point can be a known standard or a sample value. 2. Under the calibration screen, select the channel to be calibrated and press enter to start calibration. The measurement will be adjusted to the new calibration point. After each successful calibration, the cell constant value is displayed and stored. The temperature sensor may also be calibrated. 4.4 Toroidal Conductivity 1. Select a point for calibration that is near or at the point you are measuring. The point can be a known standard or a sample value. 2. Under the calibration screen, select the channel to be calibrated and press enter to start calibration. The measurement will be adjusted to the new calibration point. After each successful calibration, the cell constant value is displayed and stored. The temperature sensor may also be calibrated. 4.5 AnalogPlus DO or DataStick DO Calibration Dissolved Oxygen probe sensors can be calibrated as the DO measurement as Manual/Sample, Air Calibration or Zero Calibration (where the oxygen has been depleted or almost depleted). Manual calibration is a calibration in a sample solution and a known value in ppm is entered manually. The default is 0.00 ppm but the user sets the calibration value from 0.00 to 20.00 for a standard or a known sample value. Thermo Scientific AquaPro Analyzer User Guide 41 4.5.1 1 Point DO Calibration 1. Select a point for calibration. The point can be a ppm standard or a sample value, a zero point or an air calibration. Air calibration is quick and easy to use. The oxygen level depends on salinity (in mS/cm) and pressure (in mmHg). Those variables should be determined and entered into the AquaPro in the Setup menu for the channel. Scroll boxes allow the input of the salinity and pressure. The temperature in the DO probe will be read live so temperature compensation occurs automatically within the measurement calculation. 2. After the settings are entered, press escape to return to Calibration in the main menu. Select the channel to be calibrated and press enter to start calibration. 3. The first calibration screen is Hold so the sensor can be put into the appropriate calibration location, then press continue. 4. Define the calibration. Sensor or Temperature calibration will to be performed. The measurement will be adjusted to the new calibration point. 5. Select the Type of Calibration, either Manual/Sample, Air Calibration, or Zero Calibration. a. The Manual/Sample calibration is performed in a known sample or standard or sample stream. b. Air Calibration is a quick, accurate way to calibrate as the DO in air at a temperature and pressure is typically pretty stable. c. Zero Calibration point is the most time consuming method, as it requires very low level of oxygen in a solution and time for the sensor to achieve that zero state. 6. After selecting the calibration type, press escape to return to Calibration in the main menu. Select the channel to be calibrated and press enter to start calibration. 7. Start the calibration and follow the instructions on the screen. At the end, Calibration Successful will be displayed, Calibration Unsuccessful with a description of the error will be displayed and the calibration will not be logged, as it was not accepted. 4.6 RDO Pro The RDO Pro probe is an Optical RDO measurement probe. It uses a specific RDO card in the AquaPro. Although similar to the DataStick card, the RDO wiring is different for the Comms (+) and Comms (-) connections. Thermo Scientific AquaPro Analyzer User Guide 42 4.6.1 1 Point RDO Calibration 1. Select a point for calibration. The point can be a ppm standard or a sample value, a zero point or an air calibration. Air calibration is quick and easy to use. The oxygen level depends on salinity (in mS/cm) and pressure (in mmHg). Those variables should be determined and entered into the AquaPro in the Setup menu for the channel. Scroll boxes allow the input of the salinity and pressure. The temperature in the DO probe will be read live so temperature compensation occurs automatically within the measurement calculation. 2. After the settings are entered, press escape to return to Calibration in the main menu. Select the channel to be calibrated and press enter to start calibration. 3. The first calibration screen is Hold so the sensor can be put into the appropriate calibration location and the type of calibration can be defined, then press continue. 4. Define the calibration. Sensor or Temperature calibration will to be performed. The measurement will be adjusted to the new calibration point. 5. Select the Type of Calibration, either Manual/Sample, Air Calibration, or Zero Calibration. a. The Manual/Sample calibration is performed in a known sample or standard or sample stream. b. Air Calibration is a quick, accurate way to calibrate as the DO in air at a temperature and pressure is typically pretty stable. c. Zero Calibration point is the most time consuming method, as it requires very low level of oxygen in a solution and time for the sensor to achieve that zero state. 6. After selecting the calibration type, press escape to return to Calibration in the main menu. Select the channel to be calibrated and press enter to start calibration. 7. Start the calibration and follow the instructions on the screen. At the end, Calibration Successful will be displayed. If not successful, Calibration Unsuccessful with a description of the error, if identified, will be displayed. The calibration will not be logged, as it was not accepted. 4.7 DataSticks There are many sensor options in the DataStick product line, but the AquaPro DataStick card is used for all DataStick measurements. The DataStick sensor type and stored calibration data are uploaded into the AquaPro display. The sensor is identified on the channel description over the measurement data. The instructions for the sensor measurement can be followed for the measurement being used. Additional DataStick measurements include Turbidity, Suspended Solids, and Free Chlorine. Thermo Scientific AquaPro Analyzer User Guide 43 5. DIAGNOSTICS MENUS The diagnostics menu allows the user to quickly and easily determine the status of the analyzer functions. 5.1 System Information Displays Channel information of card type and measurement in use or power and relay information Calibration Log Select channel to review stored calibrations results Warning List Description of Conditions causing Yellow or Red colored channel label Events Log Rolling log of time and date stamped events such as power up, default calibration in use, Temperature broken(no sensor),holds on or off Analog Output Status Displays mA outputs for the installed Channels Relay Status Status of Active or Inactive System Information The AquaPro can be configured with many hardware options. Diagnostics is the best place to look when reviewing the hardware that is installed in the system. Basic information for each board function is listed: Front Panel: Main processer serial number, software version, hardware version and time/date. Slot 1: Sensor type, electronic serial number, protocol version, software version. Slot 2: Sensor type, electronic serial number, protocol version, software version. Slot 3: Sensor type, electronic serial number, protocol version, software version. Slot 4: Sensor or special function type, electronics serial number, protocol version, software version. Slot 5: Power Supply information – Power Type (AC or DC) If a slot is empty, the System Information screen will display NONE for that channel. . Thermo Scientific AquaPro Analyzer User Guide 44 5.2 Calibration Log The calibration log will list calibration events for all sensors configured with date/time, calibration type, temperature reading, calibration results (pass/fail) as well as slope and offset data where appropriate. Calibrations must be performed in the primary measurement unit for the parameter. If there is another unit selected, the calibration will revert to the primary measurement. If only a default calibration is present, the Cal ID:0 will be in the top left corner of the screen and there will be not time/date stamp. The yellow channel number can be improved with a successful calibration of the sensor. 5.3 Event Log The event log will list all events over a period of time, from the most current to the oldest, including relay switching, data log downloads, channel setting changes, system setting changes and channel status changes such as temperature failure. 5.4 Analog Output Status This function provides a single screen to display out current output readings from all channels in one place. 5.5 Relay Status This function provides a single screen to display current state of all configured relays. Thermo Scientific AquaPro Analyzer User Guide 45 6. SETUP MENU The setup menu is where the AquaPro functions are setup for specific applications. Setup Choices: Channel 1 Channel 2 Channel 3 Channel 4 Calculated Function (Math Channel) Relay Setup Data Logging Language System Reset Time/Date Channel 1: When configured the menu list will show the sensor type – pH, Conductivity, DO, etc. Settings for each of the following are available for any sensor input card. Analog Outputs: Set outputs 1 and 2 to be driven by the sensor or temperature. Then select the scale for the output. Chose linear, log or PID functions. If there are 2 of the same analog sensors active, the math channel is Calibration Setup: Setup a calibration reminder for this particular sensor in terms of days. If the sensor is not calibrated after the time period is up, an indicator on the main measure display screen will turn yellow to indicate the sensor should be checked. Measurement Settings: Setup sensor units, filters, temperature elements, manual temperature settings, temperature units. Analog sensor cards will allow for the setup of sensor type. This is not necessary when using a DataStick sensor. Channel Name: A tag can be entered for the channel to record the measurement information (for example, Basin 31) Hold/Transfer: Calibration hold time after a calibration is complete, settings for transfer current output values and Error current output values. Solution Compensation: Sensor specific options for compensation are chosen here. User Value: Temperature compensation values are chosen here (for example, 2 uS/cm/C) Channel Active: When a sensor is not being used and the user wants to remove the channel from the measure screen options and diagnostic fault alarms, the channel can be turned off. When the channel is off, the setup menu and diagnostic information is still present and can easily be turned back on. Thermo Scientific AquaPro Analyzer User Guide 46 Calculated Function: When the AquaPro is configured with two sensors on s that use the same units of measure, this “Math Channel” can be setup to derive a calculated measurement. Currently the pH and conductivity measurements are the only ones that can use this feature. Map the channels to be used into the variables X and Y. Then select the math function. Once this is setup a calculated measurement will appear in the main measure display screens and current outputs and relays can be driven by this function. (Refer to page 36) Relays: There are three standard relays in the AquaPro. Three additional relays can also be installed for a total of six relays. The standard relays are designated A through C. The add-on relays are D through F. All relays are Form C with normally open and normally close contacts. Choosing the correct contact is necessary to achieve the desired action. Each relay in the system can be driven by any measurement parameter in the system. Additionally, each relay can be configured to operate as follows: Disabled: Relay will not activate. This means that the normally open contact remains open and the normally closed contact remains closed. Alarm: Set low and high alarm values, low and high deadband values, on and off delay values. Control: Set Phase, Setpoint, Deadband, on delay, off delay and Overfeed timer. Wash: Set Interval and duration with off-delay timer. Error: Activate the relays when the assigned measurement is in an error state (EG: open temperature or out of calibration) Data Logging: Setup the channels to be logged and setup the interval of data recording. When the log is full, set it up to start over or stop until removed. Language: The AquaPro can be setup with the following languages: English Spanish German French Italian Portuguese Chinese Factory Defaults: The AquaPro can be put in its original factory setup. Please be careful when using this command and be sure that functions currently configured are not being used on control. Time/Date: Setup the time and date for data logging. Passwords: Passwords can be setup to protect system settings and calibration settings. The factory default setup is to disable passwords. Thermo Scientific AquaPro Analyzer User Guide 47 7. PID Functions Use the UP/DOWN arrows to scroll the list of PID Controller options for viewing and editing. ≡PID Controller ►Set Algorithm ►Set Full-Scale ►Set Zero-Scale ►Set Setpoint ►Set Prop Gain ►Set Integ Gain ►Set Deriv Gain ►Set Trans Time ►Set Man Reset ►Set Manual Mode ◄ Exit Each of the PID options used to configure and tune the loop is shown below for a sensor type of pH. PID Function Set Algorithm Set Full-Scale Set Zero-Scale Set Setpoint Set Proportional Gain Set Integral Gain Set Derivative Gain Set Transit Time Set Man Reset Manual Mode Edit Range ISA or Velocity 0 to 14 pH 0 to 14 pH 0 to 14 pH −99.99 to +99.99 0.00 to 50.00 reps/min 0.00 to 10.00 seconds 0 to 9999 seconds 0.0% to 100% Control: 0.0% to 100% Default Setting ISA 14 pH (Do not change) 0 pH (Do not change) 7 pH 0.00 (+ is direct action, − is reverse action) 0.00 reps/min 0.00 seconds 0 seconds 0.0% 0.0% (Process value is displayed) Scroll through these configuration and tuning options with UP/DOWN arrows. Press ENTER to select an option and view or edit the setting. Press ENTER to change setting or ESC to leave a setting unchanged. Note that in the Manual Mode, the present pH value is displayed in the top line and the Control Adjustment is made in the second line. Thermo Scientific AquaPro Analyzer User Guide 48 Each of the PID controller options used to configure and tune the loop is shown below for a sensor type of contacting or electrode-less conductivity. PID Function Set Algorithm Set Full-Scale Set Zero-Scale Set Setpoint Set Proportional Gain Set Integral Gain Set Derivative Gain Set Transit Time Set Manual Reset Manual Mode Edit Range ISA or Velocity 0 to 5000 µS/cm 0 to 5000 µS/cm 0 to 5000 µS/cm –99.99 to +99.99 0.00 to 50.00 reps/min 0.00 to 10.00 seconds 0 to 9999 seconds 0.0% to 100% Control: 0.0% to 100% Default Setting ISA 2000 µS/cm (Do not change) 0 µS/cm (Do not change) 1000 µS/cm 0.00 (+ is direct action, – is reverse action) 0.00 reps/min 0.00 seconds 0 seconds 0.0% 0.0% (Process value is displayed) When the configuration and tuning settings are made, select PID as the Parameter for current loop 1 or current loop 2. Integral gain can be disabled by entering “0.00” to provide only PD controller action. To quickly get to the PID controller set point for fine tuning, press the ENTER and RIGHT ARROW KEYS at the same time from a measure screen. This feature is present only when the personality module installed in the AquaPro is pH, contacting conductivity or toroidal conductivity. Thermo Scientific AquaPro Analyzer User Guide 49 8. Relays Up to six Form C relays with normally open and normally closed contacts are available with the AquaPro. The selectable features in the relay menus are the same regardless of the measurement. While the AquaPro is being used to calibrate the sensor, the relay is held in its present state. Use the UP/DOWN arrows to scroll the relay option list. Press ENTER to select. Press ESC to move up a level in the menu system. ≡Relay A ►Set Function ►Set Parameter ►Set Activation ◄Exit The SET FUNCTION menu is used to configure a relay for ALARM, CONTROL or WASH functions. When ALARM is selected, the relay activation is determined by low and high limits of the chosen measured parameter. When CONTROL is selected, the relay activation is determined by a single set point. WASH is a timer function and does not depend on the sensor or temperature measurements. Error is shown when normally open contacts lose power. The power failure alerts the personnel, data system or other output that a power toss had occurred. First select the desired relay function: ALARM, CONTROL, WASH, or ERROR Next, select the PARAMETER (Sensor or Temperature) that drives the relay if either Alarm or Control is selected. If Wash is selected, the relay operates as a timer. If ALARM is selected, the following activation options can be programmed in the ACTIVATION menu. ALARM Function Set Low Alarm Set High Alarm Set Low Deadband Set High Deadband Set Off-Delay Set On-Delay Edit Range Min to Max scale Min to Max scale 0 to 14 pH 0 to 14 pH 0 to 999 seconds 0 to 999 seconds Default Setting Zero or most negative reading Highest reading 0 pH 0 pH 0 seconds 0 seconds If CONTROL is selected, the following activation options can be programmed in the ACTIVATION menu. ALARM Function Set Phase Set Setpoint Set Deadband Set Off-Delay Set On-Delay Edit Range High or Low Min to Max scale 0 to 14 pH 0 to 999 seconds 0 to 999 seconds Default Setting High Highest reading 0 pH 0 seconds 0 seconds If WASH is selected, the following activation options can be programmed in the ACTIVATION menu. ALARM Function Set Interval Set Duration Set Off Delay Edit Range 0.0 to 999.9 minutes 0 to 999 seconds 0 to 999 seconds Thermo Scientific AquaPro Analyzer User Guide Default Setting 0.0 minutes 10 seconds 0 seconds 50 9. HOST COMMUNICATIONS The AquaPro Analyzer can be set up to communicate with a Host Computer system in a variety of protocols. When using Host Communications, please refer to the selected communications manual for specific protocol setup and use. Host Protocol Modbus RTU DeviceNet RS-232 Profibus CANopen Ethernet Other Reference Manual to Set up Address, Baud Rate and Parity Modbus Communications Adapter Users Manual DeviceNet Communications Adapter Users Manual DataStick Instruction Manual (MAN011DS-3): 9600 bps, no parity, 8 data bits, 1 stop bit Modbus/Profibus Gateway Manual CanOpen Communications Adapter Users Manual Ethernet Communications Adapter Users Manual Look for addendums on setting up other protocols that may be configured. Thermo Scientific AquaPro Analyzer User Guide 51 10. TROUBLESHOOTING / SERVICE The AquaPro Analyzer Service menu is an easy way to access and test outputs, relays and USB functions. All outputs and relays can be placed on hold when service is being done to a particular sensor or to all the sensors. Functions: Service Hold: Choose to hold outputs and relays for Ch1, Ch2, Ch2, Ch4, Ch5/Math or the full system. Also come here to clear hold before the time out expires. Output 1, 2, 3 and 4: Set a value to test; calibrate 4 and 20 mA settings so the output agrees with the PLC or recording device. Test Relays: Toggle Active and Inactive states for each relay in the system (A through C or A through F). USB Configuration: Retrieve Datalog on a memory stick, copy a system configuration to the AquaPro, Load new software. The colored circle next to the channel number for the sensor displays the status of the channel with green, yellow or red signifying Good, Warning and Failure. The error messages associated with the colored circle are listed in the Warning list codes and messages table below. COLOR ERROR MESSAGE INSTRUCTIONS /ERROR CLEARED RED RED RED RED YELLOW YELLOW YELLOW GREEN YELLOW TEMPERATURE BROKEN SENSOR NOT FOUND INVALID CONFIGURATION DATASTICK NOT FOUND ON HOLD DEFAULT CALIBRATION CALIBRATION DUE POWER UP RDO CAP EXPIRATION WARNING RED CONTROL OVERFEED TIMER RED RDO CAP EXPIRED NOW CLEAR TEMPERATURE BROKEN SENSOR FOUND CLEAR INVALID CONFIGURATION DATASTICK FOUND CLEAR HOLD CLEAR DEFAULT CALIBRATION CLEAR CALIBRATION DUE POWER DOWN CLEAR RDO CAP EXPIRATION WARNING CLEAR CONTROL OVERFEED TIMER CLEAR RDO CAP EXPIRED Thermo Scientific AquaPro Analyzer User Guide 52 11. Certificate of Conformity Declaration of Conformity Manufacturer: Thermo Fisher Scientific Inc. 166 Cummings Center Beverly, MA 01915 USA Hereby declares that the following product: AquaProTM Analyzer Conforms to the following directives and standards: 2006/95/EC - Low Voltage Directive (LVD) EN 61010-1:2001 - Safety requirements for electrical equipment for measurement, control and laboratory use - Part 1: General requirements 2004/108/EC - Electromagnetic Compatibility (EMC Directive) EN 61326-1:2006 – Electrical equipments for measurement, control and laboratory use – EMC requirements - Part 1: General requirements ________________________________ Patrick Chiu Manager, EHS and Regulatory Programs Thermo Scientific AquaPro Analyzer User Guide Place and Date of Issue: Beverly, MA USA May 4, 2012 53 12. Terms and Conditions AquaPro WARRANTY/REPLACEMENT PLAN Thermo Fisher Scientific warrants its AquaPro Analyzer against material and workmanship defect for a period of one year from the date of shipment. In the event that a defect is discovered during the warranty period, Thermo Fisher Scientific agrees, at its option, to repair or replace the defective product. Any product repaired or replaced under this warranty will be warranted only for the remainder of the original product warranty period. This warranty does not apply to consumable products associated with this product including, but not limited to, chemical reagents and salt bridges. Products may not be returned without authorization from Thermo Fisher Scientific. To obtain authorization, please call Thermo Fisher Scientific for a return material authorization number. Limitations: This warranty does not cover: 1. Damage caused by misuse, neglect (lack of appropriate maintenance), alteration, accident or improper application or installation. 2. Damage caused by any repair or attempted repair not authorized by Thermo Fisher Scientific. 3. Any product not used in accordance with the instructions furnished by Thermo Fisher Scientific. 4. Damage caused by acts of God, natural disaster, acts of war (declared or undeclared), acts of terrorism, work actions, or acts of any governmental jurisdiction. 5. Freight charges to return merchandise to Thermo Fisher Scientific. 6. Travel fees associated with on-site warranty repair. This warranty is the sole expressed warranty made by Thermo Fisher Scientific in connection with its products. All other warranties, whether expressed or implied, including without limitation, the warranties of merchantability and fitness for a particular purpose, are expressly disclaimed. The liability of Thermo Fisher Scientific shall be limited to the cost of the item giving rise to the claim. In no event shall Thermo Fisher Scientific be liable for incidental or consequential damages. This warranty is the sole and complete warranty for Thermo Fisher Scientific. No person is authorized to make any warranties or representations on behalf of Thermo Fisher Scientific. Thermo Fisher Scientific reserves the right to change or modify this warranty at any time. Thermo Scientific AquaPro Analyzer User Guide 54 Terms and Conditions of Sale The following terms and conditions will be presumed acceptable unless changes are made in writing and accepted by both parties in a reasonable amount of time. Any standard or boilerplate terms and conditions supplied with a written purchase order will not be applicable unless accepted in writing by both parties. Quotations: All quotations shall be in writing. Written quotations shall be valid for 30 days from the date issued. Verbal quotations or price lists are not valid. Pricing: All pricing is in US Dollars. Thermo Fisher Scientific reserves the right to change pricing without notice. Terms: Payment terms are net 30 days from the date of invoice with approved credit. Thermo Fisher Scientific reserves the right to deny credit or revoke previously extended credit. Past due accounts are subject to interest charges. Other acceptable payment terms are cash, certified check, money order, credit card or letter of credit confirmed by any United States of America bank. Other payment terms are not valid unless accepted in writing. Sales taxes shall be included on the invoice unless a valid tax exemption certificate is supplied. Return Material Authorization: Contact Thermo Fisher Scientific Customer Service for a Return Material Authorization (RMA) number. Items returned without an RMA number will be rejected. All returned merchandise must be in unused, resalable condition, and must not be contaminated with hazardous materials. Cancelled orders must be returned within 30 days of the date on the invoice and shall be subject to expenses incurred that may include, but are not limited to, inspection and restocking fees. Items returned within 60 days shall be subject to a restocking charge that is equal to 15% of the purchase price. Items returned after more than 60 days shall be subject to a restocking charge equal to 25% of the purchase price. Thermo Fisher Scientific reserves the right to reject any return that is not under warranty after 60 days. Non-stock items are normally not returnable. Transportation: Orders are shipped FOB Thermo Fisher Scientific, or factory, by the most efficient means available. Appropriate charges, such as freight and insurance will be added to invoices. All shipments will be insured. Goods damaged in shipment must be reported by the recipient to the freight carrier for claims. Thermo Scientific AquaPro Analyzer User Guide 55 13. Ordering Information: ORDER NUMBER AP01PH AP02ORP AP03CC AP04TR AP05DO AP06OZ AP07RDO AP08DS AP0ESC AP0AMB232 AP0BMBRTU AP0CETH AP0DDEN AP0ECAN AP0FPROBS AP0GREXC AP0ENCAC AP0ENCDC AP0ENC AP0DA AP0KVAC AP0JVDC AP0BASAC AP0BASDC AP0PANKT AP0PIPKT DESCRIPTION pH Scaling Card ORP Scaling Card Contacting Cond. Scaling Card Toroidal Cond. Scaling Card Dissolved Oxygen Scaling Card Ozone Scaling Card RDO Pro Digital Input Card DataStick Digital Input Card Expansion Slot cover Modbus 232 Host Comms. Card Modbus RTU Host Comms. Card Ethernet IP, TCP/IP Host Comms. Card DeviceNet Host Comms. Card CANopen Host Comms. Card Profibus Host Comms. Card Relay Expansion Card Enclosure Assy with AC Power Supply - No Door Enclosure Assy with DC Power Supply - No Door Enclosure Assy-No Door- No Power Door Assembly AC Power Supply PCB Assembly DC Power Supply PCB Assembly AquaPro Assy with AC Power Supply and Door AquaPro Assy with DC Power Supply and Door Panel Mount Kit Pipe Mount Kit Thermo Scientific AquaPro Analyzer User Guide 56 14. Specifications 14.1 Parameter measurement ranges for the sensors Measurement pH ORP Toroidal Range 0 to 14 pH -2000 to +2000mV 0 to 2 S/cm Resolution 0.01 pH 1mV 1uS/cm 1.0 2-cell Conductivity 0 to 2000 uS/cm 0.1 uS/cm 0.1 2-cell Conductivity 0 to 500 uS/cm 0.01 uS/cm 0.05 2-cell Conductivity 0 to 20 ppm 0.01 uS/cm 0.01 2-cell Conductivity 0 to 10 ppm 0.001uS/cm RDO Pro® Optical DO 0 to 20.0 ppm; 0 to 200% saturation 0 to 20 ppm 0 to 20 ppm 0 to 100 NTU 0 to 4000 NTU 0 to 5 ppm 0 to 5 ppm 0 to 20,000 ppm -5 to 200°C 0.1ppm Units pH mV uS/cm, Mohm*cm, ppm, % uS/cm, Mohm*cm, ppm, % uS/cm, Mohm*cm, ppm, % uS/cm, Mohm*cm, ppm, % uS/cm, Mohm*cm, ppm, % ppm 0.1ppm 1ppb; 0.001 ppm 0.001 NTU 0.1 NTU 0.1ppm 0.1ppm 1 ppm 0.1°C ppm, % ppb, ppm, % NTU NTU ppm ppm ppm, % °C/°F DO (ppm) DO (ppb) Low Turbidity High Turbidity Ozone Free Chlorine Suspended Solids Temperature** **Note: Temperature type is selectable from PT1000, PT100, NTC300, NTC30K, or Manual. The default element is PT1000. Thermo Scientific AquaPro Analyzer User Guide 57 14.2 Functions and Features 1 to 4 Sensors for optimal cost per measurement point. Temperature measurement for all sensors (standard). NEMA 4X Enclosure for indoor/outdoor use. Wall, Pipe and ½ DIN Panel Mounting options. Very readable large color graphics display. Math Functions for % rejection, % pass and others. Data and Event Logs for 4 channels for 30 days (Standard). Front panel USB port for easy data log extraction, quick system configuration, field software upgrades. Calibration, System Setup, Diagnostics and Service Menus. Two 4 to 20 mA loop outputs per sensor (up to 8). Three Form C Relays for Alarm, Control and Wash (Standard). Option for six Form C Relays when up to 3 sensors are used. Full Featured PID function for process control. Digital protocol options for remote measurement, calibration, setup and diagnostics: Modbus, Devicenet, Ethernet IP… 6 cable ports for standard conduit and cordgrip fittings. 14.3 Mounting Options Wall Mount with Quick Disconnect mounting plate. ½ DIN Panel Mount. Pipe/Hand rail mount (vertical and horizontal). 14.4 Interface Display: 4.3 Inch Color Graphics with High Contrast Keypad: 7 Key menu navigation Thermo Scientific AquaPro Analyzer User Guide 58 14.5 Environmental Conditions Ambient operating temperature range: -20 to 60 °C Ambient storage temperature range: -20 to 70°C Maximum Relative humidity: 95% non-condensing Meets NEMA 4X requirements for outdoor use. For industrial use. 14.6 Interchangeable Modules Factory installed function cards can be reconfigured in the field. Slot 1: pH,ORP,Conductivity,DO,Ozone,Turbidity,Chlorine,SS Slot 2: pH,ORP,Conductivity,DO,Ozone,Turbidity,Chlorine,SS Slot 3: pH,ORP,Conductivity,DO,Ozone,Turbidity,Chlorine,SS Slot 4: pH,ORP,Conductivity,DO,Ozone,Turbidity,Chlorine,SS, Host Comms, 3 Optional relays. Power: AC or DC 14.7 4 to 20 Milliamp Current Loops Two isolated current loops per sensor (standard). Setup as 0 or 4 to 20 mA. 0.01mA Resolution. Each output assignable to sensor, temperature or Math. Full featured PID control function w/ pH or conductivity. Loop power provided by AquaPro Thermo Scientific AquaPro Analyzer User Guide 59 14.8 Relays Three Form C Relays (Standard): 5A, 250 VAC Three Form C Relays (Optional): 5A, 250 VAC Normally Open and Normally closed contacts. Assignable to any measurement, temperature or math function in the system. Setup Functions Include: Alarm, Control and Timer. 14.9 Digital Protocol Options to Host MODBUS RTU DeviceNet Profibus DP/V1 Ethernet IP 14.10 Power Supply AC Power Option: 100 to 240 VAC, 50/60Hz, 0.4A Max @ 25°C DC Power Option: 24 VDC. Thermo Scientific AquaPro Analyzer User Guide 60 Process Water Instruments North America 166 Cummings Center Beverly, MA 01915 USA Toll Free: 1-800-225-1480 Tel: 1-978-232-6000 [email protected] Netherlands Tel: (31) 033-2463887 [email protected] India Tel: (91) 22-4157-8800 [email protected] Japan Tel: (81) 045-453-9175 [email protected] China Tel: (86) 21-68654588 [email protected] Singapore Tel: (65) 6778-6876 [email protected] Australia Tel: (613) 9757-4300 [email protected] © 2012 Thermo Fisher Scientific Inc. All rights reserved. 268102-001 B 0512