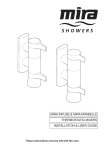
1
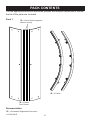
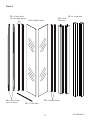
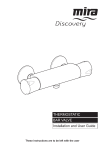
ACE
DOUBLE DOOR QUADRANT
Installation and User Guide
These instructions must be left with the user
1
1117300-W2-E
CONTENTS
Introduction.............................................................................................. 2
General.................................................................................................. 2
Guarantee............................................................................................. 3
Recommended Usage........................................................................... 3
Safety Precautions................................................................................... 3
General.................................................................................................. 3
Pack Contents.......................................................................................... 4
Installation................................................................................................ 7
Maintenance............................................................................................ 22
General Maintenance.......................................................................... 22
Cleaning.............................................................................................. 22
Care.................................................................................................... 22
Chrome Parts...................................................................................... 22
Spare Parts............................................................................................. 23
Customer Service................................................................................... 24
INTRODUCTION
Thank you for purchasing a quality Mira product. To enjoy the full potential of your
new product, please take time to read this guide thoroughly, having done so, keep
it handy for future reference.
The following pages aim to provide comprehensive installation instructions, plus
advice on how to care and maintain your product.
We recommend that the unit is installed by a qualified plumber or engineer.
General
1.
2.
3.
4.
Read all of these instructions.
Retain this guide for later use.
Pass on this guide in the event of change of ownership of the installation
site.
Follow all warnings, cautions and instructions contained in this guide.
If you experience any difficulty with the installation or operation of your new
enclosure, please refer to ‘Fault Diagnosis’, before contacting Kohler Mira Ltd.
Our contact details can be found on the back cover of this guide.
1117300-W2-E
2
Guarantee
For domestic installations, Mira Showers guarantee this shower enclosure against
any defect in materials or workmanship for a period of ten years from the date of
purchase.
For non-domestic installations, Mira Showers guarantee this shower enclosure
against any defect in materials or workmanship for a period of one year from the
date of purchase.
For terms and conditions refer to the back cover of this guide.
Recommended Usage
Domestic
ü
Light Commercial
ü
Heavy Commercial
û
Healthcare
û
SAFETY PRECAUTIONS
General
1.
2.
3.
4.
5.
Care should be taken when drilling into walls and floors to avoid any hidden
pipes or wires.
We strongly recommend that all glass panels are moved by a minimum of two
people and that any protective packaging along the glass edges is kept in place
for as long as possible to prevent damage before installation.
People not familiar with the fitting of Mira enclosures may require the assistance
from another person at certain stages of the procedure. We have indicated
these points in the installation procedure with the following symbol:
Wear protective footwear when lifting panels.
Wear safety glasses when drilling.
3
1117300-W2-E
PACK CONTENTS
Tick the appropriate boxes to familiarise yourself with the part names and to confirm
that all of the parts are included.
Pack 1
q 2 x Door Seals (magnetic)
(fitted on doors)
q 2 x Tracks
q 2 x Glass
Door Panels
Documentation
q 1 x Guarantee Registration Document
1117300-W2-E
4
Pack 2
q 2 x Door Seals
(to fit on glass panel)
q 2 x Door Seals
(to fit on doors)
q 2 x Wall
q 2 x Glass Panels
q 2 x U-channels
Channels
q 2 x Vertical Seals
q 1 x Track Seal
5
1117300-W2-E
Component Pack (Packed in Pack 2)
q 8 x Concealing Caps
q 12 x Screws
(8 required for Quadrant)
q 8 x Plastic Washers
q 4 x Grub Screws
q 8 x Screws
q 6 x Fixing Screws
q 6 x Wall Plugs
q 1 x 3 mm Drill
q 2 x Handle Assembly
q 4 x Plastic Covers
1117300-W2-E
6
INSTALLATION
1
Ensure tray
is level
60 to
75mm
U-Channel
5mm
Track
Keep
gap
even
(a) Install the shower tray in accordance with the manufacturer’s instructions.
Caution! Make sure that the shower tray is level and that the walls are vertical
and square.
Note! Cover the tray waste to prevent the loss of small parts.
Note! Protect the tray surface during enclosure installation.
(b) Place the bottom track on the shower tray and use as a guide to find the position
of the wall channels.
7
1117300-W2-E
2
x3
x3
6mm
x3
x3
(a) Position the U-channel on the wall. Using a spirit level make sure that it is
upright.
(b) Mark the position of the fixing holes, then remove the U-channel.
(c) Drill with a 6 mm masonry bit (not supplied) and plug using the wall plugs
(supplied).
(d) Position the U-channel on the wall and partially install the fixing screws.
(e) Apply silicone sealant according to the manufacturers instructions along the
length of the wall.
(f) Fully tighten the fixing screws, making sure that the U-channel is upright.
(g) Repeat the above process for the other U-channel.
1117300-W2-E
8
3
(a) Assemble the top and bottom tracks to the wall channels using the fixing screws
(supplied).
Note! Make sure that the smooth face of the wall channel is facing towards the
front of the enclosure when assembled.
9
1117300-W2-E
4
Wall Channel fits around the
U-channel (viewed from the inside)
6
(a) Fit the wall channels over the U-channels on both sides of the enclosure.
1117300-W2-E
10
5
(a) Carefully fit the glass into the enclosure, taking care not to damage the foam
seal in the top and bottom glass clamps.
(b) Repeat for the other side of the enclosure.
11
1117300-W2-E
6
1
2
(a) Apply silicone sealant to seal the bottom glass clamp against the extrusion.
(b) Fit the track seals to the bottom of the glass on each side of the enclosure.
Note! The track seals will need to be cut to length, approximately 5 mm longer
than the gap:
For the 800 enclosure cut the track seal to 160 mm
For the 900 enclosure cut the track seal to 225 mm
For the 1000 enclosure cut the track seal to 360 mm
For the 1200 enclosure cut the track seal to 525 mm.
Note! Start from the clamp end and work towards the wall channel, do not fully
install the seals at this time.
Note! Wetting the seal with water may help with the installation of the seals.
1117300-W2-E
12
7
(a) Trim the seal to the correct length and fit along the length of each glass panel,
from the inside of the enclosure. Ensure the glass panel is pushed fully into
the extrusion before fitting the seal.
(b) Finally install the last section of the track seal so that it seals against the side
seal.
(c) Repeat the process for all the other track seals.
13
1117300-W2-E
8
(a) Tighten the top and bottom screws on each glass clamp to secure the glass
panels in position. Do not overtighten.
1117300-W2-E
14
9
(a) Lift up the door frame within the U-channels and apply silicone sealant in
accordance with the manufacturers instructions to the area shown.
(b) Lower the door frame until it sits firmly on the shower tray. Remove any excess
sealant.
15
1117300-W2-E
10
(a) Fit the door seals as shown in the above diagram.
(b) Apply clear silicone sealant in accordance with the manufacturers instructions
underneath the bottom of the door seal where it contact the track and glass.
(c) Remove any excess silicone sealant.
1117300-W2-E
16
11
=
x4
3mm
±0mm
x4
x4
(a) Centralise the enclosure within the U-channels and make sure that everything
is level.
(b) Drill four 3mm holes through the wall channel and into the U-channel with the
3 mm drill (supplied).
(c) Install the plastic washers and the screws.
(d) Tighten the screws and fit the plastic concealing caps to secure the
enclosure.
(e) Repeat for the other side of the enclosure.
17
1117300-W2-E
12
(a) Remove the nuts from the top and bottom rollers.
1117300-W2-E
18
13
A
Note position
of arrow
Tighten screws
just enough to
grip door in place
Doors can be adjusted by rotating the
bottom adjusters.
Adjust until doors close with a smooth
action and then tighten the screws.
Caution
Note position
of arrow
A
STEP
14
(a) Carefully fit the doors over the top roller assemblies, loosely fit the nuts to
secure the doors in position.
(b) Fit the doors over the bottom roller assemblies and fit the nuts to secure in
position.
(c) Fit the door seals to the doors.
19
1117300-W2-E
14
(a) Fit the plastic covers to the top of the extrusions.
15
(a) Fit the door handles to each of the doors.
(b) Open and close each of the doors to make sure that they work correctly.
1117300-W2-E
20
16
24hrs
(a) Apply silicone sealant in accordance with the manufacturers instructions along
the inner surfaces of the enclosure uprights.
(b) Apply silicone sealant in accordance with the manufacturers instructions along
the bottom track/tray outer surface.
(c) Allow the silicone sealant to cure for 24 hours before use.
21
1117300-W2-E
MAINTENANCE
General Maintenance
Providing the shower enclosure has been correctly installed and is operated in
accordance with the instructions contained in this guide, difficulties should not
arise.
If any maintenance is required then it must be carried out by a competent tradesperson
to whom the maintenance instructions are provided.
Before replacing any parts ensure the underlying cause of the malfunction has been
resolved.
Cleaning
Warning! Many household cleaners contain abrasive and chemical substances and
should not be used for cleaning painted, plated or plastic fittings.
These finishes should be cleaned with a mild washing up detergent or soap solution
and then wiped dry using a soft cloth.
Care
To preserve the beauty of your shower enclosure for many years, please observe
the following care instructions:
Rinse glass and frame with clear water after showering. Remove water droplets
with a squeegee. Do not rub dry! To clean your shower hygienically and easily, we
recommend the use of a biodegradable cleanser.
Regular cleansing with a biodegradable cleanser prevents stubborn stains and
ensures a clean and hygienic surface for many years. Do not use scouring or caustic
cleansers under any circumstances! These can damage the surface of the frame,
glass and decorative parts as well as the plastic parts.
Chrome Parts
Use only cleansers expressly specified for chrome!
SPARE PARTS
1
2
3
4
5
6
7
8
800
208573
208573
308132
308132
208573
207892
204631
204631
900
208378
208378
308130
308130
206817
204637
306441
306411
1000 x 800 LH
209034
208573
308618
308617
208573
207892
209109
204631
1000 x 800 RH
208573
209034
308617
308618
208573
207892
204631
209109
1200 x 900 LH
209035
208378
308620
308619
206817
204637
209110
306411
1200 x 900 RH
208378
209035
308619
308620
206817
204637
306411
209110
1117300-W2-E
22
7
*
10
20
20
20
20
10
*
Quadrant
8
6
3
206083
206083
208411
20
83
90
208411
208391
208372
208406
202156
85
2
81
70
308140
20
30
54
54
85
20
30
1
81
70
20
84
80
30
81
40
208372
208406
202156
305320
305321
5
308167
308167
200004*
200004*
5
4
30
2
30
46
6
*
4
04
79
20
05
0
8)
(x
x6
(
9*
x8
*(
)
20
(x
)
12
20
20
20
17
04
20
*
6
4*
20
14
*
8)
(x
8
4
50
208372
208411
4*
46
0
20
206083
6
0
20
208372
208411
4*
01
206083
2
20
202156
208406
7
04
20
7
202156
7*
01
2
20
208394
208406
2
66
208480
208394
)
* indicates this component is part of the parts pack.
4
23
1117300-W2-E
CUSTOMER SERVICE
Guarantee of Quality
Mira Showers guarantee your product against any
defect in materials or workmanship, provided that it
is installed and maintained in accordance with the
instructions given in this guide.
To validate the guarantee, please return your
completed registration card within 30 days of product
installation.
Within the guarantee period we will resolve defects,
free of charge, by repairing or replacing parts or
modules as we may choose.
To be free of charge, service work must only be
undertaken by Mira Showers or our approved
agents.
Service under this guarantee does not affect the
expiry date of the guarantee.
The guarantee on any exchanged parts or product
ends when the normal product guarantee period
expires.
Not covered by this guarantee:
Damage or defects arising from incorrect installation,
improper use or lack of maintenance, including
build-up of limescale.
Damage or defects if the product is taken apart,
repaired or modified by any persons not authorised
by Mira Showers or our approved agents.
This guarantee is in addition to your statutory and
other legal rights.
What to do if something goes wrong
If when you first use your enclosure, it doesn’t
function correctly, first contact your installer to check
that installation is satisfactory and in accordance
with the instructions in this manual. We are on
hand to offer you or your installer any advice you
may need.
Should this not resolve the difficulty, simply contact
our Customer Services Team who will give every
assistance and, if necessary, arrange for our service
engineer to visit. If the operation of your enclosure
declines, please call our Customer Services Team
to talk the difficulty through, request a service under
guarantee if applicable, or take advantage of our
comprehensive After-Sales service.
As part of our quality and training programme calls
may be recorded or monitored.
Our Customer Services Team is comprehensively
trained to provide every assistance you may need:
help and advice, spare parts or a service visit.
Spare Parts
We maintain an extensive stock of spares and
aim to provide support throughout the product’s
expected life.
Genuine Mira spares can be purchased direct from
Customer Services.
Spare parts will normally be despatched within
three to five working days. Payment can be made
using most major Credit or Debit cards at the time of
ordering. Should payment by cheque be preferred,
a pro-forma invoice will be sent.
All spares are guaranteed for 12 months from the
date of purchase.
Service / Repairs
Our Service Force is available to provide a quality
service at a reasonable cost. You will have the
assurance of a Mira trained engineer/agent, genuine
Mira spare parts and a 12 month guarantee on the
repair.
Payment should be made directly to the engineer/
agent who will accept most major Credit or Debit
cards or a cheque supported by a banker’s card.
To Contact Us
England, Scotland, Wales and Northern Ireland
Mira Enclosures Technical Helpline
Telephone: 0844 571 5000
E-mail: [email protected]
Fax: 01242 282595
By Post: Cromwell Road, Cheltenham,
Gloucestershire, GL52 5EP
Mira is a registered trade mark of
Kohler Mira Limited.
The company reserves the right to alter
product specifications without notice.
www.mirashowers.co.uk
1117300-W2-E
24
© Kohler Mira Limited, September 2010
Pdf Supplied By http://www.plumbworld.co.uk/