1
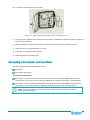
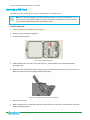
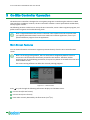
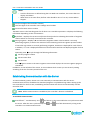
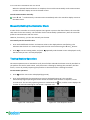
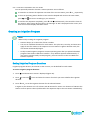
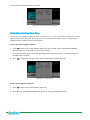
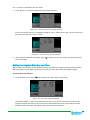
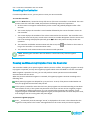
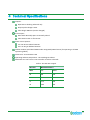
G.S.I DC Controller Installation and User Guide September 2012 G.S.I Controller Installation and User Guide Information in this documentation is subject to change without notice and does not represent a commitment on part of Galcon. The software described in this document is subject to the license agreement that is included with the product, which specifies the permitted and prohibited uses of the product. Any unauthorized duplication or use of this documentation, in whole or in part, in print, or in any other storage or retrieval system is prohibited. No part of this publication may be reproduced, transmitted, transcribed, stored in a retrieval system, or translated into any language in any form by any means for any purpose other than the purchaser’s personal use without the permission of Galcon. © 2012 Galcon. All rights reserved. Contact Us Galcon Kfar Blum 12150, Israel Tel: 972-4-6900222 Fax: 972-4-6902727 E-mail: [email protected] Visit us at: www.galconc.com 2 Table of Contents 1 Introduction .......................................................................................................................... 3 G.S.I Controller Models ..............................................................................................................3 2 Setting Up the G.S.I Controller .............................................................................................. 5 Installing the Controller .............................................................................................................5 Installing on a Wall or in a Control Cupboard ......................................................................5 Installing on a Pole ..........................................................................................................7 Establishing the Electrical Connections .........................................................................................8 Connecting the Solenoids to the Controller .........................................................................9 Inserting Batteries ....................................................................................................................9 Inserting Lithium Batteries ............................................................................................. 10 Inserting Alkaline Batteries ............................................................................................. 10 Connecting a Rain Sensor and Flow Meter .................................................................................. 11 Inserting a SIM Card ............................................................................................................... 12 3 On-Site Controller Operation ............................................................................................... 14 Main Screen Features .............................................................................................................. 14 Establishing Communication with the Server .............................................................................. 15 Manually Setting the Controller Clock ........................................................................................ 16 Testing Station Operation......................................................................................................... 16 Creating an Irrigation Program ................................................................................................. 17 Setting Irrigation Program Durations ............................................................................... 17 Setting the Irrigation Cycle Time ..................................................................................... 18 Setting the Irrigation Start Day and Time ......................................................................... 19 Cancelling an Irrigation Program Start ....................................................................................... 20 Initiating Immediate Irrigation for a Station ............................................................................... 20 Resetting the Controller ........................................................................................................... 21 Pausing and Resuming Irrigation from the Controller ................................................................... 21 Fault Indication ....................................................................................................................... 22 Locking and Unlocking the Screen ............................................................................................. 22 4 Technical Specifications ...................................................................................................... 23 5 Warranty ............................................................................................................................. 25 1 List of Figures Figure 1: Open Controller Cover ........................................................................................................ 6 Figure 2: Control Panel Swung Outward .............................................................................................. 6 Figure 3: Opening the Internal Casing ................................................................................................ 6 Figure 4: Mounting Screw Holes on Back of Unit .................................................................................. 6 Figure 5: Mounting Screw Holes Dimensions ....................................................................................... 6 Figure 6: Inserting the Mounting Screws with Cover Caps ..................................................................... 6 Figure 7: Removing the Pole Mounting Brackets .................................................................................. 7 Figure 8: Upper Bracket Reorientation ................................................................................................ 7 Figure 9: Lower Bracket Reorientation ................................................................................................ 7 Figure 10: Correctly Oriented Pole Mounting Brackets .......................................................................... 8 Figure 11: Pole Mounting Bands Inserted in Brackets ........................................................................... 8 Figure 12: Output Connectors Labeled B and R .................................................................................... 9 Figure 13: Battery Compartment Removed – Alkaline Version .............................................................. 11 Figure 14: SIM Card Case ................................................................................................................ 12 Figure 15: SIM Card Insertion Orientation .......................................................................................... 12 Figure 16: Correctly Inserted SIM Card .............................................................................................. 13 Figure 17: Main Screen .................................................................................................................... 14 Figure 18: Test Screen .................................................................................................................... 16 Figure 19: Test Sequence Screen ...................................................................................................... 16 Figure 20: Duration Screen Example ................................................................................................. 18 Figure 21: Cycle Screen ................................................................................................................... 18 Figure 22: Twelve Hour Cycle Setting Example ................................................................................... 19 Figure 23: Six Day Cycle Setting Example .......................................................................................... 19 Figure 24: Start Day Screen Example ................................................................................................ 19 2 1 Introduction The Galcon G.S.I Controller is a controller which functions as the intermediary between central Galcon servers and the irrigation valves in the field. Creating irrigation programs for the G.S.I Controller is primarily done from the G.S.I Web User Interface. However, you can also create a simple irrigation program directly on the controller even before setting up the Web interface. You can also perform manual irrigation directly from the controller. This manual describes how to install the G.S.I Controller, test to verify successful installation, perform basic, initial irrigation programming, and perform manual valve irrigation. For information about using the G.S.I Web User Interface, refer to the G.S.I Web User Interface User Guide. G.S.I Controller Models There are two models of the G.S.I Controller, based on the type of power supply used: DC unit, which supports either Alkaline or Lithium batteries. AC unit. This document describes the DC unit type. 3 2 Setting Up the G.S.I Controller Setting up the G.S.I Controller system includes the following tasks: Installing the Controller (see below) Establishing the Electrical Connections (see page 8) Installing the Controller The controller is designed to withstand outdoor installation conditions (at a rating of IP65). However it is preferable to provide additional protection from the climate by installing it in a sheltered position. Appropriate installation of the controller will ensure dependable operation throughout the years. The controller can be installed in two ways: Installation on a wall or in a control cupboard. Installation on a metal pole of 1¼” to 1½” diameter. Installing on a Wall or in a Control Cupboard To install the controller on a wall or in a control cupboard: 1. Unlock and open the controller cover (Figure 1). 2. Swing out the control panel (Figure 2). 3. For the internal casing on the right side, unscrew the two screws and open the casing (Figure 3). Mount the controller to the wall or to the control cupboard through the marked holes (Figure 4 and Figure 5) with the aid of the three supplied screws. Close the screws by hand only. For water sealing, cover the screws with the supplied cover caps (Figure 6). 4. Close the internal casing and fasten its screws. 5. Swing the control panel back into place. 6. Close and lock the controller cover. 5 G.S.I Controller Installation and User Guide 6 Figure 1: Open Controller Cover Figure 2: Control Panel Swung Outward Figure 3: Opening the Internal Casing Figure 4: Mounting Screw Holes on Back of Unit Figure 5: Mounting Screw Holes Dimensions Figure 6: Inserting the Mounting Screws with Cover Caps G.S.I. Controller Installation and User Guide Installing on a Pole To install the controller on a pole: 1. While maintaining their current orientation in space, remove the screws and the two brackets on the back of the controller. Figure 7: Removing the Pole Mounting Brackets 2. Rotate the upper bracket 180 degrees around its vertical axis, and reconnect it to the back of the controller using the supplied screws. Figure 8: Upper Bracket Reorientation 3. Rotate the lower bracket 180 degrees around its horizontal axis. Then reconnect it to the back of the controller using the supplied screws. Figure 9: Lower Bracket Reorientation Note: If the two brackets are correctly oriented, their small flaps will be facing outward and the arrow icons on both will point upwards (see Figure 10). 7 G.S.I Controller Installation and User Guide Figure 10: Correctly Oriented Pole Mounting Brackets 4. For each bracket, take one of the pole mounting bands and insert it through the two slots in the bracket. Figure 11: Pole Mounting Bands Inserted in Brackets 5. Position the unit on the pole and affix it in place by fastening the mounting bands around the pole. Establishing the Electrical Connections The DC G.S.I Controller has the following output connectors: 12 irrigation valves Master valve The G.S.I Controller has the following inputs: Rain sensor Water meter / Flow sensor 8 G.S.I. Controller Installation and User Guide Connecting the Solenoids to the Controller To connect the solenoids to the controller: 1. Insert the solenoid wires through the cable gland at the bottom of the controller. 2. Connect the wires to the corresponding connectors according to wire color, that is, connect the black wire to the connector labeled B, and the red wire to the connector labeled R. Figure 12: Output Connectors Labeled B and R Note: It is highly recommended that you label the input wires, by function, for future reference. Inserting Batteries Depending on the configuration, your G.S.I DC Controller can either use two Lithium batteries, or four D-size alkaline batteries. Note: If your unit uses Lithium batteries, do not insert alkaline batteries. If your unit uses alkaline batteries, do not insert Lithium batteries. If you want to switch between Lithium batteries and alkaline batteries or vice-versa, contact Galcon Support. 9 G.S.I Controller Installation and User Guide Inserting Lithium Batteries The G.S.I DC Controller supports using Lithium battery packs consisting of a pair of 3.6V batteries, for a total voltage of 7.2. To insert Lithium batteries: 1. Unlock and open the controller cover (Figure 1). 2. Swing out the control panel (Figure 2). 3. For the internal casing on the right side, unscrew the two screws and open the casing (Figure 3). 4. Turn the battery compartment latch by 90 degrees and pull out the battery compartment (Figure 13). 5. Insert the two Lithium batteries into the battery compartment. Make sure they are inserted in the correct directions. 6. Return the battery compartment and lock it in place by turning the latch back until it clicks. 7. Close the internal casing and fasten its screws. 8. Swing the control panel back into place. 9. Close and lock the controller cover. Inserting Alkaline Batteries The G.S.I DC Controller also supports the use of D-size 1.5V alkaline batteries as a power source. To insert alkaline batteries: 1. Unlock and open the controller cover (Figure 1). 2. Swing out the control panel (Figure 2). 3. For the internal casing on the right side, unscrew the two screws and open the casing (Figure 3). 4. Turn the battery compartment latch by 90 degrees and pull out the battery compartment. 10 G.S.I. Controller Installation and User Guide Figure 13: Battery Compartment Removed – Alkaline Version 5. Insert four 1.5 V alkaline D-size batteries into the battery compartment. Make sure they are inserted in the correct directions. 6. Return the battery compartment and lock it in place by turning the latch back until it clicks. 7. Close the internal casing and fasten its screws. 8. Swing the control panel back into place. 9. Close and lock the controller cover. Connecting a Rain Sensor and Flow Meter The GSI unit supports the following input devices: Rain sensor Flow meter (pulse type) To connect the input wires: Rain sensor – Connect one of the rain sensor wires to the connector labeled Rs, and connect the second sensor wire to one of the connectors labeled C. The polarity of the wires is not important. Flow meter – Connect one of the flow meter wires to the connector labeled Ws, and connect the second wire to one of the connectors labeled C. The polarity of the wires is not important. Note: You must define the rain sensor and flow meter in the G.S.I Web User Interface before you can use them. 11 G.S.I Controller Installation and User Guide Inserting a SIM Card The SIM card case is located on the upper left side of the controller board. Note: Your SIM card definitions should already have been set by the manufacturer. If you are inserting an independent SIM card and you need to set its definitions yourself, refer to the document SIM Card Definitions provided by Galcon. To insert a SIM card: 1. Unlock and open the controller cover (Figure 1). 2. Swing out the control panel (Figure 2). 3. Locate the SIM card case. Figure 14: SIM Card Case 4. Slide the SIM card case cover to the side to open it, as indicated by the arrow labeled OPEN (see Figure 16). 5. Open the cover and slide the SIM card into the grooves located on the inner part of the case cover. Make sure that you have oriented the SIM card correctly. Figure 15: SIM Card Insertion Orientation 6. Close the case cover. 7. Hold the SIM card case cover down while you slide the cover to the side, as indicated by the arrow labeled LOCK (Figure 16). 12 G.S.I. Controller Installation and User Guide Figure 16: Correctly Inserted SIM Card 8. Swing the control panel back into place. 9. Close and lock the controller cover. 13 G.S.I Controller Installation and User Guide 3 On-Site Controller Operation The Galcon G.S.I Controller is designed to run irrigation programs created using the online G.S.I Web User Interface. In addition, however, the G.S.I Controller includes a control panel which enables basic, initial program creation. The following sections outline how to set up the G.S.I Controller, create a basic irrigation program, and perform other irrigation and troubleshooting tasks. Note: Programs defined from the G.S.I Controller control panel continue to operate until you explicitly deactivate them from the G.S.I Web User Interface application, even if you upload a different program from the application. Main Screen Features You can view information and monitor irrigation processes directly from the G.S.I Controller Main screen. Note: As an energy saving feature, the G.S.I Controller is designed by default so that its screen turns off if no buttons have been pressed for two minutes. Therefore, before performing any of the following procedures, first press any button to activate the screen and view the Main screen. The screen turning off does not affect the currently running program. Figure 17: Main Screen Press to cycle through the following information displays on the Main screen: Current time (hh:mm format) Current time (mm:ss format) Flow value currently detected by the flow sensor (in m3/hr). 14 G.S.I. Controller Installation and User Guide Notes: Until the flow sensor is defined using the G.S.I Web User Interface, this screen does not display actual data. When there is no water flow, the flow value should be zero. If it is not, contact Galcon Support. Current voltage of the controller’s battery Last four digits of the controller unit’s 16-digit serial number Current firmware version number The Main screen is the launching point for all other G.S.I. controller operations. It displays the following information depending on the circumstances: By default – Displays the current time (hh:mm format) and a list indicating the number of irrigation stations which are currently connected to the controller. During irrigation – Displays a icon below the irrigation station in the list which is currently performing irrigation, as well as the amount of time remaining until that irrigation process finishes. If more than one station is currently performing irrigation, the icon is displayed for each of them. In addition, a icon is displayed below one of those stations and the time displayed applies for that station. Optionally press to cycle through the following information: Current program number Current water flow Current time Press again to return to the main irrigation screen which displays the current irrigation program countdown. In addition, on the left side of the screen, an icon indicates which screen you are currently viewing according to the list of screens printed on the unit. Establishing Communication with the Server To conserve battery power, the DC unit is not constantly in communication with the server. Communication must be established to download programs or upload data logs. When setting up the G.S.I Controller for the first time, establishing communication with the server automatically sets the controller clock. Note: While communication is established, the controller’s buttons are disabled. To establish communication: Press and simultaneously. The icon flashes on the screen while the unit synchronizes with the server. After the unit is synchronized, the controller is in communication mode. and icons flash alternatively as long as the 15 G.S.I Controller Installation and User Guide When the upload/ download session is complete, the controller automatically ends communication and the controller display returns to the Main screen. To end communication manually: Press and simultaneously. Communication immediately ends. The controller display returns to the Main screen. Manually Setting the Controller Clock In order for the controller to correctly operate the irrigation system at the desired times, the controller clock must first be set correctly. The controller clock is automatically updated every time the controller preforms communication with the server. However, if necessary, you can also manually set the time. To manually set the controller time: 1. Press and hold until the hour and minutes values in the displayed time start flashing. This indicates that the clock is in time-setting mode. Set the current time using the andbuttons. 2. Press to exit time-setting mode, and press repeatedly until the Main screen is displayed. Verify that the time you set is correctly displayed. Testing Station Operation The station operation test is intended to verify that all of the solenoids have been correctly installed. As you perform the test for each station, verify that water is flowing by checking the controller, the flow sensor, or even by visually inspecting the sprinklers to check that water is flowing from them. To test station operation: 1. Press until the Test screen is displayed (Figure 18). 2. Press and hold until the Test Sequence screen is displayed (Figure 19). The controller automatically begins operating the master station and each of the stations in sequence, for 60 seconds each. The currently operating station is marked with the number of seconds remaining for that station’s operation test. Figure 18: Test Screen 16 icon, and the screen displays the Figure 19: Test Sequence Screen G.S.I. Controller Installation and User Guide You can optionally extend or shorten a station operation test as follows: To extend or to shorten the operation test time of the current station, press orrespectively. To close an operating station before its test time has elapsed and move to the next station, press . The icon moves according to your selection. To end the test sequence completely, press and simultaneously. The controller closes all the stations. After closing all the stations, the message “CL OS” is displayed on the screen, and then the controller displays the Main screen. Creating an Irrigation Program Notes: When locally creating the irrigation program: Stations always run in the order of their numbers. You can set a different duration for each station. The cycle time, start day, and start time apply for the first station in the sequence. As one station’s irrigation duration ends, the next station automatically begins. Locally created irrigation programs continue operating even after you upload a detailed program from the G.S.I Web User Interface – they will both operate simultaneously. If you want to end the locally created program, you must cancel it in the G.S.I Web User Interface explicitly. Setting Irrigation Program Durations Irrigation program duration, also known as the run time, can be defined for each station. To set the irrigation program duration: 1. Press until the Duration screen is displayed (Figure 20). 2. Press to move the duration. cursor and select the station for which you want to define the irrigation 3. Press andto set the irrigation duration for the selected station. In Figure 20, the duration set is for 2 hours and 40 minutes for station 3. A duration of 0:00 sets the station to never open its valves (and therefore the sequence skips to the next station immediately). 17 G.S.I Controller Installation and User Guide Figure 20: Duration Screen Example Setting the Irrigation Cycle Time You can set an irrigation program to occur one time only, or to occur repeatedly according to a cycle. When setting a recurring cycle, the cycle value you set defines the length of time (in days) which passes between irrigations program start times. To set a one-time irrigation program: 1. Press until the Cycle screen appears (Figure 21). The message “OncE” is displayed by default, indicating that the cycle pattern is set to one time only. If a cycle value other than “OncE” was previously set for the system, pressrepeatedly until the message “OncE” appears. 2. Press to progress to the next screen, which automatically saves the change. Figure 21: Cycle Screen To set cyclical irrigation programs: 1. Press until the Cycle screen appears (Figure 21). 2. Press once. The display changes from “OncE” to “h 00”, indicating zero hours. 18 G.S.I. Controller Installation and User Guide 3. Press andto increase and decrease the number of hours. Figure 22: Twelve Hour Cycle Setting Example If you increase past 24 hours, the display changes to “d 01”, indicating one day. You can continue to press to increase the number of days. Figure 23: Six Day Cycle Setting Example 4. After setting the desired cycle length, press to progress to the next screen, which automatically saves the change. Setting the Irrigation Start Day and Time The start day is the number of days between the day you define an irrigation program (today) and the day the program actually begins operating. The start time is the time of day the program begins. To set the start day and time: 1. From the Main screen, press until the Start Day screen appears (Figure 24). Figure 24: Start Day Screen Example The default display is “d 00” which indicates zero days. If you set this value for the start day, the irrigation program will start on the current day at the defined start time. If that time has already passed for the current day, the program starts at that time the next day. 19 G.S.I Controller Installation and User Guide 2. Press andto increase and decrease the number of days. In Figure 24, the value is set to 10 days. The maximum supported value is 30 days. 3. Press to save the defined start day and continue to define the start time in the Start Time screen. The default setting is “Off”, which means that the irrigation program never starts. 4. Press andto set the start time. The possible range of values is 0:00 to 23:59. Alternatively, you can cycle through the time settings until reaching the “open” option. Setting the start time to “open” causes the irrigation cycle to start immediately after you save the start time setting (overriding the defined start day). 5. Press to progress to the next screen, which automatically saves the change. Cancelling an Irrigation Program Start To cancel an irrigation program start: 1. From the Main screen, press until the Start Time screen appears. 2. Pressuntil the start time is set to “Off”. This defines that the irrigation program will never start. 3. Press to progress to the next screen, which automatically saves the change. Initiating Immediate Irrigation for a Station In addition to defining an irrigation program, you can initiate any station to immediately begin irrigating. The irrigation is performed for the amount of time defined for that station’s duration in the irrigation program you created using the controller’s direct interface. This is true even if you have already uploaded a different program from the G.S.I Web User Interface. If no duration has been defined, the duration used is one minute. To initiate immediate irrigation for a station: 1. From the Main screen, press until the Start Time screen appears. 2. Press to select a station. 3. Press . The station immediately starts irrigating for the length of its defined duration. 4. Optionally, press orto increase or decrease the duration of the current irrigation. 20 G.S.I. Controller Installation and User Guide Resetting the Controller If a technical problem occurs, you may want to reset your G.S.I Controller. To reset the controller: Press the Reset button, located in the top-left corner of the G.S.I Controller’s circuit board. The reset process clears the controller’s RAM, and performs the flowing sequence of operations: a. All the screen icons appear simultaneously on the screen and gradually disappear after a few minutes. b. The screen displays the controller’s serial number followed by the current firmware version on the controller. c. The screen displays the numbers of the valves connected to the controller. The controller starts closing the valves one by one; as each valve is closed, its number disappears from the screen and the CL OS message is displayed. Optionally press to abort this process and skip to the next operation. d. The controller establishes communication with the server; the long as the controller is in communication mode. icon flashes on the screen as e. The controller ends communication and resumes normal operation. Note: Resetting the controller does not delete or cancel the locally created irrigation program. Pausing and Resuming Irrigation from the Controller The controller enables you to pause irrigation. While a pause is in effect, all irrigation programs currently in progress are paused, and any new irrigation programs which were scheduled to start are not started. While irrigation is paused in this way, you can still perform station operation tests and establish communication with the server. When the pause is ended and irrigation is resumed, all irrigation programs continue according to the following rules: While paused, programs are delayed for up to one hour. As such, if the pause is ended within one hour, the programs resume where they left off. If the system is paused for more than one hour, then programs are resumed according to that latter time instead. As such, if the system was paused for more than one hour and an irrigation program was scheduled to end during that time, it is not resumed after the pause ends. Similarly, a new irrigation program scheduled to have begun during the paused period will start after the pause ends, even though it was not running when the pause began. To pause an irrigation program: Press continuously until the message “PA US” is displayed on the screen. This indicates that the irrigation is now paused. The “PA US” message flashes on the screen until you resume irrigation. 21 G.S.I Controller Installation and User Guide To resume irrigation: Presscontinuously until the Main screen is displayed. Fault Indication If a fault occurs in the system, the controller screen displays the message “FLt” or “FL” and a fault number. Table 1: Fault Numbers and Definitions Fault Indication Message Description FLt 0 Low flow fault FLt 1 High flow fault FLt 2 No water flow fault FLt 3 Uncontrolled water flow fault FLt 7 Low battery voltage fault FLt 8 Critically low battery voltage fault FLt 9 Capacitor charge fault FL 10 Capacitor discharge fault FL 11 Station definition fault FL 12 Irrigation program fault FL 13 Controller memory fault To remove a fault message from the screen: Pressand simultaneously. Locking and Unlocking the Screen The G.S.I Controller enables you to lock the screen, preventing people from editing the unit’s programming until the screen is unlocked. To lock the screen: Press , and at the same time. The screen is locked and displays “= = = =”. To unlock the screen: Press , and at the same time. The screen is unlocked and the unit can be programmed. 22 4 Technical Specifications Outputs: Operates DC latching solenoids only Output pulse voltage 17VDC Pulse length 200msec (can be changed) Active inputs: Rain switch Normally Open or Normally Closed Pulse water meter or flow sensor. Power source options: 2 X 3.6V D-size Lithium batteries 4 X 1.5V D type Alkaline batteries Cellular modem: Quad band GSM modem integrated (GPRS class 10) for operating in all GSM operators globally. Dimensions: 10.5x24.5x25.5 CM Operating ambient temperature: -10 to 50 degrees Celsius. Maximum wire run from G.S.I DC controller to Galcon solenoids: Table 2: DC Wire Run Lengths Wire Size Maximum Distance AWG Feet 18 425 130 16 700 215 14 1110 340 12 1700 520 1. Meters 23 5 Warranty LIMITED WARRANTY CERTIFICATE 1. Galcon shall, for a limited period of 36 months from the retail purchase date of the original (first) purchaser (“the Warranty Period”), provide limited warranty for the Products, as provided for and subject to the provisions and limitations of this Limited Warranty Certificate. 2. Galcon’s Warranty for the Product only extends to the original purchaser of the Product (“the Customer”) who, upon requesting warranty service, must present Galcon with a valid purchase receipt. Failure to produce the said documentation will result in the request for warranty being null and void. 3. GALCON warrants to the Customer that the Product shall materially conform to the description in Galcon’s documentation and shall be free from defects in material and workmanship. Accordingly, Customer’s sole and exclusive remedy under this warranty is the repair or – to Galcon’s sole discretion – the replacement of the Product or any part\s according to the terms of this Warranty, and no other remedy shall be available. Therefore, if - within the Warranty Period - the Product is proven to be defective by reason of faulty workmanship or materials by Galcon, Galcon undertakes, with reasonable promptness, to have the defective Product (or any part/s thereof) repaired, or at Galcon’s discretion, replaced; All subject to the terms and conditions of this Limited Warranty Certificate. 4. Galcon’s warranty for the Product or otherwise shall not apply to any of the following: (i) any conduct (by act or omission) not by Galcon, including any misuse/abuse of any Product (or part/s thereof), and/or any failure to install and/or use any Product in full compliance with Galcon’s instructions; (ii) other systems/components/devices/technologies and/or the integration/interface thereof with any Product; (iii) any part/component which has been included/installed in any Product not at Galcon’s approval and/or other than by Galcon; (iv) any actual or attempted change/repair/interference of/with any Product (including any use/handling of, and/or interference/dealing with, any code of any software included/used in the Product) other than by Galcon; (v) any data/information/content which has been inserted/included in a Product; (vi) malfunction or damage resulting from accidents, which occur during transit and/or handling, and/or malfunction or damage due to fire, earthquake, flood, lightning and/or any other external disaster; (vii) unforeseen accidents, wear and tear, or any other external factors beyond Galcon’s reasonable control, or to any Product installed, repaired, adjusted, rebuilt, modified, changed or converted by any person (including the Customer) other than Galcon; 5. In addition and without derogating from the provisions of this Warranty, Galcon’s warranty is conditioned upon the all of the following taking place: (i) Customer’s operating and maintaining the Product in accordance with Galcon’s instructions; (ii) Customer’s not being in default of any payment obligation to the Galcon (or its authorized dealer, as relevant). 25 G.S.I Controller Installation and User Guide 6. Galcon does not give any warranty or guarantee whatsoever in respect of any Product (or any part/s thereof) which has not been manufactured and distributed by the Galcon and which has not been purchased from the Galcon or any of its authorized dealers, whether such products are branded with any trademarks similar to any trademark belonging to or used by Galcon. 7. After replacement or repair of the Product, the Warranty for the new or repaired Product shall be valid only for the non-expired period of the original Warranty Period. Any defective Products or part/s, which has been replaced, shall become Galcon’s property. 8. Galcon reserves the right to charge the Customer if any warranty service is requested and carried out but no fault is found in the Product or if such defect/fault is not under Galcon’s Warranty. 9. Notwithstanding anything to the contrary, Galcon shall not be responsible and/or liable, under any circumstances and in any way, for any loss, damage, costs, expenses, expenditures, responsibility and/or liability (including of Customer and/or any third party) – including (without limitation) direct and/or indirect (including incidental and/or special and/or consequential), however arising, including in respect of damages to or loss of property and/or equipment, loss of profit, loss of use, loss of revenue or damages to business or reputation, whether or not based on breach of contract, tort (including negligence), product liability or otherwise - arising from the performance or nonperformance of any aspect of the Product or any part thereof; All of the above, whether or not Galcon and/or the Customer shall have been made aware of the possibility of such loss. 10. In any event, any liability which Galcon may have in connection with the Product and/or this Warranty, including (without limitation) in connection with and/or resulting from the Product (or any part thereof) and the use thereof, shall be limited to a total amount (for all damages, claims and causes of action in the aggregate) equal to the consideration actually received by Galcon from the Customer for the Product. The limitations shall apply whether the liability is based on contract, tort, strict liability or any other theory. 11. This Warranty and the remedies set forth herein are exclusive and in lieu of all other warranties, remedies and conditions, whether oral, written, statutory, express or implied. Galcon specifically disclaims any and all statutory or implied warranties, including, without limitation, warranties of merchantability and fitness for a particular purpose and warranties against hidden or latent defects. 12. The Customer shall be solely responsible for the selection, use, efficiency and suitability of the Product(s). 13. The provisions of this Limited Warranty Certificate shall be interpreted and governed, solely and exclusively, pursuant to the laws of the State of Israel, and no other law shall apply. Any and all legal actions shall be litigated within the jurisdiction of the courts of Israel, and no other jurisdiction shall apply. 26