1
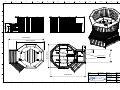
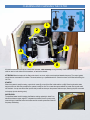
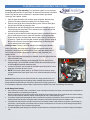
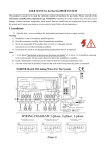
AquaKing User’s Guide WARNING! Read the technical instructions before installing the bath Read the users instructions before using the bath Do not bring sharp objects into the bath Contact the seller if the colours appear to be changing under or on top of the coating If a leakage appears contact the seller immediately. All electrical work should be perfomed by a qualified electrician Do not leave children in the bath without supervision Do not sit with your back or head against the skimmer For AquaKing a mains connection of 230V, 1x16A, 2x16A with Ground Fault Current Interrupt (GCFI) is required. A service switch, which is closely installed to the electrical connection is recommended. ATTENTION! If the hot tub will be integrated e.g. into a terrace it is necessary that the access is not obstructed in any way order to be able to service it. Service hatch and outer panel should be removable without difficulties. If automatic dispensers (floating, etc.) are used, careful adjustment should be made to avoid incorrect dosage. Follow the recommendations in our instructions. The circulation pump also generates heat and if it is running a long time (eg, continuous filtration TM) it can raise the temperature by several degrees in one day when the tub is well insulated. Check the quality of the water, as well as temperature and function, regularly, don't leave the spa unmonitored for long time periods. 1 2 3 4 5 6 7 8 9 10 11 12 B B C 394 C 1114 A 626 A D D 2289 (2620) ~ 1814,5 (2057) 200 E F Water drainage 850 1635 (1920) 210 E and electric wiring F Hose Ø 33 mm G G Article Polar 2248 (2570) Part Number AquaKing H Material LunaWood Designed by JI 31.01.11 Checked by Aproved by 1 2 3 4 5 6 7 8 9 10 11 Page Size A4 Scale 1:18 Revision v 2.4 Sheet 23/23 H 12 1 2 3 4 5 6 7 8 Kuva 2 näyttää miten porejärjestelmän ilmapumppu tulee sijoittaa. Pumppua ei saa ikinä sijoittaa niin että ilmapuhallus on ylöspäin. Jos AquaKing on varustettu BactiSafe (lisävarusteena) niin se sijoitetaan kuvan 1 mukaisesti. Ohjausjärjestelmä ruuvataan kiinni kuvan 2 osoittamaan paikkaan Kytke pumpun ja suodattimen mutterit oikein (kuva3) 1 2 3 4 Kun eristetty laatikko asennetaan on sumausvaahtoa laitettava kylvyn sivueristeen ja laatikon eristeen väliin kuten kuvasta näkyy. Laatikon kannen alla olevaa eristyslvyä ei tule käyttää jos lämpötila ylittää 10 plusastetta. Jos on riski jäätymisvauriolle, irroita mutteri ja löysää hiukan tiivistettä niin BactiSafe saadaan tyhjennettyä. Kylvyn upottaminen terassiin HUOM! Jos kylpy upotetaan esim. terassiin on rakennelma tehtävä niin että kylvyn ympäriltä on aina vapaasti päästävä suorittamaan mahdollisia huoltotoimenpiteteitä. Huoltoluukku ja ulkoverhoilu on voitava poistaa ongelmitta. CLEANING AND CHANGING THE FILTER 1 2 3 A B B All screw connections must use the rubber seals provided. Own Assembly: During assembly of wall and base fittings, silicone shall be used on both sides of the connections, as well as the threads. ATTENTION! Near the bottom of the filter holder there is an arrow, which must be pointed towards the pump. The control system should also be connected if it’s included. This must be done by a qualified electrician. Close the valves on the filter before filling the Hot Tub. STARTUP When the system is ready for testing, open the air screw (1) on top of the filter holder and the nut (2). Close it again when water begins to leak out. After this procedure, the system is ready for use. Do not start the system without any water running and watch out that both – the tap next to the filter (suction side) as well as the tap on the pressure side are open, meaning the part connected to the pump (not the draining valve). WATERLEVEL The preferred water level for keeping the filtration working optimally is about 5 cm below the skimmers upper edge. If it is beneath the skimmer, then the pump could start sucking air instead of water into the filter and the control system then shuts off the pump and heating. CLEANING AND CHANGING THE FILTER Cleaning /change of filter AquaKing For a good water hygiene it is very important that the filter gets cleaned on a regular basis. At least every second week it should be rinsed. Every second month or whenever it is required it needs to get cleaned “thoroughly” with a special solution. 1. Open the hatch where filter and circulation pump are placed. Start the pump (keep the T/A button pressed until it starts) if it’s not already running. 2. Open the screw (1) for the air above the filter top piece. Close the valve (3) on the right side of the filter by pressing it down. 3. Be prepared to close the valve (C) (the one closest to the bottom to the left of the pump) when the pump stops. This is important to do, so water will not flow back into the filter cartridge holder. 4. Unscrew the nut and take off the filter’s top piece. Now it is possible to clean the filter. It would be good to have a spare one. Assemble it in an opposite order (tighten the nut on the cartridge holder, leave it slightly loose so it will be easier to reopen it). Tighten the nuts of the filter container properly. Open the valves (1 & 2) and let air escape. Close when water starts trickling out. Now the pump can be started via the control panel. Draining of water There is a valve (V) close to the circulation pump installed in order to drain water, see picture to the right. In case the spa bath needs to be emptied for a longer period or if there might be a risk of frost then please keep in mind to empty the circulation pump and the massage pump (if included) very carefully as well. 1. Open cover where filter and pump(s) are installed. Open valve (V) and drain the water via the drain hole. 2. Loosen the lowest nut belonging to the pumps (A). This one does not to be loosened totally, just so that water can drain. Please do the same with the nuts of the filter (B) and please do keep them open. 3. Loosen the nuts which are connected to the bubble system and give the hose a good blow a few times till water runs out. 4. NOTE! If the control systems model nr. Is TM42-A1 then the blower air pump can be started via the control panel. Let it run for a few seconds before turning it off again. C V Attention! When the spa is to be drained of water for a longer period of time, or if there is a risk of freezing then the circulating pump, massage pumps and nuts for pumps and filters shall be left open. If draining is done only for changing the water it is not necessary to drain the pumps of water or open these connections. Also read “Avoid damage from freezing”. Avoid damage from freezing Plan the draining and filling of water so that there is no risk of damage from freezing, never empty or fill the bath when the temperature’s below freezing without first protecting the equipment. Attention! If the bath has been emptied of water and the temperature’s below freezing then all the equipment will also be below freezing itself- If the bath is filled with water then without considering this, the risks of freezing damage is great. For protection against freezing damages the interior of the bath can be warmed up beforehand. Use for instance an interior car heater or electric heater and set the temp to 20 degrees celsius and place it inside the box where the pumps are installed as well. If the water level drops below the massage nozzles they are automatically drained of water when the air regulator on the the edge is in open moden. Is the air regulator is closed then water can remain in the transparent 12 mm hoses and cause freezing damage. Always keep the air regulator in open mode when draining the spa. To protect BactiSafe against damage from freezing it should be drained by loosening the stainless nut and the sealing around the glass tube. USER MANUAL for the SG-0007B SYSTEM This product is meant to be used for electronic control of functions for spa baths. Please read all of the instructions carefully before enjoying the spa. WARNING: Operating the system without water will cause severe damage. Contains electronic components, shock hazard. Does not contain user serviceable parts. Do not try to repair the control unit. Contact your dealer or service center for help. Follow all user instructions. I. Installation 1) Open the door / cover according to the instructions and connect the power supply correctly. Warning A. Installation is only to be made by qualified persons. B. Read the instructions carefully before beginning the installation. C. We are not responsible if the product does not work or is damaged when the instructions are not followed during installation. D. Ensure that the system is not damaged during transportation when it is unpacked. Note! A. 1 x 16A (Read “Interlocked system between the heater and pumps”), 2 x 16A or 3 x 16 should be connected to the control system. Do not connect the power before the installation is complete. B. Install a maintenance switch close to the control system for use during maintenance work. C. An earth switch must be installed. Check that the earth switch works when the power is connected. SG0007B Sketch Of Linking Wires For The System WIRING DIAGRAM 3-phase, 2-phase, 1-phase (Figure 1) 1 USER MANUAL for the SG-0007B SYSTEM II. Operating instructions (Fig 2) ● ON/OFF key (power key): Connect the power supply and press the ON/OFF key. All the control systems are now ready to run (indicator light is on), and the circulation and Ozone disinfection system (if one exists) will start working automatically (if the water temperature is not at the pre-set temperature, the heating system will start to work in 60 seconds). The panel will display the circulation and Ozone symbols (a symbol for the heating system will also be displayed on the panel if the heating system is working). The panel will also display the detected water temperature. Note! If no button is pressed within 60 seconds, the displays backlight goes off, it reactivates if a button is pressed. ● PUMP key: press the (JET1) key. Its symbol will now appear on the panel, signifying that massage pump 1 has been activated. JET1 and JET3 work in the same way and have their own symbols with numbers 2 and 3 on them. JET1, JET2 AND JET3 are accessories for some spa models. NOTE: The massage system will shut down automatically in 20 minutes. NOTE: There are some air valves on the topside of spas near the seats. They are to control the strength of the hydro-massage in the respective seats. ● BUBBLE key: Press the key. Its symbol will appear on the panel, meaning that the air massage system has started working. NOTE: The blower automatically shuts down after 20 minutes. ● 03 key (Ozone): Pressing the O3 key will turn on or off the Ozone disinfection system (Ozone and circulation pump work automatically when activating the spa). NOTE! Ozone can be an accessory and another alternative is the UV-C ozone cleaner. See “UV-C Ozone Cleaner” under “Summary”. ● LAMP key: When the control systems are ready to work, first press the key. Its symbol will now appear on the panel, signifying that the underwater lights are on, the colour will change automatically; with a second press, the color will be fixed on a certain color; press for the third time to shut it off. NOTE! The lamp shuts off automatically after 60 minutes. TEMP key (needs to be used together with ▲/▼ key): If the TEMP key is pressed for 5 seconds, the panel will display the water temperature set last time. This temperature will keep flashing: Press the “▲” key to adjust the temperature to the highest at 42°; press the “▼” key to adjust the temperature to the lowest at 10°. The new temperature will be automatically stored and the display will then return to show the current water temperature after flashing for 60 seconds or if the T/A or T/M button is used. RADIO/AV key (Radio/DVD/Control and display of temperature): When the control systems are ready to work, press the RADIO/AV key to activate the Radio function. The panel will now show the radio channel set last time (under Radio status, press +/- key to select pre-stored radio stations); a second press will activate the 2 USER MANUAL for the SG-0007B SYSTEM TV function (this function is optional). The panel will now show a TV symbol. A third press will activate the DVD function (this function is optional). The panel now shows a DVD symbol at the same time (Under DVD status, press the +/- key to adjust the volume of the DVD). Press for the fourth time to show the detected water temperature. TUN/VOL key (needs to be used together with the +/- key): Under Radio status, first press the TUN/VOL key. The panel will now show a 2-digit volume, pressing +/- will adjust the volume upwards or downwards (the panel will automatically show the radio frequency when you stop adjusting for 3 seconds). With a second press,the current frequency will flash. Pressing the +/- key will adjust the current frequency. This frequency will be stored automatically after flashing for 3 seconds. With a third press, the panel will show the radio channel. Press the +/- key to select pre-stored radio stations ( the panel will automatically show the previous radio frequency after you stop adjusting for 3 seconds). With a long press for 5 seconds, the system will automatically search for radio frequencies again and store the searched frequencies at a different channel sequentially. Heating system: After the control systems are ready to work, the heater will start working 60 seconds after the circulation pump is activated, unless the temperature sensor detects that the set temperature is lower than the detected one. When the water temperature reaches a set temperature, the heater will stop working automatically. When the water temperature is under 2° of the preset one, the heater will reactivate. The symbol for the heater is located above the circulation pump symbol , it appears as pulsing bubbles. NOTE: The heater will not be activated if there is not enough water flow. Interlocked system between the heater and pumps: Pressing and holding the ON/OFF key again for 20 seconds will change the system between interlock mode or non-interlock mode (the indicator light on the ON/OFF key shows RED in interlock mode; while it shows GREEN in non-interlock mode). When in interlock mode, the heater will stop when you press any of the pump and bubble keys. This feature is meant to reduce the power needed for the spa so that it can match the power limit of some countries (1 x 16A). In non-interlocked mode, the heater will keep running when the other pumps are activated unless the water temperature reaches the set temperature. NOTE! That requires at least a 2-phase connection if the total effect for pumps and heating exceeds 3680 W. Temperature sensor self-checking system: If E1 is displayed on the panel, then the temperature sensor is disconnected. In this situation check the wiring of the temperature sensor to see whether it is disconnected. If E0 is displayed on the panel, then the temperature sensor is short-circuited. In this situation the temperature sensor must be replaced. The heating system cannot be activated under the above two situations. Water-lacking protection system for circulation pump and heater: In daily usage, a blockage of the filtration medium (cartridge filter or filter bag) will eventually occur. A severe blockage will lead to an intermittent lack of water for the filtration pump. Air in the system often leads to the same problem. For instance, during startup if aeration has not been performed according to the instruations in the manual. When there is a lack of water, the filtration pump and heater will stop working automatically. At this moment, the on the control panel will flash continuously, to remind the user that it is symbol of the filtration pump time to clean or replace the filtration medium. After cleaning or replacing the filtration medium, press ON/OFF several times to expel the air inside the pipe until the filtration pump works normally. Anti-freezing system: After power on to enter standby status (the indicator light on ON/OFF key flashes), the anti-freezing system will be activated instantly. The circulation pump and heating system will automatically stop at the default temperature of above 10°. When the water temperature in the spa drops below 9°, the circulation pump, heater and air blower will work automatically, Jet1 (accessory) will automatically start to work in about 85 seconds; and it will stop after working about 85 seconds; then Jet2 (if equipped) will start to 3 USER MANUAL for the SG-0007B SYSTEM work for about 85 seconds and stop; finally Jet3 starts to work (if equipped) for about 85 seconds then stops. Pump1, Pump2 and Pump3 will continuously cycle among themselves. When the detected water temperature reaches 10°, all the pumps and heater will stop working. When this system is running, the screen background light is on. When the water temperature reaches 10°, the screen returns to the standby status. Manual working mode: Turn on the spa, then press and hold the T/M key for 3 seconds to enter manual mode (the indicator light on the T/M key will show GREEN when in manual mode). If T/M is selected the filtration pump (and thus the filtration) is on continiously, 24h per day without stopping in between. Automatic working mode: Automatic working mode is on by default. Press and hold the T/A key for 3 seconds to switch over to automatic mode (The T/A button will light up). The circulation pump starts and runs for 1 hour (the display panel will cycle between "ON" and water temperature, indicator key 1 will light up). After 1 hour the pump will stop for 3 hours (the display panel will cycle between "OFF" and water temperature, indicator key 2 will light up). As long as the system is in automatic mode this filtration cycle will repeat indefinitely. The keys 1, 2 and 3 (FILTER PROGRAM) are non-functional keys and only act as indicators. NOTE: If the spa is in automatic working mode, please don’t turn off the spa when not in use. Make sure the spa is always “on”. When in automatic mode, the filtration pump will also be controlled by temperature. If the water temperature is lower than the preset level, during the “OFF” period, the filtration pump and heater will work until the water temperature has reached the preset level. Then, the filtration pump will return to work for 1 hour and stop for 3 hours repeatedly. When the automatic mode is not in use the circulation pump is always on. If the water temperature drops 2° under the pre-set level the heater will activate. Each time the spa is switched on, the system will go into the previously set mode. Press and hold the T/A or T/M key for 3 seconds (the indicator will show GREEN) to switch between automatic mode and manual mode. Summary T/A and T/M If T/A is selected the filtration is handled automatically in cycles of “1 hour on, 3 hours off”. If T/M is selected the filtration pump (and thus the filtration) is on continiously, 24h per day without stopping in between. If the preset temperature is higher than the actual water temperature then both the circulation pump and heater are activated until the water temperature reaches the chosen setting. The Ozone will automatically work together with the filtration pump and heater. This applies in both T/A and T/M modes. WARNING! The circulation pump also generates heat and if it is running a long time (eg, continuous filtration TM) it can raise the temperature by several degrees in one day when the tub is well insulated. Avoid using the TM function other times than when the water needs to be filtered further. Always check water quality and temperature after using TM for one day. FILTRATION PUMP - NOTE! If the hot tub is equiped with a massage pump it will connected to "WATER PUMP 1". If there are two massage pumps the second is connected to "WATER PUMP 2". UV-C OZONE CLEANER If an UV-C ozoner cleaner is installed, connect it so that it activates the same time as the circulatory pump. BLOWER (BUBBLE) - ATTENTION! If the blower is used often and for prolonged periods of time, the blowers built in thermal protection might activate. The blower will stop and not restart until it's cooled down enough. You can speed up the cooling by opening the service hatch(es). In doing so, please protect the equipment from potential freezing damage. 4 MAINTENANCE OF WOODEN SURFACES Standard panel Oiled Panel Untreated panel after 3 years It’s important to maintain the heat treated surfaces externally with oil in order to maintain the color. Without oil treatments the surface will turn pale and gray in color. Even if the surface has turned gray it can be restored 1. Use a detergent meant for cleaning wood. In our sortiment we have Tikkurila Tehopesu 0,5 liters. 2. Let the wood dry completely, all moisture has to evaporate before oil is applied. Use oil meant for hardwoods or heat treated woods. In our sortiment we have Vallti Wood oil with a faint light brown color that improves UV protection of the surfaces. 3. Repeat the oil treatment atleast once per year. MAINTENANCE The wood on the outside must be treated with wood oil annually. The oil must be suitable for hard wood or heat treated wood and provide UV protection. It would be also good if it contains a slight brownish nuance in order to provide more protection. The easiest method is to do the first treatment while assembling the Hot Tub but before the stainless steel hoops will be put on. This will avoid having to consider how to protect the hoops. Annual oil treatment Cover the stainless steel loop with tape as shown in the picture. As soon as the oil treatment has been finished remove the tape immediately. We recommend that the sawn ends be treated with a water resistant oil or boat varnish. Place the Hot Tub on a stable base and not directly on the ground. If your SpaDealers Hot Tub is treated correctly, it will last for many years. Water hygiene is important! Five easy advice for maintaining good water hygiene if you have got a filtration system. 1. 2. 3. 4. 5. Take a shower before you get into the hot tub Add some bactericidal solution before and after taking a bath. Control the ph-value and balance it if necessary. Oxygenate your water on a weekly basis. Clean the filter cartridge frequently and let the filtration system run sufficiently. In order to keep up water hygiene it is necessary to add some bactericidal solution to the water because water itself is not clean. Personal hygiene and effective disinfection are two things which are important for the maintenance of clean water. You should also look out for what type of water you use e.g. sea water or water from lakes, which contains algae and bacteria. Bacteria feel very comfortable in warm water and therefore you need to add some bactericidal solution before taking a bath. This is an effective way to prevent any breeding ground for bacteria. If Bacteria are already existent you need to add a higher dose of the solution in order to get rid of them. Different brands can be obtained, but the important thing is to use products for the "right" temperature. Cleansing products used in swimming pools are not suitable for warmer water and vice versa. NOTE! If you don't have filtration, we recommend that the water is used only once. However, it is not a health risk to use the same water many times if a suitable amount of chlorine is used, but the water might not look so clean after being used once. Good personal hygiene before taking a bath -Keep in mind that a person who has not washed him/herself before will pollute the water 200 times more than somebody who has taken a shower. Sun lotion, skincare products, soap should not get into the water and that’s why we suggest to take a quick shower before enjoying a bath. Effective disinfection- Filtration has the advantage that water can be used longer. Still it is important to add some bactericidal solution. Filtration prevents the accumulation of impurities but not the growing of bacteria. Everyone who is taking a bath is adding micro organisms to the water which are a blend of different kind of bacteria. Important! Bacteria can have adverse health effects and therefore you need to work with e.g. chlorine as well. If the chlorine levels are too high then the PH-value will be increased and has a strong smell. In the worst case it can even peel off the sealing compound (if your tub has such). The chlorine levels should not exceed 1.5 ppm and pH 7.2-7.6. For bromine the level should not exceed 2.0 ppm and the pH should be 7.2-7.8. If automatic dispensers (floating, etc.) are used, careful adjustment should be made to avoid incorrect dosage. Follow the recommendations in our instructions. Warning! In case you still don’t use chemicals in conjunction with filtration then the water should be renewed often. The best is to empty the tub after each use and to rinse it thoroughly. Should you leave the water in the tub in order to keep it leak-proof then it can lead to an accumulation of bacteria. A hot tub made of ordinary material doesn’t dry the in the same way as heat- treated wood does. That is one reason why it is neither reacting in dry nor wet weather. Ph-Value- it affects water quality. It should be around 7.2-7.6 (for chlorine) and can be measured with a test stick. If necessary please balance the water by increasing or reducing Ph value. For bromine the value should be 7.2 – 7.8. Good to know! Is the water cloudy, it is always a result of bad filtration. Either the filtration periods have been too short and therefore could not filter the impurities. Filter cartridge: The task of the filter cartridge is the removal of soil, sand, minerals, phosphate and dirt from bathing persons from the bath water. Cleaning of the cartridge: The filter should be cleaned and rinsed with high water pressure in addition the cartridge also needs to be cleaned thoroughly in depth. Even if it does not look dirty, it should still be cleaned on a regular basis. Minerals and other impurities can get stuck deep in the filter lamella and that can lead to problems with the flow. It is always recommended to have an additional filter. A filter needs to pass a cleaning- and drying process while the other one gets installed. The lifespan and efficiency of the filter can be doubled through the use of thorough and regular cleaning.