1
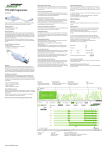
T30359
6
Use the stirrer provided, either by hand or attached to a battery
drill. Never put all the chemical in all at once. Add it to the water very
gradually, stirring continuously. Always wear gloves and safety
eyewear when handling the chemicals.
7
Clear Wash System
Operating Instructions
Stop adding chemical once you start seeing clear water. The
encapsulated paint will drop and settle at the bottom after about
10 minutes. Give it one last stir once it has finished settling.
UDC-9000
8
Now pull the drain valve to empty the sink into the filter housing. The
What it should come with
water will start draining through the filter into the reservoir. The stainless
steel grill on the bottom is important as it lifts the bag off the bottom to
allow ease of draining. The sink area holds around 70 litres of water. So
1 x flow-through brush and hose
1 x water spray gun
5 x filter bags
1 x hose
2 x stainless steel workstations
Filter box
Filter tray
Basic set of powder
Stirrer
even after draining there will still be water remaining for washing the sink
area and giving equipment a final rinse. Once the sink has emptied, rinse
thoroughly to remove all waste and drain this into the filter.
9
You will have clean water in the reservoir at the bottom now. To discharge
that, turn the lever to pump out position, remove the blank plug on the
tank drain connection, connect the hose, turn the pump on and drain
out to a waste drain or sewage drain. The reservoir should empty within
5 minutes. There is a screw lid supplied for the reservoir for use in transit
and a quick release for manual draining.
10
Once it is clean you can put your equipment in the empty sink and close
the steel lid. Add a padlock for safe tool storage if required.
11
The sludge paint waste from the filter is wet when removed but will dry
out. Empty the filter immediately into a suitable container and the filter
can be used another 1-2 times. Important: Ensure that the waste is
dry and is accepted as general waste before disposal.
Do not lean on the lid as it may
cause the unit to topple
To order parts please contact your local stockist.
ICI, the ICI roundel, Dulux Trade, the Dulux Trade logo, AkzoNobel and the AkzoNobel logo are trade marks of the AkzoNobel group © AkzoNobel 2011.
Trademark pending for Clear Wash System.
Additional components that may be required to operate the machine
n 110v
mains power lead
n 110v
transformer (if connecting to 240v supply)
Setting the machine up
1
The machine has brakes. Once you are in position,
Using the machine
1
push the brakes down and the wheels will be stationary.
Connect to the power supply. The terminal on the
outside of the machine connects to 110 volts of mains
power. You now have power to the machine and the water
is already in. Double check that the drain is closed before
beginning operation. If only 240v supply is available a
transformer and 110v power lead will be required to
power the unit.
2
Place one filter into the filter box, ensuring the metal grill
2
The brush and the gun can be connected and used
is in place in the tray, then position the filter box back
separately or at the same time. Connect your chosen tool to
underneath the sink.
one end of the hose and connect the other end to one of
the connection valve outlets. The outlet has three positions,
1, 2 and 1+2. Move the switch to the relevant position for
your chosen outlet. If more than one person is washing
at the same time, connect the gun and brush to different
outlets, select 1+2 and both will flow at the same time.
3
Locate the slide valve under the sink. Always make sure
3
Check that the mode lever is in the correct position
that the slide valve is in the closed position before filling
for the operation you wish to perform: either wash
the sink.
or pump out. For wash mode, move the lever into the wash
position. Turn the pump on. The switch will light up and the
machine will begin operation. Water will flow continuously
out of the brush or gun.
4
The outside of the machine features two tank connectors
4
Use the sink area for washing. Having the stainless steel
– tank drain and tank fill. Both are standard garden
workstations in position is not essential, but it can be useful
hose connection size.
to press brushes against them during cleaning. Use one or
both workstations as required. Remove any excess paint
Connect the main hose to the tank fill and turn the mains
from tools before cleaning.
water tap on. This will fill the large black reservoir at the
bottom of the machine, providing approximately 95 litres
of water. The ball flow valve inside the tank will shut off
when the tank is full (on the same principle as a toilet
cistern). When the machine goes quiet, this indicates
that it is full.
5
Once the waste water level has reached the lip in the
sink (where the workstations rest) it is time to drop the
Disconnect the water hose from the tank fill at this point.
chemical in and go through the coagulation process.
There is a blanking plug on the tank drain to prevent water
Average operation requires 60-80 grams of chemical,
from pumping out if the machine is operated incorrectly.
depending on how much equipment is being washed and
how much waste paint is involved. The chemical works by
encapsulating paint and separating it from the water.
Continued overleaf