1
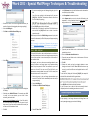
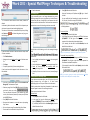
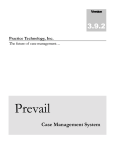
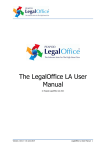
Word 2013 - Special Mail Merge Techniques & Troubleshooting
7. Insert the mail merge fields:
Creating a Directory
The main difference between a Letter mail merge and a Directory
mail merge is that whereas a letter creates a new page for each
record (row), the directory put all the record into just one single
document. A Directory, therefore, is a way of re-arranging data
that is in a strict column/row layout in the data source, into a
more appealing and legible format.
Data source columns and rows
a) Position the insertion point where you
want the first merged data to appear.
To make it easier to lay out and format
the merge fields, the author of this
document recommends that you add
them into the cells of a Word table.
b) In the Mailings tab, click Insert Merge
Field in the Write & Insert Fields
group.
c) Select the field you wish to insert.
d) Repeat steps 1 and 2 until all the
merge fields have been inserted. The
merge fields will be highlighted with a
grey background but this will not print.
NB: Only add to the mail merge document text and formatting that
you want repeated multiple times in the finished Directory
document.
8. Once you have inserted all the merge fields in the document,
you may wish to see how it looks using the actual data.
a) Select the Mailings tab.
b) Click Preview Results in the Preview Results group.
c) Make changes, if necessary, eg. move, delete or add merge
fields.
d) Although normally sufficient to view the first record in
order to check for correct layout and structure, you can
click the navigation buttons in the Preview Results group to
go through each one separately.
Same data re-arranged into a Directory
2. Select the Mailings tab.
.
4. Select Directory.
5. Click Select Recipients in the Start Mail Merge group
Editing a Directory
As explained previously, any changes made to the mail merge
document will be inherited by the entire output.
If, therefore, you wish to add to the directory a title, headings or a
cover page, you need to create a ‘snap shot’ (copy) of the mail merge
as a separate document. This separate document will contain ALL the
records that would have been printed but can now be edited. It is
important to note that this document is NOT connected to the data
source and as a result, will need to be re-created if the data source is
changed.
Proceed as described previously under Creating a Directory but
replace point 9 with the following:
1. In the Mailings tab, click Finish & Merge in the Finish group.
2. Select Edit Individual Documents….
3. Pick an option under Merge to New Document.
1. Create a new document.
3. Click Start Mail Merge in the Start Mail Merge group
c) Pick an option under Print records.
d) Click OK.
.
6. At this point, you decide whether you want to type a new list,
use an existing list or use data from your Outlook Contacts.
For a detailed explanation on which option to choose, see our
Word 2013 – Introduction to Mail Merge quick reference
guide.
NB: Editing any of the viewed records will result in ALL the
documents inheriting the same changes. To customise documents
individually, see the Editing a Directory later in this document.
9. The last step of the mail merge is printing. Word will create a
single document containing all the records (rows) in the data
source. To restrict what is printed, see Filtering and Sorting
later in this document.
a) In the Mailings tab, click Finish & Merge in the Finish
group.
b) Select Print Documents….
1
4. Click OK.
A new document is created and given a name (eg. Directory1).
You can edit, print and save this document as a normal Word
document. Remember, this document is a ‘snap shot’ of the
merge and will not update if the data source changes.
Creating Mail Merge Emails
If you have a data source containing email addresses, Word can
create a standard email message to each recipient. Word ‘borrows’
Outlook to send the emails and they are saved in the Outlook Sent
Items folder.
1. Create a new document.
2. Select the Mailings tab.
Word 2013 - Special Mail Merge Techniques & Troubleshooting
3. Click Start Mail Merge in the Start Mail Merge group
9. The final step is to send the emails.
.
a) In the Mailings tab, click Finish & Merge in the Finish
group.
b) Select Send E-mail Messages….
4. Select E-mail Messages.
5. Click Select Recipients in the Start Mail Merge group
Untick the check box to the left of the record.
To sort the mail merge:
a) Click the down arrow next to the relevant field.
b) Select Sort Ascending or Sort Descending.
.
6. At this point, you decide whether you want to type a new list,
use an existing list or use data from your Outlook Contacts.
For a detailed explanation on which option to choose, see our
Word 2013 – Introduction to Mail Merge quick reference
guide.
7. Once the data source has been selected, you set up your main
document by typing in any standard or “boilerplate” text and
inserting the mail merge fields. To insert the mail merge fields:
a) Position the insertion point where you want the first
merged data to appear.
b) In the Mailings tab, click Insert Merge
Field in the Write & Insert Fields group.
c) Select the field you wish to insert.
d) Repeat steps 1 and 2 until all the merge
fields have been inserted. The merge
fields will be highlighted with a grey
background but this will not print.
8. Once you have inserted all the merge fields in the email, you
may wish to see how it looks using the actual data.
a) Select the Mailings tab.
b) Click Preview Results in the Preview Results group.
c) Make changes, if necessary, eg. move, delete or add merge
fields.
d) Although normally sufficient to view the first email in
order to check for correct layout and structure, you can
click the navigation buttons in the Preview Results group
to go through each one separately.
To filter the mail merge:
a) Click the down arrow next to the relevant field.
b) Select an item in the list.
Tip: To avoid printing out letters that have incomplete addresses,
select Non Blanks from the address columns.
At the bottom of the Mail Merge Recipients dialog box under Refine
recipients list, there are links to commands for carrying out more
advanced sorts and filters.
c) Ensure the correct field containing the email addresses is
selected in the To: box.
d) Enter a Subject line:.
e) Pick an option under Send records.
f) Click OK.
The emails will be transferred to your Outlook Outbox. This is
so that if desired, you can open each one individually to
personalise it. In Outlook, you may need to execute a Send &
Receive command to actually send the emails.
Special Fields
The Fill-In field
Filtering and Sorting
Sometimes, you may not want to include all the records in a data
source in your mail merge or, you may wish to print them in a
certain order.
1. Select the Mailings tab.
2. Click Edit Recipient List in the Start Mail Merge group
and do one of the following:
To omit individual records from the mail merge:
2
The Fill-In field is used where you want Word to prompt you by
means of a simple dialog box for a piece of changing information each
time data records are merged. For example, you may have a mail
merge document that you use each year to invite guests to the
company AGM. Every year the AGM will probably be at a different
location and at a different date and time. So that you don’t forget to
change these details each year, you can add Fill-In fields to prompt
you for the current details.
Word 2013 - Special Mail Merge Techniques & Troubleshooting
9. Do not enter anything into the following dialog box; just click
OK.
You will not see anything in the document but if you press
[Alt]+F9 the ‘Field Code’ (instructions to Word on how to use
the Fill-In field) will appear, eg.
1. Position the cursor in the mail merge document where you
want the first piece of changing data; do not type anything!
11. Repeat steps 1 to 9 above for any further Fill-In fields that you
3. Click Rules in the Write & Insert Fields group.
want to add. Use [Alt]+F9 each time to check it has been
entered correctly.
Each time you then use the Finish & Merge command to print, edit
or email the document, the Fill-In field prompt will appear requiring
an input.
7. In the Compare to: box, enter the value that field needs to be
compared to. In the screenshot below, the exam score field is
being tested to see if it’s more than or the same as 50.
Tip: To prompt for a single piece of information that you want to
use in several different locations of the document, use the Ask field.
For an explanation of the Ask field, refer to Microsoft Word Help.
8. Click in the Insert this text: box.
The IF – THEN – ELSE field
9. Type what you want Word to write in the document if the test
This special field is able to make a decision based on a condition in
the source data and enter into the mail merge document one piece
of text if the condition is true and another piece of information if
the condition is false.
For example, you have a data source containing students’ exam
results. You want to mail merge letters to the students advising
them if they have passed or failed. The condition for a pass is an
exam score of over 50. You can use an If-Then-Else field in your
document to test each student’s score and if it is 50 or more, write
Pass in the letter and if it is not, write Fail.
1. Position the cursor in the mail merge document where you
want the If-Then-Else field to automatically enter the text; do
not type anything!
2. Select the Mailings tab.
3. Click Rules in the Write & Insert Fields group.
5. Type a Prompt. This is the message that that the dialog box
will display.
created above is true.
10. Click in the Otherwise insert this text: box.
11. Type what you want Word to write in the document if the test
created above is false.
12. Click OK.
13. Preview the results and use the navigation buttons to move
through each record. If the If… Then… Else field has been set up
correctly, you will see different text displayed based on the IF
condition.
To edit the field, display the field codes ([Alt]+F9). An example of
what the field code should look like is given below:
Press [Alt]+F9 when finished to hide the field codes.
If you are unsure how to edit the field code manually, delete it
completely and use the method given above to re-insert it.
Troubleshooting Mail Merge Documents
6. If desired, enter Default fill-in text:. If for example, your AGM
is usually at the same location, you can enter it here
otherwise, just leave it blank.
7. Ensure you tick the Ask once check box. If you fail to do this,
the Fill-In field prompt will appear for every record in your
data source. If your data source has hundreds of records you
will have to click it hundreds of times!
8. Click OK.
a true/false (yes/no) condition.
6. In the Comparison: box enter the criteria.
10. Press [Alt]+F9 again to hide the field code.
2. Select the Mailings tab.
4. Select Fill-In….
5. In the Field name: box, select the field that needs to be tested for
Lost data source
If upon opening a mail merge document and clicking Yes to the
security warning message, you receive the following:
4. Select If… Then… Else.
3
Word 2013 - Special Mail Merge Techniques & Troubleshooting
8. Save the document.
3. Press [Alt[+F9 to hide the field codes.
Lost merge fields
…it is because the data source has been moved, renamed or
deleted.
Unfortunately, Word makes rather a meal of this and presents you
with several consecutive (and confusing) dialog boxes.
The author of this document recommends that you keep clicking
the Close button
the following one.
If you successfully open a mail merge document but get the
following message when you try to preview or print the document,
it means that you have a merge field in your document that does
not have a match in the data source. Chances are that someone has
renamed one or more of the headings n the data source table.
You will also see the following error for the unrecognised merge
field.
Solutions are:
1. Use the dialog box shown above to remove the unrecognised
merge field.
2. Use the dialog above to re-match the unrecognised merge field.
3. Cancel the above message and manually delete the
unrecognised merge field.
4. Follow Step 3 above to re-insert the correct (renamed) merge
field.
Date & Number Formatting Issues
2. Click one of the described options (recommend Remove all
Merge Info). The document will open.
3. Delete any merge fields. Press [Alt[+F9 to show the field codes
4.
5.
6.
7.
and identify them more easily.
.
There may be other field codes in your document (eg. index
entries, cross-references, footnotes) so ensure you only delete
the MERGEFIELD ones.
Press [Alt[+F9 to hide the field codes.
Reconnect the document to a new data source by repeating
Step 2 above.
Re-insert the new merge files as described in Step 3 above.
Preview and finish as described in Steps 4 & 5 above.
… will display dates as…
For currency fields:
1. Press [Alt[+F9 to show the field codes.
2. In the merge field, type the following text AFTER the field name\#"£#,##0.00". This will give a sterling symbol, a comma
separator for the thousands and two decimal places.
If, for example, the date field is called ProductCost, then the
edited field code will read:
to all these dialog boxes until you get to
If you know where the data file has been moved to and/or what
it’s been renamed to:
1. Click Find Data Source….
2. Navigate to the new location and/or name of the data source
file.
3. Click Open.
4. If required, repeat Step 2 (Use an existing list) above.
If you do not know what’s happened to the data source or it has
been deleted:
1. Click Options….
Select the field and press F9 (without the [Alt] key) to ‘refresh’
the field.
You can modify the date formatting by varying the numbers of
d’s, M’s, and y’s used. For example, the field code…
If your data source contains dates, you will find that in the mail
merge document they will appear in US date format
(month/day/year) even if they are UK dates in the data source.
Similarly, numbers that look perfectly formatted in the data source
may not appear the same in the mail merge document.
These issues can be solved as follows:
For date fields:
1. Press [Alt[+F9 to show the field codes.
2. In the merge field, type the following text AFTER the field
name- \@”dd/MM/yy”. Ensure the Ms are UPPER CASE.
If, for example, the date field is called MeetingDate, then the
edited field code will read:
4
Tip: for USA (dollar) style, replace the £ symbol with a $ symbol.
For number (non currency) fields:
In the merge field, type the following text AFTER the field name\#"#,##0.00". This will give a style with a comma separator for
the thousands and two decimal places.
If, for example, the date field is called Quantity, then the edited
field code will read:
NB: If you want a currency or number style that does not display
decimals, omit the .00 from the examples above.